Home/Types of heated floors/Water heated floor. Installation of a warm water floor./Warm water floor under tiles: installation, choice of ceramics
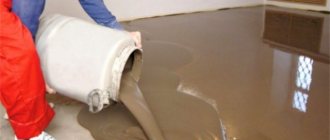
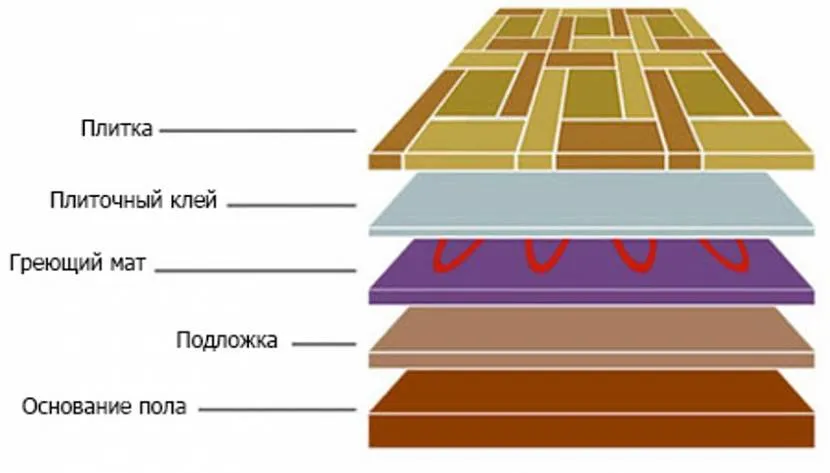
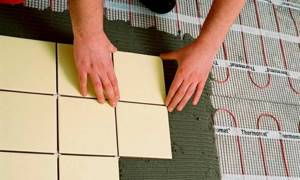
Most people are sure that tiles are a cold type of flooring and are extremely uncomfortable to walk on. This problem can be easily solved by using a warm water floor under the tiles. This system will make even the bathroom floor warm and comfortable. One of its undeniable advantages is a significant reduction in heating costs, while the floor surface will warm up evenly. To do this, you will need to install pipes inside the concrete screed. In this case, the tile will warm up evenly and your feet will always be warm.
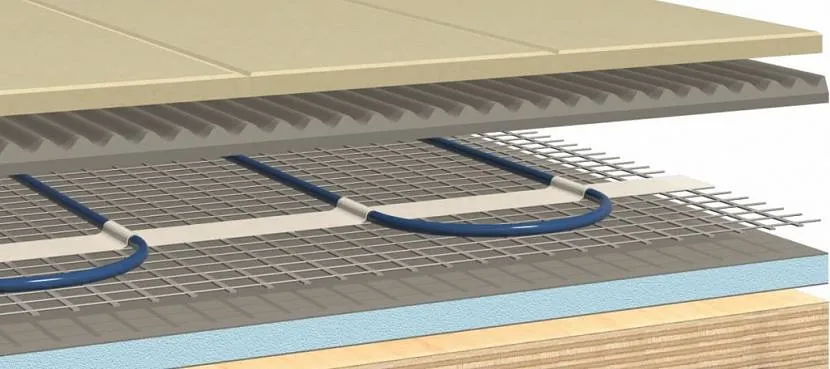
Water floor in section
Features of using tiles
Using tiles is very convenient, but for all its advantages it has several disadvantages:
- If moisture gets on the surface, the tiles can easily slip.
- The floor is cold and walking on it is then uncomfortable.
The latter circumstance is especially evident during the winter period.
The first of these disadvantages can be overcome by choosing tiles with a special surface. In the second case, the problem can be solved, but for this it will be necessary to install a warm floor.
Features of underfloor heating
There are two types of heated floors:
- using water heating;
- electric.
In the first case, the solution is more economical in operation - after installing the heated floor, it can be connected to the existing heating system. However, installing such a heated floor is a more complex and expensive procedure compared to the second option.
Heating a tiled floor can be considered as an additional heating system in an apartment.
Laying a concrete screed Source narobraz.ru
Rod infrared mats
Carbon heated floors are a popular type of heated floors, the main functional element of which is electrical rods made of carbon (amorphous carbon), silver and graphite. At the ends of each part there are contacts that are used to connect to the electrical network. The rods can warm up to a temperature of 60 degrees. The elements are connected into mats using wires located at a distance of 100 mm from each other. The maximum width of the structure is equal to the length of the rod - 830 mm, the maximum length is 25 m. Each mat emits waves with a length of 8-14 microns, which transfer heat to the air in the room and ensure uniform heating with the almost complete absence of a convective component.
Laying carbon heated floors under tiles
Installation of rod heaters does not require special skills and tools, allowing installation work to be completed without contacting specialists. Do-it-yourself installation is divided into the following stages: 1. Selection and preparation of materials (carbon mat, set of thermostat and thermostat, corrugated tube, heat-reflecting layer, electrical wiring and bitumen insulation). 2. Determination of the configuration and area of the heated floor. 3. Cleaning the base on which the heat-reflecting layer will be laid. 4. Laying the reflector. 5. Preparing a place for installing a temperature sensor, for installation of which a corrugated tube is used. 6. Installation of a carbon mat - with uniform distribution of strips over the surface and neat connection to each other. 7. Fastening the mat with masking tape. 8. Installing the thermostat and checking that all elements are connected correctly. 9. Connecting the system to the temperature controller. 10. Installation of corrugated tube and sensor. 11. Connection of the thermostat to the electrical network.
Laying infrared heated floors
At the final stage, the carbon heated floor is turned on, checking its performance, and a cement screed with a thickness of no more than 30 mm is evenly applied. Lay the tiles and regulate the operating temperature. The maximum value of this indicator for a heated floor surface should not exceed 35 degrees.
The main advantages of a carbon floor
The advantages of choosing a rod-based heated floor include: • The presence of a function for automatic regulation of operating modes and protection against overheating. Sensors respond to rising temperatures by reducing energy consumption, so the rod floor can also be laid under furniture. • Energy savings - up to 50% compared to cable heated floors. • Reliability of operation. If one rod fails, the remaining elements connected to the electrical network in parallel continue to work effectively. • Ionization of indoor air, which has a positive effect on people. • No reduction in humidity, requiring the use of special devices - humidifiers. There is one noticeable drawback of electric carbon floors. Installation of such a heating system is possible in a layer of tile adhesive or a thin screed. The result is the impossibility of making changes to the scheme and an increased risk of damage to the heated floor when replacing tiles.
How to choose the right system
In order to decide which warm floor for tiles is best to choose, you need to determine your preferences. To do this, you need to take into account the following:
- Since we are talking about installing a heating system, it is necessary to determine what power it should have. Can be used as the only or additional heating unit in the house. In these cases, power requirements will vary.
- You need to decide how much you need to use the screed. Although it provides reliable protection for heating elements, in some cases it can create additional inconvenience. There are alternative options for making the top layer of the floor.
- When analyzing the situation, you need to take into account the type of room. in which the installation will take place. In a city apartment there are more restrictions to choose from compared to a private house.
- You need to decide what level of costs the owner can afford. In this case, it is necessary to consider not only the cost of the installation, but also how much it will cost to operate.
Methods for laying a water floor Source bg.aviarydecor.com
If the house uses tiles for the floor, then installing heating under it will not only warm up the apartment better, but also make it possible to walk on it without fear of freezing. The latter is especially important when it comes to the bathroom.
When thinking about how to choose a heated floor, you need to try to ensure that the system can be repaired at minimal cost.
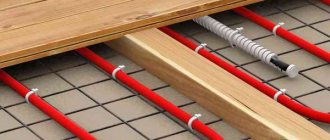
About water heated floors
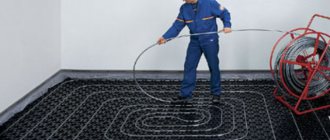
It is a pipe system through which heated coolant circulates. The pipeline is located between the base of the floor and the top covering. Water is used as a coolant. It can be taken from the heating system, or special equipment can be used for heating. As the water passes through the pipes, it gradually cools, so in such systems it is not recommended to use pipes that are too long. During installation, metal or polymer pipes are usually used. When choosing them, reliability and durability play an important role, because in the event of a leak, complex and expensive repairs will have to be performed.
The water floor is connected to the heating Source rmnt.mirtesen.ru
The operation of such floors is relatively economical. Their use makes it possible to reduce energy consumption. This value in different cases can be 20-60% depending on the specific situation. The coolant temperature during operation does not exceed 50-60 degrees.
The installation is quite complicated and requires the participation of specialists. The water heated floor is a multi-layer structure. When installing them, it is necessary to ensure high-quality thermal insulation so that the heat does not escape outside the home.
If a heated floor is installed in a residential building that was left for several days during frost, then there is a danger that the liquid in the pipes may freeze. To prevent this from happening, the system is left turned on for this time at a reduced coolant temperature or liquid is pumped out of the pipes during absence.
Installation of a water floor Source my-climate.com.ua
Cable heated floors
In this case, the heating element is an electrical cable. After laying it, a cement screed is made. When using this option, its thickness will be minimal - no more than 5 centimeters. This floor heating option is considered one of the easiest to install. To operate such a system, it is enough to use 220 volt power. During operation, a power of 80-150 watts is consumed per square meter of area. However, if the wiring in the house is old. then before installing this system it must be changed to a more reliable one.
Such devices are easy to operate and highly reliable. It is believed that cable heated floors can operate without failure for 50 years or longer. There was a recorded case where such a system worked for 62 years and was in fully operational condition at the time of replacement. It was dismantled due to deterioration of the coating.
Installation of a thermomat Source folksland.net
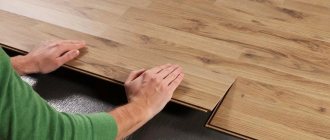
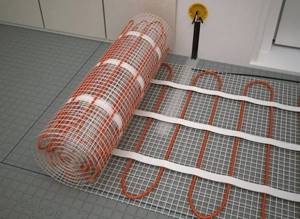
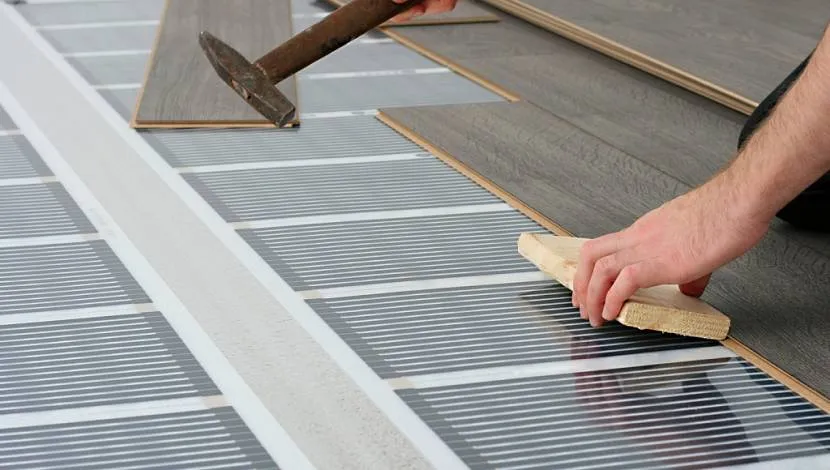
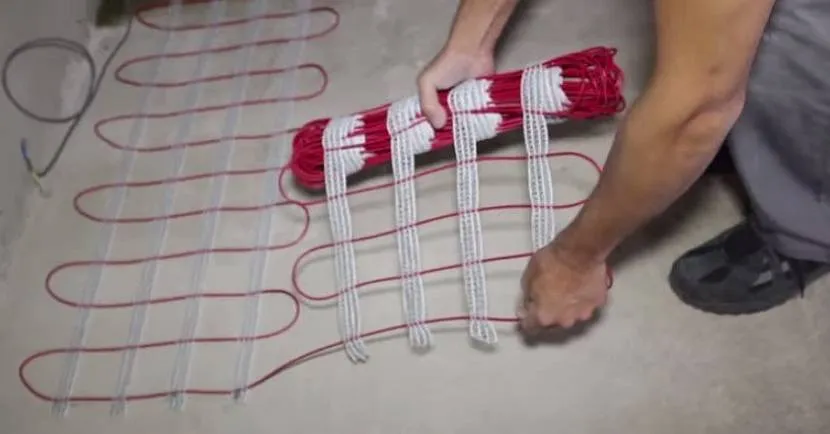
Use of special heating mats
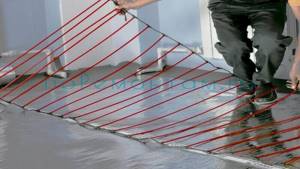
This coating is an improved version of cable coating. In this case, the wire with which the heating will be carried out is attached to a special mesh. Usually its length is 50 and its thickness is 30 centimeters. This improvement significantly simplifies and speeds up installation of the system. When installing heated floors, it is recommended to avoid areas where heavy furniture will subsequently stand.
Single or double wires are used for heating mats. In the first case, this reduces the price, and in the second, it increases the reliability of the equipment used. Such mats have a thickness of 3 millimeters, so their installation does not lead to a significant rise in the floor.
When creating a warm floor under tiles, this type is very convenient due to its low thickness and ease of installation.
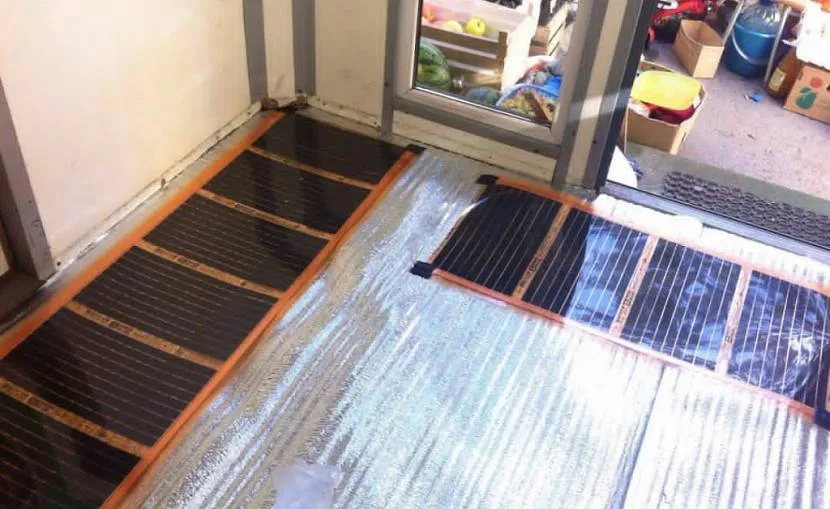
Film heating Source education-web.ru
See also: Catalog of companies that specialize in insulating country houses.
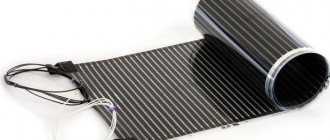
Film heating system
This principle of operation of a heated floor is based on the fact that the film warms up thanks to infrared radiation. When the rays hit opaque objects, they release thermal energy. At the same time, the floor covering is heated. The temperature of parts that emit energy does not increase during operation, which allows you to spend less energy on heating.
When the heating rods are turned on, it causes the flooring to heat up. As a result, the air near the floor is heated to the greatest extent. Temperatures decrease as altitude increases. The effect of infrared rays will become invisible at a height of 2-2.5 meters. A 4 mm thick film is used as a heating element, on which graphite strips are applied. As soon as the temperature reaches a certain limit, the sensor is triggered and temporarily turns off the current. The intensity of work can be adjusted using thermocouples.
Electric heated floor Source prodomostroy.ru
When controlling the operation of such heated floors, electronic control can be used, which allows you to set the desired operating mode for a long time. It is interesting to note that during operation of the system in question, electromagnetic radiation is generated. However, it is very weak and cannot harm human health.
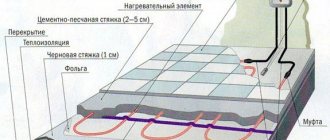
Application of electric water heating
In recent years, another type of underfloor heating has gained popularity, in which both electric heating and coolant circulating through pipes are used to generate heat. This type of heating uses pipes that are made of structured polyethylene. Their diameter is two centimeters. Antifreeze is used as a coolant in the pipes. A chromium-nickel electrical cable is laid parallel to them, which is in a sheath made of Teflon. Pipes and cables are covered with concrete screed. If a leak occurs, a clearly visible stain will appear on the floor surface, which will allow you to accurately determine the location of the breakdown and take action.
Installation diagram Source pronyr.ru
The cable warms up the antifreeze, which circulates through the pipes. As a result of the heat, the liquid quickly boils, which leads to rapid heating of the floor.
An important feature of this type of heated floors is that electrical energy during their operation is consumed efficiently and at the same time economically. This system has good resistance to overheating, which allows it to be installed in the right places, including under massive furniture.
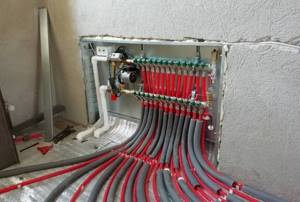
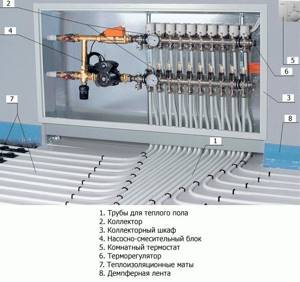
Installation and connection of the collector
As a rule, the collector is mounted inside a special cabinet, directly on the floor surface. For this purpose, it is necessary to make a convenient recess in the wall to accommodate the mixing unit, after which the supply pipe and return pipeline are connected to the manifold.
Through the supply pipe, the “warm floor” is supplied with hot water, and the “return” is intended to return the cooled coolant to the system.
Constant circulation of water is ensured, as a rule, by a special pump.
It is necessary to install shut-off valves on both pipes, which will allow you to easily and quickly turn off the water supply to the system yourself in the event of an unforeseen emergency. The water circuit is secured to the manifold with compression fittings.
It is important to take into account the fact that the collector must be equipped with a drain valve and a special air vent, both on the supply and return side, and a special cabinet allows you to disguise the complex hydraulic element of the system.
Features of electric heated floors
When comparing the two types of heating, the following advantages of this solution can be noted:
- After the water heating pipes are laid, a concrete screed must be made. It can significantly raise the floor level, which is inconvenient if the installation takes place in a city apartment. In addition, its weight increases. In a private home this can become a problem in some cases.
- The installation procedure for electric heated floors is easier than for water floor heating.
- Regulating the power supply for electric heating elements is easier than performing the same steps for a water floor.
Preparing the screed Source winplast.ru
Choice of ceramics
In order to choose a high-quality tile material that will be used as the main floor covering, it is necessary that it meets some basic requirements.
Requirements:
- high level of safety, the presence of which is required by water heated floors;
- strength indicator;
- resistance to possible temperature changes that occur when heating rooms of any size;
- the necessary indicator of thermal conductivity and density of the material used.
In addition to using tiles on water-heated floors, it is possible to install other facing materials:
- brooms, but not glazed;
- granite;
- glazed clinker;
- marble;
- porcelain stoneware
A warm water floor and the materials used for its installation must have a high level of porosity. This is why the use of terracotta is not recommended. Such a device involves the use of various grouting compounds and adhesives that were specially designed for working with warm water floors. They are as flexible as possible even after going through the curing stage. Able to compensate for the temperature difference that occurs between the tile and the base.
AdminAuthor of the article
Did you like the article?
Share with your friends:
Electric floor installation
When choosing which electric heated floor is best for tiles, you need to decide which option will be preferable: using a heating cable or thermomats.
In the first case, laying such a floor under the tiles will be a cheaper option. However, calculating the cable length, determining the layout and installation will require significant effort. When laying the cable, the concrete screed will be larger than when using thermomats.
Using heating mats is a simpler process. In this case, the cable is already attached to the fiberglass mesh, which makes it possible to lay it while maintaining the required distance between the wires. In practice, to use this method, it is enough to determine the area and shape of the room and purchase a roll of the required size.
To install heated floors under tiles, you need to do the following:
Film heating element Source mfmpsu.ru
Preparatory work
Before proceeding with installation, it is necessary to remove the previous floor surface and clean the surface of debris. It is important to pay attention to how level the floor is. If potholes and small rises are visible on it, then you will need to carry out a rough screed, leveling the surface before laying thermomats.
Heating power calculation
Before connecting the heated floor, you need to calculate the power needed to heat the apartment. To do this, you need to decide whether the warm floor is the main or additional heating system. In the first case, it is necessary that each square meter provide 140-180 watts of power. In the second case, the required value will be lower. Now it will be 80-140 watts for the same area.
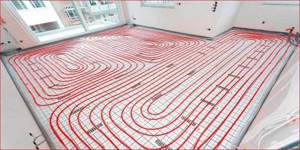
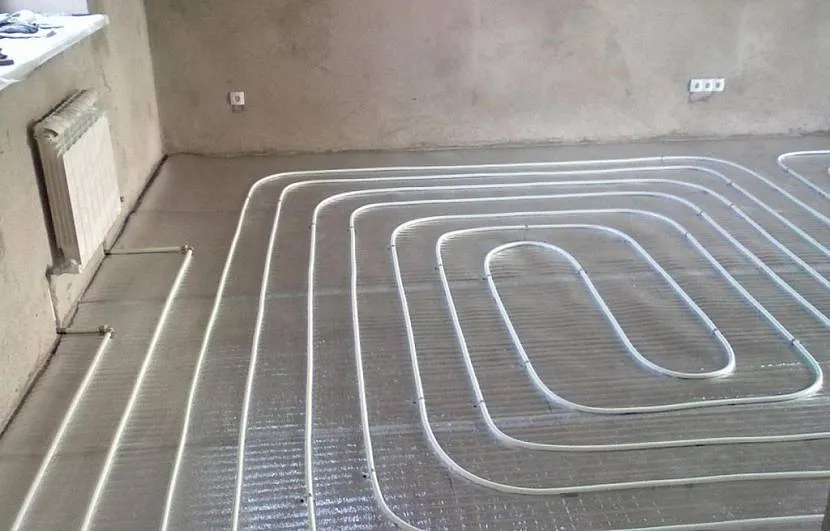
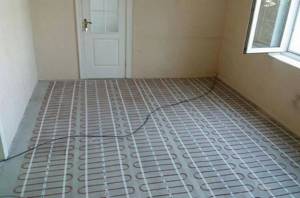
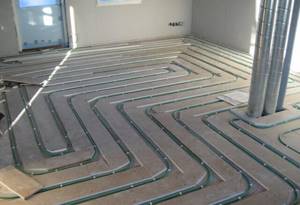
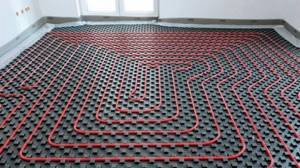
Pipe laying must be thought out in advance Source publika.md
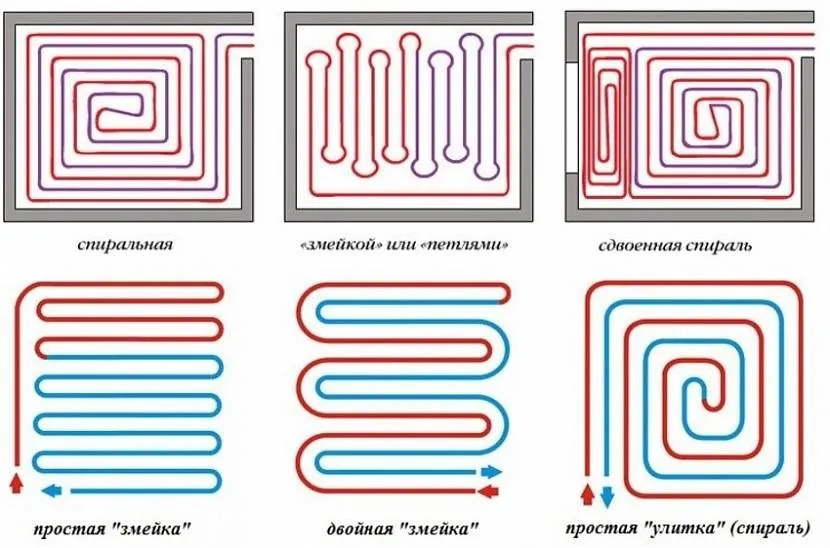
Laying methods
The most common methods of installing heated floors include:
- with screed;
- with logs (when the system pipes are laid on top of wooden logs);
- laying method (using special plates).
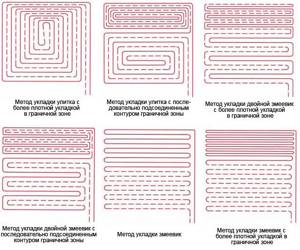
Floor installation methods
Each of the options is effective in its own way, but in order to choose the most optimal installation method, you need to become more familiar with the principles of their implementation.
With screed
To install a heated floor using a screed, you need to prepare some materials. These include:
Warm water floor with screed
- pipe made of polymer or plastic;
- fasteners;
- pump to ensure water circulation in the system;
- special fittings and valves;
- manifold for heated floors.
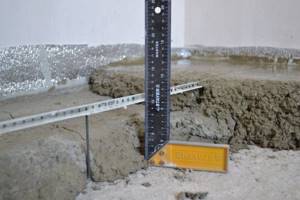
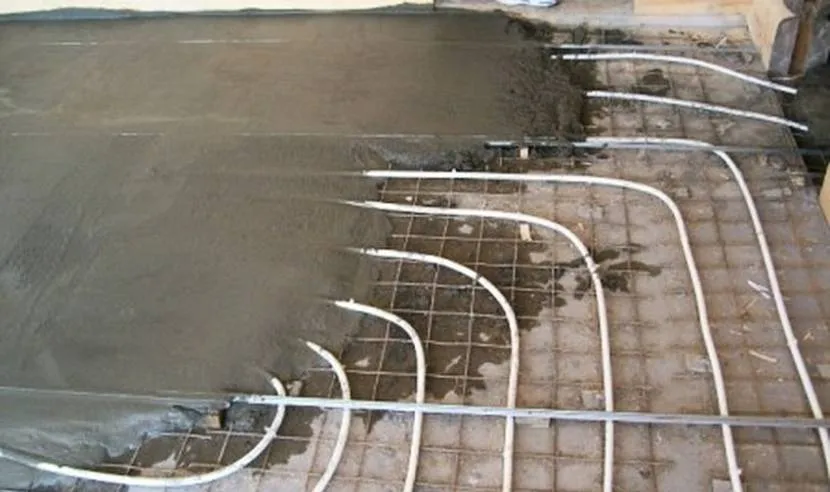
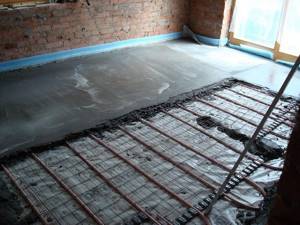
Screed thickness for water heated floors
After assembly, the finished system is filled with a layer of cement mortar. The surface of the screed, like its structure, must be free of any voids or defects. Otherwise, this may lead to deformation of individual parts of the system. After the screed has dried, the tiles are laid.
Laying the mortar
Note! The surface of the laid tiles should be as smooth as possible so that heat transfer into the room is optimal. We are talking about all types of tiles.
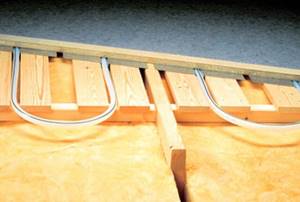
With lags
This method is used mainly in houses made of wood. During the work, polystyrene or mineral wool is laid between the lags. The installation process can be carried out in two ways - modular or rack. In the first case, large chipboard modules are used, in which special channels for pipes are made. When choosing the slatted method, the installation of pipes and plates is carried out between slats made of chipboard.
Warm water floor with logs
For fixation, small aluminum plates with special grooves for fixation are used. Once the system is installed, gypsum fiber sheets must be laid on top of it. Only after this can you begin laying tiles.
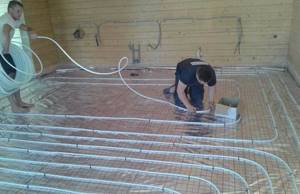
How to make underfloor heating on a wooden floor
Video description
About calculating the power of a heated floor in this video:
Create a schema
Before you begin directly laying an electric heated floor under the tiles, you need to imagine how the mats will be located. To do this, you need to draw up an appropriate diagram. In it you need not only to mark the location of the heating wires, but also to set the laying step for them.
Laying a water floor Source yar-limb.ru
When planning, the following must be taken into account:
- Necessary. so that the distance from the wire to the walls is not less than 10 centimeters.
- You need to first think about where massive furniture without legs or household appliances will stand. It is not recommended to lay a heated floor in this place due to the fact that the heat will practically not escape outside and will cause overheating of the wires.
- When determining how the wires will lie, it is not necessary to ensure that they are strictly parallel. If necessary, the mesh can be cut and the cable placed at an angle.
The location of the heating elements must be made taking into account the required power, which has been previously calculated.
Connecting heating pipes Source rmnt.mirtesen.ru
Checking the electrical wiring
For reliable operation of electric heating, it is necessary to ensure high-quality and reliable operation of the electrical wiring. It is necessary that the cable cross-section corresponds to the power that will be spent on an electric heated floor. If this is not the case, then an appropriate replacement must be made. You also need to check whether the switches can handle this current load and, if necessary, they will need to be replaced.
Thermal insulation
It is necessary to ensure that the heat from warming up does not go down. To do this, you need to lay out a thermal insulation layer. One effective way is to lay penofol. This is a self-adhesive surface with a foil layer. It is recommended to stick damper tape around the perimeter of the walls. which is designed to compensate for thermal expansion of the coating. A metal mesh is placed on top. This is necessary so that there is no direct contact between the heating elements and thermal insulation.
Tiles are glued to thermomats Source dekormyhome.ru
Fastening the cable/thermostat
Laying heating elements is one of the most important and critical stages when installing a “warm floor” system. The cable is fixed to the surface using mounting tape and plastic clamps. The standard distance from one turn of cable to another must be the same throughout the entire area. Laying heating mats is the simplest and most convenient option. The material is spread over the entire surface in accordance with the diagram supplied with the device.
Video description
About the features of laying heated floors on thermal insulation in the video below:
Control and management
In order to receive information about the degree of heating of the heated floor, it is necessary to install a temperature sensor. For it, a groove is made in the wall from the thermostat vertically downwards, then passes along the floor. The sensor must be placed in a corrugated pipe that is laid in such a way that it ends at the temperature control point.
A thermostat is used to control the heating mode. It is installed on the wall next to the outlet. With its help, you can set the desired operating mode for the heated floor.
Checking electrical parameters
Before installation, it is necessary to check how accurately the resistance of the thermomat corresponds to the value stated in the description. An accuracy of 10% is considered acceptable. This can be done using a multimeter.
Water heated floor Source boyargo.ru
Laying the heating layer
If a cable is being installed, it is convenient to attach it using mounting tape. When installed on top of the mesh, the wires can be secured to it using plastic cable ties. It is enough to arrange the thermomats according to a pre-drawn diagram and after that the heated floor is connected to the thermostat. After installation is completed, another measurement of the wire resistance is carried out. It must match the one received earlier.
Now, how to connect the thermostat:
- First, remove the decorative frame.
- The power supply is connected to the In socket, taking into account the polarity.
- The wire from the heated floor is connected to the Out input.
- The temperature sensor must be connected to the Censor.
After this, the thermostat will be in working order.
Screed
To fill it, prepare a cement mortar. It should include: sand, cement, crushed stone, water in a ratio of 4:1:5:0.6. It is also necessary to add 1% plasticizer to the mixture. The thickness of the screed should be 3-5 centimeters. It must be remembered that the cement mixture will dry completely after 4 weeks.
The tiles must be installed very carefully Source rmnt.ru
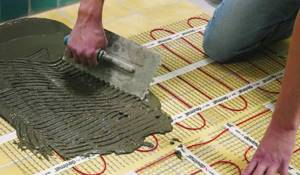
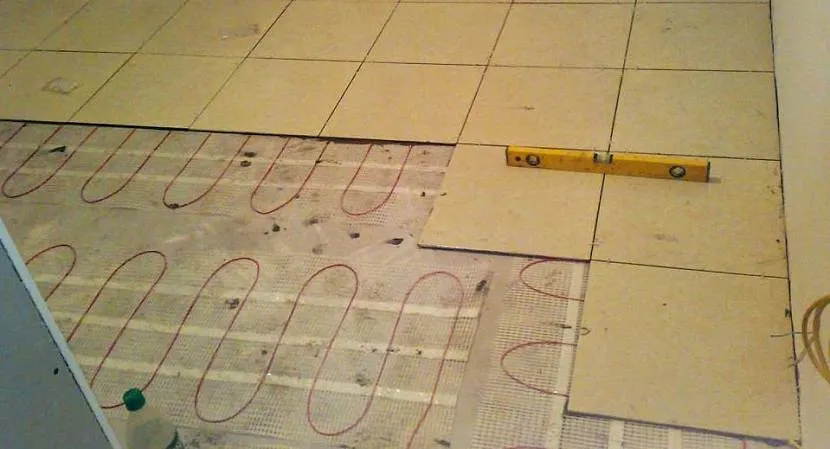
Laying tiles
After the screed has dried, apply a layer of tile adhesive on top. You can do this in 2-3 days. If a thermomat is used, the glue can be placed directly on the mats without installing a screed. After this, the tiles are laid.
Installing a thermomat Source teplospec.com
Laying heated floors under tiles
Usually, for the sake of greater efficiency, a warm floor is installed only under tiles, because this material, due to its high density, transfers heat very well. And due to its porosity, it also partially accumulates, which allows you to save some money on heating water.
Materials and tools
To build a heated floor on a finished base made of concrete or reinforced concrete slabs, you will need a small set of tools: a plumbing set, scissors for cutting plastic, polypropylene, cross-linked polyethylene, a hacksaw or grinder for cutting copper.
You will also need measuring devices such as a ruler and tape measure. Pencil for marking and labeling.
The materials you will need are a film for waterproofing, thick insulation with a lock, a mesh in cards, clamps for tying pipes, dowels for attaching the mesh. The main material is a pipe, the choice of which determines the number of fittings and other parts.
Calculation of material quantity
To determine the required number of pipes for a heated floor, you will have to make accurate measurements of the geometry of the room. Multiply each of the two adjacent sides by a step, which is usually 10-15 cm, and sum the resulting values.
This will be the approximate length of the pipe that is necessary for laying the heated floor system. It is only important to take into account the length of the pipe sections for supply to the manifold cabinet, which is usually located in the boiler room.
Clamps are attached every 30-40 cm to prevent unwanted rise of the heating main. The mesh is purchased according to the square footage of the room.
Installation of a manifold cabinet
The manifold cabinet is installed in the boiler room, closer to the heat source. Immediately from there it is output to all rooms via separate circuits. A pump and a safety valve are immediately mounted on the manifold assembly to protect against overpressure. To ensure that the pump does not rotate constantly, but maintains the set temperature, a thermostat with an integrated timer is attached to it.
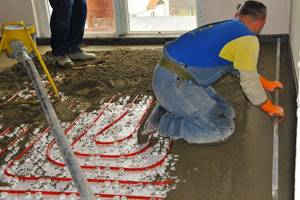
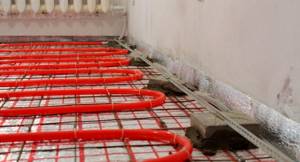
Filling the screed
After the pipe has been laid, proceed to pouring the screed. For this purpose, a cement-sand mortar is prepared, which is poured indoors and leveled according to the rule.
The recommended thickness of the screed should not exceed 5-6 cm.
Before pouring the solution, damper tape must be glued around the perimeter of the room.
Tile selection
After the warm floor has been installed, proceed to choosing tiles. It can be anything depending on the preferences of the owner. Here the imagination is limitless, but you should choose something suitable for the existing interior, if available.
How to prepare tiles for laying on a heated floor?
The tiles do not require any special preparation when laying them on a heated floor. Choose the right adhesive composition, which should be adapted for use on slippery surfaces.
Preparation involves trimming, but it is better to do this after the entire tile has been laid in order to minimize losses due to incorrect cutting. Pre-impregnate the surface on which the tiles will be laid with high-penetration soil.
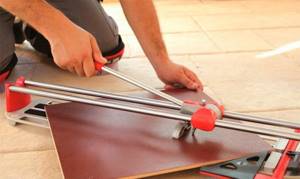
We also recommend watching - How to cut tiles with a manual tile cutter
Marking the room
To facilitate the process of marking the room for further laying of tiles, you can use a laser level. This is the most convenient and technologically advanced option. But you can also do it the old fashioned way - use a string with coloring powder.
Laying tiles
It is necessary to lay the tiles from the middle, marking the zero line with a perpendicular intersection. It will be convenient to move away from this place in different directions. Control each tile with a level at several points.
Seam processing
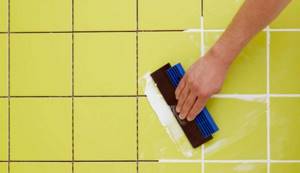
The next day, after the glue has dried, it is carefully removed from the seams using a spatula or other device. This is necessary for their decorative sealing with grout.
System pressure testing
After the heating system has been installed and connected to the collector and boiler, perform pressure testing. The procedure consists of raising the pressure in it to the maximum limit and holding the system for some time. As a result, all fittings are sealed due to internal pressure.