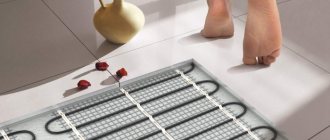
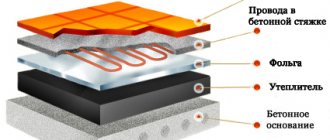
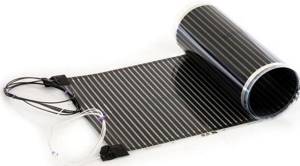
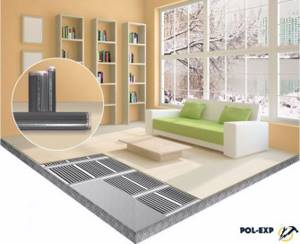
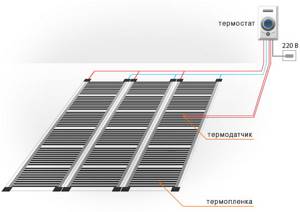
An infrared film floor is a heating system carried out using a thin heating film with a conductive carbon layer (solid or arranged in stripes). The room is heated not through the screed, but thanks to infrared radiation, which heats surrounding objects (interior elements, walls, etc.), and is an excellent alternative to water and cable underfloor heating. Its advantage is ease and speed of installation.
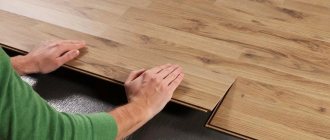
The best covering for any heated floors, including film type, is considered to be tiles, especially when installing in the bathroom and kitchen (find out what type of flooring is best to choose for the kitchen and how to install it yourself). After all, tile is a durable material, durable, moisture-resistant and environmentally friendly.
Which floor is better to choose for tiles?
There are various models of heated floors, they are water and electric. The latter are divided into cable, rod and film. Each type has its pros and cons, which you should pay attention to when choosing flooring.
Water heated floors are a structure with a laid pipeline through which heated coolant circulates. Most often mounted in a screed.
Electric cable - the cable acts as a heating element. Like a water floor, this type is often filled with concrete screed, although the “dry” installation method is also acceptable.
Electric infrared floors are the easiest and most inexpensive type to install, especially in an apartment. It is a thin film with carbon plates.
Plus, when placed on a warm floor, tiles do not interfere with the passage of heat, which increases the efficiency of the heating system. The tiles are often placed on a concrete surface and fixed with glue. For water and cable floors filled with screed, this is an ideal finishing coating.
Decorative finishing of infrared heated floors with porcelain stoneware has a number of difficulties and features, since the “pie” is very thin. But in principle, there is no ban on such proximity.
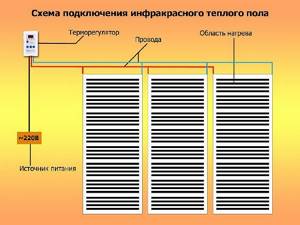
Operating principle of film coatings
There are the following types of heating systems operating on the principle of emitting infrared rays:
- carbon;
- bimetallic.
In the first case, heating strips made of carbon fibers are used. The material is made from carbon paste, to which auxiliary components are added to improve properties. The strips are covered with insulation (lavsan film). This is a type of polymer material. Properties:
- gas tightness;
- transparency;
- the material is non-hygroscopic;
- high strength when exposed to deformation loads (tensile);
- resistance to pinpoint damage;
- the film can be used as an electrical insulating material;
- immunity to extremely high temperatures.
Thanks to this, this type of coating allows the heating system to be used for a long period. The graphite strips are connected to the power source using metal conductors, which can be copper or copper-silver.
It is recommended to use this version of the IR system for heating walls and ceilings, however, if a number of conditions are met, it is also permissible to install it on the floor.
The bimetallic analogue is arranged differently. It is based on copper heating elements with aluminum additives. The strips consist of 2 layers, each of which is made of a different metal, which allows the material to provide the required properties. Connection to the power source is made through an RCD. Tiles cannot be laid on infrared heated floors of this type.
The operating principle of carbon film coating is based on the emission of infrared rays under the influence of current, which is supplied to the graphite strips through metal conductors. As a result, the tile heats up. The finishing material transfers heat to the air, which helps improve the microclimate in the room.
Is it possible to lay film flooring under tiles?
Before you decide to install an electric infrared film heated floor under PVC tiles, you should understand how to do it. Therefore, experts advise you to familiarize yourself with the installation rules of this system and the conditions of its operation.
The instructions for heated film floors indicate that different materials can be laid on them: linoleum, laminate, carpet. It is also permissible to place such a heating device under the tile. The description of the system contains recommendations on how to lay an infrared floor under the tiles.
For your information! Infrared heated floors can also be installed outdoors under porcelain stoneware, as they are not afraid of moisture.
When arranging paths near a house with this type of heating, they will never be covered with people.
How do different types of heated floors combine with porcelain stoneware?
When installing a heated floor covered with porcelain stoneware, the question arises - what kind of heating is best to install under this material?
Any type can be placed under granite tiles, the main thing is to follow some rules.
Water heated floor
Installing a water floor under porcelain stoneware is a popular option, especially in private homes. In apartments, the difficulty of installing this design lies in the connection to the general heating system, and in raising the floor height. The coolant is an emulsion or water that circulates in the pipes.
The advantage of such a system is that it is economical, so it is often installed in large rooms. Despite the rather time-consuming installation, it is not complicated, but the result is complete heating.
The disadvantage is that it is expensive, installation of such a structure is not possible without major repairs, and there is a need for constant preventive inspection.
And in case of a leak, the consequences can be serious, which will require large financial investments, because it will be difficult to get to the place of the defect through porcelain tiles.
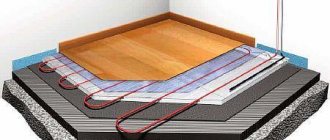
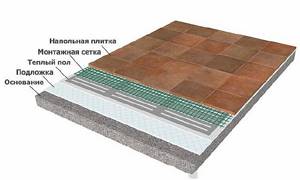
The water floor pie under porcelain stoneware consists of several layers:
- rough floor;
- hydro and heat insulation material;
- reinforced mesh;
- heating circuit;
- finishing screed;
- flooring - porcelain stoneware.
As mentioned above, installation work can be carried out independently. Most of the structure is occupied by a thermal insulation substrate and screed.
When installing on a rough surface, the minimum concrete layer is 45 mm, since the diameter of the pipes is 25 mm, and 20 mm is necessary to completely close them. To reduce the load on the structure, it is recommended to add a plasticizer to the solution.
Electric cable floor
Unlike a water-based design, the heating elements in an electric heated floor are not so thick. In addition, there are models that fit into the screed, and others directly under the floor covering.
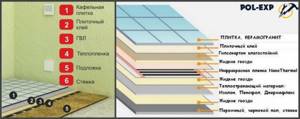
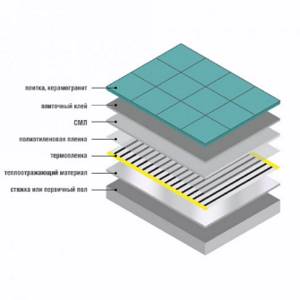
A pie of this design is the presence of:
- primary floor or screed;
- heat-reflecting material;
- thermal films;
- polyethylene film;
- drywall;
- layer of tile adhesive;
- porcelain stoneware.
First of all, when installing an electric heated floor under porcelain stoneware, attention should be paid to protecting the system from moisture.
If there is a thin screed, it is recommended to add a plasticizer to the solution, or apply an epoxy primer to the surface to increase moisture resistance.
An important point when arranging an electrical structure is the foil layer. The main disadvantage is the concrete screed, which significantly reduces the height of the room.
There are the following types of electric cable floors: heating cable and thermomats, which are laid under a certain layer of screed:
- Thickness 50 mm - a heating cable is used here, it is filled with concrete screed. The advantage of this device is the ability to change the laying step, which allows you to install different power in different areas. Heating communication can be either the main source of heating or an additional one. To reduce heat loss, it is necessary to lay thermal insulation material with a reflective layer. This will reduce energy costs and improve the quality of the device.
Features of installing infrared floors under tiles
The only peculiarity when constructing such a “pie” with tiles is that not “dry” installation is used, but tile adhesive is used or a self-leveling floor is made.
If preference is given to the “wet” method, when constructing film floors, a number of features should be taken into account:
- Low adhesion - in this regard, simply filling such floors with cement mortar is not recommended, since the structure will be floating. If something heavy falls on such a surface, the screed may crack, and it will be difficult to eliminate these defects.
Some try to increase adhesion by applying notches to the product, but experts do not advise resorting to this method. These places are difficult to insulate, which can lead to current leakage.
- The film does not tolerate alkali well - the alkali contained in the cement mortar will have a negative effect on IR floors. This will lead to their rapid failure.
If you nevertheless decide to install a heated film floor under the tiles with your own hands, then during the installation process you should adhere to certain technological conditions, which are described in detail below.
Principle of operation
IR floor is a thin film, between the layers of which carbon plates are placed. They serve as a heating element that generates heat. The device operates from the mains, heating is carried out using infrared rays measuring 10 - 20 microns.
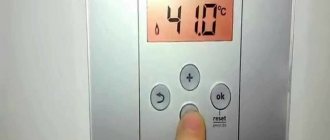
The film quickly heats the floor, and the presence of a thermostat allows it to turn off when the desired heating level is reached, and turn on again when cooling. As a result, the device operates approximately 20 minutes per hour.
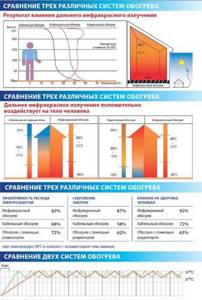
Film flooring has the highest efficiency when compared with other systems. With rapid heating, electricity consumption is not significant, thereby infrared flooring is considered more profitable and economical.
In addition, it does not heat the air masses in the room, but the objects in it, and they already heat the air. This allows you to create a wonderful atmosphere in the apartment, since the air does not dry out, while it is saturated with negatively charged particles.
Infrared flooring is perfect for different rooms; the ideal option is to install it under the tiles in the toilet or bathroom (we suggest you read the step-by-step instructions for installing the TP in the bathroom).
Types of heated floors

The weather in the house... is determined by the heat...
There are several types of heated floors, and the very first of the heated floor systems is a water floor. It works on the principle of conventional water heating and is connected to a heating boiler.
Installing a water floor with your own hands, even according to the instructions, was a rather labor-intensive process, so it was soon replaced by more practical and modern technologies. Let's consider each option separately.
Electric heated floor:
- Cable. Most often, this is a high-resistance single cable that is heated by electricity.
- Rod. The basis of the rod structure is carbon rods.
- Film. The technology involves heat transfer from floors through thermal conductivity of infrared radiation or convection. Most often, IR radiation is still used to heat film heated floors, which is why they are called infrared heated floors.
There are two types of film systems:
- Carbon. The basis is lavsan film. Carbon fiber or a thin layer of graphite acts as a heating element.
- Bimetallic. A thin copper-aluminum layer is the heating element of this film system; it is located in a polyurethane film.
Characteristics
As already mentioned, IR floors are sold in the form of strips, with a width from 50 to 110 cm, the length is adjustable using notches along which the product can be cut. The heating elements are carbon plates placed inside the film.
The thickness of the film “pie” is also important; unlike other warm systems, it is only 5 mm without a finishing coating.
The main difference between film heating and conventional radiator heating is that it is located under a decorative coating. This allows you to establish a comfortable atmosphere in the house. The temperature in it is regulated using a thermostat, the maximum possible heating is 50 degrees, but the recommended temperature level is +21.
For the floor to function, a power of 220 W is required, and the maximum consumption is 250 W/m2.
Characteristics of infrared heaters
IR floors can be easily adjusted by temperature - for example, by setting the thermostat to 21 degrees, you can achieve the most comfortable floor temperature. Although in general the system can be heated up to 50 degrees, this is not necessary. Since there are now quite a few manufacturers of IR systems on the market, you can easily select equipment at the right price. Installation can be done independently and quite quickly, and this will also have a positive impact on the wallet of the owner of the premises being equipped. And in some cases, infrared floors can even replace a centralized heating system.
IR warm floor under tiles - which one is better
Advantages of infrared floor
IR flooring has a considerable number of advantages.
- The IR system does an excellent job of heating the surrounding interior items. The wavelength is 5-20 microns, which allows it to pass through the tile.
- It is quite simple to regulate the temperature when the IR floor system is installed, which will create an optimal microclimate in any room.
- Such floors are economical and consume little energy.
- Human health will not suffer from significant electromagnetic radiation, as when laying cable flooring.
- IR floors can become a kind of air ionizer.
IR warm floor under tiles - which one is better
Disadvantages of infrared systems when laying them under tiles
But IR floors also have their disadvantages. This is especially true for the option in which the system is laid under tiles.
- Heating not only the floors, but also the room using this system is beneficial only in small rooms. Otherwise, the heating system will force you to mercilessly spend money on utility bills.
- IR floors cannot be laid where they will be covered by furniture or plumbing fixtures. Therefore, rearranging the room will no longer be possible.
- Tile adhesive, like cement screed, although not as intensely, will gradually damage the IR floor film, which will cause its service life to be significantly reduced.
- If IR floors fail, they can cause a fire due to a short circuit.
- Low film adhesion causes difficult installation work. By the way, adhesion can be increased if plasterboard and fiberglass mesh are placed between the heating system and the tiles. But in this case, the heating capacity of the system will be slightly reduced.
Infrared heating film Heat Plus, Hi Heat (warm floor)
- Laying floors of this type must be done on a perfectly flat surface, which requires a number of preparatory works.
Advantages of infrared flooring under tiles
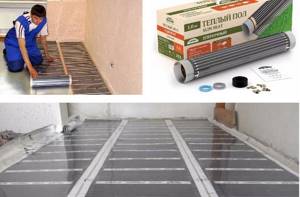
The main advantage of film heating is its simple installation, it will take only 1 day. In addition, the structure does not require maintenance during operation. It is worth noting that such a floor does not freeze in winter.
The advantages of an infrared floor laid under tiles include:
- wavelength - it is 5 - 20 microns, so it easily passes through the tile;
- ease of temperature adjustment - which allows you to easily create comfortable conditions;
- economical - consumes little electricity;
- absence of electromagnetic radiation - that is, does not harm humans;
- ability to ionize air;
- not high cost;
- efficiency - it is 20% more than other heating floors;
- operability - if one element breaks, the entire structure continues to function;
- small thickness - which does not affect the height of the ceilings;
- moisture resistance - it is permissible to lay in rooms with high humidity (bathtub, toilet, swimming pool).
Flaws
Even with all the advantages, film floors placed under tiles also have disadvantages:
- heating is recommended in rooms with a small area; when installing them in rooms of impressive size, costs will increase noticeably;
- since the floor does not lie under heavy objects and plumbing fixtures, it will not be possible to rearrange the furniture in the apartment;
- using glue or concrete screed to secure the tiles will significantly reduce their service life;
- failure can lead to a short circuit;
- it is permissible to lay the film only on a perfectly smooth base;
- mechanical damage to the film is possible - since the tile has significant weight;
- adhesion of the IR floor makes installation more difficult.
For your information! To increase adhesion, it is recommended to lay plasterboard or glass wool mesh between the heating system and the tiles.
However, this will reduce the heating capacity of the structure.
Advantages
The device has a number of advantages, including the ability to be used in small spaces. Is it possible to heat large rooms with it? The answer is yes, but the level of electricity consumed by the family will increase significantly. In large rooms it is recommended to use the device as an additional heating source.
List of advantages:
- Warm floors work on the principle of convection, thereby warming up interior items and decor. This allows you to heat the room evenly and quickly.
- The emitted wavelength is 4-15 micrometers, which allows the device not only to heat the floor covering in use, but also objects standing in the room.
- There will be no dust rising, which is so necessary for allergy sufferers and people with small children. The principle of their operation differs from radiator heating, so dust will not rise into the air and move around the room.
- To reduce costs, you should set the most optimal temperature regime. It is worth noting that the use of radiator heating implies a room temperature of 25*C, while with IR heating a temperature of 20*C will be sufficient and comfortable. Less heating will require a reduced amount of electrical energy and will lead to savings in the family budget.
- The available radiation is minimal. This figure is even less than that of cable devices.
AdminAuthor of the article
Did you like the article?
Share with your friends:
Comments (1)
- dombuimb Sep 11, 2021 at 4:30 am
Can film warm pl be used in almost any room?
Answer
Materials we will need
If you plan to install an infrared floor with a finishing coating (tiles) yourself, you should stock up on the necessary material and tools.
Required purchase:
- thermal film with a set of clamps;
- electrical wire;
- temperature controller;
- insulating bitumen material;
- thermal insulation;
- reinforcing product;
- plastic film;
- dry self-leveling mixture;
- tile adhesive;
- construction tape.
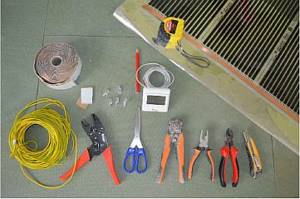
The tools that will be required when installing infrared heated floors under tiles include: multimeter, tape measure, screwdriver, square, meter, wire cutters and rubber hammer.
If you buy a standard set of film flooring, then it includes, in addition to the thermal film itself, clamps, electrical wires, insulating bitumen material with a self-adhesive base.
For your information! It is important to choose the correct cable cross-section with which the floor will be connected to the thermostat.
Necessary materials
Standard equipment for a film heated floor system
- Thermal film in a roll;
- Contact terminals;
- Set of wires;
- Bitumen insulation on a self-adhesive basis.
- Thermal reflective insulation;
- Heat-resistant polyethylene film;
- Thermostat and mounting box for it. It is selected based on the selected power of the heated floor and the type of installation (built-in or surface-mounted);
- Additional temperature sensor if necessary (one will be included with the thermostat);
- Double sided tape;
- Additional wire for mounting a thermostat. It may also be needed if you install several sets of heated floors in one room (you will need to add up their power to calculate the cross-section). The wire cross-section is selected depending on the power of the system and the material of the purchased wire (see table).
| Wire cross-section, mm2 | Maximum permissible power consumption with copper wire, kW | Maximum permissible power consumption with aluminum wire, kW |
| 1,5 | 3,5 | 2 |
| 2,5 | 5,5 | 3,5 |
| 4 | 7 | 5,5 |
| 6 | 9 | 7 |
Installation technology
Having prepared all the components and tools, you can proceed directly to laying infrared heated film floors under the tiles.
Watch video installation instructions
DIY installation of infrared film under tiles. Step-by-step installation instructions
Preparation
Infrared floors are especially sensitive to defects in the base, and its preparation should be taken seriously.
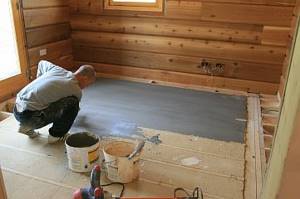
Preparation before installation
The process includes:
- Dismantling the old covering.
- Cleaning the floor from dirt and debris.
- Surface degreasing and primer treatment.
- Leveling the subfloor: “dry” method - expanded clay sand is used, the method is simple, but expanded clay can harm the heating elements; concrete-cement or self-leveling composition - this option allows you to make a flat and smooth floor.
If you have a solid and level base, the preparatory process is greatly simplified. It is enough just to apply a small layer of self-leveling mortar.
Development of laying scheme
Before you begin installation, you need to draw a plan for placing the canvases. The film floor does not lie under heavy furniture and plumbing fixtures. Therefore, you need to think about the layout of the room in advance. According to this diagram, place marks on the base where the heating element will be placed. The distance from the walls should be at least 20 cm.
After this, the location for the thermostat is determined; it should be located on the wall, at a distance of 15 cm from the floor. For the wires that will go from the device to the film, it is recommended to make grooves in which they will be placed.
For your information! It is recommended to install the thermostat before installing the floor, as this is a dirty job.
Waterproofing
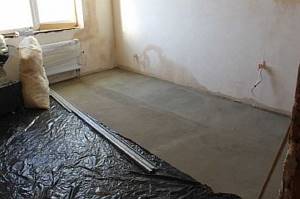
Waterproofing material is laid on the prepared surface; you can use a special membrane or ordinary polyethylene film.
The product is laid with an overlap, and tape is used to seal the joints.
Thermal insulation
Thermal insulation material prevents heat from escaping into the floor, but directs it upward. A foil product - penofol or isolon - is better suited for this role.
Material with such a coating is capable of reflecting up to 90% of thermal energy, which makes film floors more efficient.
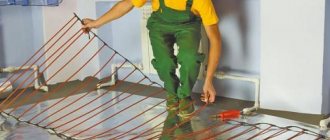
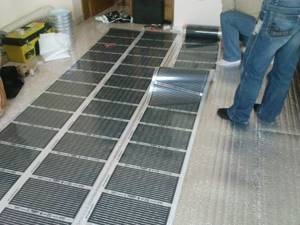
Laying thermal film

The thermal film is laid according to the developed scheme. Installation of the film should be done carefully so as not to damage the elements. To connect the strips to each other, terminal clamps are used.
The sheets are mounted in such a way that the copper contacts are located below, towards the walls, only then will the device work correctly.
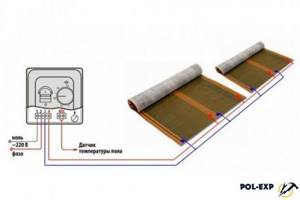
Floor connection
Once the floor is laid, it should be connected to the thermostat. To do this, according to the developed scheme, from the heating elements to the regulator, you need to stretch a cable that fits into a corrugation.
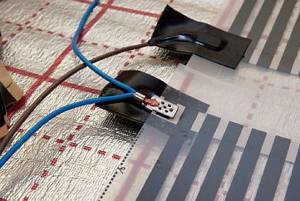
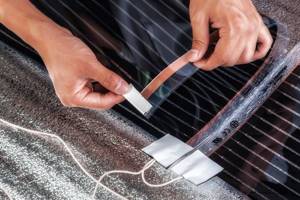
To connect the cable and the IR mat, the insulation is partially cut off from the wire, after which it is connected using clips to the heating elements. Clamp the terminal with pliers carefully but tightly to ensure reliable contact. The cut areas must be insulated with bitumen.
After this, a temperature sensor is installed, it is placed on graphite strips, and connected to the thermostat. The sensor is mounted in a special recess, which is equipped with heat-reflecting material, this minimizes differences in surface height.
When the system is connected, it should be tested. The test is done for each strip separately, at a temperature of 25 - 30 degrees.
If testing shows that the floor is functioning correctly, it should be covered with polyethylene, it will serve as an additional protective layer.
Important! When connecting a film floor, it is necessary to ground the device.
Floor installation
Even a non-professional can install an infrared floor under ceramic tiles. The main thing is to adhere to the rules for performing work.
Preparation
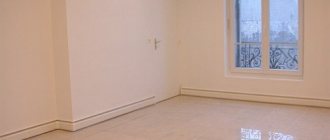
Laying infrared heated floors under tiles begins with preparing the construction base. The work algorithm will be as follows:
- dismantle the previous covering;
- remove dirt and dust;
- degrease the building base;
- treat the surface with a primer;
- Fill the floor with self-leveling mixture until the surface is perfectly smooth.
To level the building base, you can use a simple cement screed. However, in this case you need to have some experience to ensure that the surface is perfectly smooth.
Preparation of the construction base also includes the implementation of the installation scheme for the coating and the placement of thermostat elements. Since film cannot be placed under plumbing fixtures and furniture, you need to determine in advance where they will be located. There is no need to install the material in this place, which should be taken into account when drawing up the diagram.
Decide how you will lay the wires from the film to the thermostat. If the gutters are in the building foundation, it is necessary to groove the wall. You can place the wires in plastic boxes and fix them on the surface.
Next, the entire system is grounded. Contacts should be carefully insulated, as well as areas of material damage, if any.
Installation stages
Laying film heated floors under tiles is carried out in several stages:
- installation of thermal insulation material;
- grounding the system using special tape;
- installation of infrared floor;
- system connection;
- checking the functionality of the infrared floor;
- covering the building base with ceramic tiles.
Infrared heated floor under tiles
Installation of thermal film
Immediately place the heat reflecting product onto the prepared building base. It will help direct heat upward and reduce energy consumption. Next, carefully place the film with built-in heating elements.
Attention! Thermal film sheets must be mounted so that the side with copper contacts is at the bottom and towards the walls. Only in this case will the underfloor heating system function correctly.
Use terminal clamps to connect the material. After this, check the integrity of the system and connect it to a pre-installed thermostat.
Connecting the system
After laying the film on the correct side and connecting the heating elements to the contacts, you can connect the system. To do this, you should adhere to the following scheme of actions:
- Install the thermostat. Fix the device on the wall so that it is close to the outlet. You can also install a thermostat near the switch.
- Route the wires from the heating devices to the thermostat. In this case, it is recommended to adhere to a pre-designed scheme. Install the wires in the gutters using corrugations or in special plastic boxes.
- Partially cut off the insulation on the wires and attach them to the clamps located on the heating elements. Perform this manipulation on all devices. Next, wrap the joints with bitumen tape.
- Install the temperature sensor. After that, connect it to the thermostat.
After all measures have been completed to connect the floor heating system to the electrical network, it is necessary to check the functionality of the heating elements. To do this, you need to set the temperature to about 30 degrees and turn on the system. If the floor is evenly heated, it means the emitters are working correctly. In the event that the heat does not flow or some area is not heated, therefore, the system is installed or connected to the network incorrectly. It is necessary to disassemble the sheets and check the correct connection. After this, you need to test the heating elements again.
If the system is working correctly, plastic film should be placed on top of the infrared floor. This will create additional protection for the IR film.
Connecting infrared heated floor
Tile installation
There are several ways to lay ceramic tiles on polyethylene film:
- On the reinforcing mesh. To do this, the material is fixed on top of a plastic film. This will increase its adhesion to the material. Next, apply a cement screed or fill the building base with a self-leveling mortar.
- On plasterboard sheets. The material is laid on top of the plastic film. After this, finishing material is fixed onto it. Thanks to this, the tiles will lie flat.
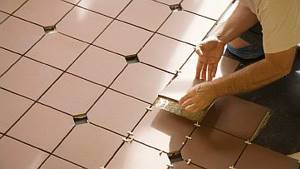
To lay tiles, glue or a special mixture is used. Apply the product to the facing material and fix it to the building base.
Infrared heated floors under tiles are a good way to make living in an apartment more comfortable. You can arrange the covering yourself. To do this, you need to adhere to the work algorithm without violating the instructions.
Laying tiles
You can lay tiles on top of an infrared warm structure in the following ways:
- Using reinforcing mesh:
- the mesh is laid on top of the polyethylene;
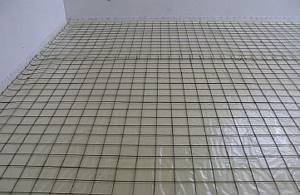
- then concrete or self-leveling mortar is poured;

- Only after the composition has completely dried is the tile laid.
- Using plasterboard sheets, which are placed on polyethylene, and tiles are laid on the plasterboard.

To fix the tiles to the floor, you will need glue or a special mixture.
Step-by-step process for laying tiles:
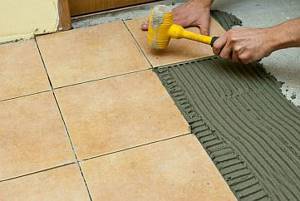
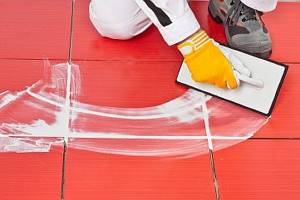
- The adhesive composition is applied to the back side of the facing material with a notched spatula, after which the product is fixed to the base. To make even seams between tiles, it is recommended to use plastic crosses.
- To ensure good adhesion of the product to the surface and to level out protruding areas, the tiles are tapped with a rubber hammer.
- When the glue dries a little, the crosses are pulled out and the joints are grouted.
For your information! When using a building level when laying tiles, you will get a flat surface.
Basics of Safe Use
In order for the infrared heating system to be safe, it is important to make competent calculations and installation, according to technological recommendations:
- install the floor on a flat and dry surface;
- make gaps between sheets of the product of at least 0.5 cm;
- provide grounding;
- choose a film floor and a thermostat of the same power;
- connect the heating elements directly to the machine and power it from the meter.
For your information! For more efficient operation of the floor, it is recommended to install an additional temperature sensor; it will monitor the temperature regime.
Film heating can create comfort in the home. Even non-professionals can install an infrared heated floor under ceramic tiles; the main thing is to strictly follow the installation rules for this system.