Heating a house with warm water floors is not uncommon today, and increasingly this system is preferred when choosing a heating method.
The design of water floors consists of pipes laid in the floor with a coolant moving inside (usually water). The system is connected to central heating, hot water supply or a specially equipped boiler.
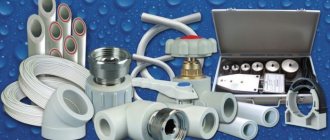
There are many types of pipes that can be installed in the construction of heating floors; today we will talk about polypropylene.
Types and characteristics of polypropylene pipes
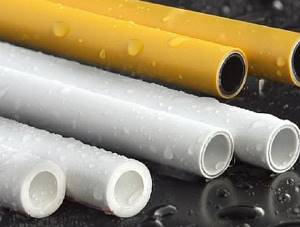
Polypropylene pipes are widely used in the construction industry, as they are inexpensive and quite durable.
They are available in two types: single-layer and multi-layer. Each type has its own positive and negative sides. Let's look at them.
Single layer
Single-layer polypropylene contours come in several varieties:
- RPH - made of homopropylene. They are not intended for heated floors, but are widely used in water supply, sewerage and ventilation systems.
- PPB - made from polypropylene block copolymer. Products of this type are durable and resistant.
- PPR - random copolymer polypropylene is used in production. The contour of it evenly distributes the load along its walls.
- PPS - this product is flame retardant. Pipes are able to work efficiently even when heated to +95 degrees.
Multilayer
Multilayer polypropylene pipes are also available in several types and have the following technical characteristics:
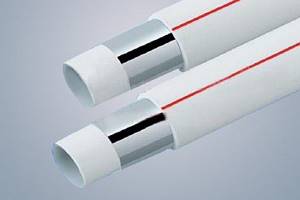
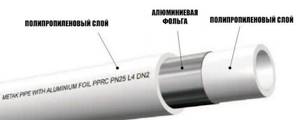
- Aluminum - the pipeline has a thin reinforcing layer on the outside. In the process of connecting such elements, the aluminum layer is cut off by 1 mm. There are products where the reinforcement is between the walls. Polypropylene pipes with a reinforcing layer function effectively even at + 95 degrees.
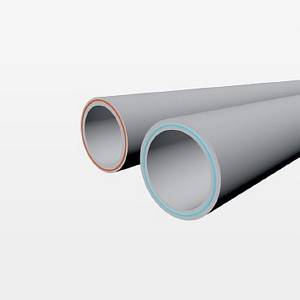
- Fiberglass - reinforcement is located between sheets of polypropylene. This type works great in the construction of warm floors.
- Composite - between two layers of polypropylene there is a layer that combines fiberglass and aluminum fibers.
Choice
Polypropylene pipes are presented on the market in several versions. They are divided into single-layer and multi-layer. For multilayer ones, reinforcement is carried out using aluminum or fiberglass. In a heated floor system, multilayer pipes must be used. They exist in three types:
- With an aluminum layer, which is located on the outside or between layers of polypropylene.
- Composite ones are reinforced between layers with a mixture of aluminum and fiberglass.

- With a layer of fiberglass they are optimal for installing heated floors. They do not deform due to temperature changes, are characterized by increased durability and strength, and lie well in the screed.
The polypropylene pipe for installing heated floors must be up to 17 mm in diameter.
Advantages and disadvantages of polypropylene
The main reason for the popularity of PPR pipes in the construction of heated floors is cost-effectiveness. Their cost is affordable, and this is especially important when installing a pipeline over a large area.
In addition, polypropylene contours:
- have increased mechanical strength and elasticity;
- have an excellent level of tightness - this is ensured by a special soldering method, the product is monolithic, almost seamless, which allows you to place pipes under a screed;
- durable - if installation rules are followed, they will last for several decades without an accident;
- are light in weight - this makes the installation process simple;
- inert - not susceptible to aggressive substances;
- are not subject to corrosion - thus, deposits do not accumulate inside the pipe;
- have good sound insulation;
- environmentally friendly - no harmful substances are released when heated.
Polypropylene is highly resistant to low temperatures, which protects the coolant from freezing.
But even if it freezes, the walls of the pipes are not destroyed, since the polymer is able to expand, and when heated, returns to its original shape. Therefore, polypropylene pipes are ideal for installation in country cottages where the owners do not live permanently and the floor is used occasionally.
However, this type of pipe rolling materials also has disadvantages. Polypropylene is highly flammable and should not be installed in rooms with a high level of fire hazard (wooden). In addition, the optimal operating temperature limit is + 75 degrees. It is worth saying that the PP has poor flexibility, and it will not be possible to make turns within a small radius.
In addition, ordinary PVC pipes are intended for use in water supply and sewerage systems, but they cannot be placed in heated floors, as they will not withstand thermal and hydraulic loads. Therefore, it is necessary to lay a reinforced contour in heated floors.
Pipes for heated floors. Recommendations from experts // FORUMHOUSE
Mistakes when soldering plastic pipes
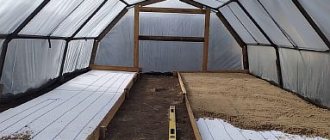
DIY pipe greenhouse. Step-by-step instructions 700 photos
An inexperienced plumber or owner who decides to carry out the installation of a polypropylene water line with his own hands often makes mistakes, not fully knowing the technology of pipe soldering and not knowing how to work with a soldering iron.
The most common errors include the following.
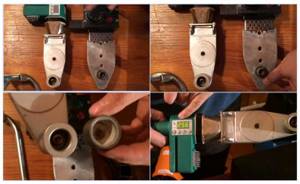
Rice. 8 Differences between budget and expensive irons
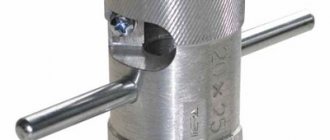
Wrong choice of soldering iron
The most popular and inexpensive devices for soldering are electric couplings with attachments for different diameters of PPR. When purchasing and using, you must consider the following factors:
- You need to purchase the device with a convenient holder so that you can easily and quickly install it in place when working independently. This will reduce the time that heated elements are in an undocked state, which can lead to cold welding and further depressurization.
- It is also better to choose the units used with the regulator and power buttons placed in such a way that you do not touch them with your hand during operation, thereby lowering the temperature or turning off the heating.
- If the device is used for regular use, it is better to purchase an expensive model with high-quality Teflon nozzles - this will prevent polypropylene from sticking and improve the quality of connections.
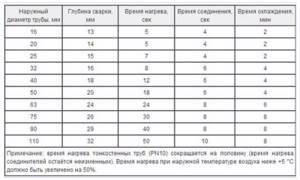
Rice. 9 PPR heating table
- Modern devices are produced with electronic indicators that maintain a constant temperature using a built-in processor, which is reflected on its display. This factor also helps to improve the quality of soldering, the time of which is determined based on the degree of heating of the couplings, which cannot be determined on old-style units.
- The device must maintain a given temperature, which increases with increasing pipe diameter. Many Chinese irons have high temperature parameters, which should be taken into account when choosing a manufacturer; Turkish-made models are considered to be some of the best units in terms of price and quality ratio.
- The shape of the iron and the location of the couplings play an important role in cases where polypropylene pipes are welded in hard-to-reach places. A narrower iron and placement of the couplings on the edge of the pointed end in this case are much more convenient to use.
Repay
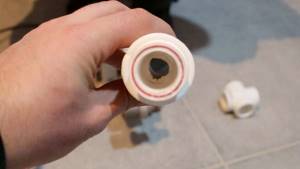
Overexposure of elements in the soldering iron for more than the required time leads to their surface overheating and after connection, accompanied by excessive force, the pipe passage becomes clogged with molten plastic. If such an error occurs at a large number of joints of heating or water pipelines, the system will not be able to function normally. In order to avoid this situation, you should strictly follow the time intervals specified in the instructions for each type and diameter of pipes and carry out several test solderings of small sections.
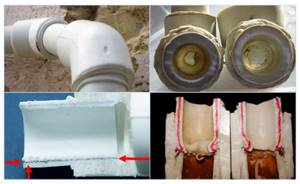
Rice. 10 PPR soldering defects
Low heating, incorrect angle and other errors
Many beginners make a fairly large number of mistakes, which include the following:
- Soldering of dirty elements near the walls or with water remaining in the line, while due to dirt or water cooling, the plastic does not connect well and subsequently depressurization of the joint occurs.
- Insufficient deepening of pipes into sockets of larger diameter. It often occurs when there is a minor error in the installation of faucets - if its valve is not turned at a small angle, the air in the joined area will not have an outlet, preventing the mounted area from being completely immersed in the hole.
- If the elements being connected are not heated sufficiently, the plastic will not have a uniform structure and the joint will depressurize. This defect can be identified by the absence of a skirt at the edge of fittings with a large diameter.
- When manually joining elements, a single axis must be maintained - otherwise distortions will lead to insufficient density and depressurization.
- Also, after joining, the joined area should be kept motionless for a certain time until it cools completely.
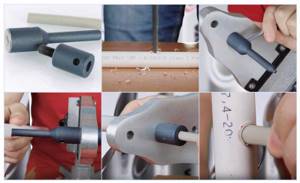
Rice. 11 Method of repairing polypropylene pipes by heating the surface of the pipe being repaired with a nozzle
For high-quality soldering in hard-to-reach places, a high-quality choice of soldering iron is of great importance - the model should provide easy access and the required heating temperature without sticking of the PPR. For convenience, all work is divided into two stages - first, long chains are installed in a convenient place, and then they move to the walls, joining sections in weight.
Marking of polypropylene pipes
Currently, there is a wide variety of products in this segment on the market, which are labeled as follows:
- PN 10 - installed on ordinary polypropylene pipes with a homogeneous structure. They are recommended for use in water supply systems with water temperatures up to 20 degrees and pressure up to 10 atm. Pipes with this marking usually have a diameter from 20 to 110 mm.
- PN 16 - designates a single-layer product that is suitable for installation in warm water floors. Let's allow the coolant to heat up to 80 degrees and pressure up to 10 atm. The diameter of the contours is the same as PN 10, but the thickness of the walls is much greater.
- PN 20 - marking of homogeneous pipes; they have a permitted heating level of the circulating coolant up to + 95 degrees. The working pressure in this case is no more than 6 atm, and the diameter is from 20 to 110 mm.
- PN20 AL (PN20 GF) - installed on polymers with an aluminum reinforcing layer or fiberglass. The remaining indicators coincide with PN 20. This type differs from other consumables in the coefficient of thermal expansion - it is smaller.
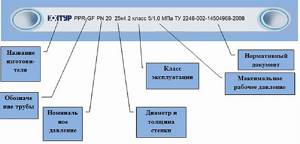
It is very important to take this marking into account when choosing a product for certain operating conditions; the efficiency of the heated floor depends on it.
The challenges of manual docking are innumerable
Experienced craftsmen, who have thousands of successfully completed joints of polypropylene pipes behind them, rely on their professionalism. But success does not always depend on the personal skill and conscientiousness of the performer! Are there many construction sites with stable power supply? Meanwhile, increased voltage in the network speeds up the heating of the soldering iron, and decreased voltage slows it down. It is enough to be distracted from work a little, and the sense of time becomes confused.
Both overheating and underheating are detrimental to butt joints of plastic pipes. Overheated plastic becomes brittle and after some – usually very short – time it cracks. Underheated pipes do not connect well due to insufficiently deep diffusion of polypropylene. The joint turns out to be fragile and may not withstand the operating pressure of the heating system.
Overheated polypropylene pipe joint
Insufficient cleaning of welded parts from contaminants leads to a decrease in the quality of the connection. Dust and sand prevent the parts from setting. Organics and lubricants seal the plastic at the tight contact point. The chips generated when cutting a pipe form internal layers at the joint.
Sometimes foreign inclusions are welded into the plastic. A small piece of metal wire caught in the joint of polypropylene pipes vibrates with the coolant current and destroys the plastic array.
Excessive effort by the worker during manual installation of the joint - and the plastic, softened by heating, bulges into the internal space of the pipeline, eating away at the cross-section and reducing the throughput of the connection.
The saddest thing is that from the outside, high-quality and low-quality joints look exactly the same!
Creating a diagram and calculating the number of pipes
Before starting work on installing a heated water floor made of polypropylene, you need to prepare a project and calculate everything.
Warm floor made of polypropylene.
The drawing is made on graph paper, it reflects the layout and installation step.
Project preparation
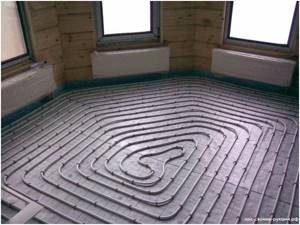
The water heated floor pipeline can be laid according to the following schemes:
- “Snake” is a simple option, but has a drawback - the coolant cools down as it passes through the pipe, and in the end it will be colder.
- “Spiral” - with this method, heating is uniform, which is why it is more popular.
- “Double snake” - in this case the heat is distributed evenly over the floor surface.

When choosing a scheme, the degree of heat transfer of the structure is taken into account, since the efficiency of the floor will depend on this. To do this, you will need to know: the area of the room, the material from which the walls, ceilings and thermal insulation are made, the type of flooring, the diameter of the circuit and its material, the temperature of the coolant.
After choosing a laying pattern, it needs to be applied to paper. It is recommended to make the step between the pipes from 10 to 30 cm, and the length of the loop is no more than 80 meters. The contour is laid at a distance of 20 cm from the walls. The installation location of the manifold cabinet should be noted on the drawing.
If warm water floors are used as the main heating, then the pipeline should be laid in increments of 12-15 cm.
Pipe sizing calculation
To determine the footage of polypropylene pipes for heated floors, two methods are used. One is to measure the size of the pipeline on the drawing with a ruler, and then multiply this indicator by the appropriate scale. A margin of 10% for pruning is added to the result obtained.
The second way is using thread. A thread is placed on the floor according to the contour laying pattern. Then, you just need to measure it - this will be the size of the pipeline. Just as in the first case, you need to add 10% of the reserve.
For each room, the length of the pipes must be calculated separately.
The Hidden Dangers of Pipe Reinforcement
The set of building codes and regulations governing the creation of heating systems prescribes the use of pipes with limited oxygen permeability. Oxygen dissolved in hot water actively interacts with all elements of the system, oxidizing metal and loosening plastic. Reinforcing polypropylene pipes with aluminum foil or fiberglass reduces the possibility of atmospheric oxygen penetrating into the coolant.
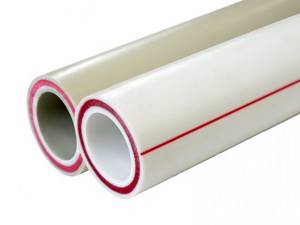
Glass fiber reinforced pipes
However, pipes with an oxygen barrier made of foil are expensive, and fiberglass-reinforced polypropylene pipes are more common on sale. The advantage of fiber reinforcement is that it increases the resistance of the polymer to thermal deformation during system operation. The downside is that polypropylene products are demanding in terms of storage conditions, transportation and loading and unloading technologies.
The manufacturer recommends storing polypropylene pipes with fiberglass reinforcement at above-zero temperatures and protecting them from impacts and bending, especially in the cold season. Domestic realities are harsh! Unheated warehouses, leaky sheds, careless loading and unloading operations, and transportation on rough roads lead to the destruction of brittle strands of fiberglass, which reduces the service life of the pipes.
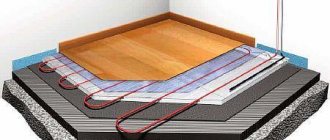
Preparatory work before installing the system
For the correct installation of a warm water floor “pie” made of polypropylene pipes, preparatory work should be carried out. Step by step, the actions look like this:
- The old floor covering is removed and the screed is dismantled.
- The foundation is assessed and if cracks are found, they must be repaired. But first, you should clean the surface from concrete chips and apply a primer. If the subfloor cannot be reconstructed, a thin layer of leveling screed must be poured.
- The manifold cabinet is installed on the wall or in a specially equipped niche, at a distance of 1 meter from the floor. This must be done before laying the floor “pie”, since the installation process is quite messy.
- A waterproofing layer is laid, thick polyethylene is suitable, it is able to retain moisture. The film needs to be laid with an overlap of 10 cm on the walls. If the area of the room is large and several strips of film are laid, then they overlap, and they can be connected to each other with tape.
- A damper tape is glued around the perimeter so that the concrete screed does not crack when heated.
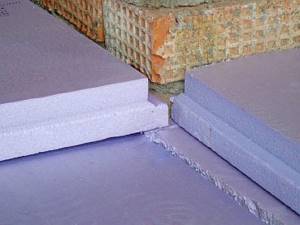
- Thermal insulation is installed. It is possible to lay different materials - roll or sheet. When choosing extruded polystyrene foam boards, there should be no gaps between them, so the material should be laid in two layers. For greater tightness, the joints can be sewn with polyurethane foam.
- A foil backing is laid down; it is necessary to reflect heat rays. The heat is directed upward, thereby heating the floor and the air in the room. The material is connected using adhesive tape. If the thermal insulation material has a foil layer, then this substrate is not needed.
- A reinforcing mesh is placed to add strength to the structure, and a pipeline can also be attached to it.
Strict adherence to all rules for carrying out this work contributes to the efficient operation of the system.
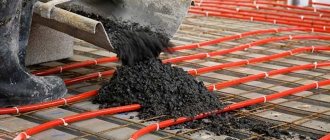
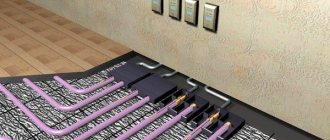
Installation of pipes in a concrete floor
When installing in concrete floors, polypropylene pipes are often used. You can install a warm floor made of polypropylene pipes into a concrete screed with your own hands, thereby saving money.
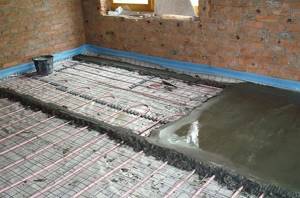
When planning the installation of a heating system, keep in mind that it will take you at least a month from the start of work until the screed is completely dry. The operating temperature in the installation room should be above 5°C.
When installing in an apartment, it is worth conducting an examination and obtaining permission from utility services. Concrete floors should not be installed in completely wooden houses.
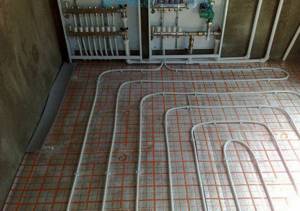
Laying polypropylene pipes
Installation is a critical stage in the construction of a water heating floor. The pipeline must be laid in accordance with the developed diagram - “snake” or “snail”. You need to start from the collector, the second end of the pipe after laying should also return to it.
When working with polypropylene pipes, the room temperature must be maintained at +5 degrees.
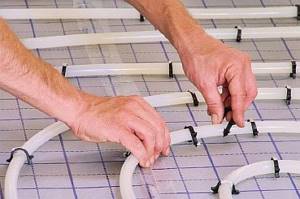
Pipe fastening is carried out in several ways:
- To the reinforcing mesh using plastic clamps or wire is a reliable option. Do not fix the contour tightly, this may damage it.
- To the thermal insulation product with dowels.
- Using thermal insulation mats with bosses. The pipeline is laid between them in grooves, thereby being firmly fixed.
Fasteners should be installed every 80 cm.
The more joints, the higher the likelihood of leakage
Polypropylene pipes are sold cut into strands 2 - 4 meters long. To install a warm floor, several tens of linear meters of pipe are required. Individual sections have to be joined together. According to experts, a polypropylene heating system with heated floors in a house with an area of 150 square meters can have up to 300 joints!
If the technology for joining polypropylene pipes is followed in detail, the risk of leaks at the joints is vanishingly small. However, the work is carried out manually, using simple tools and acquired skills. The tool does not always work properly; skills often leave much to be desired. The final quality of the heated floor is also affected by the eternal rush of builders trying to complete the project as quickly as possible.
The greater the amount of work performed, the higher the probability of error. Thus, at least one of the hundreds of joints will leak sooner or later. To find and fix the problem, you will have to carry out extensive and very costly work.
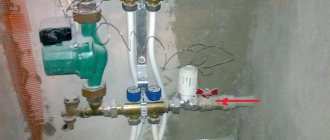
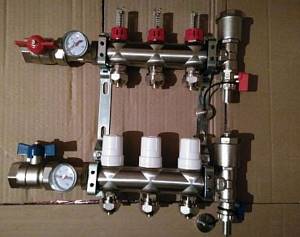
Floor connection
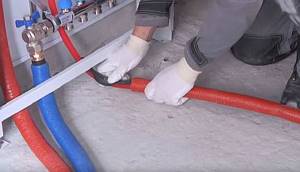
The first step is to assemble the device, which consists of a pressure gauge, an air valve, an adjustment and drain valve, and a mixer.
You can install a ready-made collector, with the required number of outlets, into an installed cabinet. Pipes for supplying heated coolant are connected to it using a nut and bushing, as well as a return hose.
After this, the floor circuits are connected to the collector group. One end of the pipe goes to the supply valve, and the other to the return valve.
Alternative solution
Modern enterprises have launched the production of not only polypropylene, but also similar materials that can be used for the installation of heating systems. For example, a heated floor system can easily be organized using cross-linked polyethylene pipes. Until recently, the concept of “stitched” alarmed many builders, as associations arose with a low-strength structure with a longitudinal seam present. In fact, the products are cross-linked at the molecular level. The structure of cross-linked polyethylene is a three-dimensional mesh with strong bonds and formed from links of polyethylene molecules (for more details: “Advantages of cross-linked polyethylene pipes for underfloor heating, installation rules”).
If we compare cross-linked polyethylene and polypropylene pipes, the first material, along with good strength, has a lower degree of expansion under the influence of high temperatures.
As an alternative to polypropylene, metal-plastic products can be used.
However, this material has its own nuances:
- High price.
- Scale formation. In this case, solid deposits most often form on the inner surface of the pipe at the threaded connection of the fittings.
The presence of these factors tips the scales of choice in favor of polyethylene or polypropylene reinforced pipes for forming a heated floor system.
System testing
Before filling the pipeline with a concrete screed, it is necessary to test the device, since in case of malfunctions or leaks, it will be difficult to eliminate them under the concrete.
To check the system, each circuit is individually filled with water and all distribution valves are opened, which helps remove air from the pipes. In this case, the pressure is set to 1.5 times the working pressure, but not less than 6 bar.
After 3 - 4 hours, the pressure drops and needs to be raised again. This must be done three times. After this, the floor is left for a day, and if during this time the pressure drops by no more than 2 bar, then the system is installed correctly.
If leaks or problems are found, they must be eliminated, the leakage areas must be soldered, and then the floor testing must be repeated again.
Modular and slatted types of warm water floors
The modular system uses ready-made chipboard panels for laying pipes. Their thickness is 2.2 cm. The modules have channels for fastening aluminum plates and pipes. Insulation with this installation method is mounted in a wooden ceiling.
The strips are installed at intervals of 2 cm. Based on the pitch between the pipes, strips 15-30 cm long and wide are used:
- 13;
- 18;
- 28 cm.
To prevent heat loss, the plates are equipped with pipe latches. If the final floor covering is linoleum (see which linoleum and which warm floor is best to choose, instructions on how to install), one layer of GVLV slabs should be laid on the pipes. When the finishing cladding is laminate or parquet, you can do without it.
The rack type of flooring systems is almost identical to the modular one. The difference is that instead of panels, it uses slats with a width of 2.8 cm.
The gap between the slats in the modules must be at least 2 cm. The rack system is laid only on logs. The step between them should be 40-60 cm. In this case, polystyrene foam or mineral wool is used as a thermal insulation material.
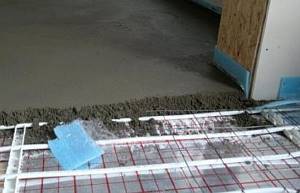
Filling the screed
To fill the screed, a cement-concrete mortar with plasticizers is used, which you can make yourself or buy ready-made.
To give greater strength to the structure, you can lay another reinforcing mesh on top of the pipeline. If additional reinforcement does not fit, then fiber from polypropylene fibers should be added to the solution.
The room temperature when laying the screed should be + 5 degrees. First you need to install a beacon profile, which will make the surface smooth.
You need to start pouring from the far corner of the room, in stripes, and end at the exit. Leveling the solution is carried out using the rule.
Depending on the diameter of the pipes, the thickness of the screed ranges from 30 to 70 mm.
It will take 28 days for the solution to dry completely. Only after the screed has hardened can the finishing coating be laid. The best type is ceramic tiles, especially for the bathroom or toilet, although installation of flooring products from a different material is acceptable.
Until the concrete mixture dries well, it is forbidden to turn on the warm water floor. Before the first start, all air must be released.
As you can see, installing a heated water floor made from polypropylene pipes is not difficult. The material is easy to work with, so anyone can make a warm polypropylene floor with their own hands in a private house or apartment.
Warm floor - features of this heating system
Let's start with the fact that underfloor heating can be used as the main heating option in a living space or act as an additional heat source. Depending on the technological characteristics of the residential building, it is up to you to decide which heating option to use in the case of heated floors. For an apartment in an apartment building, a warm floor may be an exception. In some cases, residents try to use a heated tiled surface to increase comfort in the bathroom or other technological areas.
Important! It should be recalled about the existing ban on the installation and installation of warm water floors in residential premises of apartment buildings. The reason for this situation is the unpreparedness of the engineering structures of a residential building for the installation of a complex heating system, such as water floors.
*
In a situation when it comes to installing a heating system “warm floors” in a private house, there are no prohibitions or obstacles to the implementation of the project. It is possible to carry out the installation and installation of heated floors of any size in various combinations.
For those who have decided to install heated floors in their home, it is important to know about the necessary equipment and consumables. Pipes for any water heating system are the main working element. It is through them that the prepared water circulates, transferring thermal energy to heating sources. These can be radiators or, in the case of water floors, a heated concrete screed, or a stacked wooden floor structure. The transfer of thermal energy from the floor surface coolant is carried out through water heating circuits. What material the water loop pipe is made of depends on the speed of installation of the in-floor pipeline and the quality of heating the floor surface.
What is a collector for and how to install it correctly
The main purpose of the collector is to configure and regulate the floor heating system. The simplest model of the device has only shut-off valves. A system of such equipment is much cheaper, but setting it up yourself is quite difficult. More expensive devices are equipped with control valves that allow you to control water flow separately in each circuit. Despite their high cost, such collectors have a great advantage: they allow you to configure them to heat the room equally.
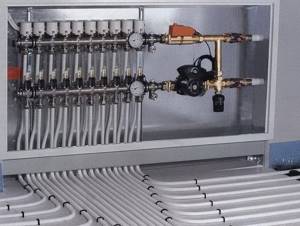
The collector is installed in a special box with a wall thickness of about 12 cm. When choosing the dimensions of the box, you should take into account the entire collector group: drains, air ducts and pressure sensors. It is recommended to place the box slightly higher than the underfloor heating system so that the pipe outlet is at the bottom. This arrangement will provide complete air venting.
Large linear extension
If you are planning to use polypropylene pipes for heating, then immediately plan to use them only in hidden installation. You will need to hide all pipes in the walls and screed, and preferably in insulation.
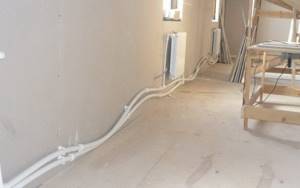
The main problem with polypropylene is its linear expansion. It is approximately 2.5 mm per linear meter. If you have installed straight pipes, then during operation they will definitely “float” somewhere. Even if you fasten them often. If these pipes are located outside, then you are unlikely to appreciate such a picture.
It will be useful: Heat-shrinkable sleeves to protect the seams of polyurethane insulation pipes