One of the best ways to replace old pipeline elements or lay a new one is to install polypropylene pipes yourself. The work will not take much time if the house has the pipes themselves, the necessary set of fittings and a welding machine for polypropylene pipes. In just half an hour you will be able to use the new system.
This welding technology is called socket (socket) welding. The pipes are not connected joint to joint, like metal ones, but through additional adapters - fittings, with which the edges are soldered at a temperature of 260 degrees. There are also adapter fittings from a welded to a threaded connection.
Types of polypropylene pipes
The service life of products depends on the temperature of the environment and the pressure created in them.
With the right choice of material type, it is possible to significantly extend its operational capabilities. There are 4 types of pipe materials that have different characteristics depending on their operating temperature.
| Product type and corresponding markings | Purpose | Ambient temperature, C | Working pressure, MPa |
| PN10 | For cold water supply and heated floors | 20 for cold water supply, 45 for floor heating system | 1 |
| PN16 | For cold and hot water supply | Up to 60 | 1,6 |
| PN20 | For hot water supply | Up to 80 | 2 |
| PN25 | For central heating systems, reinforced products, hot water systems | Up to 95 | 2,5 |
PN10 grade materials refer to products intended for cold water supply. They are not able to withstand high ambient temperatures. The second type, marked PN16, refers to mixed-type products and is intended for cold and hot water supply, but with limited operating temperature. PN20 and PN25 are materials intended for hot water supply. Such pipelines are able to withstand high temperatures, and products marked PN25 are additionally reinforced with metal, which increases their service life and ability to withstand high pressure and temperature conditions.
Soldering: stages, features
Soldering of communications begins after their preparation: cutting, stripping, degreasing. Main stages:
- The heated products are connected taking into account the soldering depth. The holding time is always different, which depends on the parameters of the polymer products.
- Check the position of pipes and fittings relative to each other. This will allow the products to be aligned.
- The position of the pipes can be adjusted within 2-4 seconds. It is permissible to increase the pressure and level the products. But you cannot scroll, tilt, or separate them. If a mistake is made, the product is cut above/below the seam.
Pipe welding kit
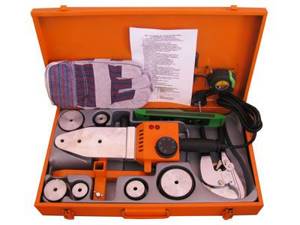
If welding of polypropylene products has to be carried out regularly, then it is advisable to purchase a special welding kit, which is immediately sold in an appropriate suitcase. Its average cost is about one hundred dollars, and it consists of:
- heating element;
- Teflon nozzles of different sizes;
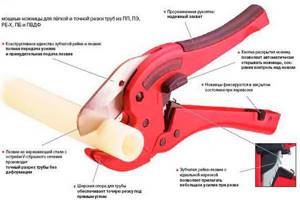
- scissors for cutting polypropylene pipes;
- bolts that secure the nozzle to the heating element;
- level;
- supports for the heating element;
- hexagon for tightening bolts.
In the case when welding work is carried out occasionally, it is more rational to rent welding equipment.
Equipment selection
Welding equipment is a tool that uses high temperatures to create a sealed joint. Moreover, the devices are different for polypropylene and steel products. But the classification provides two main varieties.
Types of welding devices:
- Mechanical. This is professional equipment that is appropriate to use for large volumes of work.
- Manual. They perform welding at home. They are used for small diameter pipes.
The mechanical unit consists of a support frame, a block and a hydraulic unit. There are grippers on both sides of the device. In the middle you can see the liners. They are used to properly distribute pressure and perform alignment.
The apparatus for soldering pipes is sold in specialized and construction stores.
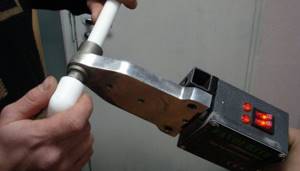
For manual soldering, special irons are used. They work like regular household irons, but the appearance has significant differences. The tool includes a heating plate, a thermostat and a handle. There are also two holes for inserting elements for soldering. Thanks to the Teflon coating, the plastic does not stick to it when it melts.
Types and purpose
Polypropylene pipes can be of four colors - green, gray, white and black. Only black ones differ in their characteristics - they have increased resistance to ultraviolet radiation and are used when laying an irrigation system on the ground. All others have similar characteristics and are laid indoors or buried in the ground.
According to their intended purpose, polypropylene pipes are of the following types:
- For cold water (temperature up to +45°C). They can be easily distinguished by their longitudinal blue stripe.
- For hot water supply (heating up to +85°C). A distinctive feature is a red stripe.
- Universal (maximum heating up to +65-75°C depending on the manufacturer). Two stripes are applied side by side - blue and red.
There are pipes with different characteristics for both cold and hot water. This is displayed in the markings:
- PN10 are used exclusively in cold water supply systems (up to +45°C) with low pressure (up to 1 MPa). They have small wall thickness. Not suitable for high-rise buildings.
- PN16. They are often labeled as universal, but are more often used for cold water - they can withstand heating of the environment up to +65°C and pressure up to 1.6 MPa.
- PN20. Thick-walled pipes, which can transport media with temperatures up to +80°C, can withstand pressures of up to 2 MPa. Used for distributing hot water and heating systems.
- PN25. These are reinforced polypropylene pipes (with foil or fiberglass). Due to the presence of a reinforcing layer, they often have a smaller wall thickness than PN20. The heating temperature of the medium is up to +95°C, pressure is up to 2.5 MPa. Used for hot water supply and heating.
All of them are produced in different diameters - up to 600 mm, but in apartments and private houses they are used mainly in sizes from 16 mm to 110 mm
Please note that the internal diameter is indicated, as wall thickness may vary.
The most common mistakes
Beginning solders often make such typical mistakes when soldering PP pipes, such as:
- Trying to weld dirty edges. Poor cleaning and degreasing will not allow you to create a strong and durable connection.
- Incorrect calculation of wall thickness. It leads to insufficiently deep heating and the creation of a joint of reduced strength.
- Failure to comply with the time parameters for warming up, soldering and cooling. Both underheating and overheating are harmful. Failure to comply with the pressing time prevents the formation of a strong and durable welding layer. Excessively rapid cooling of the joint causes thermal deformation.
- When inserting a piece of pipe into the fitting hole, you should not do it completely, but leaving a gap of one or two millimeters. It will be filled with suture material, otherwise the excess will form an internal bead.
- Exceeding the clamping force also leads to squeezing out excess burr inside the pipe and reducing the effective cross-section.
- Incorrectly prepared connection. It only takes a few seconds to join the edges. If they are connected incorrectly, violating the overall geometry of the pipeline and the orientation of fittings and fittings, it will not be possible to correct the error.
- Pipe quality. You should not skimp on material or buy different brands. They can have different chemical compositions and different heating temperatures. Apparent savings will result in a reduction in the service life of the system and significantly higher additional costs.
Stage two. Welding of polypropylene pipes
This procedure will require an electric jigsaw (cutting polypropylene) and special welding equipment.
Step one. While the apparatus is warming up, the necessary measurements are taken, the pipes are marked and cut.
Step two. The ends of the products that are planned to be connected to each other are thoroughly cleaned and degreased.
Step three. Using a pencil, mark the depth of insertion of each product into the sleeve. It is typical that at least a millimeter gap should remain, so the pipes do not rest against the fitting coupling.
Step four. The PP pipe with fitting is put on the sleeve in accordance with the marks made, and heating of all elements must occur simultaneously.
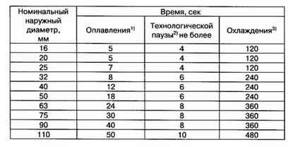
The heating duration depends not only on the diameter of the products, but also on the depth of welding (this can be found in the table below).
Step five. After a certain period of time, the products are removed and connected, pressing onto each other with little effort. It is prohibited to rotate the elements along the center line.
Step six. Within a few seconds after the connection, an initial adjustment is made, then the elements are finally fixed.
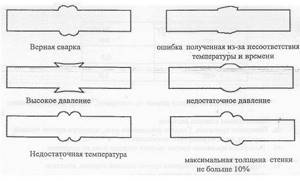
If there are no gaps left at the connection point, then it (the connection) can be considered high quality.
Manufacturing of welding machine
Due to the fact that a more or less good one costs over a thousand rubles, it is cheaper to rent it or make it yourself. If the latter was chosen, then for work you should prepare:
The sequence of actions should be as follows.
Step one. In order to improve heat transfer, the sole of the iron is treated with thermal paste, then a Teflon sleeve is fixed. The location of the latter is determined in advance - the wide part up or down.
Step two. The sharp “nose” is filed off for more convenient work near walls.
Step three. The iron is heated until the device turns off a second time.
Step four. It’s good if the iron is equipped with a temperature sensor - this will allow you to accurately determine the heating temperature. But there is an easier way - through lead. This metal melts at 230ᵒC and above, which approximately coincides with the temperature required for welding.
The further technology is identical to that described above.
Process description
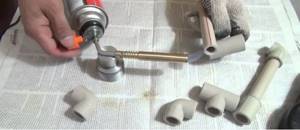
Polypropylene is considered a fairly rigid material. That is why fittings made of a similar material are used to create a pipeline. They are a kind of corners, tees and other connecting parts. To create a reliable joint, soldering is used.
Before soldering pipes, you should watch a training video with a master class
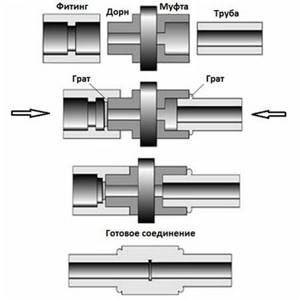
To connect plastic and metal pipes, combined fittings are provided. In such devices, one side of the metal pipe is made with a threaded connection, and the other is connected by welding. To do this, use a soldering iron or welding machine. It is a metal platform with an electric coil inside, which heats the surface. This device is often called an iron. To heat the elements to the melting temperature, use two nozzles.
Coating of metal nozzles:
- Dorn - for heating the internal part;
- Sleeve - used for the outer part.
The two elements that need to be connected are put on the nozzles at the same time. Then a certain period of time is noted and the elements are disconnected. This is exactly how the welding process occurs.
Required Tools
Fitting;
The polypropylene pipes themselves;
A special apparatus for welding such pipes;
Welding machine
A hacksaw for cutting them, a special cutter is often sold complete with a welding machine; for large volumes of work, you can use a ring cutter or special scissors;
Degreaser (ethyl or isobutyl alcohol); It is prohibited to use acetone in this case, as it can soften the plastic;
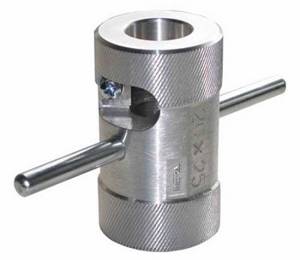
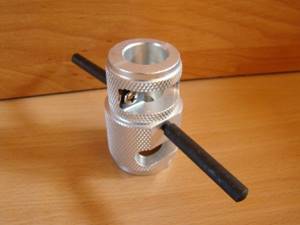
Chamfer: its internal part resembles a pencil sharpener, however, since the chamfer must be removed smoothly, the knives are located at a different angle; You can replace the bevel remover with a regular file and knife;
Beveler for plastic pipes
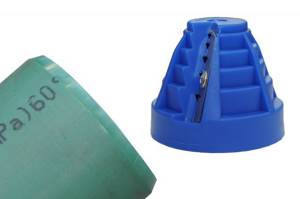
Shaver: a tool for removing the reinforced layer (if our pipes have a reinforcement layer).
Shaver
Advice.
Pipes that come close to the heating boiler (at a distance closer than half a meter) should be made only of metal. They are connected to polypropylene using adapters from a welded connection to a threaded one.
Useful tips and possible mistakes
To do everything right right away and not redo bad work over time, you need to follow some tips:
- In hard-to-reach places, it is better to use a bent electrode and control the process using a mirror.
- If it is necessary to change the electrode, then the seam must be continued with a covering of 1-2 cm.
- Metal is heated better by electric current using direct polarity rather than reverse polarity.
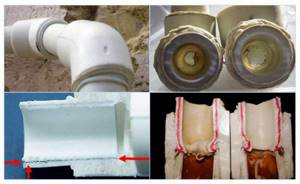
Most often, defects arise due to the fact that inexperienced craftsmen are inattentive during work. In the case of welding, even a slight deviation of the seam will lead to the fact that it will not be tight and durable. If you change the arc length, voids and unwelded areas will form in the seams. Defects can also occur due to equipment or poor quality pipes.
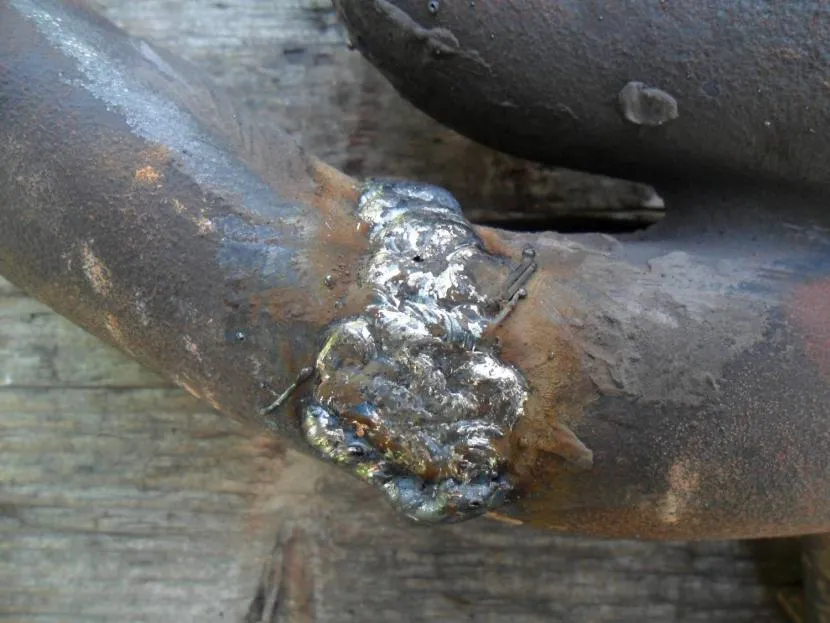
An example of a poor-quality seam Source varim.by
Also, when welding, you must remember safety precautions:
- check the conductors and parts of the device, they must be insulated;
- the equipment housing must be grounded;
- all clothing, gloves and mask must be dry;
- before starting work, you need to put on rubber shoes or lay a rug made of this material under your feet, this will provide additional insulation;
- Be sure to wear a face shield to protect your eyes and face.
If you ignore safety instructions, you can get burns or electric shock.
After the welding work is completed, it is necessary to check the quality of the seam, since welding water pipes requires careful analysis. Externally, you can determine whether there are burns, pores, fistulas or other defects on the seams.
To check the seams for cracks, you must use a compressor. Plugs are installed at the ends, and the seams are coated with soap foam. After this, air must be pumped into the pipe under pressure. Soap bubbles will appear in places where the connection is not strong enough.
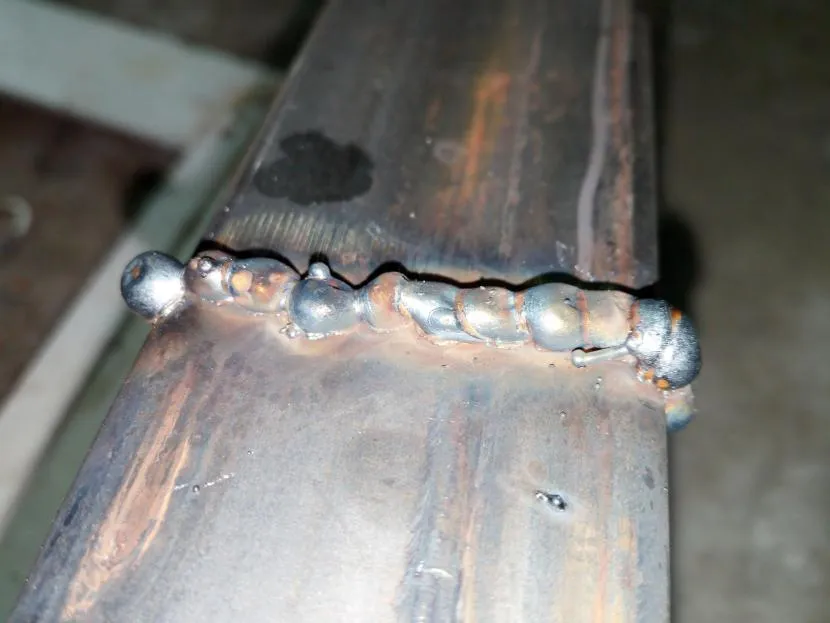
This is what scale looks like on a weld. Source ad-cd.net
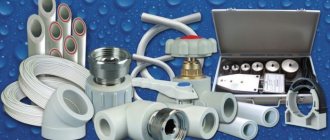
Working with polypropylene pipes
Today's polypropylene pipe installation system includes all the necessary elements for connecting pipes of all sizes, contours, fittings, fastenings and inclusions. The assembly process is quite simple and, if you have the necessary skills, happens quickly.
The set of elements can be selected the way you want, so the result is a completely unique system. The complexity and configuration depends only on the preferences and wishes of the customer, that is, you. The only feature that some attribute to the disadvantages of polypropylene is the welded connection method. After welding, it is no longer possible to separate the pipes and correct the error. Therefore, you need to think through everything in advance and try to avoid inaccuracies in actions.
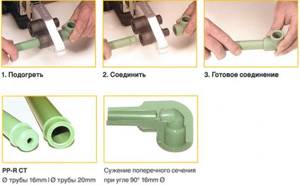
If you break down the pipe welding process into separate steps, it will look like this:
- Using a soldering iron for polypropylene, you need to heat both parts that you want to attach to each other.
- Then you need to connect the heated parts;
- After a short period of time, remove the elements already fastened together from the device.
Welding provides the elements with such a strong connection that it is almost impossible to separate the parts without breaking them. That is why polypropylene pipes are considered high quality, durable and able to withstand almost any pressure.
How to reduce the likelihood of marriage?
It is recommended that two people work together to solder elements in difficult-to-access conditions. The second specialist helps remove the second element from the nozzle and puts the soldering iron on the platform. The first master carefully joins the parts with both hands with a minimum pause. Sometimes assistance from a third party is required. His services are used when a pipe needs to be fixed in a wall in an adjacent room. Attempts to perform all operations independently in difficult areas always lead to defects and the need to perform welding again.
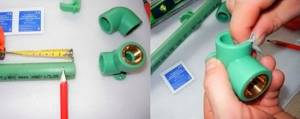
Marking planting depthSource files.builderclub.com
During soldering, precise movements must be observed. The correct inclination of the fitting element relative to the second part, its axial angle of rotation on the pipe, and the depth of entry into the fitting cup must be maintained. To control the depth of entry and the angle of rotation of the fitting, marks are made on the surface of both parts. In order not to measure the allowance each time on sections of the same cross-section, use a template.
The iron does not need to be turned off during the entire welding period. The technician will lose time warming up the equipment. The soldering iron is ready for use after the heating indicator goes out. A lit indicator shows that the mirror is heated to the desired temperature. If you start welding during this period, the pipe will not warm up properly. In order to comply with the technological process and holding time, it is recommended to check the parameters according to the table, which is recommended to be kept at hand.
If combined pipes are purchased, they are connected only after mandatory stripping. The chamfering depth should be 2 mm greater than the depth of the sleeve into which the element is inserted. Reinforcement reduces deformation expansion by 10 times. On products with external reinforcement, before soldering, a part of the surface is removed with a shaver to the required depth for joining. Pipes with internal reinforcement do not require stripping. Their installation is faster.
About the secrets of fitting pipes in this video:
Main stages of work
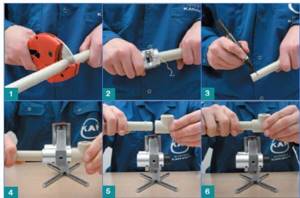
1. Take a pipe of the required size.
2. We clean its edges from burrs formed during cutting with a file or chamfer.
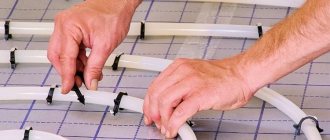
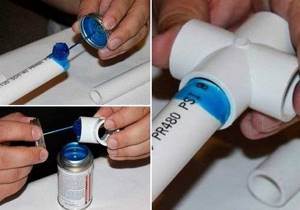
3. With a pencil, mark at the end of the pipe (see photo) which section we need to melt, that is, we mark the place where the fitting will be put on.
We mark the place of adhesion with a pencil
4. Treat the pipe and fitting with a degreasing compound.
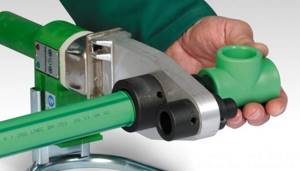
5. Firmly fix the welding machine to the table.
6. Its kit includes nozzles of different diameters. We take the required nozzles (one for the fitting and one for the pipe) and attach them to both sides of the device.
7. Set the temperature to 260°.
8. As soon as the lights go out (this means that the device is warm enough), you can start working. The average heating time is 2-3 minutes.
9. We put a fitting and a pipe on the hot nozzles (there are two of them) up to the pencil mark. Do not put too much pressure on the parts to be welded or rotate them.
Butt welding machine. The fitting and pipe are put on the hot nozzles
10. We count down the required amount of time. The heating time is always indicated in the instructions. For example, for a 25 mm pipe it is exactly 7 seconds).
The heating time of the device depends on the diameter of the pipe
11. Quickly and carefully remove the heated parts, slightly holding the welding machine.
12. Connect them with each other. Excessive pressure on them or rotation is also unacceptable.
13. We wait a few seconds.
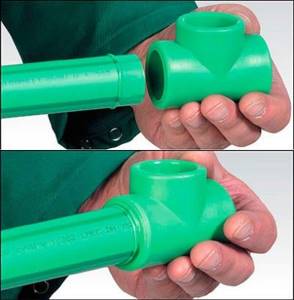
14. If we did everything correctly, we get a perfectly smooth, homogeneous connection.
The reinforced layer on a section of the connection must be removed, otherwise the connection will be heterogeneous and fragile;
When purchasing a device, it is not necessary to spend extra money and purchase a model with a thermostat, because we will need only one temperature setting of 260°C; using other modes may result in a poor connection;
Water must flow through the pipes freely; To prevent an obstacle in the form of frozen plastic from forming at the welding site, you should not put too much pressure on the molten parts when joining; however, weak pressure is also unacceptable - the length of the connection for reliable fastening will not be enough; this can lead to the formation of vortex and pressure drop in the system;
The basic rule for such soldering is that the fitting is put on the nozzle first, and only then the pipe; The countdown begins when both parts are on the device;
Polypropylene sets in 4-8 seconds, but you shouldn’t let it go right away - for it to completely harden, you need to wait 20-30 seconds;
When cooling, the parts must remain motionless; the slightest shift can break the tightness of the connection; therefore, before starting soldering, it is better to prepare special clamps for fixing them; they can be made from any block of wood or strong wire;
Cooling the resulting assembly with water or a stream of cold air is prohibited - the connection will be fragile;
Do not heat the pipe and fitting for more than the prescribed time - the polypropylene will be deformed; with less time for heating, the connection of parts will be difficult;
If welded correctly, part of the plastic should form a slight overhang on the coupling;
You can check the quality of your work by cutting the connected section in half; you should see an even monolithic connection without deformations or voids at the junction.
Mistakes during soldering, ways to avoid them
More errors when welding polymer products appear in the absence of experience. But masters also make mistakes:
- low accuracy of pipe dimensions at the cutting stage, as a result, when connecting parts, it is not possible to correctly position the pipeline, which is especially important when it passes through a section of complex configuration;
- a change in the position of the pipes relative to each other during joining (when tolerances were not taken into account), which leads to an increase in stress at the seam joint;
- uneven heating: polypropylene cools quickly, while one part of the pipe is heating up, the other is already cold, which does not allow soldering; as a result, when the pressure in the pipeline increases, the tightness of the seam is broken, and the room is flooded;
- violation of heating rules: the duration of soldering, cooling, and welding depth are not taken into account, which also does not allow for high quality seam joints.
Rules to help prevent errors:
- no gap between the parts that are joined;
- delay the soldering time, otherwise the material will not heat up enough, it will not gain sufficient viscosity, and if it overheats, the internal diameter will decrease;
- the installation area is no more than 1.5 m, since otherwise the delay in performing operations during soldering will increase;
- in an unheated room, polypropylene cools quickly; in order to weld, it is necessary to preheat the air;
- Temperature differences between the parts of the pipeline being welded must not be allowed.
After connecting polymer products, they must be held tightly without changing position. The duration of soldering is taken into account - for different types of pipes the value of this parameter is different. After this period of time has passed, you can release the product, but it is not recommended to immediately supply water to the system.
It is necessary to control the quality of soldering. The joints in each section must be identical (minimal error is allowed). Sometimes, when overheated, the internal diameter of the pipe decreases by 2-3 times. The defect can only be detected by checking the pipeline - in this case the pressure will decrease.
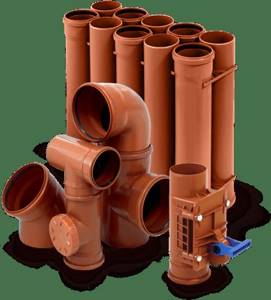
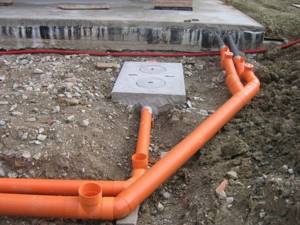
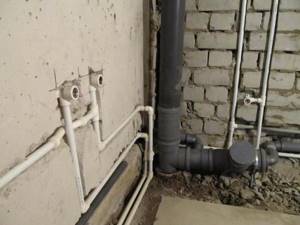
Sewage system made of PP pipes
As noted earlier, polypropylene pipes are now actively used in the construction of buildings. The installation procedure in this case has its own nuances.

Internal sewerage
There are a number of rules that must be followed when installing sewerage in the house.
- The pipeline is laid at an angle in the direction of the sewer riser (about 3 cm per linear meter).
- If the room is not heated, then the pipes are additionally insulated with mineral wool.
- You cannot make sharp turns at an angle of 90ᵒ; instead, so-called half-bends are used.
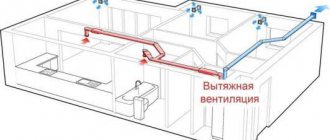
- Fan-type ventilation is an essential component of the sewer system, which will prevent the penetration of unpleasant odors into the home.
- The toilet is connected only after the sink, otherwise the water seal will break.
External sewerage
Step one. The diameter of the pipes is determined, depending mainly on the number of people living in the house.
Step two. A trench is dug from the sewer riser to a septic tank or cesspool. In this case, a slope is maintained depending on the soil freezing line, or the pipeline is insulated with mineral wool.
Step three. The bottom is covered with a “cushion” of sand. Its thickness should be at least 20 cm.
Step four. Pipeline being laid
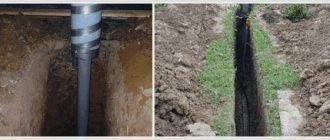
It is important to avoid possible sagging, otherwise the connections will soon collapse. Horizontal drilling of a trench for a pipeline is carried out using special equipment with pressure-action pump jacks
Drilling occurs using a steel cone-shaped tip. A similar technology is used in construction:
Horizontal drilling of a trench for a pipeline is carried out using special equipment with pressure-action pump jacks. Drilling occurs using a steel cone-shaped tip. A similar technology is used in construction:
- auto and railway roads;
- pipelines to basements;
- highways to working wells.
Installing a PP pipeline with your own hands will help you save a lot, but only if done correctly.
Products made from polypropylene are used, as a rule, when creating drainage and irrigation systems, as well as when laying water pipes or arranging a heating system. Polypropylene belongs to the class of polyolefins, which means that all products made from this material are characterized by a high degree of environmental safety.
In addition, drainage systems made of polypropylene can last a very long time, while the costs of their operation will be minimal. However, when working with such products, you need to know how to weld polypropylene pipes in such a way as to avoid their deformation
and prevent leaks.
DIY welding
Work should be carried out in a room with good ventilation. When heated, polypropylene can release toxic substances, which can cause harm to health, causing poisoning.
Step-by-step welding instructions:
- First, install the required nozzle of the correct size on the soldering iron;
- To melt polypropylene, a temperature of 260 degrees must be reached;
- Prepare parts for connection, clean them and place them correctly;
- Then the soldering iron is put into operation;
- It is necessary to wait the required time for heating, and this is indicated by the green color of the sensor.
When soldering, it is better to place the device in such a way that it stands stable.
Then the pipe and fitting are simultaneously put on the blank and the soldering tool. The pipe is inserted inside the blank. The fitting is placed on the outside. It is pushed in all the way, and the pipe is pushed in to the finished mark. The main thing is to keep the timing right.
If the tool does not warm up well, then the level of diffusion will be low, and this will compromise the quality of the alloy. A high temperature will lead to overheating of parts. The optimal time depends on the diameter of the pipe and fittings.
After heating, it is important to immediately perform docking. The main rule of procedure is tolerability
The first few seconds allow you to make a correction, but making turns is prohibited. At the same time, you need to take your time and take your time, sticking to the golden mean.
Impact of errors on welding quality
Neglecting the rules for performing welding work leads to errors that affect the final quality and reliability of structures. Before starting welding work, it will be useful for beginners to conduct training to gain experience.
The most common errors in operation:
- Welding parts that have not been treated with a cleaning or degreasing agent.
- Overheating or underheating of welded parts.
- The reinforcing layer has not been completely removed.
- Rotation of parts when warming up or joining parts.
- Failure to comply with welding depth.
- Uneven pipe cut.
Stage three. Pipeline installation
When laying the highway you will need:
- pipes;
- tees;
- Ball Valves;
- plugs;
- adapters;
- bends;
- couplings;
- detachable connecting elements;
- threaded fittings;
- plastic clamps.
First of all, the installation of the main elements of the system (plumbing, radiators, boilers, etc.) is carried out, after which the future highway is marked in accordance with the drawn up project. Pipeline elements are connected to each other using couplings.
When it comes to heating or hot water supply, thermal expansion is taken into account. To compensate for the latter, it is advisable to use movable connections. When installing a closed pipeline, the walls are first grooved (a groove with a width of two pipe diameters is made in appropriate places).
Filling the pipeline with liquid is permissible only after one hour from the end of installation. Hydraulic testing can be carried out only after 24 hours.
How does the welding process take place?
Diffusion welding of polypropylene involves joining two heated parts. These parts are subsequently connected. As a result, interpenetration of materials occurs (so-called diffusion) at the junction.
The welder allows you to clearly control the heating temperature during operation. For the joint, it is recommended to take elements from the same material.
Watch a video lesson for beginners - how to solder polypropylene pipes
The physical and chemical characteristics of the welded joint demonstrated by polypropylene are the same as those of the main pipe material. Therefore, a system connected using this method will function reliably and for a long time.
There are several welding methods, which are selected in accordance with the dimensions of the mounted system. These are: butt, bell and saddle soldering.
Why polypropylene
Today, pipe manufacturers provide a huge range of products for laying water pipes, sewerage or installing heating systems. You can purchase metal-plastic, metal, or polypropylene pipes. Today, an increasing number of consumers prefer to choose polypropylene pipes, which have many advantages:
- do not corrode;
- easy to install;
- do not require constant repairs;
- durable and reliable in operation;
- can be laid inside a wall or floor;
- are significantly cheaper than metal pipes.
Polypropylene pipes can be used for installing heating systems, for water pipes and for sewerage.
Which pipes are right for you?
To choose polypropylene pipes you need to know:
- conditions under which the pipes will be operated;
- fluid pressure in the system and its temperature;
- the required throughput of the product, which determines the working diameter.
Polypropylene pipes have special markings, depending on the purpose of the product.
- PPH – ventilation, cold water supply.
- PPB – cold water supply systems, heating.
- PPR – hot and cold water supply systems, heating.
Pipes marked PPR are universal. Therefore, they are most in demand. They are highly resistant to both high and negative temperatures.
Reducing the risk of defects at pipe joints
Recommendations that will help improve the quality of soldering and prevent the formation of defects:
- in difficult areas with limited access it is necessary to work in pairs with an assistant: one master works with pipes, the second with tools;
- To install communications with a fitting, it is recommended to use a template; this will allow you to quickly determine the soldering depth without taking measurements every time;
- You should not turn off the soldering iron every time, the speed of work with it is high, and therefore 10-20 minutes are often enough to complete 1-2 joints;
- If possible, the chamfer is removed on all pipes; its size is 2mm x 45°, which means the length of the side and the angle of inclination;
- internal reinforcement avoids stripping, which distinguishes it favorably from surface reinforcement;
Stage one. Drafting
Installation work should begin with drawing up a project for the future highway. An important criterion in this case is ergonomics, as a result of which the number of turns and connecting elements should be minimal.

When arranging a heating system, a well-designed project is especially important, in which you should indicate the location of such elements as:
- couplings;
- adapters;
- fasteners;
- corners;
- heating equipment.
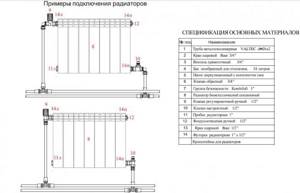
The line is connected to the radiators in a one- or two-pipe way, from the side or from the bottom.
Plumbing
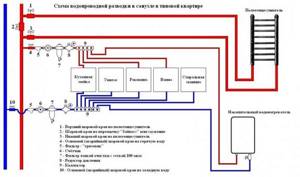
Here the main line is connected to a centralized system for the purpose of water supply to the necessary plumbing fixtures - toilet, sinks, boiler, etc. There are two ways to do the wiring.
Method number 1. Open option. Horizontal pipes are installed slightly above floor level, and vertical pipes are installed exclusively in the corners. All this allows you to make the pipeline less noticeable.
Method number 2. Closed option. It is extremely difficult to implement, since it involves preliminary carrying out the most accurate calculations. Pipes (necessarily solid) are walled up in the walls, and there must be free access to each joint.
In addition, the water supply layout can be:
- sequential type (the most budget-friendly and easiest-to-implement option);
- collector type (a collector is used when supplying water);
- with pass-through sockets (not very popular).
Stages of work welding process
Having measured the required length of the pipe, make a mark on it with a marker. Using a pipe cutter or scissors, cut the product at an angle of 90º to the axis. The tool must be sharp enough so that the pipe does not deform.
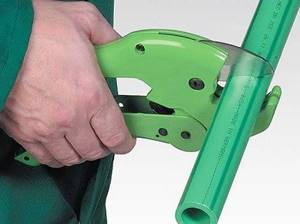
The pipe is cut at an angle of 90º to the axis
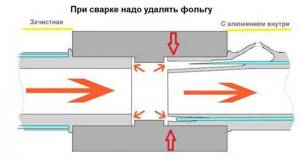
The edge of the reinforced product must be cleaned, getting rid of the top layer and foil. Without this step, the aluminum foil included in the pipes will come into contact with the liquid during operation. As a result, corrosion of the reinforced layer will lead to damage to the integrity of the seam. Such a connection will leak over time.
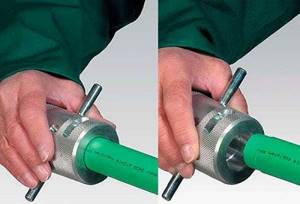
The edge of reinforced pipes is cleaned
For unreinforced products, the welding depth is indicated at the end of the pipe, focusing on the length of the fitting coupling. Another important point in preparing pipes for welding is degreasing the surface. Treating the joint with alcohol will ensure more reliable contact between the parts.
Preparing the welding machine
Before welding plastic pipes, you need to prepare a welding machine. The hand-held device is fixed on a flat surface. Parts of the device must be clean and free of defects. Clean them with a cloth moistened with alcohol. The heating elements are put on when the instrument is turned off. To melt a fitting, a mandrel is used, and a sleeve is used to melt a pipe.
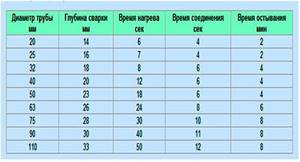
The heating time of parts for welding is determined according to the table
Then the device is connected to the network. In this case, the indicators located on the unit body should light up. One of them signals that the device is connected to the network. The second, after reaching the required heating temperature, should go out. After the indicator goes out, it is advisable to let five minutes pass and only then begin the welding process. This time depends on the ambient temperature and lasts from 10 minutes to half an hour.
What does the welding process consist of?
After heating the apparatus, place the fitting on the mandrel and insert the pipe into the sleeve. This is done simultaneously and with little effort.
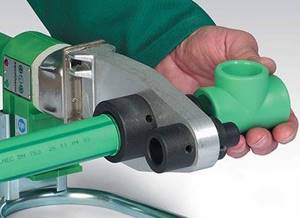
After heating the device, place the fitting on the mandrel and insert the pipe into the sleeve
To know how to properly weld polypropylene pipes, it is necessary to take into account the heating time. The correct period will allow the parts to warm up to the required temperature without melting. It depends on the diameter of the pipe.
After the required period of time, the parts are removed from the device and connected. In this case, the pipe must enter the fitting strictly up to the mark. During this process, it is prohibited to rotate the parts along the axis.
During the process of connecting parts, rotation of the products along the axis is prohibited
After joining the parts, mechanical impact on the seam is not allowed until it has completely cooled. If the technology is followed, the result should be a strong and sealed seam.
The article provides the necessary recommendations on how to properly weld pipes, with a detailed description of each stage. By putting these tips into practice, you can independently install a pipeline for water supply or heating. The main thing is to choose the right pipes and follow the process technology. Only then will the polypropylene pipeline serve for a long time and without interruption.
Cast iron has long been no longer used in modern water supply and heating systems. It was replaced by lightweight, easy-to-install and corrosion-resistant plastic. Today we will talk about welding polypropylene pipes with our own hands for beginners - the main stages of this process and its subtleties.
How to solder polypropylene correctly - instructions
You need to act consistently, in this case the likelihood that a mistake will be made is reduced.
Step-by-step instructions for soldering polypropylene pipes Soldering instructions:
- Preparing the room. Considering that toxic substances are released during soldering, effective air circulation should be ensured.
- After cutting, the edges of the communications are processed with a trimmer or chamfer. They make chamfers, this makes it easier to join the pipes.
- The materials are degreased: cleaned of dust, treated with white spirit. You need to continue working when the surface is completely dry.
- Turn on the soldering iron, having previously set the temperature to the required level (+260°C).
- When the green light on the body of the soldering iron lights up, you can proceed to soldering. A pipe is installed in the sleeve nozzle, and a fitting is placed on the mandrel.
- At the same time, 2 elements of the future pipeline are heated: a fitting, a pipe.
- After waiting the time indicated in the table above, the pipe and the shaped element are removed from the nozzles and joined to each other. In this case, the parts must be held motionless. Communications are connected to a previously drawn longitudinal line. The slightest displacement of polypropylene that has not yet hardened will lead to the destruction of molecular bonds. This may cause a leak in the future.
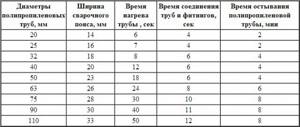
Soldering table for polypropylene pipes
| Pipe diameter, mm | Length of the section that is heated, mm | Soldering period duration, seconds | ||
| Holding the pipe in the soldering iron nozzle | When connecting pipeline sections | When polypropylene hardens | ||
| 16 | 12 | 4-5 | 4 | 120 |
| 20 | 14 | 5 | ||
| 25 | 15 | 6-7 | 6 | |
| 32 | 16 | 8 | 240 | |
| 40 | 18 | 10-12 | ||
| 50 | 20 | 18 | ||
The heating and holding time of PP pipes at a given soldering iron temperature allows us to ensure high quality seam joints. Low heating will not allow softening of communications. In this case, it will be impossible to join the pipes.
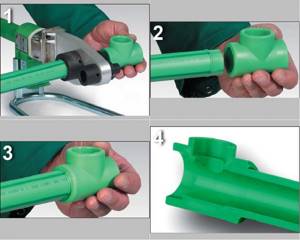
Connecting pipes by soldering with reinforcement
The operating temperature of communications for cold water supply varies within -10…+90°C. Under the influence of the coolant, the pipeline bends, as intense linear expansion occurs. This means that for heating you need to use pipes that have more suitable characteristics.
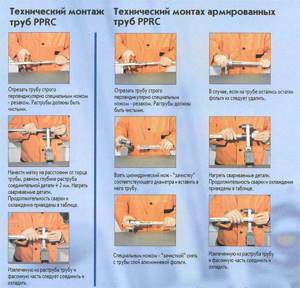
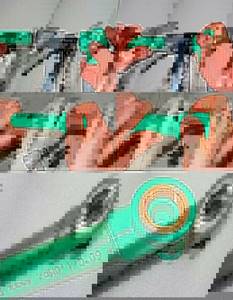
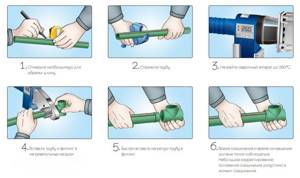
1 – cut off the required length of pipe. 2 – remove the reinforcement with a seamstress. 3 – direction marking. 4 – heating of the pipe and fitting. 5, 6 – connecting the pipe with the fitting and fixing it.
Thus, in conditions of exposure to high temperatures, products reinforced with fiberglass or aluminum are used. Such pipes are multilayer products: a thin layer of fiberglass is applied on top of the polymer product and covered with a layer of PP. Advantages:
- relative stability of linear expansion, even under the influence of high temperatures the geometry of the product changes slightly;
- ability to withstand pressure up to 10 atm; for comparison, in apartment buildings, communications are subject to less intense influence (6-8 atm);
- due to the presence of a reinforcement layer, the service life of the pipeline increases;
- pipes with internal reinforcement are resistant to high temperatures, at which the classic version of communications begins to melt.
The technology for soldering reinforced pipes does not differ from the method of joining unreinforced communications, with the only exception: at the preparatory stage, the ends of the products must be cleaned of the reinforcing layer, for which a trimmer or shaver is used. After preparation, the pipes are degreased, then heated with a soldering iron and connected.
Rules for soldering PCB to avoid mistakes
- The diameter of the polypropylene pipe is selected according to the size table;
- before work, prepare everything necessary, since welding is performed quickly, there will be no time for preparation during the installation process, the soldering iron is turned on when the communications are already cut;
- the welding machine must be securely fixed on a horizontal surface, the quality of the seam will depend on this, such units are equipped with special stands, but some models are not installed firmly, so they need to be additionally secured;
- the melting temperature of polypropylene is much lower than the value set in the welding machine settings, this difference is due to the need to quickly soften the pipe; a temperature of +260°C is considered sufficient;
- You should not change the temperature regime when using larger products, when soldering PP pipes, the heating temperature does not change with increasing diameter of communications, from the table above you can find out that the dimensions of the products only determine the duration of heating of the material;
- you need to navigate by the indication: a red light indicates that the heating element has turned on, a green light indicates that the set temperature value has been reached;
- Often users skip the stage of degreasing the material, however, the presence of dust or drops of water in the cut area can cause the seam to weaken, since in this case the structure of the material becomes more porous;
- when installing a pipeline of complex configuration, it is necessary to connect the pipes at different angles, they are also rotated relative to each other; in order not to disturb the alignment of the products, it is recommended to first determine the exact position of the communications, then perform their preliminary installation (without using a soldering iron), at this stage you need to draw a marking strip along the center line through the 2 parts being connected.
It should be taken into account that thin-walled pipes warm up faster. This means that the period of operation of the soldering iron is reduced by 2 times. If you are studying the question at what temperature to solder such pipes, you need to remember that the value of this parameter does not depend on the dimensions of the product. Thin-walled communications are connected to each other at the same temperature as thick-walled ones.
Impact of errors on welding quality
This is what happens if you solder PP pipes incorrectly!
The most common violations of the soldering process:
- surfaces are not degreased, resulting in a decrease in the quality of the seam joint;
- The cut angle of the pipe and fitting does not correspond to 90°;
- insufficient deepening of the pipe into the fitting or, conversely, communications are brought into the shaped element all the way, as a result, a large seam is formed inside, which impedes the flow of liquid;
- violation of the heating technology: the pipes were on the nozzles for too little or, conversely, a lot of time, in both cases the quality of the seam joint will be low;
- when connecting reinforced pipes, the reinforcement layer at the end section was not completely removed, as a result, this material will prevent the melting of polypropylene, such a seam will be weak, or it will not be possible to complete it at all;
- after joining, the position of the parts was adjusted, which led to a decrease in the reliability of the seam; To avoid such consequences, you should wait a while after connecting the pipe and fitting, ensuring that the parts do not move.
How to solder PP pipes without a soldering iron
When considering methods for welding polypropylene pipes, it is not always possible to use a special soldering iron. In this case, choose other options, among them:
- gas-burner;
- compression coupling;
- cold welding.
The gas burner method is less preferable.
If a torch is used, it will not be possible to heat the polypropylene evenly. As a result, the seam joint will look sloppy, in which case the reliability of the seam is reduced. Over time, a leak may appear in this area. This method can be used as a last resort and only when installing cold water supply systems.
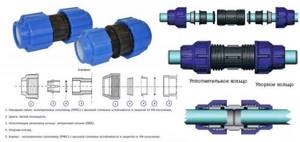
Connecting a pp pipe with a compression coupling
The compression coupling provides a reliable connection of communications and is used as a complete replacement for a welding machine. However, the cost of such an element is high. As a result, costs will increase, since a large number of compression fittings will be needed to distribute pipes throughout the room.
Method for gluing polypropylene pipes.
The cold welding method is also effective. In this case, a two-component epoxy composition is used. This material allows you to obtain a reliable connection without special equipment.
To fix the communications, you need to apply an adhesive substance to the cleaned and degreased surfaces of the products. Then the pipe and fitting are joined, holding tightly. The glue sets within 10 minutes. It takes 1 hour to completely harden. This option can only be used when installing a cold water supply system.
Why is polypropylene better for welding than metal?
A variety of elbows and fittings, as well as profile and round bends made of polypropylene are deservedly popular because:
- After properly welded, they form monolithic parts that can last more than fifty years.
- During operation they do not reduce their throughput.
- They have very high resistance to various household chemicals.
- The cost of such products is several times lower than the cost of similar products made from metal.
In addition, if the product is selected correctly and the welding is done with high quality, then we can say that polypropylene pipes in many cases are simply an ideal element of the corresponding system, including.