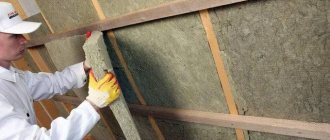
Installation recommendations
The work is carried out in the following sequence:
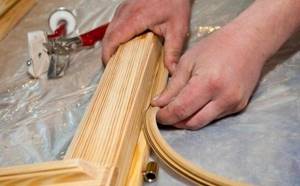
We remove the frames from the opening. We take out the glass. This will make it more convenient and, most importantly, safer to work with. We inspect the structure for integrity and general condition. The wood should not have cracks, gouges or other defects. Minor imperfections can be filled with putty. We make a groove along the entire perimeter of the frames - this will require a special milling machine
Attention - the size of the tool nozzle and the diameter of the seal must be identical. Having cleared the groove from sawdust, we push the tape into it using a special roller. We put the frames in place. We separate the window frame and glue the so-called inter-frame seal. This is a special adhesive tape that creates a “glass window effect”.
The main difficulty lies in making the groove - it must turn out smooth. In addition, if the machine is handled incorrectly, you can simply damage the frame.
Stages of work
If the tools and materials are available, you can get down to business. This is what the sequence of actions when repairing a window looks like:
Preparation
The sashes are removed, after which the condition of all window elements is checked. If necessary, you need to carry out reconstruction: fill up potholes, clean out rotten areas and also treat them with putty
Particular attention should be paid to the hinges
They must be held firmly both on the frame and on the sashes. Loose fasteners should be tightened. If this is not possible, for example due to rotten wood, the loop should be moved to an undamaged area.
If the old paint on the window has peeled off, it must be removed and the entire structure repainted. It is very easy to remove the paint coating from wooden surfaces using a hair dryer and some kind of metal scraper. When heated with a hairdryer, the paint bubbles and comes off the wood.

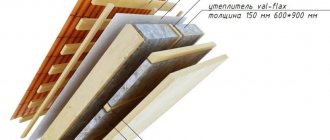
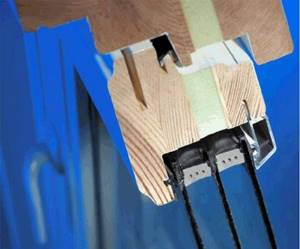
Composition of a window block with insulation using Swedish technology
This effect is due to a significant difference in the thermal conductivity of wood and paint. It will not be possible to remove paintwork from a concrete wall or metal product in the same way.
Before applying fresh paint, the window elements are treated with sandpaper (first coarse, then fine) and dry.
Making a groove and installing insulation
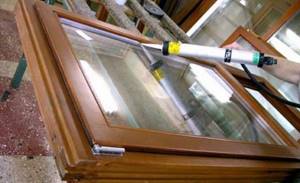
Before this operation, the glazing should be removed from the sashes. The glass is held in place by glazing beads, which are nailed down.
It is better to cut a groove in a sash outside, as this process is accompanied by the formation of a large volume of wood shavings and dust. The milling cutters used by Swedish craftsmen are equipped with vacuum cleaners, but we’ll just get out into the fresh air so as not to litter the house.
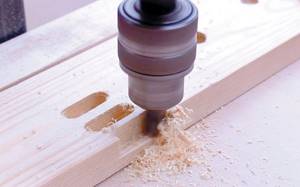
Making grooves
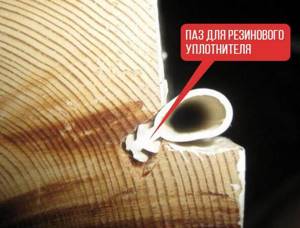
The groove, as already mentioned, should be made in the corner between the end surface of the sash and the strip on it, which, when closed, is adjacent to the frame (it covers the gap between the frame and the closed sash). In this case, the cross-sectional axis of the groove should be located at an angle of 45 degrees to each of the adjacent surfaces. The width of the groove is 3 mm, the depth is 4 mm.
The groove should not be cut all the way to the hinge - it should end approximately 15 mm from it.
When the sash is cut around the entire perimeter, you can begin installing the cord. It, as mentioned, is pressed using a roller tool.
During installation, it is important to move the roller not only in the forward direction, but also in the reverse direction. This will avoid tension on the cord and thus extend its service life.
Sealing glass on silicone
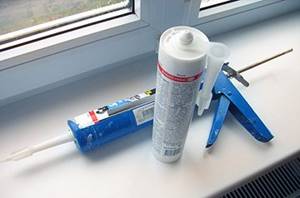
Before installing the glass in the sashes, the seats under them should be sanded until smooth and coated with silicone sealant.
Everything else is done as usual - the glass is installed in place and fixed with glazing beads.
If the sealant accidentally ends up on the glass, do not rush to wash it off.
Wait until the mixture dries and cures before it can be scraped off with a blade.
The last stage is fitting
All that remains is to hang the doors on the hinges and check how well they close. The latches will need to be reinstalled if necessary. Slowly run your palm along the seal (with the sash closed) to make sure there are no more drafts.
How a Swedish house is arranged
While the steel frame is being manufactured at the plant, the foundation is already being poured on the site, and by the time all elements are delivered, the foundation will be completely ready. To buy such a house there is absolutely no need to go to Sweden. It can be ordered from a company engaged in the construction of Swedish-style housing.
House frame
Since the frame is very light, the load of the entire structure does not exceed 117 kg/m2 of the foundation, which means that the foundation does not have to be very powerful, that is, you can save a lot on this.
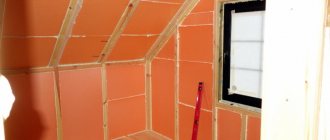
To decorate external walls, facing stone or brick, eurolining, plaster, etc. can be used. Inside the house, the walls are usually covered with plasterboard panels, which are also insulating materials. And the interior decoration can be done to your liking: painting, wallpaper, plaster. This will not affect prices.
Roofing device
The roof can have any shape that can be assembled from wooden rafters. After this, waterproofing materials are laid on it, thermal insulation and vapor barrier are installed. The future owner will not have to purchase these materials separately; they are included in the cost of construction. Since winter in Russian regions, especially in Siberia and the north, is quite snowy, the roof is designed so that the snow load per 1 sq. m is 200 kg.
Roof installation diagram for a Swedish house
Other designs
When manufacturing structural parts at the factory, all communication outputs are made in advance and are designed to be installed inside walls or under the floor, that is, communications remain under the cladding. You just need to route and connect them. This style of padding is very comfortable and safe. All surfaces are perfect and do not require additional leveling, because calibrated wooden boards are used for their assembly, due to which the joint corners are also smooth and clean. This makes the Swedish house different from other frame structures.
Finishing and laying of utilities
One of the distinctive features of Swedish-style houses is the clean finish and the ability to switch to autonomous operation of all communications.
Everything is designed so that heat, energy, water supply and sewerage do not depend on centralized networks. This engineering solution is very significant for Russia, since interruptions in the supply of electricity, gas, and water are quite frequent.
To ensure that the house is completely ready to move in, the installation and connection of plumbing, household and kitchen appliances is carried out by highly qualified craftsmen. All niches, built-in wardrobes and furniture are installed at the stage of finishing the house. All that remains is to bring the furniture, put it in its place and live. There is no need to do additional finishing or make changes. Even the antenna and telephone connections have already been made. All that remains is to install the device and antenna.
Preparing the window and adjusting the frame sashes
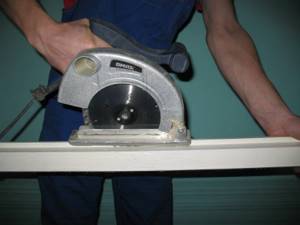
Fitting sashes using an electric planer
Before we begin to describe the main stages of the Swedish insulation method, we will determine that the process we describe will be valid for insulating wooden windows.
Only when serious faults have been eliminated can you begin to carry out further steps for insulating windows.
After a visual inspection, the window sashes are dismantled. To do this, unscrew the bolts securing the moving elements. Next, using a screwdriver, remove the required number of loops.
The dismantled sashes should be thoroughly cleaned of old paint and dirt - for this you can use coarse sandpaper or a chisel.
An electric or conventional plane is used to fit the sashes and window frames. This is done in order to eliminate possible distortions, the formation of “cold bridges” and to achieve the tightest fit of the structures to each other.
After adjustment, the prepared elements are applied to the frame, thereby simulating a closed state and the tight fit to the structure is checked. If necessary, the steps are repeated to achieve better tightness.
How to insulate your wooden window
When we talked about, we mentioned that there are at least three types of materials for these purposes, namely:
- EPDM. A grade of ethylene-propylene rubber. The material perfectly holds low temperatures and is not afraid of light and ozone. The disadvantage is that the seams cannot be welded.
- TPE (TEP) is a subtype of thermoplastic elastomers. Their disadvantage is that low temperatures simply turn the material into a solid. In addition, TPE does not tolerate exposure to sunlight well. In fact, this is material for countries with mild climates.
- Silicone sealants are still used very rarely in our country.
So there you go! Before trying on the seal profile, you need to look at what it is made of. In the field of timber frames, SEBS (styrene-ethylene-butylene-styrene rubber) is very common. It also has the properties of thermoplastic elastomers, which are primarily ease of processing, and EPDM, which consists in the fact that the material is resistant to solar radiation and ozone. But every sandpiper praises its swamp. Where is the truth? Let's start with waders.
The Maxiplast plant claims that SEBS seals are the future. This has a long service life, good temperature performance (holds frost up to 60 degrees). And we recently had to read that the cold winter of 2006 became a real reason for an avalanche of angry complaints about the fact that TPE-based plastic window seals do not keep out the cold. Already at minus 40 degrees, they undergo irreversible deformations, which leads to the formation of cracks along the perimeter of the sashes. So is SEBS worth buying?
Profile seal
Let's look further. There is GOST 30778, which sets the requirements for window seals. In Appendix A, for example, in the first sketch we see samples for PVC windows, where we vaguely recognize rubber bands for KBE and Rehau. Considering that GOST dates back to 2001, this is not so bad. Further more. Below are sketches of seals for PVC, which differ from those supplied by plastic window dealers. But! You can still find these on sale. Finally, the third number is insulation for wooden windows, but again this is not Swedish technology. Nevertheless, it is worth taking note.
What do we need to understand from this? Not every seal profile is designed to insulate windows using Swedish technology. And given how many stores there are now, it’s useful to have some information on hand for reference. In general, let's not beat around the bush... Swedish technology is something that is not yet regulated by our standards. If you don’t believe me, go to the website where EuroStrip tape is sold and you’ll understand everything. The resource that caught our eye said that the profile is relatively cheap, suitable for wooden windows, very successfully made of EPDM (the grade that is recommended for plastic windows) and... made according to sketch 2 of Appendix A according to GOST 30778. Then By all indications, this is insulation for PVC windows (both according to the standard and according to the material), but it is recommended to use it for wooden frames.
These are the pies. In general, this Eurostrip resembles masculine and feminine (Mars and Venus) signs at the same time and is clearly mounted in a groove. This is exactly the case that we had in mind when we said that the master has ample opportunities, but it is just as easy to make a mistake in choosing the right solution. How to make a groove? Considering the width of the comb is 3.5 mm, the disc of a regular grinder is quite suitable. The main thing is that this 2 kW beast does not roll along the frame.
But this is not all that can be found on sale. GOST regulates the production and use of only, so to speak, groove seals. There are many self-adhesive modifications on sale. These are first of all profiles:
- D actually resembles a Latin capital letter. On the straight side there is an adhesive layer covered with an anti-adhesive film.
- The P resembles the previous profile with the difference that the flat side continues approximately one more letter height. It turns out that the line with glue is much thicker.
- Dual D represents the first two options on the same substrate. If desired, you can divide it longitudinally and use it as usual.
- The E profile is actually placed on its end. Glue is applied to the flat side.
Do you see? This is only a part of the profiles, and rare of them exactly repeats the other.
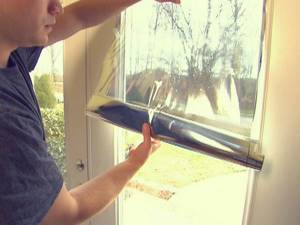
No. 9. Heat-saving film for wooden windows
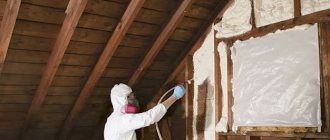
This method is aimed at increasing the thermal insulation qualities of glass, but today heat-saving film is also glued to a wooden frame. It works like energy-saving double-glazed windows, i.e. allows daylight into the apartment, but does not release heat. This film is made on the basis of polyester, and it receives unique properties to reflect thermal radiation thanks to metal coating. This is a transparent material that does not violate the optical properties of window glass, withstands the effects of detergents, is highly durable and makes the window safe, because if the glass is damaged, all the pieces will remain on the film.
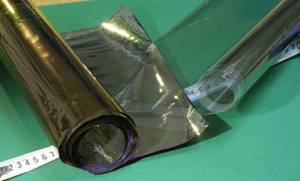
The process of installing the film is simple, but it requires care, because it is important to stick it evenly, without bubbles, with the metallized side facing out. It is best to work with gloves to avoid leaving greasy marks on the surface.
Thermal insulation film can make a window “warmer”, but cannot be used as an independent insulation material.
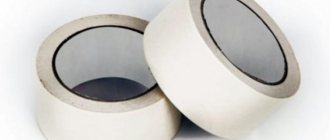
Features of the Swedish seal
The Swedish seal has five standard sizes (in mm): 5, 6, 8, 10, 12. This makes it possible to select them for each specific window, depending on the size of the gap. As a result, complete sealing of the valves is ensured. The seal is tubular and made of silicone rubber.
Main characteristics of silicone seal:
- is not afraid of temperature changes and retains its qualities in the temperature range from minus 65°C to plus 125°C;
- exhibits resistance to ultraviolet rays;
- withstands high humidity;
- chemically inert to solvents, as well as acrylic and alkyd paints - there will be no problems with painting windows;
- silicone is a soft, elastic material that shrinks very strongly;
- suitable for any, even the most uneven cracks.
How to prepare for insulation
Before proceeding with insulation, it is necessary to carefully analyze the situation. First of all, you should inspect the window frame for mechanical defects, and if there are any, they need to be eliminated.
The functionality of the window is checked as follows:
First, you should simply carefully inspect the structure. Then (if chips and rotten parts are found), you need to paint the damaged areas and, if necessary, cover them with putty. It is extremely important that the structure closes and opens easily. This means that attention is paid to the hinges. If they are rusty, it is recommended to replace them. After this, each window needs to be checked how it closes. In this case, you can find out whether there are any distortions in the structure and gaps. The next step is to inspect the glass.
Accordingly, if there are cracks, they should be replaced. The last preparatory step is to check the functionality of the fittings.
After this, you can begin the process of sealing the glass. First you need to make an accurate calculation of insulation consumption
Then you should pay attention to the quality of the clamping mechanism, and if cracks appear when closing, they can be filled with silicone sealant
If the sealing is done efficiently, the effect of the work done will be as productive as possible.
The next process is marking for cutting out the groove.
As soon as the marking is completed, the most important task of cutting out the groove with a milling cutter begins. If you remove the sashes and place them on a horizontal surface, you can make your work much easier and do it better.
The angle of the groove must be strictly 45 degrees and before the thermal insulation is attached, the entire working surface must be cleaned as thoroughly as possible from foreign objects in the form of chips and dust.
Each insulation, as is known, has its own installation principle. In this case, the cord itself must be pressed into the cut groove. This should not be done manually, but with the help of a special roller, which can be purchased at the same store where the insulation itself is sold.
After the entire cord is pressed in, we can consider that the work is done. After this, you should visually check everything and install the sashes in place.
Tools and accessories
During the process of insulation with a Swedish tubular heat insulator, the master will need the following tool at different stages of the work:
- Construction router for creating grooves.
- Furniture stapler with large staples.
- A screwdriver or screwdrivers suitable for working with fasteners.
- Walking roller with a handle for threading the insulator into the grooves.
- Pliers.
- A utility knife or large construction scissors.
The master also needs work clothes and shoes, rags, as well as an industrial vacuum cleaner to remove dirt and dust.
The owner of the premises does not need to worry about tools and consumables if he invites craftsmen from a local construction company to do the work. The builders have everything they need for the job, and if you need to purchase something additional, they always provide a price list.
Methods for insulating wooden windows
Wooden windows can be insulated in different ways. Among them are both traditional ones, proven over centuries, and those based on the use of modern materials and technologies. All of them allow you to insulate wooden windows yourself.
Sealant
The most effective use of sealant is to seal the gaps between the glass and the frame. Previously, putty was used for this, which dried out and crumbled over time; it had to be replaced every few years. It is enough to apply silicone sealant once for the entire service life of the window.
Sealant - a method of insulating wooden windows
The sequence of actions is as follows:
carefully pry up and remove the bead holding the glass to the frame; remove the glass using protective gloves; clean the glass installation site from dirt and dust, thoroughly degrease with household organic solvent; apply sealant in a thin layer; carefully put the glass in place, remove excess squeezed out sealant; nail the bead into place and remove excess sealant again.
Sometimes sealant is used to seal the gap between the frame and the window block. This can only be done as a last resort, since the frame will be firmly glued to the window block, and if necessary, the window will not be opened.
Thermal insulation film
Progressive technology for insulating wooden windows uses a thin polymer film with a metallized layer. It transmits rays of the visible part of the spectrum, but reflects infrared radiation, which carries away heat. This film, glued to the inner glass, significantly reduces heat loss. The film is moistened with warm water from a spray bottle, pressed with the metallized side against the glass and smoothed, allowing air bubbles to escape.
Such a film works effectively only on glass; sticking it to the frame and slopes does not make much sense. This method also does not save you from cracks and drafts - you will have to deal with them in other ways.
Polyurethane foam
Construction foam is able to penetrate into the smallest cracks and crevices and, expanding, filling and sealing them. All leaks between the frame, window sill and window opening can be eliminated in a few minutes. The following procedure is recommended:
- clean and degrease the inner surface of the opening;
- cut blanks from plasterboard or sandwich panels to the size of the internal window slopes;
- apply polyurethane foam in the cracks and around the perimeter of the workpieces and press them to the installation sites;
- After drying, cut off excess foam with a knife, prime and paint the slopes.
Foam is also unsuitable for insulating the gap between the frame and the window block, since it will be impossible to open it.
Paper
A proven budget method for insulating old wooden windows. Paper from old newspapers is shredded and soaked in warm water. After squeezing, add crushed clay and mix until a homogeneous thick paste is obtained. All cracks are coated with this putty.
The cracks between the frame and the window are sealed with masking tape or strips of fabric soaked in a thick soap solution.
In spring, temporary insulation is washed off. The quality of insulation achieved in this way is more than average, but the costs are minimal.
cotton wool
Elongated rollers are formed from cotton wool and placed between the frame and the window. In narrow places, the cotton wool is pushed in and compacted with a flat screwdriver, spatula or table knife. Cotton wool is also placed between the glass, where it absorbs moisture and prevents frosty patterns from forming on the glass.

Cotton wool is one of the insulation materials for wooden windows.
It all looks quite old-fashioned, but it works quite effectively. The cracks over the cotton wool can also be sealed with wide masking tape.
Cord
The principle of insulating windows is the same as in the two previous methods. A soft cord of suitable cross-section is pushed into the gap between the frame and the window. In construction stores in Moscow and other cities you can purchase polyurethane foam cords of different diameters. Such a cord easily wrinkles, and as it expands, it fills the gap between the frame and the window. In the spring it can be removed and washed from dust. After some time it will return to its original shape and be ready for reuse.
The listed methods for insulating windows for the winter with your own hands do not require the use of complex equipment and tools.
Advantages and disadvantages of the technique
The effectiveness of insulation using this method is due to the fact that a seal made of rubber is added to the design and is characterized by excellent performance in reducing heat loss in the room. This is Swedish material, hence the name of the technique. It is mounted in a special way, which makes it more difficult to carry out repairs yourself.
Swedish window insulation technology is popular due to a number of positive qualities:
- The seal lasts a long time - about 20 years. For comparison: foam rubber and simple rubber require replacement after several seasons of use.
- Swedish material does not accumulate pollution.
- Tightness. The seal does not allow wind to pass through and significantly reduces heat loss.
- Thermal and sound insulation properties are improved.
- By reducing the intensity of heat outflow, heating costs are reduced.
- Time saving and practicality due to the absence of the need to repeat the procedure annually.
- The seal can withstand significant temperature fluctuations: from -50°C to +80°C,
- Creating a barrier to dust and other contaminants that often penetrate from the street into the room.
- Improving the appearance of the window frame and sashes, because Before installing the Swedish sealant, the wood is restored.
- There is no need for additional window insulation.
- Reduces the risk of condensation.
- The window frame retains the ability to “breathe”.
- If we compare the Swedish method with the Finnish one, there is another advantage: it is not necessary to install insulation on all sashes (only on the internal ones), because The window is a prefabricated structure (double sashes are twisted together).
There are also disadvantages to this method. If you plan to use Swedish technology for insulating wooden windows with your own hands, you may encounter difficulties. We are talking about the need to use special equipment. So, to install the rubber seal, you need to make a groove around the perimeter of the sashes. The material will be placed in it.
Another disadvantage is the relatively high cost of performing the work. In addition, if you make mistakes during installation or use low-quality material, the service life will be shortened, and the sound and heat insulation properties will be weakened. For this reason, it is recommended to use the Swedish method in two cases:
- it is not possible to dismantle the window and replace it with a metal-plastic one;
- there is confidence in the professionalism of the worker who will restore the window frame.
Advantages of window insulation using Swedish technology
Note. It is better to carry out work at a temperature not lower than +5°C, because This is the lower limit for the sealant that is often used to additionally seal glass.
environmental friendliness of insulation;
low cost of an insulated window compared to replacing it with a double-glazed window;
no need for further insulation of the window;
the properties of a wooden window are preserved: attractiveness, ability to ventilate, etc.;
absence of condensation, which is typical for double-glazed windows installed in plastic windows. This is due to the fact that the glass in a standard wooden frame is located at a greater distance from each other than in a plastic window, which reduces the intensity of heat transfer.
Craftsmen who perform window repairs using Swedish technology claim that it is very difficult to do the work yourself. As an argument, the need to possess professional skills and tools is voiced. But, as reviews indicate, repairs can be done on your own.
This means that it is quite possible to implement Swedish window insulation with your own hands. The main thing is to choose a high-quality seal and have an idea of the procedure for performing the work.
Is it expensive to repair wooden frames?
Prices for insulation and fitting of windows with standard dimensions - 1.5 * 1.2 (1.3) m - approximately 3000-3500 rubles. This includes dismantling the sashes, preparing a groove for the perimeter seal using a cutter, placing a tubular silicone seal there, if necessary, adjusting the sashes, sealing the glass to the window sash, the opening between the sashes - in cases where the sashes are paired.
Work with fittings is paid additionally - everything from repairs to replacement with new ones. Prices for them can be found when placing an order for work. If repairs to the window frame are required, this must also be paid for separately.
Important! In cases with separate type bindings, which are also called “Stalinist”, insulation is usually carried out for the internal sashes, and those on the outside are left as is. But if you order such work for external sashes, the price will be doubled.
The price lists of companies performing such work also include a painting service. Its price for a regular window will be approximately 6,000 rubles.
With such data, it is not difficult to calculate how much a full repair would cost for one ordinary window. The total cost can be compared with the cost of a standard double-glazed window.
Typically, a PVC structure of the same size, including double-glazed windows, window sills, ebb, slopes and a mosquito net, together with installation and dismantling, costs approximately 15 thousand rubles. Of course, if you decide to do all the necessary operations yourself, the costs will be completely different.