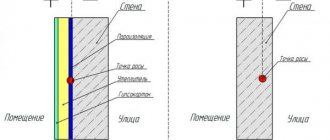
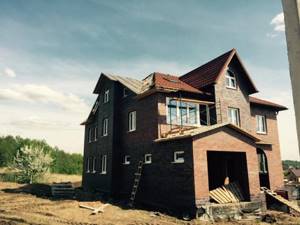
What is a roofing pie
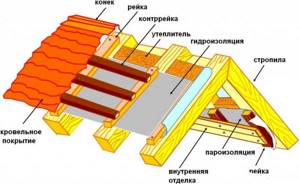
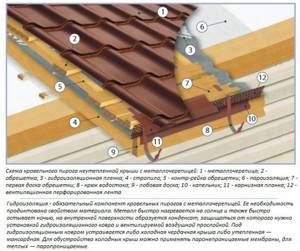
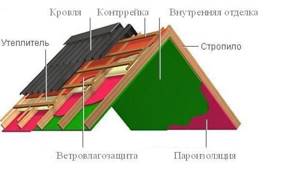
The term itself arose as a simplified name for the roof insulation and waterproofing system. The name “pie” very aptly describes the design. The roof consists of a load-bearing rafter frame and the roofing pie itself, consisting of several base layers:
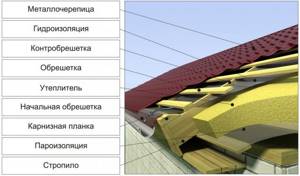
- External roofing made of metal tiles;
- Waterproofing layer;
- Vapor barrier layer;
- Insulation.
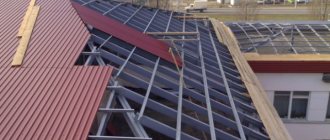
According to building codes, the roofing package also includes elements of the wooden roof frame, such as sheathing, counter-lattice and even rafter elements. But in practice, master roofers are limited to laying vapor barrier, insulation and metal tiles. The assembly of the wooden base - rafters and counter battens is the responsibility of the carpenters who assemble the roof truss frame.
Advice! When planning an order for craftsmen to lay a roofing pie under metal tiles, it would be correct to clarify who will assemble the sheathing, since the durability of the roof covering and the insulation itself greatly depends on its quality.
It is clear that all of the listed materials do not have sufficient strength and rigidity to ensure the flat geometry of the pitched roof when laid on the load-bearing rafters of the slope.
An exception is a cake based on sandwich panels; this is an insulation package pressed into a thin sheet metal shell. In this case, the finished sections are laid directly on the load-bearing roof rafters, without any additional layers of insulation and waterproofing.
For private households, the sandwich is not used, since the roofing pie for metal tiles is more durable, warm and reliable, and most importantly, repairable. The only headache of using metal tiles is the high thermal conductivity of the metal and, as a result, the intense formation of water vapor condensate. If you don’t skimp on vapor barriers, the roof will remain on the roof for at least a couple of decades without any problems.
Insulation of metal tiles - choice of material
Insulation has important properties of the roofing pie. This layer provides:
- maintaining heat in the room, preventing it from escaping outside;
- sound insulation (especially with metal roofing);
- durability of the roof.
When choosing a material for insulating a metal roof, you should take into account its features :
- life time;
- weight;
- frost resistance;
- vapor tightness;
- dimensional stability;
- environmental friendliness;
- water absorption;
- soundproofing;
- thermal conductivity;
- safety.
The most common materials for insulating metal roofing are:
- expanded polystyrene (features: good soundproofing, thermal insulation properties, however: fragile during installation);
- mineral wool (features: does not burn, does not absorb moisture, safe);
- polyurethane foam (non-flammable, good heat insulator, applied by spraying);
- cellulose insulation or ecowool (features: environmentally friendly, lightweight, cheap, however, susceptible to the influence of microorganisms, used exclusively for dry rooms);
- foam glass (features: dense material, good insulation, durable, but installation is ensured with glue).
The material for roofing should be selected based on its quality indicators, the complexity of the roof structure, and the price indicator.
Pie of insulated metal roofing
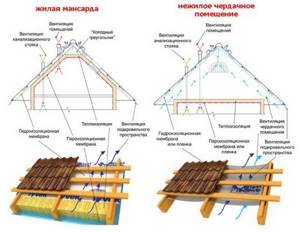
For wooden low-rise buildings, two types of gable roofs under a metal roof are used:
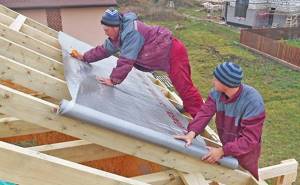
- Insulation of the ceiling of the house box. Only vapor and waterproofing remains on the roof sheathing, and the roof pie under the metal tile turns into a thin, invisible layer of polymer film on wooden slats;
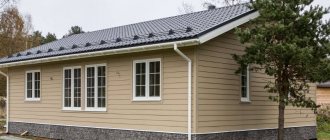
- With insulation along the surface of the sheathing, the so-called warm version of the attic or attic, the most widespread and convenient when using metal tiles as a roof covering.
In this case, the air temperature under the roof is only slightly lower than inside the house, so water vapor does not condense, but rises up to the rafters and insulation.
Important! Metal tiles greatly cool the roof, and since condensation occurs along the temperature difference line in the region of 6-7°C, if the thermal insulation is insufficiently thick, condensation can fall on the rafters.
As a result, the wood swells and deforms; any deformation of the rafter beam can lead to the tearing of the metal tile sheet from the sheathing slats, and a strong wind will only complete the destruction of the coating. But if the roofing pie under metal tiles with an insulated roof is laid according to all the rules, then the service life of wooden beams and slats of 20-25 years without repair is guaranteed.
Rafter
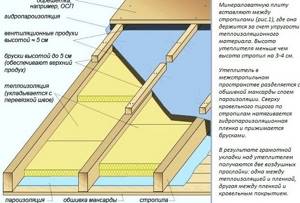
In the roofing pie device, the rafter beam is immersed in the thickness of the insulation. The upper end rests on the ridge girder, the lower heel of the rafter rests on the mauerlat boards.
Thanks to this design of the roofing pie and the complete impermeability of the metal tile to water in any form, the rafter leg of the roof appears as if in an insulating shell, so the wood can be preserved and used for quite a long time.
Cornice strip
The element is a wooden strip, 25-30 mm thick and 10-15 cm wide, sewn to the ends of the overhangs or fillets. Since the lower part of the roof slope is suspended in the air without support, any, even slight, breeze creates a variable vibrating load. Metal tiles hold a static load well, but can tear off fasteners under alternating forces. Therefore, the eaves strip of the roofing pie is installed simultaneously with the sheathing.
After laying the vapor barrier, the canvas is placed over the eaves strip to the line where condensate drips into the gutters.
Why do you need a counter-lattice?
After completing the assembly of the rafters, the distance between the beams turns out to be too large for the relatively soft and pliable roofing pie to hold on to the pitched surface of the roof.
In addition, the external supporting surface of the rafter legs is far from ideal. Therefore, slats are sewn onto the rafters, which allows you to pre-level the laying plane and at the same time strengthen the base for laying metal tiles. If the roof is quite sloping, then the presence of a counter-lattice is mandatory; on high steep slopes, a simplified version of the cladding can be used under metal tiles.
Initial sheathing
In order to lay the coating efficiently, you need a flat and durable supporting surface, as close as possible to the normal plane. Lathing is the name given to horizontal slats sewn onto counter-lattice strips.
In order for the metal roof tile to evenly apply pressure to the rafters along the entire roof plane, special rules for laying the sheathing are used:
- The first plank is laid on the lower edge of the rafter legs, hemmed with counter-lattice, strictly along the marking cord. It is important to align the slats strictly along the horizon line and the plane of the cornice;
- The first line is filled with timber 50x50 mm, all the rest are slightly thinner - 50x30 mm. This is done to provide ventilation, and at the same time to compensate for the deflection of the overhang under the weight of the metal tile cake;
- The pitch between the lathing slats is 25-28 cm, in the middle part of the slope you can fill it every 35 cm, in the upper half the pitch of the lathing under the metal tiles is increased to 40 cm. In the ridge area, two adjacent boards are nailed without a gap for installing metal tile vents and laying the ridge strip.
Important! The slats are nailed with a pair of nails using the carpenter's method, with an oblique slope to the surface.
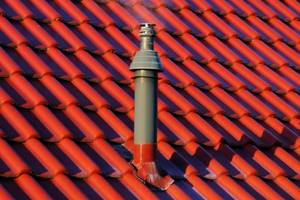
Since the metal tile will rest directly on the sheathing, additional conclusions need to be made for ventilation pipes and ducts.
Waterproofing
The next step is to install the vapor barrier. For conventional roofing coverings, a single-layer waterproofing is used, which prevents the flow of water and condensate into the thickness of the insulation. For a roofing pie based on metal tiles, a three-layer material with one-way conductivity of water vapor is used.
Some of the water vapor passes through an isospan-type sheet, comes into contact with the cold air under the metal tile and turns into condensation, and the moisture cannot return back into the thickness of the insulation.
Part of the condensate flows down the fiber sublayer of the sheet, but most of it is removed through the ventilation gap of the metal roofing pie.
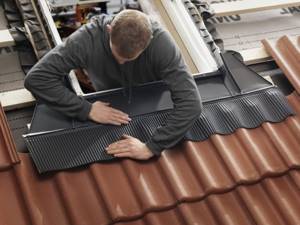
Metal tiles
Most often, roofing material is laid in packs of four. First, the first two sheets of the bottom row are laid out on the sheathing, then a pair of metal tiles of the next top row are laid. The package is secured with self-tapping screws according to the diagram below.
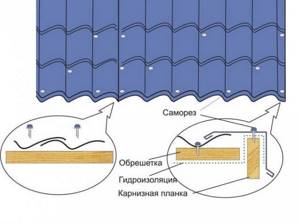
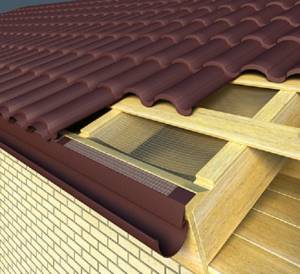
To ensure the removal of condensation from the roofing pie, the waterproofing sheet is released from under the edge of the eaves under the nailed metal drip strip. The space under the overhang is covered with a grille, this will protect the ventilation ducts of the roofing pie.
A wind strip is placed on the sides of the gable overhangs of the roof, and silicone additional elements are placed under the ridge strip. This will protect the roof pie from water leakage and at the same time ensure the removal of water vapor.
Insulation
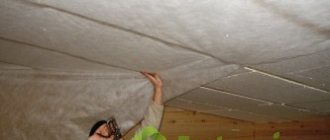
Thermal insulation of the roofing pie is laid in the space between the rafter beams. Typically, the roof under metal tiles is insulated with mats made of pressed mineral fiber.
The roof can also be insulated with more convenient and safe polyurethane foam, but in this case, to form a warm layer of the cake, you will need to rent special equipment.
Roof vapor barrier
The last layer of the cake is a vapor barrier film. It allows hot and warm water vapor to pass through, which will definitely pass through the insulation without water condensation. Microdroplets from the already condensed steam remain indoors and are removed by attic ventilation.
Drip edge and cornice strip
The eaves strip and drip are used to provide ventilation and perform decorative tasks. These elements are needed to fully ventilate the space under the roof and protect it from the penetration of foreign objects. Usually we are talking about V-shaped rectangles.
The cornice strip and drip edge are made so that the edges on one side are curved. This provides the necessary strength to the elements and protects the protruding edges from deformation.
These strips perform different functions. The cornice strip protects the front board of the cornice light from the negative effects of moisture. This happens when water drains from the roofing material and a small part of it can fall on the fascia board (if there is no flashing). The product also provides natural ventilation of the roof. The eaves strip is a visible element, the presence of which increases the attractiveness of the roof.
The drip tray is designed to remove moisture from the waterproofing material. The element protects the boards from condensation. The ends of the waterproofing are attached to the drip, which makes the task easier and allows you to achieve the desired result. The use of a drip line significantly extends the service life of the eaves overhang.
Cold roof pie made of metal tiles
The cold design of the coating is characterized by the absence of a heat-insulating layer in the under-roof space. A roofing pie for metal tiles with a cold attic is twice as light and three times cheaper than in the case of a “warm” scheme.
Rafter
When using an uninsulated roof, the wooden structures of the frame and pie do not have warm, dry protection, as in the previous version. Therefore, rafter beams must be impregnated with protective compounds that prevent moisture from penetrating into the thickness of the wood.
A small amount of condensation on the rafters and sheathing does not pose a particular threat to the metal tile pie with normally functioning ventilation.
For your information! Ventilation of the attic occurs cyclically as the wind direction and air temperature change.
In summer and winter, there are no problems with ventilation of the pie under the metal tiles, but in the transitional spring and autumn months it is important to protect the wooden frame not only with the help of attic ventilation and the use of air supply compounds.
Counter-lattice or initial lathing
The technology for installing load-bearing counter-lattice slats is no different from the method used in the warm version of the pie. The surface of the rafters is trimmed and leveled with a hand plane, after which the counter-lattice support slats are glued and nailed onto the rafter beams.
Vapor barrier and waterproofing
The next step is to stretch a vapor barrier sheet over the manufactured roof counter-lattice made of metal tiles. The fabric is stretched in the direction with overlapping edges. Usually, the places where the film is attached to the frame are taped with construction tape. After the insulating sheet has been evenly stretched and leveled, it is fixed to the rafters with another layer of counter battens.
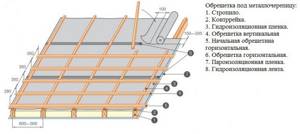
This cold roofing design is designed for the complete absence of water vapor under a metal tile roof. If the owners neglected to waterproof the ceiling, or the attic ventilation system does not work effectively enough, there is a need for additional protection of the waterproofing film from water vapor accumulating in the attic space. In this case, an additional sheet of vapor barrier film is placed under the waterproofing layer.
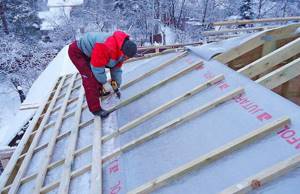
Lathing
The last stage of arranging the roofing pie is the laying of horizontal crossbars, onto which the sheets of metal tiles will be directly attached. The planks are nailed so that the caps are completely recessed into the wood, or they are sewn on with a construction stapler.
Often, the previously tensioned sheet slightly sags in a bubble; this is not a defect in the roofing pie; according to experts, such a deflection even contributes to more efficient removal of condensate from under the metal tiles.
Metal tiles and eaves strip
Due to the installation of additional counter-lattice slats that secure the roofing waterproofing of the pie, additional space is obtained between the metal tile covering and the film. This does not affect the fastening strength and stability of the roof. The increased clearance provides two additional benefits:
- The air gap acts as an improvised layer of insulation in which condensation does not accumulate and freeze;
- Due to the lateral flow of flows through the sheathing, moisture is removed more evenly, without the formation of stagnant zones under the metal tiles.
Correct fastening of additional elements also contributes to effective removal of condensate. The eaves strip not only covers the edge of the metal tile from the wind, it also promotes air flow inside the roofing pie.
Calculation of the amount of metal tiles
To calculate the required number of sheets of material, you first need to decide on the type of profile and the manufacturer of the metal tile - you will need the exact dimensions of the material itself, and each profile has its own. Then you need to make accurate measurements of the slopes - length, height, if any, you need to measure all the protrusions or other decorative elements that will need to be sheathed with roofing material. If the roof has a complex shape, it is better to draw a plan, put down all the dimensions and then start doing the calculations.
Number of rows
It is best to look for metal tiles not in stores or markets. It is advisable to contact the manufacturer directly. The point is not only the price - it may not differ very much, but the fact that many workshops/factories offer to cut sheets of the required sizes. The minimum sheet height is 0.7 m, the maximum is 8 m. That is, you can order the required number of sheets covering the roof slope from the ridge to the overhang (taking into account the eaves overhang).
This option is good because a metal tile roof will not have horizontal joints, which means there will be less chance of leaks. The second plus is a minimal amount of waste and a smaller amount of material itself (due to the absence of horizontal overlaps, several square meters are saved). Disadvantages: difficulties with delivery, lifting long sheets to the top, inconvenient installation.
Calculation of a rectangular roof slope
When using sheets of standard sizes, the height of the roof slope is divided by the useful length of the sheet. The resulting figure is always rounded up. The useful length is obtained after subtracting the amount of horizontal overlap from the total length - from 100 to 200 mm. The flatter the slope, the greater the overlap of the sheets is necessary so that precipitation cannot get into the under-roof space. On roofs with a slope of up to 12°, one sheet overlaps the other by at least 200 mm; with a slope of 12° to 30°, the overlap is 150-200 mm, more than 30° - 100-150 mm. The specified amount of overlap is subtracted from the total length of the sheet, this will be the “useful length”.
An example of calculating the number of rows of metal tiles on a roof. Let the length of the slope be 4.5 m, the useful length of the sheet is 2.3 m. Divide 4.5 by 2.3, we get 1.95, round to the nearest whole number - we get 2 rows. In this case, only a small part of one sheet will go to waste, but there are times when more than half is cut off. This is very unprofitable, since this piece cannot be used anywhere else.
Number of sheets in a row
Take the length of the slope and divide it by the usable width of the sheet. This parameter is indicated in the technical specifications for metal tiles. Most often it is 110 cm (1.1 m). We round the resulting number up to obtain the number of sheets in the row.
An example of calculating metal tile sheets in a row. Let the length of the overhang be 8 m, the useful width of the sheet 1.1 m. When dividing, we get 7.27 pieces, but round up to a larger integer and we get 8 pieces in one row. Moreover, more than 2/3 of one sheet will go to waste.
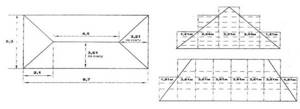
Features of hip roofs
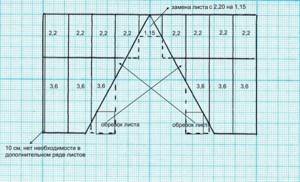
Hip roofs have slopes that are triangular or trapezoidal. Here it is necessary to select the length of the sheet in order to minimize the amount of waste.
An example of the layout of metal tile sheets on a hip roof
The height is selected so that no more than half goes to waste. It is quite difficult to do this manually, and there is still a significant error - there will be 20-25% more waste than when calculated using programs. They are usually available from sellers and manufacturers. It is better to provide them with an accurate calculation, and first measure the parameters of the roof at home (or call a measurer), and then try to select the dimensions yourself. Then you can compare the amount of material needed, calculated by you and proposed.
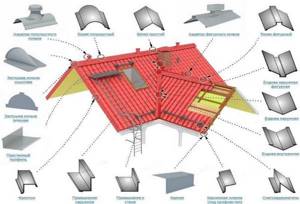
Determining the number of additional elements
A metal tile roof requires a large number of different additional elements (additions), which form the ridge, the edge of the overhang, the sides of the slope, the passage of the pipe, the valley (the junction of two adjacent roof slopes). The more complex the shape of the roof, the greater the amount of additions required. With a simple gable roof, ridge elements and caps, cornice and pediment strips will be needed. That's all.
What types of additional elements are there for metal roofing and why are they needed?
Despite the wide variety of extras, they are all considered the same. Take the length of the surface on which it needs to be mounted and divide by the useful length of the element. It is usually standard and is 1.9 m (total length 2 m). The result obtained is rounded up.
Tips and tricks
In general, a cake with metal tiles as a covering resists moisture and accumulating condensation much better. But under one condition - the geometry and quality of laying the material must be ideal.
If, when installing corrugated sheeting, it is enough to ensure the required overlap, then for metal tiles the sheets of the pie must be adjusted as accurately as possible, otherwise leaks and non-fitting will have to be sealed with a sealant, and the procedure must be carried out at least once every two years.
Installation errors
It is important to install the vapor barrier correctly to avoid dampness.
Novice craftsmen make the following mistakes:
- Ignoring the preparatory stage. The lack of calculations and drawings leads to a shortage of materials or the formation of large illiquid surpluses.
- Violation of the sequence of installation of layers. This can lead to poor ventilation, dampness and damage to supporting structures.
- Insufficient attention to insulation and insulation of roof passages, which leads to leaks and condensation.
- Excessive tension of films and canvases, which causes them to tear in the cold.
Compliance with the installation sequence and a competent approach to the selection of materials for the roofing pie will ensure protection of the house from natural phenomena and create the most comfortable living environment.
Waterproofing under metal tiles
Without a waterproofing layer, it is impossible to operate the roof, regardless of whether the roof is made of metal tiles - warm or cold.
Thanks to the presence of waterproofing membranes:
- the rafter system is protected from moisture;
- penetration of water into the insulation layer is prevented;
- moisture damage to roof structure elements is prevented.
When choosing a waterproofing material for such a roof, professionals recommend using membranes with high anti-condensation properties. They also pay attention to the fire safety of products and their resistance to ultraviolet radiation.
The membrane is secured to the rafter legs using a construction stapler. The sheathing and counter-lattice are nailed on top of the waterproofing layer.
Roll roofing
Such materials are:
- without base;
- with a base made of fiberglass, asbestos, polymers or cardboard (it can also be complex);
- with a protective layer in the form of powder.
Soft roll roofing is also divided according to the type of base and fastening:
- self-adhesive. An adhesive layer is applied to the reverse side. The protective film is removed immediately before laying on the roof;
- on bitumen mastic. Laying is carried out using the cold or hot method (mastic applied under the base is heated to a specific temperature);
- welded materials. They are mounted on a rigid base using burners. The adhesive applied to the back is heated by a flame and fixes the covering on the roof. This coating is the most durable, and a roof equipped in this way will be 100% sealed and impermeable to moisture.
additional information
Installation plan: attaching a vapor barrier film, filling insulation, installing waterproofing and film, sheathing.
Roofers pay special attention to the correct location of the waterproofing coating and ventilation gap for some reasons. One of the weak points of the system is the insulation layer. Foam insulation devices for roofing are rarely used. Its only advantage is that it does not transmit or absorb moisture, while a device of rolled thermal insulation in the form of glass or mineral wool can absorb it. With a non-standard rafter pitch, foam insulation has a large amount of waste material, which, combined with a higher cost, makes this option economically unprofitable. When absorbing moisture, thermal insulation wool loses 80% of its thermal insulation properties. Therefore, moisture should not be allowed to reach the insulation .
And if it does get there, then the only way to remove it is to blow it out naturally. For this reason, a gap of 30 to 40 mm is always left between the upper layers of the roof and the thermal insulation. The gaps are arranged in such a way that the air flow passes from the overhang of the covering to the ridge, where special gaps are also installed. In addition, a gap (10-15 mm) is left between the metal tiles and the waterproofing.
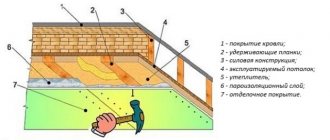
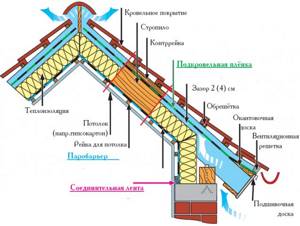
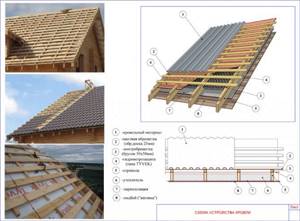
Pie diagram for corrugated sheets (warm version)
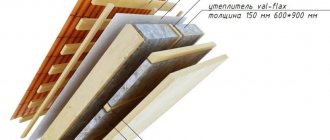
Any sound from rain, falling branches, or blowing wind will be amplified if corrugated sheeting is used. Which in turn will cause a lot of concern to the residents of the house. To smooth out the sound flow, fiber boards measuring at least 150 mm are used.
Coverings for warm and cold rooms are significantly different. The roofing pie under corrugated sheets with an insulated roof has a more complex structure. Its structure includes:
- Rafters;
- Insulation against vapor formation.
- Porous slabs that also serve as sound insulation;
- Hole for ventilation;
- Water insulation;
- Counter grille;
- Lattice made of beams;
- Profiled sheet as a cladding.
Vapor insulation is a membrane that allows condensation formed by heating the room to pass through. With the help of a membrane, water and condensate do not stagnate in the room, and the formation of germs and microorganisms is prevented.
Consider the slope of the surface. If it is single-pitch, then install the slats above the flat partitions. Rolled fiber is rolled onto it. The degree of inclination should not be more than 10 degrees. If a gable scheme is assumed, then slabs are used for the roofing pie of an insulated roof made of corrugated sheets. They are installed between partitions with counter-lattice. It is allowed to buy bars made of metal, but in the described case, another counter-lattice module is used, which is mounted under the insulation. Waterproofing is laid out above it. Slats under the corrugated sheet are mounted on it. This solution will require reinforced fasteners. Provide clearance for ventilation.
Interior decoration
When choosing finishing materials for the under-roof space, we must not forget that the rafter system will sooner or later begin to deform under the influence of wind, snow and temperature changes. Signs of deformation will be slight at first, but they need to be seen so that over time the situation does not lead to cracking of the facing joints.
The main purpose of the finishing layer of the roofing pie is to make the under-roof space pleasing to the eye, and also to protect the subsequent vapor barrier from moisture coming from the house.
What can be used for cladding:
- lining;
- GKL;
- OSB or MDF boards.
Drywall is the most common material. It is especially often used when working with sloping roofs, which are difficult to arrange.
The material is easy to cut and can be given almost any shape. The created surface will be perfectly smooth and prepared for further finishing.
Plasterboard cladding elements can be used to skillfully decorate and zone an attic.
Drywall and MDF boards are also good because they allow you to install hidden wiring using fire-resistant cables. In the case of wooden paneling, the electrical wiring will be exposed.
Our works
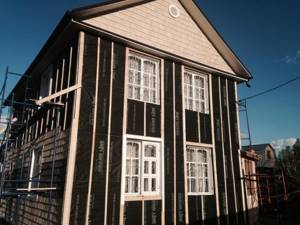
Reconstruction of the facade and roof
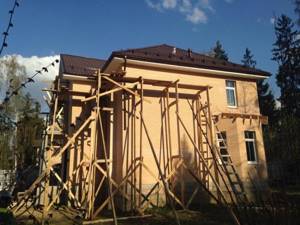
Installation of the roof pie
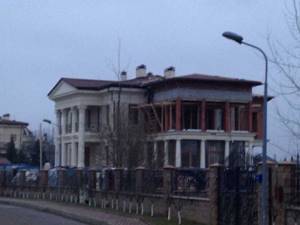
Roofing installation in Cottage Village
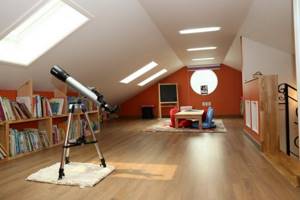
Installation of the pie on finished rafters
Other things to consider
A few additional rules that should not be ignored:
- Don't forget about the holes in the roof. It has openings of large and small diameters (chimney, sewer and ventilation risers, antennas, etc.). Methods for their design depend on the size and fire safety requirements.
For small holes, rubber seals are used; for risers, plastic passages are used, fixed with nails. Shingles are laid on top, cut around the perimeter of the hole.
The most difficult thing to install is a chimney that requires heat and waterproofing. First, a metal sheet is mounted on top of the pipe, an overlying valley “carpet” is installed on top, and only then shingles. The finishing touch is a metal “apron”.
- Hammer nails correctly. They are driven strictly perpendicular to the roof surface. This should not be done with too much force: the nail should hold the shingles and base together, but not dig into them.
- Use ready-made kits. It is worth choosing the manufacturer you like and purchasing all the materials from him. Such materials will be maximally adapted to each other.
There is no need to try to save money on anything. In this case, the service life of the entire roof will be equal to the time during which the cheap element will serve.
Anyone who is not confident in their own skills should seek the services of a professional team.

The process itself is not so difficult, but is accompanied by numerous nuances. The more complex the roof design, the more mistakes an inexperienced craftsman can make. In order not to pay twice, it is better to make the right decision right away.