Why is it necessary to plaster polystyrene foam?
Plaster will protect the material from destruction
Plaster is an important element of protective treatment. The technology for carrying out the work in this case differs in a number of nuances from conventional plaster. Polystyrene foam is characterized by a porous structure. This material is produced by filling styrene granules with gas under high pressure and heating with water vapor. Exposure to high pressure and temperature leads to swelling and sticking of granules together.
Afterwards, the mass of the resulting substance is pressed, giving it the shape of slabs. The thermal insulation properties of the resulting material are high, but it impairs natural ventilation in the house. Low cost relative to other insulation materials and low weight allow you to put up with its low strength.
As a result of atmospheric influences (ultraviolet radiation, humidity, temperature fluctuations), the bonds between individual granules weaken over time. The slab begins to crumble and may fall apart into pieces.
Due to these phenomena, it is necessary to apply a plaster coating to polystyrene foam. It plays a role protecting against negative influences.
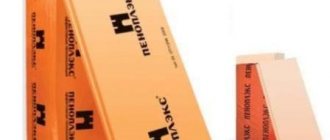
Along with conventional polystyrene foam, the use of fire-resistant and extruded types of polystyrene foam is common in practice. The latter is the most advanced version of the material in the form of a single substance (rather than individual granules) with a strong connection of molecules. The absence of micropores prevents steam and water from penetrating into the structure. The negative effects of the atmosphere can be traced only on the surface, but also in places of cuts, so the use of extruded polystyrene foam is more preferable in the long term.
Other gluing methods
Some craftsmen try to use “homemade” methods for attaching polystyrene boards using other methods. This is not always reasonable.
Polyurethane foam
Foam is used to fasten any surface, including EPS. The cost of foam is often cheaper than similar glue in cans. But the disadvantages of this method are obvious:
- slow setting with the base - slabs lying vertically will constantly slide;
- the glue contains special adhesion-improving additives, which makes it more reliable for tearing than foam;
- polyurethane foam tends to grow in volume, and when constructing polystyrene foam this can play a bad role;
- foam peels off the wall faster than glue.
We recommend: Primer FL-03K: technical characteristics and application
The advantage of foam is the ability to fill the seams between the slabs, so it can also be useful in installation.
Hot melt adhesive
Thermoplastic adhesives include special substances based on polyamide, ethylene vinyl acetate, which become liquid when heated. As they cool, they harden. Such products are suitable for working with extruded polystyrene foam, but their cost per 1 kg can be up to 1,500 rubles. The price of the work, therefore, will not be the lowest. It is more expedient to buy suitable specialized glue and carry out repairs economically, efficiently and reliably.
Which plaster to choose
When choosing a plaster composition, first of all you need to take into account the characteristics of the foam. This material is not durable, so the protective coating must be sufficiently dense and resistant to mechanical stress. Also, the plaster mixture must have high adhesion to the base, since the foam has a smooth surface. In addition, you need to choose a plaster that is moisture-resistant, plastic, easy to apply and not prone to cracking. But the vapor permeability of the composition is not of great importance, since the vapor permeability of the insulation is very low.
A conventional cement-sand mixture only partially meets these requirements, and it is not advisable to use it on foam plastic. Of course, this is the most budget-friendly composition, but within a year the facade will be covered with small cracks and everything will have to be redone. Therefore, for finishing on foam plastic, it is recommended to use only factory-made plasters containing special additives.

Cement-sand plaster
- Mineral plasters – the most popular option in terms of price-quality ratio. They are made on the basis of white cement, containing lime hydrate and mineral chips as a filler. They go on sale in the form of a dry powder, which must be diluted with water in a certain proportion before starting work. Such plasters perfectly withstand the effects of precipitation, temperature changes, and have good adhesion. True, they have a short service life - only about 10 years, and low ductility, as a result of which the plaster cracks when the building shrinks.
Mineral plaster
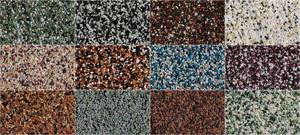
Decorative mineral plaster, shades
- Acrylic plasters – ready-made plastic mixtures based on acrylic resin. They contain mineral binders and various additives that increase the performance characteristics of the coating. These plasters are not prone to cracking, withstand temperature changes and the negative effects of precipitation, and are highly durable. The service life of acrylic coating is from 15 to 25 years. The disadvantages of this type of mixtures include high price and tendency to burn out.
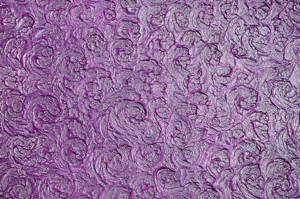
Acrylic facade plaster
What is good about acrylic plaster?
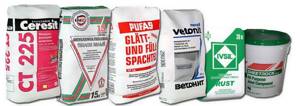
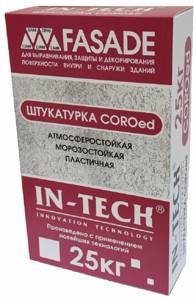
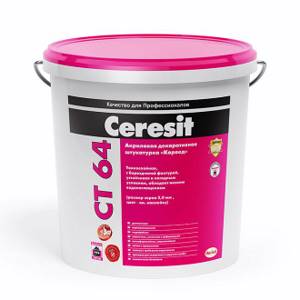
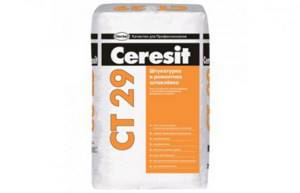
The range of plasters for foam plastic is quite large, but there are brands that are in particular demand: Ceresit, Stolit, Osnovit, Knauf, Ecomix. Manufacturers produce several types of formulations:
- for attaching insulation to the base;
- to create a leveling layer;
- universal.
It is best for a novice master to choose a universal type of plaster that can be used at all stages of finishing with equal efficiency. But even if you prefer to use separate compounds for each process, they should all be from the same manufacturer, and preferably from the same line.
Selecting adhesive for extruded polystyrene foam
How to glue polystyrene foam? To fasten the slabs, you can use different means that have different components. But there are specifics to using mixtures. So, it is better to use one for gluing to a concrete base, another for attaching to a brick wall, and another for winter work. There are adhesives that combine the properties of fastening material and insulation and have low thermal conductivity.
Before purchasing, it is important to clarify that the product contains no substances that corrode polystyrene foam. This:
- acetone;
- alcohol substitutes;
- toluene;
- esters;
- other solvents.
The ideal option is to purchase specialized formulations, because their manufacturers have already taken into account all the important points. There are three main types of products that are suitable for gluing material. This is a plaster-adhesive mixture of different brands, polymer adhesives and bitumen glue (mastic).
People often use “liquid nails” in a bottle, silicone sealants, frost-resistant tile adhesives, drywall and tile products for gluing materials. Can I use them? Experts say that the use of such adhesives is possible, especially if additional fastening of the structure with dowels is planned. But the cost of the work can be much higher, so it is better to buy products designed for XPS.
Why is polystyrene foam plastered?
Plastering the facade will protect the material from mechanical damage
Finishing polymer coating solves a number of problems:
- Protects the insulation surface from accidental mechanical impacts.
- The finish acts as a barrier to moisture penetration into the polymer. When left in a humid environment for a long time, the foam, saturated with moisture, loses its thermal insulation qualities.
- The finishing blocks access to ultraviolet rays to the surface of the polymer. Under the influence of UV radiation, the structure of the material is destroyed.
- In the event of a fire, the foam becomes an obstacle to the further spread of fire. The polymer burns only when exposed to very high temperatures.
Advantages and disadvantages of polystyrene foam when insulating a house
In polystyrene foam, the bulk of the material is gas. This determines its main advantages: light weight and good thermal insulation properties. Polystyrene foam is also a good sound insulator, since its structure dampens sound vibrations. In addition, the advantages of the material include:
- environmental friendliness - complies with environmental standards and does not harm humans and the environment;
- durability - resistant to mold, rot and corrosion;
- light weight - easy to transport, no additional load on the foundation;
- ease of processing and installation;
- affordable price.
We recommend: Do-it-yourself loft-style furniture: drawings with dimensions of furniture made of metal and wood, detailed manufacturing, design of garden and other furniture
In addition to the advantages, there are also disadvantages:
- Low strength. This is the main reason why the insulation layer is covered with additional material, since under mechanical stress its structure is easily damaged and it loses its thermal insulation qualities.
- Incompatibility with nitro-based paints and varnishes. These substances can corrode the foam mass.
- Does not allow air to pass through. Poor vapor permeability does not allow its use in interior decoration of residential premises. Without good ventilation, the house turns into a thermos.
- Rodents and insects are partial to foam that is not protected by plaster or a durable finish.
- Fire hazard - burns and releases hazardous substances.
Prices for services for finishing facades with expanded polystyrene
Specialists carry out facade work using various materials. We carry out finishing work using a layer of insulation, decorative elements and foam panels using aerial platforms, lifts, scaffolding, and also using the industrial climbing method.
To accurately determine the cost of facing work and inspect the facade of the building, our employee travels to the client free of charge.
A specialist visit can be ordered by phone. or by sending a request by email
The cost of installing a thermal insulation layer depends on the thickness of polystyrene foam. The price of decor installation is affected by its type. More accurate prices for façade finishing with polystyrene foam can be seen here.
Advantages of polystyrene foam finishing
Expanded polystyrene has replaced fragile gypsum and massive concrete. Practical and almost weightless foam plastic allows you to decorate any building without creating additional load on the enclosing structures and foundation. In addition to its versatility of use, polystyrene foam is distinguished by:
- low cost;
- variety of architectural elements;
- simple installation on the facade;
- light weight;
- resistance to mold and rot;
- non-flammability;
- moisture resistant.
Decorative elements can be made of any shape and size. They can be selected from standard models or ordered individually.
In addition to decorative facade elements, manufacturers offer effective polystyrene foam panels with a hard coating (thermal siding or thermal siding), which provide facade finishing and thermal insulation.
Expanded polystyrene thermal siding is a high-tech material with an even protective layer of quartz sand, which is easy and convenient to install on the facade. Such panels prevent walls from freezing and provide significant savings on heating costs. Expanded polystyrene boards are easy to cut. The material is mounted on the facade using adhesive solutions. Thermal siding provides sound insulation and protects the building from precipitation.
Expanded polystyrene decor
You can decorate a building, giving it style and individuality, using moldings, cornices, platbands, balconies, columns, pilasters and other decorative elements made of foam plastic.
It should immediately be noted that all these elements decorate the facade and provide sealing of individual areas, but do not carry any supporting loads. This is decor in its purest form. The most commonly used products are moldings, cornices, window sills, platbands and pilasters.
Molding is an overhead convex strip that is used to decorate walls, door and window openings. With the help of molding you can disguise facade defects and poor finishing. A reinforcing layer of a protective impact-resistant coating is applied on top of the decor.
Decorative cornices are special projections on the wall that are used at different levels of the building to protect the facade from precipitation. Cornices can be crowning (main) and intermediate. The main ones are installed on top of the facade with a significant eaves overhang. Intermediate ones are mounted on the wall in areas of interfloor ceilings.
Pilasters are flat vertical projections on the surface of the facade. I install them to give the building more impressive shapes and stylistic originality.
Natalya Kolesnikova
Types of plastering materials
This material requires the selection of a special plaster composition. Not all plasters are suitable for polystyrene foam. Some options contain components that destroy the foam immediately. Therefore, in the store, be sure to check with the consultant whether the composition will be suitable for work on this insulation or not.
Mineral
The most affordable option. It consists of cement, sand and mineral fillers that improve the properties of the layer after hardening. It is sold in the form of dry mixtures, which must be diluted with water in a certain ratio before starting work. The manufacturer must indicate the proportions on the packaging.
It is quite possible to make such a solution yourself. In this case, sand and cement are purchased separately and during the preparation process the required volumes of each component are measured separately. So, it’s more difficult to work, especially if you need to prepare half a portion to finish a small area.
Mineral plaster is of lower quality. Difficulties arise during application, since it has poor adhesion with polystyrene foam. To increase adhesion, the insulation is treated with a special primer and small cuts are made across the entire surface.
Acrylic
A more expensive option for plaster mixtures, but at the same time higher quality. This type of plaster on polystyrene foam does not require special preparatory work, since it has high adhesion rates to any materials.
The main components are acrylic resins along with chemical additives. Such mixtures were created exclusively for finishing facades after insulation. Therefore, it can withstand various loads well. The treated surface remains attractive for a long time and is easy to clean.
Using acrylic plaster, you can create textures or immediately use decorative compositions. For example, the “bark beetle” has inclusions that, after rubbing, form grooves. Using different grouting techniques you can create an original design.
Tools and materials used
To plaster polystyrene foam surfaces, you need to use a certain set of tools. The necessary tools and their purpose are described in the table.
| № | Tool name | Purpose |
| 1 | construction mixer | designed for stirring the solution to the required consistency; |
| 2 | set of spatulas | used for applying the mixed composition to the work surface; |
| 3 | construction float | removal of minor irregularities, grinding; |
| 4 | set of containers | under water, for solution; |
| 5 | construction knife, hacksaw | cutting slabs and fiberglass mesh, applying notches; |

After preparing the tools, the question arises about choosing plaster.
The materials offered differ in price and composition. To carry out finishing work, you will need special plaster (facade) for polystyrene foam.
Its most common types with brief characteristics are presented in the following table.
| № | Type of mixture (by composition) | Characteristics |
| 1 | mineral compounds | They are sand-cement mixtures with the addition of various fillers; very low cost; the quality is much lower than that of analogues; Now |
| 2 | acrylic plaster materials | main components – acrylic resins, chemical additives; excellent quality (they are created specifically for finishing insulated facades); There is no special need to prepare extruded foam plastic for plastering; fits well on the surface being treated; allow you to create decorative elements and textured images on the facade |
Choose fire-resistant mixtures
This is not a complete list. Modern manufacturers offer a large selection. Some samples may differ in only one or two of their components.
Mixtures such as “Ceresit”, “Polyrem”, “Kreisel” have gained particular popularity (for example, brands of universal adhesives “CeresitCT-85№”, “Coral SP-141”, “PoliminP-19”).
When choosing, you should pay attention to the fire-resistant properties of the compositions, because most polystyrene foams have an average degree of flammability; it is recommended to use plastering materials that are more fire-resistant.
Plaster is produced for sale (mostly) in bags of 15 to 25 kg weight.
It is not recommended to carry out plastering work with a solution of cement and sand. Such surfaces will not last long.
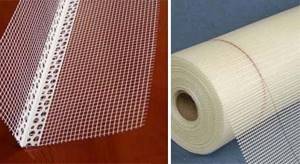
The mesh will strengthen the mixture on the wall.
You will also need water and fiberglass mesh (prevents the formation of cracks, holds the plaster).
You can easily calculate the volume of material needed for work yourself:
- according to the consumption data indicated on the packaging per 1 sq. m of treated surface;
- purchase (approximately) mixtures for one wall;
- After plastering, calculate the practical consumption and purchase more for the required area.
Features of styrofoam plaster
We have already become familiar with the first feature - the existence of special mixtures. The second feature is foam plastering. This work is carried out using reinforcing mesh. Without it, sufficient mechanical strength of the soft EPS coating is unlikely.
The third “strange thing” is that the surface of the insulation boards is not coated with a primer. Plastering on polystyrene foam is a fairly simple but effective job. The materials are cheap and easy to use.
There are also some nuances when plastering internal thermal insulation and facades.
You cannot plaster polystyrene foam with ordinary cement compositions with sand. Cement corrodes PPS
Along the façade
With the beginning of the use of polystyrene foam, the development of buildings in which the cladding was made of different materials appeared.
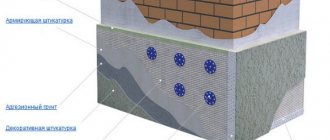
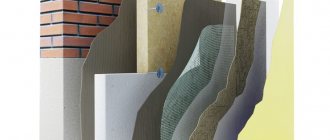
The most successful technology is called “wet facade” - the construction of a multi-layer “pie” in which the materials of each layer perform their function:
- façade primer for plaster;
- adhesive plaster mass;
- layer of sheet insulation;
- plaster (adhesive) solution;
- reinforcing mesh;
- leveling plaster layer;
- primer layer;
- finishing coating.

External cladding with foam plastic is the most reasonable and correct solution, since in this case:
- The dew point (the place where condensation forms) is taken outside the room, located inside the sheet insulation, where there is nothing for condensation to form from.
- In this case, the room also does not lose its volume.
- Heat accumulation occurs and the rooms cool down much more slowly.
However, there are cases when it is not possible to place foam sheets under the façade plaster.
Indoors
Insulation and plastering of walls using polystyrene foam indoors is used if:
- it is impossible to get close to the wall from the outside, for example, there are other buildings nearby, or this is insulation and plastering of a balcony (loggia) located at a high altitude;
- the building is recognized as a historical monument;
- prohibited by the rules for decorating houses in the center of a populated area.
In addition, foam plastic inside the house may be needed to insulate the slopes of the front door, and also if it is not possible to insulate the slopes of the apartment windows from the outside.
When insulating walls inside a building, the preparatory work is carried out in the same way as before conventional plastering. Then foam plastic is glued, a mesh is attached and plastered in the same way as on the facade. The difference here may be the finishing stage; if the walls are painted or wallpapered, a particularly smooth surface is required. Putty is applied to the leveling plaster layer applied to the PPS, then dried.
Process technology
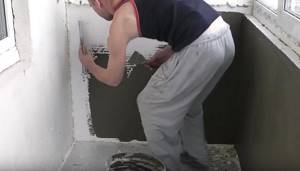
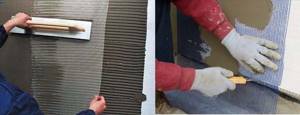
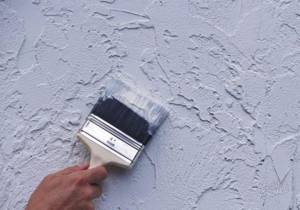
Apply plaster in two layers
Expanded polystyrene plaster is performed in two layers: the 1st - creates a coating of the reinforcing mesh, the 2nd - levels the surface. The work takes place in several successive stages:
- to increase the degree of adhesion between the materials, notches are made on the surface of the insulation boards (using a hacksaw or a needle roller in increments of about 5 cm);
- From the beginning, the door and window openings of the building and its corners are reinforced with fiberglass mesh;
- complete covering of a reinforced wall with mortar;
- rubbing the first layer;
- applying a second plaster layer;
- final (final) grouting;
- primer for finishing. For more information about plastering, watch this video:
The layer of mortar should be 2 - 3 mm.
At the second stage, for corners and openings, the mesh is cut into strips of the required length (on average up to 1.5 m) and about 30 cm wide. They are bent in half and tried on the corner (opening).
For the mesh, following the instructions on the packaging, make one bucket of solution (to have time to process it before it starts to dry). It is applied with a spatula on both sides of the corner (10 cm in each direction from the corner). The remaining 5 cm unprocessed is necessary for overlapping the next strips.
The solution is applied in a layer of 2-3 mm. The prepared mesh is pressed into it with a spatula from top to bottom. A ready-made mesh profile is also used for corners.
Then the entire wall is reinforced: the mesh is pressed into the solution, covered with a layer of plaster. Work quickly to allow the solution to set. Mesh joints should not coincide with the joints of insulation sheets.
When the plastered surface dries (this will take about 2 hours), then it is rubbed using circular movements with a special grater, which must be periodically moistened with water. Minor roughness should be left for better adhesion to the second layer. For more information about finishing polystyrene foam, watch this video:
The finishing layer is applied the next day, followed by more thorough grouting. The surface is primed with a short-pile roller (does not leave smudges) for decorative finishing. Work is carried out in warm (above 5 degrees) calm weather.
You can do the work yourself. The most important condition for obtaining a high-quality result is the use of suitable compositions and adherence to work technology.
The process of plastering foam plastic: stages of work
There are several steps to follow. But first you will need to prepare the tools: a plaster grater, a drill with a mixer, a painting mesh, a building level, sandpaper for grouting, a spatula and a trowel. Consumable materials will require plaster mixture, primer, decorative plaster (mineral or acrylic). Now you can move on to the work itself.
Plastering foam plastic: stages of work
Tools and materials for work
You should prepare in advance:
- short-haired roller (needed for priming);
- construction mixer;
- spatulas with a metal plate;
- trowel or trowel;
- plastic grater with sandpaper attached;
- plastic corners with reinforcing mesh;
- notched spatula;
- scissors for cutting mesh;
- level;
- containers for solution and water;
- brush;
- plaster mixture (or several types);
- primer;
- fiberglass mesh;
- masking tape.
Plastering materials are purchased in a volume sufficient to carry out the entire work (with a reserve). You should purchase products from the same company, preferably from the same batch (this is especially important for decorative color compositions).
We recommend: Balcony repair: sealing seams and cracks, materials and technologies used
It is better to take a trowel and spatula with rounded corners. This is especially important for applying decorative plasters.
Leveling the base
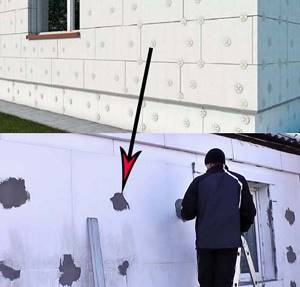
Before you putty the foam base, you need to carry out some preparation. Initially, you need to level the level of all joints between the panels, for which you use a rule or a wide spatula. Such differences must be eliminated first, since this defect cannot be eliminated using mixtures.
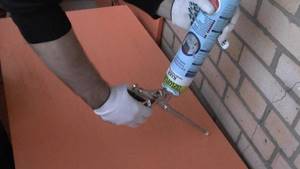
The joints are removed using polyurethane foam. This material allows you to achieve maximum tightness. As soon as the foam has dried, its excess is cut off with a stationery knife. After this, the surface is cleaned of dirt and passed several times with a needle roller. Thus, the adhesion of materials is increased and the mixture will adhere better to the foam.
Sealing joints and seams
Preparation of the solution
For beginning builders, it is better to pay attention to universal mixtures (glue-plaster). This solution is used both for fixing foam plastic to the wall and for plastering. The companies Ecomix and Ceresit have proven themselves to be excellent.
For processing 1 sq.m. the surface requires approximately 4 kg of mixture. Each package contains instructions from the manufacturer. For this stage, any plastic or metal container is used, and the stirring itself is best done using a drill with a “mixer” attachment. This will not only create a uniform consistency of the solution, but will also significantly save effort and time on mixing.
Advice! Professional craftsmen recommend preparing a solution of a thinner consistency for gluing the reinforcing mesh than that specified in the instructions. This will allow all pores on the foam to be treated, and therefore increase the adhesion of materials.
Preparing the base
Responsible stage. The evenness and service life of the plaster “shell” depend on the quality of the work performed.
Before gluing the insulation sheets, the wall is prepared as usual:
- remove unusable old coating, knock down large protrusions;
- chips and cracks are “healed”;
- clean the base from stains of various origins (wash with water, dry, treat with special means);
- Dust is removed from the surface, remaining metal objects are insulated with oil paint;
- install the base profile according to the level;
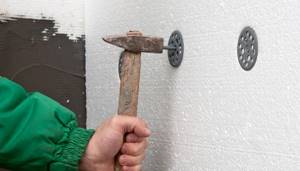
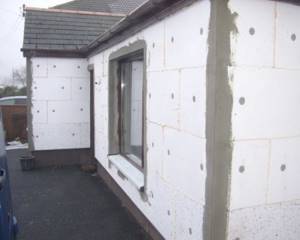
- install foam sheets (using glue and fastening with dowels).
Sequence of preparation of the foam base:
- check the evenness of the entire surface (joining sheets of PPS must be at the same level) by running a rule along the wall;
- the protrusions are carefully cut off, the joints are cleaned with sandpaper;
- remove dirt and dust from the surface;
- To increase adhesion, the top of the foam plastic is rolled with a needle roller (the solution will penetrate into the holes formed during plastering).
Beginners often wonder: is it necessary to prime the foam before plastering? If plastering is done with special mixtures for PPS or mixtures from Knauf, then no primer is required.
But where mechanical loads can be increased (to the height of a person’s height), a primer for foam plastic will not be superfluous. You can cover the walls themselves with concrete contact or Ceresite. After plastering (for finishing), the insulated wall is primed.
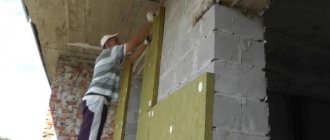
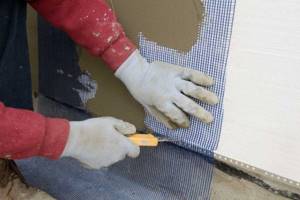
Installation of plaster mesh
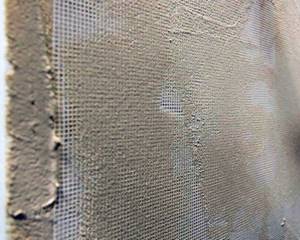
In order for the plaster to adhere securely to the foam, a reinforcing mesh is pre-installed on it. This layer provides protection against cracking and provides additional surface strengthening.
It is best to purchase dense meshes, since the mixture holds more securely on them. The best option is a mesh with a density of 130-160 g/sq.m., moreover, it must be resistant to alkali, which is present in the mixtures.
But you need to know how to apply such material to the corners correctly. The work has the following sequence:
- the mesh is cut into strips of 1 m, with a width of 30 cm;
- a bend is made exactly in the middle of the segment, which will be used to insert the tape into the corner;
- using a wide spatula, apply the solution to an angle in accordance with the length of the tape, but at the same time apply the mixture along the width an additional 5 cm on each side to create an overlap;
- the segment is applied to the treated surface and smoothed with a spatula (direction - from top to bottom and from the center to the edges).
Processing external corners
Processing the remaining sections of the walls occurs in a similar way. Since the mixture dries quickly, it is recommended to apply it in small areas - 90x100cm. A mesh is placed over the mixture and processed with a spatula so that it sinks into the solution. If this does not happen, then it is permissible to apply more putty on top. The mesh is installed with an overlap.
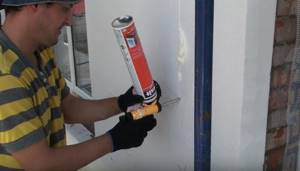
Closing seams
The seams between the EPS sheets must be filled with polyurethane foam to prevent the formation of cold bridges. If the mounting foam at the joints protrudes above the EPS, it is cut off (the seams must be completely filled). If the seams are large, they are filled with strips of polystyrene foam of the required width, placed on the foam.
Grouting stage
Each putty has its own drying time, which is indicated by the manufacturer on the packaging - 3-4 hours in summer, 20-24 hours in winter. Using sandpaper or a plastic grater, treat all surfaces.
Grouting is carried out in a circular motion - counterclockwise. If the sandpaper comes into contact with an area with undried mixture, you will need to change the paper immediately.
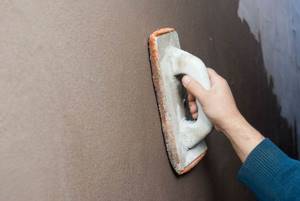
Surface grinding
Applying primer and leveling
Next, you need to prepare the surface for the finishing coat. To do this, you can use two different mixtures or one universal one. But in the first case, before priming the surface of the foam, you need to level it.
The process will require the following steps:
- Using a spatula (35cm wide), the solution is applied to the walls - if the walls are grouted well, a layer of 2mm will be enough;
- as soon as the layer is completely dry, the surface is sanded - it is recommended to start this stage 3-4 days after puttying;
- then, using a foam rubber or fluffy (short pile) roller, apply a primer that will increase the adhesion of the materials - it is best to use a mixture with antifungal properties in order to increase the protection of the walls.
Advice! It is recommended to ensure that the joint points of the leveling layer do not intersect with the joints of the reinforcing mesh. If this condition is met, then seams will not be noticeable on the surface.
It is recommended to apply the primer in two layers, but each subsequent coat is applied only after the previous coat has dried. As soon as the priming is completed, the finishing begins.
We recommend: 10 facts about joint and shared ownership of housing
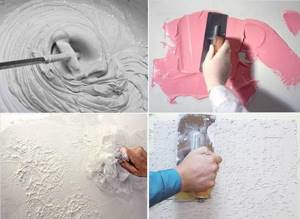
Decorative finishing
For external work, there are special facade plasters, which are designed taking into account that they will regularly experience temperature changes and the effects of climate change. Each manufacturer adds binders and additional components to the composition, on which the further performance properties of the plaster depend. Therefore, before puttingtying the foam, it is necessary to familiarize yourself with the filling of the selected mixture and correlate it with the climatic characteristics of the region.
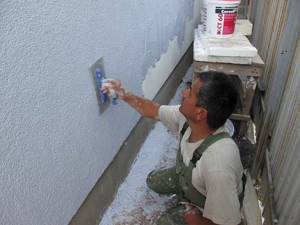
Applying the final layer
Decorative plaster is applied as follows:
- the solution is prepared - if you have to work with a large area, it is best to prepare it in portions so that the mixture does not have time to harden (it is not recommended to re-dilute the plaster);
- the plaster is applied in two layers, each of which should not be thicker than 4 cm - a new layer is applied only after the previous one has dried;
- as soon as the mixture is half dry, start grouting - at this stage they begin to form a pattern on the surface.
Painting finishing plaster
Important! The selection of tools depends on the planned structure. A specially shaped roller is used for this. But texture can also be created using improvised means, for example, a notched trowel.
In order for the final stage to pass efficiently, it is necessary to carry out all the work under certain weather conditions: temperature ranging from 5 to 25 degrees, with humidity no more than 65-70%. It is advisable that there is no strong wind outside.
Plastering polystyrene foam is not such a difficult task, which can be done with your own hands. The main thing is to choose the right materials and follow all stages of the process.
DIY plastering
Now let’s take a closer look at how to properly plaster polystyrene foam. The algorithm is as follows:
- preparation of the base;
- fastening the reinforcing mesh is the first adhesive layer;
- applying a base leveling layer;
- finishing mixture.
Tools you will need:
- mixer;
- container for mixing;
- reinforcing mesh;
- sandpaper for rubbing;
- putty knife;
- building level;
- adhesive solution and mixture for plastering (rough and decorative);
- primer.
Preparing the walls
The foam slabs themselves are even, but before plastering, check that their level matches. To do this, follow the rule along the wall: it should not cling at the joints of the panels. This is important because subsequently it will take a larger amount of plaster to level the defect than originally planned.
Each seam is sealed with polyurethane foam, and the excess is cut off clean.
Since the material is smooth, it makes sense to roll the surface with a needle roller or “comb out” with a fine-toothed hacksaw. This will increase adhesion: the plaster on the “combed” foam will stick better.
The mounting dowels are puttied and then rubbed. The evenness of the surface is checked by the rule.
Installation of mesh with glue
Reinforcement of polystyrene foam with fiberglass mesh is necessary for better performance with plaster, to give it strength. Without this reinforcement, the finish will crack and fall off. For outdoor work, choose a dense mesh that is resistant to alkalis. The corners of the building are covered with a special perforated corner with a mesh.
The reinforcement process is quite simple:
- An adhesive composition with a mesh width of + 10 cm is applied to the entire height of the wall;
- The mesh is pressed against it and smoothed out from the center to the edges, from top to bottom. Choose the length of the segment as it will be more convenient for you to glue;
- The top of the mesh is completely covered with a thin layer of glue;
- The next part of the wall is strengthened in the same way. But it is worth remembering that the mesh is laid overlapping with the previous one.
- The corners are glued in the same way.
Grout and primer
After the mixture has completely dried (3-4 hours in hot weather and about a day in cool weather), the mesh must be leveled so that it does not protrude above the layer of solution. This is done in a circular motion using sandpaper or a grater. If in some area the plaster has not dried and remains on the sandpaper, then the paper is changed.
Before applying a layer of cement-sand plaster, the surface is primed. This is necessary to increase adhesion and bind dust. The primer also prevents the absorption of moisture from the applied plaster - the dehydrated solution quickly sets and loses strength. In general, priming is a must.
A deep penetration primer, for example Ceresit CT 17 or KNAUF Izogrund, is well suited for these purposes.
A roller is used for priming. Drying time will range from 5 hours to a day depending on the weather.
Applying the base layer
The mixed cement-sand mortar is applied to the wall manually with a spatula. Then it is leveled with a rule along the entire wall. If the mesh is laid well, then a layer 2-5 mm thick is enough.
Immediately after this layer has dried, it is also necessary to wipe down the surface - if you leave the work for “later,” there is a risk of the plaster drying out, and it will be more difficult to carry out the treatment.
The dried plaster is primed. After this, the facade of the building is ready for decorative finishing or painting.
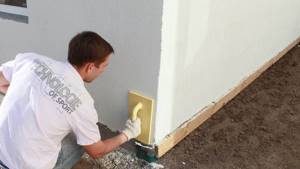
Plastering doorways and slopes
After replacing window or door frames, the best insulation of the openings formed between the frames and the facade will be to make slopes made of foam plastic with plastering. You can make slopes as soon as the polyurethane foam has dried.
The simplicity of the work is similar to installing drywall. Blanks are cut out of PPS sheets and glued to the wall along the perimeter of the frame (foam plastic also needs to be mounted under the window sill. When the glue dries, dowels with fungus are installed. Plastering the foam is done in the same way as described above (corners are placed on the mortar, strips of reinforcing mesh are attached, etc. .d.).
In order not to stain the frames, they are covered with masking tape before starting foam plastic work.
Why is a plaster mesh needed and how to install it
Some “craftsmen” advise plastering the facade directly on the foam, covering its surface with a primer and glue.
They explain this by saying that polystyrene foam is a material on which plaster, regardless of its type, cannot be maintained for a long time.
Well, if the plaster falls off anyway, then there is little point in messing around with the mesh.
Meanwhile, this approach to finishing the facades of cottages is incorrect, since strengthening the coating of foam slabs with a fiberglass mesh makes the surface more durable.
The purchased mesh must be cut into pieces - their width should be approximately
one meter, and the height is like a working surface.
When you decide to plaster the facade, which is covered with foam plastic, with your own hands, it is important to take care of an assistant.
After all, it’s easier to do the work together. In addition, the work can be done more quickly.
A layer of the prepared composition is applied to the foam plastic, covering a surface the size of a mesh piece with it.
The work is carried out with a notched trowel. Then the mesh is quickly but carefully pressed against the surface.
It is necessary to press down well, completely pressing it into the prepared composition. After this, using a spatula, you need to smooth the surface. As a result, the reinforcing mesh will become completely covered with the solution.
Gluing the next piece should be done with an overlap - approximately eight to ten centimeters.
At the same time, they do not need to be coated with the solution first, otherwise the seam will look quite rough.
Using a similar method, it is necessary to cover the entire façade of the building with reinforcement.
Finishing the facade with foam plastic differs in that first you need to cover all the corners with reinforcing mesh and only then begin to reinforce your facade.
Grouting mesh
A surface that dries out during the day needs to be rubbed down. To do this, take a wooden trowel, which is soaked in water for a certain time and gently rubbed.
You can also use a plastic trowel with an emery cloth attached to it. Thus, the coating is brought to almost perfect condition.
Upon completion of grouting the mesh, it is necessary to apply a leveling layer. For this, a solution is prepared that is similar to the solution for gluing reinforcing mesh. It is important to follow the instructions.
It is desirable that the solution be more liquid, since it should drain directly from the spatula. As a result, the surface will be thinner.
The composition must be applied in small areas. Their junctions overlap. In this case, the joints of the mortar areas should not be located above the mesh joints.
After this, the leveling layer dries during the day (but not more than four days) and it is grouted in the same way as the mesh was grouted. The base is now completely ready for final coating.
Consumption of façade plaster on polystyrene foam
If styrofoam plastering is done with a universal facade mixture, then the consumption per square meter will be 10 kg. Using two types - adhesive and leveling plaster, prepare 4 and 6 kg per square, respectively. The same consumption - 9-10 kg will be if a polymer composition is used. Of these, 3.5-4 kg will be needed for gluing the insulation, the rest will be needed for plastering on foam plastic. An online calculator will help you calculate the consumption of leveling plaster.
Insulating a house with polystyrene foam is becoming more popular every year. Having familiarized yourself with how to plaster polystyrene foam, what materials are better to purchase for the facade, which façade insulation is preferable to room insulation, you can easily solve many problems that arise during repairs or construction. Plastered thermal insulation will last longer if it is promptly tinted and repaired if the integrity of the “shell” is damaged. Your home will be safer, and you will be warmer and more comfortable in it.
Final works
The last stage of plastering foam plastic is the creation of a decorative layer, before applying which the rough surface is primed using a fine-pile roller.
Applying a decorative layer
“Bark beetle” or “wet” plaster technology is often used as a finishing finish. Apply them yourself using a spatula and grater. The thickness of the decorative layer depends on the consumption per 1 m2 and the size of the granules included in the mixture. The larger the granules, the thicker the finish coat will be.
The finished surface is left to dry completely, after which it is painted in the desired color.
High-quality foam plaster is the key to the durability of the coating and the preservation of the aesthetic appearance of the structure. Therefore, it is best to use special ready-made mixtures here. But if the budget does not allow you to resort to the most effective methods, then you can get by with ordinary cement-sand mortar.
The main thing in this case is to adhere to the correct technology for preparing the solution (1:3 plus 70 g of PVA glue per 10 liters of plaster), bringing it to the desired (creamy) consistency.
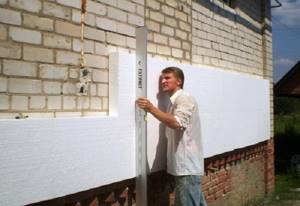
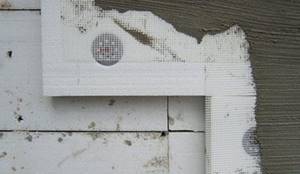
Installation of expanded polystyrene boards
As mentioned above, Ceresit glue is used for attaching polystyrene foam boards. If the walls have unevenness from 3 to 15 millimeters, then the composition is applied with a trowel along the contour of the slab. In this case, the glue strip should be 4 centimeters wide. Beacons are applied in the central part of the insulation. The number of such spots on one canvas should be 8. Their diameter is 10 centimeters. The glue strip along the contour should be applied with gaps, which will prevent the formation of air bubbles. The height of such stripes should be 20 millimeters.
When the irregularities are up to 3 millimeters in size, the glue is applied in a continuous layer, and the indentation should be three centimeters from the edge. In this case, you need to use a notched trowel. Choose a tool with a tooth size of 12 millimeters. As soon as the plaster-adhesive mixture has been applied, the slab is applied to the surface and pressed with blows of a trowel. The area of adhesive contact after pressing the canvas should be 40 centimeters from the area of the surfaces to be fastened.
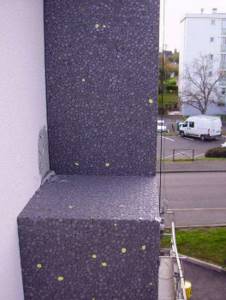
The plates are fixed in one plane so that the ligation of the seams has a T-shape
It is important to ensure that the gap between the plates is not more than 2 millimeters. Larger seams can be filled with polyurethane foam or polystyrene foam scraps
The Ceresit glue will dry completely after three days, only then can you begin additional fixation, if there is such a need. For this, craftsmen advise using facade dowels. After this period, the master can form a reinforced layer.