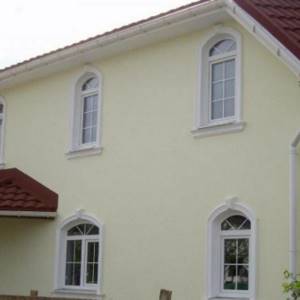
Expanded polystyrene is a heat-insulating building material that is popular for insulating the facades of private houses and apartments located in multi-storey buildings. Insulating the facade with polystyrene foam is a quick and simple solution to the problem of heat loss in the room. The article describes in detail all the features and nuances of the insulation process.
Before you start purchasing building materials, you need to determine the quantity. This is not difficult to do; just measure the area of the walls and, based on these values, calculate the required number of sheets of expanded polystyrene.
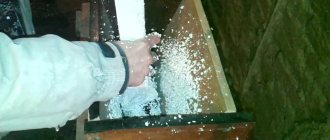
Glue mount
The heat insulator cannot be nailed to concrete, aerated concrete, brick and similar surfaces. To fix the foam boards, use EPPS glue (more details here). It is used for gluing slabs, as well as reinforcing mesh, which can be part of the building insulation system.
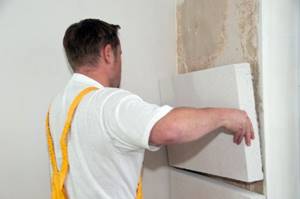
If the surface of the insulation board is smooth, additional scratches or punctures are made on it (for example, with a needle roller or an ordinary nail). This will improve adhesion and allow the glue to securely “grab” the insulation.
The glue is diluted according to the instructions, which allows for a consistency that is either more or less liquid. It is more convenient to attach a slab of extruded polystyrene foam if the glue resembles thick sour cream. You can coat the entire surface of the insulation (it is better to apply it directly to the insulation, and not to the wall), however, the generally accepted method is in which 5-7 piles are “blurred” onto the slab, after which it is fixed on the wall. By applying pressure, the glue is distributed on the wall under the slab. The slab is leveled. At the same time, the solution is significantly saved.
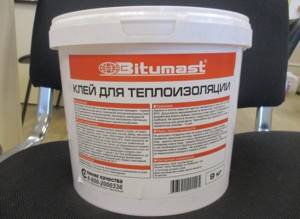
Bitumen adhesive Bitumast
Bitumast mastic is similar in properties to a plaster-adhesive mixture, but includes bitumen, which plays a binding role. The advantage of the glue is its excellent compatibility with extruded polystyrene foam; it adheres to the material for a long time without any complaints. The product also has waterproofing properties and protects the joints of external walls from moisture.
You can easily mix Bitumast, it takes a couple of minutes, you don’t need any special tools (you don’t even need a mixer). There is also no need to warm up Bitumast before use. The consistency is liquid, so apply in a thin layer. There is a significant disadvantage - the mastic sets slowly, and you will have to keep the EPP sheets from slipping for a long time.
Mushroom fastening
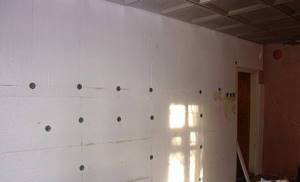
Without stopping at using only glue, extruded polystyrene foam is additionally attached to “fungi” - dowels with a metal or plastic nail, which, thanks to the large “cap,” reliably hold the heat insulator. One slab of standard penoplex (600x1200mm) should have at least 5 “fungi”.
Fastening a slab of extruded polystyrene foam using dowels alone is also used. This method is suitable for low walls with a small load - for example, when insulating a loggia, small basement or garage - where polystyrene foam does not have to bear the load of plaster. If, in addition, a sheathing is mounted on top of the insulation, which in turn must be securely fastened to the supporting structure (wall) through all layers, then there is no need for glue.
It could be mentioned that when installing extruded polystyrene foam to wooden walls, glue is also not used, but only fungi are enough. However, the fact is that such insulation of wooden walls is rarely practiced. Penoplex is not the best insulation for this material. However, this decision is fair when it comes to roof insulation.
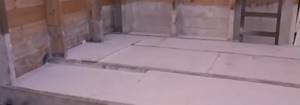
Insulation of concrete floors using joists
This method of thermal insulation involves laying insulation between the joists, which are installed on a concrete base. The algorithm of actions is given below.
Step 1. First, the old floor covering is dismantled, the surface is cleaned of debris and dirt. Then the base is leveled in the same way as described in the previous paragraph of the article.
Step 2. Waterproofing material is laid (polyethylene film is suitable) with a minimum overlap of 10 cm. All joints are sealed with mounting tape.
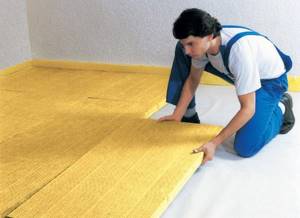
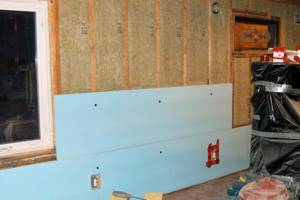
Step 3. Next, the logs are installed. The pitch depends on the width of the extruded polystyrene foam sheets, and the height depends on the thickness (5 cm, 10 cm or 15 cm). To fix it on the supporting plate, holes are made in the logs, then the guides are installed according to the previously made marks and secured with driven dowels.
Step 4. Insulation boards are laid, a regular knife is used for cutting.
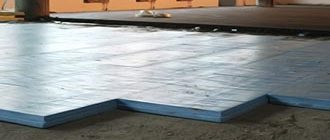
Insulation of concrete floors using joists
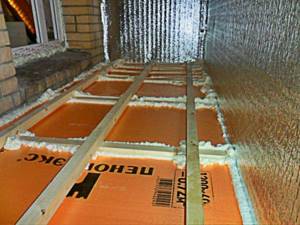
Photo of how to properly lay insulation and joists on the floor
Step 5. A vapor barrier material is attached to the joists on top of the insulation.
Step 6. Next, a durable material is laid (often OSB boards), on top of which the flooring will be laid. The plates are fastened with self-tapping screws in increments of 30 cm; between them (the plates) you need to leave a small gap (about 3 mm) for temperature and humidity compensation. This installation method is called “floating” and it provides for a gap between the walls and slabs of at least 1.2 cm.
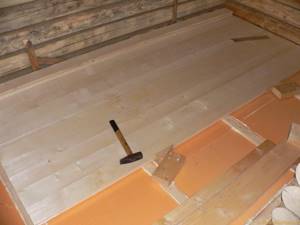
An example of attaching a floorboard over insulation
Important information! For greater reliability of fastening, the slabs can be glued to the guides using special wood glue.
All that remains is to lay the flooring.
Video - Thermal insulation with polystyrene foam on joists
Installation of polystyrene foam without fastening
In certain situations, it is possible to install extruded polystyrene foam without any fastening at all. For example, when it is laid on the floor or in interfloor ceilings. In this case, there is simply no need for them - the insulation will either be filled with screed, or will remain between the joists, which will bear the entire load of the floor.
Unlike regular polystyrene foam (foam), the structure of extruded polystyrene foam allows the production of slabs with cut grooves at the ends, which ensures a tight fit during installation. When laid on the floor, such insulation is a continuous covering without cold bridges. If the slabs are placed between wooden joists, it is advisable to achieve as close a fit as possible. If necessary, fill the cracks with polyurethane foam.
These are the main methods of fastening extruded polystyrene foam boards. Their selection depends on where exactly the insulation will be installed. The surface to which it must be attached – concrete, brick, wood or other materials – also matters.
Characteristics of extruded polystyrene foam
Extruded polystyrene has excellent qualities:
- High strength (withstands loads up to 35 t/m2),
- Resistance to aggressive environmental factors
- Waterproof,
- Durability – (operation up to 50 years),
- Low vapor permeability, zero capillarity
- Environmental friendliness (storage containers, disposable tableware and even toys are made from polystyrene foam),
- Does not support combustion without a flame source and high temperature
Extruded polystyrene foam is produced in different densities. New on the market - high-hardness EPPS - carbon polystyrene foam. It contains graphite particles in its structure, which gives it the ability to withstand loads of up to 50 t/m2. You can buy extruded polystyrene foam of this type in Kyiv from TM Technonikol, Penoplex and other manufacturers.
Polystyrene foam board
Density: 35 kg/m3 Sheet thickness: 20/30/40/50mm Sheet size: 1.25 m * 0.6 m Purpose: insulation of floors, walls, foundations
How to attach extruded polystyrene foam to a wall
Extruded polystyrene foam is widely used in civil and industrial construction. This material has excellent thermal insulation properties, is frost-resistant, lightweight and easy to use, and is also low in cost. It has successfully supplanted many popular insulation materials, firmly taking its place as a leader in the construction market. In this regard, users increasingly have many questions about the material.
What is the product? How to attach extruded polystyrene foam to the wall? Are additional components needed? This article will help you become familiar with the specifics of laying polystyrene foam on walls and learn how to do the work yourself.
Application area
Polystyrene foam can be used as insulation not only in civil construction, but also in industrial construction.
Expanded polystyrene is used to insulate the following places:
- walls, floors, ceilings;
- attics, balconies, attics;
- roofs;
- foundations, plinths, basements, blind areas;
- fences;
- pipelines;
- for installation of heated parking lots;
- for the construction of drainage outlets;
- when creating sandwich panels and much more.
Foam boards are lightweight and have convenient sizes; as a result, they can be installed by one person, and in any position. For their installation, adhesive mixtures and, if necessary, special plastic dowel umbrellas are used. Metal fasteners are not used for insulation, as they conduct cold.
Reviews
“For a long time I couldn’t decide what to buy for insulating the warehouse - mineral wool or polystyrene foam. But, after reading reviews from buyers and builders, I decided that it was better to take polystyrene foam boards, since they do not absorb moisture. Mineral wool, of course, will also not absorb and will insulate well if covered with membranes, but its installation method did not suit me. I insulated the walls with foam plastic 50 mm thick. Working with him is a pleasure, it couldn’t be better. The boards are lightweight, adhere well to the adhesive solution and do not emit dust, which means there is no harm to health from it.”
Maxim, St. Petersburg.
“I join all the positive reviews about polystyrene foam. It is truly one of the best insulation materials. Previously, there were always problems with the foundation and walls. In winter, the soil around it froze strongly, swelled, and as a result, cracks appeared in the walls. Last spring I insulated the foundation and blind area near the house with polystyrene foam. The winter passed, not a single crack appeared, and the house became better and warmer.”
Kirill, Nizhny Novgorod.
“Before choosing insulation, I read a lot of reviews, and, after weighing all the pros and cons, I decided to buy polystyrene foam. Compared to other thermal insulations, it suits me better than others, since there is no need to make a frame. I only insulated one wall of the house with it, on the north side. I did all the work myself, since the slabs are light and are laid on an adhesive mixture. Additionally secured with umbrella dowels. In winter I immediately noticed that it became much better. Rooms are warming up faster than before.”
Andrey, Moscow.
“I have been insulating facades for many years and I can say for sure that polystyrene foam is an excellent insulation material. It is cheaper than mineral wool and is easier and faster to install. At the same time, it has an excellent thermal conductivity coefficient. It is easy to process and finish. Plus, it can last more than 30 years.”
Mikhail, Moscow region.
Price
The price of insulation depends on the thickness of the material, as well as the presence of additional properties (self-extinguishing). A table with prices at which you can buy polystyrene foam from different manufacturers, sizes and thicknesses:
| Name | Dimensions, mm (length/width/thickness) | Price, rubles | |
| Knauf Term | Roof | 1200x1000x50, 1.2 m3 | 5460 |
| Country house | 1000x1200x20, 1,176 m3 | 2000 | |
| Wall | 1000x1200x30, 1,188 m3 | 3560 | |
| Country house | 1000x1200x100, 1.2 m3 | 2190 | |
| Wall | 2000x1200x50, 2.4 m3 | 7200 | |
| PSB-S 15 | 1000x1000x60, 1 m3 | 2100 | |
| PSB-S 25 | 2930 | ||
| PSB-S 35 | 4130 | ||
| PSB-S 50 | 5380 |
In order to determine whether polystyrene foam is harmful or not, you should ask the seller for a quality certificate and check its composition. It is better to purchase brands that do not use phenol-formaldehyde components in their production and also have the largest number of positive consumer reviews.
A little about the product
Extruded polystyrene foam is an analogue of foam plastic, consisting of small edges. Production involves foaming the material using agents, which can be freon or carbon dioxide. Numerous tests have confirmed the negative impact of the former on the Earth's ozone layer. In this regard, manufacturers are increasingly trying to produce polystyrene foam using CO₂. The granules themselves are obtained by passing the mixture through a special matrix with small cells. As a result, finished sheets and panels are formed. This form was not chosen by chance, since laying extruded polystyrene foam in the form of small slabs is much easier and more convenient.
Do you need hydro- and vapor barrier?
The presence of waterproofing in a wall pie using EPS is not required. Vapor barrier is present in the form of the insulation itself, which in itself is an excellent insulator, although in exceptional cases, when the room has a high content of water vapor, a layer of vapor barrier is laid on top of the EPS layer.
At the same time, simultaneously with laying a vapor barrier or insulation, it is necessary to take care of high-quality ventilation in order to organize the replacement of internal air and the removal of steam to the outside. Then the house will become much more comfortable, in addition, the passage of vapors through the cake material will be reduced.
Areas of use
A special insulating material is indispensable when arranging thermal insulation at home. The products are used when installing floor heating systems, and they do not affect the height of the room, unlike many similar materials. Insulation is often practiced for buildings where the floor covering is laid directly on the soil. The thermal insulation material can withstand significant mechanical loads and is also resistant to moisture. Sometimes polystyrene foam is attached to the foundation. It prevents freezing of the structure and reduces heat loss, which due to poor insulation reaches 10%.
Description of material
Expanded polystyrene is very similar to compressed foam. All this is due to the production process.
It differs from polystyrene foam, which is processed with dry steam, in that it is produced by melting polystyrene granules. Then a single structure is obtained. This material has some advantages:
- Heat conservation; Moisture resistance; Vapor permeability; Not subject to deformation.
Plus, the insulation sheets do not rot, and this is a very important factor for residential buildings.
Polystyrene foam is divided into three main types: expanded polystyrene, polyisocyanurate and extruded. Absolutely all of them contain brominated fire retardant in their unusual composition - a dangerous substance.
Mounting features
Experts identify several ways to secure extruded polystyrene foam to the wall. This is done through:
The appropriate technology is selected based on many factors. How to properly lay extruded polystyrene foam depends on the need for protection with additional non-combustible materials, the specific location of attachment, the presence of negative external influences, etc. However, each method has its own characteristics, which should also be taken into account when choosing.
Adhesive fastening
Concrete, aerated concrete, brick and other similar surfaces cannot be insulated with polystyrene foam using dowel-nails as fasteners. Therefore, the best option in this case is glue. For more reliable fastening, a special cement-polymer based substance is used. It is capable of firmly fixing not only polystyrene foam, but also the reinforcement mesh, which is often an additional component of the insulating material.
The adhesive composition is diluted in accordance with the instructions. It’s better if you get a thick, creamy consistency. Experts recommend applying the composition to the surface of the insulation, and not the walls, “spreading” pieces of glue over the entire base. After this, you should firmly press the slab against the wall and wait for it to level. Therefore, when the question arises, “How to glue extruded polystyrene foam to concrete,” there is no need to doubt that the best option in this case is special glue.
Fixation with nails
Metal or plastic “fungi” are widely used to fix panels.
They look like nails with a wide head, which is why they got their specific name. To fasten one slab you need about 5 “fungi”, but if you need to increase strength, you can increase the number. Before installation, holes are drilled in the sheet into which nails are inserted. Therefore, for fastening you will need a drill, a screwdriver and “fungi”. The choice of the optimal size of screws depends on the thickness of the thermal insulation layer and the material from which the walls themselves are made. Fixation with dowels is suitable for low rooms with light loads. This could be a basement, a garage, etc. It is worth noting that for wooden walls, nail fixation must be used, since it will not be possible to attach extruded polystyrene foam to the wall with glue. Therefore, in some situations you simply cannot do without special nails.
Using mastic
This method is in many ways reminiscent of the specifics of laying slabs using glue. For the work, bitumen mastic is used, which does not negatively affect the material. It is applied to the slab in the form of dots or stripes in the corners and in the center. Approximate consumption is 0.5–1 kilogram per square meter. The advantages of mastic are as follows:
However, prolonged drying can cause the polystyrene foam to “slip,” so it is better to perform additional fixation with dowels.
In general, figuring out how to attach extruded polystyrene foam is not difficult. It is enough to carefully study the recommendations and strictly follow the instructions supplied with the product. However, if you are going to do installation for the first time, then it would not hurt to first see how specialists attach extruded polystyrene foam. This will be a good visual example that will fully display the features of fixing work.
For information
Different types of XPS have differences in compressive strength, technical characteristics, and density. For example, there is a special type of XPS, with a corrugated or embossed surface for more effective adhesion to plaster and adhesive compositions. XPS boards can be easily stored even outdoors, as long as direct exposure to sunlight is avoided.
Liquid Nails
A specialized adhesive solution, produced in tubes, can be used for working with surfaces of any complexity.
When choosing liquid nails, the location of the construction work should be taken into account. If you are gluing EPS indoors, conventional compounds will do; if outdoors, select a special glue with tolerances for climatic conditions and moisture resistance. The composition is applied over the entire surface of the sheet in a “snake” fashion, using a gun into which the tube is inserted. The prepared block is pressed against the insulated surface for 10-20 seconds. This time is enough for the liquid nails to set.
This method is good for everyone, except for the cost.
If you take into account the cost of one tube of glue and calculate its consumption, it turns out to be quite expensive. To complete the above, it is necessary to remember that in order to achieve the most reliable fastening of foam sheets, it is advisable to use umbrella dowels on the walls. They will become a reliable insurance for any of the adhesive compositions offered to your attention.
How to attach polystyrene foam to the wall for wall insulation
Expanded polystyrene is a modern insulation material created using heat treatment with the addition of polymer granules to a foaming component in an extruder. “Extrusion” is a technological process in which a component is pressed into a foam mass at high temperature to give it the desired properties.
As a result of this process, the new material compares favorably with conventional foam in a number of parameters:
High thermal insulation qualities and durability have made expanded polystyrene almost indispensable for insulating buildings. More than 75% of the territory of our country is in harsh climatic conditions.
There are several ways to use polystyrene. Laying foam inside hollow walls. This method is applicable directly during construction. The method of insulating walls with polystyrene from the outside has become widely used. This is the most commonly used method, which is used both in the construction and reconstruction of various objects, and insulation of already constructed buildings.
What you need
In order to properly insulate your home and then live peacefully in warmth and comfort, you will need the following materials:
Expanded polystyrene sheets. Their number is equal to the wall area, not taking into account the windows. If the thickness turns out to be very non-standard, then two layers will be required.
And the second of them should be attached only after this glue has dried. The slabs are mineral. They are laid for safe purposes, to avoid fires. Place around doors and windows.
The slabs must be high-strength and dense, the same in thickness as the foam sheets. As many windows as there are slabs. Reinforcing mesh. Primer. If the surface is porous, two layers will be required. Glue, represented by a dry mixture. Tools and materials for insulation. Metal corner with perforation. Hammer drill with a 10 mm drill. Mixer for construction. Level. Stationery knife.
The use of expanded polystyrene in the construction and reconstruction of buildings
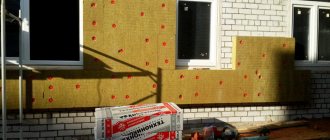
External wall insulation with polystyrene foam has received the most widespread use in the use of this material. The thickness of the sheets in this case is from 50 mm to 100 mm. Before starting this work, wall preparation is important. The foam is attached to the walls using special glue and plastic mushroom-shaped dowels. According to the work technology, reinforcement with dowels is carried out only three days after gluing.
For corners use a special corner profile. All this prevents the material from slipping while the glue dries during work. After all, the amount of slippage of even a light sheet can reach 10 cm.
After gluing the foam sheets, a reinforcing mesh is used to create a more rigid layer under the plaster. This will make it easier to later finish the building’s exterior, plastering and painting. External thermal insulation work can only be carried out on days without rain. Application of mastic under the mesh, leveling mastic, or primer should be done only after the previous layer has dried. The air temperature must be at least 5 C°.
Construction of houses
0 votes
+
Vote for!
—
Vote against!
The question of whether to insulate your home often becomes relevant before the cold weather. Nowadays, saving has become very popular, whether this is caused by economic factors, or people just want to save money somewhere, leaving an extra penny for their vacation, but the fact remains a fact. It’s true that external insulation is now being installed not only for the sake of saving money. This need is often caused by the technical characteristics of housing, where, for example, there are very thin walls - laid in one brick, or strong drafts, when even metal-plastic windows do not save. Whatever one may say, insulation will always be beneficial.
Table of contents:
- Expanded polystyrene for external cladding
- Do-it-yourself wall insulation with expanded polystyrene: surface preparation
- How to insulate walls with foam plastic with your own hands: step-by-step instructions for attaching insulation
- DIY polystyrene foam installation video
Expanded polystyrene for external cladding
Each owner, before taking on the work of insulating a house, will find out what materials are used for this task, what advantages they have and will decide to use one of them.
So, the following materials are most widely used for exterior cladding:
1. Expanded polystyrene - styrene granules filled with gas, soluble in the polymer mass (simply “foam plastic”).
2. Mineral wool - formed after spraying molten glass by interweaving such fibers.
3. Polyurethane foam is a gas-filled plastic obtained by foaming and hardening (in simple terms - “foam rubber”).
4. Basalt slabs - fibers from molten rocks, slabs are formed using a synthetic binder.
5. Cellulose insulation - paper-based, loose and fibrous material.
Today, the most common type of external insulation is polystyrene foam. It is used by both professionals and independent craftsmen. If it is clear to a professional why this particular material is worth taking for work, then a person who decides to carry out the work himself still needs to become familiar with its advantages.
Do-it-yourself insulation of walls with polystyrene foam begins with the study of the material that will be used. Expanded polystyrene, otherwise “foam plastic”, has a number of features that distinguish it from the above materials - “insulation materials”:
- cost - a very “economical” insulation, which gives it the right to be in first place among insulation materials, because there are a lot of people who want to save money;
- easy to cut and install - this advantage also gives you the right to first-line purchase among other materials, because cladding walls with foam plastic with your own hands, without the help of a professional, will be much easier if the material you are working with is easy to use;
- reliable and durable - this is what is important for any building material, because you want to make repairs as rarely as possible, and not waste interesting life moments on construction.
Do-it-yourself wall insulation with expanded polystyrene: surface preparation
In order for all work to be completed successfully, you need to start it wisely. Familiarization with the material that will be the main one during installation has already been made, its advantages and some disadvantages have been studied, all that remains is to prepare the surface and begin insulation.
Whatever installation option you choose: with glue, with “fungi” fasteners, or with the help of a frame, you must first clean the walls of various contaminants, previous cracked and partially fallen off layers of plaster, and various objects that may interfere with the installation of the insulation. All this is combed, knocked down, leveled.
There are times when a wall being prepared for insulation requires more attention in preparation. These are the cases when it needs to be puttied in some places where differences exceed 2-3 cm. Such “gaps” on the wall must be leveled, otherwise the insulation may not be attached correctly, and accordingly, it will not perform its function well enough.
Important! Putty for external work comes in different types; when purchasing it, you need to consult with the seller, be sure to indicate that it will be used for external work.
After these manipulations, it is necessary to prime the surface of the wall (do this after the plaster has completely dried). It is especially necessary to prime if you have putty on the wall, and if adhesive mass will be used in further work. A primer (necessary with deep penetration property) will provide better adhesion between all layers when working on insulation.
For more precise fastening of insulation, further plastering, and possibly fastening siding, you can make a whole system of beacons and plumb lines. These manipulations are not difficult to perform, but they help to do everything efficiently and facilitate installation, since the outer edge of the insulation is visible from them.
You need to attach anchors along the upper edge of the wall, tie a strong thread or a special plumb cord to them, to which weights will be attached to the floor. It is important to also make threads located horizontally, then a mesh will come out, with the help of which you can really navigate when installing the insulation blocks and frame.
So, preparing the wall for the subsequent installation of polystyrene foam requires the following materials and tools:
| Material/tool: | Application: |
| putty knife | With its help you get rid of excess old plaster, use it in the future for puttying the wall |
| putty | Building material for leveling the wall if necessary |
| primer | Construction material used for better adhesion of different layers when finishing walls |
| Roller | Construction tool, used for applying primer |
| Anchor | A fastener used to attach a thread to it for plumb lines (weights) |
| Plumb cord | A special mounting and marking thread, with its help markings are made for further fastening of the insulation |
All materials should be at hand in order to quickly complete the preparatory work and begin the actual insulation work. But do not forget that surface preparation is one of the most important stages, which should not be treated negligently.
How to insulate walls with foam plastic with your own hands: step-by-step instructions for attaching insulation
As already mentioned, polystyrene foam can be attached in various ways: with special glue, with “fungi” or with the help of a frame. We will consider the option that is the most reasonable and worthy of attention. Fastening with glue, but also using the second method, fastening with “fungi”, has been tested by professionals and many years of using this technology. Each owner will be able to carry out such installation without special expenses, because double reinsurance will cost only a couple of packages of fastening material in the form of “fungi”, and they are inexpensive, especially in comparison with the scale of the entire home insulation.
When purchasing polystyrene foam, you need to take into account the characteristics of your home and buy the material of the correct thickness. After all, when external insulation with polystyrene foam is done with your own hands, this moment is the most common mistake, which entails ineffectiveness of the work, or consequences in the form of fungus and moisture collection in the room.
It is known from practice that the required sheet thickness for a private house must be at least 50 mm, then the insulation will be truly effective. An even better solution would be to install two sheets of 50 mm each with an overlap, which in total will give 100 mm. Such an installation will be ideal both in terms of thickness and thermal insulation, because in this way all cold bridges at the joints will be eliminated.
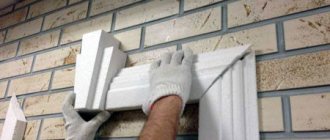
The work will require not only foam plastic of a certain thickness, but also other building materials: a starting profile, construction adhesive, dowels called “fungi” (their length varies depending on the thickness of the foam and the type of wall, from 90 to 120 mm), a metal perforated corner profile , external mesh, metal profile with mesh for slopes, plaster, paint or siding, depending on the decision on the final finishing of the facade.
1. The first thing that is necessary is to install a perforated metal profile at the bottom along the perimeter of the wall, which will later serve as a kind of “shelf” in order to evenly align the first layer of polystyrene foam sheets. The width of the corner should correspond to the width of the foam sheet.
2. After attaching the perforated corner, you need to dilute the special glue with water in accordance with the instructions. There is also a more modern and easy-to-use foam adhesive; it comes in cylinders like assembly glue and is applied ready-made. The glue must be purchased in advance and be specifically designed for such work. The first option, diluted with water, is found in practice more often and costs several times less.
3. The third stage is applying glue. This must be done with great care, first laying the foam block on a flat surface so that not one edge of it is hanging, otherwise the material may break off under the weight of the glue, because foam is an airy building material and very fragile. It is also necessary to apply the glue correctly: not in stripes or blots, but on the entire surface of the joint with the wall. Of course, it is not necessary to “cover” the entire block, but do it with a notched trowel, using wave-like movements. If the wall is not perfectly flat, then use the method of applying glue along the edges and in blots along the rest of the perimeter.
4. How to put polystyrene foam on the wall - it would seem that this is the question, but there is no need to rush with this, because the fragile material is with a large load - glue on the surface, so it is important even just to pick it up correctly, it is better if two people do this person. To install polystyrene foam, select the farthest wall to practice fastening, and start from the bottom corner. The thread markings done during surface preparation will help. Subsequent rows are laid offset (similar to the type of laying tiles and bricks).
5. Afterwards, additional fastening is used using “fungi”. Their number on each foam block is five - four in each corner and in the middle. This is one of the options; some builders install differently, fixing “fungi” along the edges of the sheet.”
When installing dowels, they should not protrude, but rather go deeper into the foam sheet. Later, the joints and the place where the dowels are attached are sealed with glue using a spatula.
6. Do-it-yourself external insulation with polystyrene foam requires a careful approach to all the nuances, so the next step is cutting off the protruding parts of the foam sheets at the corners and grinding the surface of the sheets with a special grater. In the case when more than half a month has passed since the foam was attached, you will have to sand the top layer of the foam around the entire perimeter, since it is damaged by weather influences.
7. Do-it-yourself corners of a polystyrene foam house need to be provided with a shockproof perforated corner with a mesh. Moreover, it will not be possible to cut the foam perfectly at the joint, but with the help of a corner it will be possible to create a beautiful corner. The corner must be secured using the same glue as the foam sheets. It is advisable to check with a level how evenly such a corner was glued, because until the glue has dried, everything can be corrected.
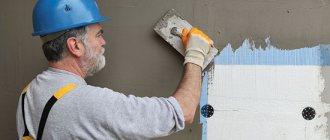
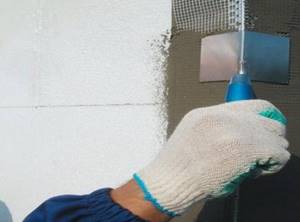
8. At the previous stage, the installation of insulation and the main finishing were completed. But there remains an important home stretch. At this stage, you will need to cut the reinforced mesh to the required size, apply glue to the top of the wall and gradually lay the mesh, covering it with glue. With such manipulation, the main thing is that the mesh overlaps slightly with the subsequent stripes, and does not shrink, creating unevenness; they are unacceptable. If such problems have already arisen, before the glue has dried, it is worth fixing it with a spatula or manually, so as not to make it even worse. Next, the reinforcing mesh is covered with two layers of putty, which are applied after the previous layers have dried. They need to be applied using a spatula, drawing in even lines without leaving streaks.
After carrying out the above work, there should not be a single gap in the foam; all areas must be carefully treated with plaster. After this, everyone decides for themselves whether to use the most affordable option for finishing the facade - this is ordinary painting on plaster, or to resort to more expensive, but certainly chic-looking siding.
DIY polystyrene foam installation video
Sometimes it is better to see once than to hear a hundred times, and for such cases we suggest watching a video on this topic:
Features of the work on insulation with polystyrene foam from inside the house
Insulating walls with foam plastic from the inside of a house has its advantages and disadvantages. The work on fastening to the wall is not affected by external weather factors; the area of the insulated surface is relatively small, which eliminates unwanted sliding of the sheets. As a disadvantage, one can note the reduction in the internal volume of the building.
The additional thickness of the insulating structure further reduces the area of the rooms. For internal installation of insulation, the thickness of the foam sheets can be no more than 40 mm, and fastening can only be done with glue. The use of profiles for laying foam plastic and additional fastening with dowels can be abandoned. It is quite possible to do this work yourself.
How to attach foam to the wall. There are two ways to attach polystyrene foam to the wall - using glue and mechanical fastening with dowels “fungi”. Mechanical fastening is usually used as additional fixation of glued foam. To fasten using this method, it is necessary to profile the wall with thin wooden blocks or special profiles. They are aligned in a plane; this determines how evenly the polystyrene sheets can be strengthened. Holes are drilled in the profile according to the diameter of the dowels used, usually 8 mm. Using dowels and these holes, the material is attached to the bars. We will not consider fastening with drilling directly into the wall as extremely inconvenient.
How to properly insulate a wooden house?
When insulating stone walls, you can choose any of the above methods and implement it. But you should be especially careful with wooden buildings. The fact is that wood, a breathable material, cannot simply be taken and wrapped in film. As a result, it will simply rot in a few years. Wooden walls urgently need to constantly receive fresh air.
What to do? For such surfaces, creating a ventilated façade is suitable. What does it mean? There must be a ventilation fence between the wall and the insulation. That is, first the sheathing is attached to the walls using bars, and the insulation is already fixed on them. Do not forget to treat all wooden components with an antiseptic that fights mold and fungi.
The optimal way to attach insulation to the wall from inside the house
The most convenient and less expensive method of fastening is fastening with glue. The possibility of abandoning the mechanical method was discussed above - small areas and the absence of unfavorable climatic factors.
This work can be carried out in several steps over two days:
The glue is applied to the foam sheet using a notched trowel evenly over the entire surface in a layer of about 1 cm. The sheets are glued to the wall starting from the bottom to avoid slipping while the glue is drying. It is advisable to arrange the foam sheets in a checkerboard pattern, as when laying bricks. This way the whole structure will be more stable. Gaps should be minimal. If foam is used, glue is applied around the perimeter of the sheet at a short distance from the edge and in the center. After gluing, the gaps between the sheets are filled with the same glue and puttied.
After the glue has dried, mastic is applied to the insulation and a reinforcing mesh is laid on it. The mesh should be recessed in a layer of mastic; this will give greater stability to the entire structure and facilitate further work on the wall. The use of mastic and reinforcing mesh further strengthens the entire structure on the wall. Plastering does not relate to the process of attaching foam plastic to the wall, but this is the logical completion of the entire process.
For all the work you will need:
The use of expanded polystyrene for home insulation has its supporters and opponents. Modern developments of this material make it possible to use it for residential premises without fear of adverse effects on health. Lightness, environmental friendliness and fire safety in addition to ease of installation make this material very competitive in construction and renovation.
Carrying out direct work
The main thing before starting all work is to plan the running time wisely. The main thing is that the fixed layer of polystyrene foam should not remain uncovered with plaster for more than seven days. The sun's rays will quickly destroy it. At the same time, it may turn yellow and lose its immediate properties. Below you will find detailed instructions for installing insulation.
Preparing the walls begins with removing dirt. If necessary, the walls are completely repaired and a leveling layer is applied. Differences near the walls should not exceed two centimeters based on the length of the sheet. Afterwards, you need to prepare a primer and apply it to the walls with a roller. To check whether it is dry or not, you need to run it over the wall with clean hands. There should be no sand or any dust left on them, especially no dyes. Then use a level to install the starting bar on the base. This is done to support the insulation while the glue dries. If the house is low, it is quite possible to do without it. Just remember to secure the bottom sheets and you can wait for the glue to dry.
Installation of insulation
The method of preparing walls for insulation is quite simple and accessible to everyone:
- Using dowels, attach the plank to the entire perimeter of the house. There should be at least three nails per meter.
- Then you need to dilute the glue in a container large enough to make it convenient. Stir with a construction mixer and leave for about five minutes and stir again. The glue must be applied evenly to the sheets with a spatula. The foam is placed on the first plank and pressed against the wall.
- You need to use a level to check that the installation is correct. The sheets must be laid in a row horizontally, then in a checkerboard pattern.
When attaching polystyrene foam to the wall, the following installation technology is observed. The foam must be cut to the required size with a knife, without leaving gaps. Lay a layer of clean mineral slabs around windows and doors. Already the density should withstand plaster and the final new coating. They must be attached in the same way as polystyrene foam. Then you should cover up the terrible cracks between this insulation and the window and the joints with the foam. The glue dries completely in about two days.
Once it is dry, you can attach the insulation using a hammer drill and a couple of dowels. There are about five nails per slab. It is allowed to make holes at the joints. To secure the foam, you will need plastic mushrooms with a cap. They do not create bridges for the entry of strong cold, and they fix well. They need to be driven in with a hammer, and at the end the nail itself must be hammered in.
After installing the foam, you should immediately begin finishing. The resulting gaps need to be foamed. Place the reinforcing mesh on the base by applying glue. The area should allow you to apply the mesh before the glue sets. It is required only for work and will not be needed in the future. Using this technology, it will be convenient to fasten it, following from the top of the wall down and gradually unwinding. You should apply it so that there are five centimeters left at the edges for overlap. Press firmly, and smooth out the glue that protrudes onto its large surface. All subsequent areas are processed using similar technology. And most importantly, do not forget to do the overlap. As soon as the glue has dried, after two days, rub the surface with rough paper, level it, and you can begin the final finishing.
Insulation of walls of loggias and balconies with extruded polystyrene foam
First of all, let's immediately answer the question: is it possible to insulate walls with extruded polystyrene foam? The answer will be unequivocal - yes, it is possible, and such thermal insulation is the most effective of all analogues used in construction.
Below we will tell you how this is done, and you can also watch the video in this article for additional information.
Penoplex and its use as insulation
What is penoplex
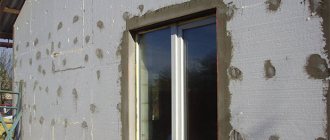
The material is also known as penoplex (penoplex), technoNIKOL and stirex. But, nevertheless, it remains extruded polystyrene foam. The perimeter size of the slab is usually 1200x600 mm.
Moreover, sheets from 20 mm and thicker are usually made with a chamfer around the perimeter. In the construction of buildings, it is used to insulate foundations, plinths, walls, roofs and floors, and it is also used to insulate loggias and balconies. .
Insulation of walls with penoplex
Scheme for insulating an external wall with Styrex
In our case, to install the sheets on the wall, you need a flat, smooth surface that has the potential for adhesion.
In some cases, it is even necessary to plaster the wall again in order to level the surface for laying insulation.
Example of laying extruded polystyrene foam outside
Since the sheets have a chamfer around the perimeter, they fit one on top of the other without gaps, and if you need to add a piece of sheet, such a chamfer can be easily cut with a construction knife.
Mushroom dowels for foam plastics
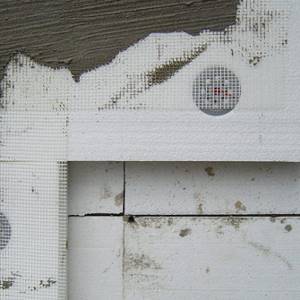
Sometimes they make do with one fastener in the center of the panel, and sometimes they drive dowels into the joints, at the corners of the panels, and then each sheet is pressed with four mushrooms. The joints are also sealed with glue.
Make stands to support the ladder
Advice. If the penoplex is installed not from scaffolding or a cradle, but from a ladder, then the latter can damage the panels with its risers.
To prevent this from happening, flat supports are screwed to the top of the vertical bars, increasing the support area and removing sharp corners.
Insulation of walls with penoplex inside the house
Extruded polystyrene foam for internal wall insulation is used mainly for putty, with preliminary fastening of a fine plaster mesh, but this already applies to finishing work.
Types and characteristics
The heat insulator manufacturer sets certain standards for its products. Therefore, the characteristics of the heat insulator of different brands are somewhat different. The main varieties of the domestic market are represented by popular brands:
- Penoplex;
- Ursa;
- Technoplex;
- Primaplex;
- Teplex;
- Bateplex;
- TechnoNIKOL.
Penoplex is known for ten varieties in priority use for the construction of civil and industrial facilities. The color of the material is orange. A special wedge-shaped heat insulator is produced for pitched roofs with a slope of 1.7%, 3.4%, 8.3%. General characteristics of insulation:
- slab thickness: from 2 to 15 cm;
- sheets 60×120 cm, 60×240 cm;
- thermal conductivity 0.03-0.032 W/m*K;
- moisture absorption – maximum 0.4%;
- flammability G 4;
- compressive strength 0.2-0.5 MPa.
The international company Ursa produces three types of extruded polystyrene foam in a standard size of 60×125 cm. The color of the material is pale beige. Main characteristics:
- slab thickness: from 3 to 10 cm;
- water absorption – maximum 0.3%;
- flammability G 4-G 3;
- thermal conductivity 0.032-0.034 W/m*K;
- compressive strength 0.25-0.5 MPa.
The peculiarity of Technoplex is the presence of graphite in the composition, which gives not only a distinctive gray color, but also increases compressive strength. This is an important indicator of a heat insulator for finishing foundations and basements. Additional characteristics of extruded polystyrene foam:
- slab thickness: from 3 to 10 cm;
- sheets 60×120 cm, 58×118 cm;
- thermal conductivity 0.032 W/m*K;
- water absorption – 0.2% of volume per day;
- flammability G 4.
The average performance of products made from extruded polystyrene foam in terms of water resistance and thermal conductivity significantly exceeds the characteristics of other insulation materials. For a specific object, you should select a specific brand of heat insulator based on its technical properties. The features of other insulation materials are manifested in the areas of application.
Primaplex differs from analogues in its highest strength and level of thermal insulation. Its use in surface cladding can reduce heating costs by up to 60%, which reflects high energy efficiency.
The use of slabs is typical for the reconstruction of buildings, restoration of basements and attics. In conditions of temperature changes and high humidity, the performance characteristics of the material are impeccable.
Primaplex slabs are indispensable in the construction of airfields and swimming pools, as they can withstand heavy loads of up to 50 tons/m². Installation of insulation is not difficult.
Features of the use of Teplex insulation - the field of thermal insulation of chambers of refrigeration and freezing equipment, ice arenas, and refrigerated trucks. High strength and level of thermal insulation allow the slabs to be used in strengthening surfaces buried in the ground: foundations, roads, railway tracks.
The thermal insulator Bateplex has better sound insulation properties among other polystyrene foam boards. Excellent characteristics of resistance to various temperatures, biogenic pests, and thermal insulation properties make Bateplex an ideal material for finishing loggias, balconies, roofs, and building facades.
TechnoNIKOL extruded polystyrene foam is known for its wide-scale use. Series have been developed for use in specific construction:
- private home ownership and decoration of city apartments - “Standard”;
- creating an optimal roof slope without stagnant zones - “Wedge”;
- structures of facades and plinths of objects with increased adhesion of the heat insulator to the base - “Facade”;
- foundation wall drainage, drainage design and micro-ventilation on flat roofs - “Drainage.
The advantage of Technikol expanded polystyrene is environmental reliability, cleanliness and safety of the material. This is the only heat insulator in Russia marked with the domestic eco-label “Leaf of Life”, the standards of which are close to European standards.
The choice of manufacturer is not important, provided that high-quality products are produced using modern safe technologies. Products by nameless authors may cost much less, but the end result will lead to moral and material losses.
Insulation of walls of loggias and balconies with extruded polystyrene foam
First of all, let's immediately answer the question: is it possible to insulate walls with extruded polystyrene foam? The answer will be unequivocal - yes, it is possible, and such thermal insulation is the most effective of all analogues used in construction.
Below we will tell you how this is done, and you can also watch the video in this article for additional information.
Penoplex and its use as insulation
What is penoplex
The material is also known as penoplex (penoplex), technoNIKOL and stirex. But, nevertheless, it remains extruded polystyrene foam. The perimeter size of the slab is usually 1200x600 mm.
Moreover, sheets from 20 mm and thicker are usually made with a chamfer around the perimeter. In the construction of buildings, it is used to insulate foundations, plinths, walls, roofs and floors, and it is also used to insulate loggias and balconies. .
Insulation of walls with penoplex
Scheme for insulating an external wall with Styrex
In our case, to install the sheets on the wall, you need a flat, smooth surface that has the potential for adhesion.
In some cases, it is even necessary to plaster the wall again in order to level the surface for laying insulation.
Example of laying extruded polystyrene foam outside
Since the sheets have a chamfer around the perimeter, they fit one on top of the other without gaps, and if you need to add a piece of sheet, such a chamfer can be easily cut with a construction knife.
Mushroom dowels for foam plastics
Sometimes they make do with one fastener in the center of the panel, and sometimes they drive dowels into the joints, at the corners of the panels, and then each sheet is pressed with four mushrooms. The joints are also sealed with glue.
Make stands to support the ladder
Advice. If the penoplex is installed not from scaffolding or a cradle, but from a ladder, then the latter can damage the panels with its risers.
To prevent this from happening, flat supports are screwed to the top of the vertical bars, increasing the support area and removing sharp corners.
Insulation of walls with penoplex inside the house
Extruded polystyrene foam for internal wall insulation is used mainly for putty, with preliminary fastening of a fine plaster mesh, but this already applies to finishing work.
Penoplex is coated with glue
Therefore, the panels can simply be glued on like ceramic tiles, completely covering the back side of the sheet with mortar.
Floor insulation with penoplex
Thermal insulation for “warm floors”
Laying extruded polystyrene foam on the floor
Advice. In cases where the base (subfloor) is flat and you do not need powerful insulation, you can use 3-5 mm thick 1000x500 mm foam plastic, which is laid as a substrate. It can be laid under linoleum without using oriented strand board.
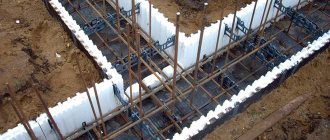
The monolithic reinforced concrete foundation is combined with the base of the building and insulated
In earlier times, mineral wool and polystyrene foam, which are very short-lived, were used for this purpose, and for moisture protection - bitumen and various cellophane films and roofing felt.
Foundation insulation with extruded polystyrene foam
Roof insulation with penoplex
Installation of extruded polystyrene foam under roofing material
Roof insulation is usually carried out in attics, but heating the attic space causes snow to melt, so in such cases it is recommended to install anti-icing systems.
Insulation of the attic with extruded penoplex
Insulation of ceilings under plasterboard with TechnoNIKOL
Advice. Penoplex insulation for installation of drywall, PVC/MDF panels, wooden lining (all facing materials that require lathing) can be done under profiles.
The panel is simply pinned onto the brackets and only after that a frame made of wood or metal is installed.
This method is acceptable for both ceilings and walls, but it is better to additionally fix the ceiling version with glue in a point-by-point manner.
Advantages and disadvantages of the material
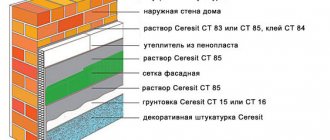
Any insulation is characterized by a number of signs, both positive and negative. Expanded polystyrene for facade insulation is no exception.
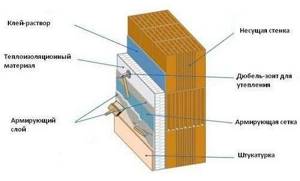
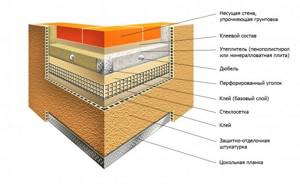
Figure 8. Facade insulation scheme
The benefits include the following:
- affordable price;
- ease of handling;
- minimizing the spread of bacteria;
- high moisture resistant qualities;
- light weight;
- hygienic properties: resistance to mold growth, as well as other forms of bacteria;
- good thermal conductivity;
- durability;
Negative aspects:
- flammability;
- toxicity;
- prone to damage by small rodents.
As you can see, there are more positive aspects than negative ones. This material does not lose its properties over time, like mineral wool, and does not change its size under the influence of negative environmental factors. As a result of completing all the stages of insulating the facade with polystyrene foam, the entire structure resembles a “sandwich” as in the photo.