Preface. From the history of pottery.
The oldest books include clay tablets
Sumerians. They were found at the site of an ancient settlement in the lower layers of the cities of Ur and Kish, which existed around 3500 BC. In the 25th century BC. (photo from the site: demsvet.ru)
In ancient times they wrote on thin clay tablets in the same way as they write on paper now. By the way, white clay is necessarily included in modern paper. This means that to some extent we are still writing on clay. Among the clay tablets found during excavations there are all kinds of documents: laws, certificates, business reports. Clay tablets became the pages of the very first books written by ancient authors. After completing the inscriptions, some tablets were only dried well in the sun, while others, more valuable, intended for long-term storage, were fired.
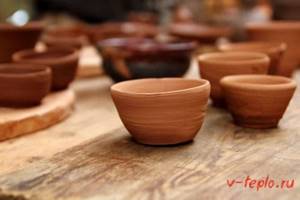
Since time immemorial, people have sculpted from clay objects necessary for everyday life, primarily dishes. Only dishes made from unfired clay are very fragile and are also afraid of moisture. Only dry foods could be stored in such containers. While raking up the ashes of a dying fire, the ancient man more than once noticed that the clay soil in the place where the fire burned became hard as stone and was not washed away by rain. Perhaps this observation inspired a person to burn dishes at a fire. Be that as it may, clay baked in a fire was the first artificial material in the history of mankind, which later received the name ceramics. With the development of technology, molded and dried clay products began to be fired not in fires, but in special furnaces - forges.
Clay pithos
, Taman Archaeological Museum. (photo from the site: showbell.ru)
Many clay objects have reached us in their original form. This is primarily a variety of dishes, lamps, children's toys, religious figurines, casting molds, sinkers for fishing nets, spindle whorls, thread spools, beads, buttons and much more. In the hands of talented craftsmen, ordinary things turned into true works of decorative and applied art. The art of ceramics reached high development in Ancient Egypt, Assyria, Babylon, Greece and China. Many museums around the world are decorated with dishes made by ancient potters. The old masters knew how to sculpt dishes that were sometimes gigantic in size. The Greek pithoi - vessels for water and wine, reaching a height of two meters - amaze with their high technical skill.
In our time, many of the secrets that the ancient masters possessed have been lost. Despite the high development of production, modern ceramists have not yet been able to uncover the secret of preparing the glaze that covers two large vases discovered during excavations by Chinese archaeologists. When water was poured into the found vases, the glaze immediately darkened and changed color. As soon as the water was poured out, the vessels regained their original whiteness. Although these amazing chameleon vases were created by Chinese potters more than a thousand years ago, they have not lost their amazing properties. Ancient Rus' was also famous for ceramics. Russian potters painted tableware with special ceramic paints or engobes (liquid colored clays) and covered them with glassy glaze. Especially a lot of black-polished dishes were made. Slightly dried items were rubbed to a shine with a polish (smooth stone or polished bone), and then fired over a smoky flame without allowing oxygen into the forge. After firing, the dishes acquired a beautiful silver-black or gray surface, at the same time it became more durable and less permeable to moisture.
. In the village of Zhbannikovo, Gorodetsky district, Nizhny Novgorod region, there is an interesting craft - making clay whistles in the shape of birds, lambs, and goats. This is a very ancient type of toy. (photo and signature from the site: s30893898787.mirtesen.ru,
In modern urban housing, clay is also present in the form of all kinds of facing slabs, bathtubs, and sinks. In a word, clay is always a modern material, without which it is impossible to do without either in the present or in the future. Since ancient times, clay has served man.
How to fire ceramics?
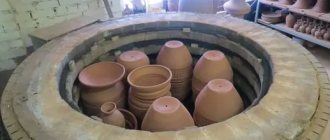
To properly fire ceramics, it is important to maintain the temperature regime in the kiln. Firing takes place in three stages:
- Evaporation of moisture. The products are heated to 250 °C and kept at this temperature.
- Heating up to 900 °C in a closed oven. Clay sintering occurs.
- Gradual cooling.
Firing furnaces must not only develop the required temperature, but also allow it to be regulated. The design should be as simple as possible , loading and unloading products should be easy.
Basic recommendations for firing
To begin with, the product must be left in a dark place (or without direct exposure to sunlight) to dry. Temperature changes and drafts will adversely affect the quality of clay firing - this is worth taking into account. The thinner the walls of the product, the faster it dries and the less time it takes to get rid of unnecessary moisture, and vice versa. This also applies to the firing time; the larger and thicker the object, the longer it takes to bake; the range varies from 4 to 12 hours. On average, this happens to be about 6 hours, but this is all individual.
When laying out your works, you should follow their arrangement according to the “pyramid” pattern: the largest objects should be located at the bottom, then higher up with a gradual decrease. Weight is of no small importance: the heaviest products should be at the bottom. At this stage, you don’t have to be afraid that they may stick to each other - feel free to lay them on top of each other. Close the oven.
Clay and ceramic mixtures. Properties of clay
Clay is the basis for the production of tiles
It consists of oxygen, hydrogen, silicone and aluminum and when water is added it changes its structure, becoming more flexible and viscous. When water is removed, the clay hardens and becomes rigid. It is very important to know that clay that has only recently been dug out of the ground is not yet ready to be used as a raw material for ceramics. The working qualities of newly mined clay leave much to be desired
The main characteristics of clay that will be important to you are plasticity, firing temperature range and degree of shrinkage.
Plasticity of clay
Plasticity allows you to obtain complex shapes (such as the corners of steps, for example)
If the clay is too plastic, it will not have sufficient strength to make large-shaped products from it, and it will collapse at high temperatures. In this case, it is worth adding coarse-grained materials to it. Clay with a coarse-grained structure will not be sufficiently plastic, it will tear when twisted and molded, and it will be impossible to obtain the desired shape from it. To make it more convenient to work with, add stickier or more plastic clays to the composition.
The plasticity of clay can be easily determined by eye by squeezing and rolling out a lump. You can do a simple test - make a sausage out of clay and start bending it in an arc. The smaller the radius of the arc along which the clay bends and does not crack, the more plastic it is. Another simple way to determine plasticity is to tear a clay sausage into 2 parts. If the ends of the edges are thin and stretch like threads, the clay is plastic. If the ends are thick and dry, like stumps, and the clay itself crumbles in your hands, it has low plasticity. Potters call plastic clays fat clays, and low plasticity clays lean clays.
Let us repeat that none of these types of clays can be used in their pure form to prepare tiles; they will definitely need to be mixed to obtain the material of the desired consistency.
Clay firing temperature range
Each type of ceramic clay and each added ingredient has its own specific melting point, which determines the firing temperature required to sinter the clay when it turns into ceramic. The clay mass formula or formulation may include several different clays, as well as other non-clay materials that are added to obtain a material with certain properties, depending on the purpose of use of the product.
Potters distinguish low-melting clays (with a melting point below 1350 degrees), medium-melting clays (temperatures from 1350 to 1580) and refractory clays (temperatures, you guessed it, above 1580 degrees). The more plastic the clay, the lower the firing temperature it can withstand. To increase the temperature, add fireclay or pumice to the clay (with pumice the temperature will drop to 800 - 950 degrees).
Clay shrinkage rate
Your piece will change in mass and size during drying and firing as the water evaporates from it. When you are making tiles that are specifically designed for a limited space, you need to learn as much as possible about the shrinkage rate of the clay in question.
The greatest shrinkage occurs during firing, when chemically bound water leaves. Next, a continuous process of hardening and compression occurs with the formation of glass crystals in the fired clay, which transform the clay mass into ceramics. The higher the firing temperature, the more the clay shrinks. To reduce shrinkage, increase the amount of fireclay in the ceramic mass.
How to avoid cracking and deformation of clay
Whether you succeed or fail in your tile making venture depends on choosing the right type of clay. One of your biggest challenges will be to avoid cracking and warping during drying and firing. Fortunately, this task can be made easier by adding a significant amount of granules or particles of a coarse material such as fireclay to the clay. Ideally, the amount of fireclay should be from 15 to 40 percent, and it is desirable that the particles be of different sizes.
A good tile clay should contain 12/2? percent finely ground chamotte and 25% medium grinding. For those who already have experience working with ceramic masses, this amount may seem extremely large (and it is not suitable for making small ceramic figurines, where the fireclay content is unlikely to exceed 20%), but the open porous structure that is obtained thanks to the fireclay, allows the tiles to dry more evenly and avoid deformation.
Firing in the oven and kiln
Oven firing is an option if you are working with fire clay. But, if you're willing to spend a little more money, you can buy an inexpensive stove.
Benefits of oven roasting:
- It's cheap because you already have it.
- Usually allows you to create decent ceramics.
- The resulting products are quite durable.
But if you want to take the process more seriously, then you need an oven, because your home oven will not produce the desired temperature. It has many advantages over the oven:
- Your products can be more varied.
- You will be able to create the right atmosphere for work.
- You will be able to work with a wider variety of glazes and clays.
- The process is easier to manage because it is slower.
- Allows the use of high-temperature (bisque) firing, which makes the ceramic stronger.
An oven is a good place to start if you're going to learn how to do this at home. But we advise you, once you have learned a little, consider buying a kiln or firing at a studio near you.
Types of furnaces
There are different types of thermal energy sources:
- The oldest is the wood stove. The masters kept the secrets of firing and passed them on only to their students. Today, wood burning is very rare. Technological types have replaced them.
- The most popular is natural gas. With forced air injection, products can easily be heated to temperatures above 1500 °C . Gas equipment is easy to make with your own hands, and gas can be purchased in liquefied form in cylinders.
- The most high-tech is electricity. Electric spirals are evenly laid inside the oven, quickly and accurately heating the chamber with the products. Such equipment is more difficult to manufacture; high voltage requires compliance with safety precautions and electrical installation rules.
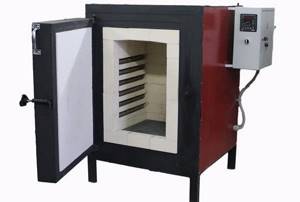
Photo 1. Small electric kiln for firing ceramics with evenly laid out spirals inside.
Wood-burning: structure and principle of operation
This is a great option for a beginner potter. It does not require large material costs to manufacture, and dry firewood is available everywhere. Wood stoves come in several types :
Earthen
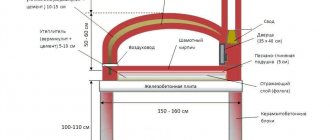
A descendant of the ancient technology of burning in a fire flame. Above the narrow pit - the firebox - a clay roof is built on which the products are laid.
A vault of bricks or strips of clay is built around the products, and a smoke hole is left at the top. The design works like this: charcoal is burned in the firebox, which gives a high temperature and does not smoke.
Scheme and drawing
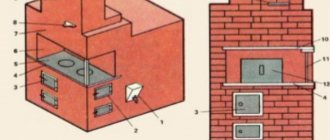
Designing a heating device yourself is a rather labor-intensive process, but making a properly functioning unit is quite possible. A schematic diagram of an industrial muffle furnace is shown in Figure 2.
Figure 1. Diagram of a muffle furnace for firing ceramics
A special feature of the muffle furnace is the location of the heating elements inside the chamber (muffle).
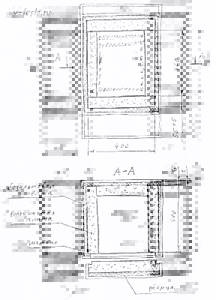
Before starting work, it is advisable to sketch out a drawing of the device in order to understand the laying of layers and the connection diagrams of the heating elements. The device drawing may look like this:
Figure 2. Approximate drawing of a muffle furnace for firing ceramics.
The main thing is that a person understands the structure of the future device down to the smallest detail. Next, select the necessary materials, components and tools.
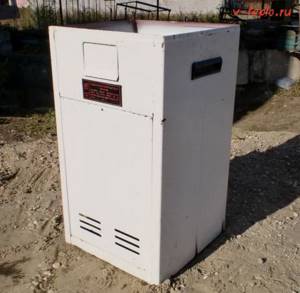
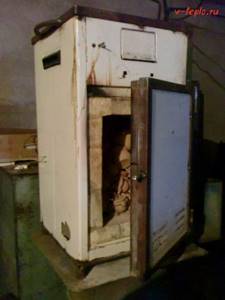
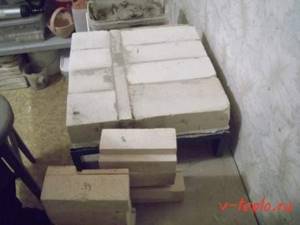
Method one. Making a chamber stove from a refrigerator or washing machine
For such a design you will need only three main elements:
- metal body (suitable for a washing machine or refrigerator);
- heating coils;
- chamber made of fireclay material.
When everything necessary for work is ready, we proceed directly to the manufacturing process.
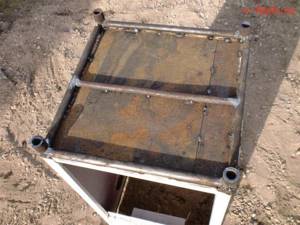
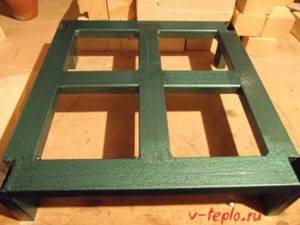
- First, it strengthens the bottom of the metal case. We use a steel corner for this purpose (as an option, it can be replaced with an ordinary pipe with a diameter of 1.5 centimeters). We weld pieces of corners/pipes into the corners of the bottom - they will serve as support legs for us.
- In addition, we need to similarly strengthen the top of the frame, the door, and at least one of the sides (the one to which the door hinges will subsequently be welded).
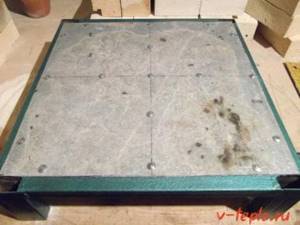
- We lay a 1-centimeter layer of basalt wool on the bottom of the body (a similar layer must be laid on the inner walls). To avoid deformation of the insulation under the weight of the chamber, we lay several pieces of metal corner or rectangular pipe. At the end of these procedures, we cover the insulation with a sheet of metal.
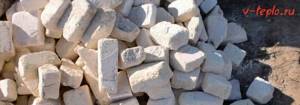
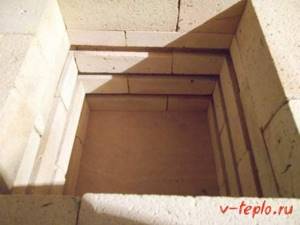
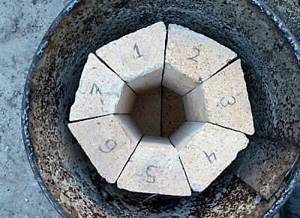
- After this, we decide on the fireproof material that we will use in the manufacture of the chamber. Ideally, these should be fibrous fireclay slabs, which can either be cut on site after purchase or ordered in the required sizes. Our DIY clay kiln requires six of these slabs.
- We bind the bricks using mortar, which corresponds to the marking of the material. There is also a cheaper option - ordinary fireclay clay or fireclay masonry mixture.
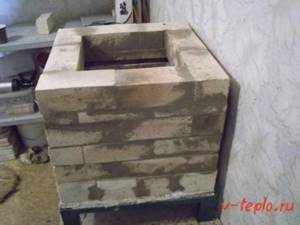
- Now we begin the laying itself. We adjust the bricks as tightly as possible relative to each other, making the seams between them no larger than 0.5 centimeters. If necessary, we cut individual bricks to the required dimensions.
- We start laying from the bottom of the box. Dissolve the mixture with water and mix thoroughly. Before installing each brick, we moisten it with water, otherwise the mixture will dry too quickly.
- We begin to raise the walls. We place sheet metal and insulation in the gap between the body and the brick layer. If the brick is laid flat, then we can not use insulation.
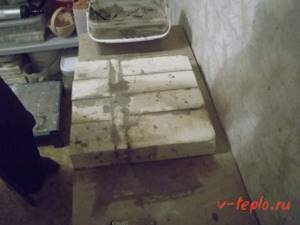
- The upper part will take more time: the bricks along the edges need to be laid with a slight upward slope, and trapezoidal blocks must be laid between them.
- We weld the hinges and adjust the door. We must ensure that the gap between the brick layer of the body and the door is minimal.
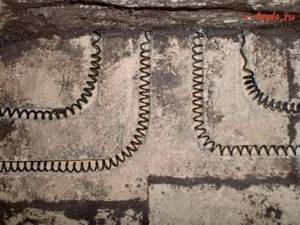
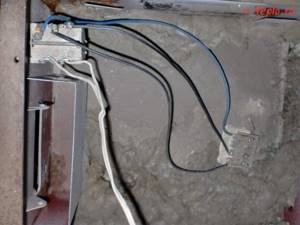
- After the masonry has dried, we begin the next stage of work. On the surface of the bricks we must make grooves into which the heating coil will be laid. We use a spiral of nichrome wire 0.1 centimeters in diameter; the diameter of the coil will be about 0.5-0.7 centimeters. The grooves should be the same depth/thickness.
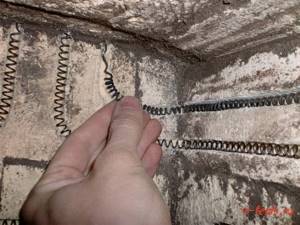
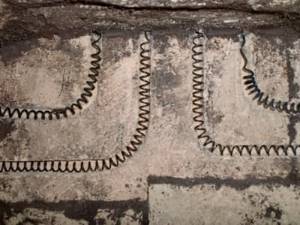
- When heated, the wire can expand, and the spirals, in turn, “climb out” of the grooves. Therefore they should be recorded. The image below shows the main ways to install spirals:
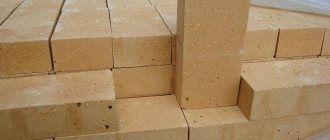
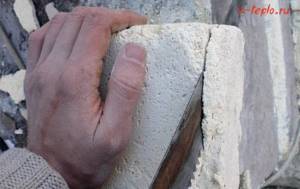
There is another way - to build a chamber from heat-resistant brick, since this material is sold everywhere and is used for laying stoves and fireplaces. For the chamber of such a furnace, it is recommended to use lightweight bricks marked “ShL” (for example, “ShL-0.5”).
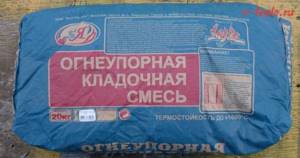
This mixture is sold in the same place where bricks or fireplaces are sold. To fix the brick on a metal surface, add a little cement to the mixture (about 30 percent of the total volume).
Note! To create the outer layer, we prepare the solution separately - with the addition of cement.

The door is also lined with fireclay bricks. We make a quarter around the perimeter in such a way that a protrusion eventually appears (we will place it in the stove window).
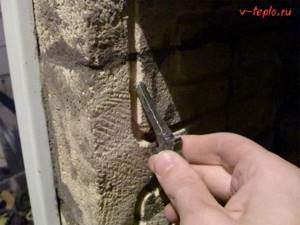
- using small pieces of wire;
- through a groove located at an angle;
- by means of a groove having a protrusion;
- using an MKR tube.
Note! A very important point: the turns should not contact each other!
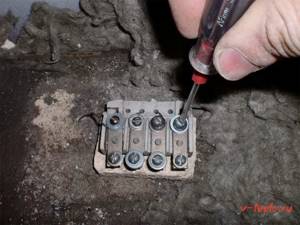
- We make 2 circuits from the spirals so that the temperature can be adjusted using a switch (the same as in an electric stove).
- We mount a ceramic plate on top (for example, from a burner) and fix the ends of the spiral with bolts.
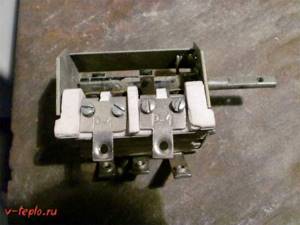
- We will equip our kiln for firing clay with our own hands with the switch shown below, in which there will be three contacts on one side and two on the other.
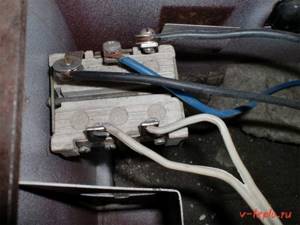
- We mount the switch in such a way that its pin goes out, i.e., onto the front panel. We connect all the wires, on the side where there are only two contacts, we connect zero and phase.
- We connect the cables leading from the plate to the other three contacts. Typically, one of the cables should close a pair of contacts on the edge of the plate.
- As a result, we should get the following: at the first “speed”, the spiral circuits will be connected in a certain sequence, since in this case the temperature will be the lowest.
- This, in principle, ends the furnace manufacturing process. At the end, we need to thoroughly dry the structure, for which we place it in open sunlight or next to a heating radiator for at least 1-2 months. After this period, we need to perform final drying by running the device for 3-4 hours at the minimum “speed”. When steam is no longer billowing from the structure, the device can be turned off - it is completely dry. We can proceed directly to firing!
We bring the ends of the spirals upward.
If the “speed” is second, then only 1 circuit will be connected due to the fact that the temperature will be higher. It is characteristic that this should be the circuit that is drawn from below, so that the elements located in the lower part are also heated.
Finally, at the third “speed” the circuits are connected simultaneously - here the temperature will be maximum.
Method two. We make a stove without having a metal casing at hand
The manufacturing process in this case is not much different from that described above, but there are definitely some nuances here. Let's start with the fact that the working volume of the design below will be about 13 liters. The spiral, as mentioned above, can warm up to a thousand degrees in just 1.5 hours, while the temperature of the outer walls of the device will not exceed 100 degrees. The algorithm of actions should be as follows.
Step 1. First, using a 4x2 centimeter profile pipe (with a square cross-section), we build a stand for the device. After this, we paint the finished stand with enamel.
Step 2. We attach a sheet of galvanized steel on top of the stand (its thickness should be approximately 0.1 centimeters), using “metal” self-tapping screws.
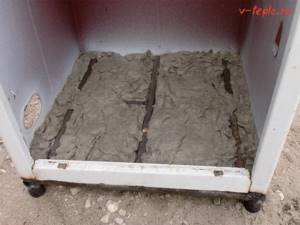
Step 3. We make the walls from fireclay bricks and a special fireplace composition (everything is the same as in the previous version). After the solution hardens, we make grooves for the spiral.
Step 4. We assemble the bottom from brick separately, and use the same mortar for fastening. Before continuing work, wait until the structure is completely dry. Do not forget to wet each brick immediately before laying.
Step 5. We lay a thermal insulation layer on top of the metal base (we can use the same basalt wool for this). In order to maximize compaction of this layer, it must be moistened before fixing the brick bottom.
Step 6. We continue the traditional laying of the stove, but we try to ensure that all voids and seams are carefully filled.
Step 7. We traditionally make the lid for the chamber from fireclay bricks, but at the same time we fasten them together with a metal tie.
Step 8. Place the spiral in the prepared grooves and insulate the structure from the outside with thermal insulation material. Next, we cover everything with sheets of galvanized steel, which are cut according to the dimensions of the resulting chamber.
As you can see, this requires knowledge not only in the furnace business, but also in the field of electricity. You can see another possible manufacturing method in the video below.

Method three. Making a vertical muffle furnace
Despite the fact that we do not recommend making this kiln for firing clay with your own hands, we will still briefly consider its design. The design diagram is shown in the image below. It consists of a ready-made muffle (1) and a burner (3) from a regular tile. The volume of the muffle will be 3 liters, it will warm up to eight hundred degrees. The ratio should be approximately the same as in the diagram, although minor deviations are still acceptable.
We purchase the burner separately and, installing it on a sheet of steel, we power it from a cylinder equipped with a reducer. Using a jet, we adjust the heating intensity (the same as in a regular stove). The body (2) may not be as strong as the muffle, for this reason we make it ourselves. To do this, you will need fluffed asbestos and fireproof clay.
Step 1. First of all, we ferment the clay to create a box: pour the clay powder into the prepared container, add water along the filling line, and then forget about it for about 24 hours. After a day, we begin mixing the solution to the consistency of plasticine, add 1/4 of the refractory sand.
Step 2. Next, add one or two parts of fluffed asbestos, mix the solution thoroughly. At the same time, we prepare a wax blank for the inner cone in the body. All external elements are made by hand or using a pottery wheel. We leave holes for the steel legs (although these legs can be made from the same composition).
Note! In this case, there is no need to check the clay for fat content. The natural fat content of this material is quite sufficient for this design.
Step 3. Then we dry the structure for two weeks at a temperature of 25-27 degrees. After this time, we melt the wax using a household hair dryer, since it is no longer suitable for further use.
Step 4. We continue to make a kiln for firing clay with our own hands. Now we need to burn the dried body. We lay it out of dry bricks and enclose it with a metal mesh about 75 centimeters high (this is necessary so that the coals do not crumble, but oxygen flows to them). We place the structure on the floor, cover it with a ceramic container and fill it with firewood to the level of the top of the fence.
Step 5. Light the fuel from below. We add firewood until the hot coals completely hide our workpiece. After this, continuing to gradually feed the flame, we maintain the combustion for another five to six hours. And then, when the ash has cooled, we remove the workpiece.
Note! The firing procedure must be carried out under some kind of canopy. Drops of moisture are not allowed!
Step 6. The final firing is carried out in a finished furnace (that is, in the shell), between the cheeks of which thermal insulating material is laid. We install an empty muffle in the appropriate place. We activate the burner (at minimum power), then gradually increase the flame to maximum (in about half an hour). We warm up the stove for another 1.5 hours, after which we can proceed directly to its operation.
As you can see, if desired, and also if you have certain knowledge, making a kiln is not difficult. But follow safety rules - both when working and when using the structure! That's all, good work and warm winters to you!
Drying clay products.
Drying
- a rather lengthy process. Haste can negate all previous work: when drying quickly, the product becomes covered with numerous cracks and warps. At the first stage of drying, moisture from the product should evaporate as slowly as possible. In the first days, folk craftsmen dry dishes and toys indoors or under a canopy in a quiet, windy place where there are no drafts. Pre-drying takes two to three days. After this, the products were dried in a heated oven. The better the clay dries, the greater the hope that there will be no defects during firing.
A product that has a complex shape with many details must be dried with extreme care, for example, by placing it in a metal container or box, covering it with a sheet of newspaper on top. A large product can be covered on top with a dry cloth. On the second day, remove the rag, but continue to dry the product in the shade. On about the fourth day, a medium-sized product can be dried on a stove or on a central heating radiator. Dried clay acquires sufficiently high strength necessary for further processing. Before firing, each product must be carefully inspected. If cracks are found, they must be carefully repaired. The crack is moistened with water and covered with soft clay. In addition to cracks, the product may contain all sorts of irregularities, accidental deposits, clay chips adhering to the surface and small scratches. Damaged areas should be treated with a scraper and cleaned with fine-grained sandpaper, and then remove clay dust with a wide brush or broom.
To give the product shine, polishing is used. One of the ancient methods of polishing is very simple. The surface of the dried product is rubbed with any smooth object, compacting the top layer of clay until shiny.
After firing, the shine becomes stronger. Polished dishes can be safely used in the household, as they are quite moisture resistant. In Rus', polished dishes were additionally subjected to blackening for decorative purposes. To do this, at the end of firing, some kind of smoking fuel, for example, var, was thrown into the furnace. Absorbing smoke, the vessels turned black, retaining their shine. There is another way to blacken dishes. Heated ceramics are thrown into sawdust or chopped straw.
Operating rules
The electric oven may only be plugged into a reinforced socket. You can also run a large cross-section wire directly from the shield. In addition, it would be useful to install a circuit breaker.
Since this device model has exposed wires, you need to be extremely careful with it. Do not touch the coils while the oven is running. To avoid accidents, it is recommended to install a limit switch on the door, which will turn off the unit when the door is opened. If you are not very good at electrical work, seek the help of a specialist who can help make the device as safe as possible, including grounding it.
Making a muffle electric furnace with your own hands
Before starting work, select materials, instruments, and electrical equipment. The oven is connected to the household electrical network .
Selection of materials
The stove of this model is compact; its production does not require special materials and parts . To work you will need:
- mortar (ready mix) - 5 kg >;
- sheet steel thick (2.2 sq. m);
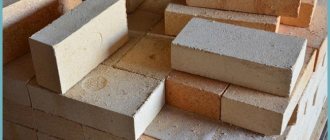
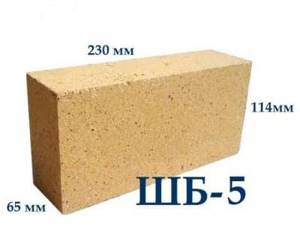
- fireclay bricks 16 pieces;
- rolled mineral wool (basalt);
- tube made of fiberglass , ceramics (diameter 10 mm , length - 15 cm >);
- rolled steel angle section - 3 m >;
- spiral (fechral, nichrome) for electric stove (1.6 m);
- thermocouple.
Important! Used materials and electrical components do not guarantee normal operation of the electric furnace.
Preparing tools and equipment
To lay the muffle you will need stove maker tools (trowel, spatula, tape measure). To work you need to buy or rent equipment and tools:
Step-by-step instruction
Before starting work, mix the masonry mortar. Construction of an electric furnace includes the following stages:
- Sheet steel is marked , outlined using a pencil, ruler and square, then the parts of the casing and door are cut out with a grinder.
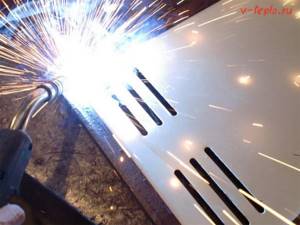
- The casing is welded using a welding machine .
- Fastenings for the door are welded to the casing . A lock is welded onto the door.
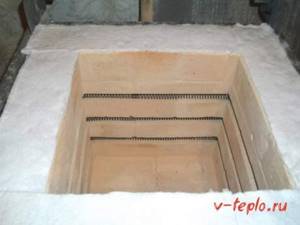
- Grooves are made in the bricks using a Pobedit drill (for a spiral).
- A frame (for the muffle chamber) from an angle profile
- A muffle (chamber) in the frame
- The chamber is dried for 5-6 days.
- carefully placed into the grooves, the ends are brought out beyond the muffle through a pre-drilled hole.
- The spiral is fixed in 3-4 places with a solution.
- A thermocouple is inserted through the hole into the muffle chamber ; the contacts are protected with a fiberglass tube.
- The places where the wires come out are covered with masonry mortar.
- The chamber is dried for 2-4 days.
- is placed on the back wall of the housing .
- A lattice stand is placed in the body , and a muffle is placed on it.
Important! The grid plays an important role , thanks to it the heavy muffle will not compress the porous heat insulator.
- The gap between the body and the fireclay chamber is filled with a porous thermal insulator (mineral wool).
- A layer of porous thermal insulator and fireclay plates to the inner surface of the door
- The door is hung on hinges , and the seals are adjusted to the dimensions of the chamber.
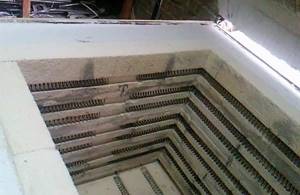
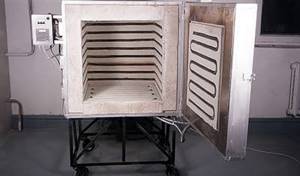
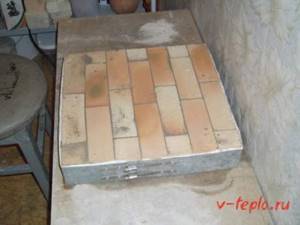
Photo 2. Finished working chamber of the muffle furnace: metal casing, layer of insulating material, brick with a spiral.
The brick does not have to be attached to the door. When firing, it can be placed directly in the muffle, in front of the door. The next stage of installation is connecting the stove to the electrical network . For this you will need:
- thermostat;
- electromagnetic starter (relay);
- terminal blocks (made of heat-resistant plastic);
- steel casing for the shield;
- electrical two-core wires;
- fork.
Reference. The technical parameters of the circuit are calculated in advance . Based on the calculations, a thermostat and relay and heater parameters are selected.
In the electric furnace under consideration, a standard M-1-K thermostat . The device allows you to set the firing temperature to 1250–1350 °C. four buttons on the front panel of the device to switch modes . Connecting the thermostat is described step by step in the documentation for the device. The thermostat, electromagnetic starter, and terminal block are mounted in a shield box with brackets and bolts.
Possible problems and difficulties
A big problem during the construction and startup of a furnace is the incorrectly selected electrical equipment, heating elements, and spiral parameters.
This leads to destruction of the heating elements or coil. If the technician does not have experience in calculating electrical circuits, you should seek help from a professional electrician.
When laying a fireclay brick muffle, mortar or fireclay-sand mixture is not always used . Instead, amateur craftsmen take a regular clay-sand mixture. As a result, cracks appear . When the furnace is first started, the cracks increase. To solve the problem, the muffle is disassembled and the bricks are placed on fireclay mortar.
Advice. For a muffle furnace, fireclay bricks with the letter “Ш” are suitable . Brick with the letter “U” (recycling) is less durable.
When making an electric muffle furnace, not all home craftsmen install thermostats . This leads to overheating and damage to products already at the first start-up. To solve the problem, you should install a thermocouple and a thermostat.
If old, used brick cracks appear in it even during test runs . The camera will have to be dismantled and a new one built.