To prevent pipes from freezing in the winter, you need to choose them correctly.
Water in pipes freezes from the inside at temperatures below -7 degrees Celsius. When water freezes, according to the laws of physics it expands. This is the main reason for burst pipes in the winter season. Therefore, it is necessary to identify in advance places in the house where the temperature could potentially drop below -7 degrees and prevent freezing. After all, this temperature can easily freeze the water in the pipes in your home. When making a well or well, you need to think in advance about the water supply system for your home.
If, after all, the pipe is frozen and damaged, then it will have to be replaced. This is extra spending from your wallet. If the tube is simply frozen and there is no damage, then you can try to warm it up. Therefore, it is worth taking care of problem areas on the street underground where your pipes run.
You should check the basement of your home. If it is too cold in winter, then you should think about additional heating of the basement. Next, you should insulate all doors and windows to prevent cold air from spreading throughout your home. These rules will help prevent the temperature in the house from dropping and, accordingly, pipes from freezing.
Water frozen in a plastic pipe - what to do and how to fix the problem?
Winter prepares unexpected surprises for all of us, sometimes not very pleasant ones.
When it comes to communication systems, their failure can be very disastrous. When it comes to metal communications, their freezing can be predicted. A different matter is metal-plastic pipes, which are more resistant to frost. However, such pipelines often freeze. You often hear the following words from residents of private houses: water in a plastic pipe has frozen - what to do? It becomes especially frustrating when there is no supply of drinking water in the house. Therefore, every home owner needs to know what to do if a plastic water pipe freezes.
Often, the reasons for this phenomenon lie in the initially incorrect laying of communications. All water mains, regardless of material, must be located at a depth that does not freeze even in a very severe winter.
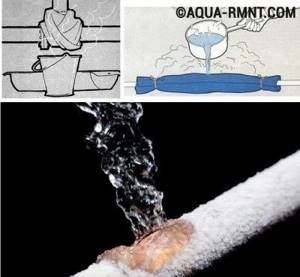
If it is not possible to dig a trench deeply, then it is necessary to securely wrap the pipes with heat-insulating and moisture-resistant materials. So, what to do if the water supply does freeze? Let's consider two cases when the water supply system froze inside and outside the house.
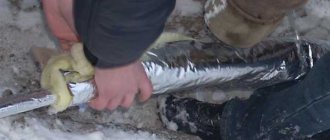
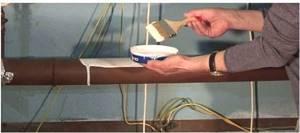
No. 2. Defrosting using boiling water and a rag
The method is also suitable if the pipes are in the building and accessible . Of course, you can simply water the pipes with hot water, having previously placed containers to collect water, but it is much more effective to first wrap the pipes with rags, and only then give them a “hot shower”. The rag will absorb water, heat up and cause the pipes to be constantly exposed to heat. If there is only a small amount of rags, then it will need to be periodically moved along the pipe section. Don't forget to place a container to catch any water that won't be absorbed.
How to defrost a plastic pipe indoors?
When we say that plastic pipes indoors are frozen, this means that there is easy access to them. For example, they can be located in the attic or basement, that is, in places where there is no heating.
In this case, the defrosting process can be performed in several ways:
- Using hot water. Wrap the frozen area with a cloth and pour hot water over it. The operating time depends on the length of the ice plug. The defrosted pipe must be covered with insulation to prevent it from freezing again.
The location of freezing is determined by touch. Where the plastic pipe is colder, there is an ice plug.
- Using a construction heat gun. A stream of warm air is directed from the hair dryer to the surface of the pipe. Despite the high efficiency of this method, such work is considered dangerous. If the air is too hot, the PVC may simply melt. Therefore, the temperature of the hair dryer must be set to minimum.
- Using electric heating. The metal-plastic pipe is wrapped with an electric heating wire, which is connected to the electrical network. The wire is wound in turns. If there is a small frozen area, defrosting occurs quite quickly. Warming up a plastic water supply takes up to 3 hours.
Attention! The water taps must be open during the defrosting process, since the melted water must flow freely from the pipeline.
The main question is how not to defrost a container of water
One of the popular old-fashioned methods for not defrosting a container of water is the use of logs. To do this, put the logs into the container. Today, instead of such logs, ordinary plastic bottles are already used. They are covered with sand, closed with a cork and left in a container with water for the whole winter.

There is another method to avoid defrosting a container of water. To do this, you need to dig a hole of 2 cubic meters. Next, cover it in two layers of polyethylene. It should be thick and durable. We lower a container of water into the hole and bury it. It is allowed to leave a couple of centimeters of the container on the surface.
Today, these two methods are the most common among summer residents.
If communications freeze underground?
The situation is much more complicated if a metal-plastic pipe underground is frozen. The easiest way is to dig a trench that is not very deep. After this, use one of the methods used to defrost intra-house pipelines. However, in practice, this option is usually unacceptable due to the fact that digging frozen ground is very difficult, and the plastic pipe can be accidentally damaged. Therefore, let's consider alternative options.
Defrosting a plastic water pipe using hot water
Heated water should be supplied inside the pipe, directly to the ice plug. To do this, you need to disconnect the plastic pipe from the taps. Further work is carried out in the following order. Water is heated in an iron barrel. This can be done over a fire or heated in the house. A smaller diameter pipe or hose is inserted into a plastic pipe. The end of the hose should rest against the ice seal.
After this, you need to supply hot water from the barrel into the hose. This can be done using a pressure pump. Hot water will melt the ice fairly quickly. The hose must be moved forward along the pipe as the ice defrosts.
When the entire plug melts, water will flow out of the pipe with strong pressure. After this, the pump can be turned off. Heating a metal-plastic pipe using this method takes a little time. It takes much longer to prepare for the defrosting process.
Tip: open areas of the plastic pipe must be covered with insulation to prevent re-freezing.
Electrical defrosting
To do this, you need to take a rigid two-core wire and subject it to some modification. One wire strand is separated from the other and stripped of its insulation. After this, the bare wire is rolled into a twist. The second wire is bent back and also stripped of insulation. Twisting a wire is done in the same way. As a result of this operation, you should get a wire with two exposed twists, located a couple of centimeters from each other.
Attention! The wires should not touch each other during operation, so the twists should be made very strong, preventing the wire from unwinding. Contact of wires may result in electric shock.
The prepared wire is inserted inside the pipe up to the icy obstacle, after which it is connected to the network. Heating of water and ice occurs due to the potential difference across the twists. In this case, the walls of the plastic pipe do not melt, since only the inner contents of the pipe are heated. As the wire defrosts, it needs to be moved further along the pipe.
The disadvantage of this method is the need to pump melt water out of the pipeline. If you don't pump it out, it may freeze again. For pumping, you can use a compressor or pump.
You can also mention a few more ways to defrost plastic pipes, which are not available to every home owner.
To be fair, let's list them:
- use of a steam generator. The steam generator hose is pushed inside through the pipe and steam is released under pressure. Since the temperature of the steam is higher than that of boiling water, the defrosting process is very efficient. If a plastic pipe is frozen and you have a steam generator, then you don’t have to worry about the pipes. The disadvantage of this method is that not everyone has a similar unit;
- defrosting using an autoclave. Hot steam is also used here. You need to heat water in an autoclave and insert a hose into the pipe. Connect the other end of the hose to the autoclave. As the water boils, the resulting steam will flow through the hose into the pipe and melt the ice. Instead of an autoclave, you can use another device, for example, a double boiler.
- heating by hydrodynamic machine. This is special equipment that is used for industrial purposes. The device creates increased pressure in the pipe, which breaks the ice in just minutes. A special hose is inserted into the pipe as far as possible. After this, the machine starts working. After a couple of minutes there is no ice left in the pipe.
We have discussed all the main methods for defrosting plastic pipes. Which of these methods to use, decide for yourself. And next year, try to eliminate the problem of freezing pipes.
What to do with insulation
For this, for example, special cases are used. The existing water supply is laid inside another pipe with a small diameter. This contributes to the formation of an air cushion between the walls of different products. Thanks to this, the heat of the water is retained.
Or the pipeline is simply poured using polystyrene concrete or foam concrete. This is a monolithic layer, with a base in the form of concrete with low weight and a porous structure.
The water supply is sometimes wrapped with insulation. Or a heating cable. The latter is laid both inside and outside the structure. It is recommended to carry out the gasket in two available ways:
- Two lines parallel to each other.
- In a spiral shape, around the water pipe.
Not every system is designed so that pressure increases without problems. But this method of protection can boast of effectiveness.
When high pressure remains inside, the liquid does not freeze. Even if there is no physical thermal insulation.
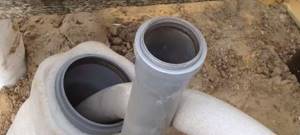
When installing external non-pressure types of sewerage, the so-called socket connection is used. The main thing is that there is no contamination on the plastic, then the connections will become highly sealed. Silicone or liquid soap is used to lubricate the parts that require connection.
Treatment with a sealant will provide additional protection during work such as laying water pipes from polypropylene pipes in the ground.
Only compliance with all requirements and technologies will allow you to obtain a water supply system that will function for a long time. And it will help reduce operating costs.
We are installing filters
If there is no scale or sand in the water, then elements such as fittings on toilet tanks, automatic washing machines, and ceramic faucets will last much longer.
You should not give preference to filters that are disassembled manually. Inside such structures there are rubber seals, whose durability leaves much to be desired.
The preparation process depends on what type of pipes you have chosen. If it is galvanized, then we use a grinder to cut blanks of the sizes we need with our own hands. This can also be done using a hacksaw.
It is more convenient to cut metal-plastic or polypropylene products right on the spot. Even small errors in size will not be terrible.
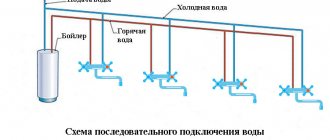
When connecting, preference is given to two methods. For example, through a collector, which plays the role of wiring for individual devices, when each of them has its own fittings. Or through a simple tee.
We work with steel products
If you have the appropriate tools at hand, for example, such as welding, it is used to connect a metal structure.
It is easy to use to weld threads. Or bends that were bent on a special machine, the so-called pipe bender.
You can use dies or holders and do the work manually. Threaded connections are made in the same way as in the case of valves.
About metal-plastic pipes
In this case, the connection is made using fittings, which are equipped with union nuts. After cutting off the pipe section, proceed to chamfering from the inside using a knife. The union nut is put on the pipe along with a split ring.
Watch the video
We place the fitting from the fitting inside the pipe
The main thing is to act carefully, otherwise the rings with sealing characteristics will move. The nut is tightened just as carefully, without sudden movements.
Products with a polypropylene base
To get the job done, it will be enough to purchase an inexpensive soldering iron. We apply heat to the inner fitting surface by selecting the desired nozzle.
We do the same with the end where the polypropylene pipe is located. We insert one part into another, wait until everything cools down.
What to do when the water supply is frozen: 3 ways to defrost plastic pipes without digging
The water supply needs to be laid wisely and ensured that it functions smoothly all year round. But if mistakes were made during installation, they will have to be corrected at the most inopportune moment. One of the worst consequences of poor plumbing is freezing water. Let's look at 3 proven methods for defrosting plastic pipes.
Winter, as always, comes unexpectedly! Let's imagine a situation - you wake up in the morning, there is biting frost outside, and no water flows from the tap. An inner voice tells you that the pipe is frozen. What to do?
Often the water supply freezes underground, as well as in places of contact with the foundation and reinforced concrete structures. It is not possible to warm up the pipe from the outside in such places. Here you have to operate remotely, inside a thin water pipeline.
The principle of defrosting a water supply is the supply of coolant to the ice plug. This is very difficult to do. It is not enough to pour boiling water from a kettle inside - it will do nothing. The coolant must be supplied continuously until the ice plug is completely thawed.

Where to start?
For those who use a well, first of all, you need to make sure that the ice plug is in the pipe and not in the pump or in the street water tap.
This is done simply: the electric pump is disconnected from the water supply and turned on - water starts flowing, which means there is ice in the pipe. It happens that the tap in the well freezes. Warm it up with a hairdryer. If there is no result, then the problem is in the pipe and you need to choose a convenient way to fix the problem and get to work.
It will be useful: Hallways in a modern style: interior and photos, modern design and ideas, apartment with a small hallway
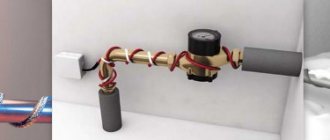
Method one: defrost the pipe using a miniature boiler
If you decide to use these methods, then take safety precautions.
- When using a public water supply or well, warn your closest neighbors not to turn on the water while you are defrosting.
- Defrost from the top of the pipe. This is important, since you cannot allow melted melt water to drain under voltage - this is a guaranteed electric shock!
- Turn off the tap.
To make a boiler you will need:
- rigid two-core cable – 2*2.5–4.0 mm (copper, aluminum);
- plug;
- single-phase circuit breaker for 10 amperes;
- insulating tape.
The cable is suitable for both two-core and three-core cables - a third core is not needed.
The machine is needed to avoid short circuits and overheating of the wire - it will not be cost-effective to throw it away after the first use. And also, the use of an automatic circuit breaker will not allow the house to be de-energized in the event of a short circuit. The 10 ampere switch is taken from the approximate performance of the device - it does not exceed 250 watts.
The length of the cable must be calculated from the length of the water pipe. The principle here is simple - the further the plug, the longer the wire.
What should be done
- Install a plug on one end of the wire.
- Mount the machine on one wire at a distance of 30–50 centimeters from the plug. It is advisable to install it in a protective box, but if there is none, then insulate the open areas.
- Strip the other end of the wire from the braid by 20 cm, expose it by 7–10 cm, and then make two insulated coils from each exposed wire. The number of turns on the coil is 3–6. The more turns, the more powerful the device. The distance between the coils is 1.2–1.5 cm.
The device is ready - let's move on to defrosting
Be sure to turn off the water! When thawing, water will rush out of the pipe under pressure. This is dangerous because there is an electrical device with exposed elements operating inside.
The first step is to disconnect the pipe at the top point and open access to the water supply. It is better to carry out the procedure from home.
The remaining water must be drained from the disconnected pipe - the work area must be dry. If there is water in the lower, frozen pipe to the brim, you should pump it out a little so that it does not come out when boiling.
Next, use the unconnected wire to feel for the ice plug. When the wire rests against it, plug the device into the outlet.
Water is heated depending on its quantity in the water pipeline. This may take 5–15 minutes.
After the water has heated up and the ice has begun to melt, move the boiler close to the ice plug. It is necessary to push the boiler until it thaws completely.
Useful tips
If a large section of the water pipeline is frozen and it takes more than 20 minutes to defrost, then it is advisable to interrupt the procedure for 5–10 minutes.
For greater efficiency, pour salt water into the pipe. It has better electrical conductivity and will increase the power of the boiler.
Temperature depending on the indicator
To clearly determine the freezing point, you must first understand how these 2 parameters are related.
How are they interconnected?
As the pressure increases, the freezing temperature decreases, and as the pressure decreases, the temperature increases. There are special formulas that help calculate a specific value .
The table of such ratios looks like this:
| Temperature, °C | Pressure, mPa |
| 0,1 | |
| -1 | 1 |
| -2 | 30 |
| -3 | 40 |
| -4 | 50 |
| -5 | 60 |
| -10 | 110 |
| -22 | 210 |
Method two: create circulation of hot water in a frozen pipe
The principle is based on a constant supply of hot water to the ice mash. So, let's make a water circulator!
To make the device you will need:
- car washer reservoir or fuel pump;
- car battery or household step-down transformer (power supply);
- wire, clamps;
- a tube from a hydraulic level or any plastic tube of suitable diameter;
- container (basin, bucket);
- kettle or boiler;
- water, salt.
Useful tips
It is not necessary to remove the washer from your car, especially if it is a foreign car. You can easily purchase it in a store new or used through advertisements. The price for a VAZ washer is from 200 to 700 rubles.
And you can also use a fuel pump. If it is not in the garage, then you can buy a used one for no more than 1000 rubles.
The tube or hose must be selected according to the length of the water pipe.
When using a hydrocirculator, clean water should be used.
For large diameter pipes, you can use a rubber hose, for example, an oxygen hose.
What to do when using washer
- Connect the tube to the tank.
- Place the tube in the water line until it freezes.
- Heat salt water to a temperature of 60–70 degrees.
- Pour water into the tank.
- Connect the washer to power.
Hot water will begin to flow into the water line and melt the plug. As it thaws, the tube needs to be moved towards the blockage. Hot water must be constantly added so that the tank does not run empty.
Salt will speed up the defrosting process and will also prevent the water from freezing if work is carried out in severe frost.
What to do when using the pump
- Attach the tube to the pump, securing it with a clamp.
- Connect the pump and prepare for operation.
- Pour salted water into the container and place the boiler.
- Place a container under the pipe so that the water drains back.
- Place the tube into the water supply.
- Place the pump in the container.
- Turn on the boiler and wait for the water to heat up.
- The water has heated up - turn on the pump.
Useful tips
Water should not be heated above 70 degrees. The heated tube will soften, making it difficult to advance.
As it thaws, the tube must be moved close to the jam.
If there is an angle connector on the water supply and the tube does not move, then it is worth increasing the water temperature to 90 degrees and maintaining circulation. Hot water will have a positive effect in any case, but it will take some time.
Method three: heat the water supply with a homemade steam generator
When the household has a steam generator, then no questions arise, but if not, then you can quickly make a simple installation.
To make a steam generator you will need:
- sealed container: flask, pressure cooker, gas cylinder;
- tube from the hydraulic level, any silicone or plastic tube of the required length;
- fitting for the size of the tube, gaskets for the fitting;
- clamp
You can also use as a container: a freon cylinder, a fire extinguisher, a receiver from KAMAZ, in general, whatever you can find on the farm. You can even adapt a moonshine still, but those who have one know the device very well and do not need advice.
What should be done
If you use a flask or an old pressure cooker, you need to drill a hole in the lid and install a fitting.
When using a gas cylinder, the fitting must be welded into the upper part of the container. The tap must be turned out - water will be poured into this hole.
After the fitting is installed, the tube is attached to it with a clamp. Next, water is poured into the container, approximately 1/4 of the volume, sealed and heated to a boil. Any heat source is suitable for heating: a gas or electric stove, a blowtorch, or, in extreme cases, a lit grill.
After boiling, the water turns into steam and begins to come out of the tube. The tube must be placed in the water conduit and pushed as the ice plug thaws. The steam effectively melts the ice – you won’t have to wait long for the results.
From the author
I encountered this problem twice and both times I used the first option. It's inexpensive, fast and effective, but be careful when using electricity!
Find out: how to prepare engineering systems for winter; how to prepare a bathhouse for winter that will not be heated; and also watch a video on how to build a house for pennies on a small plot.
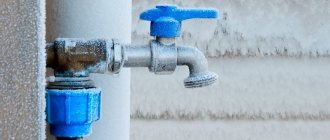
Anti-freeze taps
A common reason for the lack of water in the pipeline is a frozen tap. This is especially true if water for domestic needs in winter must be collected from the yard or used for irrigation during periodic frosts. A tap that is installed in the ground is called a hydrant. It is a piece of pipe up to 1.2 m long with a lever at the top and a valve at the bottom. There is another pipe of smaller diameter inside.
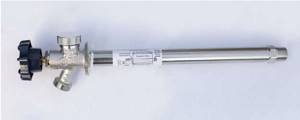
One end of the hydrant is connected to the water main, the other is above the ground and serves to supply water. When the handle is lifted, the valve of the inner tube, connected to the lever via a rod, is activated. After lowering the handle, the valve shuts off the access of water, and the remaining water flows through the external pipe back into the water supply. This way, no liquid remains in the hydrant, which means there is no risk of it freezing.
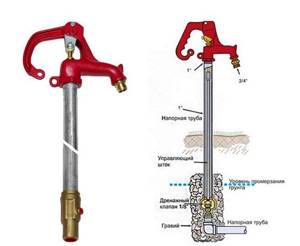
The design and principle of operation of a tap connected to a home network are similar to an underground hydrant, but with some differences. The structure is laid in the wall. At the outer end there is a valve and spout, at the other end there is a check valve with a stem. Product length from 15 to 60 cm for walls of various thicknesses. Since the shut-off valve is located in the positive temperature range, the faucet does not freeze even in severe frost.
By turning the valve, the valve opens and water flows into the spout. When the handle is rotated back, the pipe lumen closes. The remaining liquid is spontaneously removed and the pipe remains empty.
Emergency defrosting of a plastic pipe: advice from professionals
If there is no water in the tap, and it is cold winter outside, then there is a high probability that an ice plug has formed somewhere in the water supply. In harsh climatic conditions, it is necessary to protect communications from freezing; a frozen pipe leads to a lack of water in the tap and to significant financial losses when eliminating the accident. It is much cheaper to foresee possible problems at the construction stage than to warm up a frozen water supply in winter .

A simple way to preserve barrels in the cold
There are barrels at the dacha collecting drainage. In the spring, the water supply is not yet working, but water is needed for irrigation and other things, and barrels help out.
But the problem is how to prevent them from tearing in winter?
I tried putting five-liter bottles with gravel at the bottom, it works, but you need a lot of bottles and it’s inconvenient to put gravel in them, and then cut it and pour it out.
And so this method was born:
Possible duplicates found
Turn over on October 17, turn over again on April 17, in accordance with the order of the USSR Minister of Defense on the transition to winter/summer uniforms. If you are not in Turkmenistan and not in the Polar Region.
And we just turn the barrels over for the winter. Do it once.
If you are planting on an industrial scale, it makes sense to make a well or a well on the site, but there is enough water for everything else. For us, at least.
Yes, we do too. I thought you were just too lazy to leak ;)
In early spring, throw snow into barrels.
The barrels are left filled for the winter, for example at dachas, where planting begins even before the irrigation system starts. So as not to carry water with you in cans, you can stock up in the fall.
Thanks for the interesting recipe. The mother-in-law simply inserts half-decayed long sticks with one end into the water to the bottom, and this also helps maintain the integrity of the barrel, but with bottles it is somehow more reliable.
Well, if you don’t have a ditch, then you can leave it. In general, dachas have water pumps, ponds, etc. There is already so much water in the spring that it would be better to store it in the fall.
My dacha is located far from the reservoir, from where water is actually drawn during the irrigation season, which begins in May.
There is an option to arrive before the snow has completely melted (somewhere at the end of March) and throw the remaining snow, swollen with moisture, into a container, as well as into a greenhouse. But it’s still more convenient to store water in the fall and, when you arrive in April, already have water for watering and planting plants in the greenhouse.
Yes, I don’t mind) initially I thought that I was just too lazy to drain it. I didn’t know that water could be so tight
We always just left a couple of boards in the barrel and that’s it, it doesn’t tear.
if you can’t see the difference, why reduce the useful volume of the barrels?))) I also just put a board and that’s it, nothing tears, doesn’t swell)))
and how often do you have such an apocalypse?)

I don't understand how this shit works
They always left a couple of boards vertically in the barrels and that was it.
Soooo, five liter bottles with gravel - I can do it, I can do it.
When water expands when it freezes, it compresses the bottles, and the excess volume from the expansion goes into them.
You just need to throw a piece of wood and let it float. It won't tear - checked.
What are you planting that a couple of barrels of melt water is enough for you? I took an eight-ton tank - enough for a month at most if there is no rain. So my whole plot will be like a warehouse for barrels for watering this plot.
Will the ice have time to melt by the time water is needed for irrigation?
Causes of pipeline freezing
Often the cause of freezing is an error in calculations at the construction stage. The most severe case is the freezing of an underground water supply. It is difficult to find a water pipe underground, and in frozen ground there is a very high risk of damaging the plastic. There are several simple rules that, if followed, will help to avoid problems during operation:
- the smaller the pipe diameter, the deeper the trench;
- when laying a water supply system, take into account soil freezing in the harshest winter;
- if it is impossible to dig a trench of the required depth, provide thermal insulation;
- To prevent water from stagnating, lay the pipe with an inclination towards the source.
It will be useful: How to disinfect the soil in a greenhouse: from polycarbonate in the spring, disinfection in the fall, disinfection of soil and soil
Usually the pipeline freezes in border areas, between the ground and the air, between the air and the wall. The use of plastic pipes can only partially solve this problem. Although the thermal conductivity of plastic is lower than that of metal, additional thermal insulation is required.
Insulation methods
In order to properly insulate the pipes running from the well to the house underground, it is better to do this at the stage of laying the water supply. Otherwise, you will have to dig a trench again, lay insulation, and so on.
This process not only takes a lot of effort and time, but is also quite costly in terms of finances.
Of course, when laying a water pipeline from a well to a house, you can use special microflex pipes, which are already equipped with protection, but it very often happens that it is necessary to insulate an already laid water supply system.
In this case, there are several alternative methods that allow you to heat the external water supply with minimal effort and cost.
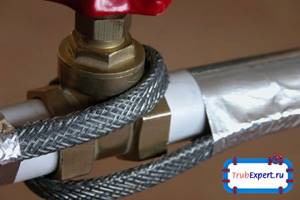
So, in order to prevent the water supply from freezing in winter, you can insulate it using a heating cable.
Video:
In this case, when the cable is turned on, the surface of the pipe itself is heated, which prevents the water from freezing.
You can also insulate water pipes using air.
In this case, it is necessary to use polystyrene foam or basalt insulation to create a kind of umbrella that will trap warm air coming from the ground.
To do this, a special receiver and check valve should be embedded into the system, which will be responsible for the pressure in the pipes.
This method is especially relevant for a water supply coming from a well, since in this case a submersible pump is installed in the system, capable of creating the necessary pressure.
In any case, before deciding on the principle of insulating an external water supply system, it is necessary to carefully study the properties of each method and choose the most suitable one.
More details about the insulation of underground water pipes are described in the video below.
Video:
External methods for defrosting plastic pipes
There are several options for defrosting the water supply outside. Before you begin to eliminate the accident, you need to find out where the ice jam formed. This is done by touch, where the coldest area is - there is a problem. To prevent excess pressure from damaging the pipes and to ensure the release of melt water, be sure to open the tap before starting defrosting. The easiest way to heat the water supply is with hot water, steam, or electricity:
- Using boiling water. The pipe is wrapped in a rag and watered with hot water. In this case, the temperature is increased gradually so that the pipe does not crack. A good method for open areas, the only downside is a large amount of dirt at the accident site. On the street this does not matter, but indoors it can cause some inconvenience.
- Warming with warm air. Use a hair dryer, or supply warm air in another way. Well suited for metal pipes; a plastic pipe may melt with this type of emergency response; you must carefully monitor the air temperature. The thermal conductivity of a plastic pipe is lower than that of a metal pipe, so this method is far from ideal.
- Heating by electric current, using a cable from the “warm floor” system. The area where the water supply is frozen is wrapped in foil, with wire on top. A layer of insulation is wound on top, all this is fixed with tape, defrosting occurs in 2-4 hours. For plastic pipes, this method is optimal, but requires additional equipment.
Under no circumstances should plastic and metal-plastic water pipes be heated with an open flame.
This method is common for various types of defrosting, but fire is destructive for plastic. The material from which the pipe is made melts very easily.
- Heating using steam occurs through a heat-resistant tube inserted into the water supply. Its diameter is selected in such a way as to ensure the drainage of melt water. One end of the tube is placed on a steam generator or pressure cooker, the inner end is inserted into the water supply until it stops. If there is no source of steam in the house, you can use hot water. It is advisable to fill it through a pressure pump. If there is no pump, use a funnel, but this method is more difficult to warm up the frozen area.
- Unlike metal, plastic water pipes can be heated using a homemade electric boiler. To do this, take a wire and strip its ends. Bare wires are fixed at a distance of 1 to 3 cm, the distance depends on the width of the pipe. The resulting structure is inserted into the pipe all the way to the plug. After this, current is applied, and as the ice defrosts, the wire moves forward. When carrying out work, it is necessary to ensure that melt water is pumped out, otherwise it may freeze again.
In most cases, you can solve the problem of frozen pipes yourself. However, sometimes it cannot be overcome without the help of specialists. A hydrodynamic machine, an autoclave, a powerful steam generator - these expensive mechanisms are unlikely to be required by everyone, but the presence of such equipment among professionals helps to quickly cope with a difficult situation.
No. 5. Defrosting with a wire
The method is suitable for defrosting only plastic water pipes located at a distance from the house. To work you should purchase:
- two-core wire, the length and thickness depends on the pipe, but people with experience advise taking a thicker and stiffer wire;
- socket plug;
- a compressor and a hose will be needed if the pipeline is long enough, or if the ice plug is located far from the point of entry into the house. You can buy a fuel hose, it is inexpensive, and use a pump as a compressor, or use a car compressor.
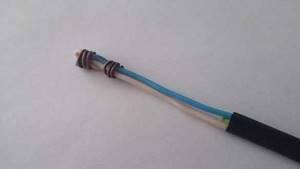
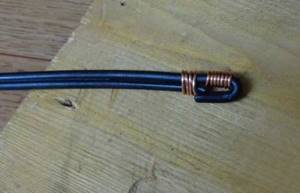
The main thing is to prepare the wire correctly . First, we remove the general insulation in an area of 8-10 cm and expose one of the wires. We carefully bend it in the opposite direction and make several turns (3-5 is enough) around the part that remains under the general insulation (it’s clear from the pictures below). The coils should be tight. The insulation is also removed from the second wire and wound below the turns of the first wire. The distance should be about 2-3 mm - the turns of the first and second wires should not touch. If you use pliers when creating turns, then first wrap the wire with something thick so as not to damage the insulation.
When the first end is ready, all that remains is to connect the plug from the second end. Here is our working tool, sometimes popularly called a “burbulyator”, ready. You shouldn’t try this method if you don’t understand much about electrics.
The action of this method is based on a simple physical phenomenon. When current passes through water, the latter heats up. Just what you need when you need to defrost pipes! It is important that the wire itself remains cold, only the water is heated, i.e. the likelihood of damaging the plastic pipe is minimized.
This method of defrosting frozen pipes can only be used if all parts (including shut-off valves) are made of plastic. If there are steel fittings, a short circuit may occur.
You can check if our defrost is working using a jar of water. It is enough to lower one end of the wire there, plug the other into the socket, and you will see bubbles begin to appear in the water, all this will be accompanied by a hum. You shouldn't put your fingers in the water - you might get an electric shock.
Now all that remains is to lower the wire into the pipe until it hits the ice, but without unnecessary force. We plug it into the socket, carefully press the end of the wire against the ice and wait a couple of minutes, after which you can try to lower the wire a little more; it will seem to fall into the ice on its own. If the frozen area is large enough, then it is better to gradually pump out the melted water. You can do without this, but then it will take more time, because you will also have to heat up a sufficient amount of water. There is another threat - the ice that has already melted may begin to freeze while you melt its deeper layers. In general, it is better to use a pump or compressor.
The accident has been resolved, what next?
Once the traffic jam is cleared, it's time to think about preventing a similar situation in the future. To do this you can do the following:
- If an underground water supply pipe freezes, there is most likely a leak or a waterproofing problem. Yes, it is difficult to carry out repair work in winter, but with the onset of the warm season it will have to be done.
- If there is a plug where the pipe passes through the wall, additional heat and waterproofing is required. You may have to widen the hole in the wall to do this.
- Open sections of the pipeline can be provided with additional thermal insulation and an electrical heating system with a self-regulating cable. You shouldn’t keep the heating system on all the time, 15-20 minutes a day is enough.
- In the event of an abnormally cold winter, it is sufficient to keep the water tap open as a temporary measure. Yes, this action will lead to additional costs, but the constant flow of water will not allow it to freeze.
PVC pipes are more resistant to freezing; they will withstand up to three freeze-thaw cycles. However, you should not test their strength; it is better to prepare in advance and not experience problems with water supply for many years.
No. 3. Defrosting a pipe with a welding machine
If the frozen area is located outside the house , then it will take more time and effort to thaw. The method with a welding machine is considered one of the most effective, but it has a limitation - it is only suitable for metal pipes.
First, you will have to at least approximately determine the location of the formation of the ice plug. Then, on both sides, the water pipe is cleared of thermal insulation and polished to a metallic shine. An electric cable connected to the secondary winding of the welding transformer is connected to these places.
Now all that remains is to set the minimum current on the device (about 180 A) and plug it into the network. The metal pipe will begin to heat up along the entire length of the connected section. Thawing occurs relatively quickly, but the duration of the entire process depends on the length of the pipe. At the same time, the water tap should also be kept open. Experts warn that the method has a side effect - pipes after such treatment begin to rust faster.
It is very important to connect and disconnect cables to the pipe only when the welding machine is turned off. Otherwise, you can get an electric arc, which can damage both the pipe and your hands and eyes.
How to quickly defrost plastic water pipes underground
Pipes freeze for various reasons: insufficient laying depth, lack of insulation, small volume of transported water, use of the pipeline in frosty conditions. Defrosting the water supply in an accessible place does not cause difficulties. The question of how to defrost a plastic water pipe underground requires attention.
Nowadays, water supply uses pipes made of high-density polyethylene, which does not deteriorate when frozen, has anti-corrosion properties and does not conduct electricity. But heating the water supply is not possible using all available methods.
Tip #3: “Melt the ice, don’t heat the pipe”
What if the water in a plastic pipe freezes? Here the above methods will be useless or even dangerous for the integrity of the pipeline. Therefore, it is worth taking a more careful route, which, by the way, is quite applicable to iron products. Before describing it, I will immediately note its main advantages:
- Absolute safety in relation to the pipes and the health of the person performing the defrosting process;
- High efficiency and clear results. The procedure may take quite a long time, but in the end you are still guaranteed success;
- Minimum financial costs. You may have to buy some things, but you definitely won’t need any expensive equipment;
- Ease of execution. You don’t need to have any special skills; it will be enough to accurately follow the instructions I provided below.
If you are installing a plastic pipeline, I recommend choosing pipes made of low-density polyethylene, as they can withstand freezing and thawing processes without damage.
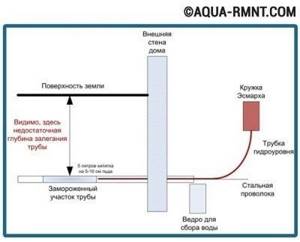
Sample of a suitable hydraulic level
- Steel wire with a diameter from 2 to 4 mm. Calculate the length depending on how far the frozen place is from the point at which you penetrate the pipeline;
The simplest plastic bucket
- We take one of the ends of the hydraulic level and attach the edge of the wire to it so that the tube protrudes by 10 mm. You can simply wrap steel around the plastic, you can fix it with tape, the main thing is that the connection is strong and there are no sharp fragments sticking out of it that could damage the pipeline from the inside;
- We connect the other end of the measuring device to the outlet of Esmarch's mug;
- Now we begin to carefully push the edge that with the wire into the pipeline;
Scheme of implementation of the described procedure
In 60 minutes, this method can free up to 100 cm of pipeline and, as I noted above, without any significant risks.
There is also a way to destroy ice by inserting a bare wire into a pipe, but if you are an electrician, you yourself will guess how it works, and if not, then it will be too dangerous for you, which means it is better not to focus on it at all.
How to find a frozen area
Before you begin thawing a frozen water pipe, locate the area where the ice blockage has formed. Search methods:
- Visual inspection. When a liquid freezes, it increases in volume and leads to swelling; the place where it freezes feels colder to the touch.
- Internal check. If a full inspection is not possible, use a flexible wire or cable. The area where the cable does not pass further will be the place where the traffic jam occurs.
How to thaw an icy area will depend on the availability of free access to the problem.
Effective ways to solve the problem
It is difficult to heat a water pipe located in the ground. In this case, it is impossible to use external thawing methods. You will have to defrost the system from the inside. Let's look at common ways to remove ice jams.
Hot water application
Prepare a metal-plastic pipe whose cross-section is 2 times smaller than the diameter of the main pipe. Carefully bring it inside the pipe to the frozen area and fill it with boiling water, which will gradually wash away the ice. When defrosting water pipes using this method, be sure to open the tap so that the pressure in the system remains low.
Heating with a hairdryer
This heating method is suitable for water pipes that are located in the public domain. A stream of air is directed onto the icy area. To avoid deformation of the plastic, the temperature of the hair dryer should be set to a minimum level. After heating with hot air, wrap the pipeline section with insulation.
De-icing with electric current
It is possible to combat pipe freezing using a welding machine. But it should only be used to defrost water supply systems made of steel, copper and other metal products.
Metal is a conductor of electric current. Electrons and ions under the influence of an electric field, moving and colliding with each other, form energy. The latter turns into heat. Plastic does not conduct current. Therefore, using a welding machine on plastic products is pointless and irrational.
Soldier's boiler for plastic pipes
Water is an electrolyte due to its salt content. Therefore, to heat it, you will need a pair of energized electrodes. This method is only suitable for polyethylene water supply systems and is based on the principle of operation of a boiler.
You will need: two-core copper wire and steel wire, tools. The wire strands are stripped and wrapped around the wire. Make sure that the turns do not touch each other, as a short circuit may occur. A plug is attached to the free end of the wire. Lower the homemade boiler into the pipe near the ice plug and plug it into the mains. After a while, the water supply will warm up and the icing will melt.
How to avoid freezing pipes
But what if it is impossible to bury the pipe below the freezing depth? For example, the site may have rocky soil that is difficult to develop. Also making it difficult to penetrate are structures buried in the ground - reinforced concrete slabs, foundations, communication routes that cannot be penetrated or bypassed.
The most common reason is high groundwater level. The soil on the site can be so damp that water begins to appear literally at a depth of two shovels. It is not possible to dig a 1.5-2 m trench and lay a pipe there.
Important. For these cases, various methods of installing a pipeline with insulation are provided. They will help prevent water from freezing even when laid at a very shallow depth.
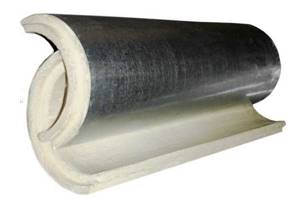
Thermal insulation with “shells”
Manufacturers produce shells for pipe insulation from various materials - polyurethane foam, foamed polystyrene, mineral wool. PPU and PPS shells are used for laying in the ground. They reliably protect structures from freezing, do not rot, and do not corrode in a humid, aggressive environment.
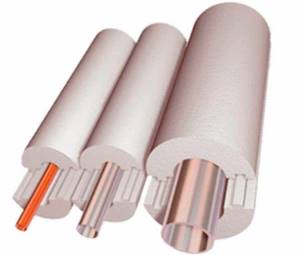
For ease of installation, some products are equipped with a tongue-and-groove lock. An additional outer layer of foil reflects heat rays and reduces the likelihood of channel freezing.
“Shells” are produced in a wide range of sizes and shapes, so choosing suitable thermal insulation for communications, even of complex configurations, is not difficult. During installation, the shell is placed on the water conduit and additionally secured with fastening tape.
"Pipe in pipe"
This method is often used when laying pipes outdoors: at the entrance to the house or between nearby buildings, for example, a cottage and a bathhouse. The method provides not only good thermal insulation, but can also be useful if an ice plug has formed in the water supply. Hot water is poured into the gap between the pipes and patency is restored in a matter of minutes. Everything is convenient and practical - no need to look for a blockage or dig a hole in frozen soil.
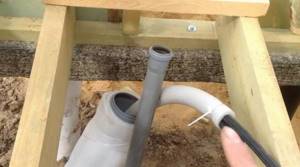
For installation using the “pipe in pipe” method, non-pressure plastic sewer pipes with a diameter of 110 mm are used. The water pipe can first be wrapped with thermal insulation, and then inserted into the channel. A good insulating effect is achieved by using polyurethane foam (polyurethane foam), which is pumped into the gap between the pipes, having previously made holes along the length every 30-35 cm.
To minimize heat loss, the design is made even more multi-layered. It may consist not of 2, but of 3 pipes. If in such a “box” you additionally install thermal insulation from some porous material, for example, foam rubber or a substrate for laminate flooring, the pipeline will not freeze even in the most severe frosts.
Foil materials
Effective thermal insulation of water supply and sewerage systems - cylinders laminated with foil or foamed polyethylene films with a metallized layer. The materials reduce heat transfer to the surrounding space by reflecting infrared rays from the metal surface into the pipe.
The products consist of layers of insulation and aluminum foil. The thicker it is, the stronger and more resistant to damage. Mount the films with the foil side facing out. When laying, use a special metallized tape, carefully sealing all joints with it.
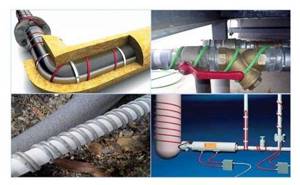
Heating cable
Cable pipe heaters are becoming increasingly popular in private buildings. They are installed both outside and inside water supply networks.
Laying can be carried out not only at the stage of laying communications, but also along already buried pipelines. This is often the most acceptable way to get rid of regular freezing without laborious dismantling of pipes.
To heat water supply and sewer networks, a polyolefin-coated cable is used, which is resistant to aggressive environments and mechanical damage. When laying wires inside the pipe, products with insulation made from food-grade fluoroplastic are used, which is safe for health and does not change the taste of drinking water.
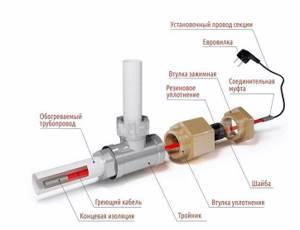
According to the type of regulation, cables can be self-regulating or resistive, the latter can have one or two cores. The temperature regime and power level are selected depending on the pipe diameter and purpose.
Installation is carried out in the following ways:
- spiral winding;
- installation outside along the pipe;
- internal gasket.
Self-regulating cables are able to change the degree of heating with temperature fluctuations. The colder it is, the higher the power consumption of the product. Sold in coils of measured length, you can cut the required amount.
Resistive heaters have constant parameters that do not change depending on environmental conditions. Manufactured in fixed length sections. If you need to cut the conductor, you will have to apply the coupling yourself.
Important. When laying a heating cable, it is advisable to carry out insulation so as not to waste heat on warming the surrounding space.
In order to save energy, you can turn on the power only when the pipe lumen is blocked with ice, and do not use heating the rest of the time.
Video - installation of a self-regulating heating cable inside a pipe
Thermal insulation paint
Liquid insulators are new generation coatings. Thermal paint creates a thin protective layer on the surface of structures, replacing traditional insulation several centimeters thick.
This effect is explained by the very low thermal conductivity of the composition. It contains tiny balls of glass, ceramics or polymers with a vacuum inside, which effectively prevent heat transfer. The content of heat-insulating microspheres reaches 80%, the rest of the volume is occupied by an acrylic or latex binder.
The paint is applied with a brush to the surface of the pipe in several layers. According to manufacturers, the service life of the coating reaches 12-40 years.
Ready-made thermally insulated pipes
You can significantly simplify your task if you install pipes in a factory-made protective shell. Manufacturers produce products for plumbing, sewerage and heating installations with one or more functioning channels, as well as an additional heating cable. Insulated communications can be installed both outside and inside the house.
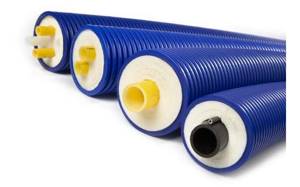
The corrugated coating provides design flexibility, which greatly simplifies the process of laying even complex pipeline configurations with a small radius of curvature. To avoid shell deformation, the installation technology provides for the installation of a soft sand cushion. A special adapter is used to connect to a regular pipe.
How to prevent your system from freezing
To do this, you need to remember the following:
- Lay the pipes at a sufficient depth, below the freezing level of the ground.
- The water supply should not pass near reinforced concrete structures (foundation, beams and supports), since this material has a higher thermal conductivity. If you cannot find another installation location, insulate the pipes.
- It is recommended to insulate those places where the sewage system passes through the walls of the building with polyurethane foam, glass or mineral wool.
- Use pipes with a diameter of at least 50 mm.
- When choosing between polymer products, remember that polyethylene reacts stably to the process of freezing and thawing. Polypropylene may burst after two defrosts.
- If the pipeline does not operate regularly in winter, it is better to drain the water from the system.
It will be useful: Curtains for the bedroom: photos of beautiful curtains, which design to choose for 2021, short ones in the interior of a small bedroom
If you have the opportunity and finances, you can also lay a heating cable.
Application of heating cable
The cable is used to heat the water supply and prevent freezing of plastic and metal pipes. Nuances of use:
- the operating time of the device does not have to be constant, night time is sufficient;
- It is recommended to use the heating cable immediately when laying a section of the pipeline that is susceptible to freezing;
- The device is divided into 2 types: cable with self-regulating function and simple.
If the conditions for laying the water supply system are observed, you will not have to face the problem of freezing.
Like, subscribe to our channel and you won’t miss many more useful articles! And visit our website, there is still a lot of useful information regarding pipes.
Methods for insulating external water supply
For thermal insulation of water pipes located on the street, the following are used:
- laying materials of natural origin;
- application of roll coating;
- spraying liquid material onto a previously prepared pipe surface.
Application of simple techniques
Basic techniques are used when laying highways at the boundaries of the freezing zone and depend on the climate zone.
To insulate water supply pipes in a private house, a method of increasing the soil layer can be used, which allows you to remove the boundary of the freezing zone from the main line. A layer of earth or sand is poured along the laying line; in winter, snow can be used.
The width of the soil or snow bank exceeds the depth of the pipes by 2 times. The methods do not require financial costs, but they disturb the appearance of the garden plot.
Types and forms of materials
Insulation of water pipes in a private house using cotton wool is carried out only in dry rooms. To protect the material from moisture in basements, it is necessary to install concrete trays; insulator-coated pipes are covered with a layer of expanded clay. The elements are laid on the pipeline with the edges overlapping by 150-200 mm (to ensure uniform protection). There is pipe insulation made in the form of segments with an angle of 180° or 120°. The parts are laid on the main line; a special lock (protrusion and groove) is used to connect the sections.
The surface is wrapped with a layer of plumbing tape, which holds the insulator and provides protection from external factors. The bends of the highways are closed with standard type shaped elements.
Thermal insulation paint and polyurethane foam spraying
This technology is characterized by the absence of seams and provides protection for highways of complex geometric shapes. Polyurethane foam is applied using a spray; after crystallization, the material provides increased protection against cooling. Application requires the use of special equipment, which increases the cost of the work and does not allow you to insulate the pipes yourself.
Therefore, insulation of the water supply system in a private house is done on your own using special paint, which can be aerosol or liquid (for example, Alfatek materials). Metal pipes are cleaned of traces of corrosion, paint is applied with a spray or paint brush.
The paint contains a binder and ceramic-based additives. The material has a low thermal conductivity coefficient, but a layer of paint may not be sufficient to reliably protect the water supply.
Ready-made integrated solutions
Property owners need to know what else can be used to insulate outdoor water pipes. There are complex solutions that allow you to build a branched pipeline of complex configuration.
Flexible or rigid water lines are available, enclosed in a layer of elastic insulating sheath. There are designs with 2 parallel pipes to simultaneously provide hot and cold water supply.
Insulated plastic pipes are supplied in coils up to 200 m long (depending on the diameter of the pipe, the thickness of the insulating layer and the manufacturer), steel lines are made in the form of straight sections or shaped connectors.
The outer surface is protected by a corrugated plastic cover, which allows bends with a small radius. The plastic pipeline allows the pipeline to be laid without connections, which improves protection against freezing.
How to insulate a water pipe at the entrance to a house
The owner of a dacha built on a strip foundation needs to know how to insulate the water supply pipe at the entrance to the house. To protect the pipe, synthetic and natural materials are used, and heating systems from external heat sources are installed.
If the house is built on the ground floor, located below the freezing level. That insulation is installed directly in the basement. A box is built around the pipeline, wrapped in basalt wool, and filled with sawdust or expanded clay.
How to thaw a frozen water supply: a review of 5 effective ways to solve the problem
Owners of private houses often face a situation in the winter when one morning it suddenly turns out that water is not flowing from the tap: the water supply has frozen. There are several reasons why water freezes in a water supply: a decrease in the air temperature outside to extremely low temperatures, insufficient deepening of pipes (without taking into account the depth of soil freezing), water in the pipe is stationary due to low or zero flow (at night or in the absence of owners ), insufficient insulation of pipes. Usually, all of the above reasons taken together lead to freezing of the water supply. What to do, is there a way out of this situation, because without water, as you know, there is no way to go and no way to go? Yes, I have. Let's look at some ways to warm up a frozen water supply, which, however, will require a lot of patience and some skills from you.
At what temperature does water freeze in pipes: saving pipes from freezing (video)
Stable operation of the pipeline in the house is the result of careful pipe maintenance. This is especially true in winter. When extreme cold sets in, the water in the pipes can simply freeze. If this happens, use only safe pipe heating methods and water will flow through your pipes again.
At what temperature does water freeze?
Pure water at O °C does not freeze - just like sea water.
In order for water to freeze, it needs something to which its molecules can attach. Ice crystals form around “nuclei” such as dust particles. If there are none, you can cool the water to -42 °C before it starts to freeze.
Cooling water without freezing is known as "supercooling". This should be done slowly. You can, for example, place a bottle of very clean water in the freezer and supercool it. But as soon as you pull the bottle out and tap your finger on the glass, the water will instantly turn into ice.
Ultra-fast cooling of water has a completely different effect. Once past the ice stage (which has a uniform crystalline lattice structure), it transforms into a chaotic amorphous solid known as "glassy water" (so named because of the random arrangement of molecules, similar to the structure of glass). To obtain “glassy water,” the temperature must be lowered to -137 °C in just a couple of milliseconds. “Glass-like water” on Earth can only be found within the walls of laboratories, but in the Universe this form of water is found most often - it is what comets are made of.
Due to its high salt content, seawater regularly cools below 0 °C without freezing. Fish blood typically freezes at around -0.5°C, so marine biologists have long been puzzled by the question: how do fish manage to survive in the polar seas? It turns out that species such as Antarctic icefish and herring produce proteins in their pancreas that are absorbed into their blood. It is the proteins that prevent the formation of ice crystallization nuclei (almost like antifreeze in a car radiator).
Knowing the properties of water at low temperatures, you will not be surprised to learn that its boiling point (even at normal pressure) is not necessarily 100 °C. It may well be much higher. True, here too the liquid must be heated slowly, and in the vessel without a single scratch. It is in the scratches that the very air cavities are contained, near which the first bubbles form.
Boiling begins when bubbles of water vapor expand and break through the surface of the water. For this to happen, the temperature must be high enough that the pressure created by the vapor bubble exceeds atmospheric pressure. Under normal conditions this is 100°C, but if there are no places in the water where bubbles can form, more heat is required to overcome the surface tension of the bubbles making their way into life. (For the same reason, it is more difficult to inflate a balloon at the beginning than at the end.)
This, by the way, explains why a cup of boiling coffee can explode, splashing everything around, if you take it out of the microwave or stir it with a spoon. The movement will cause a chain reaction, causing all the water in the coffee to quickly evaporate.
And finally, one last water oddity: hot water freezes faster than cold water. Aristotle was the first to draw attention to this back in the 4th century BC. However, the scientific world recognized his rightness only in 1963 - thanks to the perseverance of a Tanzanian schoolboy named Erasto Mpemba. The boy confirmed the words of the ancient Greek, clearly demonstrating that sweetened milk mixture will turn into ice cream faster if it is first heated. But we still don’t know what the secret is.
Overview of different methods
The water supply can be defrosted using various methods of applying external heat to the pipe, or by defrosting it from the inside.
Method 1. Use hot water
If there is a suspicion that the water supply is frozen in an open area - at the entrance to the house, in an unheated basement, etc., boiling water is used to warm it up.
To do this, you must first wrap the pipe with any rag that will absorb water and prolong the time the pipe is in contact with boiling water. Pour hot water until the ice begins to melt. And to speed up the process, the tap must be left open.
The easiest way to warm a frozen pipe is to pour boiling water on it.
This method is used only indoors, because if the pipe is underground, it will take a long time to warm it with boiling water - at least 12 hours.
Method 2. Use a hair dryer
The pipe can be defrosted using hot air produced by a powerful hair dryer. The surface of the pipe is blown from all sides, and to reduce heat losses it is recommended to erect a small pavilion made of plastic film, for example, over the frozen pipe. If the pipe is plastic, you need to correctly calculate the heating so as not to melt it.
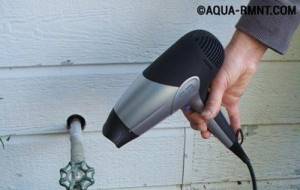
Solving the problem of defrosting a water pipe using a conventional hair dryer, but you can also use a construction tool
If the pipes freeze slightly, you can use a household hair dryer or fan heater to warm it up. If there are turns, narrowings, or entrances to fittings, they also need to be warmed up, as ice pieces can get stuck there. And in this case, do not forget to leave the tap open.
Method 3. Electric current comes to the rescue
How to warm a frozen water pipe using electric current?
Heating a metal water pipe
can be done using a welding transformer: the positive wire is connected to one end of the pipe, and the negative wire to the second. In this simple way, the problem can be solved in a few minutes: the ice plug will melt.

The time for heating frozen metal water pipes with a welding transformer is minimal
Heating a plastic pipeline
can be done using a two-core copper wire with a cross section of 2.5 mm. This method is similar to the operating principle of a conventional home boiler. The wire strands are disconnected. One of them is simply bent, and the second is exposed and twisted 3-5 turns around the wire, cutting off the excess end. They do the same with the first core, retreating 2-3 millimeters from the turns of the second core. You need to pay attention so that the wires do not touch, otherwise a short circuit will result. A plug is connected to the other end of the wire. The wire is pushed into a plastic pipeline and connected to the electrical network. Passing through the water, the current heats it up and the ice begins to melt. The good thing about this method is that only the water heats up, while the wires remain cold and this prevents accidental melting of the plastic pipe. To quickly blow out melt water, you will need an additional compressor.
Method 4. We heat the pipeline from the inside using improvised means
How to heat a water supply system if it has many bends and sections? For such a case, you can build a special device. You will need a wire, a hydraulic level tube, an Esmarch medical mug (in simple terms - an enema), which consists of a rubber container with a rubber hose and a small tap for draining water. The hydraulic level tube is secured to the wire using electrical tape so that the end of the tube is slightly longer than the wire. Push it into the water supply until it stops. Hot water flows from the rubber reservoir into the pipeline. It is necessary to organize the collection of melt water.
Schematic representation of the warming process using wire and enema
As the ice thaws, the tube with the wire is pushed further. The process of heating a frozen water pipe using improvised means is quite labor-intensive and requires a lot of patience and time (about 1 hour per meter of frozen pipe), but the costs are minimal.
Method 5. Call specialists
You can also warm up a water pipe from the inside using special equipment - a hydrodynamic unit, the direct purpose of which is preventive flushing of water and sewer pipes.
Hot water with a temperature of 150 degrees is supplied under high pressure (90-100 atm) through the hose. The water boiler of the installation runs on diesel fuel, and the unit is powered by an electrical network with a power of at least 7 kW and a voltage of 380V. This method requires calling specialists, so this method is not suitable for everyone.
How is it prohibited to heat process pipelines - dangerous methods
When we want to warm a pipe from ice ourselves, we should know in what way it is prohibited to warm process pipelines. A prohibited way to heat pipes is to use an open fire. To heat ice, use only hot water, firewood or sand at high temperatures.
Fire should not be used, as a sudden change in temperature occurs. The pipe may simply burst. Metal pipes will still withstand this heating method. But polypropylene or metal-plastic pipes will burst.
This could result in a fire and your home catching fire. Not to mention the pipes themselves. Take into account all safety measures when heating the pipeline and then you will be able to remove ice from the pipes without incident.