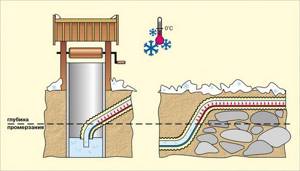
Laying pipes below freezing depth
This method is advisable to use if in winter the soil freezes no deeper than 170 cm. A trench is dug from a well or borehole, the bottom of which is 10-20 cm below this value. Sand (10-15 cm) is added to the bottom; the pipes are laid in a protective casing (corrugated sleeve), then covered with earth.
To avoid having to insulate the outdoor water supply in cold weather, it is better to do this in advance
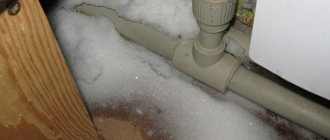
This is the easiest way to make winter water supply at the dacha, but it is not the best, although it is the cheapest. Its main drawback is that if repairs are necessary, you will have to dig again, and to the full depth. And since it is difficult to determine the location of a leak with this method of laying a water pipeline, there will be a lot of work.
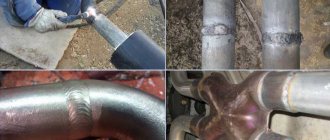
To ensure that there are as few repairs as possible, there should be as few pipe connections as possible. Ideally, there should be none at all. If the distance from the water source to the dacha is greater, make connections carefully, achieving perfect tightness. It is the joints that leak most often.
Choosing a material for pipes in this case is not the easiest task. On one side, a solid mass presses from above, so a strong material is needed, and this is steel. But steel laid in the ground will actively corrode, especially if the groundwater is high. The problem can be solved by properly priming and painting the entire surface of the pipes. Moreover, it is advisable to use thick-walled ones - they will last longer.
The second option is polymer or metal-polymer pipes. They are not subject to corrosion, but they need to be protected from pressure - placed in a protective corrugated sleeve.
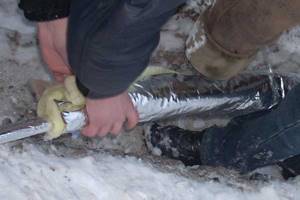
Even if the ditch was dug below the freezing level, it is still better to insulate the pipes
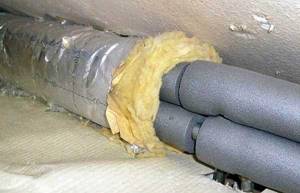
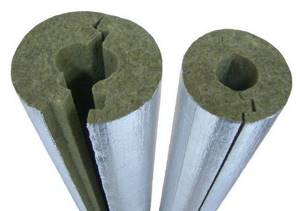
One more thing. The depth of soil freezing in the region is determined over the past 10 years - its average indicators are calculated. But firstly, very cold winters with little snow occur periodically, and the ground freezes deeper. Secondly, this value is the average for the region and does not take into account the conditions of the site. Perhaps it is on your piece that freezing may be greater. All this means that when laying pipes, it is still better to insulate them, lay sheets of polystyrene foam or expanded polystyrene on top, as in the photo on the right, or lay them in thermal insulation, as on the left.
You might be interested in reading “How to make automatic watering“.
Pipeline insulation
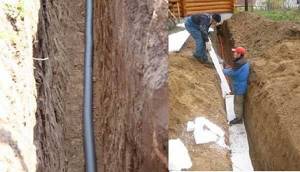
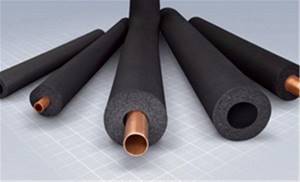
When supplying water to a private house from a well and a borehole, the pipeline can be laid at a very shallow depth - 40-50 cm - this is quite enough. Just laying pipes in such a shallow trench needs to be insulated. If you want to do everything thoroughly, then line the bottom and sides of the trench with some kind of building material - bricks or building blocks. Everything is covered with slabs on top.

An example of laying pipes above the freezing depth in a prepared ditch. The insulation of the water supply is carried out with a special insulation, with a suitable internal diameter
If desired, you can fill in the soil and plant annuals - if necessary, the soil can be easily removed and free access to the pipeline is provided.
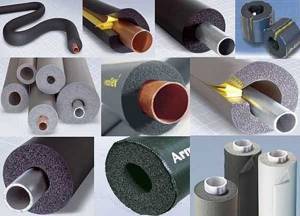
Insulation for water pipes
Two types of insulation can be used:
- special energy-saving shells molded in the form of pipes, they are also called “pipe shells”;
- roll material - ordinary insulation in the form of rolls, which is used for walls, roofing, etc.
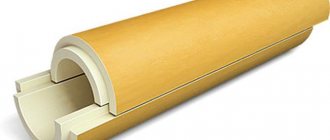
Thermal insulation for pipes in the form of a shell is made from the following materials:
- Expanded polystyrene - multiple granules are fused together. The result is a fairly rigid and durable material with good thermal insulation characteristics.
- Extruded polystyrene foam - the cells of the material have a closed structure (small balls). This also gives the material water-repellent properties, as well as higher thermal insulation properties. This is one of the best materials with a high degree of insulation, but its disadvantage is its high price.
- Polystyrene foam - one of the variants of expanded polystyrene - has good thermal insulation characteristics, but is characterized by low strength. That's why he needs protection - he can't stand pressure. But it costs a little. If you are laying pipes in a trench with walls made of brick or concrete, it can be used.
Nobody bothers you to play it safe and use two layers of insulation - Polyurethane foam - in terms of characteristics and price, it is between expanded polystyrene and polystyrene foam. This is what is most often used for pipe insulation.
- Foamed polyethylene (such as “Energoflex”) has good characteristics due to the high content of air bubbles.
- Glass wool is a rolled material with good thermal insulation characteristics and a relatively low price. Its disadvantage is that it requires special measures when installing: fiberglass is very prickly, and it is impossible to remove microscopic particles from the skin. You also need a respirator and safety glasses - small particles are volatile and harmful to health.
- Stone wool. It is made from basalt or slag. Basalt wool has the best characteristics, but is expensive. Slag wool is a cheaper material, but its characteristics are worse - you need to take it in greater thickness, which often reduces material benefits to a minimum.
Insulation of water supply pipes in a private house is done using thermal insulation.
Mineral wool - glass wool and stone wool - have one significant drawback: they are hygroscopic. By absorbing water they lose most of their thermal insulation properties. After drying, they are only partially restored. And another very unpleasant moment is that if wet mineral wool freezes, after freezing it turns into dust. To prevent this from happening, these materials require careful waterproofing. If you cannot guarantee the absence of moisture, it is better to use another material.
How to make drip irrigation systems for greenhouses and vegetable gardens with your own hands is written here. There is an article about manufacturers of ready-made drip irrigation kits here.
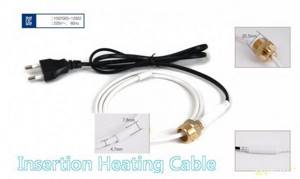
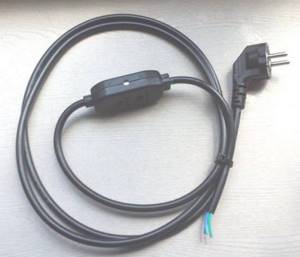
When the water freezes (dacha, country house, etc.) - heating cable INSIDE the pipe
A product needed primarily by summer residents and those living in country houses. As I promised, I will gradually post my “developments” for comfortable living outside the city, in order of relevance. This review is a heating cable to prevent freezing (defrosting) of water pipes.
The manufacturer also intends to use pipes with oils and petroleum refining items.
Declared characteristics: 220-240V 60-75C temperature of the cable included. 15W per meter power consumption.
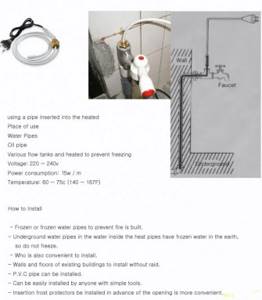
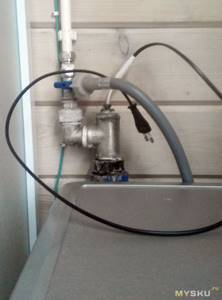
Specifically, I ran from a bathhouse (freestanding) to a well (10m) - although putting 10m into a pipe was not too easy, everything went well and has been working for the second year. And most importantly, it was easier than digging up the entire water supply! The seller has various cable length options. I was freezing where the pipe went deep, i.e. the input is insulated, the laying depth is sufficient, but the insulation of the pipe to the depth of the main pipeline laying was not enough.
After several painful thawings of the place where the pipe went underground with boiling water, with digging out part of the pipe in depth (when I wanted to take a steam bath), a search for a solution to the problem was organized.
There are similar solutions that are “cooler” - but also noticeably more expensive. These are cables from Scandinavian manufacturers (those that I could find), several times more expensive, but having the advantage of a change in resistance between the cores depending on temperature. Those. self-regulating cables that prevent freezing and at the same time save energy.
But after thinking about it, I settled on this cable (at the time of purchase, I really didn’t read the instructions carefully and didn’t know that it was not self-regulating :)
This is roughly what I got:
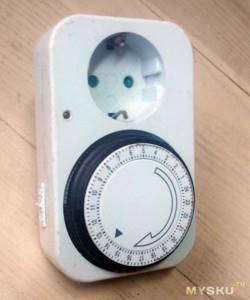
I don’t use the cable always on, although in cold weather you can turn it on permanently, it doesn’t consume as much power... I usually turn it on after the fact, when I need to thaw the water supply in the bathhouse. I have it made of black PVC, so I’m not too worried about damage to the pipe, it shouldn’t break. But in principle, it’s not difficult to implement an automation, or one that is triggered by temperature, for example, this one (also bought on Ali)

aliexpress.com/item/1PCS-W1209-DC-12V-heat-cool-temp-thermostat-temperature-control-switch-temperature-controller-thermometer-thermo-controller/32340863493.html or a regular mechanical switch/timer that are sold in supermarkets everywhere now, and you can adjust the on/off phases at your discretion.
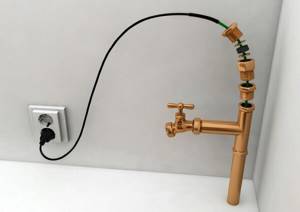
The most important advantage of such a cable is that it is inserted INSIDE an existing pipe!
There is NO NECESSITY to dig up an already laid water supply system, you just need to install a tee. Quite easy to replace (in case of malfunction) Cons: Some difficulty when inserting a large length of cable, especially if the pipe has strong bends. Fixed cable lengths.
A note from myself - several of these cables were purchased, of different lengths (for friends in different regions). One of them failed after a few months, quite possibly due to the cable being re-wired (by the owner) before use. The seller very kindly offered to send another, working one (free of charge) - i.e. The seller is really good, did not require any special proof of the problem and did not require sending the faulty cable back. Fast delivery.
I have a cable coil purchased on Ali for laying OVER the pipe - but this is relevant for places with access, or during the initial installation of the pipe. Well, also a solution for thawing drains, gutters of various kinds, etc. Like this:
aliexpress.com/item/Anti-freeze-Frost-Protection-Heating-Cable-For-Water-Pipe-Roof-230V-8MM-30W-M-65Temp-Self/1951095867.html
It can also “make life easier” in winter, but people won’t get around to it yet
ZYZH. It came to mind - probably with a similar cable in the bathhouse and the sewer outlet, there, too, in the “castle” it sometimes grabs from users...
Heating
When planning the installation of winter water supply, you need to keep in mind that insulation only helps reduce heat loss, but cannot provide heat. And if at some point the frost turns out to be stronger, the pipe will freeze. Particularly problematic in this sense is the area where the pipe leads from the underground sewer into the house, even a heated one. Still, the soil near the foundation is often cold, and it is in this area that problems most often arise.
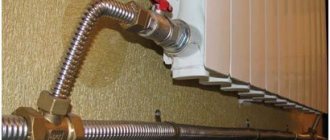
If you don't want to freeze your water supply, heat the pipe. For this, a heating cable or heating plates are used, depending on the diameter of the pipes and the required heating power. Cables can be laid lengthwise or wound in a spiral.
Method of attaching the heating cable to the water pipe (the cable should not lie on the ground)
A heating cable is good for everyone, but it’s not so rare that our electricity goes out for several days. What will happen to the pipeline then? The water will freeze and may burst the pipes. And repair work in the middle of winter is not the most pleasant experience. That’s why they combine several methods - they lay a heating cable and insulation on it. This method is also optimal from the point of view of minimizing costs: under thermal insulation, the heating cable will consume a minimum of electricity.
Another way to attach a heating cable. To reduce your electricity bills, you also need to install a heat-insulating shell on top or secure roll insulation
Laying a winter water supply system in a dacha can be done using the type of thermal insulation shown in the video (or you can take the idea and do something similar with your own hands).
The development of a scheme for laying a water supply system in a dacha is described here.
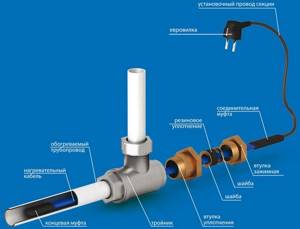
Heating the water supply: self-arrangement using a cable in the country
The topic that will be discussed in this publication will be of greater interest to owners of country houses or owners of private houses, especially if the building is equipped with a completely autonomous water supply system. An extremely unpleasant situation is when a sharp cold snap outside is also marked by the fact that water stops flowing from open taps. There is nothing to be surprised - if reliable thermal insulation and heating of the water supply system are not provided, one of its sections froze, resulting in either a plug or such a significant narrowing of the pipe lumen that the movement of water becomes extremely difficult.
Heating of water supply
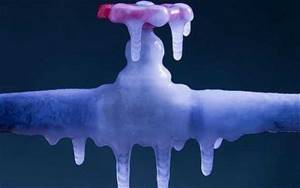
This is not only very uncomfortable from a domestic point of view, but the consequences can be much worse. If the freezing process is not prevented or stopped, then with a high degree of probability this can lead to deformation of the pipeline and even rupture of the pipe body. All this ends in a major accident with the inevitable overhaul of the water supply system.
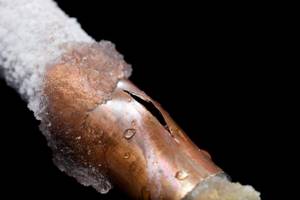
Freezing pipes can cause serious accidents
Of course, when designing a future home and its utility networks, steps are always taken to prevent such a situation. Water supply pipes are buried in the ground below the freezing level calculated for a specific area; reliable thermal insulation becomes a prerequisite. However, in some cases such measures are simply not enough.
It is not always possible to place pipes below the soil freezing level
A typical example is that the deepening of a trench is simply hindered by a rocky ridge or any reinforced concrete structures located below. Vulnerable places always remain water intake areas - the outlets of their wells or boreholes, the points of connection to the city water supply network. Ice jams often occur in areas where pipes rise to a building, in unheated basements, where they pass through a concrete base mass, etc.
Such areas of the water supply require special attention, and it would be better if electric heating is provided in these places. This is not so difficult to do, because modern technologies make it possible to use a special heating cable for such purposes.
How does a water heating system work?
The heating principle is based on the conversion of electrical energy into heat when current passes through special heating cables (similar to the operation of a familiar coil or heating element). The cable is attached outside or placed inside the pipe in the areas most vulnerable to freezing. The amount of heat it releases is sufficient to maintain the minimum possible temperature level in the pipeline cavity, which should prevent the onset of crystallization of water and its transition to a solid state.
It is quite clear that in this case the cable itself must have reliable electrical and waterproofing with a good margin of safety, so that any possibility of rupture, melting, or voltage penetration into the pipeline is completely eliminated.
Currently, the buyer can choose one of several heating cable options:
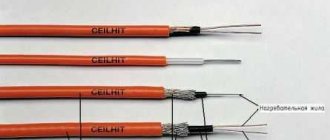
Resistive heating cables
This type of cable is the simplest in its design. The conductor is made of a certain alloy with high resistance, and when an electric current passes through it, heat begins to be released.
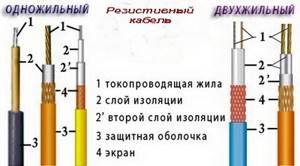
Types of resistive cables
They are produced in single-core or double-core versions. Single-core ones are rarely used in the conditions under consideration - for the simple reason that they require a “loopback” of the circuit, that is, both ends of the cable must converge in one place - at the power source. When heating pipes, this is not always easy to do, and often even impossible.
Two-core cables are more practical in this regard - at one end such a cable is connected to the electrical network, and at the other a contact coupling is installed to ensure the circuit is closed.
The role of a heat source can be played by one conductor - the second in this case serves only to ensure conductivity. In some cables, both wires have heating capabilities - the power of such devices is much higher.
Typical resistive cable structure
The conductors are protected by reliable, most often multi-layer insulation, and a grounding circuit - a screen. The outer layer is a high-strength, weather-resistant polyvinyl chloride shell.
The positive qualities of such cables include:
- High power and overall heat transfer, which is especially important for large-diameter water pipes or with a large number of shaped elements that require heating (tees, flanges, taps, etc.).
- The relative simplicity of the design, which also determines their availability in terms of cost. Thus, such a minimum power cable can be purchased at a price of 150 rubles per meter.
Resistive cables also have their disadvantages:
- For the cost-effective operation of such a water heating system, it will be necessary to purchase and install additional devices - temperature sensors, control units and automatic control units that will maintain the temperature at a given level, including power supply as needed.
- The cable is sold in a certain meter, and the end contact sleeve must be installed under production conditions. Do not cut the cable yourself.
Semiconductor Self-Regulating Heating Cables
This type of cable was designed specifically for cost-effective operation, and is fundamentally different in both its design and principle of operation.
Structure and operation diagram of a self-regulating semiconductor cable
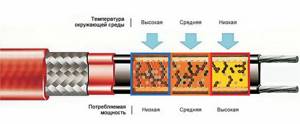
Two metal conductors are separated from each other by a special semiconductor matrix, which acts as a heat emitter. The special properties of the semiconductor used ensure its maximum current conductivity at low temperatures, and when they increase, electricity consumption is significantly reduced. It is characteristic that a similar process of self-regulation occurs at each specific point along the entire length of the cable. The temperature along the length of the pipe can vary quite significantly, and thus, maximum heating occurs precisely in the most vulnerable sections of the pipeline.
The advantages of using such a cable are obvious:
- Considerable savings are achieved in terms of energy consumption. When the overall air temperature increases, the system will immediately respond by reducing power consumption.
- This cable can be purchased in any length - most of its varieties provide cutting points in increments of 200 or 500 mm.
The main disadvantage of such a water heating system is its rather high price. Thus, even the most inexpensive types can cost about 300 rubles per meter, and the upper limit of the cost goes “off scale” even beyond 1000.
A water supply heating system may involve external installation of the cable or placing it in the cavity of the pipe. Each of these technologies has its own characteristics, which are taken into account when selecting the right model and when performing work.
Heating cables can be produced with a round cross-section, but for external placement on a pipe, a flattened (ribbon) shape is better suited, which will be in greater contact with the surface and release thermal energy more efficiently. The power range is also quite wide - from 10 to 60 W per linear meter - this should be taken into account when drawing up the design of a heating system, taking into account the material of the pipes and the specific conditions of the location of the water supply system.
There is a rather complex system for calculating the required power, which is used by specialists at the project preparation stage. However, oversimplified. In everyday life, you can focus on the following parameters:
To install a cable inside a pipe, a power density of 10 W/m is usually sufficient
If you plan to heat a pipeline with the cable placed inside, then a specific power of 10 W/m will be sufficient for this.
When placing the cable externally on metal or polymer water pipes, rely on the following indicators:
— Ø ½ ÷ ¾ inch – 17 W/m;
— Ø ¾ ÷ 1½ inch – 27 W/m.
More powerful heating cables or tapes (for example, 31 W/m) are used in private construction to heat sewer pipes with a diameter of 100 mm and above.
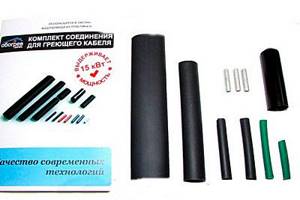
The delivery package for a water supply heating system usually includes the heating cable itself and the “cold” part - a wire for connecting to a source of electricity. The “cold cable” may already be connected to the heating part, but more often this work has to be done independently. In this case, the kit may include tubular adapter terminals and the required number of heat-shrinkable tubes of different diameters. In the case of using a self-regulating cable, in addition, there must be a special end sleeve that reliably insulates the cut end.
End plug installed
Video: one of the heating cable kits for water supply
A temperature sensor with an automation (thermoregulation) unit is almost never included in the kit - they will have to be purchased separately. Thermoregulation units are available in various designs - for example, they can be similar to underfloor heating thermostats with wall mounting, installed in an electrical panel on a DIN rail like a conventional machine, or mounted directly on a pipe in a place convenient for maintenance and control.

DIN rail mounted thermostat
For self-regulating cables, compact thermostats are produced, which are placed on the “cold” part of the cable, pre-configured to turn on the power when the temperature drops to 5 ºС and turn off when it reaches 15 ºС.
“Cold” wire with installed thermostat
The installation of a water supply heating system will require the installation of a separate machine, with an estimated power of about 25 amperes. The emergency protective device system - RCD - will never become superfluous.
Prices for self-regulating heating cable
Self-regulating heating cable
Installation of a water heating system
The most important operation is connecting the heating cable to the power cable
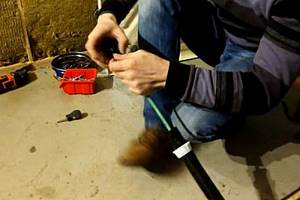
The cable is most often sold by the meter, that is, the required quantity is purchased to warm up a specific section of the pipe. Before installation, the integrity of the cable insulation along its entire length must be checked again. Under no circumstances should a cable be laid that shows signs of surface damage.
One of the most critical operations is connecting the heating part of the cable with the “cold” part, if it was not provided by the manufacturer or this service is not provided by the store. Each of the models may have its own specific connection features, which must be reflected in the instructions included with the kit. The main task is to ensure reliable electrical contact and, at the same time, create multi-layer insulation protection that completely eliminates the possibility of short circuits and voltage breakdown to the outside.
For example, let’s look step by step at how the cable is prepared for further installation on the water supply system.
Find out how to calculate the length of your heating cable using our calculator, complete with instructions for use.
Step-by-step instructions for preparing the heating cable for further installation
| Illustration | Brief description of the operation performed |
| When purchasing the required length of cable, you usually immediately purchase the appropriate kit for connecting to the power cable and insulating the free end. The kit includes heat-shrinkable tubes of various diameters and lengths, crimp sleeves that will act as connecting terminals. Heat shrinkage for such purposes uses a special layer of glue applied to the inner surface - this dramatically increases the insulating qualities of the resulting joints. In many kits for insulating the free end of the cable, a regular heat-shrinkable tube is provided, and a ready-made coupling is already plugged at one end (as in this example). |
| Once the required length of cable has been measured and cut, you can proceed to work. The most convenient way to do this is not on your knee, but on a workbench. From the end of the heating cable, which will be connected to the power cable, the outer insulation is carefully removed at a distance of 45 mm from the edge. A neat cut is made around the circumference with a knife... |
| ...then make a longitudinal cut, and the top dense insulation in this area can be easily removed. There may be a grounding braided shield underneath it - if the cable is equipped with one. In our case, there is no provision for connection to the ground loop, so the cable was chosen without braid. If there is one, it is carefully cut off with pliers. In the same case, when switching of the grounding loop is planned, the braid is assembled into one neat pigtail and is bent to the side for now. | |
| Under the top layer of insulation, another thinner translucent layer will open. It is also carefully removed. | |
| The heating matrix is carefully cut with a knife in the center, not reaching approximately 5 mm to the end of the area with the insulation removed | |
| Heat-shrinkable tubes are placed on the separated halves. | |
| Please note that one of them is approximately 15÷20 mm shorter than the other. This is necessary to space out the length of the connection between the two cable wires. | |
| Using a heat gun, the tubes are heated and deposited, tightly fitting the insulated sections of the wires. | |
| The ends of the wires are trimmed - each of them should protrude from their heat shrink by about 9÷10 mm. | |
| The conductor is cleaned of matrix residues. To do this, first make a neat cut around the circumference, and then the cut “cylinder” can be easily removed progressively along the wire. | |
| The illustration clearly shows the stripped cable wires. A crimp sleeve is put on them one by one. | |
| Then it is crimped using side cutters, pliers or a special crimp. It immediately makes sense to check the quality of the contact - the wire must be securely fixed in the sleeve, without the slightest play. | |
| This is what the sleeve should look like after crimping on one side. | |
| Exactly the same operation is carried out on the second wire of the heating cable. | |
| After this, pieces of heat-shrinkable tubing are put on the ends of the wires with crimped sleeves. | |
| Go to the “cold end”, that is, to the power supply cable. A section of external insulation is removed by approximately 40 mm, and the ends of the wires are stripped to 8÷10 mm. | |
| Two pieces of large-diameter heat-shrinkable tubing are sequentially placed on the power cable and then pulled aside. The one that is longer is put on first... | |
| ...and then a shorter one. | |
| Since in our case there is no grounding, the yellow-green wire is simply bitten off. In the case where the shielded heating cable will be connected to the ground loop, this wire is temporarily bent to the side. | |
| The stripped end of one wire is inserted into one of the sleeves installed at the end of the heating cable and crimped. Moreover, such electrical installation begins with a shorter heating cable wire. | |
| A similar operation is carried out with the second power wire. Its length is already precisely cut in place (it is clear that it requires slight shortening), and then the end is stripped. | |
| Then everything is the same - the stripped end of the wire is inserted into the sleeve and crimped. | |
| The wires are connected, but now it is necessary to ensure their reliable insulation. | |
| To do this, the previously put on sections of heat-shrinkable tube are shifted so that they are located in the center of the connection nodes, completely covering them on both sides. | |
| Next, they heat it with a hairdryer to shrink the tubes tightly. | |
| The next step is to shift the previously applied piece of wide heat shrink (shorter) to the switching area. | |
| It should completely cover it - all the way from the removed external insulation of the heating and electrical cables. | |
| This area is heated and shrinked. The tube should tightly envelop all the connections located underneath it, creating a common “cocoon”. By the way, it is after this that, if necessary, the ground loop can be connected to the shielding braid. The connection is made in the same way - using a crimp sleeve and closing the top of this unit with a small piece of heat shrink of small diameter. | |
| After this, the entire resulting assembly is completely closed with a second, longer piece of large-diameter heat-shrink tubing. | |
| The cable connections are heated and finally sealed. Since heat shrink has an adhesive layer inside, when heated, small droplets of glue can protrude out from the ends. This is a completely normal phenomenon, which only indicates the good quality of the insulating unit being created. | |
| The finished switching unit for heating and electrical cables should look something like this. | |
| Now it's time to insulate the free end of the heating cable. In our case, a ready-made plug coupling will be used for this, but it is quite possible to get by with a heat-shrinkable tube with an adhesive inner layer. To ensure complete safety and reliability of the insulation, it is recommended that the cut ends of the two heating cable conductors be spaced slightly apart along the length. To do this, one conductor is cut as a “step”, that is, it is made shorter than the other by 7 ÷ 10 mm. | |
| Next, the end coupling is put on. This is, in fact, also a heat-shrinkable tube, but only with a plugged end. If regular heat shrink is used, then it is put on in such a way that in addition to the 45-50 mm put on the cable, about 30 mm remains free, that is, extends beyond the cut end. | |
| Next - everything is done in the usual way - the put on coupling is warmed up with a hairdryer. | |
| When heated, the coupling settles and creates reliable insulation at the end of the heating cable. If a tube is used, then after heating and shrinking, the section protruding beyond the boundaries of the cable is carefully crimped with pliers to a width of about 12÷15 mm. The remaining excess tube can be cut off so that it does not interfere with cable installation. | |
| That's it, the preparation of the cable for further installation on the water supply system is completed. |

Another example of cutting the cable and connecting it to the power wire is shown in the video attached below.
Video: how to properly connect a heating self-regulating cable
When watching the video, be sure to pay attention to the correct and reliable installation of the end coupling.
Installing a cable over a water pipe
- The usual cable arrangement is along the pipe in one line. It is never placed from the top of the pipe. This is done for two reasons. Firstly, the possibility of damage to it must be excluded due to possible mechanical load on the pipeline from above (falling objects, tools, etc.) Secondly, freezing of the liquid always occurs from below, and it is this area that needs maximum heating.
Typical cable placement on a pipe
- If one cable is not enough for reasons of the required heating power, several “threads” are used, arranging them as shown in the diagrams:
Various types of cable placement on the pipe
- They do it differently - they lay one cable in a spiral around the pipe. This can also be done in different ways:

Spiral cable winding techniques
- Simply wrapping a cable around a pipe at a certain pitch;
“This is not always convenient, and in some cases it is simply impossible, when the space for work is limited and it is not possible to pass the entire cable coil under the pipe. Then they do it differently: they leave loop allowances and then wrap them around the pipe body in the opposite direction.
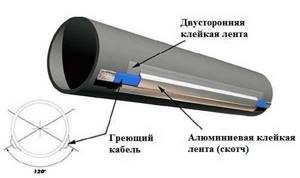
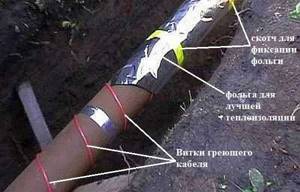
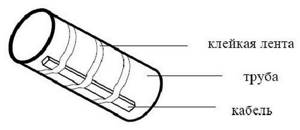
- How to fix the cable to the surface of the pipe? If polymer pipes are used for water supply, then there is no option - only aluminum tape, which will ensure maximum heat transfer from the cable to the pipe. In this case, the cable is fixed along its entire length.
Aluminum tape
In this case, in particularly problematic areas, you can increase heat transfer by gluing the adjacent area with aluminum adhesive tape or even completely wrapping the pipe in foil before laying the cable.
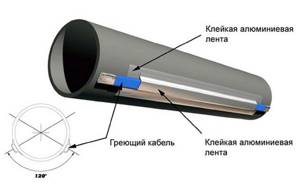
Fixing the cable on a plastic pipe with aluminum tape
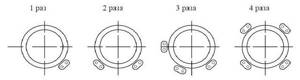
- When installing a heating system on a metal pipeline, the cable is fixed in a ring manner with a certain pitch between the fastening points (no more than 300 mm). It is recommended to use heat-resistant adhesive tape or a special plastic cable tie.
Fastening the cable in a ring manner
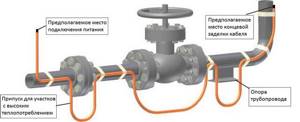
There are features of cable laying on some water supply units:
- When placing the cable on bends, it should be located as close as possible to the outer radius of the outlet.
Installing cables on pipe bends
- A lot of heat is always dissipated where the pipe is attached to the metal supports. These sections will require an additional loop at the bottom - as shown in the diagram.
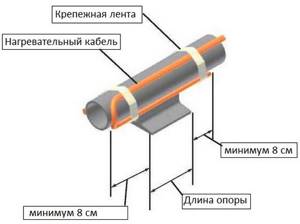
Insulation of pipes on supports
- Massive water supply units – taps, valves, flanges – always require special attention. This also requires cable laying according to a special scheme - see the figure.
To install the cable on the shaped elements of the water supply system, special allowances are left
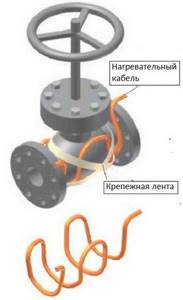
Placing the heating cable on the valve
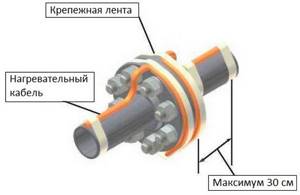
Laying heating cable on flanges
- The next important issue is the placement of the temperature sensor. In no case should it be placed in close proximity to the heating cable, otherwise the entire control system will simply lose its meaning, since the sensor must take temperature readings as accurately as possible exactly inside the pipe. Approximate layout diagrams are shown in the figure.
Placement of the sensor when laying one cable ... ... two ... ... or even three
- The surface of the pipe under the sensor must be glued with aluminum tape, and it is also fixed with it at the installation site. Typically, the coldest place in the pipeline is chosen to install the sensor.
Installation of heating cable inside the pipe
In some sections of the pipeline it is simply impossible to install a cable on top of a pipe, for example, in sections passing through floor slabs, a plinth, concrete rings of a well, etc., the technology of installing a cable inside a pipe will come to the rescue.
To do this, purchase a special cable that can be used in such conditions - with especially reliable insulation, round cross-section. The kit should include a special stuffing box assembly - threaded bushings and washers with a conical or cylindrical rubber seal placed between them.
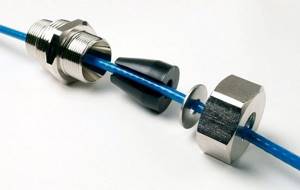
Heating cable gland assembly for placing it in a pipe
- Before installing the cable, all plumbing equipment is immediately put on it in the required sequence, in accordance with the instructions, and only then is switching with the “cold” wire.
- At the point where the cable enters the water supply, a tee is installed into which the seal sleeve is screwed.
Approximate diagram of installation of a heating cable in a pipe
- The cable is then very carefully inserted into the pipe body to the specified length. It should be taken into account that in this way only straight pipe sections or those with minimal bends are heated, which will not interfere with the free passage of the cable. Under no circumstances should the cable pass through valves, taps, latches, or connection areas where protruding internal threads could damage the integrity of the insulation.
- After the cable is inserted, the gland assembly is completely twisted and crimped to prevent depressurization of the water supply system.
An example of installing a heating cable inside a water pipe - step by step
| Illustration | Brief description of the operation performed |
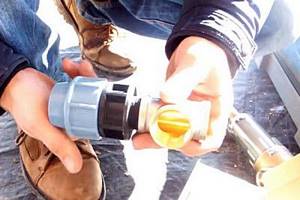
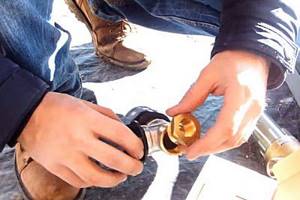
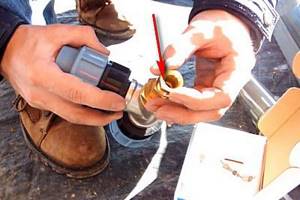
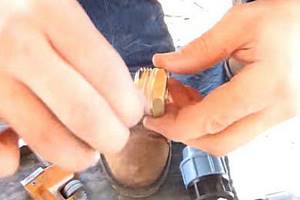
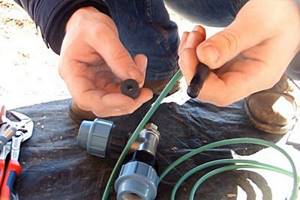
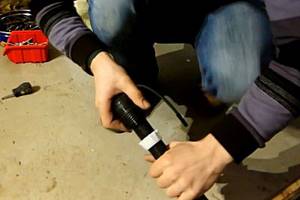
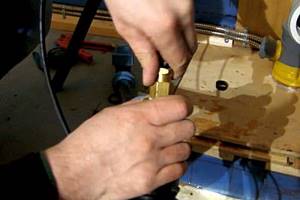
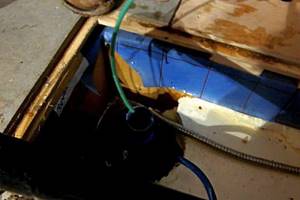
| In this example, we will consider the installation of a section of water supply from HDPE pipes. The house is on a pile foundation, the well is located directly below it, that is, the section of the water supply between the heated room and the ground level, as well as the one going to the well to the entire depth of soil freezing, needs protection from freezing. In this section there is a need for two turns at an angle of 90 degrees - this will impose some changes in the process of installing the pipeline and cable in it. To begin with, the heating cable input unit is assembled. An ordinary 1-inch brass tee is used. Two fittings for HDPE pipes and a penetration unit will be connected to it. The first illustration shows a “trying on” of all components of the unit. A HDPE fitting is screwed onto the tee |
| The second fitting is sampled (at an angle of 90 degrees to the first). And now an adapter from 1 inch to ¾ is placed on the remaining output of the tee - to assemble the input assembly. |
| The next step is to place an adapter from 1 inch to ¾ on the remaining free outlet of the tee - for further assembly of the input assembly. |
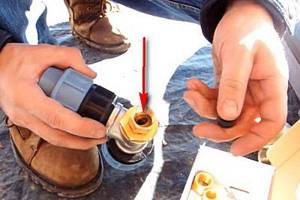
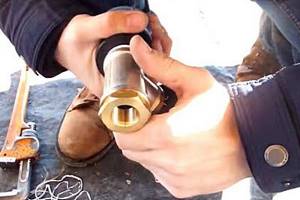
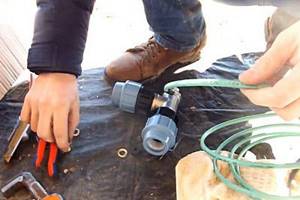
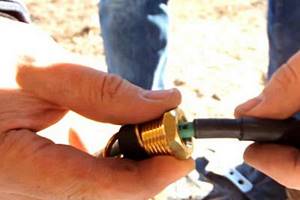
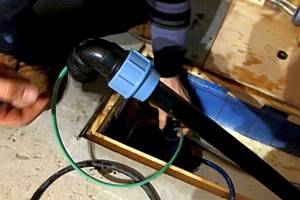
| A bushing is screwed into the adapter, in which the sealing unit will be located. |
| This sealing unit itself consists of several parts. From below it rests on the washer - shown by the arrow. |
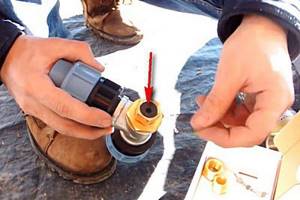
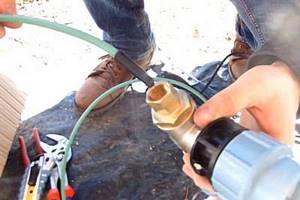
| Above there is a sealing ring-shaped rubber coupling with a hole in the center through which the heating cable will be passed. |
| To ensure uniform compression of the rubber coupling, another metal washer is installed on top of it. |
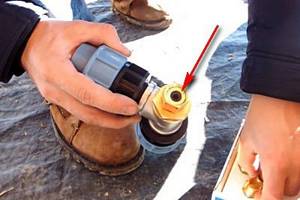
| And the final “packing” of this sealing unit will be carried out by tightening the clamping nut. |
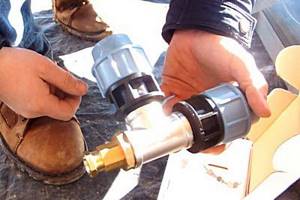
| Here is the entire tee input unit for the heating cable assembled “dry” - to check the condition of the threaded connections and completeness. Now you can proceed to further installation - with sealing of the connections. |
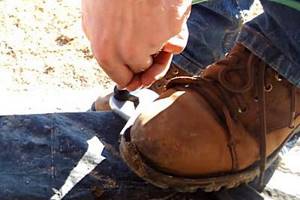
| To install a plastic fitting into a brass tee, you can use FUM tape. It is wound in several layers onto the threads, and then the fitting is screwed into the tee socket and tightened with a wrench. |
| The second fitting is installed in the same way. |
| It is better to seal the threaded connection of two brass parts - a tee and an adapter - using tow winding coated with Unipak sealing paste. |
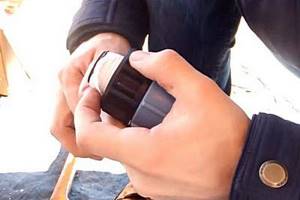
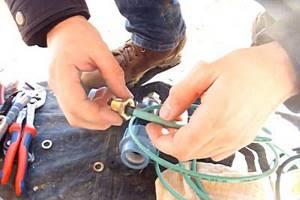
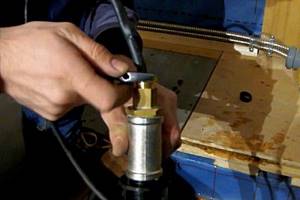
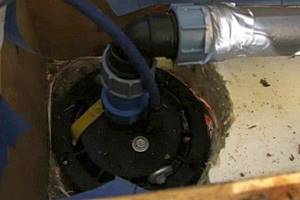
| The assembled tee with its “hinge” is being moved to the side for now. The parts of the sealing unit begin to be “strung” onto the cable from the end insulating coupling. |
| They are put on, naturally, in reverse order. First, put on the clamping nut. |
| Next comes the brass washer. |
| Difficulties may arise when pulling the cable termination through the hole in the rubber sealing sleeve - simply due to the increased thickness of the insulation at the end. But this will have to be done with effort and, of course, with some caution. If work is carried out in cold weather, you can slightly soften the rubber bushing by heating it in warm water. Eventually, the rubber will give in and the coupling will fit into the hole. |
| To make it possible to apply force to pass the end coupling through the rubber bushing, you can rest the seal against the jaws of the adjustable wrench, as shown in the illustration. As soon as the rubber bushing passes the insulating sleeve, it can then be moved along the cable, although not entirely freely, but without much difficulty. |
| The second brass washer is put on last. Here are all the parts of the assembly, put on the heating cable in the correct order. |
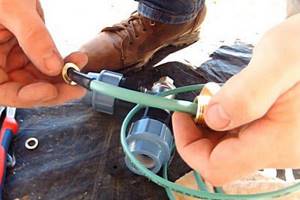
| All these parts are moved in a “package” close to the junction of the heating cable with the “cold end” - the power cable. |
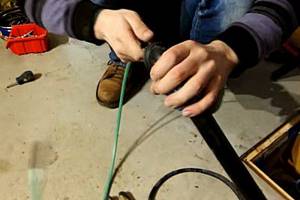
| The cable is inserted into the tee input unit through a coupling... |
| ... and then stretches along its entire length - to the connecting node. In the example under consideration, due to the fact that two 90-degree turns are assumed, we took exactly this path. Pushing a cable through even one perpendicular outlet is a big and often insoluble problem. Trying to push it through two outlets is simply useless. This means that the assembly of a complex section of pipes will be carried out while simultaneously pulling a heating cable through it. |
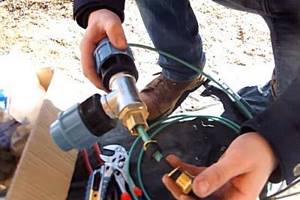
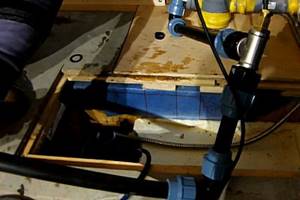
| We go directly to the place where the water supply system is assembled - to the area where the pipe from the heated room goes down into the well. Here is the first vertical section, which turns into a horizontal section through a branch. The tee is “packed” onto a section of pipe so that the cable entry is on top. The cable is pushed forward - it was introduced into the first turn zone in advance. |
| We meet the cable at the end of the horizontal section and stretch it with a small margin. |
| This is where the second 90-degree bend will be located, which will connect the horizontal section with the vertical pipe, which already goes into the well. To begin with, simply pull the heating cable through the outlet. |
| Only after this the fitting on the outlet is tightly connected to the horizontal section of the pipe. |
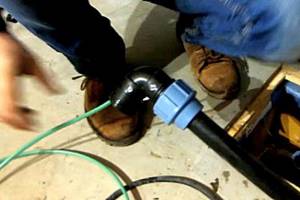
| The next step is to pull the heating cable completely through the outlet, so that the coupling of its connection to the “cold end” is located right next to the input unit. |
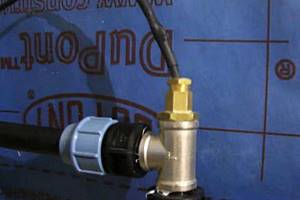
| This is the picture we get - the cable is completely pulled out, all the parts of the input unit are assembled at the feed-through coupling. |
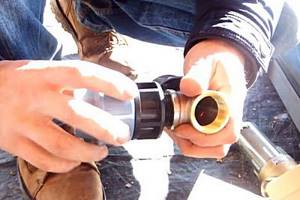
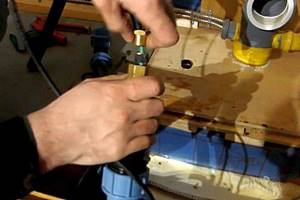
| All parts of the assembly are inserted one by one into the feed-through coupling. The rubber sealing sleeve must fit tightly - it must be pushed down all the way to open the threads for screwing in the compression nut. |
| The nut is first tightened by hand as far as possible... |
| ...and then - pulled up with a key. |
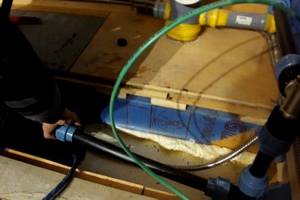
| Now all that remains is to complete the assembly of this heated section of the water pipeline. |
| The cable has already been threaded through both existing turns, so no special problems are expected. |
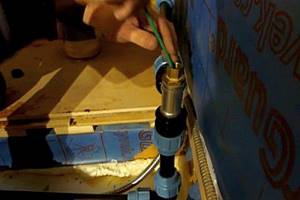
| The free end of the cable with an end sleeve is inserted into a pipe that is lowered into the well. The cable is quite rigid, and on a straight vertical section of the pipe it will go down without any resistance. |
| The cable goes deeper and deeper, and soon you can begin installing the outlet on the vertical pipe. |
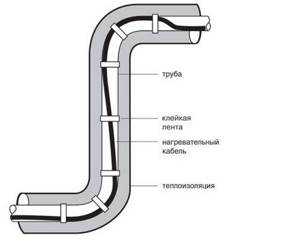
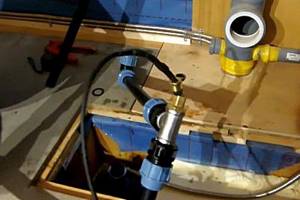
| That's it, the transition unit is assembled. The heating cable inside will prevent water from freezing in the winter cold in this most vulnerable section of the water supply. Please note that the master additionally “dressed” the pipes in thin thermal insulation made of foamed polyethylene. |
| And this is the assembled assembly for passing the heating cable into the pipe. If, after starting the system, there are signs of water leaking through it, it will be necessary to tighten the upper compression nut again - the tightness will be restored and the leak will disappear. |


With all the advantages of this technology for installing a heating cable, it also has many disadvantages. The main ones are a decrease in the overall reliability of the water supply system, since an extra insertion point appears, a narrowing of the internal lumen of the pipe, and difficulties that often arise when installing cables on long or curved sections.
If you choose this installation method, you should check in advance whether the heating cable has the appropriate certification for use with drinking water.
Thermal insulation after laying the cable part
Heating a water supply with a cable will only make any sense if subsequent thermal insulation of the pipes is provided.
Foil half-cylinders for thermal insulation of pipes
- For these purposes, special materials are used, made in the form of half-cylinders or split cylinders made of mineral wool, expanded polystyrene, foamed polyurethane, or rubber, and other traditional thermal insulation materials with high thermal resistance.
Insulation elements made of foam materials
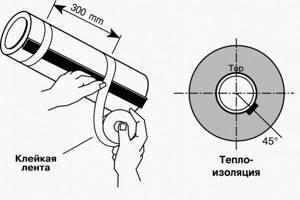
- It is recommended to install thermal insulating parts immediately as the cable is laid - this reduces the possible risk of accidental damage. Before installation, be sure to make sure that the insulating material is completely dry, since the presence of moisture will significantly reduce its effectiveness.
- Installation of thermal insulation is carried out with the utmost care, so as not to damage the surface of the heating cable and not to displace its correct position on the pipe. All parts must be fixed in place and among themselves in the manner established for them. The joints, if there are cracks, should be caulked with mineral wool and taped with waterproof tape (if thermal insulation with an external foil coating is used, then the joints are taped with aluminum tape).
- In construction practice, the following thicknesses of insulation for heated sections of water pipes are generally considered:
— For diameters ½ and ¾ inch — 20 mm;
— Ø 1 and 1¼ inch — 30 mm;
— Ø 1 inch — 40 mm;
— Ø 2 inch — 50 mm;
— Ø 2½ inch — 65 mm.
- Having completed the installation of cylindrical thermal insulation parts, we must not forget about their high-quality protection from moisture penetration from the end part.
After completing the thermal insulation work, it will be possible to connect the heating system to the power supply and conduct a test run. If a thermoregulation system is installed, it is set to maintain the temperature in the pipe at 3 - 5 ºС.
A well-planned and high-quality installation of a water heating system should relieve the home owner for a very long time from the “headache” regarding possible freezing of pipes.
Read useful information in our new article, flushing the heating system and flushing instructions.
Winter water supply at the dacha: new technologies in insulation
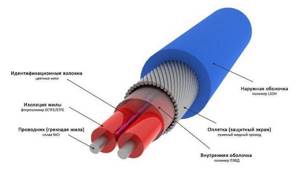
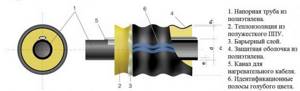
There is an interesting option, a polymer flexible pipe, insulated at the factory. There is a layer of waterproofing on top of the insulation, and along the pipe there is a channel for laying a heating cable. Such pipes are called anti-freeze pipes or insulated pipes. For example, even in the northern regions, it is possible to make winter water supply at the dacha over the surface using ISOPROFLEX-ARCTIC pipes.
Insulated pipes for winter water supply at the dacha
Operating temperature - up to -40°C, operating pressure - from 1.0 to 1.6 MPa, pressure pipe diameter - from 25 mm to 110 mm. It can be laid in a channel or on the surface. They are flexible and supplied in coils of the required length, which allows us to minimize the number of joints.
There is also a new way to insulate the winter water supply at the dacha - liquid thermal insulation or thermal insulation paint. It can be applied to an already installed water supply system, which can be a good solution.