How does a resistive heating cable work?
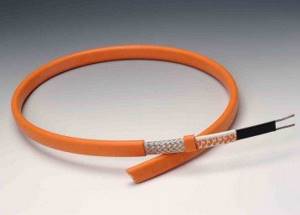
Resistive heating cable differs from other heating elements in its small dimensions and ease of installation. The device uses a conductor with high resistance as a heating element. In this article we will look at the design and operating principle of a resistive heating cable.
Design features
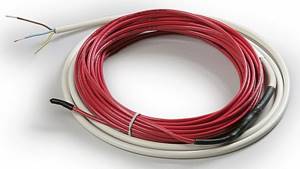
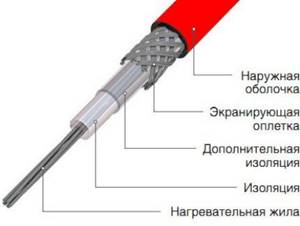
How is the conductor constructed? Its design is based on steel cores (one or two); depending on this, the resistive heating cable is divided into two types: with one and with two cores. The conductor is insulated with a special material. In some types, the design includes two layers of insulation. A protective metal shield (braided shielding) is applied to the insulating material. Its purpose is protection against mechanical damage, as well as use as grounding. For complete protection, an outer protective shell is used.
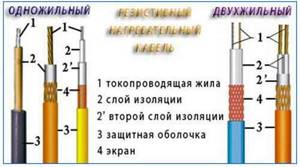
A single-core resistive heating cable has one heating conductor that occupies the entire length of the structure. The use of such a device is considered the most cost-effective, since it is resistant to high plastic temperatures. Power is supplied from both sides of the device. Such a scheme may create some boundaries in terms of installation, since there is a need to return the heating conductor to its connection point. There is also a need to use additional power systems.
The two-core design includes two wires: heating and conductive. An electric current is applied to one end of the wire, and a coupling is installed on the other end. When drawing up a project, this design option is much more comfortable to use.
Principle of operation
The operating principle of the design is described by the Joule-Lenz law, which states that with a uniform electric current along the entire length of the circuit, heat will be generated in any section. The higher the resistance in this area, the stronger the heat. In other words, the principle of operation is similar to an electric heater: a current flows through a conductor, which generates heat. It will be stronger if the resistance of the conductor and the strength of the electric current are greater.
Therefore, a resistive heating cable contains a heating element that consists of alloys with a small cross-section and high resistance. It is sold in a certain length, each piece of conductor has a constant resistance and the ability to generate the same amount of heat.
The principle of operation of a single-core conductor is as follows: since the connection to electricity occurs at both ends, the resistive heating cable is pulled in a loop so that the two ends of the product are in the same place. Such a connection is shown in the diagram below (left):
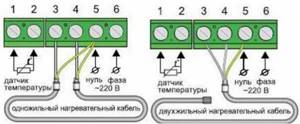
The operating principle of a two-core resistive cable differs from the previous one. The use of two cores makes it possible not to bring the two ends of the product into one place. The diagram on the right shows the correct connection.
As a rule, this operating principle makes it possible to use the device in the home and heat small-sized pipes. And in order for the work to happen correctly, it is permissible to use pipes with a diameter of no more than 40 mm.
Advantages and disadvantages
The operating principle of a resistive cable has its pros and cons. The advantages of the product are as follows:
- affordable price;
- simple device;
- with proper installation it lasts for several decades;
- significant resistivity values;
- with long-term use, the stability of the parameters is maintained.
The resistive heating conductor also has its disadvantages. These include:
- the inability to lengthen or shorten the device, since its length is fixed;
- in case of failure, it is necessary to completely change the heating cable; there is no option to replace a specific section;
- if the heating element is located next to another similar one, or the wires are intertwined, this leads to overheating, as well as to a breakdown of the insulation and a short circuit.
So we looked at the device, the principle of operation, as well as the main pros and cons of a resistive heating cable. We hope the information provided was useful and understandable for you!
Comments:
Stepanych
The article is good, but this cable is in no way intended for heated floors. It will not be possible to heat it to any acceptable temperature. For defrosting and anti-icing purposes only. This cable is no longer good for anything.
Worker
Expensive and impractical. I have never met a self-regulating cable that worked normally for at least 2-3 years. Everyone has problems. In general, it’s a crude technology, and very expensive, too.
Leave a comment Cancel reply
Related Posts
Advantages and disadvantages of electric heating radiators
Do-it-yourself electric heating of a greenhouse with a cable
Advantages and disadvantages of a quartz heater
Selecting a heating cable for heating a water pipe
Self-regulating cable installation instructions
Heating cable for water supply
There are many cable laying options - the choice depends on the location and installation conditions. When installing home autonomous communications, it is most often necessary to insulate pipes, so we will dwell in more detail on the description of the processes of internal and external installation of cables on the pipeline.
Option #1 - internal installation
Installation of a heating cable inside a water or sewer pipe is carried out for various reasons. The main one is the impossibility of fixation due to the fact that the pipeline is already in the trench and covered with a layer of soil.
Of course, this type of installation has some disadvantages:
- the use of an additional part - a tee;
- reduction in cable properties due to plaque that appears after some time (depending on the characteristics of the water);
- reducing the diameter of the pipe, an additional obstacle to the movement of water;
- limited length and preferred use on straight sections.
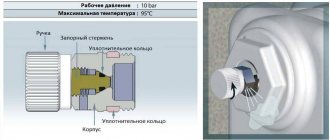
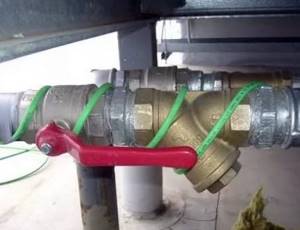
An important point: the samreg is connected only through a special tee; it is prohibited to use shut-off valves when connecting heating systems!
Repairing or replacing the cable is easy; all actions are performed through the same tee. The main advantage is that when installed internally, the contact of the cable with the liquid directly leads to an increase in heating power - hence direct savings
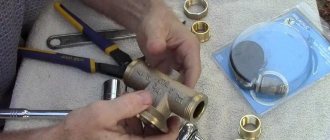
Instructions for using the finished kit:
- connecting all functionally important parts to the cable (design of the termination, connection of the power cable);
- insertion of a tee into the pipe with a free cable outlet;
- inserting the cable into the pipe to a certain length;
- sealing the assembly using feed-through elements or union nuts.
It is not recommended to insert Samreg into a pipe with a cross-section of less than 40 mm - this will affect the speed and volume of the liquid being moved.
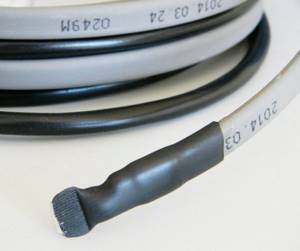
How to prepare the cable and put on the termination can be seen in the following instructions:
Image gallery Photos from
It is necessary to expose the core and matrix - to do this, first remove the outer insulation, then “fluff” the copper braid
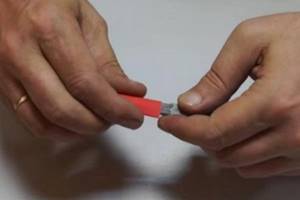
We put a coupling suitable in diameter onto the bare end of the wire (while the matrix remains in place untouched) and encircle it with a hairdryer
While it is still hot, carefully pinch the tip of the coupling and glue it together. We remove unnecessary things
Stage 1 - Removing Insulation and Braid
Stage 2 – cable end casing
Stage 3 – gluing the end of the coupling
Stage 4 – casing the cap with a hairdryer
Now the cable is completely ready for installation inside a water supply or sewer pipe.
Option #2 – outdoor installation
It is not recommended to insert more than one cable inside a pipe, especially a narrow one, but from 1 to 4 self-regulating cables can be placed on the outside. One is usually enough for a small diameter pipe (40-50 mm), and 2 to 4 pieces are used for large pipes located in low temperature areas.
For communications placed in the ground, a “golden mean” is often used - two cables running parallel along opposite sides.
For fixation, aluminum tape is used, designed to increase heat transfer and simultaneous protection. However, sometimes a more durable fastening is required - with ties. If direct sunlight falls on the pipe fragment, it is recommended to use black UV-resistant screeds.
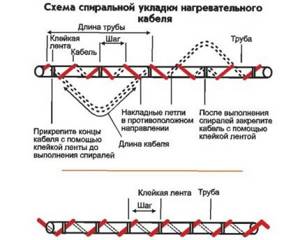
The type of installation is chosen depending on the required degree of heating - spiral or linear. One cable is enough for spiral installation
The spiral method covers the maximum surface area of the pipe. The smaller the step between cable turns, the more efficient the heating. The average interval is 5-6 cm. The length of the spiral is approximately 1.7-1.8 times longer than a linearly laid cable. Mounting tape is used as fastening.
Installation instructions:
- Cable placement along the entire length of the pipe section requiring heating, in a linear or spiral manner.
- Winding during installation of connecting units, valves and other shut-off valves.
- Fixation with mounting tape (aluminum tape, zip ties).
- Thermal insulation “in the sleeve”.
The last point is mandatory. Thanks to the insulation, the heat generated by the cable will remain in the pipeline area. The type and thickness of thermal insulation is selected based on the type of pipeline and external conditions.
Let’s assume that in order to lay a water pipeline in a trench, in addition to the heating cable, you will need insulation 25-30 mm thick - a foam “shell”, extruded polystyrene foam or basalt wool.
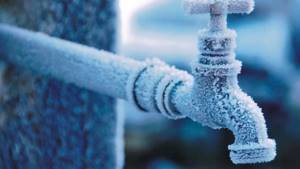
The pipe is frozen - the reason
All heating cables operate normally only if the voltage corresponds to the nominal values specified in the product data sheet. If you have problems with the voltage at home, and it rarely rises above 180-190V, then do not be surprised that the selected power may not be enough, and one day the pipe will freeze.
Why does the cable itself sometimes die? Self-regulators are afraid of frequent switching on and off. They usually have a finite number of such switchings.
They also fail due to improper connection to the 220V power cable. Poor quality end seal and moisture getting into the shell are another reason.
To seal the food cable into the pipe, seals are used. When choosing them, pay attention to the shape of the cable. They are round or flat.
They use their own seal for a specific brand. If you choose the wrong one, you will get a leak.
How to connect a heating cable
Heating cable for plastic pipes and its installation
Direct connection of the cable is made by connecting it to the unit that performs thermoregulation. Depending on the purpose and scope of application, linear and spiral installation are used, while the wire itself is laid either inside or outside relative to the pipes or another surface.
Most often, when selling heating cables, a thermostatic unit is included. You should try to install it so that it is not affected by the negative environment. The connection of the wires must be sealed. To do this, you can use special clamps and couplings.
Connecting the heating cable takes place in several stages:
- Cable conductors intended for connection are cut in the form of a ladder at various distances and freed from insulating material to a length of 10 mm.
- Heat-shrinkable sleeves are pulled over all existing conductors, and a joint sleeve with a large diameter is attached on top of the cable.
- The ends of the wires are mounted in sleeves and clamped with pliers on one side, and on the other hand they crimp the sleeve after inserting the other ends.
- Couplings with a small diameter are put on the wires and heated with a hairdryer; after clamping, a coupling of a larger diameter is pulled onto the connection area and also heated with a hairdryer.
- If we are talking about self-regulating types of cable, then both end wires are sealed. They are cut in the form of a ladder, a heat-shrinkable sleeve is pulled over them and also heated with a hairdryer.
- The thermostatic regulator, which is necessary to regulate the temperature, is placed close to the electrical panel. To increase safety, an RCD (automatic switching device) is introduced into the thermostatic regulator circuit.
Why doesn't the heating cable heat?
More often, when problems arise with the operation of the cable, the thermostat, circuit breaker or temperature sensor fails. If the heating cable was installed incorrectly, various damage may occur. The cable may not heat up due to the following reasons:
- defect in the cable;
- faulty contact;
- RCD damage;
- no tension;
- bad connection.
How and with what to insulate
The absence of a basement floor especially forces you to take care of insulation.
Pipes, of course, can be partially buried in the ground, but some part of them will inevitably come out, and it requires thermal insulation. In the first case, the depth to which the pipe was buried plays an important role - it is not always possible or even the desire to dig a hole or trench to the depth of soil freezing - after all, in Siberia and the North this value is several meters.
If the house is located on a slope, then the space under it is quite large; wind and frost “walk” there, even if this gap is covered with some kind of shield material. The mentioned gap can reach one meter or even more, and here we need effective measures to protect the pipes from the cold.
Insulation can be different, and the most common is packing pipes with mineral wool. But this coat is not always effective, and such measures are not always sufficient.
For insulation of wells, for example, extruded polystyrene foam is sometimes used. The method is very labor-intensive, since it requires a whole set (package) of pieces of this material and you also need to make holes in each of them for the pipe. This entire “structure” is buried in the ground (if possible). This material, by the way, is not cheap at all.
Not just a cable
Whatever the type of cable used, insulation is still carried out - this is much more reliable, especially considering that the cable will eventually fail, and the water in the pipe will freeze in a short time.
Thermal insulation is installed over the water pipe and cable. If, however, the pipe and cable are not packaged in this way, then the heating will be wasted almost in vain - into the atmosphere.
In addition to the already mentioned polystyrene foam, foamed polyethylene is also used. Both of these materials are moisture resistant and provide some protective cushioning for the pipes. Although they themselves also need additional protection.
For this simple reason, the well-known design “pipe in pipe” is very often used, especially if the pipes are placed in the ground or in the air. The insulation is located between these pipes - between the “standard” and the protective one, it is of a larger diameter, taking into account the thickness of the thermal protection.
How to choose a cable
How to connect a heating cable to the network
The choice of the most optimal self-regulating heating cable should be based on what this system is needed for and what problems it will be aimed at solving. Thanks to this, the scope of its further application is indicated. These self-regulating systems make it possible to regulate many household water-related problems that may arise for owners of cottages and summer houses. They can be used to heat heating systems, protect drainage and sewer systems throughout the winter.
In this case, you can use a small system. Ideally, the power of such a device should not exceed 60 watts per square meter of room. Installing a more powerful system will only lead to higher energy bills. A small amount of power will be enough to prevent the pipes from freezing and the existing water from forming into ice masses. This makes it possible to save money, while the system will fully perform its tasks.
Where is it used?
Self-regulating heating cable is used in any wiring for private needs, commercial organizations and industry. It is used to heat sewerage, water supply, pipes and fire extinguishing and high-risk systems, since it can heat up. It also protects the industrial system from freezing, the roof and gutters from ice with icicles and freezing rainwater. It is used for underfloor heating systems and warm degrees.
You might be interested in Tee for TV cable
Using cables at home to protect pipes from freezing
In general, a self-regulating heating cable is a cable element consisting of a copper conductor and a polymer matrix. It has endurance and strength. It works thanks to internal electrical insulation, a self-regulating heating matrix, current-carrying conductors, outer sheath and braided shielding. It is connected using open and hidden external and internal pipe laying. It is used both in everyday life and in industry.
How to properly install a heating system
There are two methods of installing a heating cable - internal and external. In the first, the cable is inserted into the pipeline, in the second, it is wound around the pipe or attached along its entire length.
Note! For internal installation, a cable of any cross-sectional shape is suitable. For external installation, it is better to prefer the tape (flattened) format of the product, which provides better contact with the surface of the pipe
In addition to determining the laying method and cross-sectional shape, it is equally important to correctly select the power of the product. A self-regulating cable with power ratings from 10 to 60 W/linear meter is available for free sale.
For small household projects, when choosing, you can focus on the following rules:
- For internal installation, most often a cable with a power of 10 W/m will be sufficient.
- For pipelines with a diameter of ½ to ¾ inches, a self-regulating cable of 17 W/m is suitable.
- ¾ - 1 ½ inches - 27 W/m.
- Over 100 mm – 31 or more W/m.
Outdoor installation
The most common arrangement of a self-regulating cable with this installation option is in one line along the bottom of the pipeline. Firstly, this arrangement virtually eliminates the possibility of mechanical damage to the cable (when heavy objects fall from above, for example).
The second reason is that liquid media inside the pipeline accumulate mainly in the lower part, so it is this part that needs to be heated first. If the power of one cable is clearly not enough, you can do this in several ways:
- Lay around the pipeline in a spiral.
- Buy a higher power cable.
- Lay several strands of cable along the pipeline.
The method of fixing the cable largely depends on the material from which the pipes are made. For plastic, the best option is to secure it with aluminum tape. The adhesive tape is wrapped around the pipeline at equal distances, eliminating sagging of the heating cable. After this, the cable is additionally taped with the same tape along the entire length of the pipeline.
The cable is fixed on a metal pipeline using the ring method using heat-resistant adhesive tape or a plastic bandage.
Note! At pipeline bends, the self-regulating heating cable should be correctly positioned closer to the outer radius of the bend.
Massive components of the pipeline system (taps, fittings, flanges, etc.) require increased heating, so it is laid here according to a special scheme. The temperature sensor, on the contrary, should be installed in the coldest place in the system.
Internal installation
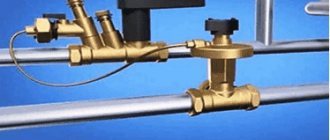
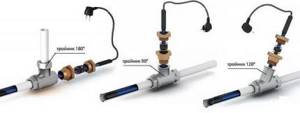
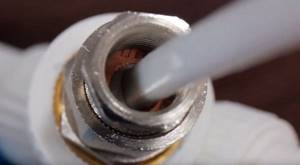
A special self-regulating cable with reinforced insulation is suitable for installation inside the pipeline. A tee is mounted at the cable entry point, at one end of which a seal sleeve is installed. It is worth remembering here that the prefabricated elements of the assembly must be strung on the cable until they are connected to the cold wire.
After this, the self-regulating cable is carefully inserted into the pipeline to the required length, and the gland assembly is assembled and crimped to ensure the tightness of the entry point.
It is important! It is strictly forbidden to route the cable through shut-off valve elements (valves, gate valves, taps, etc.).
In this way, it is possible to ensure heating of only straight sections of the pipeline, or sections with a minimum number of bends. Among other disadvantages of internal installation, one can note the narrowing of the working space of the pipeline and the difficulty of its mechanical cleaning if necessary.
Features of self-regulating electrical tape
This type of heating cable allows you to make the pipeline heating process as efficient and cost-effective as possible.
Compared to other types, self-regulating has a number of important advantages. This solution is considered very economical, since electricity is not consumed constantly, but only as needed. When cable sections overlap, the contact area will simply heat up less, without the slightest damage to the performance of the system. In such a case, the resistive cable will most likely burn out.
And one more important difference:
- Resistive cable is sold only in ready-made coils of a fixed length. Its end sleeve can only be installed correctly in the factory, so it cannot be cut. This fact can cause a lot of inconvenience, especially with internal installation.
- The self-regulating cable can be cut without affecting its performance. Most manufacturers' products have markings at the cutting points. The marking step is usually 20 or 50 cm.
The only drawback of a self-regulating cable is its fairly high cost. Fortunately, developments in production technology have made it much more accessible to consumers in recent years.
Description of self-regulating heating cable
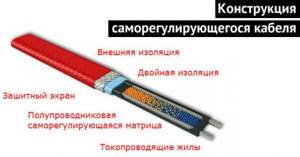
Self-regulating heating cable is ideal for heating, protecting against freezing and maintaining the desired temperature of pipelines, tanks, roofing, and gutters. The use of a self-regulating heating cable allows not only to simplify calculations and design, but also to significantly increase the reliability of the system and achieve significant energy savings. The outer shell (fluoroplastic) of heating cables allows their use even under conditions of possible exposure to corrosive chemical solutions and vapors. The main feature of a self-regulating heating cable is the ability to use it in long pieces.
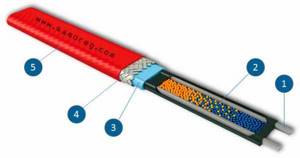
- Large-section copper current-carrying wires
- Self-regulating conductive material (matrix)
- Polyolefin insulation
- Tinned copper braid for added protection
- Outer sheath made of modified polyolefin, UV resistant.
The main characteristics of a self-regulating heating cable are linear thermal power, supply voltage, minimum and maximum length of the heating section at a given voltage, operating and maximum permissible temperatures.
Operating principle of a self-regulating heating cable:
The self-regulating heating cable has two parallel conductive wires. The conductors are surrounded by a self-regulating semiconductor matrix, in which heat is generated. The effect of self-regulation is to automatically increase the thermal power of the cable when the ambient temperature decreases and vice versa. This effect is based on the use of a special semiconductor matrix in the heating cable, which changes its conductive properties depending on the temperature - as the temperature decreases, the resistance of the matrix decreases and, consequently, the flowing current increases, which leads to an increase in the released thermal power and heating of the surface. As the temperature rises in this area, the reverse process occurs. Moreover, each section of the self-regulating heating cable changes its properties depending only on the specific temperature in this section, regardless of other sections of the cable. Thus, the self-regulating heating cable does not overheat and does not burn out even when the cable turns are superimposed on each other. Thanks to the self-regulation effect, the reliability of the system significantly increases, an increase in efficiency and significant energy savings are achieved.
Features of self-regulating heating cable:
- High reliability.
- Saves energy as the cable power changes depending on the temperature.
- Convenience and ease of installation.
- Independence of linear power from circuit length.
- Doesn't overheat or burn out.
- Long service life.
Safety of self-regulating heating cable:
Systems based on the use of self-regulating heating cables are the safest and easiest to install and operate. They are fully automatic and do not require any special maintenance.
Features of installation of a self-regulating heating cable:
Installation of self-regulating heating cables is simple and does not require special tools. Connecting the heating cable to the power supply or connecting parts of the cable to each other is carried out using sets of couplings. During installation, a self-regulating cable can be cut into sections of any length without leaving any residue, which greatly simplifies the design of heating systems. To save energy or in cases where temperature control is necessary, it is possible to use control devices - thermostats.
Systems based on a self-regulating heating cable are reliable, durable, practical and cost-effective.
Specifications
Selecting the type of heating cable and calculating power
In accordance with various consumer properties, there are three main types of temperature-controlled wire according to power and purpose of heat consumption.
- Cable with maximum temperature up to 70 degrees
- Up to 105 degrees
- Up to 135 degrees
An increase in power and temperature height is achieved through the use of copper cores of various diameters.
Marking
- D - used for marking low-temperature option
- Z - medium temperature
- Q - option with maximum temperature (usually additionally marked with red insulation)
- F - anti-corrosion treatment
Fire-resistant polyethylene and fluoroethylene are used for insulating coating.
Regarding working with copper wire. Copper is an ideal conductive material; copper wire is ductile and flexible.
Therefore,
when working with a cable with a copper core, it is important to avoid kinks and the possibility of physical abrasion.
How is power calculated?
In accordance with the rated power, voltage class and heat transfer class. That is, you can look at the table of power and energy consumption for each type of cable.
Sectional view of self-regulating cable devices
Heat dissipation of linear type for self-regulating wire is from 6 to 100 watts per meter.
If we calculate offhand, according to average parameters for practical use, heating 1 meter of wire will cost about 30 watts . It is highly desirable to connect via a separate transformer.
Perhaps you will be interested in water distribution in a private house, external and internal pipe distribution and do-it-yourself installation. On this page, read about a caisson for a well with your own hands.
And here https://aquacomm.ru/vodosnabzenie/zagorodnyie-doma-v/avtonomnoe-vodosnabzhenie/trubyi/plastikovyie/polipropilenovyie/trubyi-polipropilenovyie-tehnicheskie-harakteristiki.html all about the technical characteristics of polypropylene pipes. What temperature does this material hold and what service life does the manufacturer promise.
Installation rules
Any residential building now has a water supply and sewerage system that ensures comfortable living. But in winter, the external water supply may freeze if the installation depth is shallow. That’s why heating cables of different designs are used:
- for heating water supply
- for heating sewerage.
The thermal relay turns on the heating cable when the water temperature drops below the measured temperature on the pipe by 1-3°C and turns it off when the water temperature and the pipe temperature begin to equalize. The entire structure is insulated and insulated.
Since the pipeline is usually short, the cable itself consumes little electricity, and powerful relays are not required.
Self-regulating usually draws much more power than cable using a relay. The thermostat will help your water supply work in the most severe frosts.
Often used for heating sewer systems. Its main advantages in this case are that it can be cut to the required length, and the average power consumption of such a cable per 1 meter of pipe is 30-35 Watts.
If the total length of the cable does not exceed 80 meters, then it can be connected directly to an electrical outlet. If more, you will need to install a special isolation transformer.
The installation method is simple, just follow the included instructions:
- The instructions clearly indicate which coil pitch must be observed when winding the cable onto the pipe.
- The surface of the pipes must be clean and dry. The influence of any aggressive environment on the cable or its insulation should be completely eliminated.
- One end of the cable must be stripped 0.5-1 cm. Then a heat-shrinkable tube of a slightly larger diameter is put on it.
- All the wires that are in the cable must be separated and also stripped to 0.4-0.8 cm. Each of the wires is also covered with a heat-shrinkable tube.
- The tubes are heated with a hair dryer and the ends are stripped to 5-7 mm.
- The braid is inserted into a metal tube and clamped into it. Next, the wires of the heating and power cables are connected to each other.
- The ends of the supply cable are pre-stripped in the same way. The connection must be isolated.
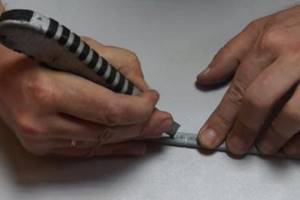
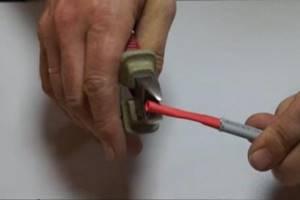
Cable preparation and cutting
First of all, use a knife to cut off the outer insulation from the self-regulating cable. The length of the cut depends on the brand and section.
Usually it is about 7cm.
The cut must be made carefully so as not to damage the grounding braid. Next, this braid needs to be unwoven.
The most convenient way to do this is with a thin screwdriver or an awl.
After unbraiding, the fibers are twisted into one braid.
We get to the inner thermoplastic shell. Make a cut at a distance of 4cm from the edge and remove the middle layer of insulation.
Hidden under it is the so-called matrix with copper conductors on the sides.
You cut through the matrix, heat this area with a hairdryer and pull the sheath off the cores.
When making a cut, do not damage the veins themselves. They are quite thin.
You can extract the veins in another way. Use side cutters to bite the corners of the matrix, and use pliers to forcefully pull out each vein.
Then remove the matrix and remaining insulation from the copper.
Next, put connecting sleeves on the ends of the cores and crimp them with a crimper on one side.
Mistake #3 Do not crimp sleeves with regular pliers.
They will never create normal contact at such a critical junction.
Error No. 4 Also note that it is recommended to install the sleeves in a “ladder” rather than at the same level.
First of all, this applies to moments when you do not use insulated sleeves, but ordinary bare GML.
Otherwise, with sufficiently dense shrinkage, this place will be the most likely source of insulation breakdown. Sometimes one sleeve can even push through another.
After crimping, insert small heat shrink tubes onto each core.
The tube should creep and overlap the sleeve by a few millimeters. Heat it with a hairdryer and reliably isolate this area.
Be sure to allow time for the connection to cool down. After that, insert a wide heat tube onto the inner thermoplastic shell and heat it until the glue comes out.
It should equally cover both the section of the inner shell and the individual veins.
While this insulation has not cooled down, move the cores apart and use thin-nose pliers to flatten the middle for a few seconds.
You will get 100% reliable tightness and no moisture will get inside.
Let's move on to the power cable and plug. Remove the outer insulation from it.
Error No. 5 In this case, you cannot leave all three wires the same length.
The grounding conductor must be longer than all the others.
Pull the largest outer sleeve through the cable, and stretch small heat shrinks onto the working cores.
Then you insert the stripped wires into the sleeve on the heating cable and crimp them with a crimper.
Error No. 6 In this case, stranded wires do not need to be twisted before inserting them into the sleeve.
Otherwise, during crimping, some of the veins will crush themselves. This is the most common mistake when working with similar tips and sleeves.
People often ask, is it possible to simply solder the wires together without using any press pliers? Yes, you can. But this is provided that you have enough experience and skill in this matter.
Crimping of tips and sleeves is less prone to errors due to the influence of the human factor and almost always creates 100% reliable contact (provided the sleeve size is correctly selected).
Slide the heat shrink onto the sleeve and warm everything up with a hairdryer. There should be glue coming out from both ends of the tubes.
As a result, you will get a connection in which each working core:
sealed from each other
sealed from braid
Give the connection time to cool and proceed to grounding.
Heating of sewer pipes
The need to heat communication pipes, including heating sewer pipes, arises, as a rule, when it is impossible to lay pipes at the required depth, which would prevent them from freezing.
The easiest way to protect utility lines from freezing is to bury them at a sufficient depth. But at the same time, certain areas may still be exposed to cold, and here it is impossible to do without using a heating cable.
In order for any sewer system to function normally and always be in good working order, it is necessary that there is a positive temperature of 5 degrees inside the pipe. Without a sufficient depth of installation, this temperature can be maintained in winter by using a heating cable for the sewer and using it to heat the sewer pipes, thereby heating the sewer as a whole.
Often there is a need to use heating of sewer pipes of a septic tank or local treatment plant. Pipes that are designed to drain wash water from water filters can also be heated.
It is advisable to lay these pipes bypassing the local treatment plant, and the end of the pipe inevitably ends up on the street, which clearly leads to its freezing in winter and the cessation of the functioning of both the sewerage system and the water treatment system.
To secure the sewer heating cable to the pipe, when laying the heating tape, a special reinforced adhesive tape with aluminum coating is used.
The heating cable can be cut into any pieces and, with a length of up to 80 meters, simply connect to an outlet or electrical circuit breaker in the panel.
Use appropriate electrical circuit breakers and residual current devices (RCDs) to power heating cables.
Popular brands
As for the price of a self-regulating heating cable, it is slightly higher than the cost of a standard device. However, during its service life it manages to justify itself.
The cost of such cables varies from 100 to 1 thousand rubles per 1 meter of material. Cheap devices are offered by domestic manufacturers. In addition, it is necessary to take into account the fact that the longer the wire the buyer needs, the lower the price for each meter.
If you believe the reviews written by supporters of such products, the most popular brands of heating cables are Raychem, Lavita, Ensto and Devi.
Products from manufacturers Ensto and Lavita are distinguished by high-quality internal coating of the product. The most expensive products come from Denmark under the Devi brand. Budget options include models from the Ensto and Lavita brands. In terms of service life, Ensto is not inferior to expensive devices from Devi. In this regard, most consumers prefer heating devices from Ensto.
What characteristics to pay attention to
Before purchasing a cable, you must clarify the conditions in which it will be used.
It is important to correctly calculate the power, set the length, take temperature readings, and determine the installation method - internal or external.
Characteristics that will be required when choosing
Power. The parameters of power/resistance and heat transfer are interrelated. Also, the properties of the cable depend on the cross-section of the core. You should also focus on it when choosing the length. Let's assume that a cable system with a cross-section of 1.1 mm² and a power of 25 W should not be longer than 80 m.
The average power of samregs that can be found on sale is from 5 W/m to 25 W/m. Systems with a minimum value are suitable for internal heating of pipes laid in the ground. For the same pipes, but with external heating, the cable should be a little more powerful - 10 W/m. The harshest conditions are above ground, so for above-ground placement the maximum power is suitable - from 25 W/m.
Temperature. It should be remembered that not all types of pipes tolerate heat equally well. Let's assume that plastic products (especially sewage and cold water) are not designed for strong heating.
To heat liquid in polypropylene water pipes, it is recommended to use low-temperature systems with a maximum operating temperature of + 65 ºС
In production there are cables that heat up to + 190 ºС (with a power of up to 90 W/m), but there is no use for them in everyday life.
Presence of grounding braid. This protective element is equally important for both the system and people - it guarantees the safety of installation. For the braid to function, it is connected through an RCD. However, on sale you can find options without grounding - in some cases their use is understandable.
External insulation material. Various types of polymers act as external insulating materials. Some of them are thinner and more elastic, others are more rigid in bending. All types, without exception, protect the internal parts of the cable from damage, aggressive environments, and humidity.
Table of technical characteristics of various types of cables. Among other things, they differ in the material of the outer protective shell: polyolefin and fluoroplastic
External insulation affects the scope of use of the cable. Polyolefin protection (the most common material) is not suitable for all installation methods.
For example, for installation on the roof, a cable with fluoropolymer insulation (with protection from UV rays) is used, and for internal installation, systems with fluoroplastic insulation are used.
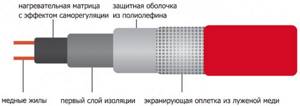
Principle of self-regulation:
The heating element of the temperature control system consists of:
- internal core with high electrical resistance. The higher the resistance, the more heat is generated when current flows;
- a protective inner shell, which in turn is covered with a shielding wire mesh made of metal, which serves as grounding;
- seamless PVC coating, also known as insulation. Acts as protection for all internal elements from the external environment.
The self-regulating cable heats up due to the fact that electricity passes through the inner core. Essentially, the standard properties of the metal are used. This heat is then transferred to the shell, and from the shell to the heated object (pipe, floor, wall). The larger the contact area with the wire, the better the heat transfer, so flat models are effective cables with a round cross-section.
The top layer of insulation, which covers both the heated object and the wire, helps to retain some of the heat released into the air. The material for such protection can be aluminum foil or any other insulation.
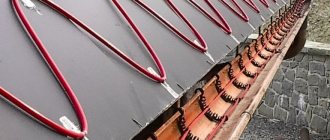
Roof heating cable
Careful installation of the heating cable will keep gutters and pipes open, but will not freeze when temperatures drop. This is often necessary when using a metal roof without infill or insulating film.
Electrical heating cable sets for gutter and gutter protection are available in a wide range of lengths, usually cables of the TSOE type (armored flexible wire for heated floors), brands and types of Engl, FSM, Engkeh (for heating the roof of hazardous industrial premises) and others.
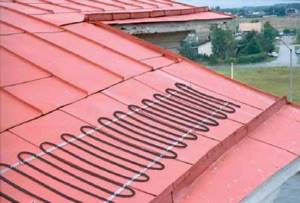
Photo – Roof cable
Connection diagram: step-by-step instructions on how to connect a heating tape or armored cable:
- For a typical installation, leave about 2-4 meters of cable unused, ideally hanging from the roof;
- Be sure to ground all metal gutters and pipes;
- It is much more convenient to control the cable connection if you use a special switch to it; it can be connected in the same way as an RCD;
- Make sure that the switch and other cable junctions are well insulated and sealed;
- Installation is carried out using a “snake” - this is not very economical, but quite effective.
Advantages:
No overheating. Self-regulating thermal cables can be overlapped without any risk of overheating. Their intersection with each other does not cause any harm
This is of no small importance for control-closing mechanisms, for example, when you need to wrap a valve on a pipe. It also happens that the heating cable in anti-icing systems becomes covered with dirt, leaves and other debris. In this case, an ordinary resistor will burn out while the samregs will work reliably;
In this case, an ordinary resistor will burn out while the samregs will work reliably;
Convenient cutting. Such cables can be cut from a common coil to the required length immediately on site “in the field”. This provides additional flexibility when plans do not match the “real life” situation on site. Such connections can be divided into pieces of the required length with a maximum length of up to 0.7 - 0.15 km (depending on the type of samreg). In contrast, resistive cables have a clearly defined length;
Self-regulation. During operation, there is no need to install complex multi-channel thermostats, because the cable sharply reduces power after reaching a certain threshold temperature. This mode is ideal for anti-icing systems, where it is often very difficult to maintain the desired temperature along the entire length of the section. Samreg itself finds the appropriate temperature for each zone;
Saving electricity. Due to the point release of heat where it is required and minimal heat release in places that do not require heating, a self-regulating cable is much more economical than a resistive cable. In anti-icing systems, a resistive cable is usually connected to one temperature sensor and generates heat where the sensor is located and heating is required, and in places where it is not needed.
Types of heating cable
All heating systems are divided into 2 large categories: resistive and self-regulating. Each type has its own area of application.
Suppose resistive cables are good for heating short sections of pipes with a small cross-section - up to 40 mm, and for long sections of water supply it is better to use a self-regulating cable (in other words, self-regulating, “samreg”).
Type #1 – resistive
The principle of operation of the cable is simple: a current passes through one or two cores located in the insulating winding, heating it. Maximum current and high resistance add up to a high heat dissipation coefficient.
Pieces of resistive cable of a certain length that have a constant resistance are available for sale. During operation, they give off the same amount of heat along their entire length.
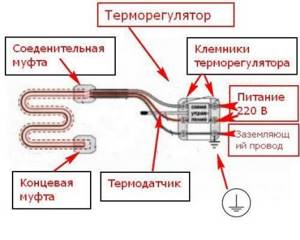
A single-core cable, as the name suggests, has one core, double insulation and external protection. The single core acts as a heating element
When installing the system, it must be remembered that the single-core cable is connected at both ends, as in the following diagram:
Schematically, a single-core connection resembles a loop: first it is connected to an energy source, then it is pulled (wound) along the entire length of the pipe and returned back
Closed heating circuits are more often used for heating roof drainage systems or for installing “warm floors”, but an option applicable to plumbing also exists.
A special feature of installing a single-core cable on a water pipe is that it is laid on both sides. In this case, only the external connection type is used
For internal installation, one core is not suitable, since laying the “loop” will take up a lot of internal space, and accidental crossing of wires can lead to overheating.
A two-core cable is distinguished by the separation of the functions of the cores: one is responsible for heating, the second is for supplying energy.
The connection diagram is also different. In “loop-shaped” installation there is no need: as a result, the cable is connected at one end to the power source, the other is pulled along the pipe
Two-core resistive cables are used for plumbing systems as actively as samregs. They can be mounted inside pipes using tees and seals.
The main advantage of a resistive cable is its low cost. Many note reliability, long service life (up to 10-15 years), and ease of installation.
But there are also disadvantages:
- high probability of overheating at the intersection or close location of two cables;
- fixed length – can neither be increased nor shortened;
- the impossibility of replacing a burnt-out section - it will have to be completely replaced;
- no power adjustment - it is always the same along the entire length.
In order not to spend money on constantly connecting the cable (which is impractical), install a thermostat with sensors. As soon as the temperature drops to + 2-3°C, it automatically starts heating; when the temperature rises to + 6-7°C, the energy is turned off.
Type #2 – self-regulating
This type of cable is universal and can be used for various applications: heating roofing elements and water supply systems, sewer lines and liquid containers.
Its feature is independent regulation of power and intensity of heat supply. As soon as the temperature drops below the control point (assuming +3°C), the cable begins to heat up without outside intervention.
Self-regulating cable diagram. The main difference from its resistive counterpart is the conductive heating matrix, which is responsible for regulating the heating temperature. The insulating layers are no different
The principle of operation of the samreg is based on the property of the conductor to reduce/increase the current depending on the resistance. As the resistance increases, the current decreases, which leads to a decrease in power.
What happens to the cable during cooling? The resistance drops - the current increases - the heating process begins.
The advantage of self-regulating models is the “zoning” of work. The cable itself distributes its “labor power”: it carefully warms up the cooling areas and maintains an optimal temperature where strong heating is not needed.
The self-regulating cable works constantly, and this is welcome in the cold season. However, during a thaw or in the spring, when frosts stop, it is irrational to keep it on (+)
To fully automate the process of turning the cable on/off, you can equip the system with a thermostat that is “linked” to the outside temperature.
Useful tips
It is very difficult to navigate the sea of heating cables offered on the modern market - there are too many offers from different manufacturers. What you need to know and consider:
- Before going to the store, you need to know exactly the diameter of the heated pipe and the length of the area protected from the cold.
- At the same time, you still need to focus on the lowest temperatures to which the soil or air can cool.
- It is necessary to clarify the presence of a protective braid, which increases the reliability of the heating element and provides grounding.
- The following is also important: type of external insulation, power, temperature class, as well as the manufacturing company.
External insulation type
If a polyolefin-insulated cable is suitable for sewer pipes, then fluoroplastic protection is better suited for internal installation (directly into the pipe). Fluoropolymer is also quite suitable for outdoor installation - it protects from both moisture and ultraviolet radiation.
Temperature and power
The medium temperature system is suitable for larger diameter pipelines. The maximum system temperature is 120°C. The power reaches up to 33 W per meter.
The most powerful are with a temperature of 190°C, their power is already 95 W per meter. Such systems are not used in everyday life; their scope of application is industry.
You can select and correctly calculate the optimal power based on the diameter of the pipe. Examples:
- For water supply systems with pipes up to 25 mm in diameter, cables with a power of 10 W per meter are used.
- From 25 to 40 mm – 16 W per meter.
- From 40 to 60 mm - 24 W per meter, etc.
Recommended Manufacturers
There are brands of heating elements that have proven themselves to be long-term, stable and reliable. Imported products:
- Lavita.
- Nelson.
- Ensto.
- Devi.
- Raychem.
The most popular Russian manufacturer is considered to be the company Teplolux (SST), which specializes in high-quality household products.
Homemade heating cable
Nothing is impossible, and you can also make a heating cable with your own hands. There is enough information on this topic on the Internet in the form of:
- Videos.
- Schemes.
- Articles.
Having some skills in basic electronics, as well as the desire to produce one, using an on-board computer, a power supply, and some materials, many craftsmen make effective, reliable and safe systems for such heating.
The most common reason for making homemade products is the desire to save money, and such “craftsmen” often use “mongrel” wires instead of cables. So, when creating something like this, you need to think a hundred times before doing something that could ultimately lead to a short circuit, even a fire. In addition, everything related to drinking water requires a special, thoughtful attitude.
You can make homemade automation if you have experience in this matter, but it’s not worth experimenting with wires at all - it will end up being more expensive.
They say that the greedy pays twice - but that’s not so bad, it’s worse when such a makeshift device harms your own health and the health of your household. Not to mention the safety of the home itself and the breakdown of the water supply due to defrosting.
Reviews
There are plenty of reviews on the Internet about heating cables. Users use them to heat the following communications and surfaces:
- Drainage.
- Drainage devices.
- Water pipes.
- Sections of pipes in an artesian well.
- Sewage systems, etc.
Opinions are divided. Some claim that this method of electric heating is simply irreplaceable, while others claim that a deep trench for pipes will work “cheaply and forever.”
Users of devices such as heating cables assure that with a thermostat, heating is more profitable and saves electricity.
In addition, many are inclined to believe that the combined option is still more profitable: the pipe is buried in the ground and heated by a heating element.
It is strongly recommended not to wrap pipes located in the ground with mineral wool - they absorb moisture. This is how the insulation becomes useless, and the risk of freezing is present.
Everything, apparently, depends more on the specific situation and financial situation of the homeowner.
Laying and connection
We have considered all the most important issues, starting from the principle of operation of a self-regulating heating cable to issues of its choice. It remains to find out how to install it. First, let's discuss the most interesting method - inside the pipe.
Hidden installation inside the pipe
The most interesting task before us is to lay a self-regulating heating cable for water supply inside the pipe. Being in a heated state, it will prevent the pipe from freezing and bursting. Let's see how it's done. We will need the following materials and tools:
Such a connection scheme requires much more effort, but gives a disproportionate increase in efficiency
- Self-regulating heating cable of suitable length;
- Sharp knife for removing insulation;
- Heat shrink film for insulating conductors;
- Rubber seal;
- Tee for installing a self-regulating cable inside the pipe;
- Hair dryer for shrinking the film;
- Electrical wire with plug.
First, we determine the insertion location - it can be an internal or external area (everything is individual here, we look at the situation).
The end section is located where the pipe goes into the ground or enters another building.
Remember that there should be no taps or valves throughout, as they can damage the self-regulating heating cable.
All work is carried out before the onset of frost, at positive temperatures - do not wait until the first frosts appear. Don't forget to turn off the water in advance!
A special coupling used for connection. You can buy it at any plumbing store
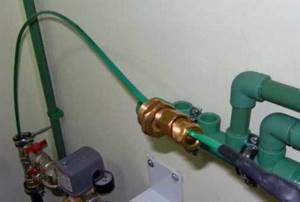
If the water pipe rises from the floor and goes further horizontally, this will make the installation easier - we cut the pipe and install a tee in this place.
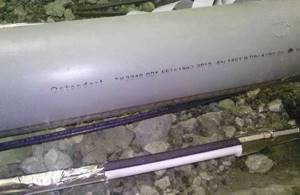
Next, we place a heat-shrinkable tube on the tip of the self-regulating heating cable and heat it with a hair dryer - this tip must be reliably sealed to avoid contact of water and live parts. Through the upper outlet we insert a self-regulating heating cable into it, not forgetting to put the gland on it.
Next, we push the cable to the required length - it needs to be calculated in advance and with a small margin. At the other end we need to mount a wire with a plug. Carefully remove the insulation and braiding so that we can see two conductors - we solder the wire to them, not forgetting to put a heat-shrinkable coupling on it (after soldering, we put it on and blow it with hot air from a hairdryer).
After you have made all the electrical connections, you need to check the resistance with a multimeter - it should be several tens of ohms. If the multimeter indicates a short circuit, remove the self-regulating cable and inspect it for damage.
Pay special attention to the farthest end part.
Now we fix the oil seal, open the water supply, and check for leaks in the place of our work. If all is well, we plug the wire with the self-regulating heating cable connected to it into the network. Even though the water supply is now protected from freezing, it is highly recommended to wrap the pipe with insulation. Remember that good protection is multi-layered protection.
Open outdoor installation
If necessary, you can lay a self-regulating heating cable outside the water supply. It is used to wrap not only the pipes themselves, but also the flanges, couplings and valves installed on them. The simplest option is to lay several self-regulating cables parallel to the pipe, securing them with aluminum tape. Laying in a spiral or double spiral is also possible, which only increases the heating efficiency.
Attaching the heating cable with this connection is a real pleasure. The main thing is not to skimp on aluminum tape.
You can also use a double installation method - lay one heating cable in parallel, and wrap the second around the pipe in a spiral. It is wound to the pipe using the same aluminum tape, in rings every 20-30 cm. After the winding is completed, we apply tape to the cable along its entire length - this way we will achieve maximum efficiency of the system.
Some experts advise increasing the efficiency of heat transfer by pre-wrapping the pipes with foil or the same tape.
Is it possible to use a self-regulating cable for heated floors?
The main function of a self-regulating heating cable is to reduce the supply of electricity when the required heating degree is reached, without affecting the quality and uniformity of surface heating. This feature allows the model to be successfully used in the construction of heated floors in any room, from living rooms to bathrooms and toilets.
In addition, if you have heated floors with a self-regulating cable, you can rearrange the furniture in the apartment, since it has the ability to regulate the heating level, unlike resistive cables. That is, it is permissible to reduce heating under heavy furniture. It is impossible to change the heat supply of a resistive wire; overheating of the surface may occur, which will lead to failure of the system.
It is worth noting the simplicity of constructing a self-regulating floor, since this electrical cord can be cut anywhere and the end sealed with your own hands. At the same time, all connections, if installed correctly, can last for more than one year.
Naturally, like any self-regulating electric floor, it must be connected to power while observing all standard protection methods. That is, the system must have a circuit breaker and an RCD, the current leakage of which is no more than 30 mA. The Samreg cable must have a screen and a power of 30 - 40 W. At the same time, the laying step of the heating element is 15 - 20 cm.
Previously, the use of this function was not possible due to the small size of the film. Today, infrared film with 30% self-regulating ability is produced in Korea.