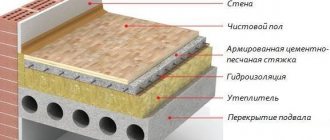
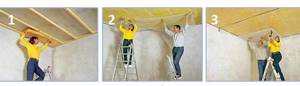
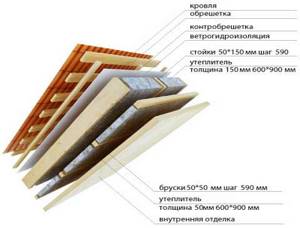
Roof insulation
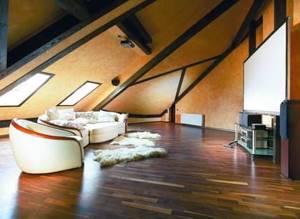
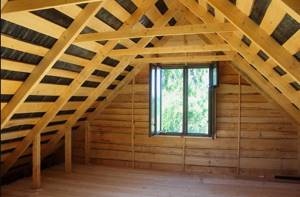
In addition, if the roof is insulated, thoroughly waterproofed and provided with effective ventilation, this will allow, in addition to effective energy saving, to expand the living area of the room due to the resulting attic, which can be made as cozy and comfortable as all other rooms.
If the roof is located above a non-residential attic and consists of rafters, sheathing and roofing, then insulation is not always necessary. The attic is continuously ventilated, and the temperature and humidity in it are almost the same as the outside air. In such houses, the main thing is to carefully insulate the attic floor.
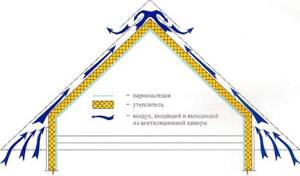
But if under-roof thermal insulation is installed, the temperature and humidity of the air inside the attic floor differ significantly from the air outside. Moisture rises along with the warm air and comes into contact with the colder, lower surface of the roof. This causes condensation to form on it. Also, moisture can penetrate into the roof elements, which is facilitated by inaccurate laying of the vapor-proof layer on the inner surface of the insulation, insufficient overlap of the vapor barrier strips, their loose fit to the walls and pipes, accidental ruptures, etc. Therefore, first of all, when insulating the roof, you need to take care of the device reliable vapor barrier located on the interior side. On the roof side, the insulation is protected by a layer of waterproofing laid along the rafters or a special flooring.
Such protection of an insulated roof on both sides is quite reliable, but sometimes this is not enough. It is necessary to provide a way to remove moisture that accidentally gets into the insulation. This effect is achieved by air circulation in cavities, one of which is located between the roof and the under-roof waterproofing, and the other is located between the under-roof layer and the thermal insulation layer. In order for outside air to freely enter these cavities and be removed from them just as easily, it is necessary to install vents in the roof overhang and in the upper part of the roof. To ensure free movement of air between the roof and the under-roof waterproofing, lay counter battens along the rafters. Their thickness determines the size of the air cavity. Air enters this cavity through holes located in the side overhangs of the roof.
How to avoid the problem of high humidity
After thermal insulation work, the humidity inside the room may increase, which negatively affects the microclimate. There are several reasons for this.

- Insulated structures have gaps or cracks, which means their integrity is compromised. Therefore, before starting work, it is necessary to carefully check all the bases and eliminate all existing defects in advance.
- There is no vapor barrier layer or it is damaged. In this case, moisture does not leave the room, but accumulates in the insulating material. Therefore, it is imperative to use a vapor barrier film, gluing the joints of the sheets with a tape specially designed for this.
- The system of natural and forced ventilation of the room was broken. For example, during the renovation, the ventilation holes were moved or blocked, the shaft was blocked, and metal-plastic windows were installed. All of the above actions lead to a decrease in air circulation due to excessive tightness of the structure, so it is necessary to periodically ventilate the room or take care of installing supply and exhaust ventilation.
If the roof is already covered with roofing material
*
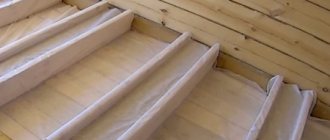
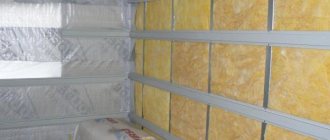
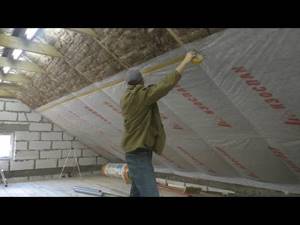
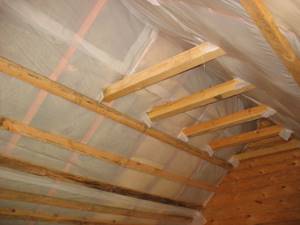
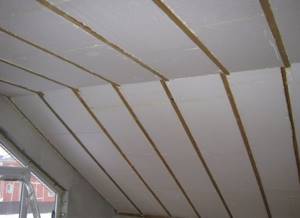
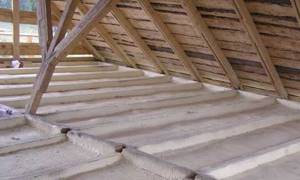
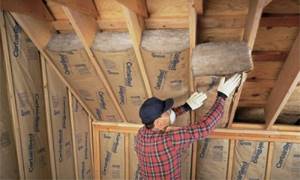
Here the thermal insulation technology differs little from the previous one. The peculiarity is that all work is carried out from inside the attic. And the main distinguishing feature is waterproofing, which is applied in strips along the rafters with the film recessed into the formed niches. To make it clear what we are talking about, look at the photo, which shows how the waterproofing should be laid and fastened.
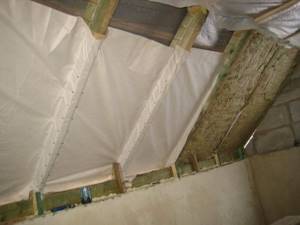
Waterproofing membrane installed from inside the attic onto the roof slope
All other operations are carried out using the technology described above. That is:
- The slab insulation is being laid.
- Installation of vapor barrier film.
- Interior decoration of the attic.
If polyurethane foam is used, it is simply applied to the rafters covered with film. If ecowool is used, then a vapor barrier layer is laid, and the space between the two protective layers is filled with insulation.
Insulation of pitched roofs
You can insulate a roof with a frame made of rafter systems in one of four ways: by laying insulation between the rafters, on the rafters, under the rafters, or in a combined way. In most cases, thermal insulation is carried out in the simplest way - by laying thermal insulation material between the rafters.
Roof insulation between rafters
The insulation with this method of insulation must be continuous, gaps are not allowed. This also applies to areas adjacent to walls, pipes and windows that are built into the roof plane. This approach is explained by the fact that any place where thermal insulation is interrupted leads to the formation of a cold bridge. Also, in insufficiently insulated places, condensation may occur due to temperature differences, which will gradually destroy the entire structure. It must be remembered that the attic always brings greater heat loss than other floors, since its entire surface is in contact with the street. Since heat escapes not only through the slopes, but also through the gables, it is necessary to insulate the entire roof contour.
For example, an uninsulated gable wall connecting to the roof structure can cause a problem. When insulating walls, Mauerlats are usually not insulated. When thermal insulation of a roof slope is carried out, it is also quite often brought only to the level of the Mauerlat. Thanks to this, a powerful cold bridge appears, along which heat leaves the room. To avoid such a negative phenomenon, you need to wrap the insulation of the attic slopes onto the Mauerlat to the place where the insulation of the outer wall reaches.
Calculation of the thickness of insulation of roof slopes
It would be logical to finish the publication by considering the question of what thickness of insulation is required to create an optimal microclimate in the attic.
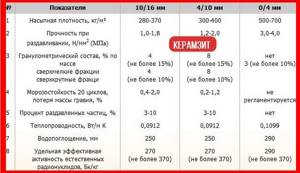
The current SNiP, which are immutable laws in the construction industry, establish standardized values of heat transfer resistance for building structures of residential buildings, separately for all regions of Russia. In order not to provide long tables, below is a schematic map from which it is easy to find an approximate value (with a sufficient degree of accuracy) for your place of residence.
Please note that resistance values are indicated in three different numbers - for walls, for floors and for coatings. Of course, in this case we are interested in the coatings (red numbers)
Schematic map with normalized values of heat transfer resistance for building structures (graded according to the climatic characteristics of the regions of Russia)
The total resistance to heat transfer of a building structure consists of the parameters of all layers that create a barrier to the spread of cold. But in the case of roof insulation, only the insulation itself, as well as the materials of the internal lining of the attic, can be taken into account. The roofing material, whatever it may be, does not take part in thermal insulation, since it is separated from the insulating layer by a ventilated layer. The thermal resistances of vapor and waterproofing membranes are so small that there is no point in taking them into account.
So, if you know the thermal conductivity coefficient of the selected insulation, the parameters of the layers of the internal cladding, the normalized value of the thermal resistance of the coating structure for a given region, it costs nothing to calculate the required thermal insulation thickness.
We will not give calculation formulas here, but rather suggest using a special calculator, which already contains the basic parameters necessary for the calculations.
Calculator for calculating the thickness of insulation of roof slopes
The resulting value is the minimum. It is brought to standard thicknesses of manufactured insulation materials. It should be borne in mind that very often it makes sense to use two-layer insulation, with bandaging of the seams and complete overlap of the elements of the roof rafter system - this technology allows you to get rid of all possible “cold bridges”.
Do-it-yourself roof insulation step-by-step instructions
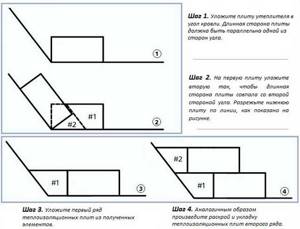
First, waterproofing is done. The film is rolled out horizontally in the direction from the eaves to the ridge of the roof with an overlap. On the film, the places of such overlap are indicated by a special strip, and its magnitude directly depends on the slope of the roof. If the slope is up to 21%, the overlap must be at least 20 cm, at 22 - 30% it is 15 cm, and for a slope greater than 31% an overlap of 10 cm is required. The waterproofing film is attached using a construction stapler or galvanized nails with a wide head. Overlapping areas must be insulated with special adhesive tape.
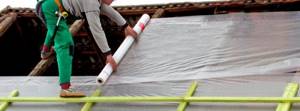
It is advisable to roll out the film so that the overlaps fall on wooden structures (counter battens, rafters, spacer bars). If the lathing was impregnated with a special antiseptic, you should make sure that the impregnation has completely dried before laying the film.
The waterproofing layer at the eaves and roof overhang above the gable should protrude beyond the wall line by at least 2 cm, and at the ends of the roof extend onto the end boards. At the eaves, it runs directly along the rafters and is secured with a special adhesive tape.
When laying perforated film, you must ensure that the perforation “looks” outward. Otherwise, it will allow moisture to pass into the roof and prevent steam from escaping from the inside. The film always has inscriptions indicating its front (outer) side.
The film must be laid, leaving a sag between the rafters equal to 20 mm. It is necessary in order to eliminate possible film tension and rupture due to a decrease in its size due to the cold. It is desirable that the distance between the rafters be no more than 1.2 m.
The next stage is laying insulation. At the junction of the wall insulation and the roof slope, you need to try to make sure that both of these layers fit very tightly to each other. Also, such places need to be additionally reinforced with reinforcing mesh and protected from rain. In a pitched roof, they are usually located under the eaves, which protects them from atmospheric moisture, and for a flat roof, protection is required using tin aprons and sealing polyurethane tape.
Then an anti-condensation film is laid. It must be laid out on the rafters in the direction from the eaves to the ridge of the roof. Laying is done with an overlap, the absorbent surface down, and then secured using staples of a construction stapler or galvanized nails with a wide head. The film must be laid with tension, avoiding sagging. It is advisable to reinforce the gluing area with a pressure strip. This is especially important if the roof slope is less than 30°. The bottom surface of the film should not come into contact with the insulation. To ensure ventilation, the distance between the insulation and the anti-condensation film should be about 40 - 60 mm.
Video description
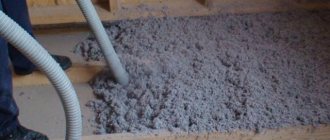
The video shows what polystyrene foam chips are and where they are used today:
As for the insulation of a pitched roof along wooden rafters, the crumbs are used almost like ecowool, filling the space between the rafter legs with the material. They just do it manually in stages. That is:
- cover the rafter system from the attic to a height of 1-2 m, for example, with plywood;
- fill the space limited by plywood sheets and roofing material;
- coating, polystyrene foam granules;
- install the next sheet in height;
- carry out filling;
- and in this way all the way to the top.
You can also backfill granular insulation from the side of the roof. To do this, you will have to cover the rafters from the inside of the attic with boards or sheets, and fill the material itself from the street. And only then, after the process is completed, begin the installation of the roofing and other necessary layers.
Today the process is mechanized and automated, that is, the material is supplied using pressurized air and hoses.
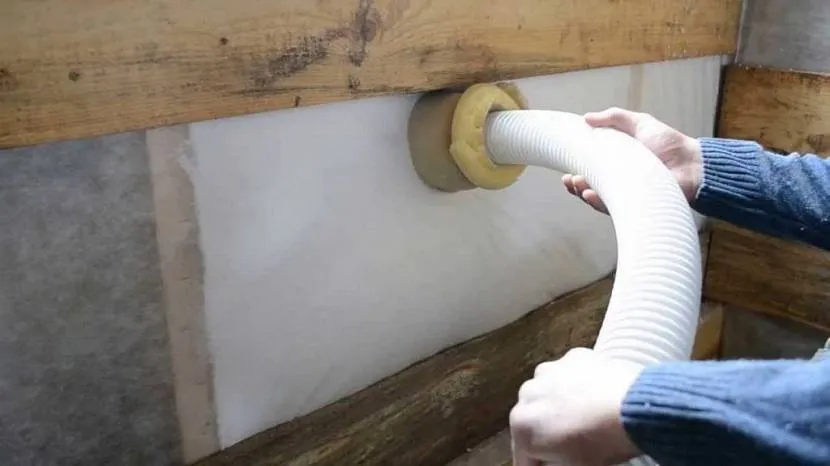
Filling the space of the roof structure with polystyrene chips Source besplatka.ua
Insulation for roofing
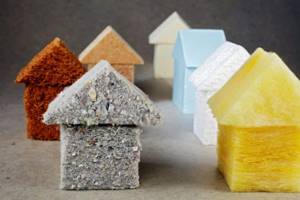
You need to start understanding the insulation of pitched roofs with thermal insulation materials. They are presented in a fairly wide range on the market, but only four are used for roofs:
- mineral wool slabs are mineral wool pressed into mats;
- polystyrene foam boards;
- polyurethane foam;
- ecowool.
Which insulation to choose
Mineral wool boards
This is a material made from rocks that are heated, melted and drawn into threads. The latter are in a chaotic state in the material itself.
Regarding technical characteristics:
- thermal conductivity – 0.042 W/m K;
- density – from 50 to 200 kg/m3;
- 100% environmentally friendly;
- ease of installation by hand;
- service life 50 years;
- flammability class - NG (non-flammable).
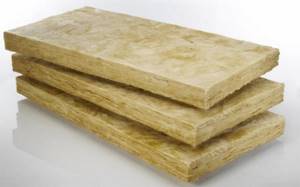
Mineral wool mats
Expanded polystyrene boards
This is foamed polystyrene, whose structure is closed balls filled with air. In this case, air occupies 90% of the volume, which reduces the weight of the insulation and its thermal conductivity.
Specifications:
- thermal conductivity – 0.034-0.044 W/m K;
- density – 25-45 kg/m3;
- flammability class - G3 (burns and supports combustion);
- environmental friendliness is high;
- installation method – manual;
- service life – 20 years.
It should be noted that the higher the density of the insulation, the higher its thermal conductivity.
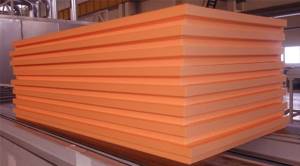
Foamed polystyrene boards
Polyurethane foam
This is a foamed mass that hardens in air, turning into a durable, seamless coating. Essentially, this is polyurethane foam, only modified. The insulation of this type itself is a two-component material. Its ingredients are mixed in a special container and supplied under pressure through a hose and nozzle to the insulated surfaces.
Specifications:
- thermal conductivity – 0.019-0.028 W/m K;
- density – 55 kg/m3;
- flammability class - G2;
- service life – 80 years;
- environmental friendliness is high;
- installation method - special equipment is required.
Polyurethane foam is applied to the attic roof
Ecowool
This insulation is pure cellulose made from wood. Looks like cotton wool. Here are its characteristics:
- thermal conductivity – 0.038 W/m K;
- density – 40-45 kg/m3;
- flammability class – G1 (low flammability);
- service life – 100 years;
- installation method - using equipment;
- environmental friendliness - 100%.
Ecowool - 100% natural insulation
Comparative analysis
It is incorrect to do such an analysis of insulation for roofs (various pitched roofs). Each material has its own pros and cons. In addition, the price is different, and the installation method varies greatly. For example, polyurethane foam is better than others in its thermal characteristics. But it cannot be applied to the roof without special equipment. And this increases its already high price.
In this regard, mineral wool and polystyrene foam boards are the best option. They are easier to install and inexpensive. But their service life is short.
Price comparison:
| Type of insulation | Mineral wool | Expanded polystyrene boards | Polyurethane foam | Ecowool |
| price, rub. | 50-100 per 1 m2 | 250-300 per 1 m2 | 1500 rub. per 1 m2 thickness 50 mm | 2200-2700 rub. for 1 m3 |
And one more criterion by which insulation can be compared is the thickness of the layer being laid. Here are the positions:
- mineral wool – 214 mm;
- foamed polystyrene – 120-150 mm;
- foamed polyurethane – 50-100 mm;
- ecowool – 150-200 mm.
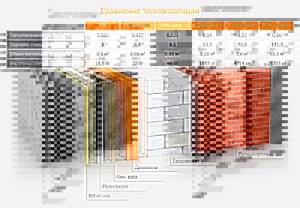
Comparison of building materials by thickness and thermal characteristics
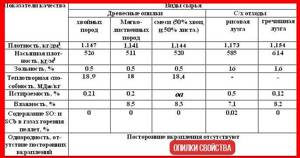
Sawdust
Sawdust itself is a fairly inexpensive material. Its advantage is its absolute naturalness. But there are two problems with using it:
- Rodents;
- Shrinkage.
Both solve in the same way. Adding lime to sawdust. Gypsum is also used to impart viscosity to the mass. It is added in an amount of no more than 5% by weight of sawdust. The resulting mass becomes viscous and is perfectly applied and keeps its shape.
Expanded clay
Expanded clay is small crushed pebbles of different fractions (sizes). It is filled between the joists. Expanded clay is not afraid of either steam or rodents. In a sense, it is an ideal insulating material for roofing.
In addition, it is not quite expensive. We will talk in more detail about the use of this type of thermal insulation for roofing in a separate article. Here the mention was necessary to understand the general picture of possible insulation options.
Spraying and blowing
There are two main representatives in this family of roofing materials:
- Polyurethane foam;
- Ecowool.
PPU
Polyurethane foam is one of the most effective thermal insulation materials. It is sprayed or blown in the form of white foam. To blow in polyurethane foam you need a special suit and a compressor. This material does not allow steam to pass through and you need to use a lathing to blow it in.
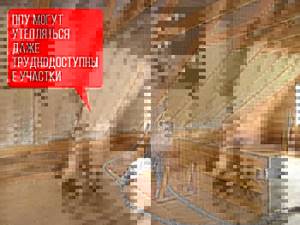
PPU can insulate hard-to-reach surface areas
PPU is a synthetic material, ecowool is environmentally friendly. Both of these materials are rodent resistant and require special equipment to blow them out. A specially trained technician can apply polyurethane foam correctly.

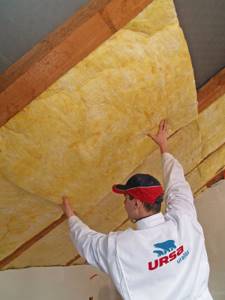
Main types of insulation
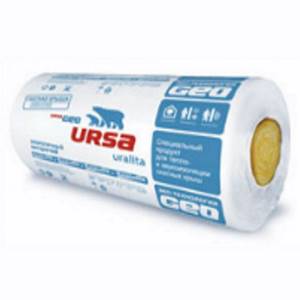
URSA is one of the modern insulating materials that fully meets the requirements.
Its basis is spatula fiber, processed using the proprietary technology of the URSASpannfilz company.
The insulation has such a high level of geometric resistance that it does not require renewal or repair over its entire service life.
URSA is available in the form of mats measuring 1200 x 4200 mm, the thickness of which is 150 mm. The material is rolled into tight rolls and sealed in film.
Before use, the rolls are opened and allowed to straighten. It only takes a few minutes to reach normal size and restore thickness.
Afterwards the mat needs to be cut. If the pitch between the rafters is 60 cm (standard size), the mat should be cut lengthwise into two parts.
After this, the slabs are placed between the rafters (they must be slightly compressed). Due to the high degree of elasticity of the material, the mats hold in place independently, and there is no need for additional fastening
Installation of this insulation is so simple that even one person can do it. URSA is also suitable for broken gable roofs.
Glass wool is a material that has been used for a very long time and has not yet lost its popularity.
However, it should be noted that this insulation has a number of serious disadvantages, as a result of which many builders do not recommend using it for thermal insulation of gable roofs:
- glass wool perfectly absorbs moisture and loses its quality characteristics in a short time;
- it can easily be deformed and lose its geometric shape, as a result of which, when using it, it is necessary to significantly complicate the roofing pie to prevent slipping;
- the material does not meet environmental safety requirements.
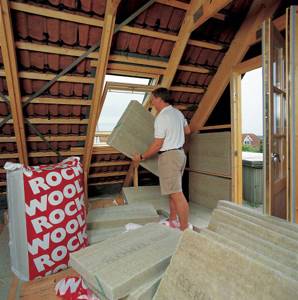
Mineral wool is a very popular material for insulation. It is obtained as a result of special processing of basalt rocks.
They are exposed to extremely high temperatures, after which the resulting mass is pressed and shaped into tight slabs. As a result of the described actions, a chaotic interweaving of fibers occurs into a very dense micronetwork. Thanks to this structure, the boards do not deform, do not absorb water and moisture, are resistant to temperature fluctuations and the effects of adverse environmental factors,
In addition, mineral wool does not emit toxic substances and does not burn.
Spatula insulation - this material is non-hygroscopic and easy to install. There are several types that differ from each other in the degree of density. Therefore, it can be used for internal insulation and external thermal insulation.
To maximize heat retention, a material with a high fiber density is used. It is perfect for gable roofs. Due to its weight, the insulation fits tightly to the slopes, which helps prevent slipping. The material based on spatula fibers meets environmental requirements.
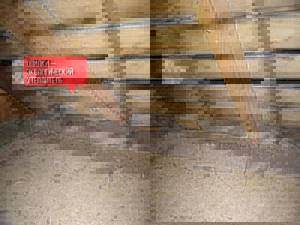
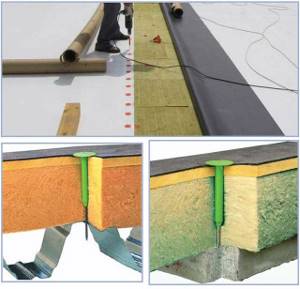
Ventilation gap device
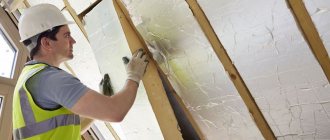
The first thing that had to be done during installation was to ensure a constant ventilated gap between the roofing material and the membrane, which is 20 mm. The easiest way to maintain the accuracy of the gap is to use 20 mm wide slats, which are nailed to the sides of the rafters close to the sheathing . This is what the roof slope looked like from the inside before the insulation work began:
Before starting work on insulating the slats, I sawed the internal view of the roof slope from scraps of boards left over from the construction site. The length turned out to be approximately 30-60 cm. I placed 2-3 2x30 nails in each rail so that their sharp ends did not protrude from the reverse side. And he quickly nailed the slats to the sides of the rafters. The rail that determines the size of the ventilated gap:
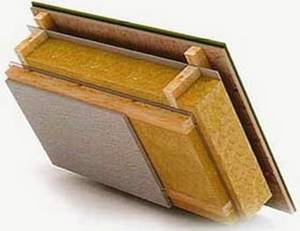
Basic materials for insulation
There are many materials for this type of work, so I will give a brief overview of the insulation materials for pitched roofs that are most suitable for this:
1. Polystyrene - there are various varieties of this material, but polystyrene foam is widely used as insulation.
Its main properties are low weight, low thermal conductivity and long service life. But these are all its advantages. There are a huge number of disadvantages: the material is extremely flammable, tends to be destroyed by high temperatures (80-900) and it cannot be used to get rid of cold bridges. It's better not to use it.
2. Cellulose is a fairly new material that is just beginning to gain popularity. Cellulose insulation has a number of positive features - low thermal conductivity, environmental friendliness, good air permeability, and also has good sound insulation. The material is not subject to combustion, is resistant to external temperatures, and during installation it creates a monolithic insulating structure. The disadvantages include the inflated price of cellulose insulation and minimal demand. Often the material is supplied only to order, which causes inconvenience when waiting.
3. Basalt wool is the most common and affordable material, which includes many positive qualities.
note
Distinctive features of basalt wool are the almost complete absence of thermal conductivity, increased sound insulation, increased density and porosity of the material.
Basalt wool is not subject to combustion, which increases the safety of the structure. The service life of such insulation is on average 25 years, which allows you to simply forget about the problems associated with roof insulation for a quarter of a century. Our team uses this material most often, and my own recommendations for insulating pitched roofs are always associated with basalt wool.
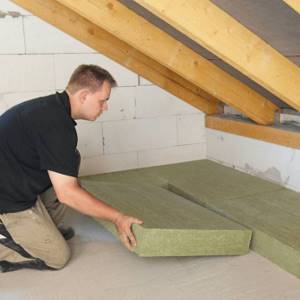
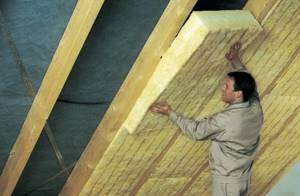
Stage of laying insulation
This operation had to be done by two people, since one person could not hold all the components of the system at the same time. The size of the soft slab “Light Butts Scandic” is 600x800 mm. You can choose insulation for your country house on our market. Take a look at the selection of thermal insulation materials and compare offers from the largest online stores. KNAUF Thermal insulation for floors KNAUF HeatKNAUF mini 50 mm 8 sq.m 699 RUR
OBI KNAUF Thermal insulation for roofs and walls KNAUF HeatKNAUF 50 mm
1,029 RUR
OBI ISOBOX Thermal insulation ISOBOX Extralight 100 mm
709 RUR
OBI MAUNFELD Thermal insulation for attic stairs Lxd 70x120
3,499 RUR
OBI We began to insulate the opening with a distance of 600 mm between the rafters.
The first slab of half size 600x400 was laid down. And we realized that the most difficult place was the connection of the rafters with the lower joists. Here a niche appears, which we found very difficult to insulate and subsequently finish. Therefore, we decided to create a ledge twice the width of the lining - approximately 180 mm.
At this height, a lower longitudinal bar of 50x50 mm must pass to secure the overlapping fourth layer of insulation. Therefore, before laying the layers of insulation, boards with a cross section of 100x20 mm and a length of 350-400 mm were vertically attached to the rafters and joists (180 mm for the lining, 50 mm for fastening to the joist, approximately 120 mm for fastening to the rafters), in which a triangular socket was first cut out for bar. Laying the first layer of insulation
Laying the first layer of insulation
Having laid the second slab of the first layer and holding them, they laid a second 600x800 mm slab on them. And it was held in place by slats inserted into the gaps between the main and additional rafter boards. For holding the second layer, this is a fairly easy to implement solution.
Holding the second layer of insulation with slats I will dwell in detail on the process of fixing the slabs.
- 2x20 nails with large heads were driven along the rafters, not finishing 2-3 mm to the end. The nail installation pitch is approximately 300 mm. On adjacent rafters, nails were driven in offset by half a step.
- A thin, strong twine was tied to the bottom nail.
- The first slab of the third layer was laid.
- Gradually removing the slats holding the first two layers of slabs, we laced the slab of the third layer with twine through the nails and secured it to the outermost nail.
Lacing to hold the slabs in a suspended state The slabs of the first, second and third layers were laid sequentially and laced again. And so on until the very top of the opening. This technique made it possible to hold the slabs well in an inclined suspended position.
Then the nails for lacing were driven into the board up to the head, but the string was not removed . Now the surface of the third layer of insulation is ready for laying the fourth layer of insulation, which we had to lay in horizontal rows, overlapping the rafters.
Before laying the fourth layer of insulation To install and secure the last, fourth overlapping layer of insulation, we provided for fastening bars measuring 50x50 mm horizontally to the rafters along the entire length of the second floor . Marking the installation location of the second bar.
Marking the installation location of the second block. Attaching the block for marking the holes.
Fastening the block for marking holes. Fastening the last block.
Fastening the last block As a result, we obtained a surface with straight parallel bars fixed at a constant pitch.
Preparation, installation and fastening of the overlying layer of thermal insulation
- In the center of the bars from the outside, 1.5x20 nails were driven in increments of 300-400 mm, but not completely , but so that the heads protruded by 2-3 mm.
- On adjacent bars, the nails were driven with a half-step offset .
- They tied a string to the outermost nail of the block and, having carefully laid the slab flush with the block in the opening (it is 10 mm wider than the opening), they laced the opening with a “snake”.
- Having secured the twine, they laid the next slab horizontally, secured it with lacing, and so on.
- Then they moved to the next row, and so on until the very top. The top row is narrow, so after cutting the required width of the slab, we installed and secured it as usual.
Fourth layer lacing.
Lacing of the fourth layer All layers of insulation are laid and laced.
All layers of insulation are laid and laced
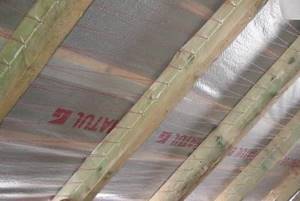
Membrane installation
, we proceeded to installing a vapor-tight membrane type B. The membrane was secured to the bars with a stapler and a 10.6x8 bracket. We measured the length - the distance between the outer edges of the second and upper bars - and cut off a sheet 30-40 mm longer from the roll. Fixing the upper part of the membrane The membrane sheet was attached as follows:
- First, the middle part of the membrane was shot towards the lower block.
- Then, slightly stretching the canvas, to the top, middle and other bars.
- Then, from the central (fixed) line to the right and left, diagonally up and down, sections of the membrane were stretched, straightened and attached to the bars (this is how wallpaper is straightened when sticking to a wall).
- Next, the sagging areas were additionally attached, wrinkles were removed (if they appeared), and as a result we received an evenly stretched canvas, ready for clapboard covering.
Fixation of the lower part of the membrane.
Fixing the lower part of the membrane The first membrane is reinforced.
Fixing the first sheet of vapor-tight membrane
Climate
0 votes
+
Vote for!
—
Vote against!
The installation of a pitched roof is not just one of the most complex and labor-intensive processes in the construction of a private house, but also a very crucial moment. Indeed, in case of incorrect calculations or installation errors, the roof will have to be rebuilt. No less responsible and complex is the insulation of a pitched roof, designed to ensure optimal temperature conditions in the attic, attic and throughout the house. Errors in the installation of thermal insulation material can lead to it becoming wet, no longer performing its functions, and, as a result, wooden roof structures to rot. There will be nothing left but to completely make a new roof. To avoid such sad consequences, you need to know several important rules for insulating pitched roofs and choose the right material for insulation.
- How to choose insulation for a pitched roof
- Roof insulation using Ursa Pitched roof
- Insulation URSA Glasswool Pitched roof
- How to insulate a pitched roof with Ursa
- Insulation of a pitched roof with Penoplex
- Laying Penoplex on top of rafters
- Laying Penoplex under the rafters
- Laying Penoplex on the attic floor
- Insulation of a pitched roof with polystyrene foam
How to choose insulation for a pitched roof
The modern market is replete with a variety of thermal insulation materials, but each of them is good in its place. In order not to make a mistake when choosing insulation for a pitched roof, you need to pay attention to the following characteristics of the material:
- Low thermal conductivity coefficient, less than 0.05 W/m*K;
- Light weight so as not to overload the roof structure. To determine the weight, you should pay attention to the density of the material. For mineral wool insulation, 45 - 50 kg/m3 is sufficient, and for fiberglass 14 kg/m3.
- The material should not absorb moisture; it is ideal if it is waterproof. If, for example, cotton insulation gets wet, it will have to be completely replaced, since it will lose more than 60% of its properties.
- Resistance to temperature changes, severe frosts and numerous cycle changes. This directly affects the durability of the material.
- Environmental friendliness is also equally important. The material should not release foreign odors or substances into the space.
- Fire safety is one of the main requirements for insulation. It is desirable that the material is completely non-flammable and does not support combustion.
- Form stability for better fit to the roof structure, without the formation of cracks. Also, this property will protect against a situation where the material slides off the roof, exposing the upper part.
- Durability. Not everyone is excited by the idea of doing a major home renovation soon, so it is better to choose a thermal insulation material for a pitched roof that can last 50 years without changing its properties.
Almost all requirements are met by the following thermal insulation materials:
- Mineral wool based on basalt rocks : PAROC eXtra, ROCKWOOL Light BATTS, ROCKWOOL Light BATTS SCANDIC, ISOROC ISOLIGHT, TECHNOLIGHT Extra, TECHNO Rocklight.
- Fiberglass-based mineral wool : URSA Pitched roof, ISOVER Pitched roof, ISOVER Roll Frame-M40-TWIN-50, KNAUF Pitched roof Thermo Roll 037, KNAUF COTTAGE Thermo Roll-037, KNAUF COTTAGE Thermo Plate-037.
- Expanded polystyrene or simply polystyrene foam is good only for insulating attic non-residential premises by laying it on the floor and then filling it with a cement-sand mixture. Such precautions are due to the fact that the material is flammable and during the combustion process releases extremely toxic substances and droplets.
- Extruded polystyrene foam , for example, PENOPLEX material. This material is also used only in places where it will not have direct contact with fire.
- Polyurethane foam is a spray-type liquid insulation material.
Important! Although all cotton wool does not absorb moisture, it is well absorbed by the air enclosed between the wool fibers, so the installation of such materials requires additional protection against leaks and condensation in the form of a waterproofing film. Expanded polystyrene and extruded polystyrene foam are also optionally used for insulating pitched roofs, but this method is not recommended by experts.
Here we have listed only the most popular materials in modern construction. But also don’t forget about environmentally friendly natural materials: seaweed, linen roof insulation, straw, hemp and cork. Most of these materials are flammable, but both polystyrene foam and extruded polystyrene foam have a flammability class of G3-G4, however, they are quite often used to insulate pitched roofs. In the event of a fire, although natural materials will burn, they will not release toxic substances.
Below we will consider only the most popular options for insulating pitched roofs using different materials.
Roof insulation using Ursa Pitched roof
Recently, Ursa Pitched Roof insulation based on fiberglass has become increasingly popular for thermal insulation. This type of insulation is developed on the basis of the German URSA Spannfilz technology, but modified taking into account the climatic conditions of Russia and the construction technologies used here.
Insulation URSA Glasswool Pitched roof
Advantages of URSA Glasswool Pitched Roof Insulation:
- Increased elasticity allows the material to stay tightly in the space between the rafters, without sagging or forming cracks.
- Lightness of the material.
- Excellent sound insulation properties.
- Low thermal conductivity 0.036 W/m*K.
- The good flexibility of the material allows installation on complex architectural shapes, hard-to-reach places and uneven surfaces.
- Does not require additional fastening; installation “off-the-cuff” between the rafters is sufficient.
- In the packaging, the material is compressed 5 times, which greatly facilitates transportation. After unpacking, Ursa quickly takes its working form within 10 - 15 minutes.
- The material does not burn.
For Ursa Pitched Roof insulation, the price depends on the size of the mats and starts from 50 USD. for 1 m3. The thickness of the mat can be 150 mm and 200 mm. The most popular material is 150 mm thick; this is quite enough for insulating pitched roofs in many cases. More accurately, the required thickness of Ursa insulation can be calculated according to SNiP II-3-79, taking into account the climate zone in which the house is located. The width of the material is 1200 mm, and the length is from 3900 to 4200 mm. This is quite enough to lay the material between the rafters without gaps or joints.
How to insulate a pitched roof with Ursa
The main feature of installing glass wool-based insulation is the need to lay a waterproofing film to prevent leaks and condensation from entering the material, and a vapor barrier film to protect against steam rising from the living space.
Most often, this insulation is used when it is necessary to insulate the under-roof space of a pitched roof in order to make the attic space habitable.
To insulate the pitched roof of a private house using Ursa Pitched Roof insulation, you must do the following:
- Even before installing the roof, you should spread a waterproofing film on top of the rafters from the outside. The type of film is selected based on the design documentation of the house, taking into account the characteristics of the thermal insulation material, roofing material and vapor barrier film. The waterproofing film is laid across the slope with an overlap of at least 100 mm. The connection of the canvases is carried out using special self-adhesive tapes. The material is secured to the rafters with staplers or special galvanized nails with a wide flat head.
Important! Under no circumstances should roofing waterproofing material be laid in tension. Otherwise, with the onset of winter cold, the film may shrink and tear at the attachment points. Therefore, the canvases are laid with sagging, but not more than 2 cm per 1 m.
- A sheathing of wooden blocks, at least 25 mm thick, is placed on top of the waterproofing film. The thickness of the bars is selected depending on the size of the ventilation gap for sufficient ventilation of the under-roof space. The sheathing is also secured using corrosion-resistant screws. Holes in the bars are made in advance so as not to further injure the waterproofing film.
Important! In order to further protect the thermal insulation material from getting wet, the waterproofing film can be laid not directly on the rafters, but on the sheathing nailed to the rafters. A counter-lattice is mounted on top of the film, to which the roofing material is already attached. Thus, two ventilation gaps: between the insulation and the film, and between the film and the roof, provide maximum protection against condensation.
- Roofing material is laid on top of the sheathing. Most materials can be attached directly to the sheathing. And to install a soft roof, you should lay sheets of chipboard or moisture-resistant plywood on top of the sheathing, and then attach the roofing material to it.
- Thermal insulation material Ursa Pitched roof is laid from the inside of the roof into the space between the rafters. The material must be unpacked and allowed to rest for about 20 minutes so that it takes a working shape and straightens out. Then the insulation is cut into the required pieces so that the width of the sheet is 20 - 30 mm greater than the distance between the rafters. This will ensure that the material is secured “by surprise”. The material is pushed into the space between the rafters. To straighten the edges, you need to press on the middle of the canvas. The material will spring back and straighten.
Important! Ideally, the pitch of the rafter legs is selected taking into account the width of the insulation (1200 mm) that will be laid between them. This will greatly facilitate installation, and will also save time and money due to the fact that the material will not have to be cut lengthwise and there will be less scraps.
- A vapor barrier film is laid over the insulation from the inside of the room and secured directly to the rafters using staples.
- Next, the sheathing is installed from the inside of the attic or attic space, and finishing materials will be attached to it.
At this point, the roof insulation is ready. If the attic space is not planned to be residential, then this insulation technology is not suitable. The insulation must be laid on the floor of the attic, insulating the ceiling.
If you have purchased a finished house that does not have roof insulation, and do not want to remove the roofing, you can cheat a little to the detriment of the wooden roof structure. In a finished pitched roof, from the inside of the attic, a waterproofing film is laid on top of the rafters, carefully inserted into the space between the rafters, then the insulation and vapor barrier film are laid. In this case, the wooden rafters are not protected from leaks, but the insulation is protected.
Another method, of higher quality, as it provides sufficient ventilation of the under-roof space. The space between the rafters remains free; a waterproofing film is laid on top of them from inside the room. Suspensions for the plasterboard ceiling are attached to the rafters, insulation boards are installed in them, and a vapor barrier film is placed on top. To arrange the finishing, additional lathing will be required.
In conclusion, I would like to note that this technology for insulating a pitched roof is suitable for any mineral wool or glass wool insulation for a pitched roof.
Insulation of a pitched roof with Penoplex
Penoplex is a material based on extruded polystyrene foam, has exceptional strength, does not absorb water, and therefore does not require waterproofing. But at the same time, the material is flammable, so it is used extremely rarely in private residential construction. The main advantage of this material is that it is possible to provide a continuous thermal insulation surface without cold bridges.
Laying Penoplex on top of rafters
The most successful option for installing this heat-insulating material, if it is not possible to use another material, is used only for new construction. The thickness of Penoplex slabs ranges from 60 to 120 mm.
The sequence of work is as follows:
- After installing the rafter structure, a fixing strip with a thickness of at least the thickness of the heat-insulating material is laid below. It is necessary to ensure that the insulation boards do not slide off the roof.
- We lay out the Penoplex insulation boards in a checkerboard pattern, starting from the bottom of the fixing strip.
- We lay a vapor-permeable waterproofing film to protect the material from leaks and condensation.
- We install the sheathing on top from wooden blocks with a thickness of at least 40 mm. This is necessary for the ventilation gap. We secure the bars using self-tapping screws, but make the holes in advance so as not to accidentally split the Penoplex slabs.
- We install roofing material on the sheathing.
From the inside, Penoplex does not require any protection.
Laying Penoplex under the rafters
This method is used if the house has already been built and there is no desire or opportunity to remove the roofing material. Mineral wool insulation can be laid in the space between the rafters, and Penoplex slabs can be laid on top of the rafters and secured with lathing nailed from below from the inside of the room. Installation of additional thermal insulation with Penoplex slabs will provide a continuous surface without cold bridges in the form of wooden rafters.
Laying Penoplex on the attic floor
This method is used if the attic space is not planned to be made residential. The slabs are laid on the floor between floors. In this case, the surface must be flat. For leveling, use plywood slabs or cement-sand screed. It is also necessary to pour a 40 mm thick screed on top of the insulation slabs.
Insulation of a pitched roof with polystyrene foam
Expanded polystyrene is a fairly cheap material, so many are tempted by the opportunity to thermally insulate a pitched roof with it. In fact, this is not the best option for several reasons:
- Polystyrene foam is an inflexible material. It is inconvenient to work with, cut and lay.
- The material burns and releases toxic substances.
Expanded polystyrene can be laid both in the space between the rafters and below under the rafters. When installed in the space between the rafters, many cracks are formed that need to be sealed. Installation of insulation under the rafters is carried out using the same technology as the installation of Penoplex. Next, it must be hidden with finishing, since polystyrene foam is afraid of sunlight.
In conclusion, I would like to clarify that if you plan to insulate a pitched roof yourself, be sure to consult with a specialist first about the material, its thickness and installation method in your particular case. Ideally, it is better to first create an insulation project.
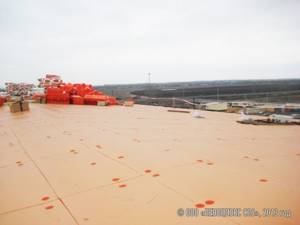
Do-it-yourself insulation of a flat roof
External insulation of a flat roof includes the installation of a vapor barrier layer, laying thermal insulation, waterproofing, and then a roll covering. The final layer is the laying of bulk material.
Before starting work, you need to clean the roof surface from debris, dust, and level it. Then install a vapor barrier as described above. After this, glue the insulation boards using cold mastic or special glue. The slabs are laid with a semi-overlapping seam, which ensures uniformity of the coating. It is permissible to lay several layers of slabs staggered and glue them with tape. This method of installation will prevent the occurrence of cold bridges.
Next, waterproofing is laid. The fire method of gluing a waterproofing carpet is often used: a cement-sand screed is laid on the slabs in a layer of at least 3 cm. After laying it, you need to wait until the concrete gains the necessary strength, then clean the surface from sagging and dirt. The waterproofing layer is glued using short-term exposure to fire. The gluing method is described in great detail on the packaging of the material. As a result of exposure to fire, the insulation does not lose its properties. After this, a rolled roof covering is laid and expanded clay or other similar material is poured.
Flat roof: how and how to insulate it
A roof with a slope of up to 12 degrees is considered flat. Covering it is the easiest way - you don’t have to bother with additional elements and tricky things with the sheathing. It can be either unexploited or exploited. In the latter case, the roof is equipped with a rigid and durable base - after all, it takes on considerable loads.
When choosing insulation for a flat roof, you first need to decide whether it will be used. If this is the case, then we take a heat insulator with high moisture resistance and a load limit of up to 250 kilograms per square meter. For a roof that is not in use, the load limit may be lower, but the requirement for moisture resistance must be observed. As a rule, a flat roof is insulated with polystyrene foam (ordinary or extruded type); less often, basalt fiber mats are used for these purposes.
Insulation of a flat roof with slabs of extruded polystyrene foam.
An example of insulating a flat roof with basalt wool mats.
Expanded polystyrene weighs little and is somewhat cheaper. It is also easy to process, and you don’t even need a special tool. Expanded polystyrene retains heat simply remarkably, since almost all of it consists of air. Among the disadvantages of this insulation, flammability should be noted. Therefore, on a flat roof, on top of this heat insulator, non-combustible protection is applied in the form of a sand-cement screed.
Read more: Expanded polystyrene - characteristics and selection criteria
Popular brands of insulation for flat roofs
We found out above that it is best to use expanded polystyrene boards for insulating a flat roof; now we will consider the most popular manufacturers producing various types of insulation based on expanded polystyrene.
#1. Penoplex Roofing.
The older name of the insulation is PENOPLEX 35. Manufactured by a Russian company of the same name, it is nothing more than extruded polystyrene foam. It is produced in the form of slabs with a thickness of 2 to 10 centimeters, measuring 0.6 by 1.2 meters. And the density of this roof insulation is 28-33 kilograms per cubic meter.
See more about Penoplex Roof insulation
#2. EPPS TechnoNIKOL.
And again the products of the Russian company - TechnoNIKOL. Extruded polystyrene foam, produced under this brand, has several varieties. The following are applicable for roof insulation.
- XPS TECHNONICOL CARBON ECO – suitable for the roof of a low-rise building or a country mansion.
- XPS TECHNONICOL CARBON ECO DRAIN – differs from the previous material by the presence of drainage grooves on the slabs. They help ventilate a flat roof.
- CARBON PROF is an especially durable polystyrene foam. Excellent for roofs of high-rise buildings, shops and warehouses. This rigid roof insulation can withstand enormous loads.
- CARBON PROF SLOPE is as strong as the previous material, but has a special “trick”. It is a set of five slabs with different surface inclinations. With their help, a slope is made on a flat roof.
More information about these insulation materials: Extruded polystyrene foam TechnoNIKOL
#3. Expanded polystyrene brand URSA XPS.
The manufacturer (the international holding URALITA) guarantees excellent quality to this insulation. The flame retardants included in its composition help to increase fire resistance. This material is good for an inverted roof. Its slabs have a cutout on the side, ensuring perfect joining and no gaps.
For more details, see: Expanded polystyrene insulation URSA XPS
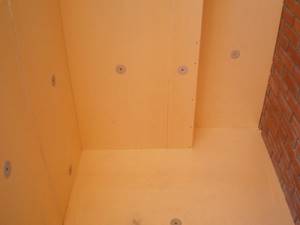
Insulating a flat roof from the inside
There are times when it is necessary to insulate the roof from the inside. The most acceptable way of internal insulation of a flat roof is from the ceiling.
The main thing is to choose a fire-resistant material. The thermal insulation process is not difficult, but the placement of lighting fixtures will need to be redesigned.
What material to choose for insulating a flat roof from the inside
For this method of thermal insulation, fire-resistant polystyrene foam boards such as PSB-S-25 or PSB-S-35, with a thickness of 25 mm, are suitable. They meet all fire safety requirements.
Stages of work
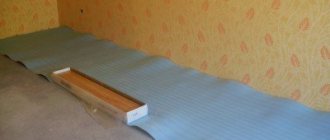
First, strips made of soft wood must be screwed to the ceiling every 40 cm. The first is attached along one of the walls, which is perpendicular to the beams of the supporting structure. The second is mounted along the opposite wall. After this, glue the expanded polystyrene slab flush to the first plank, using special glue or mastic. Then the next plank is screwed in the same way and the second heat-insulating board is glued, etc. The laying of planks and heat-insulating boards is alternated. When the insulation layer is completely laid out, a plastic film is attached to the entire ceiling area. Decorative panels are then nailed to the slats. Galvanized nails are suitable for fastening.
How to lay insulation ↑
- Placing rigid roof insulation on a flat roof begins from the low area of the roof, more precisely from its corner. If for some reason the slope of the structure was not observed during construction work, then you need to start from the installation sites of the gutter or water intake funnels.
- Thermal insulation boards are placed on the profiled sheets in such a way that the corrugations and their long sides are mutually perpendicular. In this case, fastening can be done through different ridges.
- Plates in multilayer thermal insulation are arranged according to the principle of brickwork, that is, the seams are staggered. In addition, the seam lines and crosshairs in the upper tier cannot coincide with those in the lower row.
Below is one of the options for cutting and laying insulation.
Mounting options
To fix the insulation layer on a flat roof, the following methods are used:
- Fastening is done using so-called telescopic fasteners. They consist of a flange with a smooth outer surface and a tubular rod. The various standard sizes of disc dowels available on the market allow you to fasten roofing pies of various thicknesses.
- Anchors are driven into concrete floors and secured to the screed with screws with plastic sleeves.
- To calculate the required number of fasteners for an insulated flat roof, the default condition is taken as a basis: two units of fasteners for each slab.
- For concrete roofs, the coating and insulation are fixed simultaneously. If the base is made using profiled sheets, separately.
- In certain areas (roof penetrations, lines connecting to vertical planes, etc.), the installation step of fasteners is reduced.
- All layers of the roofing cake, including thermal insulation, are glued to hot mastic, most often bitumen-polymer. The insulation must be glued evenly. In this case, the total area of contact between the heat-insulating material and the base must exceed one third of it.
- If the roofing pie is completed with bitumen or bitumen-polymer material, then the installation of the roofing system cannot be carried out during the rainy period, since excess moisture will accumulate in the insulation without the ability to escape outside. But when using a roofing membrane as a finishing coating, you can glue it throughout the year, since the membrane allows excess moisture accumulated in the insulation to pass through.
ballastnie-krishi-1 ballastnie-krishi-2
Ballast.
The insulation is laid on a flat roof and covered with a waterproofing carpet. A mixture of gravel and pebbles is poured over the waterproofing layer or paving slabs are laid on plastic supports. The components of the roofing pie lie freely. The pie is fixed exclusively around the perimeter, as well as around the roof penetrations.
Green roofs are also classified as ballast roofs. Although it should be noted that the roof with landscaping is inverse, so the order of the layers of the roofing cake differs from the traditional one. The insulation is laid on top of the waterproofing, which simultaneously functions as a vapor barrier. The thermal insulation layer is covered with a geodrainage polymer membrane, on which a soil-vegetative layer is arranged.
Installation of thermal insulation from the inside
Installing insulation slabs from the inside of a building with a flat roof is physically not very convenient, but practical. After all, installation can be carried out in almost any weather. And there is no need to rush to complete the work in a day, because the insulation does not get wet.
The algorithm for installing thermal insulation is as follows:
- Along the line where the ceiling meets the wall, a plank of wooden block is screwed in, the thickness of which on one or both sides is equal to the thickness of the insulation.
- The same bar is attached on the opposite side.
- We screw a block, both or one of the sides of which is equal to the thickness of the insulation board, along the line where the ceiling and wall join.
- We install a similar bar made from a bar on the opposite wall.
- Rigid polystyrene foam boards are perfect for internal insulation.
- The ceiling is conventionally divided into strips.
- The polystyrene foam board is glued to the ceiling and plank using bitumen mastic and pressed tightly. The marked strip is completely filled with polystyrene foam. If necessary, the outer slabs are trimmed.
- On the side of the completed strip of polystyrene foam boards, pressing tightly, another strip is screwed.
- Next, the insulation strip is formed and glued again.
- Alternating these two operations: screwing the bars and gluing the thermal insulation, fill the ceiling plane.
- Fixing them with a stapler, a plastic film is attached to the planks and the ceiling is finished with some convenient covering material, for example, plasterboard.
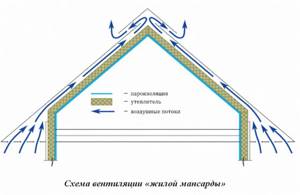
How to properly ventilate a roof
- The area of exhaust and supply openings must be determined taking into account certain parameters, which include the volume and concentration of removed vapors, etc., which in practice is not always possible to do. Therefore, they usually use existing empirical findings. 2. The height of the ventilation gap between the base of the roof and the insulation must be at least 5 cm. It directly depends on the length and angle of inclination of the roof slopes. 3. The flow of air is organized both along the entire eaves and in local places - with the help of ventilation grilles that cut into the lining of the eaves overhang.
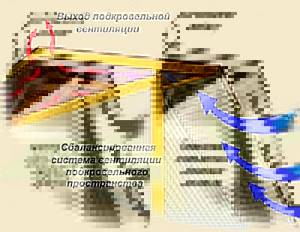
4. The total area of exhaust ventilation openings installed only at the highest point of the roof must be no less than the area of the supply openings for each slope. Exhaust devices are ventilation hoods for hipped roofs, ventilation ridges, roof aerators, etc. You can use both ready-made (store-bought) devices and those made by yourself.
Glass wool
This thermal insulation material topped the rating some 20-30 years ago, but it should not be discounted. In terms of its properties and technical characteristics, glass wool is close to mineral wool. Such products are produced in the form of slabs or rolls, they are obtained from molten glass, hence the name.
This type of insulation has good soundproofing properties, does not burn, and is absolutely safe for human health. Among the many advantages, there is one drawback: when working with such thermal insulation, it is necessary to use safety glasses, rubber gloves, and hermetic clothing.
Thickness of the mineral wool layer and its protection against steam
Different climates will require their own thickness of insulation. Without going into details of choosing the optimal thickness of insulation according to the standards, we can say that for warm regions 20 cm of mineral wool will be enough to insulate a pitched roof. Temperate climate - 25 cm, slightly to the north - 30 cm, cold climate - 35 cm.
On the room side, the layer of mineral wool in the pitched roof must be protected by a reliable vapor barrier. A polypropylene membrane (film) is used, which is attached to the rafters from their underside. Polyethylene is less strong and durable.
A vapor diffusion membrane is placed on top of the insulation layer - a special material that retains water, but easily allows steam to pass through (vapour permeability is more than 1000 g/mkv day). Actually, it is a dense material, but with the smallest perforation.
In addition to protecting against water penetration from the roof, the diffuse membrane protects the environment from the spread of mineral wool fibers.
Which insulation to choose for an attic roof?
The peculiarities of climatic conditions in Russia constantly surprise or frighten. But they always leave the question of which insulation to choose for an attic roof, which is very popular, because... the cost of dismantling a soft roof due to incorrectly chosen insulation is an additional expense. The attic is the room that is located directly under the roof. The roof is the place that comes into contact with the external environment with its entire surface. In winter, when the temperature difference between the air and the heated building is very large, the heat flow rises from the living quarters to the roof.
The main task of the attic is to stop the escape of heat and ensure waterproofing of the building. In order to accomplish this, it is necessary to use special materials that will not allow heat to escape from the room. To retain heat, you will need insulation, and in order for the roof to retain water, you need waterproofing. For waterproofing, it is better to choose a PVC membrane sheet; the cost of work on a membrane roof will include the installation of insulation.
In order to choose the right insulation specifically for the attic, you need to determine what the basic requirements should be for the heat-insulating material. For example, will chimneys pass through the insulation? Then the main indicator of insulation should be the fire safety indicator. In this case, it is better to use basalt insulation, which has a high level of fire resistance.
Important indicators that you need to pay attention to when choosing insulation for the attic should be:
- versatility;
- sound insulation;
- ease of installation;
- long service life;
- water-repellent properties;
- ability to retain heat.
The last indicator is the main one, because This is the immediate task of the insulation. If the insulation is marked “universal”, then such insulation is suitable for insulating walls, floors, ceilings, and not just roofs.
The sound insulation indicator is important; if the roofing material is metal, then sound insulation is necessary because even the sound of raindrops will be very audible. The membrane roofing, which has high waterproofing properties, will help protect from water after rain.
When choosing sound insulation for an attic, you need to know what material the supporting structures are made of. If the structure is made of flammable materials, then it is better to use fireproof insulation. The next important indicator is water resistance. We choose insulation that has a low level of moisture absorption, this will avoid having to repair the soft roof frequently.
The need for additional sheathing
There should be a ventilation gap of 3 cm thick or more between the roof waterproofing and the diffusion membrane. Naturally, the required thickness of mineral wool with vent. the gap cannot fit between the rafters. Therefore, counter-battens are made - additional beams are packed, lying both across and along the rafters.
How best and most cost-effectively to make a counter-lattice in each specific case must be decided on the spot. If the roof covering has already been laid, it may be more profitable to carry out all the work from the inside, with the creation of a high internal counter-lattice, despite the significant reduction in the under-roof space.
Types of roofing and insulation for them
When choosing a material for insulating the roof of a house, the difference between the three types of roofing structures is important:
- Flat roof;
- Pitched roof (cold attic);
- Mansard roof (floor).
Each of the three types of roofs requires its own approach in choosing insulating materials.
A flat roof is most often used, which means that the thermal insulation of the roof must be rigid. For these purposes, extruded polystyrene foam is most often used, for example, penoplex or rigid mineral wool insulation. Typically, each manufacturer has special solutions for this type of roofing. Slabs with cuts allow you to create the desired slope and special gutters for discharging water. It is enough to lay such a layer of insulation correctly and the roof can be considered insulated.
You can insulate a pitched roof with a cold attic along the floor. However, in some cases, insulation is also inserted between the rafters. For these purposes, soft and elastic mineral wool slabs are most often used, which are inserted into the spacer. The attic floor is insulated with various materials, both sheet, bulk and sprayed.
An attic roof is essentially the walls of a room, but they are made not of concrete or brick, but of rafters and, for example, tiles. This design is more expensive than a separate, ordinary floor. Roof insulation for an attic roof must be environmentally friendly, because, in essence, we are talking about insulating the room from the inside. There are also increased fire safety requirements. In a separate article, we examined in detail the issue of using polystyrene foam in insulated attic roofs. Most often, such roofs are insulated with mineral wool.
Bar sizes and design
In most cases, the height of the rafters is 15 - 17 cm, therefore: on top of the rafters (above the diffuse membrane) a beam 3 - 5 cm thick is stuffed, which forms the vent. gap. The necessary sheathing, waterproofing and roofing are attached to the timber.
A transverse beam 8-10 cm thick is nailed to the rafters from below, between which an additional layer of mineral wool is placed to cover the rafters themselves. A vapor barrier is attached to this sheathing on top, which is pressed against the interior finishing of the attic.
Rafters are significant bridges of cold. When insulating pitched roofs, it is in any case recommended to cover them with an additional layer of insulation.
There are options for shifting the thickness of the additional sheathing inward or outward, depending on the design of the house and the desires of the owners (design decisions).
It is unacceptable to reduce the thickness of the insulation; this will affect comfort and the cost of heating and air conditioning. With a reduced layer, thermal insulation will lose its economic feasibility.
Installation - arrangement options ↑
Insulation of an unheated attic ↑
The simplest type of roof insulation device is thermal insulation of an unheated attic, since insulation of roof slopes is irrational. The most reasonable thing in this case is to insulate the attic floor. Structurally, it is performed as follows:
- by attaching a vapor barrier to the joists with an overlap from below, they create an obstacle to moving steam;
- insulation is placed between the joists;
- so that you can move on the thermal insulation, it is either covered with a continuous flooring, or “paths” are laid from boards.
Thermal insulation must be constantly dried, so ventilation holes are provided in the gables, and waterproofing is installed under the roofing material to protect against possible leaks.
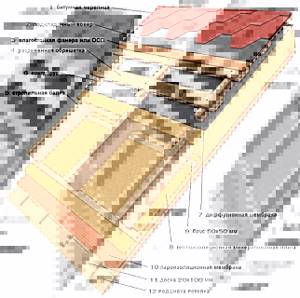
Insulation of a warm pitched roof ↑
Thermal insulation of a used attic or residential attic is somewhat more complicated. The insulation design, which also includes thermal insulation of slopes, is as follows:
Vapor barrier
Necessary to minimize the penetration of vapors from residential premises into the thermal insulation. The vapor barrier film consists of several layers of polyethylene in several layers and a reinforcing grid made of polyethylene or polypropylene. Fastening is carried out either using a stapler or strips.
It is important to always glue the joints with construction butyl tape.
When installing a vapor barrier, special attention is required to the junction units. They are also glued with butyl tape
Roof insulation
The space between the rafters is filled with insulation of the calculated thickness.
The calculations take into account the thermal conductivity coefficient and operating conditions of the pitched roof. Quite often, mineral wool acts as insulation (density - 30-50 kg/cube
m) and staple fiberglass. For additional fastening of fibrous materials, stretchers made of fishing line or rope are also used. If the height of the rafters is not enough to lay insulation of the required thickness, it is increased by adding timber to the rafters.
We advise you to study - Technical characteristics of waterproofing agent of its brand and scope of application
Waterproofing insulation
The main function of this layer is protective: firstly, against leaks of the roof covering, and secondly, against condensation that forms on some of its types. For waterproofing use:
- a hydrobarrier made similarly to a vapor barrier made of PE layers with a reinforcing lattice, with the difference that to remove steam, it has additional micro-perforations and cone-shaped punctures. During installation, a gap of several centimeters is maintained between the thermal insulation and the hydrobarrier.
- a superdiffusion membrane, the vapor permeability of which is very high compared to a film hydrobarrier. It is laid without any gaps directly on the heat-insulating layer.
Ventilated gap
An air gap must be provided above the waterproofing layer for ventilation, through which steam that escapes from the insulation through the waterproofing is removed. The vents are located on the roof eaves and ridge.
Substructure for roof covering
As a rule, laying the roofing requires the installation of sheathing - solid or lattice with a certain pitch.
Roof covering
Roofing material is selected according to the requirements of operating conditions.
2020 stylekrov.ru
- Safety
- Types of roofs Mansard
- Flat
- Pitched
- Glass
- Keramoplast
- Types of jobs
- Mauerlat
- Flexible
- Hydro- and vapor barrier
- Ventilation
Preparation of rafters and ventilation. gap
Let us dwell on the main issues of installation and insulation of pitched roofs.
The rafter system and counter-lattice beams must be treated with compounds against biological damage. If such treatment has not been carried out in advance, it must be carried out directly on the roof.
The windows are cut into the roof between the rafters using a special technology. Installation of windows in pitched roofs is carried out by specialists from the selling organization. It is important to ensure a tight connection between the perimeter of the frame and the diffuse membrane and insulation. The air must be able to flow around the windows and move through the ventilation gaps.
A vapor diffusion membrane is laid on top of the rafters. The individual overlapping strips are secured with tape (across the rafters). The membrane is pressed against the ventilation bars. gaps, which are nailed in increments of 30 cm, layers of the roof itself are mounted on top.
How to insulate a soft roof?
Regardless of the type of roof (flat or pitched), it is preferable to insulate a soft roof with basalt wool. Its distinctive property is non-flammability.
This is important because:
- in the private sector wooden buildings predominate;
- the rafter system of a pitched roof is usually wooden;
- Most roll coverings for flat roofs are either fused or laid on heated bitumen.
Expanded polystyrene insulation for roofs is not the best option: all types of EPS are flammable to one degree or another and emit toxic substances when burned. Also, complete insulation with this material is impossible!
The downside of mineral wool is its hygroscopicity. But if you use an absolutely sealed bitumen coating and install full ventilation to remove condensate, this drawback will not appear.
The advantages of basalt insulation for soft roofs include affordable price and ease of installation.
Placement of insulation boards
The ventilation gap must be open at the bottom and top so that air can move through it freely. Therefore, under the ridge, a gap of at least 5 cm wide is made in the waterproofing for air to escape.
The mineral wool material is inserted between the rafters exclusively at random; it should be 1 - 2 cm wider than the space. Gaps are not allowed, since in this place there will be a blowing of the layer with a large heat leak - convection air movement.
All work with mineral wool must be carried out using personal protective equipment. Goggles, a respirator, long gloves and thick clothing are required. To prevent pieces and harmful mineral wool fibers from clogging the building, the floors at the work site are covered with plastic film, which can be easily removed along with the scraps. The transverse counter-lattice bars are fastened with screws along the lower edges of the rafters. The distance between them is chosen according to the step of fastening the interior finishing, but usually at the centers - 600 mm, which also corresponds to the dense laying of the mineral wool layer.
The vapor barrier is applied in strips and secured with staplers to the wooden beams. The individual strips are overlapped by 15 cm and carefully secured with tape. The junctions of the vapor barrier with metal structures are sealed with tape. An airtight shell of mineral wool is created on the room side.
On top of the vapor barrier, the finishing elements of the attic are attached to the transverse bars. Typically, gypsum plaster sheets are used under a pitched roof, followed by puttying, painting, or wallpaper.
Step-by-step instructions for thermal insulation with mineral wool from the inside
Before starting work, prepare a workplace; it must have a table for cutting insulation with dimensions of at least 1.5 x 1.2 m and places for storing waste. It is best to prepare 50 liter bags for collecting waste.
Step-by-step instructions for insulating a pitched roof with your own hands:
First, thermal insulation mats are laid across the width, taking into account the distance between the rafters and the thickness of the boards, while the thickness of the thermal insulation should be 1 cm greater than the rafter pitch.- If a waterproofing film is not installed after the roofing material, install it in such a way that it envelops the rafters.
- Fix the waterproofing with a regular stapler; laying should be done with an overlap of at least 100 mm.
- The lower ends of the waterproofing film are brought out under a bevel to organize the drainage of collected liquid.
- There must be a ventilation gap between the insulation and the waterproof membrane using a fixing lathing.
- Mineral wool is fastened due to the fact that slightly larger slabs are installed in spacers in the cells of the rafter system.
- In this case, when the thickness of the insulating board is less than the calculated value, it is laid in two layers, and the joints are shifted in a checkerboard pattern.
- After this, they begin to install the vapor barrier, also with a ventilation gap of 2 cm.
- It is very important to securely secure the vapor barrier layer in the area where the chimney intersects with the structure. The protection of mineral wool from atmospheric moisture will depend on this.
- The vapor barrier is laid with an overlap of at least 100 mm and secured with lathing, which also serves as the basis for creating a new ventilation gap and installing a finishing layer.
- Chipboard panels, plasterboard or natural/plastic lining can be used as finishing.
- Depending on the selected layer of finishing material, the final finish is chosen in the form of painting or wallpapering. When installing the lining, subsequent finishing is not required.
Final
It is possible to insulate the pitched roof yourself, in addition to installing windows. In this case, there will likely be fewer errors than if the work was carried out by hired specialists. When insulating a pitched roof, the presence of cracks in the layers of vapor barrier, insulation, and wind protection is not allowed. Because If water accumulates in the insulation layer, there will be a risk of rapid failure of the rafters.
At the slightest sign of moisture in the attic, it is necessary to find out the cause of what happened - perhaps there is leakage from the roof, or the ventilation is not working. gap, vapor barrier is broken. Violations must be corrected as soon as possible, avoiding extensive wetting of the insulation.
Which is the best insulation for a roof?
Many owners of suburban real estate do not know the best way to insulate the roof of a house, however, each type of thermal insulation material has its own cost, installation features and technical characteristics. When installing rafters to match the dimensions of the roof insulation, installation is simplified, so many building owners carry out insulation work with their own hands. In other cases, the use of special equipment is necessary, so the installation of thermal insulation must be carried out by specially trained workers.