Vadim
24106 1 30
Vadim September 1, 2016
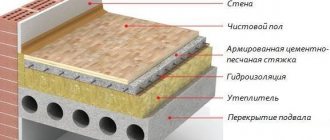
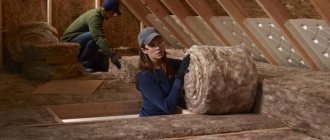
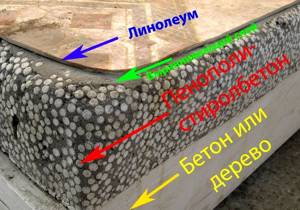
Among the variety of floor coverings, linoleum occupies a special place. Despite the tough competition, this convenient material confidently holds one of the leading places. But compared to its competitors, the coating itself is quite cold and in most cases it is necessary to install additional insulation under the linoleum. In this article I will talk about what insulation materials exist and how to install them correctly with your own hands.
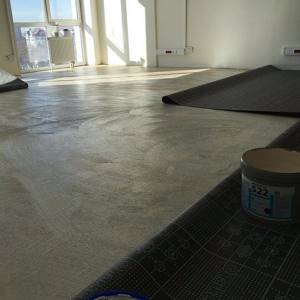
Soft backing for linoleum.
Which floor insulation for linoleum to choose and how to install it
Linoleum is the most commonly used flooring. It has gained such popularity due to its remarkable qualities, such as strength, long service life, ease of installation, and a large selection of colors. Despite all these advantages, it has one significant drawback: the material itself is not warm and if the base for the floor is concrete, the floor will be very cold. Therefore, insulation for the floor under linoleum is necessary.
Insulation technology
You can insulate the floor using the selected substrate yourself by studying the installation procedure.
concrete floor
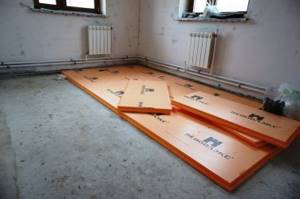
It is preferable to lay polystyrene insulation and plywood on a concrete floor.
Polystyrene insulation for concrete floors under linoleum
Laying the polystyrene foam backing is done as follows:
- The surface must be cleaned of dirt, debris removed, and any large protrusions knocked down.
- Place a layer of sand or expanded clay no more than 15 cm thick on the concrete, depending on the height of the ceiling in the room. Smooth out well.
- Lay slabs of polystyrene foam, penoplex, penofol. You can secure them together with construction foil tape.
- Install beacons to ensure even filling.
- Prepare a self-leveling concrete mixture for the screed.
- Fill the screed with a layer of 5-8 cm.
- Leave to dry for three days.
- After final hardening of the surface, it is necessary to evaluate its quality and remove possible irregularities.
- Lay linoleum.
When laying baseless linoleum, the floor will be hard, so it is better to choose a coating with a natural jute or foam base. It is better in quality and wear resistance.
The technology for laying the plywood backing will be different. Sequence of work:
- Wooden logs are laid on a concrete base at a distance of 300-600 mm from each other. The thickness of the timber is about 4 cm. They are attached to the base with dowels.
- Lay a layer of ecowool, mineral or basalt wool between the joists. They can be replaced with expanded clay and foam chips. Or cut polystyrene foam to size.
- You need to lay waterproofing material on top.
- Prepare the plywood by sawing it into squares or rectangles.
- Lay out the sheets with a small gap between them and up to the wall.
- Secure flush with self-tapping screws.
- The caps of fasteners and cracks are sealed with putty.
- After the putty has dried, linoleum is applied.
Wooden floor
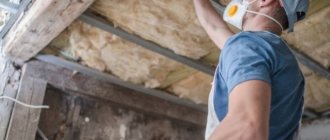
Laying thermal insulation on a wooden floor or old parquet requires special preparation. First you need to mark the unevenness of the floor with a marker. These areas will need to be smoothed using a sander. Old boards need to be strengthened: punched with nails or fastened with self-tapping screws as often as possible. In this way, the creaking of the old floor is eliminated, and the boards are additionally connected to the joists. The fastener caps need to be recessed by 5-7 mm and puttied. Next, installation work is carried out in the following order:
- Lay sheets of insulation made from wood chips or natural materials on a layer of PVA glue.
- Glue the gaps with construction tape (if a natural substrate is used) or cover them with putty.
- If an environmentally friendly material is chosen, then you can immediately lay linoleum by welding its joints.
- When choosing wood insulation, it will need to be oiled. The decorative coating can be applied after the drying oil layer has dried.
Some owners choose a more difficult path - removing old boards. Then the procedure becomes more complicated and is similar to laying it on a concrete base. It is necessary to remove the old covering only if there is severe subsidence, rotting or broken boards. But in this case they can be partially replaced. You can try to knock down dried floors and place additional slats in the gaps.
To level and eliminate cracks, the method of tightening with gauze followed by painting is used. This option takes a long time to implement and is not practical.
When laying insulation on a wooden base, you need to remember that the height of the room will decrease and choose an option in accordance with the permissible minimum distance from floor to ceiling.
In total there are more than 200 products in the catalog
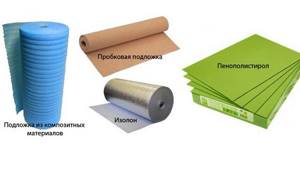
Selection of insulation material
They consist of components of natural and artificial origin. Even when purchasing linoleum with insulation, when laying it on a concrete floor, in most cases it is necessary to additionally place a suitable substrate. Foam plastic (expanded polystyrene) is a good option as an insulation material, and its improved analogues, for example, penoplex and extruded polystyrene foam, have recently appeared on the market. They are great for further installation of linoleum on an uneven base.
Among modern solutions, we can highlight liquid thermal insulation, which not only acts as an insulating material, but also provides protection against corrosion of elements made of metal. It has a long service life, does not emit components harmful to health and eliminates the formation of condensation on the surface. Liquid thermal insulation is an excellent option for insulating the flooring in a children's room.
Also, heated floors are becoming more and more in demand, which makes it possible to create a favorable environment in the room with an optimal temperature. During its operation, low-quality linoleum can undergo deformation or become soft, which usually does not happen with high-quality linoleum. It is best to choose natural or vinyl material with a foam base for heated floors.
When selecting a substrate, it is also necessary to take into account its thickness, since if it is more than 0.5 cm, the height of the floor will noticeably increase, which can become an obstacle when opening doors.
Installation of a "warm floor" system
Another type of insulation of a concrete floor under linoleum is the installation of a heated floor system. It includes the laying of heating elements.
Classification of “warm floors”:
- film based on infrared heaters;
- thermomats with heating function:
- water;
- based on electrical cables.
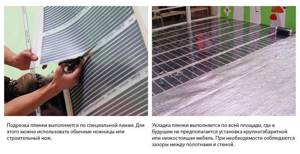
For linoleum coverings, it is recommended to use infrared heated floors. The material will not take up much space because it is film. This type of heated floor cannot be laid directly under linoleum. It is necessary to create a layer. Plywood or other similar sheet material is placed on the surface of the heated floor, and the trim is placed on top of it. With a properly installed insulation system, such a warm floor can actively maintain a comfortable temperature in your home.
Linoleum structure
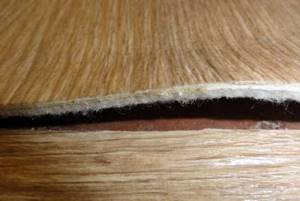
In addition, the structure of the material can be of several types:
- Linoleum without base. Such a coating can have a thickness of no more than 2 mm and its price is minimal. The pattern runs through the entire thickness, so abrasion will not affect the aesthetic properties of the coating. This type lasts up to 5-7 years. Very capricious in terms of surface preparation.
- Linoleum based. This 5-6 mm coating is quite elastic, easy to install and does not require particularly careful surface preparation. Has some thermal insulation properties. The basis can be foamed polyvinyl chloride compounds, jute, polyester or felt.
- Heat and sound insulating linoleum. A pre-installed material most suitable for cold concrete and wood floors. The most expensive type of material. The lining is made of a special heat insulator, which we will discuss below.
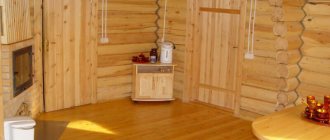
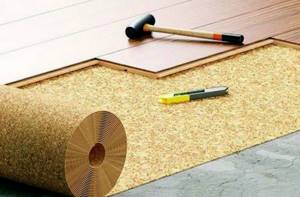
This is an environmentally friendly, warm, lightweight, practical and moisture-repellent material. An accessible installation method and attractive performance characteristics are the main advantages of cork.
It can be laid directly on a concrete base. However, some are confused by the high price of the material.
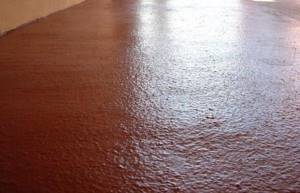
Several layers of heat-insulating paint will allow you to satisfactorily insulate a concrete floor
Popular types of substrates with thermal insulation properties
When starting to select insulation, it is necessary to take into account that the main selection criterion should be the material of the floor to be insulated. It can be either concrete or wood. You need to study the list of suitable materials that are best combined with the main floor material, find out the nuances of installing the substrate, and familiarize yourself with the list of advantages and disadvantages.
Fiberboard and plywood
The use of fiberboard or plywood sheets for floor insulation is one of the most cost-effective ways to insulate a floor. In addition, installing this type of coating will allow you to make the surface more even. Sheets of the selected material must be laid on the floor, marked according to the required dimensions and cut by sawing.
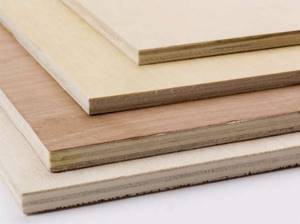
To attach to the concrete surface, you will need to use dowels, to wood - the same, plus self-tapping screws.
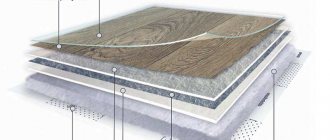
Multilayer linoleum
This type of linoleum is called warm. This coating is distinguished by the presence of a heat-insulating substrate consisting of jute fibers or felt. By choosing such linoleum, you will get rid of the need to install an additional insulating layer and reduce the amount of costs. The insulated surface must be smooth and free of noticeable flaws and level differences. The material is convenient and recommended for use in dwellings located on the upper floors of apartment buildings.
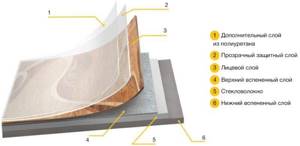
Advantages: The material has several layers and can simultaneously serve as a heat insulator and finishing coating. It is easy to install and can be laid without the use of glue. The coating is warm, soft, and comfortable to walk on.
How to lay linoleum on a concrete floor
When the base or rough coating is ready, you can begin the flooring. It’s not difficult to do this yourself, the main thing is to follow the rules.
The temperature in the room should not be less than 15 degrees with a relative humidity of at least 30% and not more than 60%. Otherwise, waves and swelling may appear.
Before laying the product on a concrete floor, allow it to “rest” in a straightened form for a couple of days so that the canvas is leveled. There are several types of laying linoleum: the simplest - without the use of adhesives, with double-sided tape, with mastic or glue. The choice of method depends, first of all, on the room itself.
Let's look at each method in more detail.
Simple flooring
To work you will need scissors, a knife, a ruler and a simple pencil. After the linoleum has “rested”, it is cut off along the perimeter of the room. And then the plinth is installed. The main danger of this method is that subsequently, under the influence of loads, including furniture, the flooring may become deformed.
The process is shown in more detail in the video:
Using adhesive
After the linoleum has been leveled, you can begin flooring.
First stage
- First you need to cut the material around the perimeter of the room, not missing entrances, pipes and spaces under windows. On the first adjustment, you can leave allowances of about 5 cm.
- Next, the allowances are reduced to 10 mm. They start with the outer corners, then work with the inner ones, the last work is cutting out the pipes.
- After adjusting the coating, give it more time to straighten and settle. For household linoleum, one or two days are enough.

Second phase
At this stage you need to prepare the glue. It is applied to the base with a metal notched trowel, and mastic is applied using a plastic tool.
- Linoleum is glued in small parts. The adhesion time of the glue to the surface should be indicated on the packaging of the product.
- While the glue is still plastic, you need to “expel” the air in the direction from the center to the edges. If there is no professional skating rink, you can use a board with soft upholstery, but you will have to put in more effort.
Features of laying different types of insulation
Before installation, you need to think about the installation method. The insulation material can be soft or hard, and the algorithm of actions depends on this. In the first case, it is enough to simply lay it under the linoleum and secure it with tape or glue. In the second, you will need to build a sheathing and stitch it with plywood, and then lay down the flooring.
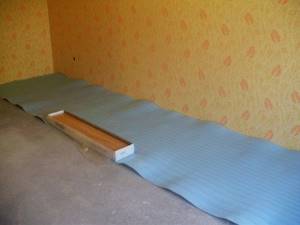
Installation of soft covering
Laying soft material (cork, penoizol, substrate and others) is the easiest option, especially if the room area is small. The basic rule is installation as tight as possible followed by gluing the joints. To properly lay soft insulation under linoleum, proceed as follows:
- Measure out the required amount of material depending on the surface area.
- They are laid clearly end to end, leaving no space, but also not allowing the edges to overlap each other.
- Next you need to fasten all the insulation blocks.
To fix the material, two methods are used:
- scotch;
- construction adhesive.
If foil foam insulation or cork is chosen for insulation, go over the top with construction or regular tape. It is best to use double-sided tape. It is necessary to take into account that after laying linoleum, stripes of adhesive tape can create an unsightly relief.
Therefore, most often the insulation material is placed on glue. And in the case of a backing (combined, linen, jute) - this is the only option. The tape will not be able to adhere well to the fleecy surface and will soon fall away from it.
The glue is applied to the floor in a thin layer and leveled using a metal spatula. Then the pre-cut insulation blocks are carefully laid. The adhesive composition can be applied only to the joints, extending up to 7 cm onto the canvas itself. In this case, the insulation blocks lying along the edges do not need to be fixed, since they will not move anyway.
Laying soft coverings does not require special skills or complex equipment.
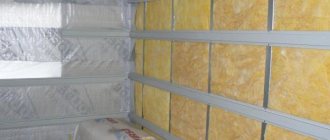
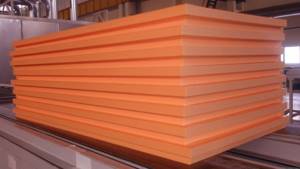
Installation of rigid insulation
Rigid material for insulation under linoleum is penoplex, extruded polystyrene foam, polystyrene foam and other dense materials. They are not very durable. Such sheets for insulation are laid only under the sheathing. The instructions are:
- Make several wooden beams, the thickness of which exactly matches the insulation (minimum 20 mm).
- Fix the bars to the base using dowels.
- Lay insulation material.
- Sew plywood on top.
- Next lay the linoleum.
Attention! This method of installation for insulation allows the installation of any other floor covering.
Chipboards
Insulating a concrete floor using pressed slabs is a three-layer “pie” consisting of waterproofing, chipboard and a finishing coating. Please note that the insulation is installed exclusively on a dry, clean surface covered with plastic film (waterproofing).
A small gap (1.5 cm) must be left between the wall and the slabs. This will help maintain the integrity of the structure during linear expansion of the material, because chipboard boards change their dimensions with temperature changes.
The insulation is attached to the base of the floor with dowels, and the joining seams are glued with a special construction mesh, which is coated with a composition of sawdust and parquet varnish in a 1:1 ratio. At the final stage, the decorative covering is laid and the plinth is attached.
Advice from professionals
Linoleum fits perfectly on a flat concrete floor. The plane must be horizontal, only minimal differences are permissible - up to 7 mm, and preferably 2-3 mm.
Important! During the work, the base must be dry, the presence of grease stains and paint is unacceptable.
The concrete base needs to be leveled - the work is complex and labor-intensive. In most cases, it will be better to use a substrate. If the base is level, skip this step (at your own discretion).
Sometimes you can do without a heat insulator
Plywood is placed on a concrete base only if there is high-quality waterproofing. Protruding nails are removed, cracks are filled, defects are leveled. You can put a new roll of linoleum on the old one, although builders do not advise doing this.
Types of thermal insulation materials
Insulation of a concrete floor begins with preparation for the process and selection of a suitable material. Nowadays there is a wide variety of similar products on the market:
- Mineral and basalt wool. Such insulation materials are very popular due to their low density and thermal conductivity, and good sound insulation. But construction wool also has negative properties: it is not environmentally friendly and absorbs moisture. Therefore, it is recommended to use it only in homes with low humidity.
- Polystyrene foam (expanded polystyrene). Despite the fact that polystyrene foam is quite fragile and not environmentally friendly, it has good moisture resistance and thermal insulation.
- Extruded polystyrene foam. It is characterized by strength and durability.
- Polyurethane foam. It has remarkable characteristics of moisture resistance, thermal conductivity and resistance to sudden temperature changes. In addition, polyurethane foam tolerates mechanical loads well and is part of the group of durable insulation materials. But, like most insulation materials, it has one big drawback - it is not environmentally friendly.
Insulation for concrete base: 1 - Mineral wool, 2 - Extruded polystyrene foam, 3 - Polyurethane foam

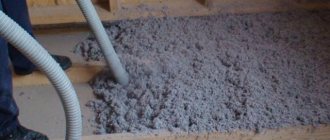
- Expanded clay. It is mainly used instead of crushed stone. Expanded clay is environmentally friendly and has a low level of thermal conductivity, but a very thick layer of insulation is required, and it also has strong moisture absorption.
- Foam glass. It does not absorb moisture, is environmentally friendly and durable, has a low degree of thermal conductivity and specific gravity. But due to its fragility, it is better not to use it in homes where there is a high probability of mechanical stress.
- Cork. It is completely natural and insulates a concrete floor well in a private home, but is more suitable as insulation for a finishing coating.
- Perlite. Its properties are similar to expanded clay, but some characteristics are superior to it.
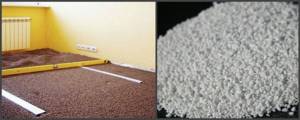
Bulk and 100% environmentally friendly insulation - expanded clay and perlite
Insulating the floor with penoplex is the easiest and most reliable way
There are several floor subfloors that can be insulated using penoplex. There is no significant difference on what the insulation boards are laid. The main point here is the need for waterproofing under penoplex. This applies to any type of base. The slabs themselves can be laid without fastening or attached using glue or special self-tapping screws with plastic washers. The joints between the plates are glued, foamed with polyurethane foam or insulated with tape.
Various options for arranging screeds using penoplex
In any case, the foam under the floor screed should be smooth, dense and covered with a vapor barrier film. This rule applies to any method of creating an insulated floor. A classic concrete screed is a leveled and hardened mixture of cement, sand and plasticizers. The higher the grade of cement, the stronger the screed. Most often, Portland cement M400 is used for these purposes. In order for the screed to turn out smooth, you need to follow certain rules. It is best to do the work together. One person mixes the solution, and the second performs the main steps.
Then, when a vapor barrier membrane is laid on the penoplex slabs, it is necessary to take care of the contact points between the concrete and the lower part of the walls along the entire perimeter of the room. They must be isolated. To do this, take a strip of polyethylene foam and lay it along the walls, overlapping them in the form of an angle. Polyethylene should be higher than the planned thickness of the screed. As a rule, they take 12–15 cm.
Penoplex sheet dimensions
Helpful advice! To make the film adhere better to the walls, you can apply a primer to them. This will improve adhesion between materials.
When the insulation, vapor barrier and waterproofing of the bottom of the walls are completely ready, you can begin the main work. The solution is mixed in a bucket or other convenient container. This can be done conveniently using a drill with an attachment. If it is possible to install a small concrete mixer in the house, then it will be even better.
Filling work begins after the leveling beacons are installed on the floor. This is done using a simple or hydraulic level. Start pouring the solution from the farthest corner. When the first batch of mortar is poured onto the floor and leveled with a shovel, a reinforcing mesh is placed on it. This will prevent the screed from cracking.
Only after this the next layer is poured.
Floor insulation with penoplex
Filling is done between the guide beacons, one at a time, so that using the rule it is convenient to level the solution along them. All operations are repeated until the entire room is completely covered with the solution. The thickness of the screed should be from 5 to 10 cm. It depends on what load is expected to be placed on the floor of this room in the future. You can place structural elements of a “warm floor” system inside the screed.
Floor screed arrangement diagram
Helpful advice! When carrying out work on laying penoplex under the floor screed and pouring the solution, you should wear soft shoes. This will prevent accidental damage to the material.
When all work is completed, it is necessary to periodically water the screed for 3 days. This will allow the cement to set stronger and achieve the best hardness without cracking. After this, it is recommended to wait a few more days for the cement to finally turn into solid concrete, which can only be broken with a hammer drill.
Laying reinforcing mesh on top of penoplex
After the concrete has completely hardened, you can begin installing the finishing floor covering. It can be absolutely anything: parquet, laminate, linoleum or even a state-of-the-art 3D self-leveling floor.
Advantages and disadvantages of floor insulation with penoplex
- The degree of liquid absorption is close to zero, which allows it to be used for its intended purpose in damp rooms. After a long stay in water, the insulator absorbs only 0.5% of its weight in moisture.
- Floor insulation with penoplex can be done at the stage of building a house and during its operation.
- The material consists of chemically inert components that resist rotting well. Thanks to these properties, its service life exceeds 50 years.
- The insulation cells are very small (0.05-0.12 mm) and provide greater mechanical strength to the product.
- Despite their high density, the slabs are easy to process.
- Extruded polystyrene foam can be laid on any base, even on the ground.
- The sheets are of a convenient shape, the dimensions are maintained with great accuracy, which facilitates installation work.
- This is an environmentally friendly material that does not have a negative impact on humans.
- The product is afraid of sunlight, so it is stored in a dark place.
- It is expensive compared to other insulators.
- The material does not burn, but actively melts, so it is not recommended to use it in fire hazardous areas.
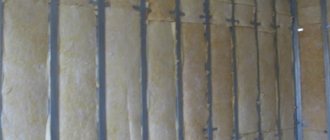
How to insulate a wooden floor
You can lay a layer of penoplex directly on top of the plank base if it is in good condition.
Source: https://www.tproekt.com/stoit-li-uteplat-derevannyj-dom-penopleksom/
Is it worth doing waterproofing under a thermal insulation coating?
It will be useful to waterproof the room on the ground floor, where the problem of dampness is especially common. In addition to protection from moisture, the screed provides additional thermal insulation, sound insulation and vapor barrier. This is especially important in multi-storey buildings with concrete floors, where there is often increased audibility from neighboring apartments. Waterproofing will prevent flooding of the lower floors.
In a wooden house, you should also consider the option of moisture insulation. Since excess dampness leads to rotting.
Important ! To carry out repair work, you should not take the first waterproofing compound you come across. The stores have a large selection of all kinds of ties. Consultants will guide you on prices and purpose of mixtures and help you make the right choice.
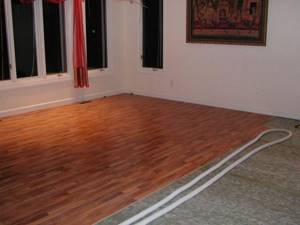
Subtleties of styling
When laying linoleum on a wooden floor, most attention should be paid to the quality of the base. You need to strive to create a perfectly flat surface plane. The final result depends on this. Sudden changes of more than two to three millimeters, peeling paint, cracks between boards, heads of nails or screws, dried knots will be noticeable under thin linoleum. Moreover, in these places, linoleum wears out faster, and with frequent use, it bursts over time. To get rid of flaws, the floor must be leveled.

For this purpose, special polymer mixtures with reinforcing optical fiber are used as a substrate. This method is used when it is necessary to save more space in the room. The solution can be applied in several layers, using a special impregnation before each layer. Do not use mixtures based on gypsum or cement. Due to the properties of wood, changing its density under the influence of external factors will not result. If the floor has minor defects, it is enough to use a foam backing. This is the fastest, cheapest and easiest method.
A slightly more labor-intensive and inexpensive method is to nail down fiberboard sheets. You can level the base with plywood, chipboard or OSB boards of the third or fourth category. It must be taken into account that when wet and then dry, chipboard and fiberboard change their shape, which is not restored. Therefore, they are used in dry rooms where there is no running water.