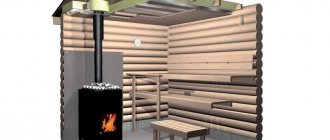
When going to a hot bathhouse to take a steam bath, we certainly put on a warm hat, although for a beginner it looks more than strange. But a hat is like a heat insulator that absorbs moisture and protects your head from overheating. Likewise, when building the bathhouse itself, the insulated ceiling is the most important part.
It is unacceptable to forget about this after insulating the floor and walls, for which different materials are used. In order for the bathhouse to retain heat well, it is necessary to correctly select the insulating material and method of thermal insulation of the ceiling, of course, taking into account the type of roof.
Choosing thermal insulation material
Experts recommend using the following materials to insulate the bathhouse ceiling:
- Mineral wool is a classic version of thermal insulation, which is a chaotic interweaving of thin artificial basalt fibers. These fibers are responsible for retaining heat. The material also contains limestone, diabase and dolomite. Among the main advantages are durability and fire resistance, and among the disadvantages is a decrease in thermal insulation properties when wet.
- Ecowool is a material made from wood fibers made from recycled waste paper. An undoubted advantage of insulation is its environmental friendliness. In addition, it has a fairly low price.
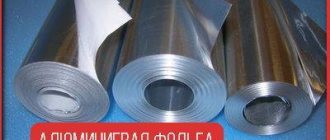
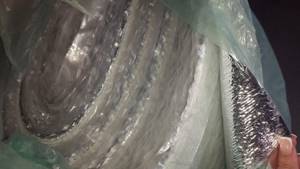
- Penotherm is a type of foamed propylene with one foil side that reflects heat flow. The material is very light, but guarantees effective heat retention: thanks to it, you can reduce the heating time of the bath by 2-3 times.
Important! To treat the ceiling of a steam room, you cannot use organic insulation materials - jute, flax fiber, tow. They ignite quickly, so their use in high temperature zones is unsafe.
What is ecowool insulation?
Let's start with the fact that ecowool is a cellulose thermal insulation material. It is made from finely chopped waste paper , boric acid , borax (mineral) and lignin (a sticky compound found in almost all plants). All these elements are non-toxic, harmless and environmentally friendly.
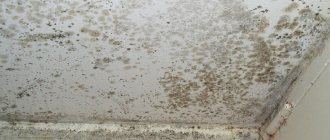
This cellulose insulation is used not only for its intended purpose, but is also successfully used as a good noise and moisture insulator. Typical places of application are walls, floors, floors, ceilings in houses with cold roofs. In the renovation of old buildings, ecowool insulation is convenient for filling hidden cavities that require thermal insulation. It is recommended for use in damp areas. Fungus and mold are not dangerous for it, since the boric acid included in the composition prevents the development of microorganisms.
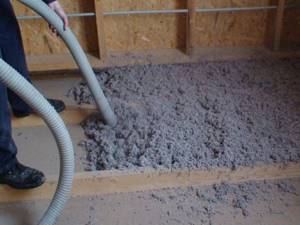
Ecowool is supplied to the construction market in pressed dry form, packed in bags. Before use, the briquettes fluff up and the material increases in volume by 3-4 times. After watching the video below, you can imagine the process of making “paper insulation.”
We carry out preparatory work
Regardless of which thermal insulation material you choose for your bathhouse, you should carry out preparatory vapor barrier work before directly laying it.
Why do you need a vapor barrier? It will block the entry and deposition of wet vapors on the thermal insulation. Why is it important? Because if moisture accumulates on the insulation, this will immediately lead to several negative consequences: firstly, the weight of the ceiling structure will increase; secondly, the insulating qualities of the insulation will decrease; thirdly, the service life of thermal insulation will be significantly reduced.
If your bathhouse does not have an attic, use heat-reflecting plastic film or aluminum foil as a vapor barrier. The first material must have lint - it is they that will trap condensation. It is more rational and economical to use foil in those rooms where it is important to maintain a high temperature, for example in a steam room and shower, and film in other, less demanding rooms. Use a staple gun to attach the vapor barrier to the ceiling. Even if you overlap the material, carefully cover the joints with self-adhesive tape to ensure the necessary tightness.
In steam rooms with an attic, you can use the same materials, but the roof on the inside must first be treated with clay. The minimum application layer is 2 cm.
Methods of applying ecowool
Dry application method
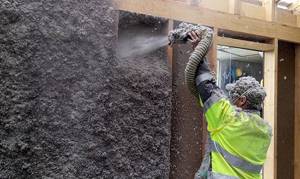
There are 2 ways to apply ecowool. These are manual and mechanized . It is possible to insulate small, horizontal and open surfaces manually. It is impossible to properly insulate the roof, walls and complex building elements. This requires special professional equipment.
If you decide to install ecowool yourself, then before use, the insulation briquettes must be fluffed using a barrel or large vat. To do this, use a drill and a nozzle for mixing paint. After ecowool has acquired a light airy appearance, it can be laid on prepared horizontal surfaces.
The manual method of installing ecowool is not entirely practical. It is labor-intensive, long and tedious. It is quite possible that there will be an overconsumption of material. This work is dusty and requires the use of personal protective equipment. To avoid such negative aspects, it is advisable to use a mechanized method and invite specialists for this.
Remember that no manual laying of insulation can compare with the quality of work with mechanisms specifically designed for this. Professional installation of ecowool is always better than a homemade option.
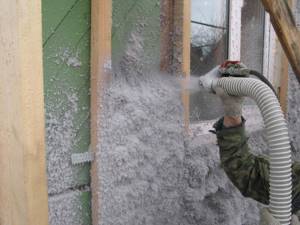
Insulation with ecowool using professional equipment, that is, mechanized, can be carried out using two methods: dry and wet .
Wet application method
The dry method allows you to apply the material not only to horizontal areas, but also to closed vertical areas. Through holes in the partitions, “cellulose insulation” is supplied with air through a corrugated pipe into all hidden cavities. Blowing ecowool helps the insulation penetrate into the most inaccessible places. The equipment allows you to carry out a large amount of work in a short time.
The wet method (water or adhesive is used) is relevant for open walls, ceilings, etc. We can say that the necessary surfaces are being plastered. This “liquid plaster” adheres perfectly to any material and allows you to process geometrically complex areas.
The first stage of insulation: arrangement of the floor
Now let's proceed to the direct insulation of the bathhouse ceiling. You need to start with arranging the top floor:
- Fix wooden beams, pre-treated with antiseptics, onto the crowns of the logs or beams of the steam room roof. Especially carefully it is necessary to treat the areas where beams meet roofing materials with excellent technical properties.
- Sew boards to the beams, forming roll-up panels. They should be two strictly perpendicular rows of boards. Use self-tapping screws to secure the panels. Make sure that the lower planes of the boards exactly coincide with the corresponding planes of the beams.
Advice. Before arranging the ramp, draw a diagram of the location of the shields, indicating their numbers and dimensions - this way you will not get confused during the installation process. Keep in mind that there must be a gap of at least 5 cm between the beams and cladding boards, and 20-25 cm between the panels and the chimney.
- After installing the rolls, protect the boards from fungus - treat them with special antiseptic compounds.
Insulation with foamed polypropylene
Foamed polypropylene and its derivative materials (penofol, foamed polyethylene, etc.) are laid in a similar way. But often polypropylene alone is not enough to insulate the ceiling of a bathhouse and therefore it is used in conjunction with other heat insulators (for example, mineral wool). This combination will allow you to create the maximum degree of heat conservation in all rooms of the bathhouse.
Foamed polyethylene for ceiling insulation
Materials and tools
- Foamed polypropylene.
- Mineral wool.
- Primer for wood.
- Adhesive for penofol.
- Foil tape.
- Wooden slats.
- Self-tapping screws or anchors.
- Vapor barrier material.
- Stapler with staples or small nails.
- Hammer.
- Screwdriver.
- Lining or OSB.
Stages of polypropylene insulation
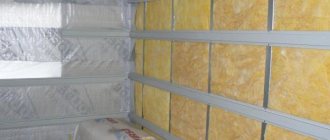
- We clean the surface of the ceiling from dust and cover it with a special primer to increase the adhesion of various materials. Then we attach the polypropylene sheets to the wooden surface of the ceiling using glue, and seal all joints with tape. We connect the sheets end-to-end without overlap.
- We fasten the sheathing slats on top of the insulation with self-tapping screws or anchors. The spacing of the slats must correspond to the width of the thermal insulation material.
- We fill all the space between the slats with mineral wool. The slabs are laid in cells without additional fastening.
- We install a vapor barrier on top. We lay the sheets with an overlap of about 10–15 cm. We glue all joints with tape and, for strength, secure them with staples using a stapler or nail them with small nails.
- At the end we finish the ceiling. For this you can use clapboard or OSB sheets.
It is possible to insulate the ceiling with polypropylene alone, but this method is used in regions where the average annual air temperature does not fall below 0°C. Otherwise you will have to use two types of material.
Tips for insulating with polypropylene
In order for the insulation process to be of high quality, it is necessary to follow a number of important recommendations.
- It is imperative to carefully seal all the joints between sheets of polypropylene thermal insulation material. If you don't have tape, you can use silicone sealant.
- The insulation must be installed in such a way that it does not meet at the junction points between the ceiling and walls.
- Electrical wires and cables should not come into contact with the foil side of the insulation, since aluminum is a conductor of electricity. Therefore, exposed sections of wiring must be carefully insulated or hidden in a special engineering corrugation.
- It is not recommended to glue polypropylene overlapping, as moist hot air can get into the cracks and turn into condensation, which will damage the wood.
The second stage of insulation: laying thermal insulation
As soon as the top floor is ready, you can proceed to the installation of thermal insulation material. Whatever insulation you choose, the operating technology is approximately the same.
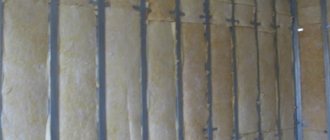
Thermal insulation material should be installed in all spaces between beams. Lightly compact it so that the insulation fits tightly to the surface. The thicker the thermal insulation material, the higher the effect of its action - in a regular bathhouse, 100 mm of insulation will be sufficient. Check several times to ensure that there are no gaps left in the ceiling structure.
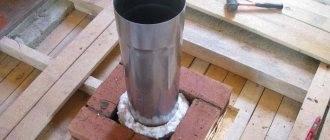
Separately, it should be said about the mandatory insulation of the chimney. There may be several options:
- “packaging” the chimney in a special pipe made of non-galvanized steel, treated from the inside with a layer of expanded clay;
- insulation of the area around the chimney with expanded clay composition.
The process of insulating a bathhouse with an attic will look a little different. First, the boards are coated with a thick layer of clay. Then all existing cracks in the attic are filled with wooden chips, which are pre-moistened in concrete mortar. And then the thermal insulation material is laid. Better in two or three layers.
After completion of the work, the material must be sheathed with wooden boards. Place them perpendicular to the beams. It is not necessary to use a long board - it can be replaced with a short board, homemade boards with sawdust or fiberboard. The top surface of the bathhouse is treated with a fire retardant. It is advisable to cover all wooden boards in the chimney area with asbestos sheets.
Do not forget that without high-quality ceiling insulation, not a single bathhouse will be able to fully fulfill its tasks and guarantee a healthy microclimate. Therefore, if you want to get a truly comfortable steam room, once again evaluate the thermal insulation materials described above, choose the appropriate option and get to work, following the installation rules.
Advantages and disadvantages of the material
Thermal insulation product used as building insulation has a number of the following advantages:
- Low level of breathability. Elastic material easily absorbs sound waves, protecting the interior from annoying noise.
- Evaporation of moisture. The properties of cellulose included in ecowool are capable of absorbing and simultaneously releasing moisture. Such processes do not impair the thermal insulation capabilities of the product. The insulation maintains a humidity level acceptable for residential buildings. Therefore, homeowners feel comfortable.
- Environmentally friendly material. Ecowool contains no phenolic agents. The absence of harmful components eliminates the possibility of harmful fumes appearing in the air that negatively affect human health.
- High-quality insulation. A homogeneous mass is placed in pre-prepared cells. The seamless insulation method prevents the formation of voids and other bridges that impair the thermal insulation properties of the product.
- High level of fire safety. Ecological wool is not flammable. In the event of strong heating or fire, the material begins to smolder without releasing toxic substances.
- The structure of the insulation increases its service life.
Economical and easy to install, this natural product is ideal for insulating residential premises.
Still, the homeowner should become familiar with the negative qualities of ecowool. The disadvantages of insulation are:
- Low degree of rigidity. Unlike polystyrene foam boards, ecowool cannot be used for frameless thermal insulation when installing floor screeds.
- Professional and high-quality equipment is required during the installation of natural insulation. Without the necessary equipment, it is impossible to achieve success during the installation of ecowool.
- The insulation is not suitable for heating surfaces located close to the fireplace pipe or chimney. Otherwise, the material will simply decay.
- Due to the constant absorption of moisture, the thermal insulation properties of the product gradually decrease.
- Long drying of insulation during installation of ecowool using a wet method.
Insulating a bathhouse ceiling: step-by-step instructions and diagrams + choosing insulation
Bathhouse construction belongs to the category of structures with special operating conditions. The formation of a microclimate acceptable for the adoption of beneficial procedures, fuel consumption, and the time for warming up the premises depend on its proper design. The concept of “proper design” refers to a number of technological processes, one of which is the insulation of the bathhouse ceiling. After all, it is the insufficiently thermally insulated upper floor that contributes to the leakage of almost a third of the thermal energy.
The heated air, obeying the strict laws of physics, rushes upward. If there is no impassable barrier in its path, its further work will be aimed at heating the atmosphere. To stop such unreasonable spending, you need to erect a reliable barrier. Moreover, it must be done in such a way that it does not contribute to the formation of condensation on the wooden elements of the ceiling, so that this moisture does not favor the settlement of colonies of microorganisms that destroy building materials.
Principles of thermal insulation of bath ceilings
Based on the design features of the roof, bathhouses made of logs or timber can be divided into two types: buildings with and without attic space. In the path of warm air flowing out of bathhouses with attics, there will be a much more powerful ceiling, into the layer cake of which thermal insulation material is usually laid during the construction process.
The under-roof space itself, filled with an air mass, also inhibits the leakage of thermal energy, and the insulation of the roof structure also slightly moderates the agility of the “escaping” heat.
However, this does not mean that insulation of the ceiling in a bathhouse with an attic or attic is not necessary. Increasing the thermal insulation characteristics in it is no less necessary than in a building without an attic, where the heat leaking out encounters few and too weak barriers in its path.
Specifics of the vapor barrier device
In both cases, regardless of the roof structure, a vapor barrier is laid on the bathhouse ceiling before laying the heat-insulating layer. To equip a building without an attic space, you can use aluminum foil, compacted cardboard, generously impregnated with drying oil, or wax paper as a vapor barrier layer.
In bathhouses with an attic, the same materials are used, but most often the ceiling boards on the roof side are coated with a two-centimeter layer of clay.
Of the options offered by the industry, the following are used:
- standard polyethylene film (as for greenhouses 0.4 mm with variations) - a type of vapor barrier that is not very popular due to the greenhouse effect;
Note. The use of polyethylene film as insulation requires leaving a gap necessary for condensation to evaporate.
- a special vapor barrier film made of polyethylene with fibers to retain condensation;
- membrane type vapor barrier material.
Vapor barrier is necessary to prevent the transit of wet vapors and their settling in the insulation. After all, water accumulated in the thermal insulation material will shorten its service life, increase the weight of the multilayer ceiling system and, if we return to the physics course, reduce its insulating qualities.
Three functions of bath ceiling insulation
The hotter the room temperature is required, the more difficult it is to build a barrier to retain heat. To solve this difficult problem, those who want to know how to insulate the ceiling of a bathhouse should familiarize themselves with the three main leak patterns:
- movement of heated air through the cracks in the ceiling;
- gradual transition of heat from heated objects to cold ones;
- intersection of homogeneous barriers by thermal waves.
Laying thermal insulation material in a multi-layer roofing system prevents all types of thermal leaks. Properly done insulation will adequately perform all the work assigned to it. Due to poor thermal insulation, condensation will settle on the ceiling, it will take much longer to warm up the room, and more fuel resources will be spent.
Selection of materials for insulation
Before deciding how to insulate the ceiling in a bathhouse, you need to consider all options for suitable thermal insulation materials.
- “Classic” mineral wool is used most often. In its chaotic interweaving of fibers melted from basalt there are billions of air-filled voids, each of which works responsibly to retain heat. Disadvantage: loss of insulating properties when wet.
Note. When using mineral wool to insulate the ceiling in bath buildings, it is recommended to lay a waterproofing layer on top of the insulation if the roof is not sufficiently protected from atmospheric water leaks. A thermal insulation gap must be created between the waterproofing layer and the insulation.
It is difficult to recommend the thickness of the insulation layer offhand, without knowing the actual size of heat loss and the technical parameters of the structure. The figures are approximate throughout, variations are allowed. Much depends on the climate zone, because the ceiling insulation in a bathhouse is not only a barrier to heat, but also protection from external temperature factors. If the ceiling freezes from the outside, moisture will certainly condense on the ceiling. In such cases, the thermal insulation layer is simply increased.
Expert advice
For bath structures, the criterion of environmental friendliness of the insulation is important, so it is better to choose natural heat insulators that meet fire safety standards. Expanded clay, prepared sawdust-cement backfills, and vermiculite are well suited for thermal insulation. They can be installed independently, following installation technology.
When installing insulation, you need to build a protective steel box for the chimney pipe. Expanded clay can be poured into the box. It is necessary to ensure that wooden structures do not touch the chimney.
When insulating with mineral wool, it is better to choose multi-layer installation with overlapping of previous joints. This method will avoid heat leakage through the seams of the insulation. This will not affect the cost of the heat insulator, since it is sold in cubic meters. There is no need to exceed the thickness of the planned layer, but choose a thinner roll of cotton wool.
For bath buildings, foil materials are more relevant, since foil reflects infrared heat rays from the ceiling, improving the heating rate of the steam room. This reduces heating costs. The vapor barrier with foil is laid with the reflective side down. To fix the joints of vapor barrier films, foil tape is used. To form a sealed vapor barrier, the seams are overlapped by 10 cm and then secured.
The thickness of the installed layer of a specific heat insulator is calculated based on climatic conditions and the thermal conductivity coefficient of the material.
The greater the temperature difference between the environment and the heated steam room, the faster the hot air tends to leave the room. Proper sealing of all cracks, gaps and technological openings will prevent rapid heat loss. A monolithic thermal insulation layer with a sealed reflective vapor barrier will significantly reduce heat loss.
How and with what to insulate a bathhouse, see the following video.
Ceiling insulation technology
Regardless of the material chosen for the construction of the bathhouse, the design of its upper ceiling is almost the same. The load-bearing base is made up of beams resting on the upper rims of timber or logs or on the mauerlat of brick or panel buildings. The timber used for the construction of the beam floor is usually treated with an antiseptic before installation. But, if the fungus protection procedure has not been carried out in advance, the wood should be treated before laying layers of thermal insulation. Particular care must be taken at the junction of building materials with different technical characteristics. In such tandems as brick-wood, foam concrete-wood, wood-metal.
- On the side of the bathhouses, the ceiling is hemmed with boards, nailed from below to the beams.
- Rolling boards are knocked together, which are two rows of low-grade boards perpendicular to each other.
Attention. Craftsmen who insulate the bathhouse ceiling with their own hands need to make calculations before constructing the roll-up panels. There must be gaps of at least 5 cm between the beams and the panels installed on the skull boards. There must be a distance of at least 25 cm between the wooden elements and the chimney.
It is necessary to draw a diagram and, according to it, calculate the dimensions and configuration of each of the shields. After manufacturing, the shields must be numbered so as not to get confused during installation.
- Knocked together “boxes” also need to be protected from rot and bacteria with antiseptic impregnation.
- A vapor barrier material is stapled to the bottom and inner walls of the pallet-like panel.
- The panels are lifted up without insulation, starting with those that will be mounted last.
- Having raised all the elements to the top, they are arranged according to the markings. The lower plane of the replaced shield must coincide with the lower plane of the beam.
- After placement, the boxes are filled with thermal insulation material. It is also necessary to insulate the gaps between the panels and beams.
- The entire structure is covered with boards on top in a direction perpendicular to the direction of the beams.
Advice. It is not necessary to use a long board for the top cladding; it can be alternated with rows made up of short boards.
Instead of boards, you can use fiberboard, homemade slabs made of cement mortar with sawdust. The finished ceiling must be treated with a fire retardant; in the area of the chimney, all wooden elements are sheathed with asbestos sheets.
Thermal insulation for steam room
This is a separate topic, since the upper plane of the steam room should not only not let through, but also promote the accumulation of steam in the ceiling area. It is recommended to lay two layers of vapor barrier material over the steam rooms and supplement the insulation for the bathhouse ceiling with layers of thermal insulation.
Design by Sosnin and Bukharkin
- The beams are hemmed with tongue-and-groove boards 2.5 cm thick. They need to be covered in two layers with drying oil, which, according to the developers, should make the lumber moisture-resistant.
- A low-grade board with gaps of approximately 3 cm is nailed on top of the beams in the transverse direction. This is the so-called moisture gap.
- Roofing felt is laid on boards laid with gaps, or polyethylene film can be used. It’s great if the owner doesn’t skimp on reinforced foil.
- Fill up with a 20-centimeter layer of slag or sand.
Two more options for the steam room
For filing from below along the ceiling beams, an unedged five-centimeter board is suitable. Outside, along the beams, to support the filing, a narrow board is attached to the wood grouse. The lining of the ceiling itself, made of tongue-and-groove aspen boards with a ventilation gap, is attached to this thin board.
A vapor barrier layer is laid on the attic side, then a 3 cm layer of clay mixed with sawdust. Then mineral wool with a density of 125 units and a width of 15 cm and PP film against the wind. Finally, the attic floor boards are installed.
If the ceiling is made of logs, the ceiling of the steam room from below is sheathed on top of a sheathing specially constructed for it. Glassine is laid on top as a vapor barrier layer, then 20 cm of sand, everything else is optional.
If the owner wants his structure to hold steam perfectly, it is worth finding out in detail how to properly insulate the ceiling of the bathhouse. Information about the order in which the layers are laid, and how the ceiling design in the steam room differs from its analogue in the washing compartment will help to properly insulate the structure, which has become a symbol of country life. The proposed device options can be upgraded in accordance with personal requirements and climatic conditions.
Schematic diagram of a vapor barrier
We have already said that steam spontaneously moves to where the air is less saturated with moisture and, as a rule, has a lower temperature. In accordance with our climatic realities, the flow of evaporation passes through building structures and is directed into the environment. This is exactly what happens for most of the year. Only on hot summer days, which, unfortunately, are few and far between, can vapors from outside rush indoors.
The vapor barrier is arranged in full accordance with the prevailing direction of the diffusing steam flow. It is installed very first on the inside of pies of all types of enclosing structures, including roofs. Those. First, on the side of the premises there is a film that protects the insulation and the roofing pie as a whole from steam, then other components come.
All materials used in roof construction have some degree of vapor permeability. It can vary from zero or thousandths of one to 3000 mg/m². This characteristic tells about the ability of the material to pass a specific volume of moisture per day. To form a barrier against moisture suspended in the air, options with the lowest vapor permeability are chosen.
The main principle of constructing a roofing pie is that on the side of the room there is material with the lowest vapor permeability:
- With zero vapor permeability values, the film will not allow household fumes to penetrate into the thickness of the roofing pie at all. Condensation formed there due to the difference in temperature on the outer and inner sides of the roof is evaporated in such cases through vents or accumulates on the waterproofing, after which it flows into the gutter.
- With permeability values other than zero, a certain amount of vapor penetrates into the roofing pie. In this case, there is a need for effective moisture removal. To remove steam, an under-roof ventilation system is installed, and dormer windows are constructed to ventilate non-residential attics and attics.
Any of the steam protection options installed on the side of the premises must make it difficult for water suspended in the air to seep into the roofing pie. However, if it does penetrate, the structure should be arranged in such a way that complete moisture removal is guaranteed. This means that the layers following the vapor barrier should allow it to pass through freely.
Therefore, when constructing roofs, the order of the layers, determined by the vapor permeability indicators, must be observed. The first of them should allow the least amount of water to pass through, followed by those with the highest ability. The specified arrangement of protective layers at the same time prevents the passage of cold air flows from the outside into the building.
Insulation of the ceiling in the bathhouse
The ceiling can rightfully be called the most important structure from the point of view of insulation. And anyone who is familiar with the laws of physics will understand why this is so. After all, warm air is lighter than cold air, which means it rushes up, while cold air flows down. That is why the most heated air and steam collect under the ceiling of the bathhouse.
It is not difficult to guess what will happen if it comes into contact with an uninsulated ceiling that has good thermal conductivity. In addition, the greater the temperature difference, the faster the cooling. (You should not conclude from this that the floor does not need insulation - this is the second most important area that requires it.)
That is why we will consider here in detail the insulation of the bathhouse ceiling from all sides.
How to insulate
The ceiling of the bathhouse is usually insulated during the construction phase. Therefore, the choice of insulation is usually related to the type of ceiling:
- flat;
- hemmed;
- panel.
Mineral wool (=basalt wool for baths, because it is the most environmentally friendly) can be used in any type, but flooring is considered the most budget-friendly, so cheaper materials are often chosen for it. Insulating the bathhouse ceiling with mineral wool is a popular solution.
In any case, mineral wool needs to be insulated from water and steam, for which it is insulated on one side with a film or membrane, and on the other with foil (as the best vapor barrier).
You just need to remember that the vapor barrier is laid closer to the hot room (steam room, washing room), and the waterproofing is placed on top of the insulation from the attic side . For a better understanding, we present the sequence of layers of two “pies”.
The hemming consists of:
- ceiling beams;
- cranial bars;
- boards;
- vapor barriers;
- insulation;
- finished ceiling (eg lining).
Look at the explanation of the above picture:
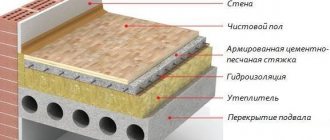
Flooring consists of:
- flooring boards;
- vapor barriers;
- insulation;
- optional waterproofing (not at all necessary, except in cases where dry sawdust is used, in which case a layer of clay or earth is needed on top for fire safety).
Look at the explanation of the above picture:
Most often, in place of the insulation there is mineral wool or glass wool (the latter should not be used only above the steam room).
Expanded clay is an excellent way to insulate a cheap floor ceiling for baths with a cold attic. You just need to make sure that the foundation and walls can withstand the weight of a 30-centimeter layer of this material.
The insulation technology is simple: when boards are laid on the walls (and there are no floor beams in the project), wax paper is placed on top of them, and expanded clay of different fractions is scattered on top of it and leveled with a rake.
Then foil is stapled to the boards from below, slats for the ventilation gap are attached to it, after which the finishing ceiling is attached. Insulating the ceiling in a bathhouse with expanded clay is a time-tested solution.
Polystyrene foam is the most undesirable material for a bathhouse ceiling because it cannot withstand high temperatures, is flammable, and when burned also emits smoke with toxic substances. However, it begins to release harmful substances even when heated. However, many people ignore the danger and use it to insulate the ceiling because it does not weigh down the structure too much and is one of the inexpensive and accessible materials. Well, everyone is the architect of their own happiness. We advise you at least not to place it above the steam room or next to the stove. And check the certificates: sanitary and hygienic and fire.
Sheets of foam plastic are laid on the outside of the bathhouse ceiling on a pre-laid vapor barrier, for example, on foil insulation. Or instead of sheets, backfill with foam chips is used.
Insulating the ceiling of a steam room in a bathhouse
The steam room is a special room in the bathhouse, because it is here that any material is subjected to the greatest tests due to the combination of high temperature and humidity.
One of the consequences of these factors may be the release of volatile compounds, for example, phenols or formaldehydes contained in some types of insulation. Therefore, the insulation of the steam room must be approached with greater care than other rooms.
In addition, everything literally gets hot next to the chimney, and the stove is the main source of sauna fires, so fireproof materials will come in handy here.
On the other hand, the steam room must be insulated so that the hottest room cools down more slowly. For this purpose, it is usually turned into a “thermos” - covered with foil and insulation.
So, the “pie” scheme remains the same. When insulating the ceiling of a steam room from the inside:
- The rough ceiling is covered with wax paper with a wide overlap at the joints.
- 5x5 cm bars are attached on top of the paper, between which insulation is then placed.
- Insulation is being installed.
- It is covered with a layer of vapor barrier - foil - with careful sealing of all joints and fastening holes with metal tape.
- Slats are placed on top of the foil, with the help of which the necessary ventilation gap is formed between the foil and the finishing of the ceiling.
- Decorative finishing - finished ceiling.
Proper insulation of the ceiling of a Russian steam bath
The temperature in a Russian bath should not rise as high as in a Finnish one. After all, Russians go to the bathhouse for the steam, while Finns are satisfied with the dry heat. The optimal upper temperature limit is 90 degrees. It follows from this that in a Russian steam room the materials are attacked not so much by heat as by steam.
That is why it is better to refuse to decorate the ceiling of the steam room with clapboard - it is suitable for a Finnish bath, but in a Russian it is better to use a massive aspen or linden board. The thickness of the wood first gains and then gently releases heat.
A ventilation gap between the board and the vapor barrier is required; here it is also created by slats stuffed with foil.
Foil is also used in the Russian bath, no changes here. Here too it is better to lay it in two layers and overlap. In addition to foil, you can use foil kraft paper or Penotherm; for other materials, see their temperature limits. The foil is laid from the ceiling onto the walls - 10-20 cm, and at the junction it is glued with silicone sealant and closed with slats. But this is if the walls are without foil, and if with foil, then the ceiling is fastened to the wall with metal tape.
The foil is separated from the insulation by a rough ceiling, 25 mm thick. The insulation is taken in three layers of 50 mm each (mineral wool) and placed with the joints shifted so as not to create cold bridges. It doesn’t need any backing, it goes straight onto the boards.
If desired, a membrane is spread over the insulation in the attic so that the insulation can breathe and not get wet from above.
Next, you can build a finishing floor on top of the insulation if the attic will be used as an attic.
The insulation of the bathhouse ceiling also depends on the roof
It was already mentioned above that there are three ways to install a bath ceiling. In fact, there are two of them - the panel one is rarely used. And the rest are distributed between bathhouses with a cold attic, where they usually make a simple and cheap floor ceiling, and bathhouses with an attic, where hemmed technology is used.
The difference between them is, first of all, that the flooring is not intended for walking on it, so they don’t even reinforce it with beams, they simply put boards on the walls, cover them with paper and put a layer of thermal insulation, often the cheapest, but we have already talked about this.
A hemmed one is much more expensive financially. The previous chapter describes it in all details.
conclusions
Heat leakage problems need to be solved comprehensively, and not just those discussed in this article. There are no trifles in organizing thermal insulation; window and door openings, walls, roof, ceiling, floor - everything must be done correctly, in compliance with building codes and calculations taking into account your region. When insulating the ceiling in a bathhouse with an attic, you should also take into account the thermal insulation features of buildings made of different materials: foam block, brick, frame, timber or logs.
Vapor barrier
Is it possible to do without a vapor barrier in a bathhouse? Of course not, if the tree is pathetic. If you don’t tend to spend money on wind and rot and your bathhouse is expensive, insulation of the ceiling, vapor barrier is something you can’t do without. Another thing is that there is a lot of debate about whether to use foil as a vapor barrier. But this is already a matter of faith. In fact, those who cope with similar work themselves can find their own answer - by steaming with and without foil. By the way, its advantages include high heat resistance, which means that if you install something else for vapor protection, then it will be with a temperature range corresponding to a specific bathhouse - Russian or Finnish.
Now that it is already clear why a ceiling without insulation is a waste of heat, all that remains is to wish every owner that in any weather his bathhouse will warm up properly and keep warm for the second day.