Design selection
The first thing you need to decide when choosing a chimney is where to install it. There are few options. It can be entirely indoors and go vertically outside through the roof. Or it can be brought out horizontally through the wall and rise up from the outside.
Each option has both advantages and disadvantages that will affect the choice of chimney location.
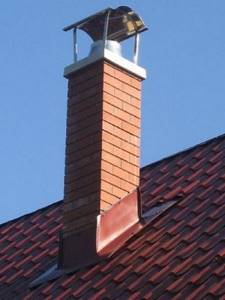
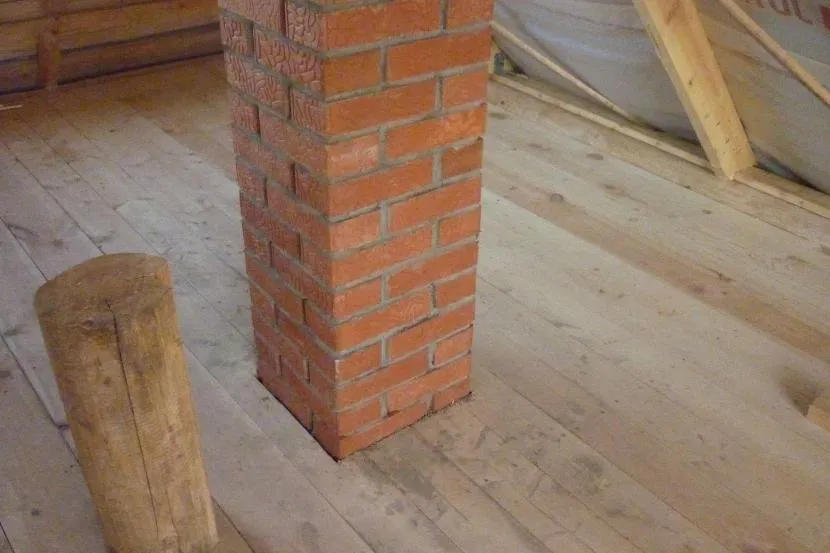
Internal chimney
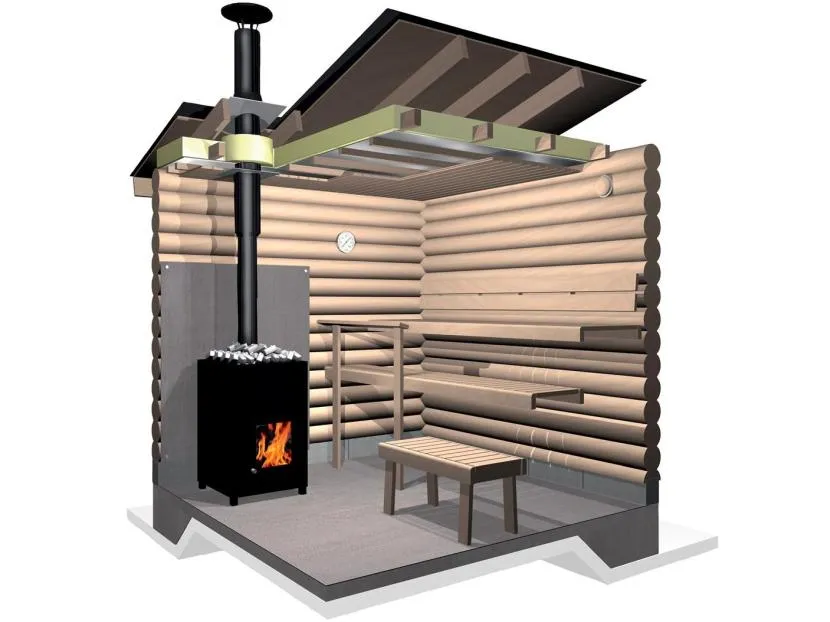
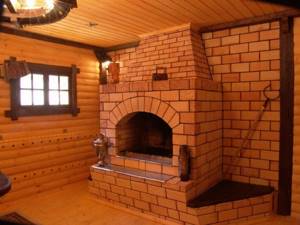
The traditional and more familiar way of installing a chimney is inside the bathhouse, vertically upward from the stove, which ensures maximum draft. Passing the entire distance to the ceiling through the pipe, the hot smoke becomes an additional source of heat, so the bathhouse heats up faster, and less firewood is required.
Bathhouse with internal chimney Source rakentaja.fi
Its main disadvantage is the complexity of installation, since the pipe passes through two structures at once - the ceiling and the roof. And the passage units must not only provide protection for their elements from the hot surface of the chimney, but also be sealed so as not to let precipitation inside.
Pipe passage through the roof and ceiling Source sdelai-lestnicu.ru
Another disadvantage is that the chimney takes up a certain space. This can be critical for small rooms, both by reducing the usable area and by increasing the risk of getting burned from the hot surface of the pipe.
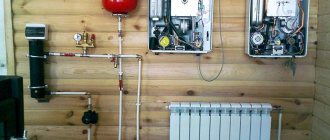
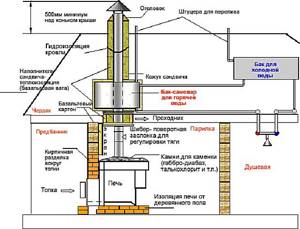
However, an additional advantage of the internal chimney is the ability to install a tank for hot water on it, which will heat up, taking heat from the walls of the pipe. Such a tank is called a “samovar”. It can only be mounted on a chimney for a stainless steel bath; in this case, you don’t have to choose which pipe material is better - metal heats up more than others, and it’s only possible to ensure the tightness of the tank.
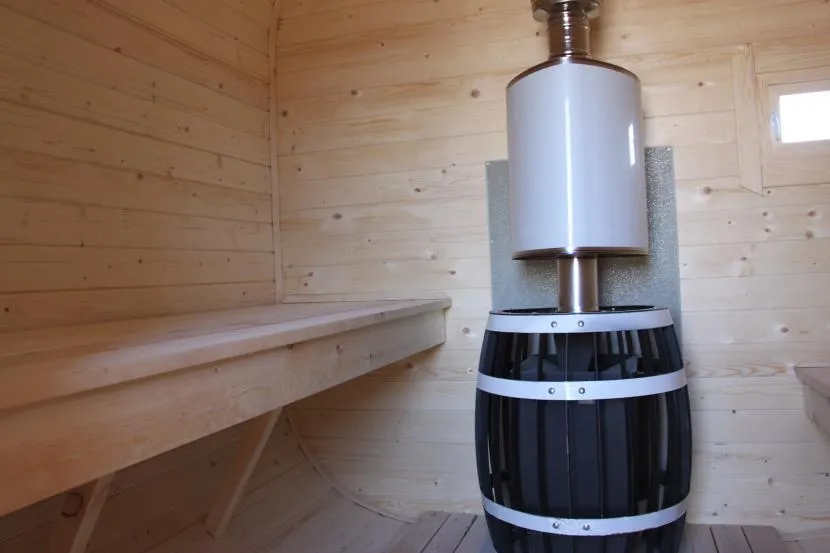
Stove with a samovar tank for hot water Source e-stroy.pro
External chimney
A chimney that immediately goes outside from the stove through the wall is not the best solution for latitudes with cold and long winters. A huge amount of heat that could remain in the bathhouse is immediately thrown out into the street. And this leads to additional fuel consumption and increased time for heating the premises.
In addition, when hot gases come into contact with the cold walls of the pipe, condensation forms on them. Soot and other combustion products settle on a wet surface, clogging the passage and gradually narrowing the lumen of the pipe. To prevent this from happening, its outer part must be insulated.

External chimney - view from inside and outside Source vosaduly.ru
But this solution also has significant advantages:
- ease of installation - there is only one pass-through unit, through the wall, and it is easier to make;
- maintaining the usable area of the steam room;
- reducing the risk of smoke and fire inside the bathhouse in the event of damage or depressurization of the chimney;
- availability of all components for inspection and repair.
Combined option
External or internal pipe for a bathhouse - which one to choose will be determined by the size and layout of the heated premises, as well as personal requirements for fire safety, fuel economy, and ease of installation.
If you don’t want to touch the roof, but want to install a samovar tank in the bathhouse, you can use a combined design, where the pipe rises up almost to the ceiling and then goes outside through the wall. But the height of the ceiling must be sufficient for such a maneuver - a fire distance must be left from it to the horizontal part of the pipe.
In a combined design, the pipe goes out to the street at the top of the wall Source demyan-pechi.ru
Note! The fewer turns the chimney has, the better the draft. In terms of this parameter, direct internal chimneys connected to the stove from above win.
Do-it-yourself chimney for a bathhouse - made from a pipe
A properly installed chimney will ensure long-term heat retention in the bathhouse and safety for visitors, as it will remove fuel combustion products in a timely manner, but at the same time, will not allow the stove to cool down too quickly. Is it possible to make a chimney for a bathhouse with your own hands and save on the work of a master?
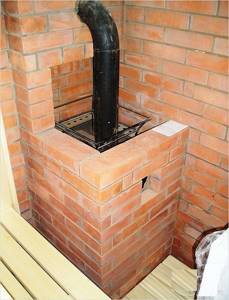
Do-it-yourself chimney for a bathhouse
It must be said that doing this is quite possible, especially since currently in specialized stores sales consultants can, according to a developed scheme and using special software, quickly and accurately select a set of elements necessary for a proper chimney. However, their varieties are not at all limited to metal structures, and it is worth taking a closer look at what types of chimneys there are in general, and how to optimally choose the appropriate design for the built sauna stove.
Types of chimneys
Stove bath chimneys are distinguished according to several criteria.
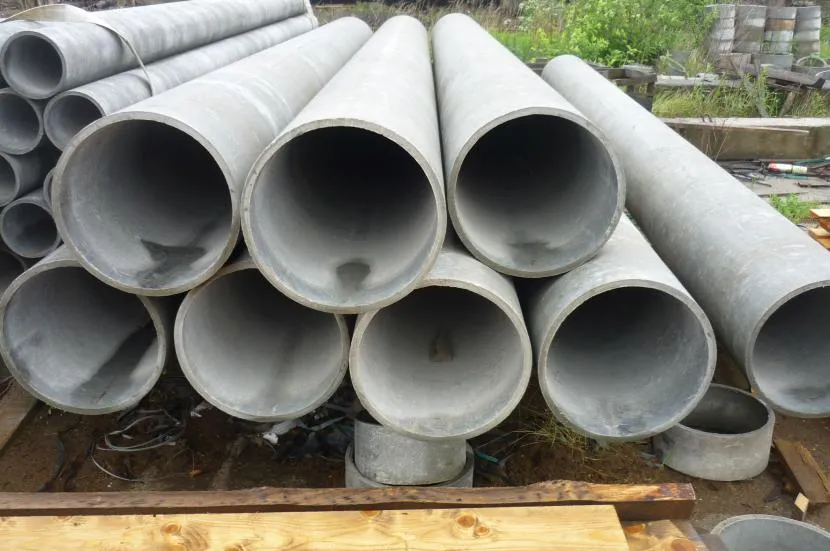
- First of all, according to the material of manufacture. If earlier they were traditionally laid out of baked bricks, then in recent years metal chimneys have become more popular.
The chimney can be placed inside or outside the building
- According to their design and location of installation, these elements of a sauna stove can be divided into two types: the one that passes inside the room, through the ceiling and roof, or, in another version, the chimney is discharged through the wall and rises along it from the outside of the building.
To make a choice, you need to consider all the pros and cons of each type of chimney pipe.
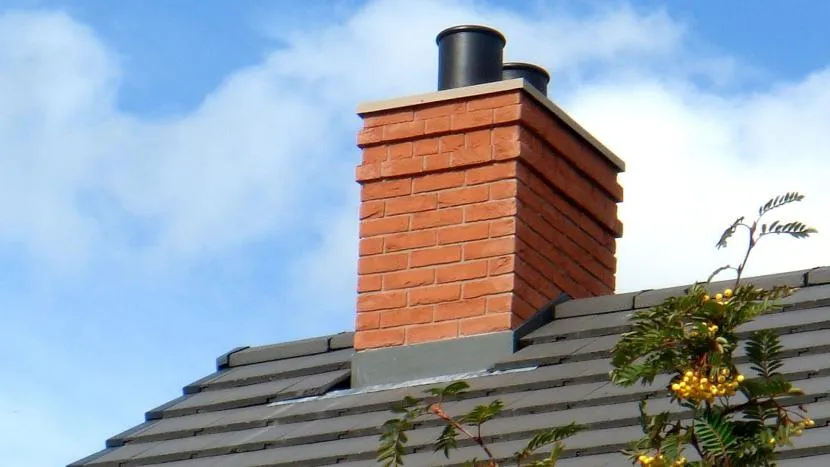
Brick chimney
Previously, chimneys were traditionally made only of brick, since there were simply no other worthy alternative materials for the construction of this part of the stove. The construction of brickwork is a rather labor-intensive process, especially since it must be done according to a special scheme, with strict adherence to all dimensions.
Not so long ago, the vast majority of chimneys were brick
However, brick chimneys are just the option that has been tested by time. They have higher strength and are much more durable than metal ones. In addition, due to its structural structure, brick itself has good thermal insulation and heat accumulating properties.
A brick structure is safer in terms of fire safety than a prefabricated metal chimney, even one made using the most modern technologies.
However, a rather big disadvantage of chimneys built from brick is their inner surface, as it is rough and has corners. Soot deposits linger on it, clogging the smoke passage and reducing draft, which negatively affects the heating of the stove. In addition, the inside of the pipe, which is excessively overgrown with soot, can cause smoke in the bathhouse premises or even catch fire during the heating of the stove from sparks that fall on it, which sometimes leads to very dangerous situations.
Metal chimney
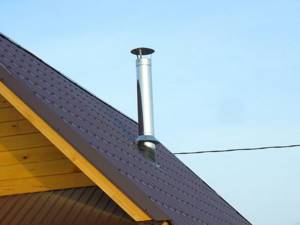
A metal chimney is much easier to install.
A metal chimney pipe is much easier to install than a brick one, and should cost much less. Modern sandwich structures made using insulation are more practical than just single-wall metal pipes, but they also do not provide the same effect of retaining heat inside the stove as a real brick chimney.
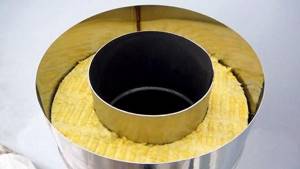
Structure of an insulated sandwich pipe
The advantage of the metal structure is the almost perfectly smooth inner surface, which has no edges, which allows smoke to flow out unhindered in a directed turbulent flow. However, with sudden temperature changes, condensation may well form on internal surfaces - this phenomenon will directly depend on the temperature outside in winter. If such a pipe is installed in a region with harsh winters, then it is necessary to select pipes with the thickest possible heat-insulating layer.
The metal chimney can be placed inside and outside
Another criterion for choosing the type of chimney is its external or internal installation. Each type of accommodation has its own advantages and disadvantages, which you also need to know when choosing the right option for yourself.
External chimney
The idea of placing the chimney pipe on the outer wall belongs to American architects. This installation has become popular in domestic buildings due to its simpler structure. The chimney connected to the stove does not rise to the ceiling of the room, but is led out through the wall.

External chimney
The advantages of a metal chimney constructed in this way are increased safety and the fact that there is no need to install insulated passages for it in the attic and roof. Such a chimney will save the building from the risk of rain or melt water leaking into the gaps between the pipe and the roofing.
Serious disadvantages of the appearance of a chimney include its rapid cooling, which means the formation of condensation inside it, so such a chimney must be heavily insulated.
The second disadvantage is that a chimney taken outside will not be able to provide additional heat to the bathhouse, and at the same time fuel consumption will increase.
There are external chimneys made of brickwork
There are also combined chimneys that bring knowledge outward. In this case, a metal pipe is removed from the stove, which is then led through the wall and enters the brickwork of the chimney, which is built into the wall and rises to the desired height.
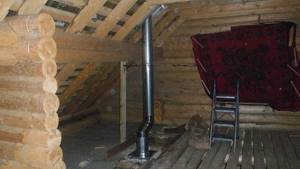
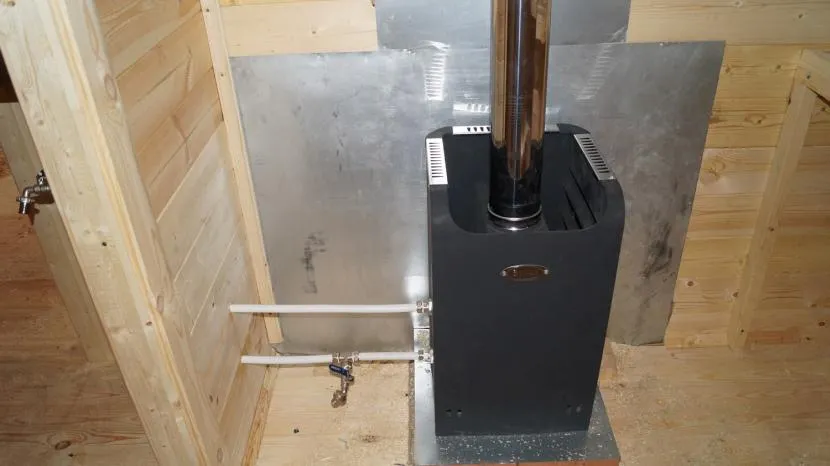
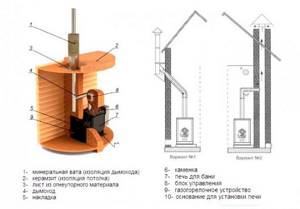
Internal chimney
The metal chimney running inside is mounted on top of the sauna heater and raised to the ceiling, then passed through the attic and roof, then raised to a level corresponding to its relative position with the roof ridge. The advantage of this design is that all the heat that comes from the firebox, when passing through the pipe, will also warm the bathhouse and attic, which means the stove will take longer to cool down. This has a positive effect on fuel economy.

Stove-heater with internal chimney
If you plan and assemble the structure of the internal chimney correctly, and constantly keep the joints under control, then such a system will last for many years without problems.
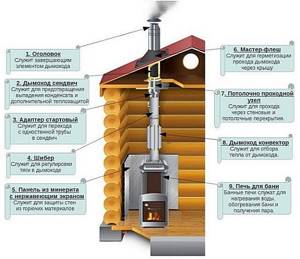
Main components of an internal metal chimney
The disadvantages of this design option include the fact that you will have to run the pipe through the floors and through the roof.
Video: “short course” on the types of chimneys
Prices for different types of chimneys
Chimneys
Materials for constructing a chimney
Materials are purchased after deciding on the chimney design option.
Brick chimney
For a brick building, you need to purchase heat-resistant bricks and a masonry compound - this can be a special construction dry mixture intended specifically for laying chimneys and stoves. Some craftsmen prefer to use a well-selected clay solution.
In addition, it will be necessary to provide material for the fungus above the pipe.
Metal chimney
Manufacturers produce all the necessary parts for assembling the chimney
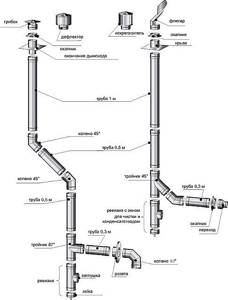
- For a metal chimney, all the necessary parts are purchased after drawing up a detailed design diagram, taking into account all the angles and turns of the pipe.
The diagram can be drawn with one line, which will indicate where the chimney passes through the wall, ceiling and roof, and at the turns - the approximate size of the angle. With such a drawing, you can contact the store with a request to select everything necessary for installation.
- In addition, two metal sheets with holes equal to the diameter of the pipe will be needed, which will be fixed to the ceiling of the bathhouse and to the floor of the attic. Next, you need to think about heat-resistant material that will be located in the attic floor around the pipe, thereby creating protection for easily flammable materials.
- To install waterproofing around the pipe on the roof, you will need to have waterproofing in the form of glue, sealant and a special rubber seal that is put on the chimney.
Elastic element for passage through the roof
- Separately, it is necessary to say about the parameters for choosing pipes. The first thing you need to consider when buying metal chimney pipes is their internal cross-section. It is calculated taking into account the power of the stove, and usually for the bath option the internal diameter is taken to be 150-200 mm. If the diameter is too large, heat will not be retained in the stove, and the pipe of an excessively small cross-section will not create the draft necessary to remove smoke. In any case, the diameter in none of the sections can in any way be smaller than that of the outlet pipe of the installed heating device.
- The total height of the pipe must be at least 5 meters. And the exact value of this parameter will depend on its location on the roof. If the pipe comes out in the middle of the slope, then it must be raised above the level of the ridge, about half a meter. The best option for locating the chimney on the roof is considered to be one and a half meters from the ridge, but this parameter is optional and depends on the location of the stove in the bathhouse. The quality of traction will also depend on the height of the pipe.
- The metal from which the pipes are made must have a thickness of at least 1 mm, then the chimney will last longer.
- If you plan to install a tank for heating water in the chimney system, then the diagram may look like this. It can be modified and adjusted to a specific version of the installed stove and chimney.
Variant of a chimney diagram with a water heating tank.
The tank shown in the figure operates using a “samovar” system, that is, it is tightly welded to the chimney pipe. Some companies engaged in the production of this type of pipes produce such an element with a water heating tank already installed on it, which has two or three inputs for connecting water pipes - for filling the tank and for collecting water at points of consumption.
Video: design features of sauna chimneys
Installation of a sauna chimney
After the sauna heater is finally installed, installation of the chimney begins from the stove nozzle. This could be the beginning of a metal chimney or a metal section that connects the stove to the brick chimney.
Metal chimney
Since there are two types of chimneys, their installation occurs differently.
Internal structure
- If the pipe runs inside the bathhouse structure, then usually the entire system has an almost perfectly vertical appearance. A chimney is assembled from separate elements, with each higher-level part being placed on top of the lower one - installation “along the smoke”.
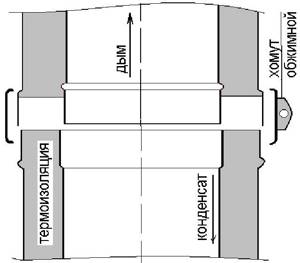
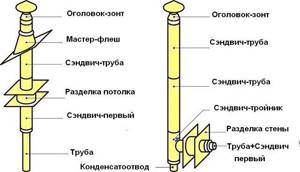
The usual scheme for connecting sandwich pipes: the inner part is “through condensate”, the outer part is “through smoke”
. If sandwich pipes are used, the approach changes somewhat - installation of their inner part is carried out “through condensate” (the upper pipe enters the socket of the lower one) and the outer part - “by the smoke”. This system allows accumulated moisture to flow freely inside the pipe down into the condensate collector, without getting into the heat-insulating material, which loses its properties due to waterlogging.
- It is very important to calculate the placement of connections in such a way that the joints do not fall on the levels of the attic or interfloor ceilings, as well as the roof.
- If the stove is located next to wooden walls, they must be protected from possible overheating and fire with heat-resistant materials, for example, it could be asbestos boards, which are best secured in two layers.
Thermal insulation of walls and ceiling transition
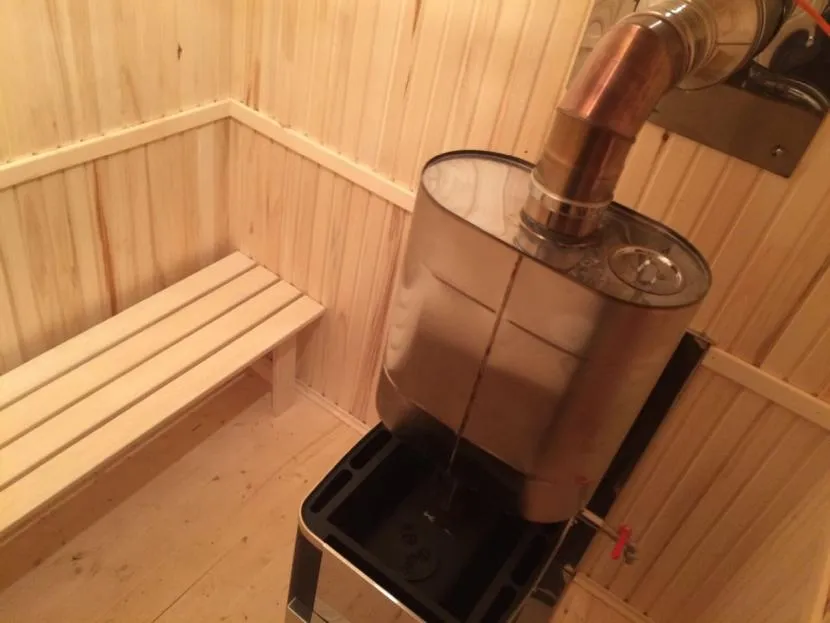
- If a samovar-type water heating tank is installed, then a place is found for it not far from the firebox, placing it directly above it, or in the attic, if the heated water is distributed into two rooms - the washing room and the shower room.
- Before installing the pipes, their joints are coated with heat-resistant sealant, and after installation on top they are additionally secured with special wide clamps.
Clamp for reliable fixation of pipe connections
- If, when combining individual elements of the chimney, sufficiently large gaps are found, then the inserted part is sealed using an asbestos cord, which is wrapped around the pipe. However, it is better to select elements that fit each other perfectly in size.
- The first section of the chimney, attached to the stove pipe, cannot be multi-layered, that is, it is a regular single-walled metal pipe with special connections. It usually has a valve installed, which is otherwise called a gate valve. This control element is necessary in order to create and maintain the required level of draft for the period when the sauna is heating up, and to retain the heat of the stove as much as possible after the end of the fire. The installation location of this element can be clearly seen in the chimney installation diagrams presented above.
Pipe section with gate valve
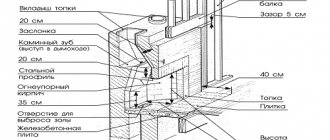
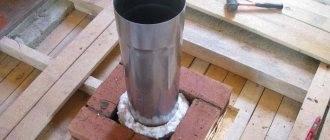
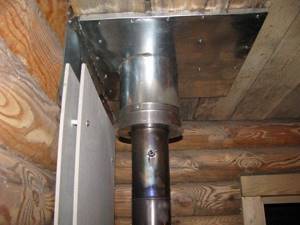
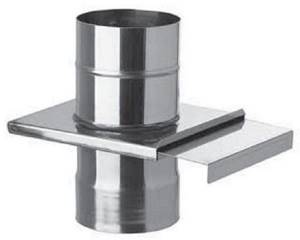
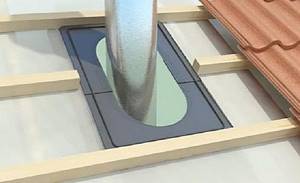
- To pass the pipe through the ceiling, it is convenient to use a box with a wall height of 30 ÷ 40 cm greater than the thickness of the ceiling. The distance from the pipe to the walls of the box must be at least 180 ÷ 200 mm.
Passage block - a special box for the ceiling.
A square hole is cut out in the ceiling into which the main box can easily fit. Its bottom, that is, the lower part, is fixed to the ceiling. Through a hole in the bottom part, the chimney pipe is passed into the attic.
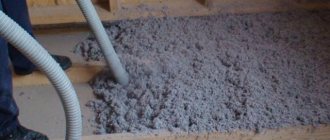
Then the box is filled with light, heat-resistant material - it can be medium-grained expanded clay or mineral stone wool. The box is filled completely with such thermal insulators, to the top, with the maximum possible density.
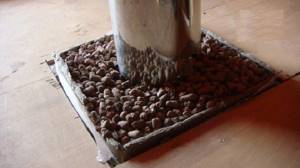
A box filled with thermal insulation material (in this case, expanded clay)
In the attic, the box is closed with a metal lid with the same round hole, which is placed on the protruding part of the pipe.
- In the attic, the chimney usually runs straight, but if it suddenly hits the sheathing bars, you can use bends to make a slight bend.
In the attic, to avoid hitting a rafter or beam, you can make a slight bend
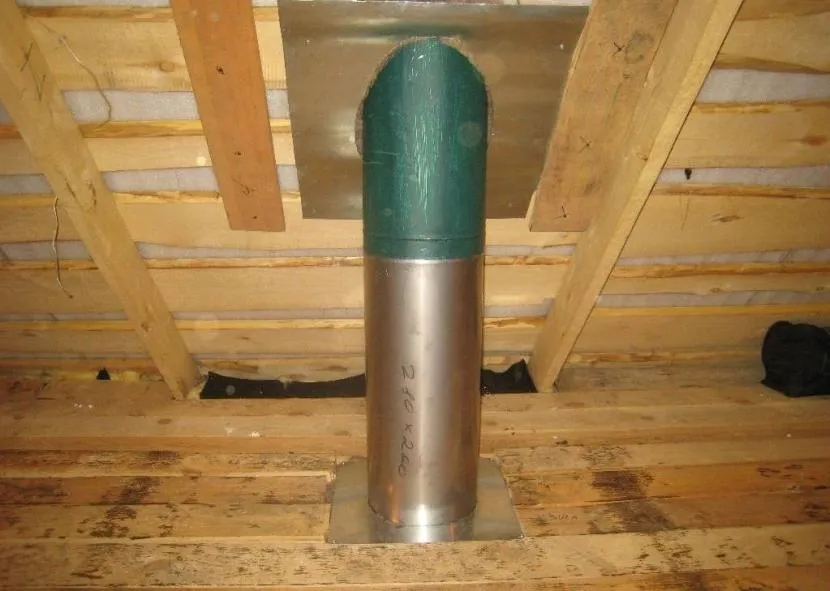
- When the pipe passes through the roof, a metal or asbestos sheet with a hole is also fixed on the attic side. The hole can be round or oval, depending on the slope of the roof.
Pipe passage through the roof
Safe heat-resistant insulation made of asbestos boards or mineral wool is laid around the pipe. Such a gasket or box will protect the flammable elements of the rafter system.
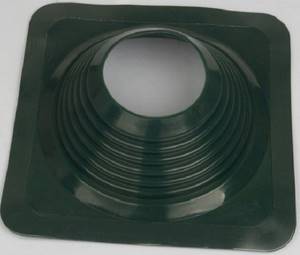
Next, after laying the roofing material, it is necessary to carry out waterproofing work, since moisture can penetrate into the gaps between the pipe and the roof covering. To do this, a special elastic element is put on the pipe, which is glued to the roof surface using a moisture-resistant sealant, and then securely fixed with fasteners (for example, roofing screws, self-tapping screws).
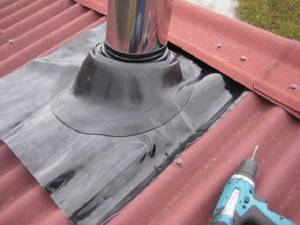
“Flash” is an elastic element for sealing the passage of a pipe through the roof
- It is imperative to install a protective umbrella on top of the chimney, which will protect the chimney from not only precipitation, but also various debris or dust.
Pipe umbrella
External structure
To install the chimney according to the scheme with its external placement, the pipe from the stove is led out through the wall. To ensure safe operation in this case, it is best to use brickwork, which will cover the brick wall behind the stove and insulate the wall from heat when the chimney passes through it.
The diagram clearly shows what a pipe route through a wall looks like in cross-section.
One of the options for external placement of the chimney. Disadvantage: condensate collection is not provided
- In order to turn the pipe towards the wall, you will need a system element called a bend or elbow. Such parts are produced with rotation angles of 90 or 45 degrees (sometimes there are others), so it can be selected to suit any design location.
Tees and bends
- The pipe can be routed through the wall and through a metal box, just like through the attic floor. In this case, the box is filled with stone wool, and small gaps around the pipe are sealed with heat-resistant sealant.
- A tee is installed on the external wall, from which further installation will proceed - up, along the wall, and down, to the condensate collector.
- Special fasteners-holders are installed on the wall, which will fix the chimney vertically. The pipe is raised above the height of the ridge by about half a meter - this is necessary to create good traction.
- A protective fungus is placed on top of the pipe head.
The installation of an external sandwich chimney is explained very roughly, since it is described in more detail, with all the nuances, in a publication on our portal specifically dedicated to this issue.
Video: version of a metal sauna chimney with access to an external wall
Brick chimney
Brick chimneys are divided into root and mounted. For sauna stoves, the first one, the main one, is ideal, which is located next to the stove.
If the stove is also made of brick, then the chimney is attached to the overall structure. Well, if the stove is metal, then it is connected to the brick chimney with a metal pipe.
The sauna stove is connected to the main chimney by a metal pipe
The figure shows an approximate diagram of a brick chimney, with all its departments:
- Closer to the ceiling, a smoke valve is installed on the pipe, which regulates the draft inside the furnace, on which both the intensity of combustion and the long-term preservation of the entire structure in a hot state depend.
- Next, to allow the pipe to pass through the attic floor, fluffing is performed in the chimney structure. Fluffing or cutting is the thickening of the walls of the chimney while maintaining its internal cross-section. This is provided in order to protect flammable materials of the ceiling from possible overheating and fire.
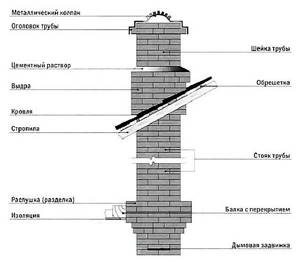
Scheme of a “classic” brick chimney
- Above the fluff there is a straight section of pipe that runs through the attic and is called a riser.
- Above, when passing through the roof, an otter is laid out, which, in principle, “works” in the same way as fluff, protecting the rafter system from overheating. However, in addition to this, it closes the gaps between the roofing material and the chimney masonry with bricks protruding from the general structure.
- The pipe is then tapered to its original outer size - this section is called the neck.
- Above the neck of the pipe there is a head, the bricks of which also protrude outward beyond the width of the walls, providing additional protection from precipitation.
- The chimney will be protected by its final element - a metal cap - from getting water and dirt inside the pipe.
Chimney installation
The chimney is removed from the foundation according to one row pattern, since the structure must be level and not have any protrusions or windows, with the exception of leaving a hole in it for embedding a metal pipe from the stove.
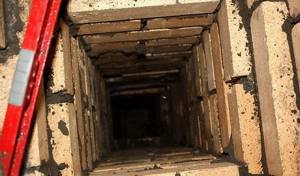
Internal channel of a brick chimney
This chimney is built in the form of a square pillar with a well-shaped section inside. The section size can be “half a brick” - 130 × 130 mm, “a brick” - 130 × 260 mm, or even two bricks - 260 × 260 mm. It all depends on the power of the sauna stove.
- The basis for the chimney will be the foundation - usually it is made the same thickness as for a sauna stove, and forms a single structure with it.
- Having raised the pipe to the desired row, a valve is installed in it, and then work proceeds according to a scheme that is suitable for both the top and the main chimney.
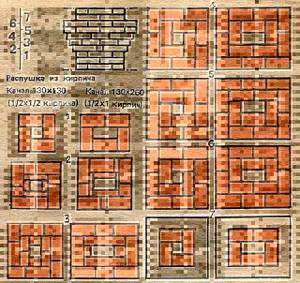
Schemes of row laying of the chimney and fluff
- This diagram shows two pipe options. They are given as an example for masonry, therefore, given the size of the chimney, the number of bricks on each side may vary in one direction or another.
— The first row in the diagram is the final row of the pipe neck.
— In the second row, the fluff begins to be laid out, so the bricks are laid with a shift to the outside, by about ⅓ of the brick. Here you will have to use not only whole bricks, but also their parts. To do this, using a pick, they are carefully broken into the necessary fragments.
— When moving the bricks to the side, they need to be supplemented inside with additional fragments, since the internal cross-section of the well must remain unchanged throughout the entire masonry. Failure to comply with this rule may significantly reduce traction.
— From the third to the fifth row of fluff, the brick also moves outward by ⅓ of the length, still maintaining the size of the internal section.
— The sixth row has the same size as the fifth and is laid out without shifting to the side.
— The seventh and eighth rows correspond to the laying of the first row.
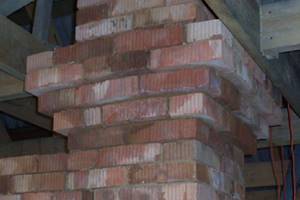
This is what the finished fluff looks like
- After the cutting masonry is completed, it is the turn of the otter to be erected. This is a rather difficult task, since it is necessary, with the help of each subsequent row, to build a step that protrudes outward by ⅓ of the brick.
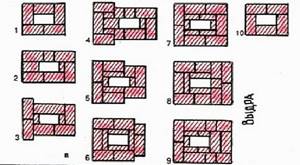
Otter laying pattern
- The first row of otter is the same size and shape as the last row of cutting.
— In the second row, the laying of steps begins, which expand the chimney outward by also 1/3 of the width of the brick.
— Further rows are laid out in accordance with the otter pattern.
- Then comes the neck of the pipe - it can be clearly seen in the diagram presented.
- Next, lay out the head, which consists of two rows, and the bottom one should also protrude somewhat outward.
- The last step is to install the roof cap.
In this case, combustible elements in the attic floor will be well protected by fluff, but you still cannot do without waterproofing the pipes on the roof.
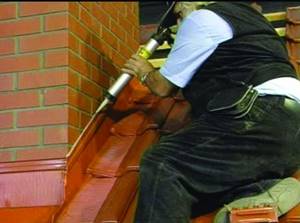
- Waterproofing of a brick pipe begins before covering the roof with roofing material. It can be done using roofing felt and mastic. After applying mastic to the surface of the lower part of the pipe, it is heated with a burner, and then roofing material is glued to it, pressing it firmly to the heated surface.
- Next, roofing material is laid close to the pipe on top of the roofing material, and a decorative finish (apron) is installed on top of it. The remaining gaps must be tightly filled with sealant to prevent moisture from entering through the cracks between the roof and the brick pipe.
Sealing the gap between the apron and the brickwork
So, in principle, any of the chimneys can be erected with your own hands. Probably the most difficult part of all installation is to correctly mount the pipe passage units through various obstacles. Any problems can be solved if you approach them competently, study all the instructions and choose the right option. However, the article must end with an important warning:
A chimney is a structure on which the health and even lives of people, the safety of buildings and all property located in them directly depend. There are no and cannot be trifles in the process of building a chimney; no amateurish simplifications are acceptable. If you have even the slightest doubt about your abilities or about the correctness of the design being created, you need to seek help from specialists. There is no need to be ashamed of your ignorance or inexperience – the stakes are too high!
Find out the available ways to clean a chimney with your own hands from our new article.
Choosing material for making a chimney
Chimneys are made from a variety of materials, from traditional brick to heat-resistant glass and ceramics. They are chosen based on practicality, financial capabilities, fire safety requirements, appearance and many other factors. For example, when deciding which pipe is best to put on an iron stove in a bathhouse, it is unlikely to be logical to consider a heavy brick chimney. Although this option is also possible. Therefore, it is worth studying in detail all existing types of chimneys, their pros and cons.
Brick
A brick chimney has excellent heat capacity - it remains hot for a long time after the end of the firebox, releasing heat into the surrounding space. At the same time, the outer surface of the pipe does not heat up so much as to cause a fire in the adjacent structures. You can also note the safety for health (when heated, the brick does not emit harmful substances) and the visual attractiveness of such a pipe.
The thickness of the walls and the non-flammability of the material make it possible not to construct a fire protection unit when the chimney passes through the ceilings Source mybuilding.tips
However, today this material is not as popular as it used to be, when the choice of chimneys was small. Brick pipes have many disadvantages compared to them.
- Heavy weight. The brickwork has an impressive mass, so such a chimney requires the construction of a durable concrete base buried in the ground.
- Incompatible with modern metal stoves. The brick pipe cannot be placed on the stove; it is laid out separately and connected to the firebox by an outlet pipe.

An example of connecting a stove to a brick chimney Source izba-brevno.ru
See also: Catalog of companies that specialize in fireplaces, stoves and utilities
- Frequent cleaning required. The rough surface of the internal walls and the rectangular cross-section of the pipe lead to the fact that deposits of wood combustion products quickly build up in it.
- Difficult to install. Carrying out brickwork requires experience to ensure that the structure is smooth, with as smooth walls as possible and well-made seams through which smoke should not leak.
Considering all the advantages of brick chimneys and the problems associated with their installation and operation, such structures are chosen primarily for the installation of brick sauna stoves, which are always placed on a foundation. But even in this case, they are often sleeved, installing steel or asbestos pipes inside the masonry.
Through a pipe with a round cross-section, smoke escapes faster, without turbulence Source blogspot.com
Ceramics
Like brick, ceramic chimneys are not afraid of high temperatures, acids, alkalis, and moisture. But they also have a lot of weight and require a support base. And if you choose which is better, a brick or ceramic pipe for a sauna stove, then preference should be given to the latter - the round cross-section and smooth surface do not allow soot and street dust to settle and accumulate on the walls.
Ceramic pipes for chimneys Source schiedel.com
This is an ideal option for a bathhouse, which is most often rejected for three reasons:
- relatively high cost;
- the need to fill the foundation;
- occupied by a chimney installed on the floor next to the stove, the useful area of the steam room.
The pipes themselves do not weigh so much that they cannot be installed directly on the stove. But they are mounted inside special concrete or ceramic blocks that have a large mass. These blocks protect rather fragile thin-walled ceramics from mechanical damage and serve as a frame for laying thermal insulating shells made of basalt wool around them. This design of the chimney eliminates the appearance of condensation in it.
Depending on the type of external blocks, the ceramic chimney can be made single- or double-channel. This is convenient if you need to combine the smoke exhaust system from two stoves. But such a need usually arises only when arranging large baths with many isolated rooms.
The kit may also include shaped connecting elements and special compounds for assembling and sealing the chimney Source vhdom.ru
Glass
If we talk abstractly about a chimney for a bathhouse - which one is better to choose, so as not to think about the need for repair and cleaning, and not to be afraid of fires and smoke leaks, then the most correct solution would be a pipe made of heat-resistant and impact-resistant glass.
But it will cost a very decent amount, since both the material itself and the installation of a glass smoke duct cost a lot of money. And finding a specialist capable of professionally performing this work in our country is still almost impossible.
Asbestos
This option cannot be recommended for indoor installation on a sauna stove, since asbestos releases toxic substances when heated. Such pipes can be installed during external installation of chimneys, using steel adapters to connect to the firebox and pass through the wall.
But you need to understand that cheap asbestos pipes will not last long, since their porous surface will absorb moisture, which expands when freezing and causes destruction of the material. In addition, soot will quickly accumulate on their walls, and cleaning the channel using mechanical methods can be disastrous for fragile walls.
Inexpensive but unreliable asbestos pipes Source mtv-plus.rf
Chimney construction technology for a brick kiln
Most problems with unstable operation of a brick stove are usually associated with unbalanced draft in the chimney.
It is especially important to correctly calculate and assemble the chimney structure for a massive stove designed to use low-calorie fuel - firewood, pellets, peat or sawdust briquettes. Most often, owners choose the simplest way - to make a brick stove and chimney in their house or bathhouse. Is this always justified?
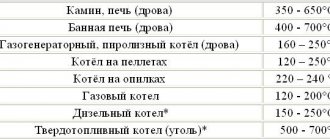
The power of the stove is directly related to the cross-sectional size of the chimney duct:
- For small stoves, a square section with an edge of 120-150 mm will be sufficient. Most often this is a channel that has four bricks in a row, so the size of such a section is often called a quad;
- For a bathhouse of 15-20 cubic meters or a fireplace, you will need a chimney with a cross-section of “five” or 125x250 mm. When laying, five bricks are placed in a row;
- For Russian stoves and large sauna heaters, they use the “sixth” size with a channel of 250x250 mm. This is a very large cross-section, and should only be used for low-lying pipes or a very large furnace firebox.
Structurally, the laying of a chimney is no different from the laying of the stove itself. The only area that requires the hands and skill of a professional is the top pipe. At this point you need to properly bandage the brick being laid. For a simple tower chimney structure, the pipe can be made of alloy metal and connected to the main brick duct, as shown in the figure.
How tall should the pipe be? There are certain recommendations for the installation and layout of the height of the brick pipe and the ridge of the roof of the house. If the pipe is located at a distance of up to one and a half meters from the ridge, it is raised to a height of up to half a meter above the highest point of the roof; at a distance of up to three meters, the pipe cut can be level with the roof ridge; everything that is further should not be at 0.2-0.3 m below the ridge.
They try to raise the total height of the chimney to a level of 5 meters, this allows for a “cold” air flow of around 1-2 m 3 /hour, which is quite enough to ignite the stove. Higher pipes will make the stove uneconomical.
Conventionally, the brickwork of a chimney can be divided into two parts - up to the widening, or fluff, and above it. A flange is a thickening or banding of brick that allows you to secure a very unstable tall structure in the ceiling system of a house. Despite the obvious ineffectiveness of fluff, it should not be neglected, except for the possibility of attaching to ceiling beams. This element strengthens the relatively thin brick pipe and prevents the development of cracks due to transverse wind loads.
In addition to the fluff, the chimney pipe has an otter and a cap. The first element is a belt or thickening on the top of the chimney pipe, located above the roof. You don’t have to do it, it works like an umbrella over the junction of the roof and the brickwork. The head can be made of steel or brick.
When choosing a chimney pipe design, give preference to simple and reliable vertical pipes. They are unpretentious in operation and do not require frequent maintenance.
If you choose the right mortar materials and bricks for masonry, and maintain a vertical position above the stove, then this option will serve you faithfully for many years. Such a chimney is quite simple to set up and modify in case of changes to the design of the stove.
For masonry, you can use high-quality red brick of the M100 brand, without cracks or signs of warping. Fireclay is usually used in superstructure pipes and in places where gas flow turns around. The temperature at the entrance to the pipe can rarely rise above 800 o C, so in most masonry, from the base to the top, they are made with ordinary bricks. Coal or combined stoves are another matter; in this case, the lower tier of brick is supplemented with inserts made of dinas or fireclay.
You cannot use sand-lime and clinker bricks, materials with the addition of organic fibers, natural stone fillers, all of them crack under the influence of temperature, and sand-lime brick, even at low temperatures, is susceptible to corrosion due to the large amount of carbon dioxide.
A fairly large amount of work in the manufacture of a brick chimney, especially the upper parts of the structure, forces owners to look for alternative options, for example, from a metal or asbestos-cement pipe. Despite the visual appeal of the idea, in practice metal or asbestos is used to install the top of the chimney. At the bottom of the riser, transition sections made of alloy steel from the furnace to the flue pipe channel can be installed.
Pipes made of alloy cast iron have excellent performance characteristics. Unlike brickwork, a cast iron chimney is not subject to shrinkage or cracking of the material. It picks up heat well and, due to the high thermal conductivity of the material, provides very smooth and stable draft in the channel.
But the cast iron channel, with a diameter of 150 mm and a length of 4-5 m, is very sensitive to the correct setting of thermal gaps on the chimney mount. Due to the high coefficient of thermal expansion, if the surface of the pipe is tightly pinched, the metal may crack during the first attempt to warm up the furnace.
A freshly laid brick chimney requires no less careful and careful handling during drying and sedimentation processes in the masonry. During the first week, only paper and wood chips are burned in the canal. After a couple of weeks, after the solution has set, the temperature is slowly raised to the operating temperature and, having closed all the holes and dampers, it is also slowly cooled. If no problems arise, you can proceed to normal use.
You can talk for a long time about what to make a chimney from and how it should look outside and inside. Let's focus on the classic version:
- In this case, you need to use a solid one made of clay, but it’s better to forget about ceramic or hollow ones. For example, the latter option is not able to accumulate heat, as a result the chimney quickly cools. Sand-lime brick is not able to withstand the processes that occur during the removal of exhaust gases from fuel for a long time, and soon becomes unusable.
- Using bricks, you can lay out a system of channels in the chimney and adjust the thickness of its walls. It must be said honestly that no other material can cope with this.
- The binder is a mortar of cement or lime. The first one is necessarily used for external work, the second one copes well with internal work. Moreover, this provides significant overall cost savings, since the price of lime is much lower.
- Chimneys differ from each other in height, cross-section inside the trunk, and size of the firebox.
- The main parameter is the correspondence between the height and cross-section of the pipe. For example, a fairly high brick chimney with the same large cross-section will not be able to fulfill its intended role, since the hot air will rise upward slowly, which will cause condensation. It will begin to flow down the pipe, causing a foreign burning smell in the room. In this case, the draft will also be insufficient, causing smoke in the room.
- Another important parameter is the ratio of the internal cross-section of the chimney and the dimensions of the firebox. The larger the latter, the larger the cross-section should be. Otherwise, exhaust gases will not be able to quickly leave the chimney; as a result, smoke will accumulate next to the heating device.
We suggest you read: Is it possible to take a steam bath if you are sick?
How to make the transition from a brick pipe to a sandwich
The pipe can not only be combined with the wall of the house, but also make it a separate structure. But, in any case, it should be made at the time of construction of the cottage, since there must be an appropriate foundation under it, which is best poured in the first stages of the process.
Chimney for a gas boiler made of brick with a container for collecting condensate
Depending on the pipe design, not all of them may be present.
The trunk consists of:
- firebox (inlet);
- hats;
- deflector (visor).
Connecting the roof to a brick pipe with a fire-prevention gap
Building the foundation
There are basic rules for the process:
- The base must match the weight and height of the pipe.
- It can be made of brick or stone, filled with concrete or reinforced concrete mortar.
- Please note that the width of the foundation should be 100-150 mm wider than the trunk in each direction.
- In preparation for pouring, you need to install formwork around the perimeter and put waterproofing material inside, usually roofing felt.
Tip: if pouring concrete, install a metal mesh or reinforcement inside the formwork.
- After laying the brick or pouring, wait until the mortar hardens to remove the formwork without damaging the foundation.
How does a pipe for a brick kiln work?
Below is a process guide that will help you understand complex construction:
- Prepare M75 bricks for laying inside the house. For a chimney rising 2-3 floors, use M100 or more.
Internal brick chimney pipes are made from M75
- The outer part must be laid out of stronger and moisture-resistant bricks, its grade is from M150. Be sure to choose high-quality material, since the service life of chimneys should be long. (See also the article Pipe for a potbelly stove: features.)
- The proportions of materials in the masonry mortar are lime, cement, sand, respectively 1:2:5. For exterior work, lime is excluded.
- When laying bricks, it is necessary to carefully fill all seams with mortar to ensure the tightness of the structure.
Pipe for a potbelly stove: features.)
- The proportions of materials in the masonry mortar are lime, cement, sand, respectively 1:2:5. For exterior work, lime is excluded.
- When laying bricks, it is necessary to carefully fill all seams with mortar to ensure the tightness of the structure.
Stages of laying a chimney flare.
Selecting pipe parameters
To determine the amount of material for equipping the stove in the bathhouse with a smoke channel, you need to know its length and diameter.
Diameter
What pipe diameter is best to use for the chimney into the bathhouse is not an idle question; your safety and the normal operation of the stove depend on it.
We are talking about the internal cross-section of the chimney or the size of the lumen of the pipe through which smoke is evacuated to the outside. If there is a factory-made stove in the bathhouse, then it is easy to determine the required internal diameter of the smoke channel: it should be the same or slightly larger than the outlet pipe from the firebox.
The outlet pipes have standard sizes, allowing you to accurately select a chimney pipe for them Source domizbrusa.by
How to choose and calculate a brick chimney
Before making a chimney, you will have to rack your brains and calculate the dimensions of the future channel, look at literature and projects, maybe look at your neighbors or friends to see their version of a chimney for the house and for the stove in the bathhouse. No matter how clever the advice or calculations are, there is no substitute for practical experience.
The operation of a stove chimney for a bathhouse and a residential building is similar, but has specific differences. For a bathhouse, a stove is built to accelerate heat as quickly as possible and warm up the room; for a home, the efficiency of the stove and the ability to flare up in any weather are important.
Before installing a chimney for a stove in a bathhouse, you will need to carefully consider several basic issues:
Important! In addition, the chimney should be easy to maintain and clean the channel from soot. Therefore, the design will need to provide an inspection entrance of at least the size of the chimney cross-section.
Most often, it is installed at a level of 40-50 cm above the connection - the junction of the stove firebox with a free-standing chimney column. Such an entrance must be blocked with a special block - a brick plug, and hermetically closed with a metal hatch with screw fastenings. A correctly made inspection entrance has virtually no effect on the level of traction, but makes it possible to clean the channel without much effort. At the same time, you can make a brush for cleaning chimneys with your own hands to fit the size of the revision.
Video description
How to determine the height of the chimney, watch this video:
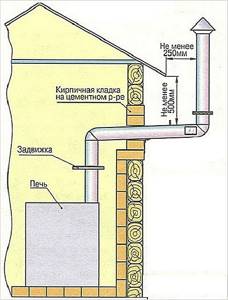
- If the horizontal distance from the ridge to the pipe does not exceed 1.5 m, it should rise 50 cm above it.
- At a distance of up to 3 m, the top of the pipe can be at the same level as the ridge.
- If it exceeds 3 m, then you need to draw a line from the ridge at an angle of 100 to the horizontal, and at its intersection with the vertical axis of the pipe installation the required height will be located.
- The length of the chimney above a flat roof should be 1 m.
Options for arranging a chimney pipe
How to make a brick chimney with your own hands? This question is asked by many stove heating owners. This process is not very easy and labor-intensive, but it saves money. Let's take a closer look.
Building a high-quality brick chimney is not an easy task and it is very important to carry out the masonry so that everything is airtight, fireproof, and every seam plays a big role here. The priority direction of the functioning of the chimney is the removal of smoke and fumes from burnt fuel using draft, which not only draws out, but also supplies air flows into the firebox, and due to this, the combustion process is supported and ensured.
Do-it-yourself brick chimney construction diagram
The big advantage of such a chimney is that it has good draft in all weather conditions and has an increased service life compared to metal pipes. Let's look at the question of how to build a brick chimney with your own hands according to all the rules.
We advise you to study in more detail the recommendations: what to make a chimney from in addition to this article.
Brick chimneys are laid in three steps:
- Step 1. Carrying out preparatory work and laying the foundation.
Brickwork for the foundation of the future smoke exhaust duct
At this stage, you need to carefully familiarize yourself with the construction drawings of the future chimney duct. For an ordinary and traditional wood-burning stove, complete masonry is required; for a brick chimney for a gas stove, a metal pipe made of a specialized alloy will definitely be required as an addition.
Advice! The height of the foundation base should be 30 centimeters or more, and the width, which is fifteen to twenty centimeters larger than the chimney duct, will be optimal. On such a foundation the chimney will stand stable.
- Step 2. Laying the chimney duct.
The second stage of constructing a brick chimney with your own hands. Masonry
The chimney is built at a height of five meters or not lower than the roof ridge, as this plays a big role in draft. This type of chimney is laid exclusively with specialized fire-resistant or solid red brick. To bind them, a solution of cement and sand or limestone is used, and for places with particularly high temperatures, a specialized mixture is needed, used for stove masonry.
To break off the required piece of brick, you will need a grinding and cutting machine and a marker (felt-tip pen) for measuring. Using these tools, it is possible to create plates that are absolutely accurate in size, which will be needed in the field of otter, as well as cutting.
Advice! The seams need to be made thinner. Thus, the chimney made will be stronger. The width of the seams should not exceed fifteen millimeters.
Brickwork chimney for a gas heater
If you pay attention to the private houses located around you, in most of them the chimney is made of brick. In addition, they have proven themselves to be excellent for saunas, as well as for other buildings where stoves, boilers and fireplaces are used for heating. Below we will tell you what a brick chimney pipe is, how to make it, and also give useful recommendations from professionals.
We invite you to familiarize yourself with Quartzite stone properties for baths
But, before this, it is necessary to recall that you can get the maximum benefit from a structure only if certain rules for its construction are observed. Otherwise, smoke will begin to flow into the room rather than leaving it.
In the photo - a brick chimney
Chimney installation can be divided into several stages.
Before you begin installing a chimney in a bathhouse with your own hands, it is necessary to protect the places where the smoke channel passes through the ceilings. This section will require the use of a special element called a through pipe.
Stage 1. We start by preparing the pipe. We place a layer of basalt wool along its outer surface.
Stage 2. Then we move on to insulating the inner surface. We mark the installation point on the ceiling and use standard dimensions to prepare a rectangular hole for the future smoke duct.
Stage 3. We install an additional insulating layer where the pipe touches the ceiling, then install the pipe.
Stage 4. A minimum gap must be left between it and the smoke channel for additional heat removal.
Now let's start cutting the roof.
Stage 5. We take measurements from the outside and inside, not forgetting to take into account the slope of the roof.
Stage 6. From the inside in the roof we cut out the necessary hole for the chimney.
Stage 7. We take galvanized sheeting, with a pre-made hole for the smoke duct, and attach it to the roof.
Stage No. 3. Installation work.
We propose to consider installation operations using the example of assembling the most popular dual-circuit system.
Stage 8. We begin connecting the chimney from the stove. We connect the sandwich module to the special outlet of the oven. We do not insulate the area near the heating device, because the temperature in this place is too high. Regardless of the quality of the chimney material, due to maximum temperature conditions, this section will fail within a short time.
Stage 9. We insert each subsequent internal module into the previous one. Then put on the outer pipe. In this case, it is necessary to ensure that the new module is connected to the previous narrow end. This will ensure that the condensate formed during operation will flow freely down the pipe and will not flow into the joints.
Stage 10. After installing all structural elements, we fasten the tees with the prepared fasteners and seal all connections with clamps.
Stage 11. Upon completion of work, remove the protective coating and apply a fire-resistant sealant that retains its properties at high temperatures. And so, you built a chimney in your bathhouse entirely with your own hands!
So, what exactly is a brick chimney? At the very beginning there is a supercharger pipe, which is installed directly on the stove. There is a valve in it. The top pipe is laid out with a special ligation of bricks.
Five to six rows before the interfloor ceiling, the top end ends and the neck of the fluff begins. The fluff is the subsequent widening of the brick chimney, but its cross-section remains the same as throughout the entire pipe. In fact, only the outer part of the fluff widens - by 25-40 cm.
The part of the brick chimney that goes into the attic is a riser, a flat part that will go all the way to the roof.
The next cut is otter, a special expansion on four sides, no less than 10 cm. It is thanks to this that precipitation does not fall into the cracks between the roof and the chimney into the attic of the bathhouse.
But after the otter, the neck is already placed - the same size as the chimney. Its masonry ends with the last extension, which forms the head of the chimney. You can already put a metal cap or deflector on it to protect the chimney itself from snow, rain and wind-blown debris. And it's good for traction too.
On the right side, the opening is filled with pieces of bricks to cover the space above the core. The distance between the masonry and the core should be about 3 cm, all voids must be filled with thermal insulation material.
In the next row, the space above the core disappears completely, after which the formation of a displacement of the channels towards the middle begins. In order to prevent the destruction of the masonry in the future, an additional row of bricks is laid above the core. The next row becomes the beginning of the narrowing of the brick pipe.
The cross-section of the pipe should not be larger than permissible, this will slow down the rise of combustion products. The easiest way is to purchase a ready-made structure, however, you also need to be able to install it correctly. When installing a pipe, its end must extend to the street at least 50 cm. At the joints of the chimney and roof, an otter is installed, which will protect the bathhouse from the penetration of precipitation.
Selection of components
It is not enough to simply choose which pipe to use for your sauna stove. For proper installation of the chimney and its safe operation, various components and consumables are required.
Even if your choice fell on an insulated three-layer sandwich pipe, installation begins with an uninsulated single-wall pipe, the task of which is to take the temperature of the gases leaving the furnace and release it into the room. Using an adapter, it is connected to the main chimney.
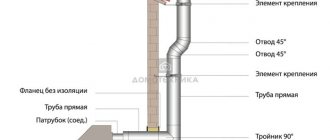
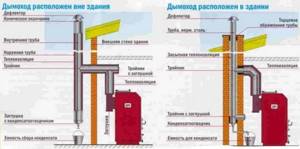
The set of components depends on the design and location of the chimney.
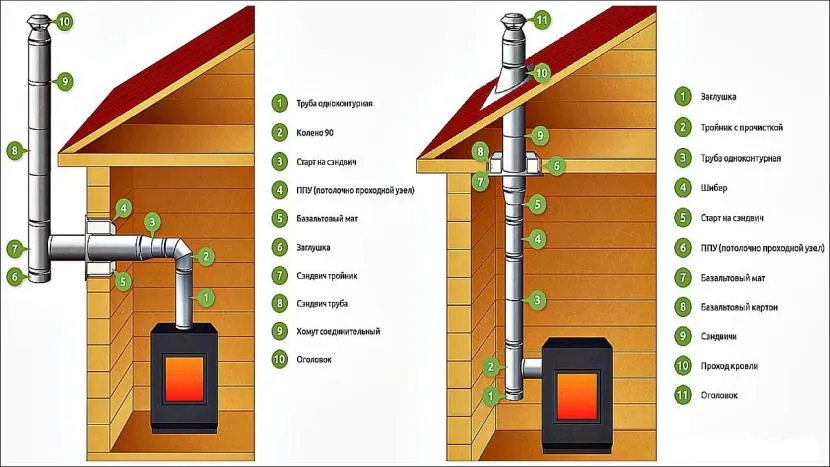
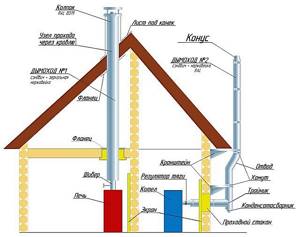
The main components of the external and internal chimney Source tvoya-banya.ru
A mandatory element of any design is a gate, which is a rotary or retractable valve mounted in a pipe. The damper handle extends outward so that it can be controlled by adjusting the draft.
To rotate the pipe or bring it out through the wall, you will need an elbow with the desired rotation angle. A cap in the form of an umbrella or a reflector is installed on the top of the pipe to protect it from debris and precipitation getting into it and from blowing wind. And tees are used to collect condensate and clean the chimney.
For reference! To clean brick chimneys, holes are made in them, which are closed with metal doors.
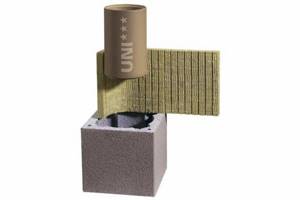
Particular attention is paid to arranging the passage of pipes through walls, ceilings and roofs. In prefabricated structures, the kit includes a PPU - a ceiling-passage unit, which just needs to be installed correctly, following the instructions.
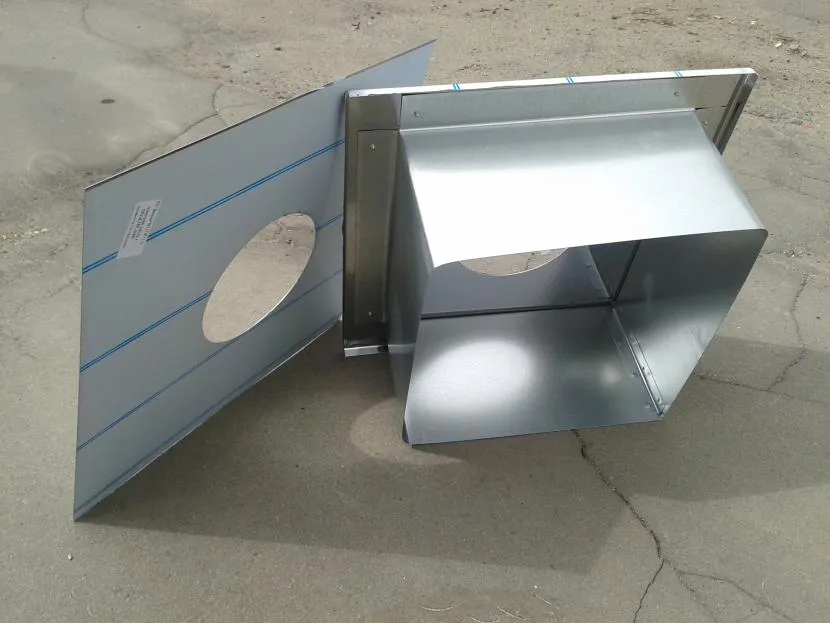
Ceiling pass-through assembly for sandwich pipe Source u-dacha.rf
Structural elements of the chimney system
Brick chimneys are the most common and are used in almost every private home. Traditionally, they begin to be built at the same time as the house. There are two types of chimney laying:
- carrier. One of the walls of the chimney will be the wall of the room;
- separate.
Freestanding chimney in the attic of a house
Regardless of the type, the masonry is done the same way.
Conventionally, a chimney for a brick fireplace can be divided into several sections:
- foundation. The main and obligatory section of the chimney duct, which is recreated from full brick or stone. The height of the foundation is made 30 centimeters, and gives it the appearance of a rectangle. Parameters such as width and length are selected based on the fact that it should protrude by more than fifteen centimeters. But also the size of the foundation depends on the main mass and bearing capacity of the foundation;
Place prepared for a foundation for a brick chimney
- brick chimney channel. It is made in a square, but the best option would be to lay it out in the form of a rectangle. The optimal channel dimensions are 14 by 14 or 14 by 20 centimeters. Such a chimney is most often laid by bandaging the seams using spoon or bonded rows. The surface of the chimney channel should be made perfectly smooth without protrusions or depressions. For this, specially prepared templates made of steel or wood are used. As the masonry is created, they should be lifted up.
Advice! The outer side should be plastered to its entire height. It is better not to touch the inside, since the chemical reaction that occurs as a result of combustion can lead to destruction in the shortest possible time.
Laying a brick chimney using a wooden template
- The chimney head or cap requires protection from precipitation getting inside it. It is usually made of concrete and reinforced with steel reinforcement bars. Such a cap is usually installed five centimeters outside the chimney and thereby prevents rain or melt water from entering the lining. Also, when constructing the masonry, it is necessary to leave holes on the cap for gas exhaust and smoke channels.
↓ Be sure to study the recommended material on the topic ↓
Do-it-yourself chimneys for solid fuel boilers: how to calculate correctly
Advice! To prevent problems with draft, the smoke exhaust pipe should be located higher than the roof ridge. To do this, install the nozzle. They can be made of concrete or sheet steel.
- On the furnace, it is necessary to install a top pipe equipped with a valve, after which it must be lined with bricks using a special specialized dressing method. At the end of the nozzle, the chimney passage should be expanded only from the outside by twenty-five to forty centimeters, the cross-section inside remains unchanged;
- the chimney section, located in the attic or riser, will rise to the roof itself. After this, an expansion of at least ten centimeters is made on each side. It's called otter. Due to the expansion, precipitation - snow or rain - does not fall into the slot between the roof and the chimney into the attic;
- "neck" - part of the smoke duct at the top of the roof, which is laid out after the otter.
A rectangular brick chimney is the best option
- vane. Tin collars made from sheet metal such as galvanized steel, aluminum or copper are used to protect the chimney and attic. Thus, precipitation falling on the dome rolls onto the tin collar, then onto the roof, and not onto the cladding and into the attic.
We invite you to familiarize yourself with the Insulation of a bathhouse from the inside - a diagram of the correct step-by-step insulation, types and methods of insulating a bathhouse made of cinder blocks, aerated concrete from the inside, photos, insulation of the base and roof of a log bathhouse, materials
The ideal design of a chimney duct in a bathhouse is a straight structure, running strictly vertically upward from the stove. This chimney is made of brick. A special feature of this oven is its location. As a rule, it is installed in the middle of the bathhouse structure, taking into account the location of the beams and rafters.
The advantage of steel and ceramic chimneys is the presence of additional elements. They allow the stove to be placed almost anywhere in the room, and if there are obstacles, they make it possible to design a chimney duct with a bend or a horizontal part in order to bypass the obstacles encountered.
But it is necessary to take into account that the total distance of the horizontal or inclined section should be no more than 1 meter. If this size is exceeded, it will negatively affect the operation of the chimney duct. Products of incomplete combustion of fuel will collect in the horizontal section, and the movement of smoke will be difficult. The maximum number of turns allowed is no more than two.
The connection of horizontal and inclined sections is ensured by the presence of various shaped parts of chimneys. When installing them, it is necessary to initially resolve the issue of further cleaning of the chimney. The knee is where soot accumulates. Here the output is considered to be an element such as a tee. The presence of a removable glass in it allows you to clean the chimney easily and without problems.
The tightness of the pipe joints not only ensures good traction, but also prevents smoke from entering the bathhouse. For safe and fireproof passage of the chimney through a wooden ceiling and roof, special pipes are used. A pipe is inserted at the intersection.
Wall brackets are used to fasten steel pipes, which are not light in weight. Installation of fasteners is carried out at a distance of no more than two meters from each other. Where the chimney exits to the roof, a roof cut must be made to prevent precipitation from entering the bathhouse.
The entry of rain and snow into the smoke duct is prevented by installing a protective fungus.
Brick chimney diagram.
The wiring of the smoke exhaust system includes a pipe, connecting elements and flanges. Materials for the construction of chimney pipes must withstand high temperatures without emitting toxic chemical compounds. The following materials and tools are used during construction:
- fire brick;
- cement mortar;
- Master OK;
- connecting elements;
- mineral wool.
Similar designs differ in the method of removing combustion products. To prevent heat from escaping from the room through the chimney, it is placed closer to the inner sides of the walls, in which case the best draft is ensured. If such a placement of the chimney pipe is still impossible, it is necessary to make its walls thick. The thickness of the chimney walls is selected depending on the ambient temperature.
If in winter the air temperature does not drop below -20°C, then you can make a pipe with walls no more than 38 cm thick. If you live in the northern regions, this parameter increases to 65 cm. If there are several brick stoves in the bathhouse, it is necessary to organize a separate system smoke removal for each of them.
If this is not possible at a height of 70 cm, the system is dissected. The internal walls of the chimney should not have any irregularities; it will not be possible to make it perfectly smooth, but the number of bends should be reduced as much as possible. This will prevent soot from accumulating inside the brick chimney, which will help prevent fire.
Selection by manufacturer
Those who prefer quality to an affordable price can be advised to buy products from manufacturers with a good reputation.
Steel chimneys on our market are represented mainly by domestic brands. Judging by the reviews, the products of the following manufacturers have the highest quality:
- Ferrum and Kraft (Voronezh);
- Schidel (Germany);
- Baltvent (Kaliningrad);
- Termofor (Novosibirsk);
- Vulcan (St. Petersburg);
- Inzhkomtsentr VVD, Rosinox (Moscow region);
- Rosst@In (Russian Industrial Company) (Moscow).
But the production of ceramic chimneys in our country has not yet been developed. We produce only external blocks and insulation for fireclay pipes imported from European countries.
Chimney cleaning
The bathhouse was built, the chimney was installed. You enjoy the delights of the bath ceremony. Like any device, the smoke duct requires maintenance. In our case, this is cleaning it. Over time, a layer of soot forms on the walls of the chimney, which impairs draft and can cause a fire, which in turn can lead to a fire.
The most common and effective method is mechanical cleaning. To implement it, you will need special rods, preferably dismountable ones with brushes, weights, and sometimes even a sledgehammer. This procedure is quite labor-intensive, and most importantly, dirty. Therefore, before cleaning the smoke duct, it is necessary to remove all things from the bathhouse premises and cover the walls, ceilings and floors with plastic wrap.
Another way to clean a chimney is to burn off the soot. To do this, you need to heat the stove with wood that creates good draft and intense heat, for example, aspen. This will cause the soot to burn out and be carried out in the form of ash through the chimney.
Recently, chemicals for cleaning chimneys have become increasingly popular. But they are no longer a means of cleaning, but a preventive measure to increase the time period between cleanings.
Video description
This video contains complete information about the installation of a UNI chimney, the blocks of which are manufactured in Russia:
Among similar products, it is worth noting the products of such joint ventures as:
- Shidel;
- Wolfshäuer;
- Ecoosmosis;
- Hymen.
But if you prefer completely imported products, then they are represented on our market by the following companies:
- Tona (Germany);
- Marshal (Czech Republic);
- Effe 2 (Italy).
Material for the chimney in the bathhouse
Brick chimney
As already mentioned, brick used to be the main material in the manufacture of chimneys. The advantage of building a brick chimney has always been the low cost of the material. Construction was the most economical and low-cost. Sand and clay, water and brick are what have always been within reach. Unfortunately, at this time, finding a furnace specialist is associated with certain difficulties. And in a brick chimney, quality operation directly depends on the professionalism of the stove maker. Therefore, the price for the services of a qualified specialist has increased significantly. The rectangular cross-section contributes to the creation of local turbulence in the smoke channel and leads to its clogging. It needs to be cleaned at least once every six months. However, if a brick chimney is built correctly, then this is a guarantee that it will last for many years. But a brick chimney is not always suitable for installation in a bathhouse. First of all, from the financial costs of installing it.
Steel chimney
The time of using brick as the only material for smoke ducts is over. An alternative solution was metal. The use of heat-resistant stainless steel in the arrangement of smoke ducts for a bathhouse was a breakthrough in smoke exhaust technology. Two-pipe designs have gained wide popularity. They consist of two pipes of different diameters with non-flammable insulation between them. The insulation protects the chimney from excessive condensation and its effect on the pipe. Such structures are called sandwich. As a rule, the outer pipe is made of either stainless steel or galvanized. Galvanized steel is more of a budget option that does not affect performance characteristics. The inner tube is made only of heat-resistant stainless steel with a thickness of 1 mm or more. When choosing a pipe, pay special attention to this parameter. Thermal insulator based on basalt rocks that can withstand high temperatures. Such smoke channels have a cylindrical shape, which makes them less susceptible to contamination.
Ceramic chimney for a bath
A new material that has recently appeared on the furnace equipment market is ceramic fireclay pipes. They have absorbed all the advantages of steel structures. At the same time, they are characterized by the reliability and long service life of brick smoke ducts. They consist of an internal fireclay pipe, a heat-insulating layer of basalt rocks and an outer casing made of stainless steel or lightweight foam concrete. The price of such a pipe is much higher than a steel chimney, but thanks to its long service life, the cost is more than recouped. This material competes with brick structures in terms of reliability, durability and fire safety. In principle, this is the same pipe; assembling it is as easy as steel sandwiches. Although in some cases it requires reinforcement of the foundation. There are special elements for assembling pipes into a finished structure. When purchasing a ceramic pipe chimney kit for your specific application, all of these elements and materials are included in the delivery. The cost of ceramic chimneys is approximately an order of magnitude higher than steel sandwiches.
Glass chimney
The ideal option for chimney systems is a glass smoke channel. This material has enormous advantages: absolute absence of corrosion, moisture resistance, low thermal inertia. But the cost of such chimneys is very high, and if you add the huge installation costs, then such material simply has not found distribution due to the enormous price. Although some optimists claim that glass chimneys are the future, and the time will come when all smoke channels will be made of glass.
I would also like to dwell on chimneys made from asbestos pipes. This is a material that cannot be used for the construction of chimneys. It is carcinogenic and fire hazard. An asbestos-cement smoke duct can cause a fire in your bathhouse.
To sum up what has been said, we can come to the following conclusion:
· Chimney made of brick, labor-intensive installation, requiring certain qualifications of performers.
· Steel chimney from pipes - not expensive, but has a short service life.
· A chimney made of ceramic pipes is durable, but the cost is much higher than that of steel chimney structures.
· A glass chimney has virtually no disadvantages, but the price of the material and installation costs are expensive. Didn't get distribution.
· Chimney ducts cannot be built from asbestos cement.
Briefly about the main thing
The main questions when choosing a pipe for a bathhouse are which one is better, safer, more practical, cheaper, more durable. Each owner has his own requirements, so their choice may vary. First you need to decide where the chimney will be installed - inside or outside, and then select it based on the material it is made of. The most practical and durable option is ceramics, but it is also the most expensive. The cheapest pipe is made of ferrous metal, but it is susceptible to corrosion. The optimal solution is a modular chimney made from a sandwich pipe. Regardless of the type of pipe chosen, it is necessary to calculate its diameter and length and select component materials for installation and insulation.
| Additionally The exhibition of houses “Low-Rise Country” expresses sincere gratitude to the staff for their help in creating the material. Schiedel is a leading global manufacturer and supplier of chimney, stove and ventilation solutions, with over 70 years of experience in the field. If you need more detailed advice or a free estimate, you can use the following contacts: Website: schiedel.com email: tel.: +7 (499) 271-30-74 tel.: +7 (499) 271-30-75 |
Ratings 0
Read later
Chimney construction technology for a brick kiln
It is worth paying attention to a number of mistakes that are made when building chimneys by non-professionals:
- Use of unsuitable materials such as asbestos and aluminum. This may cause a fire.
- An unauthorized change in the diameter of the chimney can reduce efficiency or destroy the structure of the bathhouse.
- Combining several chimney systems into one.
Several more typical mistakes in chimney construction are shown in the video presented.
https://www.youtube.com/watch?v=
Sometimes it seems that you can quickly build a chimney in a bathhouse with your own hands, without anyone’s advice. But the construction of a chimney is quite a responsible procedure, requiring compliance with the rules, the availability of skills and the study of modern techniques. This will save you from mistakes, and the chimney you built in the bathhouse will serve reliably and for a long time.
Chimney design and installation
When carrying out the design and installation of a chimney yourself, you must:
1. Competently choose the cross-section of the chimney pipe. The small size will not allow the combustion products of fuel to be completely removed. The wide cross-section will ensure the rapid passage of smoke, which will not allow the bathhouse room to warm up. This will increase the time and amount of fuel spent on heating. The cross-sectional size of the pipe depends on the power of the furnace. Its indicator ranges from 140 to 270 mm.
2. The optimal shape of the chimney is round. Smoke passes through this channel easily. It is less clogged and easier to clean.
3. If you place the chimney closer to the inner wall of the bathhouse, this will improve thermal insulation.
4. The height of the chimney duct is indicated in the stove equipment passport. But if the instructions do not contain specific dimensions, and you install the structure yourself, then you should install a chimney of at least 4.5 m.
5. The height distance from the roof ridge to the chimney head must be at least half a meter.
6. The smoke channel is equipped with a damper to adjust the draft.
7. As additional protection for walls and ceilings in the chimney area, it is recommended to use basalt wool, copper sheet or other non-combustible materials.
8. To increase fire protection and prevent fire at the point where the chimney passes through the ceiling, it is necessary to increase its thickness with non-combustible materials by at least 5 cm.
The design of the chimney in the bathhouse
By location, smoke channels for baths can be divided into the following:
· internal, the chimney passes through the internal space of the building;
· external, the chimney duct from the stove equipment is directed outside the room and passes through an open space.
The advantage of the internal location of the smoke exhaust is the use of the combustion waste temperature to heat the sauna room. This design facilitates the creation of draft in the chimney duct.
The external structure of the chimney facilitates the installation of the structure, but requires additional fuel costs, since the heat of the smoke heats the outdoor space, and not the bathhouse. In addition, there is an urgent issue about the formation of condensation and soot in the chimney duct. To avoid these problems, it must be additionally insulated.