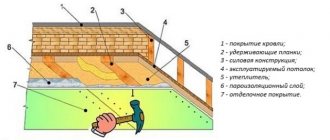
Roof waterproofing: it needs to be done right
When installing a roof, the most important issue is waterproofing. It protects the wooden parts of the roof from rain and melt water. Prevents the destructive effects of condensation under the roof space. Provides reliable ventilation and protection of insulating materials from getting wet.
In addition, the waterproofing layer serves as protection against wind. The penetration of cold air under the roof significantly increases the cost of heating.
Waterproofing functions
Functions of roof waterproofing
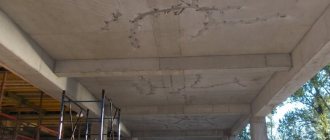
The need for waterproofing is explained by the fact that during its long-term operation the roof is exposed to many destructive factors. If moisture gets under the roof, its insulation begins to rot and collapse, which can subsequently lead to damage to load-bearing wooden structures.
In order to waterproof a roof, you need, first of all, to know that it not only protects the structure from moisture penetration, but also performs a number of auxiliary functions:
- prevents natural precipitation from entering under the roof;
- serves as protection against condensation formation;
- is part of the ventilation system.
Condensation, as is known, is formed due to the difference in temperatures under and above the roof and can accumulate on the surface of the insulation or other structural elements. The formation of a special ventilation circuit (which also includes a waterproofing layer) helps prevent the occurrence of condensation.
Let's consider options for forming a protective layer using a variety of waterproofing materials.
Materials for roof waterproofing
With the development of construction technologies, the waterproofing of roofs of private buildings has changed significantly. New roofing materials have appeared that require different water protection technologies. However, along with modern technologies, there are still cheaper materials for roof waterproofing.
There are two commonly used waterproofing materials:
- Waterproofing with roofing felt
- Waterproofing with polyethylene reinforced water barrier
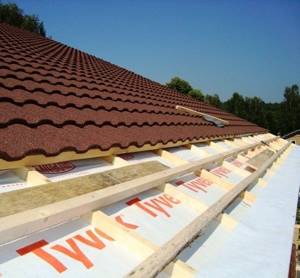
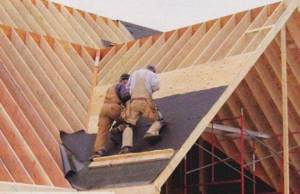
The traditional material for protecting wooden roof structures was roofing felt. This is cardboard impregnated with bitumen, which was attached to the rafters with an overlap of adjacent strips of 10-12 cm. To protect the joints from moisture penetration, they were coated with molten bitumen.
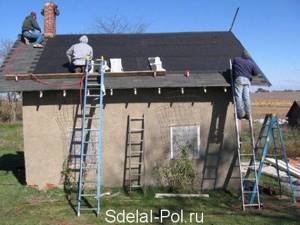
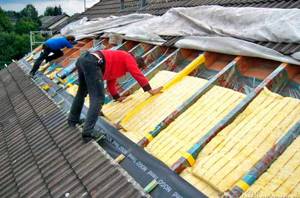
The installation of waterproofing on the roof is carried out by at least 3 workers (two on the roof and one below). Roofing felt is attached to the roofing frame with nails with wide galvanized heads. Wavy slate was laid on top. Thanks to the waves, the slate was ventilated, which prevented the accumulation of moisture under it.
It was a simple and very affordable way to waterproof a roof, which can still be found today. However, this method has a number of disadvantages that significantly affect the service life of the supporting roof frame.
The basis of roofing felt is paper, which in itself significantly reduces its service life when exposed to moisture. The joints of strips of bitumen waterproofing crack after temperature changes after 4-5 years and begin to let moisture through. This is caused by the aging of bitumen, as a result of which intermolecular bonds are destroyed.
When installed on rafters, bituminous roofing felt can easily tear from a slight load. In addition, the roll of this waterproofing is not light in weight, which also makes it difficult to install at height.
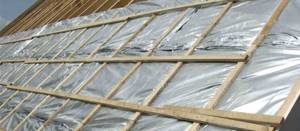
Steam waterproofing of a roof using a hydraulic barrier made of reinforced polyethylene film is a modern technology. It would not be entirely correct to call this material a film, because it has micro-holes for ventilation. It is more of a membrane than a film. With a small thickness, this material has high strength and low weight.
It is important to know! When laying a hydrobarrier, it is necessary to consider which side to mount the strips of material on the rafters.
The film should be laid on the rafters with the side without inscriptions or in accordance with the instructions that come with the kit. Often the installation sides are indicated on the hydrobarrier. In this case, condensation will not be able to leak through the waterproofing. If you mix it up, the water will pass through the membrane onto the thermal insulation. Wet mineral wool will lose its thermal insulation properties.
Laying steam and waterproofing under metal tiles or corrugated sheets
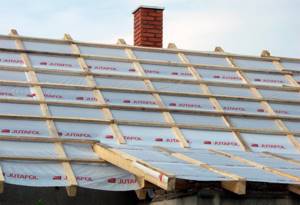
Waterproofing a roof under corrugated sheets or metal tiles requires waterproofing membranes according to technology. Only in this case is their service life of 50 years guaranteed.
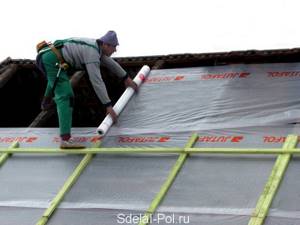
The technology for installing waterproofing is as follows: laying the first strip of the water barrier begins from the bottom of the roof. The roll is rolled out across the rafters and secured to them with staples or galvanized nails with a wide head.
The next strip is laid with an overlap of 10-15 cm on the previous one and is also attached to the rafters. The joints between two sheets at the places where the waterproofing is vertically joined are secured with wide butyl rubber tape. Two sheets are fixed with galvanized nails to the rafters by fastening a counter batten with a width of 20-40 mm
It is important to know! There is no need to install a hydraulic barrier under tension. It is recommended to attach the film between the rafters with a sag of no more than 20 mm.
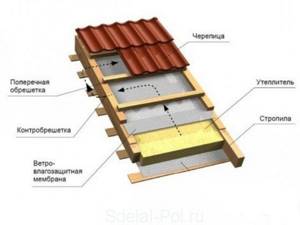
Counter battens provide a technological gap to ventilate the space between the corrugated sheet and the waterproofing. When the installation of waterproofing on the roof is completed, sheathing is installed to attach corrugated sheets or metal tiles. Wooden sheathing slats with a cross-section of 20 x 40 mm are fastened with nails in a direction perpendicular to the rafters.
Waterproofing an attic roof or the roof of any other building requires a 50 cm fastening step for the battens. All counter battens and sheathing beams are first treated with an antiseptic solution. It prevents the formation of fungi and protects the tree from insects. After installing the slats, you can install the corrugated sheet.
Particular attention should be paid to waterproofing around chimney pipes, ventilation and air ducts. According to the technology, a polyethylene membrane is glued to the chimney to prevent rainwater and condensation from getting under the roof. Butyl rubber double-sided tape is used as an adhesive material. The overlap should be at least 10-15 cm.
To further protect the waterproofing around the chimney from overheating, it is recommended to lay a layer of thermal insulation between the brickwork and the asbestos pipe. It is also worth noting that the waterproofing membrane can withstand heating up to 120 degrees C, and double-sided tape is resistant to temperatures of + 70 degrees.
Waterproofing and vapor barrier: what is the difference ↑
Before installing a new roof, you need to choose the right hydro- and vapor barrier films so as not to encounter various unpleasant surprises in the future, for example, stains on the surface of the attic ceiling in the absence of any defects in the roofing covering. That is why, first of all, it is necessary to clarify what waterproofing and vapor barrier are, what functions these insulating materials perform.
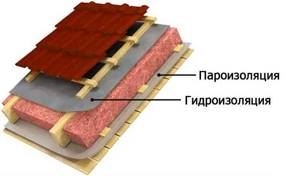
- Waterproofing. The main purpose of the waterproofing film is to protect the under-roof space from the penetration of moisture from the outside. Roof waterproofing is required in cases where the proposed thermal insulation layer is made of mineral wool insulation. Insulating a warm attic is considered a necessary operation, since the roof can only retain precipitation: raindrops and snow, while it cannot retain water vapor rising after fog or warm summer rain.
If there is no waterproofing of the roof from the inside, steam will directly enter the thermal insulation layer, “clogging” the air pores in it, and this will sharply reduce the properties of the insulation. This process is especially active in winter, when water vapor settled in the pores of the thermal insulation quickly crystallizes. That is why the thermal insulation layer needs protection from moisture coming from outside. This is exactly where film waterproofing material will functionally help.
- Vapor barrier. Vapor barrier film protects the insulation from the penetration of warm vapors coming from the ceiling. And they, as costs of human life, are present in abundance in residential premises, regardless of whether there is ventilation there or not, and how effective it is. This is what distinguishes a vapor barrier from a waterproofing material. Vapor insulating films are usually laid before the insulation layer.
Water vapor always diffuses towards cold air. The barrier that will first encounter steam on its way to the insulation layer will be the vapor barrier. Of course, it is difficult to expect that no part of the steam will nevertheless leak through the vapor barrier into the insulation. However, thanks to the vapor permeability of the waterproofing, steam will freely escape from it, after which it will go outside, picked up by ventilation flows.
Vapor barrier: which side to lay, how to lay waterproofing
In order for the roofing structure to successfully withstand the effects of moisture and steam, it is necessary to install the roofing pie according to all the rules. The quality of this work depends not least on the waterproofing materials used - glue, tape and vapor barrier tape.
We can only talk about high quality protection if all the necessary requirements are met during the work process.
For waterproofing, you need to pay no less attention than the choice of roofing material. It is especially important here how exactly the vapor barrier films and waterproofing membranes were laid. And for this you need to know which side to attach the vapor barrier.
How to attach film waterproofing to a roof
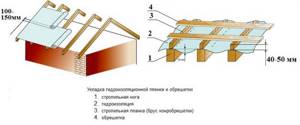
When laying the main tier of film, you must adhere to the following rule: it must run strictly along the entire roof eaves, certainly with a sag of 10–20 mm relative to the rafter structure.
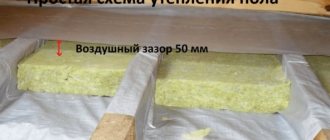
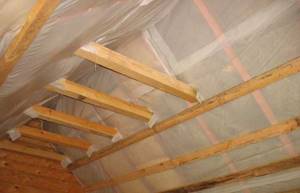
To avoid problems during operation, when laying the rafters, it is necessary to ensure a gap between them of no more than 120 cm . Do not forget about creating an air gap for the insulation and vapor barrier film, which should have a height of approximately 40 mm.
During installation, axton waterproofing is placed only in a horizontal plane . The starting point for work is chosen next to the cornice and gradually moves upward, at each step overlapping the joint line with an overlap of 100–150 mm.
It should be taken into account that the film relative to the rafters should sag no more than 20 mm. Where the edges of the insulation are located, use the overlapping method , not forgetting to stick a special tape, tape or glue to the joints.
The vapor barrier film must be attached to the base over the entire area using a construction stapler . In some cases, galvanized nails may be used. The main requirement is that the hardware has a wide head so as not to compromise the integrity of the material.
When laying the next row of film insulation, it is necessary to ensure its overlap by no more than 200 mm. The exact value of the overlap is determined taking into account the roof slope.
lattice bars are laid directly on the vapor barrier layer . This must be lumber with a diameter of at least 40 x 25 mm, and it must be placed in increments of 150 mm. Having completed this stage, they move on to installing the sheathing.
Features of attaching waterproofing to the ridge of the roof
In the ridge part of the roof, it is necessary to pay attention to the area between the corresponding axis and the waterproofing film, where a gap of no more than 50 mm should be provided. According to the technology, a ridge vent must be created .
So, experts call it a rupture of the insulating material under the corresponding part of the roof. This is a necessary measure to ensure conditions for ventilation of the hidden space.
In areas where the roof structure is attached to various masts, a chimney and an antenna, a hole of the required size is made in film insulation, and then fixed to nearby sheathing elements.
To do this, you can use vapor barrier tape or self-adhesive tape with a double-sided backing. When installing the waterproofing component on roof windows, you must strictly follow the manufacturer's instructions.
Materials for waterproofing
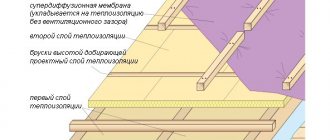
Superdiffuse membrane
There are films with limited permeability to steam and films that are waterproof but conductive to steam.
- Classic. The material requires double-circuit ventilation with a counter-lattice. Air must move between the film and corrugated sheeting, between the membrane and the insulation. Take a rail with a height of 30 - 50 mm.
- Superdiffuse waterproofing agents. Most have cone-shaped holes, so they actively allow steam and moisture to pass through in only one direction. For them, only one ventilation gap between the film and the roof is enough.
An anti-condensation type is often used. They are made in the form of a fleecy material that is saturated with water and holds it inside in case of high humidity. After normalization of the microclimate, this layer gradually dries out, releasing moisture into the ventilated spaces. You will need two of them, they are arranged using an additional strip with a thickness of 20 - 50 mm.
Types of films used:
- Mastic. Placed as a coating layer on surfaces made of screed, concrete, wood. It creates a solid layer on the surface and can be used on structures of various configurations, pitched, hipped, arched, domed.
- Film. They are mechanically attached to the rafters, and on surfaces with a slope of less than 10° they are fixed with ballast (fixed around the perimeter, and crushed stone and gravel are poured on top in an even layer). On complex surfaces, films are glued over the entire area.
- Pasting. The film is equipped with a bottom layer of adhesive mixture, which is heated with a hairdryer before laying on a plane or lathing. More often used for solid foundations made of concrete slabs, screeds, and OSB panels. They take materials from roofing felt, polyester, glassine, fiberglass.
- Tiled. This category includes roofing coverings made of bitumen tiles and Euro slate. The materials simultaneously waterproof the roof structure and act as a top layer. Condensation does not form under the tile coverings.
- Leafy. It consists of separate thin plates made of PVC or steel. Metal sheets are made of aluminum, lead, and stainless steel. They are fixed to the surface by welding or self-tapping screws. The material is used more often on large roofs of industrial or public buildings.
Waterproofing in the form of plaster is also used. The composition is sold ready-made in the form of a dry mixture, which includes cement, fine sand and polymer modifiers.
How to install anti-condensation film
To perform this work correctly, the following procedure must be followed:
- First of all, the rafters must be installed and a layer of insulation laid. After this, you can begin laying a vapor barrier film, for example, Stroybond. It is advisable to do this in dry weather.
- For rafters, it is necessary to maintain a distance between structural elements of no more than 120 cm.
- The anti-condensation film must be laid in such a way that the surface is directed with the absorbent side towards the base. You also need to pay attention to its base, which should not interact with the insulation.
- Construction staples, glue or galvanized nails with a large head are used as fasteners.
- During the installation of vapor barriers, the construction bond is advanced sequentially from the eaves to the ridge, periodically overlapping the overlapping joints with separate horizontal layers. For the created overlap layer in the horizontal plane, a width of no more than 150 mm is allowed, and for the vertical part - no less than 200 mm.
- The areas of film joints must be brought out to the rafter elements of the structure.
- To connect the joints, use a special adhesive film for vapor barrier, for example, Stroybond. It can also be replaced with waterproofing tape.
- When laying the film, you need to make sure that there are no surface irregularities. The appearance of sagging up to 20 mm in the central part of the inter-rafter space is not a violation of technology. Such an artificial defect will help remove condensate vapor from wooden elements.
- The insulation should be located at a distance of no more than 40–60 mm from the film.
When laying waterproofing material, you need to remember that the lower base of the component performs the function of draining water into the corresponding gutter.
At the end of installation of the waterproofing layer, they begin to finally fix the coating. As fasteners, take wooden slats with a cross section of 30 x 50 mm, into which galvanized hardware is hammered . The roof sheathing is installed directly on them.
How to properly install hydro-vapor barrier
When waterproofing a flat or pitched roof, the vapor barrier film is attached not only horizontally, but also vertically.
Installation of water vapor barrier is carried out in two ways:
- Horizontal installation of film. In this case, the film is laid on the rafters, the distance between which does not exceed 120 centimeters. When installing the film, do not allow it to come into contact with the thermal insulation. Also, it should not sag by more than twenty millimeters. Next, a counter-lattice is attached to the rafters on top of the film, on which the roof sheathing is subsequently constructed.
- When installed vertically, the film is secured using galvanized flat-head nails or mechanical staplers. The film is attached to the load-bearing elements of the roof along the inside of the insulation.
Features of installing waterproofing film
No less difficult is the installation of waterproofing film, which also has its own characteristics:
- During installation, the material must be positioned in such a way that when operation begins, moisture cannot penetrate from the top side to the insulation layer.
- Particular attention should be paid to the quality of processing of the areas adjacent to the penetrating elements. This is achieved by making a trapezoidal cut in the required places.
- The upper and lower valves are secured using horizontal sheathing elements using a sealed tape to the penetrating element. The side parts should be taken to the upper side, fastening is carried out to the penetrating component using a similar technology.
- When working with skylights, moisture-proof materials are installed in accordance with the instructions for use.
- When working on a roof with inclined ridges and a hip roof, the film must be placed relative to the longitudinal axis of the corresponding element.
- When laying hair on horizontal roof slopes, be sure to comply with the requirement to cover the protruding side.
Fastening superdiffusion and diffusion membranes
These materials are most widely used for the protection of roofing elements, since their vapor-permeable characteristics are superior to all other modern materials. Installation of membranes with the best performance characteristics is carried out directly on the insulation layer without creating a ventilated space below.
Most often, a ventilation gap is made in the upper part at a distance of about 40 mm from the sheathing and membrane. During the installation process, it is necessary to comply with the requirement of horizontality relative to the lower part of the roof of the ridge part.
For the final fastening of the membrane to the rafter structure, use a construction stapler , galvanized nails with a large head or special glue for vapor barrier and counter battens. If the insulation is laid directly to the ridge, then it is necessary to comply with the requirement of overlapping the membrane by 200 mm.
After preparing wooden elements for installation of waterproofing by applying antiseptics and other protective compounds, it is necessary to give them time so that they can dry thoroughly. At the end of the work, they begin installing the counter slats on the sheathing . Failure to comply with this condition will lead to the fact that steam will accumulate inside the roof space and will not be discharged outside.
Next, the membrane is laid according to the same scheme as in the case of a waterproofing film. Galvanized nails with a wide head, glue or staplers are used as fasteners
Installation of waterproofing is an important stage in laying roofing. The quality of this work determines how reliably the internal elements of the roof structure and insulation will be protected. Therefore, it is important not only to select the right waterproofing components, but also to lay them on the correct side in accordance with current requirements.
When laying waterproofing, you need to remember the need to bring out special elements - a chimney, an antenna, etc. These places must be treated especially carefully , since you will have to create holes and use additional fixing elements to attach the waterproofing layer to the base.
Why do you need roof waterproofing?
The main function of materials for water vapor barrier is to protect the insulation layer from moisture, which reduces its performance characteristics.
Water vapor barrier materials are divided into two groups:
- Steam-condensate waterproofing films. Such films protect the roof from leaks and do not allow precipitation to penetrate into the ventilation inlets. They can be used not only for waterproofing cold roofs, but also for insulated ones.
- Diffuse membranes. This material is more modern. These membranes are capable of releasing steam that rises to the roof of their building areas. Diffuse membranes are laid on the inside of the thermal insulation.
Both types of materials described above are usually installed in layers between the base of the roof and the insulation. This installation method prevents the insulation from absorbing water.
Polyethylene films used for waterproofing and vapor barrier of roofs are reinforced with reinforcing mesh or special fabric. Due to this, the films become more durable.
Polypropylene reinforced films have the following advantages:
- They are resistant to ultraviolet exposure;
- High strength;
- They have a special anti-condensation coating, as well as a high level of vapor permeability, due to which they can be used not only as waterproofing, but also as a vapor barrier.
House roof waterproofing installation and installation under corrugated sheets, metal tiles and price analysis
A roof made of metal tiles or corrugated sheets requires high protection from water, since iron, when in contact with cold air, can form condensation underneath, which can damage the rafter system. Since waterproofing for a roof under metal tiles is carried out in the same way as roofing with corrugated sheets, it is better to consider them locally. Waterproofing the roof of a house under these materials must be done with high precision. In this article we will tell you in detail how to do this and choose the right material.
Functions of the waterproofing layer
The main function of waterproofing is protection against leaks.
Drops of condensation form on the inner surface of the corrugated sheet due to the temperature difference between day and night in cold weather. If moisture gets on mineral wool, it will get wet, increase heat conductivity, and cease to protect against cold. Water insulation is a necessary layer in roof decking.
Waterproofing film for roofing under corrugated sheets performs the following functions:
- protects against roofing leaks;
- drains condensate towards the gutter;
- retains insulation properties;
- protects the attic from dust and dirt.
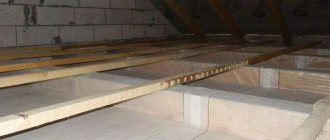
Waterproofing will work correctly if it is installed at an angle (along the rafters) and the possibility of drainage and removal of condensate is provided. For mineral wool, an additional counter-lattice is installed to provide a ventilated gap for drying of drops and to prevent the cotton wool and film from touching each other.
Choosing material
The material for metal tiles or corrugated sheets on a log house must be laid as recommended by the manufacturer, this is the only way the structure will last a long time. The choice of waterproofing material depends on the choice of roof structure (“roofing pie”). They come in two types:
- Warm. This option is for a heated part of the house under the roof, when the attic or attic space is used for any household needs.
- Cold. When the attic is not heated and is not used in any way.
Waterproofing under a cold roof
The standard design of a “roofing pie” for a house made of cold roof timber under metal tiles or corrugated sheets consists of the following layers:
- Lathing and counter lathing for fastening sheets of corrugated sheets or metal tiles. This layer creates a ventilated gap under the roof and waterproofing, where condensation will not accumulate and immediately evaporate.
- Waterproofing layer. In such a system, it is advisable to use a special membrane film. It is able to protect the rafter system from any precipitation.
- Roof rafters.
- Interior decoration of the attic (at the request of the owner).
Waterproofing under a warm roof
The “roofing pie” of a warm roof has a more complex structure. Let's look at its main layers:
- Lathing and counter-lattice for corrugated sheet material.
- Waterproofing layer. In this design, the choice of material must be approached more responsibly, since it will have to be protected in more difficult conditions. These include large temperature differences with the formation of condenser vapors, when it is -30 outside and +20 inside the heated attic, the need for high vapor permeability and protection from possible leaks. Waterproofing should protect the insulation so that it does not lose its functionality.
- Next, another sheathing is made, which creates an additional ventilated gap (roof ventilation).
- Insulation. For thermal insulation, insulation with a thickness suitable for a specific region is used. Lay insulation between the rafter legs.
- A vapor barrier layer that protects the insulation from wet vapors from inside the attic or attic.
- Interior wall decoration.
Ruberoid as a waterproofing material for metal roofing
Roofing felt can only be used in the construction of a cold roof of a house, and in the most desperate cases. In this case, metal tiles or corrugated sheets are mounted on the sheathing to create a ventilated gap that will draw out excess condensation.
If corrugated sheeting is planned to be laid on an old roof, then roofing felt can only be used if there is a ventilated attic system.
In any case, iron sheets should only be laid on the sheathing, which is attached directly to the waterproofing. Installation cannot be done any other way, otherwise the roof structure of a wooden house will quickly rot.
Soundproofing
If you have a roof made of corrugated sheets, then even “mushroom” rain causes such a level of noise that it sounds like machine gun shots. The same situation is observed with galvanized iron sheets. In this case, sound insulation of the roof is necessary.
There are various options.
- You can lay a layer of 10 cm of fiberglass, which will immediately insulate the room. You can use fiberglass boards or specialized fiberglass. But it is worth understanding that a vapor barrier of the roof is necessary.
- You can also purchase a roll of cork. There are different thicknesses on the market from 2 to 8 mm. 1 roll contains exactly 10 sq.m. Like fiberglass, additional roof insulation is also provided.
- Penofol is attached with a stapler directly to the counter-lattice. In this way, heat, steam and sound insulation is immediately obtained. It is attached with the foil down.
- The cheapest option proposed above is to cover the corrugated sheets with polymer or bitumen mastic to reduce the noise level from falling raindrops.
Installation of waterproofing under metal roofing
When installing waterproofing, you need to understand that you need to exclude its contact with the insulation, if it is provided for in the design. When laid against the insulation, the waterproofing loses its protective properties.
After assembling the rafter part, waterproofing is installed on it. The waterproofing must be secured to the base of the roof with a counter-lattice. The gap between the metal roof and the waterproofing is required to be at least 0.5 cm.
The roll of film should not be spread out stretched, but there should not be much sagging, maximum 0.2 cm. If you do not follow this rule, the material will tear when moving the house and temperature changes.
There should be a good ventilated space of at least 5 cm between the metal roof and the waterproofing. This ventilated gap is especially necessary in the ridge area. If you follow these rules, the roof will be well ventilated.
Some subtleties when laying waterproofing
- Logs under corrugated sheeting or metal tiles are installed in increments of no more than 120 cm. If the roof is flat, then you still need to install logs so that there is ventilation and to control the sagging of the waterproofing.
- If you need to waterproof the roof of an attic with a metal roof where there are window openings, then you need to make sure that there are no blind, unventilated places.
- It is easier to attach film waterproofing to wooden joists with staples. The staples must be of high quality and not rust, this will prevent corrosion from developing near the metal roofing material.
- If the roof of a wooden house has a complex structure with multiple broken points and ridges, then the waterproofing overlap should be at least 3 cm. In units with pipes or a ventilation system, at least 6 cm.
- To increase the degree of protection of the overlap, additional wide pieces of the same waterproofing material can be laid on it.
- For cold roof systems, waterproofing is also mandatory. If you take film, it will additionally normalize the temperature.
- When using anti-condensation film, it is necessary to create a ventilated gap: between the metal tile and the film at least 5 cm, between the corrugated sheet and the film at least 4 cm.
- Membrane-type waterproofing does not tolerate direct sunlight, so it is better to store it in a dark place. And after installation, the roof is covered as quickly as possible with corrugated sheet material or any other material.
Only by following all the basic rules can you reliably protect your roof under metal tiles or corrugated sheets. When choosing a membrane film material for work, you should purchase it only from well-known manufacturers.
How does a superdiffusion membrane differ from conventional waterproofing?
Let's consider the case of a user of our portal.
HorchiiForumHouse Member
I built a log house. The roof is insulated. I bought the so-called superdiffusion, vapor-permeable, wind- and waterproof membrane. I invited roofers to do the roof. They tell me that the under-roof waterproofing must be installed so that it is ventilated on both sides. Those. mount it not close to the insulation, but with a ventilation gap. To do this, you need to remove 1 of the 4 layers of insulation. The salespeople at the store also said that the waterproofing should sag between the rafters so that water flows through it better. To my objection that this is not according to the technology prescribed and allows steam to pass through, the roofers only smile. I want to know how to do it right?
To answer this question, you need to understand how a superdiffusion membrane differs from conventional waterproofing.
Alexey Spitsyn Technical Head of the Tyvek® Construction Membranes Division
According to SNiP “Roofs” (SP 17.13330.2011), the key difference between a diffusion membrane and a conventional waterproofing/anti-condensation film is vapor permeability. The diffusion membrane must have a vapor permeability of more than 600 g/m² in 24 hours. Only in this case can it be directly laid on the insulation.
In the case described by a user with the nickname Horhiy, installers most likely simply do not know how to work with modern materials . Therefore, they proposed a method of installing waterproofing “the old fashioned way”, with a double gap. That is, the first ventilated gap is arranged between the insulation and waterproofing, the second - between the waterproofing layer and the roofing.
This leads to a complication of the entire structure of the under-roofing “pie”, additional consumption of materials and an increase in the likelihood of defects on the part of workers.
One of the main building rules: the simpler and more technologically advanced the design, the less likely it is for the builders to make mistakes. Therefore, it is correct, easier and cheaper to install waterproofing directly on the surface of the insulation, attaching it to the rafters without sagging, etc.
Price for film waterproofing and work
Film-type protective material is produced in rolls of 50 m, 150 m wide. When purchasing, you need to pay attention to the density; for a roof made of corrugated sheets or metal tiles, the range should be 140-160 g/m2. Domestic and foreign manufacturers produce protection. The price of film of different production is presented in the table:
| Name, manufacturer | Price, rub./roll |
| FOLDER Light (Germany) | 1750 |
| FOLDER Classic | 1890 |
| FOLDER Strong | 2340 |
| YUTAFOL N 96 Silver (Czech Republic) | 1600 |
| UTAFOL D 96 Silver | 1860 |
| Yutafol D110 | 2100 |
| Fibrotek RS-2 Prof (Russia) | 1560 |
| Fibrotek RS Prof 80 | 1890 |
The price of work to protect a roof made of corrugated sheets differs depending on the qualifications of the workers. If you hire from advertisements, the cost is lower, but no one will be responsible for the quality of how the roof will be protected.
| Type of work | Price, rub./m2 |
| Preparing the surface for laying the material | From 250 |
| Lathing | From 350 |
| Installation of waterproofing | From 450 |
| Seam taping | From 150 |
Whether to hire professionals or do the work yourself depends only on personal choice. But do not forget that the correct implementation of the protective structure determines how often repair work will be carried out and how long the roof of the house will last.
Selection of materials for waterproofing
Rolled bitumen materials
Ruberoid is a universal material, one of the most common in the Soviet period. Essentially, it is roofing cardboard impregnated with bitumen and sprinkled with talc on top. Not all types of roofing felt are suitable for roofs, but only RPK and RKK. They are characterized by increased resistance to external influences (in particular, precipitation).
The material is one of the cheapest and easiest to install.
It is not particularly resistant to ultraviolet irradiation: under the influence of external factors, bitumen components lose their elasticity, as a result, the layer of material becomes brittle and becomes covered with cracks.
When choosing roofing felt, you should not count on long-term operation without the formation of leakage areas: approximately every five years you will have to carry out repair work, although this process is quite simple.
Special types of roofing felt RKCh and RKM are produced with a protective layer in the form of fine stone chips or mica flakes for roofs of the type in use. When laying such material, the service life will extend for several years. Ruberoid with sprinkling is used exclusively for the top layer.
Bitumen-polymer roll materials
As in the case of roofing felt, bitumen-polymer materials are produced with stone topping that performs protective functions. Such materials are the optimal choice for roofs designed for medium load levels.
The most popular brand in Russia is the Tekhnikol company, whose products are not inferior in quality to foreign analogues. The company offers 22 types of rolled waterproofing materials designed for different purposes.
PVC membrane
Polyvinyl chloride membranes are made from polyvinyl chloride with the addition of plasticizers. The purpose of using plasticizers is to increase the elasticity of the material, although it tends to evaporate over time, which can cause cracks. Installation of membranes is carried out using a welding seam: in terms of reliability, it is significantly superior to the adhesive method. This material is not suitable for laying over old pavement as it is incompatible with bitumen.
Polyvinyl chloride membranes have a number of advantages, the main of which are:
- durability (service life ranges from 30 to 50 years);
- reliability;
- resistance to UV irradiation;
- frost resistance - many types of PVC membranes retain elasticity at very low temperatures - down to minus 60 degrees;
- resistance to chemical agents;
- ease and speed of installation (membranes are produced in rolls 1-15 m wide, their installation is carried out in a single layer);
- low degree of flammability (G2, G1).
Mastic waterproofing
The creation of a waterproofing layer is carried out by applying several layers of mastics on a bitumen-polymer base. This coating is not durable and in most cases is used to repair rolled roofing.
Liquid rubber
An excellent result can be achieved by choosing liquid rubber as the material for waterproofing. The coating is reliable, durable, elastic and seamless. The two-component mixture is applied using airless cold spraying. After application to the surface of the base, the material hardens very quickly, moisture evaporates from it, as a result it adheres very firmly to the roofing surface and takes on the appearance of a rubber-like coating. Main advantages of the material:
- strength;
- elasticity;
- durability;
- reliability;
- absolute waterproofness;
- environmental friendliness (does not contain solvents);
- durability (service life reaches 30 years).
Liquid rubber is perfect for waterproofing large-area roofs and in the case of complex roof topography (for example, in the presence of parapets, caps, projections, antennas, pipes).
Expensive professional equipment is required to carry out the work.
How to properly install waterproofing on a roof?
Moisture does not penetrate into the room thanks to reliable roofing material. But don’t forget about the steam that rises from the living quarters. It penetrates into the under-roof space, precipitates and can have a detrimental effect on thermal insulation material, wood and metal.
Therefore, it is necessary to ensure high-quality insulation of the roofing pie. To prevent the development of such events, you need to know how to lay waterproofing on the roof. Otherwise, this may negatively affect the condition of the insulation. It loses its properties when exposed to moisture or wind. Moisture can come from cracks in the roof surface or condensation precipitated by steam.
Flat roof waterproofing
Until recently, the main waterproofing material used for flat roofs was bitumen. It was heated up and first coated on the concrete surface of the floor slab, roofing material was laid on top in two or three layers and a bitumen layer was applied again. Such a roof could not withstand one year of use, so it was repaired every year.
Today the market offers a fairly wide range in the category of waterproofing materials for flat roofs. Let's look at each of them and outline the technologies and standards for installing waterproofing on the roof.
See also: Catalog of companies that specialize in roof repair and design.
Penetrating insulation
In essence, this type of waterproofing material is a bitumen coating. That is, it penetrates into the pores and defects of the ceiling (cracks, chips, recesses, etc.), filling it with itself, where it hardens into crystals and becomes as strong as the material from which the ceiling is made. Penetrating insulation elements include liquid glass, bitumen or special polymer compounds.
One of the methods of applying penetrating insulation on a roof Source psk-azimut.ru
This type of waterproofing has many advantages:
- ease of application;
- there is no need to repair the treated surfaces , unless, of course, there are serious defects;
- high adhesion qualities;
- inertness to acids and alkalis;
- withstands heavy loads;
- acceptable price.
The application method is simple, using spatulas, brushes or rollers. If special solutions are used for waterproofing, they can be applied with a spray bottle.
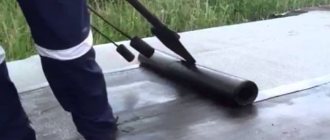
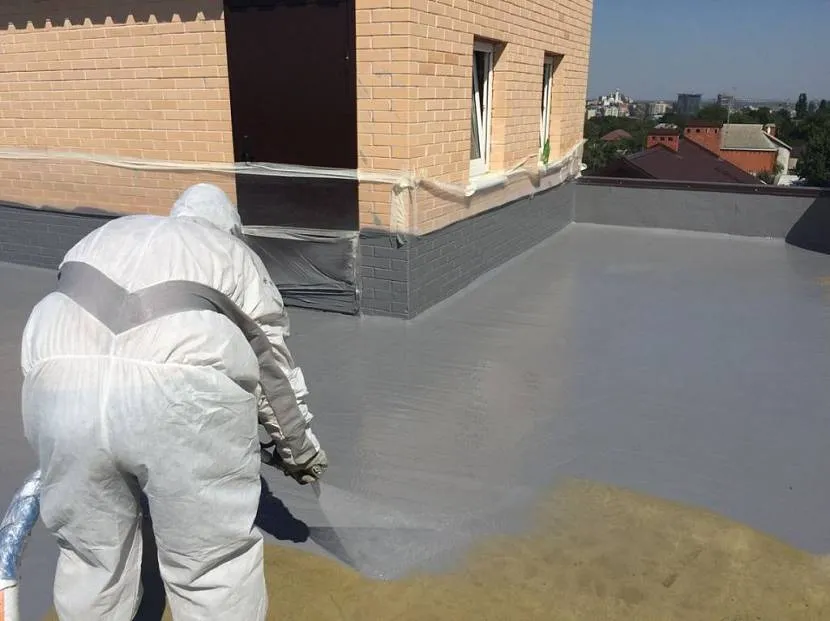
Liquid waterproofing
A prominent representative of this category is the bitumen-polymer composition, which is called liquid rubber among ordinary people and specialists. It is combined with rubber only by the high plasticity of the applied layer. And nothing more. There is no rubber or rubber in the mastic itself. Its basis is modified bitumen and polymers.
It should be noted that this waterproofing composition is applied in a seamless manner, and this is one of the important advantages of the coating. At the same time, the mastic adheres well to almost any materials. A big plus is elasticity, which does not change with changes in humidity and temperature. That is, at high temperatures the coating expands, at low temperatures it contracts, but at the same time no breaks form on its surface.

High elasticity of rubber waterproofing Source kamtehnopark.ru
It should be noted that liquid rubber is a two-component material. The first component is a water emulsion of bitumen and polymers. The second is a hardener, also known as a coagulant. Both ingredients are mixed before application, for this purpose special equipment is used - a two-channel mixer.
And a few more characteristics:
- thickness of the applied layer – 2 mm, on inclined planes up to 3 mm;
- service life – up to 20 years;
- It is better to apply at temperatures above +5C;
- It is recommended pre -clean the surface and treat it with a primer .
Why is moisture dangerous for the roof?
Why is this happening? Everyone knows that warm air rises to the ceiling. Through miniature cracks it enters the under-roof space. In winter it is often cold here. Warm steam, penetrating into the insulation, precipitates and condensation forms. These droplets subsequently turn into ice. As a result, the thermal insulation material is destroyed.
As soon as the frost subsides, the ice begins to melt, which, flowing down, can penetrate into the layers of the interior decoration of the room. As a result, the finishing structure is destroyed, which means that repair work to restore the building and roof is not far off.
What is the difference between waterproofing a wooden flat roof and a concrete one?
A flat roof on a wooden base is rarely made and, as a rule, on extensions. This type of roofing is not suitable for a main house due to:
- severely limited load-bearing capacity of the floor;
- properties of wood to easily absorb moisture;
- the presence of frequent joints between wooden boards or OSB boards.
Consequently, waterproofing a wooden roof is carried out using a technology that differs in several significant points from the technology of installing a water barrier on concrete.
Firstly, these grounds require different preparation. A wooden roof does not need to be dusted, just cleaned of heavy dirt. In addition, the boards must be coated with antiseptic and fire retardant compounds, after which they wait at least a day.
Secondly, all joints between the boards need to be sealed with sealant and the surface brought to approximately the same level. Otherwise, in these places the rolled roofing will not adhere to the base, and the self-leveling roofing may leak inside the house.
Thirdly, waterproofing a wooden roof must be done using a fire-free method. The burner should only be used in exceptional cases, and if there is complete confidence that the wooden base will not catch fire.
Fourthly, after installing waterproofing, a wooden flat roof cannot be immediately covered with a finishing coating. It should be allowed to sit for about a year, since the wood may crack when drying. And these cracks will need to be covered to maintain the tightness of the waterproofing layer.
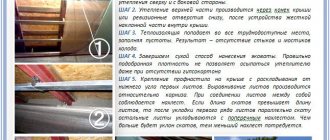
Features of installation of membranes and films
You need to start laying the film from below, heading towards the ridge. The next strip of material should overlap the previous one. The overlap width should be from 10 to 15 cm.
The first row should be laid so that the waterproofing between the rafters sag slightly. You should also leave 4 cm for an air gap. The film is laid in the same way, from bottom to top. The overlap in this case is no more than 15 cm, while between the rafters there can be a sag of up to 2 cm. The edges of the film are connected with a special adhesive tape. Fastening to the rafters is done using a stapler or nails with a wide head.
Then the film is laid with an overlap of up to 20 cm. Counter battens measuring 4 x 5 cm are stuffed on top of the laid film in increments of 15 cm. Then the lathing is installed. When laying waterproofing, you should remember that between the ridge axis and the edge of the film you need to leave a gap of about 5 cm.
In the places where the bars are located, the film is cut. The film is glued to them with double-sided adhesive tape or tape. In buildings with roof windows, the film must be laid taking into account the recommendations of the window manufacturers. Perforated film should be laid with the perforation facing up. This eliminates the possibility of possible leaks.
Valley device
A membrane is laid on the valley canvas and secured with a stapler or nails, then the overlaps in the valley are sealed. At the intersection with the attic window, the membrane is laid on the window frame to a width of no more than 5 cm and the connection is secured. In accordance with the manufacturer's recommendations, the membranes are laid with the painted side facing the insulation. However, when repairing the roof, the membrane is strengthened on the lower and upper battens of the sheathing.
To install the roof, different materials can be used (roofing felt, tiles, wooden roofs, slate, copper, etc.). To ensure long-term operation of the building with a minimum number of roof repairs, slate (stone) coatings can be used, since they have an unlimited service life. Copper provides roof protection from various weather conditions. Roofing felt is well suited for flat roofs. Tile roofing has many different types, and all of them are characterized by increased strength.
Installation of anti-condensation film
After the rafter system and the thermal insulation layer have been installed, you can begin installing the waterproofing film. The pitch between the rafters should not exceed 1.2 m. The anti-condensation film must be laid so that its absorbent surface does not touch the insulation.
The film is overlapped using mounting adhesive tape. In this case, the joints must be located on the rafters. It is necessary to ensure that the film is evenly stretched. Under no circumstances should there be folds. Between the rafters you need to leave 2 cm of sagging to protect the wood from moisture. Fastening is done with a stapler and nails.
A gap of about 5 cm should be left between the thermal insulation and waterproofing layers. Excess moisture should flow along the lower edge into the drainage gutter. After this, you can secure it with 3 x 5 cm slats using nails and insulation.
The lower and upper valves must be secured using a special sealing tape. This is done on the horizontal surface of the sheathing. The side flaps are secured in the same way, only they are pulled up. On roof slopes, horizontal strips of film should be laid overlapping on top. Diffusion and superdiffusion films are an ideal option for protecting your home from moisture. This material is able to “breathe”. In this case, only the upper gap is left between the membrane and the sheathing for ventilation.
The membranes are laid from bottom to top in strips with an overlap of 20 cm. They are secured with nails.
Before you begin any steps to install waterproofing, you should make sure that the antiseptic impregnation that was used to cover the wood has dried. Only after this can counter battens be placed on the sheathing to ensure the removal of water vapor. Further installation occurs in the same way as for waterproofing films. For fastening use galvanized nails or a stapler.
The membrane joints are connected to each other with double-sided tape. The joints with structural elements also need to be insulated using sealing tape.
Materials used
We found out that waterproofing is the most important element of a roof covered with metal tiles. But what should a high-quality water-protecting layer be like? The requirements for waterproofing are as follows:
- it must have increased fire resistance;
- good steam flow;
- strength and reliability indicators must be high;
- the material should not deteriorate due to sudden temperature changes and should not be afraid of ultraviolet radiation;
- the layer must withstand a certain level of mechanical loads;
- waterproofing should not be susceptible to pest attack or mold development;
- it must also cope well with its main tasks and not cause harm to human health.
Laying waterproofing material
Various types of materials can be used for waterproofing. They all have a lot of differences from each other, including different resistance to light, strength, quality and durability.
In most cases, special roofing films having several layers are used for waterproofing metal tile roofs. There is a reinforcing and absorbent layer. The first provides protection from precipitation, and the second is able to absorb moisture coming from the inside, so that condensation cannot accumulate on the waterproofing and mold will not form. Also, on both sides the material usually has a polyethylene lamination.
Roofing films
This coating has special pores that allow the passage of vapors that form inside the house, but at the same time do not allow moisture coming from outside to spoil the materials from which the roof is made. This feature of the material, called vapor permeability, is especially important if the attic space is converted into an attic and is used as a living space.
Exiting vapor and waterproofing on the roof, screwing in metal tiles
Table. Films recommended for use as waterproofing films when installing metal roofing.
Name Brief description
Standard or classic
A film with low vapor permeability, for which it is important to equip the so-called double-circuit ventilation, which will be located between the roofing and waterproofing materials, as well as between the film and the insulating layer of the roof. The gaps between them should be 3-5 cm
The material is ideal for constructing a cold roof or a roof with a simple structure.
Anti-condensation
A material that also requires the creation of dual-circuit ventilation. The film is equipped with a moisture-absorbing fleecy layer that perfectly retains excess water. This is a fairly dense material, rough to the touch, durable and resistant to ultraviolet radiation. But the vapor permeability of such a film is low.
Superdiffusive
The best material for roof waterproofing, as it has increased vapor barrier performance and does not require dual-circuit ventilation. It is enough to leave gaps between the film itself and the roofing. Installation of this film is simple, it has a long service life. The main disadvantage is the high price.
Isover Tyvek Solid roofing film
Of course, for temporary roofing you can use cheaper film, but for capital construction it is better to take high-quality, albeit expensive, material. There is no need to save money here and it is better to buy a diffusion membrane coating. All indicators of the purchased film are shown on the edge tape that frames the material. The film is produced in rolls 1.5 m wide and 50 m long. The density of the material is about 140 g/m2. A prominent representative of the optimal material for laying under metal tiles is Izospan AM or AS.
Izospan AM
Izospan AS
Installation of volumetric diffusion membranes
Volumetric membranes must be laid on the flooring parallel to the cornice. Along the top edge you need to secure this material with nails. The next roll is placed in such a way that the fastening area is covered by approximately 8 cm. Using special glue, the intersection is glued together.
In the places where the counter-lattice is attached, a sealing tape is laid on top of the film. The membranes are laid around the chimney in the same way.
So we learned how to properly install waterproofing on a roof using modern materials.
Watch the video and find out which waterproofing is better for the roof and which has proven itself over time.
How to waterproof a roof
In any building, the most important element is the roof of the building. It protects from rain and snow. If moisture gets into the room, it negatively affects the condition of the roof and the entire structure. Water causes the roof to age and wear out faster.
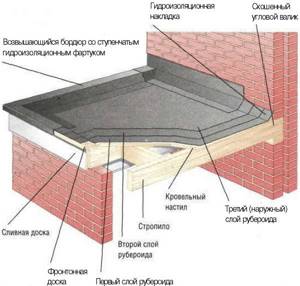
Scheme of laying a roofing pie on a metal tile roof.
If the roof remains cold at all times, then ice will not form on it. To do this, you need an air gap in which air will circulate. In this case, there is no need to insulate the roof. But if you want to properly insulate the roof for an attic room, for example, then you should also think about waterproofing. This is not a very complicated process that two people can handle.
You should think about high-quality waterproofing during the construction process, so as not to carry out additional and costly repair work later.
There are several ways to install waterproofing on a roof: traditional and modern. The difference is in the labor intensity and cost of these works.
Is waterproofing necessary?
If you have built a house, of course, together with a roof that will protect you from all atmospheric precipitation, then you should understand that in the case of a “cold roof” there is no point in spending money on insulating it, because it will already be dry.
But if we are talking about subsequent insulation of the roof after a certain period of time, for example, to create an attic room or store non-frost-resistant things, then it is worth thinking about waterproofing the roof. How to do it?
If you decide to do this, then it is worth noting that insulating the roof on your own is not so difficult.
Waterproofing under the roof
In the multi-layer construction of the roofing “pie”, the insulation is protected from moisture by vapor and waterproofing films.
Previously, it was necessary to lay waterproofing materials such as bitumen or roofing felt under the slate. But with this method, water passed into the nail holes if the installation was poor. Nowadays such waterproofing agents are also used, but their composition has changed. Yes, and installation too. Instead of cardboard, fiberglass, polyester, and fiberglass are used as the basis for such waterproofing materials. That is, inorganic substances. They are impregnated with bitumen (modified) and laid overlapping. The seams are fused together. To work you will need rafters, waterproofing material and the following tools:
- axe;
- hacksaw;
- large metal brackets (for fastening rafters);
- stapler;
- construction knife;
- self-tapping screws;
- low speed drill;
- sealant;
- sealant gun.
How to choose hydro- and vapor barrier ↑
The choice of water vapor barrier is based on its characteristics. As an example, let's look at the modifications of the popular vapor barrier Izospan today, more precisely, A, B, C, D and FB.
- ISOSPAN “A” is a vapor-permeable material that provides protection from wind and moisture to the externally insulated surfaces of a ventilated façade, walls, and roofs.
- ISOSPAN “B” combines vapor and waterproofing properties. It is used for vapor and waterproofing of roofs. Lay the material from the inside. The film is used in the process of insulating floors and wall surfaces. Laying is carried out from the side of the thermal insulation layer facing the inside of the structure. ISOSPAN “S” is the most dense waterproofing material, which has the highest density. ISOSPAN “D” is a universal, durable, vapor-permeable material designed for waterproofing. It can be laid on any side of the thermal insulation: internal or external. ISOSPAN “FB” is a special-purpose hydro-vapor barrier, intended for use in high-humidity structures such as swimming pools, saunas or baths.
Installation of waterproofing coating
- Install rafters on the roof.
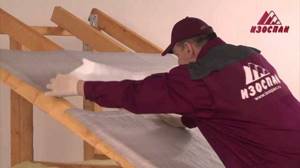
- Together with your partner, unwind the roll along the rafters. An assistant should hold the roll, gradually unwinding and pulling the film, you staple it to the roof.
- Trim the edges of the film with a construction knife.
- The next step will be attaching the sheathing to the outside.
- Then attach the counter-lattice from the inside with self-tapping screws. You need to attach the counter-lattice along the rafters to the waterproofing film you have placed.
- This will create a ventilation gap between the roof and the film.
- The next layer of film should be laid with an overlap of up to 15 cm. Tape the joints, this is additional insulation. In the place where it is difficult to reach with tape, apply sealant.
- Next, lay the film over the ridge when you reach it. Secure this edge with a stapler additionally so that it does not dangle from the wind and tear.
- In exactly the same way you need to lay the film on the remaining slopes. Then it will cover all sides of the internal space.
Since it is necessary to lay the waterproofing film and install the roof sheathing at the same time, this takes a long time. But for the sake of comfort, it’s not a sin to work hard!
Nowadays various films are sold for waterproofing work. They do not allow moisture to pass through and are very easy to install. Film waterproofing materials are of the following types:
- Polyethylene.
- Polypropylene.
- Non-woven membranes.
To make the waterproofing polyethylene film more durable, it is reinforced with mesh or special fabric. When using polyethylene film, you need to leave a gap for air ventilation between the insulation and the waterproofing.
Reinforced polypropylene films are very durable and stable. This design will reliably protect against rain, snow and hail. Also, this film does not transmit ultraviolet radiation.
Non-woven membranes consist of propylene fibrous non-woven fabric. They have very good characteristics. This film should be laid with the glossy side up. In this case, it allows air to pass through well, but does not allow water to pass through. The underside of such a waterproofing material has a fleecy layer - anti-condensation. The pile absorbs moisture, protecting the roof from dampness.
Breathable membranes can also be used for waterproofing. These are transparent films that absorb water vapor from the inside, emanating from the room. Such a film must be laid correctly, without leaving a gap between the insulation and the film.
Mastic film is a polymer membrane that needs to be laid on any roof surface. But its installation requires special equipment.
The method of spraying mastic or pouring is used, when a viscous liquid composition is applied to the surface of the roof. After it hardens, the structure becomes similar to an elastic membrane, reminiscent of a rubber coating. A durable seamless layer is formed, which provides good protection against moisture. Such a roof, properly installed, is resistant to ultraviolet radiation, oxidation, and also has high strength and elasticity.
Under-roof waterproofing, how to install it
Previously, roofing felt or other waterproofing materials were simply placed directly under the slate sheet, which were basically unsuitable due to improper installation or nail holes. But that was before, and now there are a large number of different waterproofing films.
Often, films of this type consist of a non-woven fibrous web made of propylene. They have excellent properties.
Attention - this film must be laid only with the glossy side up. When laid in this way, the film allows air to pass through without any problems, but at the same time protects against moisture, rainwater penetration and condensation.
Condensation can penetrate inside only if ideal conditions for this appear, the so-called “dew point”. In the case of a cold roof, such a process is impossible due to the fact that it is well ventilated, and the internal temperature is almost identical to the outside one. It is because of this that there is no need for insulation for a “cold roof”.
Among other things, on the bottom side (non-glossy) there is a special anti-condensation layer consisting of pile.
Such a surface has the properties of a sponge, which is capable of absorbing large amounts of moisture, thereby taking on most of it, relieving the roof of excess moisture. And then, when the humidity decreases, this surface dries quietly and thereby keeps the insulation intact.
Due to the fact that the insulation can be fixed to an existing, finished roof, it is therefore necessary to begin waterproofing the roof initially.
It’s worth noting right away that working at height with a large roll of film is not one of the most convenient and enjoyable jobs. One has only to imagine how you have placed the rafters and begin to unwind the roll along them, after which we slowly go along the roll with a stapler until the entire roof is ready. It is worth noting that it will be impossible to cope with such an operation alone; at least 3 people are needed.
After the film has been fixed, it is necessary to cut off the edge using a construction knife, and then proceed to the outer sheathing of the roof. Next we move on to the internal fastening of the counter-lattice. The slats should be the same width as the rafters, and the thickness should not be less than 25 mm. Fastening is done with stainless steel screws.
The counter-lattice must be secured along the rafters on top of the waterproofing film. This creates a ventilation space between the roof and the film.
Advice ! Try to choose the length of the slats slightly less than the width of the film.
This is due to the fact that after the film, lathing and counter-lattice have been attached, it is necessary to continue to do this higher up to the ridge.
As for the overlap between the layers of film, it must be no more than 10 cm. The joint must be taped for additional insulation. If there are places where it is impossible to reach with tape, try to reach with sealant.
At the very top, at the ridge of the roof, it is imperative to overlap the film over the top. It can be additionally attached with a stapler so that it does not tear from the wind.
All other slopes must be treated in exactly the same way so that the film completely covers the entire internal space.
What if the roof is concrete?
If the roof for waterproofing is concrete, then waterproofing should be done in a different way. In the modern world there is a very original solution that can significantly simplify the entire process.
Waterproofing a concrete roof is carried out as follows.
- During repair and construction work related to the roof, it is initially necessary to make a screed and tilt in the required direction; all this is done using special concrete, which, due to its properties, practically does not leak.
- Various mastics (polyurethane, acrylic or bitumen) are applied on top. The main advantage of such mastics is that they do not need to be heated, and they can be applied at normal temperatures.
- Application occurs using a sprayer, roller or ordinary brush.
- After the work is done, the film, hardened within a few days, provides high-quality waterproofing for 20 days.
The list of advantages of such waterproofing:
- high level of mechanical strength of seamless elastic coating;
- surface of almost any shape can be covered without problems;
- simple repair;
- high level of tack to almost any building materials;
- even when puddles occur, the service life is incredibly high;
- resists heat, heat and ultraviolet radiation;
- biological and chemical inertness, not subject to rotting;
- withstands physical impact;
- does not release toxic substances after application and polymerization;
- no shrinkage.
There is a possibility of multi-colored coating.
How to waterproof a concrete roof
- When constructing or repairing a concrete roof, a screed is made with a slope in the desired direction. For this purpose, a special composition of concrete is used, which practically does not allow water to pass through.
- The next step is to apply mastic. For example, based on bitumen, or acrylic mastic or polyurethane. Perhaps the main advantage is that such mastic can be applied at normal temperatures; there is no need to heat and melt it.
- There are mastics with reagents that need to be mixed for hardening. But, basically, it can be applied with a roller or brush.
- The film hardens within a few days and provides reliable waterproofing for a very long time.
How to prevent the destruction of under-roof waterproofing and protect it from birds
At the end of the article, we will consider another common situation.
I installed metal tiles on the roof. Under-roof waterproofing - membrane. I don’t have time to finish the overhangs extending from the walls by 0.5 to 0.8 m. I'm thinking of postponing construction for a year. I wondered if the waterproofing would collapse during this time under the influence of UV radiation reflected from the walls? And if so, how to protect the membrane?
In addition, on our portal there are several cases where birds (mainly tits) tore the under-roof membrane, penetrating under an already installed roof through uncovered eaves.
To protect yourself from troubles and not to think about what will happen to the membrane and waterproofing during long-term downtime (more than 4 months), remember the rule: you cannot leave under-roof waterproofing for a long time without protection. To do this, we cover the unlined cornices with a thick, sun-resistant film or sew them with any other suitable sheet material.