How to insulate floors in a wooden house from below, the choice of insulation and work technology depending on the type of foundation, errors in insulation. Insulation of floors in wooden houses is carried out in order to protect structures from freezing, dampness and destruction, preserve heat inside buildings and save money on heating them. Optimal results are achieved by insulating these structures along the joists. With proper planning, the method of arranging and insulating floors is selected at the design stage of a wooden house, taking into account the climatic and geological parameters of the site and the type of foundation.
How to insulate floors in a wooden house from below, depending on the type of foundation
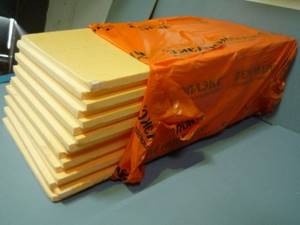
Floor insulation
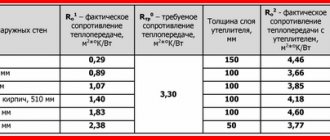
How to insulate the floors in a wooden house from below, the choice of insulation depends on the type of foundation and floors of the first floor. For thermal insulation of the floors of the first floor of houses made of timber, logs, frame panels or other types of lumber, insulation materials that are moisture-resistant, possibly breathable and comply with sanitary and fire safety standards are used. They have the necessary characteristics:
• Extruded polystyrene foam boards with a density of 35 kg/m3 and higher. Conventional lightweight grades, in the absence of explicit prohibitions, are used less frequently due to higher hygroscopicity and the risk of damage to the slabs by mice.
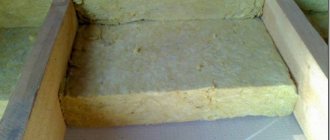
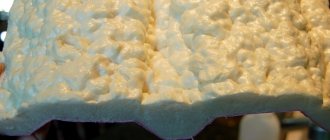
• Plates or rolls of stone and mineral wool, used in combination with hydro- and vapor barrier films for insulating floors over ceilings.
• Sprayed polyurethane foam insulation.
• Bulk thermal insulation materials: granules of foam glass, closed polystyrene chips, expanded clay, sawdust treated with borax or antiseptic, perlite.
• Slab and block composite materials based on wood chips and mineral binders (arbolite, fiberboard, wood chips), successfully used in dry screed systems and combined with other types of insulation.
• Rolled thermal insulation (cork, penofol, isolon and their analogues).
Optimal results are achieved when placing the insulating layer at the bottom. With this design, the height of the ceilings inside the premises is not reduced, the lower crowns, ceilings and beams of the first floor are protected from freezing, and the dew point is shifted to the floor surface.
The latter makes it possible to reduce the risks of developing putrefactive processes to a minimum; with the correct laying of layers of insulating cake, the floors in a wooden house do not need to be updated for decades.
The choice of insulation depending on the type of foundation and floors of the first floor
The technology and materials of insulation primarily depend on the type of foundation of the house or bathhouse . In particular:
• Floors in buildings with hanging grillages of a pile or columnar foundation are insulated exclusively along the beams, using any breathable heat insulators, such as stone or mineral wool , including bulk materials, provided that double flooring is installed and the layer is protected from moisture, the accumulation of internal condensation and blowing out. With an unlimited budget and a high raised grillage, the simplest and fastest way to insulate them is to spray polyurethane foam between the beams.
• Wooden houses with strip foundations are insulated along the ground or along beams . In the first case, preference is given to compacted polystyrene foam or EPS, in the second - mineral wool, stone wool or bulk insulation (foam glass, closed polystyrene foam chips, ecowool, sawdust granules).
• Floors with foundations with a low or recessed grillage are insulated in the same way as strip structures.
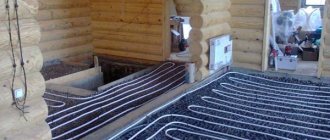
• Slab types of foundations are, if possible, insulated with extruded polystyrene foam at the laying stage. Underfloor heating systems (water pipes or cables laid during the concreting stage) and rolled thermal insulation materials (cork, foamed polyethylene) also help to reduce the level of heat loss in such houses.
• Wooden houses with a crawl space are insulated from below using sprayed polyurethane foam, roll insulators, EPS or hydrophobized mineral wool.
In such cases, slab materials are held in place by a counter-lattice.
In what cases and why is insulation from below correct?
It is better to insulate the floor above a cold attic from above, but the thermal protection of the floor above the basement is technically more competent to perform from below. This has its reasons:
- there is no reduction in the height of the room on the ground floor;
- there is no need to choose dense rigid insulation that will withstand the loads from residents, furniture and equipment;
- protection from freezing not only of the floor, but also of the entire wooden floor;
- displacement of the dew point (the line on which condensation falls) to the surface of the ceiling from the thickness of the structure, which prevents rotting.
But when carrying out work in a private house or dacha, some difficulties may arise specifically related to work from below:
- the need for more reliable fastening of the insulation;
- the difficulty of working in low subfloor conditions;
- the need to work on the ceiling leads to rapid fatigue of workers;
- restrictions on types of insulation.
Therefore, if you are looking for simpler methods of insulation, we recommend that you read the following articles:
- Floor insulation with foam plastic
- Floor insulation with Penoplex
- Insulation of the floor of a frame house
- Floor insulation with mineral wool
Floor insulation for wooden floors
The essence of this method is to lay a breathable insulating layer between the subfloor and the main plank flooring, supported from below by bars and joists with a pitch of no more than 60 cm, or additional supports made of brick, concrete or pipes.
These works are recommended to be carried out simultaneously with the installation of dry logs and floor systems, after the thickness of the insulation has been justified by thermotechnical calculations. Mandatory conditions of the technology include protecting materials from condensation, ground and top moisture and laying a ventilation gap above the top layer of insulation.
Important! If logs of natural humidity are used (in most cases during self-construction), then they must dry completely, only after this insulation is carried out, otherwise the formation of mold and rotting of the subfloor is guaranteed.
Principles of installation work
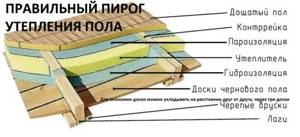
Regardless of the choice of type of thermal insulation, it is necessary to follow the sequence of work performed for proper insulation. If we consider the structure from bottom to top, it will look like this:
- waterproofing layer;
- thermal insulation layer;
- vapor barrier layer;
- design for floor installation;
- floor.
Compliance with this order of work guarantees the maintenance of normal temperature conditions in the room and protection of the structure from freezing and rotting.
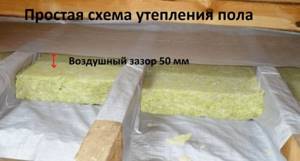
The easiest way to insulate the bottom is through joists. They are beams measuring 5x10 cm or more, on which the floor is subsequently laid.
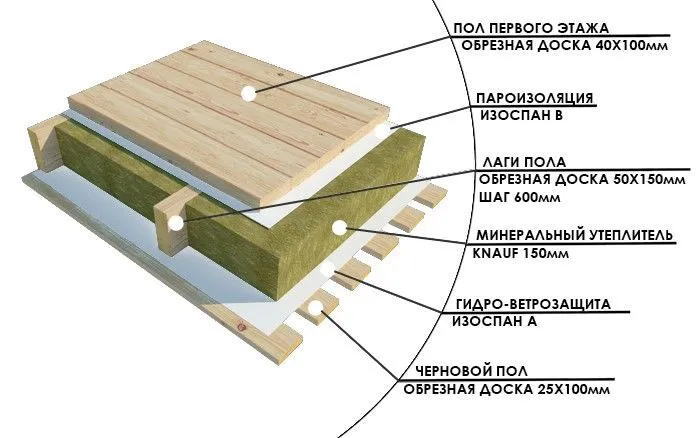
Scheme of floor insulation using joists Source nehomesdeaf.org
How to insulate floors in a wooden house from below with wooden floors, choice of material
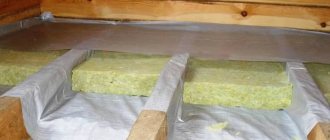
The choice of insulation in this case is practically unlimited; the floor space can be filled with slabs or mats of mineral wool, stone wool, bulk materials, blown with ecowool or polyurethane foam. An exception is made only for expanded clay (due to its heavy weight) and slab polystyrene foam (due to low vapor permeability and inevitable gaps between the insulation and the joists).
These varieties are used in special cases , for example, when you are confident in the quality of expanded clay granules and the load-bearing capabilities of the rough flooring, in the absence of other options or the risk of periodic flooding of the floor from below.
In addition to the insulation for laying the insulation cake, hydro- and vapor barrier membranes based on polymers, reinforced, perforated or foamed polyethylene are purchased.
The subfloor is laid from boards, DSP boards, fiberboard or other moisture-resistant sheet materials. The desired option is selected taking into account the degree of humidity of the underground and the budget; with the right approach, the cake is protected from blowing and penetration of external moisture, but is capable of removing condensation from the inside.
Advice! In order to save money, the subfloor can be made from edged boards with a natural moisture content of 10mm by 100mm, and the boards should not be laid end to end, but three or four boards apart, so that the distance between the boards is at least 20 cm, while you save on subfloor boards. But we must keep in mind that in this case it is necessary to use dense material as windproofing and waterproofing from below.
Installation of insulation under a concrete floor
Often the floor of the first floor is made of reinforced concrete slabs.
Typically, a concrete base is made above the cellar where household goods are stored. The insulation of such a floor is carried out from underground, i.e. from the basement side. The same principle of creating an insulating cake applies here as in the previous case. As a heat insulator, in addition to the materials listed above, you can use penofol enclosed in a foil shell. The reflective coating simultaneously serves as a hydro- and vapor barrier.
Penofol, as well as expanded polystyrene boards, can be glued directly to the concrete ceiling of the basement with assembly adhesive. The joints between the plates are foamed with special foam, and the rolled materials are sealed with adhesive tape.
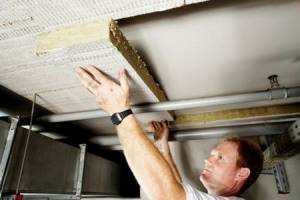
To lay mineral wool, a wooden or metal frame is required. When using frameless technology, it may be difficult to install the final ceiling covering. If you plan to install an aesthetic ceiling in the cellar, it is also recommended to install lathing.
Work order:
- The frame is mounted. In the case of a concrete base, it is better to use a metal profile.
- Waterproofing must be laid between the insulation and the ceiling, since concrete allows moisture to pass through, which will accumulate in the heat insulator.
- The insulation is installed directly into the cells of the frame and covered with a vapor barrier film.
- A counter-lattice is made onto which the finishing sheathing is attached.
Technology and stages of work
Work begins with the preparation of supports and space under the future ceiling. At this stage, excess fertile soil is removed, the area under the wooden house is leveled, and if necessary (high groundwater level), part of the top layer is changed to a mixture of sand, crushed stone or expanded clay. Additional supports (if any) are covered with rolled waterproofing materials or coated with mastics. After this, work is carried out according to a simple scheme:
• Floor joists are attached to pre-prepared grooves of the load-bearing beams along the perimeter of the walls in increments of no more than 60 cm. For complex room configurations and high weight loads, the increment is reduced to 45 cm.
• A cranial block with a cross-section of 4 cm or more is attached to the load-bearing joists on both sides, which subsequently holds the boards or slabs of the lower flooring. If there is an underground space in the house, sheet materials can be attached to the joists from below, but the option with rough timber is considered more reliable. All lumber used is pre-treated with antiseptics, metal fasteners have reliable anti-corrosion protection.
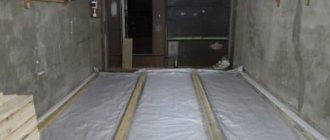
• Waterproofing membranes are laid over the joists and the rough base with an overlap and the method of joining the joints specified by the manufacturer. The canvases are laid without tension and excessively tight abutment to wooden structures, but completely covering them.
• The internal space is filled with heat-insulating materials with a ventilation gap on top of 20 to 40 mm; if the log height is insufficient, a counter-lattice made of durable timber is placed on top.
• The insulation and logs are covered with vapor barrier membranes with high protection against moisture transmission and mandatory penetration into the walls. By analogy with a waterproofing layer, such films are laid with an overlap and reinforced fixation of the joints.
• A thin damper pad is attached on top of the joists, protecting the floors from creaking and the transmission of extraneous sounds, boards or sheet materials of the main flooring
How to insulate floors in a wooden house from below
Important! Place films and membranes with the correct side to the insulation, as indicated by the manufacturer.
Instructions for forming hydro- and vapor barriers
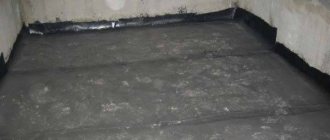
Waterproofing
Mount the rough base. Carefully place a moisture barrier film on top of it.- Lay the material in exact accordance with the contours of the insulated structure. As a result, there will be enough free space between the lags for laying insulation.
- When laying the canvas, make sure that the resulting overlap is at least 12 cm.
- Also check that the waterproofing material on the wall side reaches a height of approximately 20 cm.
- Protect the joints with reinforced tape, connecting them on both sides.
Vapor barrier
This task is performed after laying the thermal insulation layer. If mineral wool is used, it is important that there are no gaps in the cells. When laying expanded polystyrene and polystyrene foam, no reserve is left; the slabs are cut exactly to the size of the cells. After installation is completed, to increase the reliability of the insulation, the seams are filled with polyurethane foam.
Vapor barrier is performed in this way:
- install a protective membrane on top of the heat-insulating layer;
- securely attach the film along the joists and perimeter using staples;
- Attach counter slats (elements in the form of bars) along the wooden logs, which will become the basis for the floor covering;
- Attach sheet material, such as plywood, across the surface of the slats. As a finishing coating, you can use any material taking into account your own preferences, for example, linoleum, laminated flooring or parquet.
Mistakes when insulating floors
The main difficulties arise at the stage of attaching joists to foundation structures and walls; errors in selecting their cross-section, pitch and type of tie are costly. Rigid fastening is avoided whenever possible, both because of the risk of shrinkage of the wooden house and because of the deterioration of the soundproofing properties of the floors.
Technological violations also include poor treatment of wooden structures with antiseptics, lack of ventilation in the underground and insufficient ventilation gap.
Tight abutment of the insulation to the finishing flooring is strictly prohibited; to avoid errors, the thickness of the insulating layer and the height of the joists are agreed upon in advance.
Laying stages
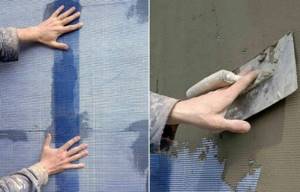
A layer of penoplex of the selected thickness is mounted on the leveled base. It must be taken into account that the material must be a monolithic slab, which cannot be replaced by several thin layers. If such a replacement is a necessary measure, then a screed should be made between the layers.
A screed three centimeters thick is placed on top of the penoplex. When the linear dimensions of the fill are more than seven meters, expansion joints must be made on the screed itself. A factory-made mixture must be used. It is possible to use a self-made mixture in the proportions of one part cement to three parts sand.
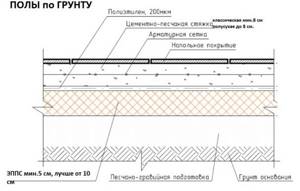
Floor insulation for floors on the ground
At a sufficiently low groundwater level in houses with strip foundations, floors can be insulated along the ground.
With this scheme, wooden logs are simply laid on a dense sand-crushed stone cushion protected from ground moisture, without rough flooring.
An alternative method is to lay dry screed slabs on top of a 20-40 cm layer of expanded clay or sawdust granules, followed by insulating the floor or pouring a classic or semi-dry insulated concrete screed (if desired, with simultaneous laying of underfloor heating elements).
Installation procedure
Although the laying technology for all types of material differs, the arrangement of layers is always the same.
When insulating floors from below, it is necessary to lay layers in the following order:
- waterproofing;
- thermal insulation;
- vapor barrier;
- overlap;
- directly to the floor covering.
If the installation technology is followed, the room will always maintain normal temperature and humidity.
If the house already has a wooden floor on the 1st floor, then installing insulation can be done quite simply. Sectional bars measuring 5x5 or 5x10 centimeters are attached to the beams from below. The selected insulation is laid on them and the resulting cake is hemmed from below with boards (about
How to insulate floors in a wooden house from below with floors on the ground, choice of material
Taking into account the proximity of the soil and the inability to fully ventilate the underground, preference is given to rigid, durable, durable and maximum moisture-resistant types of insulation.
Sheets of compacted polystyrene foam with a density of 35 kg/m3 and higher, fiberboard and similar wood-based board materials with mineral binder additives have the necessary properties
Optimal results are achieved by combining the listed materials with each other, and with bulk insulators such as expanded clay or foam glass, poured into dry screed systems.
When pouring an insulated concrete screed, the only correct solution is to use EPS, laid without seams due to the special edge of the sheets or in at least 2 layers with offset joints.
Advice! Do not listen to builders who suggest you build floors on the ground on joists. Such floors are always a risk. The optimal solution would be to install a classic insulated screed or a semi-dry screed. Based on the final cost, it is preferable to make a semi-dry screed.
Useful tips
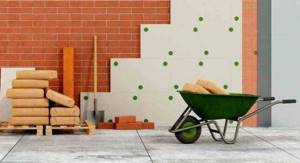
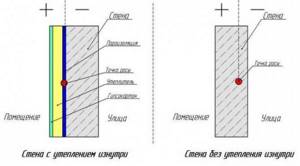
Most homeowners turn to external rather than internal wall insulation with penoplex. This is explained by the fact that the second option hides the usable area of the room.
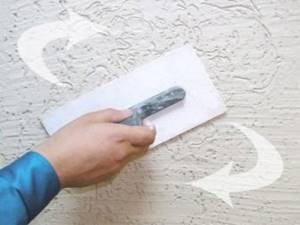
When decorating floors after insulation, they often turn to grouting. For this it is better to use sandpaper. You can proceed to this stage after the reinforcing layer has completely dried. Despite the strength of penoplex, you should be careful when working with it, since this material can still be damaged or broken.
Select high-quality and most effective glue for penoplex. A special adhesive foam is ideal for laying this insulation: it firmly and tightly attaches the material to the base and holds it quite reliably. Make sure that the thickness of the penoplex for wall insulation is at least 5 cm. Ensure that the insulation is securely and tightly attached to the base. Use both nails and glue.
When installing insulation, you cannot do without a profile, especially when it comes to installing a frame structure. It is advisable to purchase a bubble or laser tool, which is both easier and more convenient to use.
To make the external insulation of a house more effective and complete, it is recommended to insulate the foundation in advance (the basement can also be insulated along with it). In this case, all the work is done quite simply: first you need to dig out the foundation, clean it of any dirt, and then glue the foam sheets. After this, the base can be buried.
When installing penoplex on the facade of a building, you must ensure that the panels overlap each other by about 10 cm. This way you can avoid the formation of cracks.
Extruded polystyrene foam is a strong and durable material, but it does not tolerate contact with the following substances:
- gasoline, diesel fuel, kerosene;
- acetone and other ketone solvents;
- formaldehyde and formaldehyde;
- benzene, xylene, toluene;
- various esters;
- polyesters;
- coal tar;
- oil paints.
It is most convenient to apply glue to materials using a notched trowel. In this case, it is advisable to make the adhesive layer no more than 10 mm.
Facade penoplex glued to the ceilings needs to be bandaged vertical seams. This technology is very similar to laying bricks.
If you are going to plaster a wall insulated with penoplex, then you should first apply a base composition with a reinforcing mesh. The density of the latter must be at least 145 g/m2. Make sure that the size of the overlap is about 10 cm. Next, you need to lay a leveling plaster layer (its thickness should be at least 5 mm). Only then should the thermal insulation material be covered with decorative finishing.
If you are sheathing a house with penoplex in 2 layers, then first glue the starting layer, and on top of it place the next layer with a slight offset. Before this, it is worth treating the slabs with a roller.
Before installing insulation, old coverings should be removed only if they have noticeable damage or crumbling areas. If the previous finish does not have any defects or complaints, then penoplex can be placed on it.
Penoplex can be installed on a variety of substrates. It can be safely used for a private/country house or city apartment. In addition, you can easily install this insulation not only on walls, but also on the roof/ceilings.
Experts advise not to rush to insulate the house until it shrinks completely. Otherwise, the layer of plaster will become cracked and may begin to crumble. To carry out thermal insulation work, it is necessary to select only high-quality materials and tools.
Leveling the bases for laying penoplex can be done with plasterboard. However, the presence of this material will reduce the additional space in the room. Owners of city apartments with uneven floors often turn to such solutions.
If you decide to lay penoplex on a wall made of foam concrete, then it will come in handy to install a vapor barrier material. These components are not needed only if we are talking about bases whose structure is not porous.
Technology and stages of work
When laying logs on the ground, the technology is generally similar to the previous one: the base is covered with crushed stone and sand, carefully compacted, covered with at least 2 layers of roll waterproofing or protected from moisture with 2-3 cm layers of bitumen.
Small strong supports (pieces of brick or timber) are placed under the logs; after checking the level of the frame, the pie is insulated in the standard way - with a ventilation gap and installation of the main flooring.
If it is necessary to pour concrete floors on the ground, work is carried out according to a more complex scheme:
• All fertile soil layer is removed from the floor space. • The internal perimeter of the foundation is insulated with rolled or coating materials and, if necessary, insulated. • A layer of sand of at least 10 cm is successively poured and compacted onto the bottom. • The base is covered with bitumen or polymer roll waterproofing with an overlap of 8 cm and above and the edges are soldered with a blowtorch. The edges of the insulation extend onto the walls and the pre-fixed damper tape, protruding 5 cm beyond the height of the future screed. • The base is covered with polystyrene foam slabs and filled with good quality concrete with a strength grade of B22.5 and higher. The minimum thickness of a classic screed is 8 cm, semi-dry from 4 to 8 cm, with a high risk of movement of the base, it is not reinforced with metal or fiberglass mesh. • The insulated screed is covered with polyethylene film until it reaches full strength. The work is completed by removing excess waterproofing and installing flooring and skirting boards.
Floor on the ground
Advantages and disadvantages of penofol
Main advantages of the material :
- Low thermal conductivity, the thermal conductivity coefficient of penofol varies from 0.039 to 0.051 W/(m*C).
- The vapor permeability coefficient is 0.001 mg/(m*hour*Pa).
- Thermal reflection coefficient is from 97%.
- Excellent sound absorption.
- Does not absorb moisture.
- Moisture absorption coefficient is less than 1%.
- The material does not melt at high temperatures (up to 110 degrees Celsius).
- Small thickness.
- Strength and durability.
- Easy to install.
- Affordable price.
The density of penofol can be from 25 to 50 kg/m³. When used together with other insulation materials, penofol significantly enhances their properties.
Disadvantages of penofol:
- Insufficient rigidity. You cannot glue wallpaper or paint on top of the penofol layer.
- When attaching penofol, you need to protect the electrical wiring and avoid breakdowns.
- Poor adhesion. It is necessary to use a special adhesive or fasteners for strong adhesion to the surface.
What is Penoplex?
“Penoplex” is a modern material based on expanded polystyrene. It is produced on special extruded machines. During production, catalyst gases are added to polystyrene, which foam the material, causing it to greatly increase in size. Then the resulting mass is squeezed out of the device. At this stage, the gas evaporates, and polystyrene forms many pores. This material is produced in the form of slabs with a thickness of 2-10 cm. In appearance, it resembles polystyrene foam, but unlike it, it has good density and excellent strength. In addition, Penoplex is waterproof. Such properties allow it to be used for thermal insulation of any premises.
Thanks to its structure, Penoplex retains air, so it always remains warm, due to which it is widely used not only in heated, but also in unheated buildings. The material has proven itself well in insulating the floors of loggias, balconies, bathhouses, and the lower floors of apartments and houses. Many experts recommend using Penoplex when laying heated floors.
Technological process
Before starting the main processes, you should examine the working surface for defects and irregularities. If the floor is installed on the ground, then the floor screed with penoplex will have a sand cushion. At the next stage, a waterproofing layer is placed. The best option for waterproofing is the use of polyethylene; it can cope well with high humidity, temperature changes and has a budget price. Synthetic boards are laid end-to-end in the screed.
Screed with insulation
Before gluing penoplex under the floor screed, it is necessary to leave a special temperature gap at the edges of the heat insulator, which allows you to compensate for possible expansion. For these purposes, a deformation tape, for example, foamed polyethylene foam, is attached around the entire perimeter. After installation, the heat insulator is covered with an additional layer of concrete mixture (for example, a solution of cement and expanded clay).
Laying thermal insulation material
Where to order and how much does floor insulation cost?
You can purchase products that can be used to insulate a cold wooden floor in different places: on the construction market, in specialized stores, through online resources. Below is a table with the approximate average price for the country:
| Name of insulation | Cost in rubles per 1 square meter |
| Mineral wool | 3000-6000 |
| Expanded clay | 1500-2500 |
| Styrofoam | 200-300 |
| Penofol | 60-170 |
| Penoplex | 250-550 |
| Polyurethane foam | 150-180 |
Find out in more detail how vapor barrier is carried out for the walls of a wooden house.