Korovin Sergey Dmitrievich
Master of Architecture, graduated from Samara State University of Architecture and Civil Engineering. 11 years of experience in design and construction.
It is important to properly insulate the floor, as this will prevent heat loss from the building and ensure the most comfortable temperature. There are two ways of insulation: from above and from below. Each case must be considered separately, since when thermal protection of different elements of a building is carried out, only one of them will be competent from the point of view of thermal engineering. When is it better to use floor insulation in a wooden house or in a country house from below?
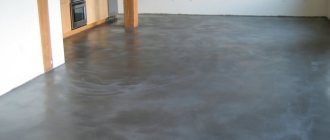
Basic structures for insulation
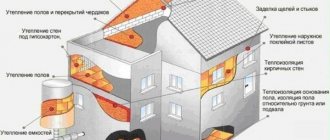
Thermal protection of vertical elements in a private house is required in three cases:
- insulation of the floor above a cold basement;
- interfloor ceilings;
- attic floor in the presence of a cold attic.
In the second case, work is carried out to improve sound insulation characteristics.
Insulation in a wooden house helps prevent the following problems:
- overconsumption in the heating system;
- violation of the temperature and humidity conditions of the room;
- rotting of floor structures;
- the appearance of mold and mildew.
In a private house or country house, it is worth thinking about carrying out thermal insulation measures at the design stage.
In what cases and why is insulation from below correct?
It is better to insulate the floor above a cold attic from above, but the thermal protection of the floor above the basement is technically more competent to perform from below. This has its reasons:
- there is no reduction in the height of the room on the ground floor;
- there is no need to choose dense rigid insulation that will withstand the loads from residents, furniture and equipment;
- protection from freezing not only of the floor, but also of the entire wooden floor;
- displacement of the dew point (the line on which condensation falls) to the surface of the ceiling from the thickness of the structure, which prevents rotting.
But when carrying out work in a private house or dacha, some difficulties may arise specifically related to work from below:
- the need for more reliable fastening of the insulation;
- the difficulty of working in low subfloor conditions;
- the need to work on the ceiling leads to rapid fatigue of workers;
- restrictions on types of insulation.
Therefore, if you are looking for simpler methods of insulation, we recommend that you read the following articles:
Which variety to choose
In many ways, the choice will depend on the specific situation and what area needs to be treated. Using an example, we can consider the most common cases when a house needs foam insulation:
- If you need to seal cracks or eliminate any other defects on the surface, then polyurethane is suitable. But such material should not be exposed to sunlight.
- If you need to fill a large volume, then penoizol is suitable. But an ordinary cylinder will not be enough; you will need to purchase a special device with high pressure. You don’t have to buy it at all - you can rent it or borrow it from friends, because no one will use it often.
- If you need to seal small cracks and carry out thermal insulation in small areas, you can buy a cylinder with regular polyurethane foam. It does not support combustion, after hardening it is particularly hard, and it has an ecological composition.
- If defects are found on the outside of the wall, then you need to apply a composition based on polyurethane. It is applied directly using a special cylinder or apparatus.
It is worth remembering that foam insulation creates errors inside the layer that need to be eliminated. To do this, you will need a long hose to push the material inside. If it is necessary to fill air gaps inside the insulation, then holes are made in the wall with something sharp.
Polyurethane foam is not suitable for insulating the entire external facade - it does not have the appropriate characteristics necessary for this. Therefore, you should not choose it for these purposes, even despite its more economical cost.
Material requirements
The peculiarities of the method of carrying out work force the use of only certain thermal insulation materials. The basic requirements when carrying out heat-protection measures in a private wooden house or in a country house from below include:
- small mass of insulation, since the place of attachment to the ceiling experiences increased loads;
- Ease of use;
- high efficiency;
- structure coherence (bulk materials are not suitable);
- if possible, fire resistance, since when carrying out work in a wooden house it is necessary to ensure maximum fire safety.
There are many options for materials that satisfy all these requirements.
How long will the foam last?
Thermal insulation material does not have a limited service life.
After installation, the foam is destroyed when exposed to:
- direct sunlight;
- exposure to ultraviolet radiation;
- carrying out silicification.
Therefore, the thermal insulation layer is covered on top with a finishing material, which serves as a protective layer.
Under the cladding, the service life of the foam is unlimited.
Materials for bottom insulation
It is recommended to use the following as thermal insulation layers:
- mineral wool produced in the form of rolls;
- Styrofoam;
- polyurethane foam.
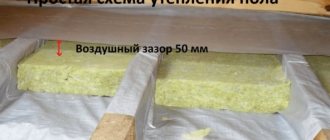
Mineral wool in the form of rigid slabs can also be used; it is installed between the beams of a wooden floor in a country house or in an individual building from below so that the width of the slab is slightly greater than the clear distance between the beams. In this case, the rigid insulation will be held in place due to friction. The same applies when installing thermal protection on an attic roof.
Mineral wool insulation has the following advantages:
- high efficiency;
- non-flammability;
- low degree of water absorption;
- resistance to biological influences.
The main disadvantage of the material is that workers require reliable protection from fibers getting into the skin and lungs: gloves, overalls, masks.
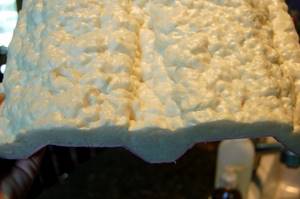
You can also use inexpensive polystyrene foam in your country house and home. Its main advantage, of course, is cost, but there are others:
- good thermal insulation;
- low degree of water absorption;
- ease of installation;
- there is no need for complex tools or special clothing.
The fact that the material has low strength is not important when insulating from below, but flammability and instability to the simultaneous effects of negative temperatures and a humid environment are obvious disadvantages. The solution to the second issue can be reliable waterproofing and protection from steam. Due to its low cost, this type of material has become quite widespread.
The third insulation option was polyurethane foam. This type of thermal protection has the following positive characteristics:
- ease of installation;
- reliability of fastening due to penetration into cracks, irregularities and inaccessible places;
- effectiveness as thermal protection;
- resistance to biological influences.
More information about this type of insulation as thermal protection for structures, including floors, can be found in the article “Insulating a house with foam.”
Gun foam advantages, disadvantages, application
The first polyurethane foam that arrived in Russia was for amateur use. That is, the balloon was equipped only with a dosing tube. Pistol systems appeared later - in the late 90s. Moreover, the cost of the gun itself was very high and not all suppliers understood that it was necessary to order flushing fluid for the gun. Otherwise, it will become unusable after the first use. What are the advantages of installation using gun foam? First of all, the ability to accurately and very dosedly apply foam to the seam
This is very important, since an excess of foam leads to squeezing out the box. In addition, when working with pistol foam, it is always possible to stop for a sufficiently long time
This is very convenient if, after installing one window or door, you have half a cylinder left, and you need to move on to installing the next one. The foam in a regular container can set during this time, but in a gun it does not dry out for a long time. The next positive point is the ability to access remote and hard-to-reach places due to the sufficiently long length of the pistol barrel. And when using an additional dosing tube, you can supply foam to places with limited height (where it is impossible to hold the container vertically). The smooth flow of foam plays a decisive role when filling large voids, where it is important to dose the foam in layers so as not to cause it to roll off. The same rule applies when filling vertical joints. The pistol foam itself has higher plasticity indicators compared to conventional polyurethane foam, and a standard 750 ml cylinder is enough to fill a larger number of seams due to foam savings with a more accurate dosage. The disadvantages of pistol foam are the need to wash the pistol at the end of work with a special liquid, which is supplied in the same cylinders as the foam, the impossibility of using a pistol cylinder with a conventional dosing tube (although there are some manufacturers who supply an adapter with a tube for manual work with a pistol cylinder ) and the fragility of the pistol. So, if you are not going to install windows and doors at least within your own home or apartment, then it makes no sense to purchase a gun and special cylinders. This investment will not pay off. And a few words about the techniques of working with a pistol:
- Be sure to shake the can well before installing it on the gun.
- Screw the gun onto the cylinder, not the other way around
- Work with the cylinder only in a vertical or slightly inclined position with the neck down, not allowing gas to escape without foam.
- Press the trigger smoothly, do not feed large volumes into the seam
- Fill the left and right seams of the boxes alternately to the same height
- Do not fill the seam more than a third
- If the gap is large, it is better to lay strips of polystyrene foam into it before starting foaming. The seam width should be within 2 cm
- If it is not possible to lay polystyrene foam, apply the foam in small portions, moving from the box to the slope in the form of a figure 8 placed on its side, and move from one slope to another every 30-40 cm of a vertically filled seam
- Remember to rinse the gun thoroughly after handling it. The washing liquid is made on the basis of acetone. Rinse the gun only in an open place! Do not smoke when flushing the gun and do not direct the liquid stream from the gun towards the fire! Explosion hazard! Do not direct the stream into the toilet under any circumstances!
Installation technology
The fastening methods for each material are different, but when installing reliable thermal protection, it is necessary to follow the order of layers, which is the same for all. When insulating from a cold basement or underground, materials for insulation and protection of the insulation are arranged in the following order:
- waterproofing;
- thermal insulation layer;
- vapor barrier;
- floor design;
- floor construction.
Compliance with just this order will ensure normal temperature and humidity conditions in the house. Next, it is necessary to consider in more detail the arrangement of protective materials.
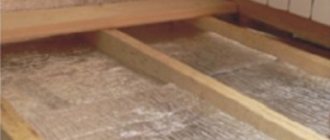
In a house with an existing wooden floor on the 1st floor, insulation from below can be done by attaching bars with a cross-section from 50x50 to 50x100 to the beams below and placing insulating material between them. After waterproofing, the resulting pie can be hemmed with boards.
Waterproofing
Cold air from the basement can fall out in the form of condensation onto the warm surface of the ceiling. The constant presence of moisture on the structure will lead to the formation of mold or mildew, and subsequently to rotting, even if the wood is treated with special compounds. In addition, condensation is very harmful to the thermal insulation layer. It can lead to increased thermal conductivity. To avoid this, a layer of waterproofing is laid on the cold air side.
Features of national installation in the era of the pre-penetration period
To appreciate how serious and breakthrough the emergence of polyurethane foam was in the field of technology for installing window and door systems, you need to have an idea of how doors and windows were installed before. If we are talking about the classic installation method, it involved the preliminary installation of a so-called subframe in the opening, which was attached to wooden mortgages, previously walled up in the masonry or installed in a mold at a reinforced concrete factory during the manufacture of a standard window or partition block. The subframe was leveled, and it had even right angles. The subframe itself was attached to the mortgages with nails or screws. In some houses there were systems where the stretchers were attached to forged metal mortgages with a flat eye in which there was a hole for a nail or screw. In old houses, after the subframes were installed, they began measuring the carpentry and made windows and doors individually for each opening in order to reduce the gaps that may arise between the subframe and the frame. The doors and windows were then installed in the openings for which they were made. The installation process was simple. The boxes were leveled and nailed to the stretchers. And if there were unfilled spaces, they were caulked with tow or waste paper. In houses of standard construction, subframes were not installed, since the production of reinforced concrete products at the factory makes it possible to obtain an even and fairly accurate opening, and the introduction of standardization standards in construction made it possible to obtain standard carpentry for a standard opening, which was installed by nailing the box to the mortgages. The voids between the box and the slab were filled with the same tow. The disadvantages of this installation were colossal heat losses through window and door units, as well as extremely low quality of installation and difficulties with subsequent operation. The doors needed to be constantly adjusted, and sometimes even the locks had to be changed. Labor productivity during installation work left much to be desired.
Material characteristics
Foam sealant has a number of special characteristics:
- foam output volume. The indicator is measured in liters, determined by the consistency and amount of mass that came out of the cylinder;
- adhesion level. The parameter is intended to characterize the strength of adhesion of the substance to the base. For example, with concrete, brick, wood and plastic, the level of adhesion of the product is exceptionally high. At the same time, there is practically no grip in case of contact with oily surfaces, ice and silicone;
- foaming The indicator characterizes the process of boiling of foam insulation in a cylinder;
- extension. The process is a chemical reaction of a substance to its environment that follows foaming;
- secondary expansion. The process occurs after polymerization of the composition, and has a negative character, since high-quality products are not subject to repeated expansion or shrinkage.

Foam for floor insulation has an expansion characteristic.
When planning the insulation of floors with polyurethane foam, one should also take into account such indicators of the quality of the substance as the level of viscosity and density.
Types of foam insulation
Foam insulation may differ in its structure and composition. We can distinguish the main types of material for insulating walls and windows:
- Penoizol. It contains aldehydes, which are harmful to health, although manufacturers often claim the opposite. It dries much longer than polyurethane (complete drying time can reach three days). Typically used for insulating attics, load-bearing walls and structures. Can be purchased in the form of ready-made slabs or as a liquid composition.
- Ecowool and foam concrete. Can be purchased in liquid form, most often used for pouring foundations. They are practically not used when finishing facades due to their significant weight, which puts a large load on the walls. In addition, the high cost often speaks against this material.
- Polyurethane foam. Suitable only for sealing seams, joints, holes, since it does not allow moisture and steam to pass through, and this is a critical point for insulating material. When interacting with air, its volume increases twenty times, while there is a minimal amount of air bubbles inside. Can be purchased in convenient small-volume containers that have a significant shelf life.
- PPU or polyurethane. The most common option, which is considered the most universal. Polyurethane insulation is very effective as thermal insulation for facades. It consists of two components; they must be mixed by machine immediately before application. The foam expands thirty to forty times from its initial volume, and small balloons form inside. Due to this, high-quality insulation of the house is achieved.
The main advantages of floor insulation with foam
Thermal insulation of floors with foam in a wooden house is characterized by a number of advantages:
- foam insulator has an extremely low thermal conductivity coefficient, which determines the efficiency of thermal insulation work;
- there is no load on supporting structures due to the low density and light weight of the insulation;
- foam for floor insulation is capable of filling any cracks and holes, therefore eliminating the risk of cold bridges;
- the polymer mass is highly elastic and is not subject to deformation under the influence of external factors;
- the material provides a high level of resistance to pathogenic microflora.
The fire resistance characteristics of foam floor insulation are also impressive. Product class G 1-3, ignites only upon direct contact with fire. The service life of the material is designed for 30 years.
Characteristics of polyurethane foam, its pros and cons
Polyurethane foam insulation is synthesized directly on the insulated surface through the interaction of two components: polyol and polyisocyanate. The mixing process is carried out using special equipment, which makes it difficult to insulate the floor yourself.
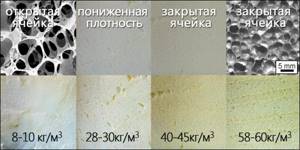
As a result of the chemical reaction, a voluminous substance is obtained in which closed pores occupy 90-95% of the volume of the frozen foam. This gives the resulting material unique abilities:
- the best thermal insulation properties among all insulation materials: thermal conductivity coefficient - 0.022-0.035 W/(m×°K);
- low level of moisture absorption - 1-3%;
- practically no vapor permeability - 0.02 mg/(m*h*Pa).
Other characteristics include:
- density - 20-80 kg/m3;
- compressive strength - 1.53-10.19 kgf/cm2;
- bending strength - 3.3-19.37 kgf/cm2.
When evaluating insulation, experts cite the strengths of PPK:
- high thermal insulation properties;
- durability;
- good adhesion with all types of building materials;
- no seams;
- environmental friendliness;
- self-extinguishing;
- light weight;
- Possibility of application to the most complex geometric surfaces;
- low level of water absorption;
- inertness towards all substances used at the household level;
- does not serve as a basis for the reproduction of microorganisms;
- wide temperature range in which the insulation can be used;
- versatility - used to insulate any building structure.
We cannot remain silent about the weaknesses :
- intensive aging under ultraviolet rays;
- lack of vapor permeability;
- complex insulation technology;
- lack of resistance against mice and rats;
- impossibility of creating a ventilation gap;
- the need to use special equipment;
- high cost of thermal insulation (work together with materials);
- inability to make an accurate calculation of component consumption;
- the need to strictly follow all insulation instructions;
- under compressive loads, thermal insulation properties are lost.
More details about polyurethane foam as insulation can be found in the article “PPU Insulation”.
Classification of types of polyurethane foam
Products are classified according to the following criteria.
- professional foam – sprayed using special equipment. Thermal insulation of this category requires high quality work and significant costs for professional services;
- semi-professional - foam for insulation is presented in cylinders, the material is intended for domestic use.
By temperature of use:
- summer – temperature range of use ranging from +5°C to +35°C;
- winter – can be used in conditions down to -20°C;
- all-season – the operating range extends from -10°C to +30°C.
By number of components:
- single-component – ready-to-use products are presented in aerosol cans;
- two-component - a complex composition requires additional preparation before installation in the form of mixing the components in a special installation, applied with a construction gun.
According to the degree of flammability:
- class B1 – parameter characterizes a product with high resistance to open fire;
- class B2 – indicator of self-extinguishing properties;
- class B3 - the composition is not heat-resistant.
Floor insulation with two-component foam
The last category includes, for example, waterproof foam, which is relevant in the design of swimming pools and bathrooms.
Can it be used as insulation?
It is widely used for insulating walls outside and inside. Apply using a special apparatus or a pistol.
The material fits well on vertical, horizontal and inclined surfaces.
Features of wall insulation:
- The walls become thicker, which leads to greater resistance from environmental influences.
- The material can withstand temperatures up to +80.
- Vapor permeability.
- Resistant to various damages. It will not crumble from impact or become deformed.
- The material does not burn.
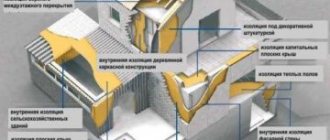
The following objects are insulated:
- window openings;
- walls from the street;
- foundation;
- balcony, attic;
- pipelines;
- attic spaces.
After application there are no seams or joints. The insulating foam hardens in 1 to 3 days, depending on the number of layers applied.
From the inside
Warming indoors is carried out as a last resort. Only when it is not possible to carry out work, if the apartment is on the upper floors. This is indicated in SNiP 23-101-2004.
When insulating walls indoors, you should take care of waterproofing, because the dew point shifts. The walls will be wet, which will lead to the appearance of fungus and destruction of the supporting structure.
Outside
Insulating the outside is the right solution. The main factor is not the violation of the dew point. The walls will be warm and dry.
Benefits of insulating from the outside:
- High energy saving data.
- Inside, the footage remains the same.
- No condensation.
- Sound insulation performance improves.
Disadvantage: foam insulation requires the use of equipment.
Even with the inflated cost of the materials, the equipment used, and the work of the craftsmen, this pays off in savings (payment for heat), silence, and comfort.
Methods of insulation with material
Polyurethane foam is convenient to use for insulating the floor from above and below due to the high adhesion of the composition. So, when arranging a floor above a cold basement floor, it is recommended to insulate the floor with polyurethane foam on the basement side. The product is ideal for creating a thermal barrier on horizontal and vertical surfaces:
- when arranging the facade, rigid polyurethane foam is used;
- For roofing work, soft foam or liquid polyurethane foam is recommended. The material is in demand for filling niches and voids, and is used in working with structures of complex shapes;
- semi-rigid polyurethane foam is used for thermal insulation of internal walls and floors in a wooden house. This composition must be combined with hydro- and vapor barrier, as it is susceptible to moisture.
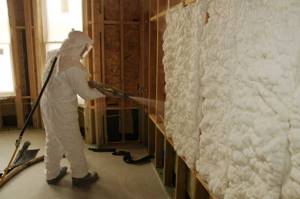
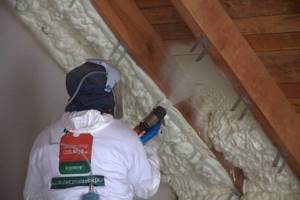
Features of PPU
If you use the method of spraying polyurethane foam to insulate floors, the whole process will take no more than a couple of hours. The specialist will evenly spray the thermal insulation material into the space between the joists, that’s all science. The work process, although it does not seem too complicated, has many features. Installing a high-quality polyurethane foam coating in the floor area, the service life of which can be about half a century, is not an easy task.
This is due to the following nuances:
- The process of polyurethane foam formation consists of the creation and logical completion of the chemical interaction between the constituent substances of the mixture. They must be mixed qualitatively in a strictly defined proportion, as a result of which a uniform foam of microscopic bubbles is formed at the output. It is applied under high pressure, which allows the resulting coating to be highly durable and chemically neutral, with excellent thermal protection.
- To achieve the maximum level of thermal insulation of the surface, it is necessary to select the correct brand of mixture for the manufacture of polyurethane foam. The thickness of the spray layer is calculated individually in each individual case and depends on the materials used to cover the floor and temperature indicators.
- When carrying out floor insulation work, polyurethane foam should be applied in uniform layers of small thickness. This technique will avoid the formation of voids and other flaws.
Good quality of work on thermal insulation of floors with polyurethane foam can be ensured only with a high level of qualification of the employee, availability of equipment of the necessary power and some practical experience.
Features of insulation application technology
The technology for installing sprayed insulation in cylinders involves the following steps:
- the cylinder is equipped with a special tube or gun, having first removed the lid;
- shake the composition thoroughly for at least 60 seconds;
- before applying foam thermal insulation, the surface is treated with water;
- The cylinder is held with the bottom up, the voids are filled to 1/3 of the volume, leaving room for expansion of the composition.
When the foam fills the entire volume of the gap, it is recommended to sprinkle the mass with water to improve the polymerization process. Curing time for foam insulation varies depending on the model and brand, and manufacturers produce products of varying quality. Surface hardening is observed within approximately 20 minutes after spraying. Correction of the mass using a cutting tool begins no earlier than after 4 hours. The full period of polymerization of foam floor insulation in cylinders requires a period of at least 24 hours.
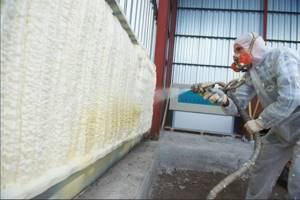
Providing protective equipment
When applying polyurethane foam in cylinders for floor insulation, it is worth considering that the composition is poorly washed off from skin and clothing. You should work in protective clothing; it is also important to use safety glasses and gloves. Manipulations of spraying polyurethane foam with special equipment are performed using professional equipment to completely eliminate contact of the skin and mucous membranes with the substance.
When insulating a floor with foam, you need to use protective equipment
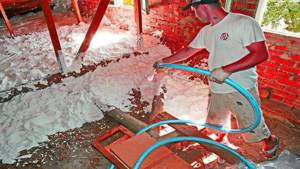
Thermal insulation of the floor by spraying
Installation of polyurethane foam when insulating floors using spraying technology involves the use of special installations. The foam insulator components are contained in separate tanks. The working composition is prepared directly on site before use. Substances enter the mixing device, are then sent to a spray gun and applied under pressure to the surface to be treated.
Features of installation of foam insulation:
- a frame structure is constructed for applying spray-on thermal insulation. Experts recommend lathing depending on the nature of the area being treated. For example, for effective thermal insulation of a wall structure, it is advisable to build a wooden or metal frame with an interval between guides of 30 cm. If you plan to insulate the floor with sprayed polyurethane foam, you should create a sheathing in increments of up to 1 m;
- the foam composition is applied by smoothly moving the jet over the surface to ensure uniform distribution of the mass;
- when processing vertical planes, foam insulator is sprayed from the lower perimeter, gradually filling the openings upward;
- When manipulating, keep the spray gun at a distance of at least 25 cm from the surface to be treated. When moving to another sector, you must release the gun trigger to block the stream.
The flooring is laid after the foam insulation has completely polymerized.
Floor insulation by pouring method
The technology involves creating monolithic thermal insulation in the floor structure by pouring foam into specially made cavities. For example, a rough plank floor is constructed on joists, and small holes are made on the surface in designated areas for pumping polyurethane foam. If thermal protection of walls is planned by pouring polyurethane foam, the cladding is performed with a technical gap between the base and the finishing material. Next, the foam composition is poured through special holes on the facing panel.
Filling is carried out on the basis of the same spraying installations, reconfiguring the equipment parameters. In a professional environment, special units are also used for pouring polyurethane foam, which determines the high-quality level of thermal insulation work. The foam substance exclusively fills all voids down to the slightest cracks, resulting in the formation of a sealed thermal barrier with high performance characteristics.
The technology for floor insulation in a wooden house depends on the location of the floor - it can be the floor of the first floor, the interfloor floor or the floor of the attic. The highest requirements for thermal insulation performance are imposed on the floor of the first floor, unless an insulated basement is provided underneath.
Insulating the floor in a wooden house from below allows you to reduce heat loss in the house, save energy during the heating season, and avoid the rooms being blown through cracks in the floor. Thermal insulation will help prevent fungus and mold from damaging the wooden floor frame.
Installation of window and door blocks using foam
A radical simplification of installation work when installing windows and doors occurred in Russia in the early 90s. It was at this time that the first treasured cans of polyurethane foam appeared. However, the first use of foam caused great disappointment among most specialists. Since the boxes were placed in the old fashioned way on mortgages using nails, they did not immediately think of putting expansion bars inside the box. Therefore, at that time it often happened that the boxes bulged with foam and had to be rearranged. Over time, a unique technology for installing door and window blocks on foam has been developed. Some models of interior doors began to be produced even without the possibility of installing additional fasteners. In general, the sequence of operations today looks like this:
- Cleaning the opening, measuring the level of deviations from the vertical and horizontal
- Installing an empty box in the opening and fixing it with wedges
- Adjusting the position of the box relative to the opening by level
- Fixing the frame in the opening using the method provided by the technology (windows on frame anchor dowels, door frames on anchors, dowels or only on wedges)
- Installation of window sashes and door leaves
- Adjusting the position of the box to obtain the correct rebate
- Jamming of window sashes with spacer wedges and door panels with spacer bars with spacer wedges
- Pasting wooden door frames and their leaves with protective agents to prevent damage to the decorative surface in case of possible leakage of excess foam
- Direct filling of the gap with foam between the frame and the opening slope
Despite the apparent complexity of this chain, the speed of each technological operation is low. Therefore, with a little experience, labor costs are significantly reduced and in one day two installers can complete the weekly installation standard determined in Soviet times.
Advantages of bottom insulation
In order to reduce labor costs and construction costs, many resort to top insulation of wooden floors. The technology consists of installing an insulating layer of rigid heat-insulating sheet material between the frame and the finishing coating. This option is suitable for construction in regions with a relatively mild climate.
But when building in a region with cold winters, it is recommended to insulate the floor on the ground floor in a private house from below for the following reasons:
- the height of the premises is not “eaten up”;
- it is allowed to use any type of insulation - there are no restrictions on rigidity, since the thermal insulation layer will not experience loads from furniture, people, or household appliances;
- protection against freezing is provided for the entire floor frame, and not just the external flooring;
- The dew point (condensation line) moves upward to the surface of the coating, due to which the base structure is protected from rotting.
Selecting a thermal insulator
Insulation of the floor from below is carried out using slab thermal insulation material - mineral wool, polystyrene foam or extruded polystyrene foam. You can also use sprayed polyurethane foam, but this requires the involvement of specialists with professional equipment.
When choosing, pay attention to the advantages and disadvantages of each material, requirements for technical characteristics, and installation features.
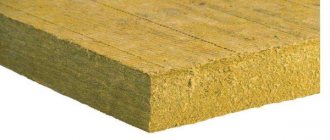
Mineral wool. There are several varieties of this material:
- glass wool - prone to shrinkage and inconvenient to install due to the formation of harmful dust;
- slag wool – contains binding substances that are released into the air and are dangerous to human health;
- basalt wool is a material that is safe for health if the composition does not include binding elements (when purchasing, you should choose products from well-known manufacturers and check for a certificate).
Basalt wool is fireproof, durable, and resistant to caking. But due to the fibrous structure of mineral wool, it tends to accumulate moisture, losing its thermal insulation properties. Therefore, special attention should be paid to the quality of installation of the waterproofing and vapor barrier.
First stage of installation
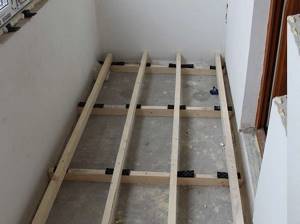
Insulation of a wooden floor consists of creating a multi-layer cake, the basis of which are logs or beams on which the flooring will rest. To install the structure you will need:
- lumber (bars 50x50 mm or 40x40 mm, edged board);
- waterproofing film;
- vapor barrier membrane;
- reinforced tape;
- woodworking tools;
- stapler with staples;
- screwdriver + self-tapping screws;
- sheet material for flooring (plywood, OSB boards, etc.).

All wooden elements prepared for installation are impregnated with an antiseptic and treated with a fire retardant. Or use a universal fire-bioprotective composition.
At the bottom of the joists or beams, you need to fill the skull blocks - the basis for laying the rough flooring. For flooring, edged boards are cut, and the elements are simply laid with their ends on the skull blocks - they do not need to be fastened.
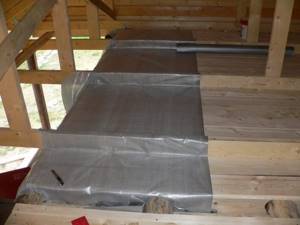
Waterproofing
Low air temperature in an uninsulated basement can lead to condensation on the warm surface of the ceiling. If moisture is constantly in contact with the wood, even high-quality treatment will not save it from fungal damage.
Condensation is also dangerous for mineral wool and loose foam - moisture entering the pores reduces the thermal insulation properties of the materials. Therefore, it is impossible to do without installing a waterproofing film material.
The waterproofing film is laid over the installed rough base. Make sure that the overlap of the canvases is at least 12 cm, and glue the joints on both sides with reinforced tape. The canvas is laid over the walls to a height of about 20 cm; it must follow the contours of the mounted structure so that thermal insulation material can be placed in the cells between the joists.
Installation of heat insulator and vapor barrier layer
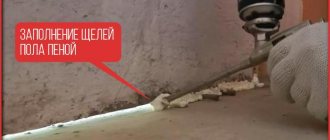
Mineral wool slabs are cut with an allowance of a couple of centimeters in length and width - then the elements will fit into the cells by surprise, without gaps. If slabs made of polystyrene foam or extruded polystyrene foam are used, they are cut as accurately as possible to size, and after installation, all interfaces of the elements with the wooden frame and among themselves are filled with polyurethane foam.
A vapor barrier is necessary to prevent moisture from penetrating into the insulation from the room. If warm steam enters a porous material, it will pass through, cooling and turning into water. This will lead to an increase in the thermal conductivity of the insulating layer and will cause rotting of the wooden joists or beams that serve as the basis of the structure.
The vapor barrier membrane is laid on top of the cells with insulation and secured around the perimeter and along the joists with staples. Next, along the joists, counter-battens are placed - wooden blocks that will serve as the base of the floor. Sheets of plywood or other sheet material are fastened staggered along the slats.
Such an insulated base is ready for waterproofing and screed (if floor tiles are to be laid) or floor installation of any finishing coating - parquet, laminate, linoleum, etc.
Preparatory work
The technology of preparatory work is influenced by the place where the polyurethane foam is sprayed, i.e. The floor is insulated with polyurethane foam from below or above the floor, as well as the type of base: wooden or concrete.
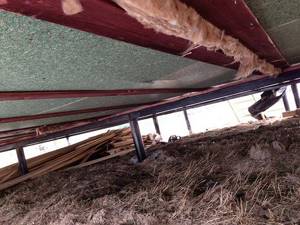
Insulation from below
When insulating the floor from the basement, ground floor or lower part of a building located on screw piles, the complex of work comes down to removing dirt and dust. Particular attention should be paid to greasy (oil) stains. They must be removed with chemical reagents. But when spraying polyurethane foam, the easiest way to do this is with a hammer drill (for a concrete floor slab) and a chisel (for wood). In both cases, the oily material is removed. If a sub-wood floor has an oil stain on the boards, they need to be replaced.
A pothole in concrete is primed with “Betonokontakt”, after which the foam will not only hide the defect, but also strengthen the damaged area, acting as a repair mortar. Rotten boards are removed from the wooden base of the floor. Other problems such as cracks, fallen knots and creaking do not affect the quality and durability of the insulation.
Insulation of a wooden floor from above
Insulation of wooden floors with polyurethane foam begins with preparing the base. It is cleared of construction debris and dusted. Boards and joists damaged by rot, mold and mildew are removed (you can ignore other defects). Waterproofing impregnation is applied over the entire surface.
Insulation of the concrete base
Insulation of the concrete base is carried out under the screed and along the joists. In the first option, preparation of the base comes down to removing dirt and dust, as well as degreasing oily areas. Open joints between slabs, cracks and chips will be filled with foam and bound.
More thorough preparation is needed when insulating along joists. In this case, the following work is performed:
- the old screed is dismantled;
- Construction debris and dust are removed from the surface of the base;
- the passage of logs is marked;
- logs are installed.
Removing the old screed. During operation, the screed becomes covered with a network of cracks, peeling, cavities and other defects appear. It is better to remove such a screed. To do this, you need to use a hammer drill, since a chisel and hammer will take several days to complete the work.
Surface cleaning. Construction debris is removed from the surface of the ceiling, after which the base is vacuumed or removed with a damp cloth. There is no need to carry out repair work - the foam will hide defects and bridge cracks.
Marking. Pre-applied markings on the base of the floor with a pencil or marker will help you install the joists correctly. The process is carried out in several stages.
- Stage 1. The line of passage of the outer lags is drawn. They should be located at a distance of 5-7 cm from the wall.
- Stage 2. The distance between the extreme lags is measured.
- Stage 3. The value obtained during the measurement is divided into segments of 50-60 cm (this step should be between the logs).
- Stage 4. Attachment lines for internal joists are drawn.
Installation of logs. Concrete joists can be installed using several methods. But at the same time, the logs are pre-cut to size and then treated with waterproofing impregnations.
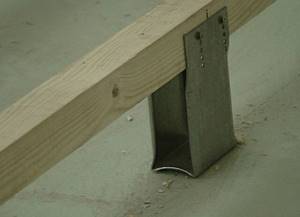
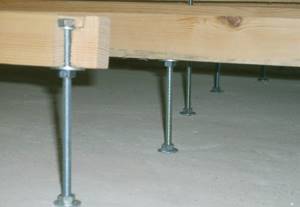
1. Fixing the timber to the concrete base is carried out using U-shaped metal elements, which are attached to the floor with dowel screws. The log is inserted between the pillars of the element and screwed to it with wood screws, 2 on each side. Using a level, it is necessary to constantly monitor the horizontal position of the beam.
2. Studs are used for fastening. They can be fixed to concrete using anchors or heels. After this, a nut and washer are screwed onto them, and through holes are drilled in the joists, through which the beam is placed on a series of studs. Fixation is carried out with a nut and washer screwed on top. The mounting diagram is clearly visible in the photo. A detailed description of each step can be found in the work “Insulating the floor on the balcony.”
3. A two-layer lathing is used. The bottom row is attached to the concrete with a metal corner, and the top row to the bottom with long wood screws. To obtain a perfectly flat surface, you can use wedges.