How to properly waterproof wooden floors in a wooden house
Before installing waterproofing, it is necessary to carry out preparatory measures. To do this, protect the foundation from moisture and prepare ventilation holes in the ceiling. Choose an insulating material suitable for your conditions, taking into account several subtleties:
- Coatings and mastics used to protect wooden structures must have poor combustion properties;
- Be sure to provide ventilation space between the finished and subfloor;
- When installing a concrete subfloor, roofing felt, polyethylene film and similar materials are used;
- To protect wood elements, liquid waterproofing compounds that contain antiseptics and water-repellent components are better suited;
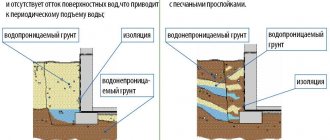
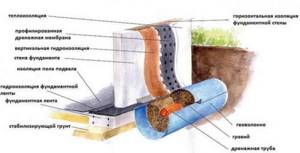
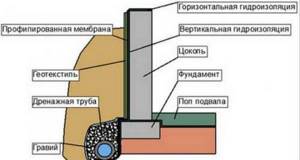
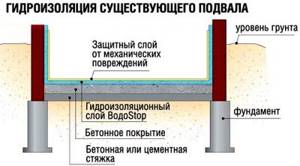
Close attention is paid to protecting the basement floors of the building (basements and garages). Premises located underground are constantly exposed to moisture. For this reason, if you have a basement, reliably protect it from groundwater. The quality of the waterproofing device determines whether the ground floor will be dry and the service life of the wooden floor.
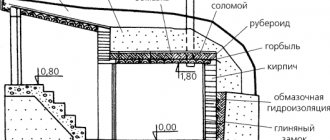
Drainage in the basement of a house is an essential element of waterproofing
If you follow the correct construction technology, you need to take care of drainage at the initial stage of building construction. To do this, a trench measuring approximately 1.5 * 1.5 meters is formed at the base slab. Geotextiles and crushed stone are laid in it, after which drainage pipes are laid - they should cover the entire building, gradually turning into a drainage well. After this, the trench is completely filled with crushed stone, and geotextiles are laid on top. The space between the pit and the foundation is filled with a sand-gravel mixture, which allows you to create a high-quality drainage system.
If the drainage was not completed in a timely manner, it can be done after the completion of construction work. To do this you will need:
- Completely remove water from the room
- Perform waterproofing - injection and penetrating methods are optimal for this purpose
- Place a layer of crushed stone on the base plate and lay drainage pipes
- Ensure that drainage pipes are led out of the basement
- Horizontal insulation of the floor is carried out directly on top of the drainage, after which a new floor covering is formed using a concrete screed.
This method makes it possible to effectively solve the problem of high humidity in the room, but the building owner will have to sacrifice about 40 cm of flooring.
Waterproofing the underground. Purpose and basic principles of basement waterproofing
If you started talking about the need to waterproof the basement, it means you either decided to arrange a food storage in it, or equip a living or technical room. This means that there must be a normal level of humidity in the basement and the task of waterproofing is to ensure it. It is necessary to somehow block the access of moisture in both liquid and vapor states. This problem is solved at the design stage and for this purpose a whole range of measures is laid down:
- External waterproofing of walls coupled with a layer of waterproofing of the basement floor.
- Use of concrete with increased water-repellent characteristics.
A comprehensive solution for waterproofing a basement or cellar at the design stage
- Continuous monolithic fill without seams.
- Waterproofing grillage with interfacing hydro/vapor barrier of the first floor floor.
- Organization of the drainage system.
- Blind area.
To ensure normal humidity in the basement, all materials are used with protection not only from liquid penetration, but also from steam. That is, all materials must also have vapor barrier properties. After all, there is always moisture in the soil, even if groundwater is far away. If the walls allow steam to pass through, moisture will move from the damp soil to a drier room. The result is eternally wet walls, condensation and dampness. So when selecting materials, we make sure that they block steam too. “Breathable” materials are of no use here. Basement floor waterproofing must be impervious to moisture of any kind. Then it will be dry.
Step-by-step work plan
In general, whether there will be a basement or not must be decided before design. Immediately after the data on the geological structure and groundwater level at the site arrives. In accordance with these data, certain decisions are included in the project. But in general the order of work is as follows:
- Make concrete preparation over compacted soil and a layer of crushed stone. The thickness of the concrete is at least 50 mm. The strength here can be kept low - M 100. There is no need to go higher. This is only the basis for laying waterproofing.
- Lay rolled waterproofing material with outlets to zero level. Roll up the outlets, cover them from contamination and place them on the side of the stove.
- Fill the protective screed. It is not always used, but when the groundwater level is high, it is a necessary thing.
- Tie the reinforcement and place the formwork.
Proper basement waterproofing: example of construction
Types of waterproofing
The “Recommendations for the design of waterproofing of underground parts of buildings and structures”, published in 1996 in Moscow, identifies the main types of waterproofing depending on the materials used (other materials that have been most popular in low-rise construction in recent years have been added to the table).
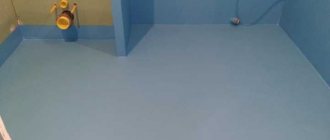
Coating (polymer, bitumen-polymer, coating, liquid rubber, liquid glass). The walls and floor are cleaned and leveled, corners and joints are reinforced with special tape, and the surface is primed. When the primer has dried, a waterproofing material is applied to it using a roller or brush, which, after drying, forms a film with waterproof properties.
- Pasting (roll). This includes the good old roofing felt and modern rolled materials like glass roofing felt, waterproofing material, etc. Bituminous mastic is applied to the cleaned and primed surface, roofing felt sheets with an overlap of 150 mm are applied to it, and the same overlap is applied to the wall to waterproof the joints.
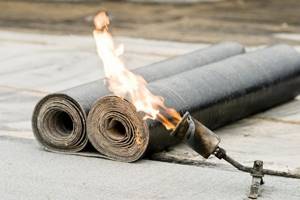
- Fused - a type of lining. The material is applied to the surface and heated, the inner layer melts and sticks to the surface.
- Penetrating. It uses materials that penetrate the structure of concrete or brick through capillaries and microcracks, crystallize and densely fill the smallest pores of the walls, increasing their water resistance. The mixture is applied to the cleaned, degreased and roughened surface with a metal brush and moistened (the insulation is sold in dry form, which is diluted with water). First of all, the joints and corners are processed. After two hours, apply the second layer. To ensure that the mixture hardens evenly, the treated surface is moistened for several more days.
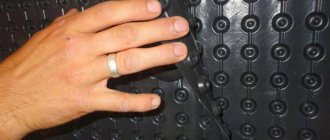
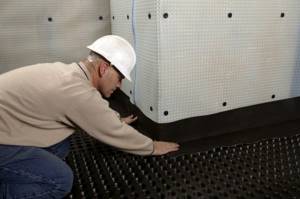
- Membrane is a type of roll. Previously, it was used only for external waterproofing, since for tight adhesion to the base it had to be pressed tightly with water pressure; Recently, internal waterproofing membranes have been introduced with spikes that drain water. Waterproofing is applied to a cleaned basement wall, in which the cracks have been previously sealed and a primer has been applied. It is secured at the top with dowels. The ends of the membrane must be secured with horizontal waterproofing.
- Injection - a type of penetrating, used to seal damage. This is a thick gel that is injected into the prepared holes with a special pump. A hole is made in the surface, through which, using special equipment, the gel is pumped into a crack, fracture or other structural damage into which water can enter. The advantages of this method are the low consumption of material and the fact that there is no need to specially prepare the surface for waterproofing.
Also, for waterproofing the basement, waterproof concrete is used - ordinary concrete with special additives.
The author of the book “Universal Foundation,” popular among self-builders, R.N. Yakovlev, identifies three layouts for the location of the sealing layer in the basement:
- External anti-pressure waterproofing;
- Internal anti-pressure waterproofing
- Waterproofing to protect against capillary moisture.
Some authors classify non-pressure waterproofing of the basement as a separate group. It protects against temporary flooding, and the insulating material is bitumen mastic.
Based on the method of surface arrangement, basement waterproofing is also divided into vertical and horizontal.
- Vertical is done when the basement walls are at the groundwater level, or when there is no drainage system.
- Horizontal is always done, even in the driest basement.
Horizontal waterproofing is additionally applied to the walls to a height of about 300 mm.
With an eye to the future: suddenly there will be prolonged downpours or there will be a strong flood, the level of groundwater will change, or after some time some useful room will be equipped in the basement, like a billiard room, etc. You will have to pay a high price for carelessness.
EvanFORUMHOUSE Member
The flood protection project varies depending on what we are equipping there: potato storage or a home cinema.
To choose the right type of reliable waterproofing, you need to consider:
- the magnitude of hydrostatic water pressure;
- the permissible humidity of the indoor air specified by the project according to SNiP II-3-79 (from dry mode - 60% to humid mode over 75%);
- crack resistance of structures according to SNiP 2.03.01-84 (the formation of cracks may not be allowed in any quantity, and even crack opening up to 0.3 mm may be allowed).
- aggressiveness of the environment according to SNiP 2.03.11-85.
Structures must be waterproofed above the maximum ground level by at least half a meter - from capillary moisture.
RNikonovForumHouse user
I will add the recommendations that we were given in the course “foundations and foundations” for buildings with a basement.
These are the recommendations.
- Coating waterproofing, which protects against high water, is done on sandy soils with low groundwater level;
- Pasted waterproofing is used when the groundwater level is 0-2 m below the base of the foundation;
- Pasted insulation with protection from damage (lining over the insulation with flat AC sheets, etc.) is needed when the ground level is higher than the sole;
- And if the sole is more than two meters below the groundwater level, insulation will no longer help. It is necessary to lower the water level by other measures.
If during the survey it is determined that groundwater is aggressive to concrete or metal, it is better to waterproof the entire foundation, regardless of the presence of a basement, with at least coating insulation. But when the groundwater is non-aggressive, the groundwater level is low, the house has no basement, horizontal waterproofing along the top of the foundation is enough.
What materials to choose
The three-layer membrane Liplent PS is suitable as a base roll material for the bathroom. It is resistant to mold, repels moisture well, and is environmentally friendly - it does not emit harmful fumes.
The material is elastic and thin, so it rolls out easily on horizontal and vertical surfaces. It serves for many years and provides reliable waterproofing provided that the seams are properly processed. Knowing the area of the walls and floor, it is easy to calculate the consumption.
The self-adhesive membrane Liplent PS is more convenient to install than built-up bitumen-based roll materials. It does not require a gas burner or other specialized equipment.
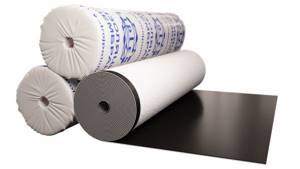
Liplent PS – peeled off, spread, pressed!
Proper basement waterproofing: useful tips
The question often arises about how to waterproof a basement with your own hands, and what is required for this. In this case, it is worth considering a number of tips that will help when performing the work. Namely:
- Completely pump out the liquid from the basement (or wait until it goes away). Despite the fact that some types of waterproofing can be used even in conditions of high humidity, such work is not performed in water.
- It is better to pre-clean the surface - preliminary preparation will not take much time, but it will help to rationally use consumables.
- You should not neglect priming the walls, because it will ensure effective adhesion of the insulating materials to the main surface.
- The use of reinforcing fabric is relevant for work in new buildings, which may shrink over time. It is laid between layers of waterproofing or attached to a wet solution.
- Most types of waterproofing are applied to concrete - they are ineffective on the ground. Therefore, the ground floor must first be cemented, and only after that can work begin.
- Take into account the temperature conditions at which work should be carried out - not all technologies are suitable for arranging a basement in winter.
- It is important to insulate not only the basement, but also the flights of stairs leading to it.
Important! Proper basement waterproofing is done using a kind of hood. For this purpose, it is necessary to make a gateway in the ceiling, and install an air duct on the other side. It is important not to forget to cover the pipe with a cap, because otherwise precipitation will penetrate into the room very quickly.
Why insulate the floor?
In a country house or in a private house there is always a cold floor above an unheated basement. And if there is dampness in the underground, then it should be slightly damp. This affects the condition of the materials that make up the lower floor. If it is wood, rotting processes begin to develop in it; if it is concrete, dampness and delamination begin to develop. This reduces the lifespan of the building, and after some time it may receive emergency status.
The floor and other structural elements of the building are insulated in order to reduce heat loss, as a result of which the cost of heating rooms in the cold season is reduced.
Are we setting up an underground space in a wooden private house? For storing things and vegetables - Review + Photos and
An underground is an empty closed space between the ground and the floor of a room inside the foundation.
The underground of the house is the place where various personal communications, water and sewer pipes, and electrical wiring are located.
It is also very common to set up a cellar underground to store supplies of vegetables and pickles.
The depth of the underground is 50-60 centimeters, a maximum of a meter, which distinguishes it from basements.
Types of underground premises
There are two types of underground: warm and cold. Cold is used for houses that are not heated during the cold period; for this purpose, the floor is additionally insulated.
In such a subfield, the temperature depends on the temperature outside, and not in the house . Ventilation in the underground of a private house is carried out through vents in the foundation of the house; there is no air exchange with the interior of the house.
Floors with a warm underground are made in houses with permanent residence and heating. The temperature in the underground depends on the temperature in the house, since it is connected to the interior by ventilation vents in the floor.
To reduce heat loss, the foundation is insulated.
Most often, the depth of the warm underground is 15-25 cm. With a depth of more than 25 cm, heat loss increases, with less, ventilation will deteriorate.
The underground construction process
The underground is usually built under the floor of the kitchen or hallway.
Excavation
First, the fertile layer of soil, the so-called turf, is removed, then a hole is dug. The recess is made 20-30 cm deeper than the planned depth. The surface of the earth is carefully compacted.
Next, waterproofing is carried out. Waterproofing is carried out only for wet soils. The waterproofing material is laid in two layers directly on the compacted soil. Most often, roofing felt or thick polyethylene film is used for this.
Fatty clay is also sometimes used: it is laid out as a top layer and compacted, thereby creating a kind of barrier to moisture.
The waterproofing is covered with a 5-10 cm layer of dry sand on top. Tamping is done. Next, lay a layer of crushed stone, 10-15 cm thick, and also compact it. This will serve as the basis of the underground.
If you plan to use the underground as a cellar, then it is advisable to concrete the base. Next the floor is laid.
Ventilation of a warm underground
To avoid the appearance of dampness in the underground, a favorable environment for the appearance of fungi and mold, the underground must be equipped with ventilation.
When building a warm underground, ventilation holes are made in the floor in opposite corners of the room and covered with gratings measuring 10x10 centimeters.
To ensure free ventilation and good air circulation, it is not recommended to cover the vents with furniture and floor coverings.
It is also possible to provide ventilation using skirting boards. To do this, they are fixed just above the floor level around the entire perimeter with a gap of 1-2 millimeters.
This will ensure the necessary air circulation. This method is not very popular. And this is due to the fact that the underground is partially open. Dust located underground will also enter the house.
There is also a method of ventilation through windows cut into the baseboard.
On the back wall of the plinth, a groove is provided along its entire length, 1 mm deep, 4-6 cm wide. Windows 4-5 cm long are cut into this groove. Two windows on opposite plinths will be enough to provide ventilation in an underground area of 20-25 m2. The windows are covered with bars. They are attached to the baseboards using screws.
In a room with water heating, holes are made in the baseboards under the heating radiators. From the underground, the air rises through the hole in the baseboard, passes through the radiator, heats up and rises, moving to the opposite wall. Then it cools down and sinks to the bottom and returns to the underground through the hole in the baseboard.
Work options
Waterproofing of wooden floors is carried out on the subfloor. In private buildings, preference is given to materials with light weight, so as not to create additional load on the foundation. They also have the following requirements:
- non-flammability;
- high insulation characteristics;
- ease of installation,
- strength;
- durability.
These materials include:
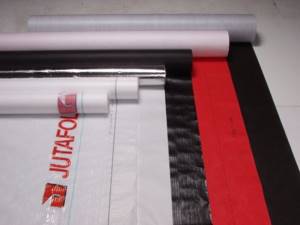
- roll options – pasting
This type of waterproofing option involves applying a carpet of layers of polymer-bitumen compounds and materials. Initially, the coating is primed using cold mixtures.
- bitumen-based mastics – painting
The principle of applying insulation is to coat (paint) wood in several layers using bitumen and polymer compounds. This is a fairly affordable option, both in terms of execution and economics. However, when it gets colder it begins to crack. The service life of such protection is 5–6 years, then it will have to be renewed.
- liquid glass or impregnating rubber
Wood is a porous material. Density is imparted to it using impregnating compounds: drying oil, tar or more modern compounds based on silicone, synthetic resin or acrylic. Liquid glass to improve quality. Such impregnations are applied to completely dry flooring.
- cast
First, a rolled material, say, roofing felt, is laid on the base of the floor, on top of which a screed is poured with liquid glass added to the composition. The top of the screed is reinforced with mesh, which is again filled with screed, but with the addition of waterproof elements. To reduce the likelihood of the insulation being abraded, the wooden floor is laid on an underlay on top.
Primer of the floor before waterproofing
Floor priming means impregnation of the base with compounds that prevent water from rising into the basement. To some extent, the clay castle performs the functions of priming, but traditionally it is the impregnation of the crushed stone-sand base of the floor with bitumen or mastics based on it. A number of polymer-based impregnating compositions are now produced, but for use in a private home, the traditional bitumen version will be cheaper and more practical. Works include:
- Laying a 5-10 cm thick sand layer on a clay base with leveling and compaction.
- The top is filled with fine crushed stone of a fraction of 5-10 mm, which is leveled and compacted tightly.
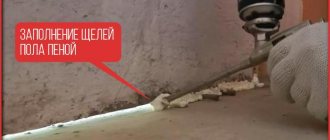
- Hot bitumen or mastic is poured over the crushed stone covering. Bitumen plays the role of a binder between stones, while simultaneously creating a film waterproofing coating.
- Further insulation work depends on the project and the wishes of the developer.
As a rule, such floor waterproofing is sufficient in a shallow basement of a garage or shed.
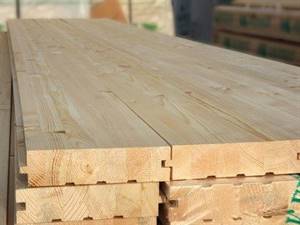
Use of special wood species
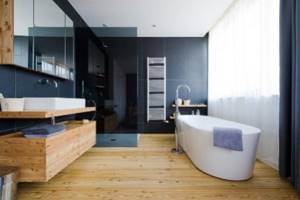
In the bathroom, you don’t have to cover the wooden floor with other materials.
In this case, for flooring it is necessary to use special types of wood (teak, cork) or building materials that have undergone heat treatment during the manufacturing process.
Excellent waterproofing qualities are characteristic of certain tree species. Wood treated in a special way acquires moisture-resistant qualities and the ability to maintain its original dimensions throughout its entire service life.
Cork is resistant to constant exposure to moisture, while it is very decorative and durable.
Teak floors are valued for their high content of essential oils, moisture resistance, and durability, subject to the technology of laying floors and treating cracks with sealant.
The bathroom walls, finished with boards, are covered with deck varnish.
Now you clearly understand the process of waterproofing a bathroom in a wooden house and can decide on the choice of method for carrying it out. However, desire alone is not enough.
Still, it is better to entrust the finishing of the bathroom with all the accompanying processes to professionals, and monitor the work itself with knowledge of the matter, albeit superficial.
Waterproofing of a bathroom installed in a wooden house must be carried out for all surfaces: floor, ceiling, perimeter walls.
Having soberly assessed your capabilities, consider hiring specialists from a trusted company that provides bathroom renovation services.
Errors at the waterproofing stage can render not only the bathroom room unusable, but also the house as a whole.
Waterproofing a brick basement and its features
Due to its porous structure, brickwork instantly absorbs any moisture. As a result, dampness reigns in the basement and mold actively spreads, and therefore waterproofing in this room is mandatory. It is carried out in several stages:
- Preparing brickwork - you need to thoroughly clean the surface, remove any dirt, level and then dry the floor and walls.
- Painting waterproofing is carried out - a primer is first applied, and then the base material (special mastic, which contains resins or bitumen).
- Consecutive application of layers - the thickness of each is about 2-3 mm, the next one is started only after the previous one has completely dried.
In addition to painting technology, adhesive waterproofing can also be used, for which insulation, roofing felt and similar materials are used. A quick and budget solution for insulating a basement would be to apply a cement-sand mixture prepared on the basis of M-100 cement and higher.
Important! Penetrating insulation should not be used in brick basements.
Installation of vapor barrier
The floor is a very important structure of the house, through which, if the protective “pie” is installed incorrectly, a lot of heat can be removed. Vapor barrier, arranged according to all the rules of technology, will protect wooden floor structures for a long time. When installing films, the following rules should be observed:
- Double-sided vapor barriers are installed with the smooth side inward. The rough surface should “look” outward.
- Single-sided films are laid according to the same principle. It is laid with the smooth side facing the thermal insulation.
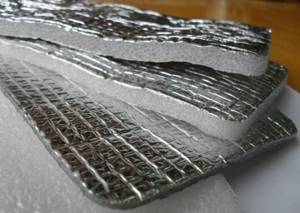
- Foil vapor barrier materials are installed with the reflective layer facing outwards. If this technology is followed, the layer fully performs its functions, protecting structures from condensation.
The insulation cake includes several layers: steam, heat, and waterproofing. Only their close “neighborhood” prevents the destruction of the house and the settling of moisture under the floor. In addition to these three components, the floor covering includes:
- wooden frame;
- rough flooring made of boards;
- waterproofing film;
- insulation;
- vapor barrier layer;
- air cushion;
- clean floor covering.
Some designs require more thorough protection from moisture. Thus, waterproofing a wooden floor in a bathroom involves using 2-3 layers of insulating film or mastic.
Penetrating waterproofing
Modern technologies offer a number of compounds for waterproofing basements that penetrate concrete or other layers; Penetron can be considered one of the main ones.
The composition is used in basements with close groundwater levels and loose porous soils.
Preparation
Treatment of concrete surfaces of basement floors with Penetron is carried out only after a series of preparatory operations. They must ensure maximum penetration of the insulating composition into the concrete structure. An obstacle to saturating concrete with insulating impregnation is usually the finishing or insulating layers on top of the main concrete floor covering:
- lime plaster;
- painting and finishing layers;
- accumulation of dust, pollution; film insulating coatings;
- moisture protection that does not perform its functions well.
Don’t forget to prepare the necessary material.
The task of the preparatory process is maximum cleaning of foreign materials unusual for concrete and ensuring access of penetrating insulation into all pores and capillaries of the concrete covering of the basement floor.
Removal of the listed layers can be done mechanically by hand, but to achieve the greatest effect from using the composition, the surface should be polished with special devices with abrasive materials. In some cases, it is possible to use cleaners and compounds like “Lepta Himfrez”.
The final stage of cleaning is the removal of dust and wetting the surface under pressure until the concrete is completely saturated with water using Kärcher devices.
Composition application technology
The process of applying a waterproofing agent to a concrete surface can be done independently, but be sure to use chemical-resistant rubber gloves:
- dry mixture “Penetron” is diluted at the rate of 400 ml of water per 1 kg of mixture;
- the consistency after mixing must correspond to the definition of a “jelly-like” liquid;
- apply the first continuous layer with a wide brush;
- the second time the concrete is coated after the first layer has dried at intervals of about an hour;
- from drying out, the coating is moistened within a week using a watering hose with a spray nozzle;
- If additional protection against overdrying is required, various film materials can be used.
Waterproofing basement floors with Penetron and identical compounds can be done independently, but the process is quite labor-intensive, dirty and unsafe for health. Invited specialists perform such work at a price of 300 to 500 rubles. for 1 m2.
The market offers a large selection of waterproofing compounds of similar action: “Hydrohit”, “Kalmatron”, “Maxill” and others.
Underfloor ventilation
Ideally, you need to make at least eight holes (two on each side of the foundation). For more efficient ventilation of the underground, special turbines with blades powered by wind can be installed in the openings. And in order to protect the space from litter and rodents, it is recommended to cover the vents with mesh plugs. During the winter, the vents in the foundation can be closed so as not to freeze the subfloor. However, care must be taken that this does not lead to condensation.
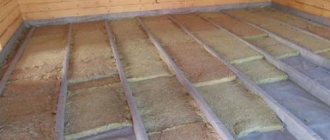
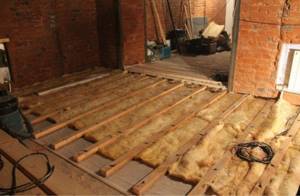
Logs are mounted on leveled posts using metal corners. If waterproofing is carried out for a cold underground, subfloor boards are first laid perpendicularly on them. Minor gaps are allowed between them. A vapor barrier film is laid over the subfloor, and then a sheathing of timber for laying the finished floor. The insulation in the sheathing cells must be laid in such a way that there are no gaps between the edge of the insulation and the joists. At the final stage, the finishing floor is laid.
When waterproofing a warm underground, a subfloor is not needed - a floor board is immediately laid on the load-bearing joists (as a rule, tongue and groove is chosen). During installation, it is necessary to ensure that its elements are tightly fitted to each other. Since a warm underground requires air circulation from the upper rooms, several ventilation holes are made in the floor. Often, to ventilate a warm underground floor in a wooden house when waterproofing, they resort to the following method - instead of holes in the floor, they make a small gap under the baseboard. And since a technical gap is left between the edge of the floor and the wall, this ensures air exchange between the lower and upper rooms. However, experts advise not to do this.
Types of wood for bathroom floors
Tree species tolerate the effects of moisture differently.
In the bathroom and other similar rooms it is recommended to use the most moisture-resistant:
- larch;
- teak. This wood is richly impregnated with oil, which explains its increased resistance to moisture;
- Cork tree. This breed is attractive not only for its moisture resistance, but also for its durability. Cork is the bark of a special type of oak tree. It is called the cork tree, as well as the cork and western oak;
- thermotree. This is wood treated with superheated steam in an oxygen-free environment. As a result, it becomes resistant not only to moisture, but also to fungi.
How and with what to waterproof a concrete floor?
Kitchens and bathrooms are called “wet” areas because they are at risk of water overflows and leaks in pipelines. Yes, and residential premises may suffer from breakdowns in the radiator heating system. This means that the floors in the house first of all need good waterproofing. Let's talk about how to make it reliable and durable
Ubiquitous in city apartments, reinforced concrete floors are very often used in country houses. They are environmentally and fireproof, can withstand high loads (up to 1250 kg/m²), and are resistant to deformation. However, in order to prevent corrosion of the reinforcement in them, as well as to prevent leaks through the joints of the slabs with the walls and between themselves, the floors must be carefully waterproofed - both around the perimeter and along the entire plane. The water barrier must provide the structure with complete water resistance, have high adhesion, resistance to temperature changes and cracking, and prevent the penetration of steam into the base.
To protect slabs from moisture, coating, spraying, penetrating, welding and self-adhesive materials are used. Liquid insulation - bitumen mastics, cement-based, polymer-based and rubber-based compounds - is applied with a roller or brush in several layers, forming a hard or elastic film on the surface. The work is quite labor-intensive. It is necessary to prepare solutions (dry mixtures are dosed and mixed with water, two-component mixtures are kneaded), the uniformity and continuity of the layers is maintained, and their intermediate drying time is maintained. For surfaced materials, the hot installation method is used, laying them using a torch. This requires appropriate equipment and the ability to handle it; During the process, it is necessary to carefully control the density and evenness of the insulation to the base, and in addition, the heated adhesive mixture will emit an unpleasant odor.
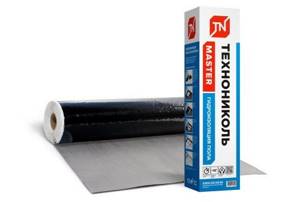
TECHNONICOL self-adhesive roll floor waterproofing
It is clear that not every homeowner will undertake to insulate floors using these technologies on their own. Optimal from the point of view of operational properties, as well as convenience and ease of installation, is TECHNONICOL roll self-adhesive floor waterproofing.
The material is a bitumen binder modified with SBS polymers, covered on top with a protective layer of non-woven polypropylene (Spunbond), and on the bottom with a removable siliconized film. The canvas has a thickness of 1.5 mm and is available in rolls of a convenient size of 0.75 × 10 m. Weight - 1.5 kg/m². The waterproofing is intended for installation on reinforced concrete floors, including in rooms with high humidity (bathrooms, kitchens, showers, saunas). The price of a roll is from 1650 rubles.
Due to its strength and elasticity, as well as the presence of a layer of protection against mechanical damage, TECHNONICOL floor waterproofing is not subject to cracks and will ensure complete integrity of the structure for a period of more than 45 years
The material is absolutely waterproof, can withstand temperatures up to +85ºС and remains flexible down to –15ºС. It is self-adhesive, so it does not require the use of a torch for installation, which means it can be laid on both concrete and combustible wooden floors. Following the manufacturer's instructions, the work can be easily completed by any performer who does not have special skills. The process does not require mandatory technological breaks (for layer-by-layer drying, etc.), so it will take a minimum of time compared to coating or fused insulation. For example, a standard bathroom in an apartment can be waterproofed in one day.
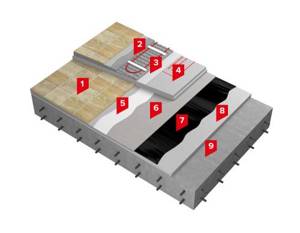
Insulation system for interfloor ceilings in bathrooms
The presence of a unique front layer Spunbond is an important advantage of TECHNONICOL Floor Waterproofing over other rolled materials, which allows you to lay the tile covering directly on it, without installing a protective screed (the waterproofing is laid on a concrete base and treated with a concrete contact type compound). This not only significantly reduces the period of work, but is also a significant savings item. In addition, thanks to this floor design, it is possible to maintain the ceiling height, which is very important for typical urban dwellings.
In total, the manufacturer offers three floor “pie” schemes using this material: the first involves gluing tiles directly onto the waterproofing, the second involves pouring a cement-sand screed for laying any floor covering (laminate, parquet, etc.) and the third involves installing an insulated screed with integrated water or electric underfloor heating system. The TN-FLOOR Barrier KMS system has been developed specifically for the implementation of these schemes, which includes TECHNONICOL products such as emulsion bitumen primer No. 04, reinforced three-layer vapor barrier film ALPHA Barrier 3.0 and thermal insulation boards made of extruded polystyrene foam CARBON ECO.
Rolls of waterproofing packed in boxes should be stored under the roof in a vertical position, without stacking them on top of each other, at a temperature of –35 to +35ºС and at a distance of at least a meter from heating devices. The material should not be exposed to moisture or direct sunlight
Installation of TECHNONICOL self-adhesive floor waterproofing on a concrete base
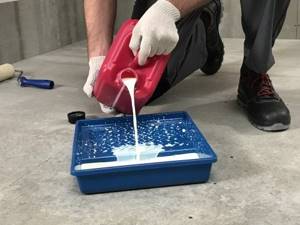
Work is carried out at a temperature not lower than +10ºС, having previously kept the material in a warm room (+18…+23ºС) for 24 hours. The base - floor slab or leveling screed - must be dry and clean. To improve adhesion, the surface is primed with bitumen primer TECHNONICOL No. 04. If necessary, it can be replaced with a penetrating latex primer (both compositions are water-soluble, odorless and recommended for interior work). The primer is applied to the floor plane with a roller, extending 20 cm onto the walls, and all corners and joints are carefully coated with a brush. At room temperature it dries in 15–20 minutes. To make sure of this, you need to apply a napkin to the surface, on which there should be no traces.
The base for laying waterproofing must not only be cleaned of debris and dust, but also its levelness must be checked according to the rule. Lumps and sagging should be removed, recesses and cracks should be sealed and the solution should be allowed to dry completely. All these measures will help achieve optimal adhesion of the material to the surface.
The next step is to roll out the roll starting from the far corner of the room and cut it into pieces of the required length, taking into account that they will be laid with longitudinal overlaps of at least 100 mm and transverse overlaps of at least 150 mm. ( An important point: the cutting of the canvas must be carried out with the expectation that the transverse overlaps on adjacent canvases should be offset by 500 mm relative to each other.) The further progress of the work depends on the design of the floor. Let's consider both options - with and without a screed.
Installation of self-adhesive waterproofing under the screed. After cutting, cut the protective film along the overlap lines on the fabric fragments and let the coating lie flat for an hour. Then the pieces of material are rolled into rolls and installation begins: they are carefully rolled out, slowly pulling off the film and exposing the adhesive bitumen-polymer layer. The overlaps are not glued in this case, since the film is removed along the cuts only from the main plane of the canvas. So that there are no air bubbles left under the laid waterproofing and it fits tightly, without waves, to the base, the coating is smoothed with a rolling roller. Having covered the entire surface of the floor, the overlaps are fastened. To do this, the edge of the upper sheet covering the joint is folded back and bitumen mastic is applied under it, after which, after removing the remaining strip of protective film, it is pressed against the lower sheet. Glued overlaps are also rolled with a roller.
During the installation process, it is necessary to ensure that the outer side of the siliconized film does not touch the bitumen-polymer layer: they will set tightly and it will no longer be possible to separate them. As a result, this piece of coating will become unusable
The joints of the floor and walls are waterproofed separately. This is done because it is easier to ensure a high-quality fit of the canvas to horizontal and vertical structures without swelling and folds, and the adhesive properties of the bitumen-polymer mixture in combination with the additional application of bitumen mastic guarantee absolute tightness of the joints.
The waterproofing is cut into strips 30 cm wide, 20 cm of which will be on the walls and 10 cm on the floor. The protective film is cut along the corresponding line and, having first removed its upper half, glued the vertical part of the segment, and then, having removed the lower half, the horizontal part. The end overlaps are performed immediately, during installation, by coating them with bitumen mastic and rolling them with a roller. External and internal corners must be reinforced with triangular pieces of canvas, laying them on the same mastic and pressing them tightly to the base.
Installing self-adhesive bitumen-polymer waterproofing on the walls allows you to create a reliable water barrier in the room, which will prevent water leaks through the joints along the perimeter of the ceiling
Installation of self-adhesive waterproofing under tiles. Having cut the material, the edges of the canvases, which will be at the bottom of the overlaps, are treated with a bitumen primer (or latex primer) to enhance adhesion. The minimum width of overlaps is the same - 100 mm longitudinal, 150 mm transverse. When the composition is completely dry, installation can begin. The installation of waterproofing is carried out according to the principle described above - with the difference that cuts are not made on the protective film, but rather it is removed entirely, since mastic is not used in this case. Both the overlaps and the canvas itself are rolled with a roller.
The sections for installing waterproofing on the walls should also be pre-coated with primer in the overlap area. The film on the back side of the strips is cut and pasted in the familiar way - first on a vertical surface, and then on a horizontal one. Triangles to strengthen the corners are also mounted on top of the dried primer. A concrete contact primer is applied to the finished coating, after which it dries you can begin tiling work.
Waterproofing floor screed
Waterproofing a floor screed that lies directly on the ground is carried out in the following sequence: first we compact the soil, then lay a separating layer of geotextiles, pour and compact high-quality granite crushed stone 15-20 centimeters thick on top, then again a separating layer of geotextiles. Next comes a layer of sand which will serve as the basis for waterproofing the floor screed. Geotextile plays in our “pie” as a separating and at the same time drainage layer, that is, moisture will easily pass through it, but geotextile will not allow the upper and lower layers that it separates to mix with each other. Sand and crushed stone separated by geotextiles will not mix over time and the soil under the floor will not sag. Sand and crushed stone are not hygroscopic substances, that is, water cannot rise through them from bottom to top under the waterproofing of the floor screed. In addition, it is advisable to provide a drainage system and a device for shut-off waterproofing of the foundation walls. Next, it all depends on what material we will use to waterproof the floor screed.