The cellar serves as a warehouse during the winter period. With the help of this simple room you can preserve vegetables and homemade preparations until the start of the next season. This is accompanied by various microclimate conditions inside the cellar - a certain air temperature, humidity, as well as air pollution.
In order for the necessary conditions to be maintained over a long period of time, care should be taken in advance to insulate the internal and external parts of the room. Since warm air tends to rise, you need to make sure that it always remains within an enclosed space. This can be facilitated by an insulated hatch into the basement.
How to insulate a cellar lid on the street? To do this, you need to follow some rules and follow tips that will allow you to preserve vegetables for a long time.
Arrangement of the cellar
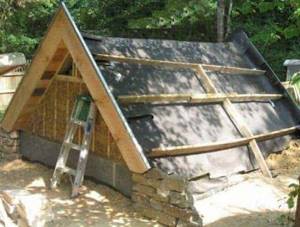
It must be said right away that a good basement can be built only if it reaches a depth of about two meters, has a side exhaust and a vertical entrance - this is the main difference from ordinary classic basements. Excavation work may be hampered by stone boulders or groundwater.
Before construction, you need to find out the depth of the water layers in the area where you live. There are special instructions for this, which can be found on the World Wide Web. If the foundation of your basement gradually erodes, it will not last long. .
Important. If you have a lot of moisture around your basement, then you need to make a water drainage system around its perimeter. Otherwise, water will flow into the middle of the room.

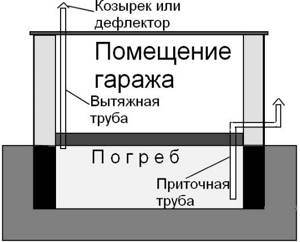
A variant of the movement of air masses into the cellars by vertical descent
In most cases, the basement is made rectangular; it can be located either under the entire garage or under part of it.
Sequence of steps when building cellars:
- They dig a trench under the foundation;
- They make formwork to pour the foundation;
- Concrete is poured for the foundation, before that we make a sand cushion at the bottom of the trench itself;
- The walls are made of reinforced concrete blocks;
- It is necessary to think through holes for vertical ventilation passages so that moisture can escape;
- The last step is to insulate the cellar in the garage.
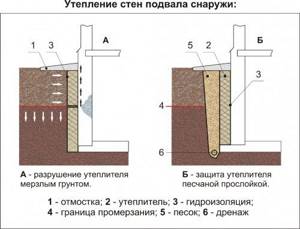
Foundation insulation
In this part we will talk about how to insulate a cellar from the inside and start with the foundation. Since the walls are made of concrete, they, like this material, have high thermal conductivity. In the summer months it warms up, and in the winter it freezes.
From such temperature changes, the wall begins to collapse. Through the foundation walls located in the frozen ground, cold and moisture enter the cellar.
- To ensure that the foundation does not come into contact with the ground, they are plastered on the outside;
- To achieve maximum insulation, you need to put roofing felt.
Floor insulation
To prevent moisture and cold from entering our room through the floor, we need to make the following design:
- It is necessary to deepen the floor by thirty centimeters and level it;
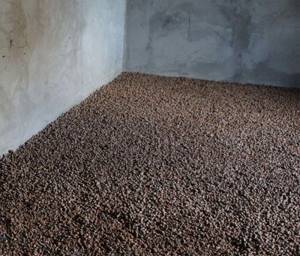
- A layer of crushed stone ten centimeters thick is poured;
- Pour sand onto the crushed stone to make a cushion of about five centimeters;
- We compact the materials well;
- Fill the resulting mixture with hot bitumen;
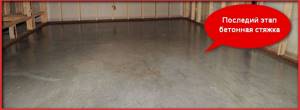
- We make a concrete screed and reinforce it with reinforced mesh.
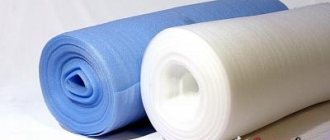
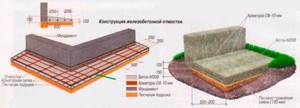
Components for wall insulation
Wall insulation
Insulating a loggia and insulating garage walls are similar in many ways. Their main similarities are the materials used and the progress of work.
This part is also suitable for those people who have a question: how to insulate a cellar in a private house? Because the work is the same. First, you need to pay attention to the presence of moisture, which will require insulating the electrical wiring, because faulty wiring is a big fire hazard.
If the wires come into contact with the insulation, the fire will spread very quickly, so they need to be hidden in special boxes. How to insulate a cellar in a garage? These can be a variety of thermal insulation materials: mineral wool, glass wool, polystyrene foam and others.
You can read more about them in a special article on our website.
External wall insulation
Important. Before the thermal insulation is installed, it is necessary to treat the walls with antifungal solutions. Copper sulfate or quicklime can help you with this.
The top of the insulation can be sheathed with decorative materials, for example, sheets of plastic. Such a plastic insulated cellar will look modern and beautiful.
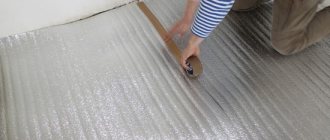
But what to do if moisture accumulates in the basement, how to insulate it? This is where vapor-proof materials come in handy. For example, ordinary polyethylene is suitable for the floor; it needs to be rolled out over the entire floor area and left ten centimeters at the walls, here it will be pressed against the bricks.
If such simple protection is not enough for you, then you can build the following structure:
- Fill the ceiling with bitumen;
- Place a layer of sawdust on top;
- Laying a wooden floor.
To create thermal insulation, we will use charcoal, straw, peat or expanded clay.
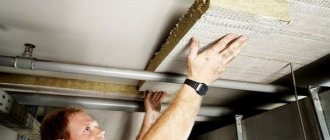
If external insulation is not enough, then the cellar floor is insulated from the garage side. How to insulate the cellar from the outside in this case? To do this, a suspended ceiling is constructed, inside of which a heat insulator is placed.
- Pipes with a cross-section of one inch are attached to the floor slabs;
- A chain-link mesh is attached to the pipes;
- Everything is painted with waterproof paint;
- Plastic bags filled with straw or moss are placed under the mesh.
The price of this type of insulation will be much less if you use store-bought insulation. The efficiency of this design is high if there are no gaps or voids.
If you are interested in how to insulate a cellar on the street, then this is done in the same way as insulating the walls of residential buildings.
But if the cellar freezes, then you need to insulate it from the inside with foam plastic, for this:
- Wooden blocks (lathing) are attached to the walls;
- Polystyrene foam is placed tightly between the bars;
- Using dowels, the insulation is attached to the wall;
- All voids and joints must be blown out with foam;
- We plaster the walls;
- We insulate the lid. If you do not know how to insulate a cellar lid, then carry out this work according to the example written for walls, but without the plastering step.
Insulation and ventilation of the basement
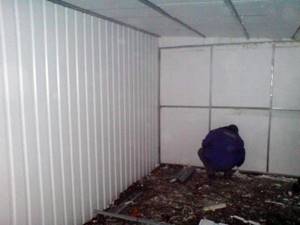
Insulation technology can vary significantly depending on the type of basement . If there is an above-ground structure, the main emphasis should be on installing insulation inside and outside the structure. Foam plastic is best suited for such tasks. The technology for installing these materials involves carrying out all work outdoors.
insulation , stages of work:
- Check the walls for damage.
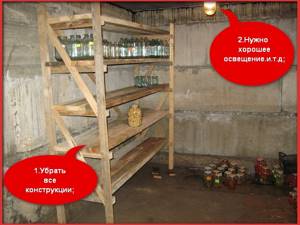
- Remove all unnecessary items from the basement.
- Cleaning the hatch.
- Removing all detected defects.
- waterproofing .
- Fixing rigid insulation boards.
- Attach a polymer mesh to the surface.
- Blow foam over the joints of the sheets.
- Apply plaster.
In some cases insulate the cellar from freezing using penoplex. The product is better than most popular cheap insulation materials. It has high strength, durability, and also provides high thermal protection, safety and environmental friendliness.
Why do you need to insulate a cellar in a garage?
To preserve reserves, it is important to create the right conditions. The main enemy of vegetables and fruits is low temperatures. After freezing, root crops lose their nutritional and nutritional properties. That is why it is important to ensure an internal temperature of at least +1-5 °C without using heating devices.
Another problem with vegetable pits is high humidity. It can cause fruit and vegetable products to sweat, which leads to their further unsuitability. Proper insulation of the cellar in the garage in combination with the organization of supply and exhaust ventilation helps to normalize humidity levels. This guarantees long-term preservation of agricultural stocks.
The decision on how to effectively insulate a vegetable pit in a garage should be made taking into account:
- climatic features of the area - the depth of soil freezing is taken into account;
- area and depth of the basement - spacious rooms are more difficult to heat; a large basement depth facilitates the insulation process;
- type of soil, depth of groundwater;
- thickness and material of the walls, floor and ceiling of the basement.
Work order
In the basement located under the garage, the ceiling and walls are insulated to the freezing depth. If the depth is small, the floor will also have to be insulated. The process of insulating a cellar depends on the material chosen. However, at the preliminary stage you will have to perform a number of simple operations:
- remove all items and existing structures from the premises;
- provide good lighting;
- remove old paintwork, peeling decorative and base materials;
- treat surfaces with an antiseptic, antifungal agent (quicklime, copper sulfate, etc.);
- ensure insulation of electrical wiring (if any) - the wires are laid in non-flammable corrugation.
If the groundwater level is high, it is important to take care of waterproofing the basement in advance. An effective material for this is bitumen. Different types are applied cold or hot.
How cold and hot bitumen is used
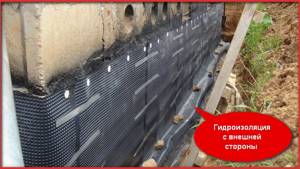
If possible, waterproofing is carried out from the outside of the garage. To do this, a trench is dug around the building. The walls are cleaned of soil and dried.
The cold method uses liquid formulations. They are applied to the surface in an even layer using a spatula or roller. The “hot” method uses solid bitumen. They should be warmed up before use. They are applied with a brush or roller in several (up to 3) layers.
Floor insulation
To make using the pit comfortable, it is important to take care of the thermal insulation of the floor. The insulation process depends on the type of base. In the case of a ground surface, you will have to follow the steps step by step:
- excavate the soil to a depth of about 30 cm;
- fill in crushed stone of medium fractions - height of at least 10 cm;
- arrange a sand cushion (5 cm) - fill it and compact it;
- pour the surface with hot bitumen to ensure waterproofing;
- the cooled surface is reinforced with metal mesh;
- pour the concrete screed.
If there is significant freezing, experts recommend adding a layer of insulation to the pie. The optimal solution is to lay polystyrene foam on a waterproofing material.
Insulating a reinforced concrete garage basement floor is a less labor-intensive process. A layer of roofing material is laid on the base and expanded clay 10-25 cm thick is backfilled. Some craftsmen recommend using dry sawdust to reduce the cost. However, if such insulation gets wet, putrefactive processes will begin to occur and the thermal insulation will have to be changed. Expanded clay is poured into a concrete screed with reinforcement.
How to insulate basement walls from the inside
The process of insulating a basement in a garage can only be done on dry surfaces. Therefore, it is better to carry out work in the warm season.
When applying liquid materials, preliminary leveling of the walls is not required. Spraying is carried out under pressure, so the work will require special equipment. It is also important to moisten surfaces in advance and follow safety precautions. The application of insulation should be carried out using a respirator.

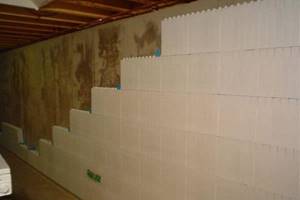
When thermally insulating basement walls in a garage with polystyrene foam or polystyrene foam, you will have to do the following steps with your own hands:
- fix the insulation using a special solution and dowels. The latter are driven in along the edges and in the middle of the sheet.
- seal existing cracks and voids with construction tape or blow out with foam;
- stick the mounting grid;
- plaster the walls.
Internal insulation
Any type of expanded polystyrene is most often used precisely to insulate the basement from the inside. Here there are some features for each of the available surfaces: ceiling, floor and walls.
Floor insulation with polystyrene foam
Since installing heated floors in the basement is not the most common event, more traditional methods of insulating the basement from the foundation side are most often used.
To insulate the floor in the basement, you only need a few steps:
- Level the surface.
- The insulation layer must have a certain thickness and fit tightly to each other at the joints. It is optimal to use 5 mm thick material for the floor.
- It is necessary to lay a layer of polystyrene foam on top of the expanded polystyrene slabs.
It is better to insulate the floor in the basement using an additional reinforced screed on top of the insulation layer.
insulation with polystyrene foam
Wall insulation
Insulating the basement walls from the inside allows you to maintain the temperature in the room
In addition, to avoid condensation accumulation in the basement, it is very important to use high-quality waterproofing materials. This will ensure long service life of the thermal insulation and prevent destruction of the structure as a whole.
Next, polystyrene foam boards are attached on top of the material chosen for waterproofing. Glue is usually used for fastening. After all the walls are covered with slabs and the glue has dried, additional work is carried out on the surface of the basement walls.
A concrete screed is used to strengthen the structure. To create it, it is recommended to purchase M100 cement and use additional reinforcement. Do not be too zealous; the screed layer should not be too thick.
Since any basement has high humidity, an additional layer of waterproofing material will not be superfluous, but this item is optional. After insulation with polystyrene foam materials, the surface can be covered. For this, you can use various materials, it all depends on the budget and wishes of the owner.
wall insulation
How to insulate a cellar: external thermal insulation, insulation of floors, walls, ceilings and doors
As you know, building a cellar does not mean getting a good place to store your crops. Poor waterproofing can cause groundwater to penetrate into the room, and poor-quality thermal insulation can lead to unfavorable temperature conditions and the formation of condensation. That is why we will look at how to insulate a cellar in a garage or under a house; this will create an optimal microclimate in which all products will be kept fresh for a very long time.
It is worth remembering that only an integrated approach: good waterproofing, high-quality insulation and proper ventilation guarantee that the cellar will not be damp.

Insulation serves two main purposes:
- In winter, freezing of the structure is prevented.
- In summer, high-quality thermal insulation allows you to maintain a low temperature in the cellar even on the hottest days.
DIY basement insulation technology
Let's look at how complex basement insulation is carried out using penoplex (the technology will be similar for polystyrene foam and expanded polystyrene). Note that comprehensive thermal insulation includes external and internal insulation (in particular walls, floors, ceilings).
In addition to insulation for work you will need:
- material for interior decoration;
- polyurethane foam;
- reinforced polymer mesh;
- waterproofing material (bitumen mastic);
- adhesive solution;
- concrete or external plaster;
- tool.
In order for the insulation of the basement from the inside to be sufficient for the minimum level of heat loss, the thickness of the insulation should be:
- 10 centimeters for polystyrene foam;
- 8 centimeters for polyurethane foam.
But it is recommended to increase this value by 40 - 50% if the basement is supposed to be heated and maintain a temperature of 20 - 25 degrees in order to reach the recommended level of thermal insulation.
If water penetrates, then it is unacceptable to insulate from the inside.
Insulating the basement from the inside is a necessary measure when external insulation is impossible or not cost-effective. Internal insulation of the basement can only be carried out on dry foundation walls. But this poses a risk of increasing the rate of destruction of the foundation due to its freezing.
If water penetrates into the basement from the ground through the foundation walls, then laying insulation on the inner side surface of the foundation is strictly prohibited.
Internal insulation will cause even greater moisture in the foundation, and will also lower its temperature in winter, since there is no external insulation.
The freezing area inside the foundation will increase significantly, which, coupled with increased humidity, will very quickly damage the foundation.
How to drain and drain water
Eliminating water penetration into the basement from the ground is either difficult or impossible. More often it is necessary to install a drainage system around the house or repair the existing one.
In this case, it is necessary to tear off the foundation from the outside. In this case, talking about internal insulation loses all meaning, since the foundation walls become free for external insulation and for additional waterproofing.
There may be other drying options. Sometimes the issue is resolved comprehensively for a group of houses or an entire village, by opening a drainage ditch.
Sometimes the basement can only be drained by installing a well with a pump. Although pumping out a spring under a house is an extremely thankless task, what should you do? This source of water can serve the purpose of water supply to the house, so not all the work of the pump will be “wasted”.
Thus, for a wet basement there is only one method of insulation left - external with preliminary drying of the soil.
If finishing is required
In the basement, polystyrene foam does not require additional protection, since sunlight does not penetrate into the basement. Therefore, the layer you paste on the wall yourself does not need to be covered with additional protection.
If finishing is necessary, then the easiest way to insulate the basement from the inside is to do the following:
- coat the polystyrene foam with a thin layer of glue using an 8 mm notched trowel;
- drown a plaster fiberglass mesh with a cell size of 4 - 5 mm in glue;
- Apply another layer of glue on top of the mesh with a shaped roller, obtaining a shaped surface that is suitable for painting.
But this simple option can be replaced with any other finishing option, with the exception of heavy finishing (ceramic tiles, stucco...), and methods where it is necessary to break through the continuity of insulation. Most often, either figured plaster or leveling the wall under wallpaper is used.
Features of insulation of various parts of the cellar
First you need to decide which insulation for the cellar to choose. This depends on the heat-insulated surface and the specifics of the material used. We will look at the most popular options, and you will have to make the final choice.
External thermal insulation
Insulation of the outside of the building is relevant in cases where the cellar is located under a garage, in a barn or near the outer walls of the house, and also if it is located separately. In cases where the cellar is located under the house several meters from its outer walls, this operation does not need to be carried out.
At this stage, the following features can be distinguished:
- It is best to carry out work during the construction stage, when there is space . Otherwise, you will have to clear the entire foundation, and in some cases this is almost impossible to do.
- The walls must be waterproofed . The best option is modern roll materials and liquid rubber. These coatings last for decades, unlike bitumen and roofing felt.
- If there are large gaps, it is best to seal them with polyurethane foam ; it reliably insulates and does not collapse over a long period of time.
- Next, foam plastic or other sheet heat-insulating material is attached . The easiest way to glue it is with polyurethane foam or a special composition. You can also use bitumen mastic - when it dries, it also provides high fastening strength.
Advice! If high quality work is important to you, it is better to use extruded polystyrene foam. This material is much stronger than ordinary foam plastic, it has higher thermal insulation properties, and thanks to the grooves at the ends, the joints are very reliable.
- To ensure maximum efficiency of the thermal insulation layer on the street, it is necessary to make a blind area along the wall to protect the basement walls from moisture.
Floor insulation
This is also an important point in the construction of a cellar. Many people believe that gender does not require special attention, but this is not true. In order for your floor to be reliable, it should be thermally and waterproofed. There are several ways to do this.
Insulation using expanded clay:
- The base is leveled, which needs to be covered with roofing felt or filled with bitumen, and a waterproofing agent is glued to it.
- Next, expanded clay of fractions from 5 to 20 mm is poured. The layer of material should be from 10 to 25 cm. A concrete screed with reinforcement is poured on top of the material, the thickness of which depends on the expected load on the floor. After it hardens, you can carry out additional waterproofing of the surface.
It is worth noting that expanded clay is a very light material, which simplifies the process of working with it. In addition, the price for this material is quite affordable.
You can insulate the floor using sand and crushed stone:
- The site is prepared and leveled, after which 15-20 cm of fine crushed stone is poured onto it. Then a layer of sand 5-10 cm thick is poured.
- The pillow is compacted and waterproofed; this can be done using roofing felt or construction film.
- Next, a reinforcing belt is installed and concrete is poured. If groundwater is located close to the surface, you can waterproof the poured surface and make a 5 cm thick screed on top. This will provide additional protection.

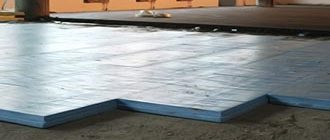
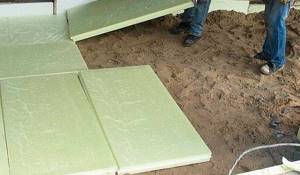
The third method is foam insulation:
- A sand or gravel cushion is installed, which is covered with a waterproofing material.
- Grade 35 foam is laid on top.
- Next, a screed is poured, which, if necessary, can be reinforced to increase strength.
But this method is less common, since the floor can be perfectly insulated in simpler ways.
Wall insulation
We have looked at how to carry out work on the outside, now we will look at how to insulate the cellar from the inside.
The best option is polystyrene foam due to ease of installation and low price. With its help, you can easily carry out insulation with your own hands; you do not need the help of specialists or instructions - everything is very simple.
Walls
Basement walls should also be insulated. You can insulate them from the inside, but the effect of such insulation will be small and the area of the basement will be reduced. With internal thermal insulation, the facades still continue to be exposed to cold and moisture and can allow water to pass into the room.
It is more effective to insulate the basement walls from the outside. This is done during the construction stage. But if the basement is already in use and there is no thermal insulation, then you will have to dig up the soil, thoroughly clean and dry the walls. Then install a layer of high-quality waterproofing (you can use liquid rubber, as described above).
The waterproofing layer is insulated with polystyrene foam or polystyrene foam. The sheets are attached to the walls using glue or dowels, or both methods of fastening are used simultaneously.
Functional features of the basement
The basement serves several functions:
- It maintains certain conditions, practically independent of the outside world, which allows you to store food in it.
- It is hidden, so it is convenient to store things that are unnecessary for a long time in the basement, and at the same time they will not be in plain sight (better than a balcony, you must agree).
- Allows you to save above-ground space at home (you can install a water heater or boiler).
Note. The cellar can be located on the street, but this creates additional inconvenience, so preference is given to basements, the entrance to which is located directly in the house.
- Agree, it’s much better in winter to simply open the lid and go down to the basement for preserves, rather than spend a long time getting dressed and going outside for one jar of cucumbers.
- But if you want to equip a cellar in your home, you will need to make sure that the cellar lid meets certain standards.
There are certain instructions, following which you can make a cellar lid with your own hands.
Design planning
How to plan a structure
The first thing to do with any construction job is to plan everything out. First you need to decide on the size of the hatch.
In this case, 2 factors are decisive:
- The size of the person and the type of staircase. Naturally, if the owner is large, then the cellar lid should be wide.
- Also, if the ladder is not an ordinary stepladder, but, say, a single-flight one, then you will have to make the hatch longer (see Do-it-yourself wooden stairs to the basement: choose and make).
What to consider:
- Also consider what items you will lower into the basement, and if you are going to store vegetables in boxes in it, then make the opening size such that you and the box can pass through without obstacles.
- The standard size is 75 x 75 cm, which is what most manufacturers of factory hatches focus on.
- At the planning stage, the location of the hatch is also chosen. You should not place it in front of a doorway, where people constantly walk, but should place it in a corner.
Advice. If you are making a hatch near a wall, then make sure that it does not damage the finish: install the basement cover so that it opens in the direction opposite to the wall or make limiters.
Ventilation
In order to maintain a normal balance between temperature and humidity, ventilation is required in every basement. The garage cellar is no exception.
The ventilation system can be different, it is important that it exists and works effectively. It is advisable to install ventilation while the garage and basement are just being built, but this can be done later
For a garage, ventilation is necessary not only because of the creation of a microclimate, but also because of the presence of exhaust gases and toxic substances, which, in the absence of an exhaust hood, will accumulate in the room, including in the garage basement.
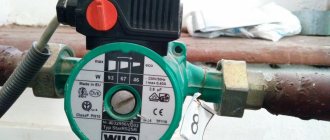
Ventilation can be natural or forced. When installing natural ventilation, two pipes are required, which are at different heights. Sometimes it is enough to simply make holes in the basement to ensure sufficient ventilation.
For forced ventilation equipment, additional mechanisms will be required, which must be assembled strictly according to the manufacturer’s instructions. This complex includes fans that help draw air out of the room. In addition, immediately before the crop storage season begins, regardless of the availability of ventilation, you need to ventilate the garage, open the external doors and the cellar lid.
Selecting material for the cover
You can make a lid for the cellar from metal or wood:
- If you choose metal, then you should remember that such a cover will need to be additionally insulated.
- Wood itself is a good thermal insulation material, but the cover made from it will need to be further strengthened and treated with water-repellent materials and insecticide.
Advice. If the point of thermal insulation is not important to you (for example, the hatch is not in a living room, or non-food products are stored in the basement), then it is not necessary to insulate the lid.
It is also necessary to consider what loads the cellar lid must withstand. If people will constantly walk on it, then it is best to make it out of metal.