House insulation with stone wool: walls, floor, roof
If you plan to live in your country house all year round, then you will probably need to insulate it.
Of course, it is better to plan housing insulation at the construction design stage, but situations vary. In general, if you need to insulate your house, then we suggest choosing stone wool, or basalt wool, as a thermal insulation material. This building material has a lot of positive aspects, which we plan to talk about in this article. Who are we?
Heat at Home Company. We are engaged in the construction of houses in Moscow and the Moscow region. We also provide various repair services, including insulation of houses. We have been in the construction market for more than 15 years. During our work, we gained the necessary experience to provide services at a high level, and also earned the trust of all those who turned to us for help. As for insulating your home, you can discuss this issue with our consultant right now.
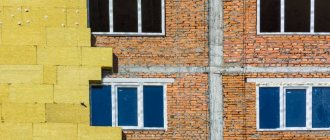
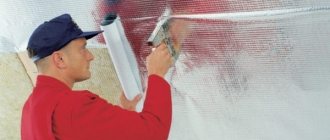
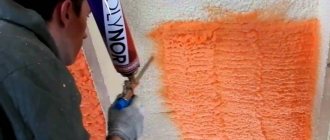
Production of thermal insulation for a brick building
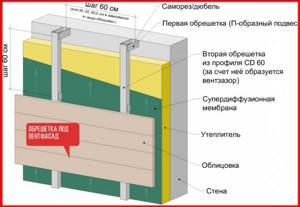
The process of insulating a brick house with mineral wool is similar to that described above. The creation of a ventilated facade begins with the manufacture of sheathing on the load-bearing wall. The insulation is fixed on it. A windproof membrane is laid on top and secured. You also need to install ventilation ducts measuring 4-6 mm. All this is covered from above with the selected finishing material.
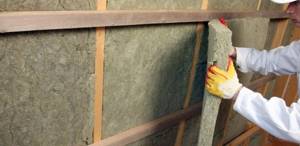
Insulating walls with mineral wool in frame, wooden, and brick houses is a simple process. If you purchase the simplest tools and necessary building materials, then 2-3 people can properly insulate a medium-sized house in one day.
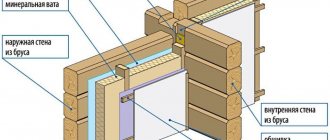
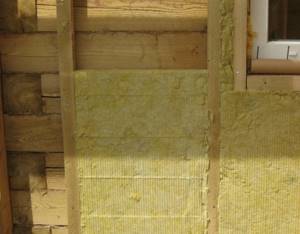
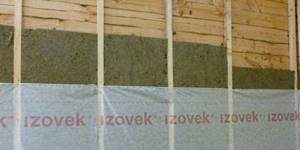
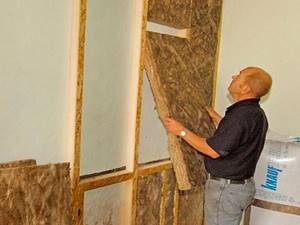
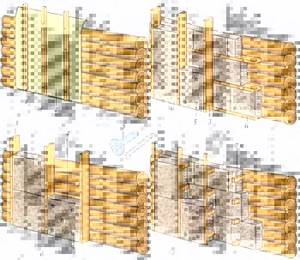
Scheme of fastening the material to wooden walls
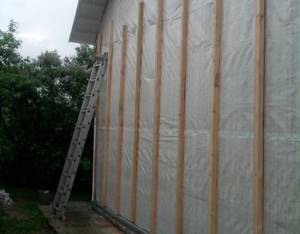
At the initial stage of work, it will be necessary to install the sheathing on a wooden base made of metal profiles or well-dried wooden blocks.
They will play the role of guides and it is between them that a layer of insulation will need to be placed.
The pitch of the sheathing must correspond to the dimensions of the insulation boards.
Due to the high elasticity of mineral wool, the installation of layers can be carried out “expanded” in such a way that they are supported by each other. This type of installation eliminates the formation of “cold bridges”.
For reliability, you can additionally secure the insulation around the perimeter with adhesive tape.
We have described the simplest technology for installing mineral wool on wooden walls.
In fact, in certain areas of the country with a particularly harsh climate, slabs with a thickness of up to 100 mm are used, they are mounted in several layers, preparing a separate sheathing for each.
Naturally, not only mineral wool-based materials can be used to insulate wooden houses. That is why below are the main general recommendations for attaching insulation, regardless of its type.
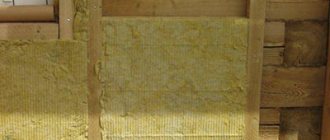
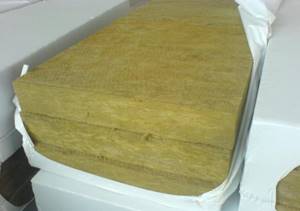
Insulation properties
Mineral wool is a material made from natural basalt and silica, treated with compounds with water-repellent properties. It is produced in the form of mats, slabs, and rolls. Depending on the location of the fibers, mineral wool and lamella slabs are distinguished.
To insulate walls, mineral wool is used, the density of which is in the range of 75-150 kg/m. cube The first layer (possible without preliminary preparation of the surface) is a material whose density is 75 kg/m. cube The slabs completely fill the unevenness of brick, concrete and wooden walls. Using mineral wool with a higher density, laid in a second layer, a more even surface is formed, which greatly facilitates subsequent finishing work (so-called wet facades). The thickness of the material ranges from 20 to 200 mm.
Advantages
The undoubted advantages of this insulation include the following:
- excellent heat and sound insulation;
- high-quality filling of voids;
- fire resistance, ability to withstand high temperatures;
- possibility of use in different temperature conditions;
- ease of installation.
Mineral wool is suitable for insulating both external and internal walls of frame, wooden, and brick houses.
Flaws
There are also disadvantages to using mineral wool insulation. They emit formaldehyde, which is hazardous to human health. But according to many experts, the amount of these substances is insignificant and does not cause any harm to humans.
All installation work on insulating the house outside can be carried out at a relative air humidity of no more than 85%. You cannot work with mineral wool in rainy or foggy weather. At temperatures above +30°C, external insulation is also stopped, and the treated area is covered with dark-colored heat-insulating fabric. Otherwise, the mineral wool will crack later.
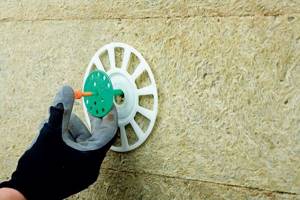
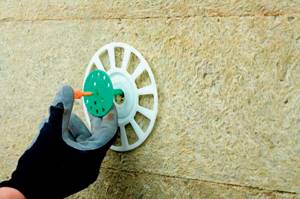
Installation on dowels for fastening insulation with “fungi”
Experts often combine foam pasting and additional fixation with disc-shaped “umbrellas” or “fungi”. This method of fastening is considered mechanical; it involves the use of an electric tool.
For safety reasons, it is important to turn off the electricity supply in a room where there is hidden wiring. A universal tool for working with dowels or a hammer drill is connected through an extension cord from the next room.
The sheets are precisely adjusted along the edges before fastening with “umbrellas”. But you can place rows with offset seams to eliminate cold bridges.
Dowel umbrellas are made of durable polymer, inside of which a metal rod or long nail must be installed. They are used where fixing layers of insulation is impossible in any other way. Installation is simple and reliable:
- the insulation plate is pre-fixed with glue (with tight pressing) or a bracket;
- the thermal insulation layer is drilled through;
- a drill of the required length must be attached to the end of the hammer drill;
- deepening is carried out with fixation in the wall by 3-5 cm;
- It is sufficient to fix the slabs in the center and at rectangular joints;
- dowels for fastening the insulation are joined with locking screws or special rods.
Dowel for fastening
This fastening method is suitable for both polymer insulation inside a building and for insulating walls outside a house with stone wool siding. Stone wool is a very effective insulation for walls.
If the wall is of small thickness, you need to work carefully, correctly calculating the depth.
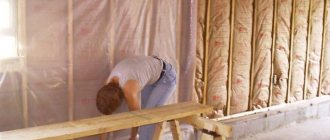
Features of thermal insulation of wooden buildings
When carrying out thermal insulation cladding work on walls made of timber or round timber with your own hands, you may notice that these surfaces are uneven. This is a significant problem, since finishing work in this case requires a special approach. Moreover, the curvature of walls in different directions makes some adjustments in terms of the selection of thermal insulation materials.
There is one more difficulty that must be taken into account before finishing work begins - wooden walls are unstable. Lumber may be slightly deformed, both during shrinkage processes and during operation of the finished building.
In connection with the previously listed points, to insulate walls made of round timber, it is advisable to use heat-insulating materials with a density of no more than 40 kg/m3. If the density of the material is greater, it will not be possible to ensure its tight fit to the surface without the formation of voids.
But unfortunately, low-density materials can only be used on horizontally located surfaces, while the walls are located vertically. The solution to this problem is the use of special facade thermal insulation with a slab configuration.
These plates are installed close to each other during installation. In addition, the installed thermal insulation is covered with windproof and vapor barrier film. As a result of this approach, the space between the insulating material and the surface of the wood does not pose a danger.
Returning to the instability and mobility of walls, we note that this problem is solved by laying thermal insulation into a specially installed wooden frame.
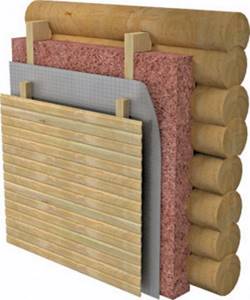
Selection of thermal insulation materials
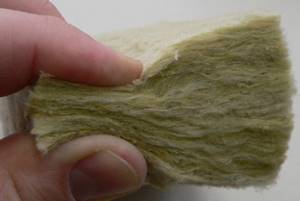
Structure of mineral wool slabs
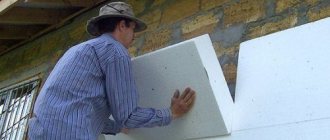
Today, there are two main types of thermal insulation materials suitable for outdoor use on the market: expanded polystyrene (sheet foam) and mineral wool.
As already mentioned, the use of materials with increased density, which is what polystyrene foam actually is, is not recommended for cladding log buildings, since this thermal insulation is not able to provide a good fit to the largest area of the insulated wall.
The photo shows an example of how not to insulate a house made of timber
Important: External or internal insulation of wooden walls does not allow the use of foam and similar polymeric materials. This is explained by the inability of such materials to transmit steam. If wooden surfaces are insulated with polystyrene foam, there is a high probability of rotting and subsequent destruction of the wood.
That is why we will focus on the choice of mineral wool slabs.
This category of insulation is represented by a wide range of products from domestic and foreign manufacturers. The material can have a slab configuration or, with a small thickness, can be supplied in the form of rolls.
For cladding vertical walls, it is preferable to purchase slabs, since their shape and density make them easier to attach, and they will not slip or deform. For example, a good solution is domestic products sold under the Techno Nicole brand. Of particular interest is facade mineral wool with a thickness of 50 mm and dimensions of 1200x600 mm. (See also the article Facade paint for wood: features.)
As materials for assembling the frame, you can use wooden beams, which are easier to install than metal profiles. To install the slab material, you will need special dowels. Again, you will have to purchase wind and waterproof material.
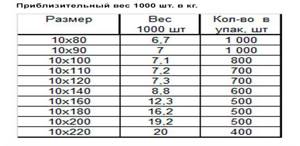
Calculation of materials
Special fasteners for fixing heat-insulating materials
The standard thickness of mineral wool is 50 mm. If the temperature in the region does not drop below -20°C, then it will be enough to lay it in one layer. If frosts are more noticeable in winter, then two layers will be required as insulation with a total thickness of up to 100 mm.
Accordingly, the timber for mounting the frame, when laying one layer of slabs, must have a height of 50 mm, and when laying two layers - at least 100 mm.
Now, in order to calculate the materials, it is necessary to measure the area of the facade, for which we multiply the height of the wall by the length. Based on the obtained figure, we purchase insulation, which is also sold per square meter. We purchase windproof material based on the area of the façade.
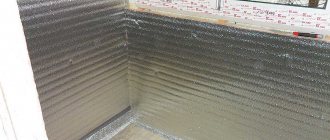
Application of windproof film
Important: Windproof materials are sold in strips rolled into rolls. When purchasing the required number of strips, remember that they must be laid on top of each other with an overlap of at least 10 cm.
Installation work
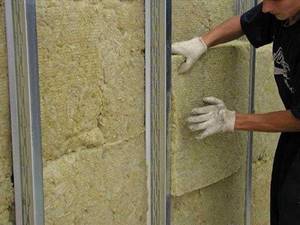
Correct placement of mineral wool slabs
Instructions for installing insulation on wooden walls of a house consist of the following steps:
- Preparatory work consists of cleaning the wooden surface and treating it with special antiseptic solutions. This must be done in order to prevent the lumber from becoming infected with fungal infections. Antiseptics are applied to clean, dry wood. You can begin subsequent work only after the surface has completely dried.
Advice: Instead of special disinfectants for impregnating lumber, you can use purified waste, the price of which is low.
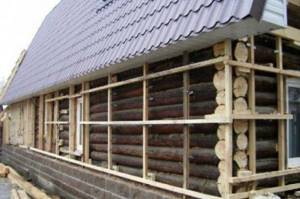
Stuffing the frame on a log house
- Installation of the frame involves the installation of wooden beams, the height of which corresponds to the thickness of the insulation boards, so that a sheathing is formed.
- First, the vertical beams are attached.
- Installation of the first beam begins from the edge from the most protruding section on the wall. Then, using a level, the bar is set strictly perpendicular to the horizon. To do this, wooden inserts of suitable thickness are installed in the gaps between the beam and the wall.
- Next, in the same way, the outermost beam is installed. Between the first and last beams, cords are stretched along which the intermediate beams are placed.
- The step between the beams is 60 cm, however, you can use a different distance, in accordance with the width of the selected slabs. Then transverse horizontal beams are attached, the distance between which should be equal to the length of the insulation boards.
When working with insulation, we use protective gloves.
- The slabs are installed directly into the sheathing. The slab must be installed so that it fits tightly into one segment of the sheathing; in extreme cases, one of the edges of the insulation can be trimmed.
- Fastening the insulation to a wooden wall with a fungus is done using special long screws. On average, for one slab of mineral wool with dimensions of 1200x600 mm there are about 8 fungi at the rate of 6 pieces around the perimeter and 2 pieces in the center.
- Fasteners for insulation to a wooden wall must be screwed tightly without a gap so that the slab does not protrude forward later.
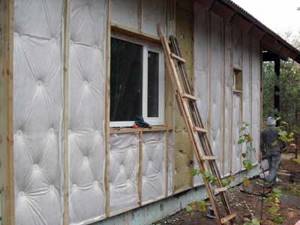
Installation of windproof film
- Installation of windproof and vapor barrier films is carried out on top of the frame. The most convenient way to attach the film is with a stapler. We place the strips vertically with a 10 cm overlap on the sides. The film should not sag or move away from the frame.
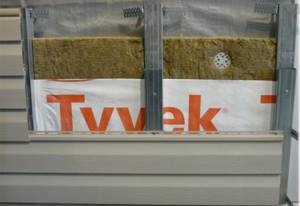
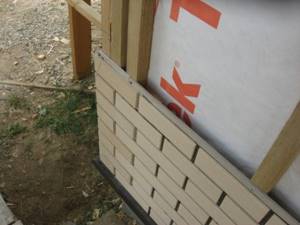
Wall cladding with siding over thermal insulation
- After the installation of insulation is completed, a ventilated façade is installed using siding, a house block or a more budget-friendly plastic lining. You can find detailed instructions for installing siding or lining in the relevant articles on our portal.
How to insulate walls with mineral wool
Everyone knows that it is much more effective to insulate walls from the outside. However, this is not always possible. For example, residents of high-rise buildings are deprived of choice, and owners of private houses for the most part do not want to spoil the facade, finished with expensive materials. In such cases, mineral wool comes to the rescue, helping to insulate the walls of the house from the inside.
Minvata
Definition
Mineral wool or mineral wool is a heat-insulating fibrous material on a synthetic basis, which includes basalt minerals.
It has:
- high resistance to chemicals and high temperatures;
- low thermal conductivity.
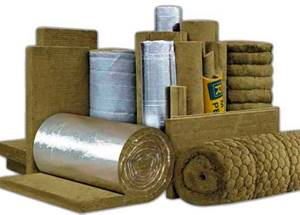
Release form
Mineral wool is produced in:
- rolls;
- slabs
They have different thickness, width and density. The price of the material depends on these parameters.
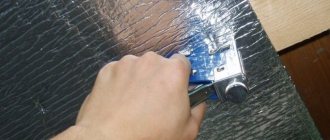
You can also find insulation on the market, one side of which is covered with foil. This layer can serve as a good heat reflector if installed with the foil side inward.
Flaws:
- The disadvantages of slag and glass wool include excessive fragility of the fibers. During operation, particles of material enter the respiratory tract and settle on the skin, thereby causing irritation or more serious consequences.
- Stone wool fibers are more durable, but formaldehyde resins are used as a binding element, which emit harmful substances.
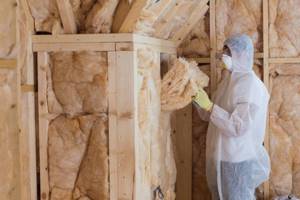
Safety precautions
There are certain safety precautions when working with mineral wool:
- It is necessary to use respirators and special glasses to protect mucous membranes.
- Work should be carried out wearing gloves and long sleeves.
- Do not cut or install the material near drinking water or food.
- After completion of work, the remaining material must be removed and the room must be thoroughly cleaned.
The safety of using mineral wool comes down to its isolation from the internal space using any dense material:
- drywall;
- decorative wall panels.
Installation methods
The use of mineral wool requires the presence of one, which is attached to a frame attached to the main wall. It is this frame that is used for installing mineral wool.
There are two ways to install material on the frame:
Mounting on hangers
This method is optimal when using rolled mineral wool.
The working process:
- Using preliminary markings, direct hangers for metal profiles are fixed to the wall. Fasteners are selected depending on the wall material;
- the hangers are installed one below the other in increments of 40–60 cm. The horizontal distance between them should be 60 cm;
- the two halves of the suspensions are bent forward, taking shape;
- the height of the wall is measured and a strip of mineral wool is removed from the roll with a margin of 10–15 cm;
- a strip of material is applied to the wall with an overlap to the ceiling and pierced with protruding shelves of the hangers;
- the next strip is installed without creating gaps;
- a frame is installed under plasterboard sheets, consisting of horizontal and vertical profiles. They are attached on top of the insulation level to the hangers;
- the insulation is covered with a film that provides a vapor barrier effect, which is overlapped and attached to the profiles;
- Drywall is attached to the frame, after which the joints are puttied and decoratively finished.
The disadvantage of this insulation method is the transfer of cold to the interior lining of the room through metal hangers in contact with the outer wall.
Warm plaster
As you might have guessed, you cannot apply warm plaster to a wooden base (house), because the material can only be applied to a concrete surface (a brick wall is also suitable for this).
Let us immediately note that the work associated with the use of plaster is incredibly difficult, but it is still popular, despite the significant lag in thermal insulation characteristics from the previously considered materials.
Here are 3 layers that must be included in attaching the insulation to a brick wall:
- The 1st layer involves applying plaster to the prepared coating, which has been completely cleaned. This layer is needed to ensure that all remaining defects are completely eliminated.
- The 2nd layer is the main one, and its thickness can reach 150 mm, but it is impossible to apply all this plaster at once, so builders apply about 20 mm, after which they wait for it to dry.
- The 3rd layer is considered the final layer; its purpose is to create the most even and smooth surface possible.
You can’t just say “install”, “fix, fasten” about plaster, since this material involves performing a huge amount of complex work over a long period of time. It is important to thoroughly wet the entire surface of the wall before starting work, this is necessary to prevent moisture from being sucked out by the surface.
Not every person will be able to correctly install insulating material, because not even all builders attach it correctly. It is important to observe a huge number of subtleties in order to avoid critical mistakes!
The wall of any building must meet several requirements; in addition to being sufficiently strong, it must also retain heat well in the room. Otherwise, heating bills will increase several times.
Traditional building materials such as concrete and brick have good thermal conductivity. Things are somewhat better with wood, but the thickness of wooden walls, as a rule, is not sufficient to effectively retain heat.
Types of thermal insulation materials
To give the walls the required thermal insulation characteristics, various types of heat insulators are used. Most often, either polystyrene foam (expanded polystyrene) or mineral wool is used. Although quite often ordinary warm plaster is used as a heat-insulating material, its thermal conductivity is almost twice as high as that of foam plastic, and the installation of warm plaster requires much more time and effort.
Foam plastic is popular due to its low thermal conductivity and ease of installation. Not the least role when choosing this material is played by its low weight. The thermal conductivity of polystyrene foam is 0.39 W/m2. Depending on the type of wall, the insulation is attached either using an adhesive mixture or using dowels.
Mineral wool. To insulate walls, hard mineral wool is usually used, which is available in the form of mats. Its disadvantages include the need to construct a sheathing made of wooden bars or metal profiles. But the additional installation effort is compensated by excellent heat and sound insulation.
Mineral wool is also available in roll form.
Penoplex differs from polystyrene foam by being completely airtight; it is extruded polystyrene foam (foamed). The method of attaching this insulation to the wall is no different from foam plastic.
Traditional plaster should also be noted as one of the ways to reduce the thermal conductivity of a wall. Warm plaster is performed in 3 layers. The main disadvantage of plaster is its increased thermal conductivity compared to other thermal insulation materials. In addition, drying the plaster will take a long time.
Among the new thermal insulation materials, polyurethane can be noted. After installing the sheathing, it is applied to the wall and adheres to it. After hardening, the excess is cut off. Apart from the high cost, it is practically free of disadvantages.
Methods for attaching insulation to the wall
The technology for attaching insulation strongly depends on the type of base. Also, the choice of fastening depends on the type of thermal insulation material.
Expanded polystyrene (foam plastic). If the wall of the house is concrete or brick, then the slabs can simply be glued. To do this, at the preparatory stage it is enough to just clean the wall from dust and dirt; possible wall defects should be corrected using a plaster mixture.
There are several methods for applying adhesive to foam board. The mixture can be spread using a notched trowel over the entire surface of the slab.
It is allowed to coat the perimeter of the slab with glue and apply the mixture pointwise to the surface of the insulation. In order to attach the insulation to the wall, you just need to press the slab tightly.
Attaching foam boards to the base using dowels is considered a little more difficult. The mount for the insulation has the shape of an umbrella - with a wide cap (it prevents damage to the insulating material). Also, due to the wide cap, the foam plates are tightly pressed to the wall.
As for the placement of dowels, you will need at least 5 of them per slab (4 are placed in the corners and one more in the center). To be on the safe side, many builders place the dowels at a distance of 25 cm from each other. Insulation is attached to wooden walls exclusively using dowels.
When attaching foam boards, you need to pay special attention to the joints. The slabs must fit tightly against one another without gaps or cracks.
To prevent aging of polystyrene foam, a metal mesh is placed on top of it and a layer of plaster is applied, which, in addition to its protective function, also performs a decorative function.
Mineral wool. The main inconveniences when thermally insulating a wall using mineral wool are related to the installation of the sheathing. Wooden blocks are often used for it. The distance between the bars should be slightly smaller than the size of the mineral wool slab itself, in which case the fastening of the insulation will be more reliable. When using hard mineral wool (in the form of slabs), wooden sheathing bars are packed in horizontal and vertical directions, and insulation is inserted into the resulting cells.
Rigid mineral wool boards can be glued to the wall or used as a fastening for insulation with dowels. But it is not recommended to attach them to the wall without lathing; the rigidity of mineral wool is much less than that of foam plastic.
If roll insulation is used, the sheathing bars are placed in a horizontal or vertical direction.
The main problem associated with attaching mineral wool is that the mats can fall out of the sheathing cells. This can happen if the distance between the bars exceeds the dimensions of the insulation board. In this case, you can either redo the sheathing or secure the insulation with threads. To do this, nails are driven from bottom to top into the bars so that the head protrudes 3-5 mm. Then, after placing the insulation, thin wire or strong thread is wound around the protruding nails. This provides a fairly reliable fastening of the insulation.
After this, all that remains is to complete the final finishing of the wall.
Sometimes timber is specially used for lathing, the width of which exceeds the thickness of the insulation. Due to this, an air gap is formed between the mineral wool and, for example, siding. This increases the thermal insulation of the wall.
Plaster, despite the labor-intensive nature of the work, remains a popular thermal insulation material. Performed in 3 layers:
- First, a spray is applied to the prepared, cleaned base (thickness 5 - 7 mm). Its purpose is to hide visible defects in the base;
- then the main layer of plaster is applied up to 15 cm thick. It is applied in layers of 2 - 2.5 cm. Before applying the next layer, you must wait until the previous one dries;
- The finishing layer is a mixture of sand and cement, it creates a smooth plaster surface.
In order not to make a mistake with the composition of the mixture, you can use ready-made “insulating” plaster.
Before plastering, it is necessary to wet the wall so that the concrete or brick does not “suck” the moisture from the plaster mixture. It is possible to make small notches on an excessively smooth wall to provide additional adhesion of the mixture to the base; for this you can also use a regular metal mesh.
Before plastering a wooden wall, it is necessary to fill it with shingles or cover the wall with shingles.
It is possible to create a metal frame from wire. To do this, nails are driven into the wall ½ thickness in a checkerboard pattern. Then their protruding parts are wrapped with wire.
The effectiveness of thermal insulation of the room depends on the correct fastening of the insulation to the wall. Even with a small gap between individual slabs of thermal insulation material, the resulting “cold bridges” will significantly reduce the effectiveness of thermal insulation. Compliance with the technology guarantees the preservation of heat in the room and ensures a long service life of the heat insulator.
Heat loss through the walls of a house can reach 30% of the total heat loss, so one of the main stages of thermal insulation of a building is wall insulation. Mineral wool is often chosen as insulation for walls. Mineral wools are made from molten glass, rocks or slag; resins are used as a binding element. The material has a fibrous structure, and, depending on the purpose, the direction of the fibers may be different.
Wall insulation with mineral wool
Insulating walls from the outside with mineral wool has a number of advantages:
- This is a relatively cheap insulation with low thermal conductivity;
- Mineral insulation has good sound-absorbing characteristics;
- Mineral wool does not support combustion, so it can be used for insulation of flammable structures;
- This material is vapor-permeable and does not create the effect of a thermos; the building “breathes”;
- Mineral wool is easy to install - the insulation is sold in the form of mats or rolls, you can choose the most convenient option;
- Depending on local conditions, you can select the required thickness of insulation;
Mineral wool does not rot and is not susceptible to fungus, microorganisms and rodents.
The disadvantages of mineral wool include the deterioration of its thermal insulation characteristics when wetted, so it must be protected from atmospheric moisture and condensation. In terms of environmental friendliness, mineral insulation, when used under normal conditions, does not pose any danger, since the release of harmful components occurs only when mineral wool is heated to 300 degrees or more.
The choice of insulation thickness is made using thermotechnical calculations, taking into account the thermal conductivity of the wall material, their thickness, as well as the standard thermal resistance of the walls for a particular region. For a simplified calculation, you can use the table.
Recommendations for insulation thickness in different regions of Russia
Technology of wall insulation with mineral wool
- Preparing walls for laying insulation depends on the material from which they are built. Wooden walls must be impregnated with an antiseptic to avoid damage to the log house by microorganisms. Areas damaged by rot, fungus, and mold must be thoroughly cleaned and soaked in appropriate solutions - after installing the insulation, access to them will be impossible. It is enough to free brick and foam concrete walls from peeling plaster and paint. If the walls are wet, they must be thoroughly dried. Window trims and slopes must be dismantled, and fastening and decorative elements that can damage the vapor barrier and insulation layer must be removed from the walls.
- A layer of vapor-permeable membrane is placed under the mineral insulation. The film is positioned so that the vapor-permeable side faces the wall of the house, and the smooth side faces the insulation. A vapor-permeable membrane is necessary to ensure the removal of water vapor from the walls of the house through the insulation.
It is allowed to lay mineral insulation on smooth walls without first laying a membrane film. Laying a vapor-permeable membrane under mineral wool - Wooden guide rails or a profile for attaching drywall are attached on top of the vapor-permeable film.
They are attached to the wall with self-tapping screws or using a dowel-nail mounting pair. The distance between the slats is chosen so that it is 1-2 centimeters less than the width of the insulation. The thickness of the slats should be equal to the thickness of the insulation. Attaching the slats starts from the corner of the house. When attaching the slats, use a level. If the wall is uneven, you can use perforated plasterboard hangers to secure the frame. If you use insulation in the form of mats, you can additionally attach a horizontal strip along the lower border of the wall, on which the lower insulation mat will be installed. Horizontal strip under the bottom layer of mineral wool - Thermal insulating mats or rolled material are placed in the space between the guide slats, while laying the mats begins from the bottom, and the rolled materials from the top, fixing the insulation to the wall either directly between the slats, or using several dowels with a wide head.
The slab material is attached to brick or block walls with a special glue that ensures a tight fit of the insulation. There should be no gaps between the insulation and the guides. First, solid pieces of insulation are fixed, then the remaining areas around window and door openings are filled. Mineral wool laying process - Another layer of film is placed on top of the mineral insulation - wind protection and waterproofing.
The film must also be vapor-permeable so that moisture can be easily removed from the insulation layer to the outside. The film is fastened with staples to the slats without tension, after which the entire layer of insulation and vapor barrier is additionally secured to the wall using dowels with a wide head; the attachment points can be glued with metallized tape for better waterproofing. Wind insulation is installed on top of the mineral wool layer. - An important stage in wall insulation is the installation of a ventilated façade.
The ventilation gap should be at least 5-6 cm; for this, additional counter-battens are placed on top of the guides or profiles are attached on which the ventilated facade is mounted: siding, block house or other finishing materials. The process of creating a ventilated facade - When insulating the walls from the outside, their thickness increases, so you will have to install new window slopes, window sills, as well as trim and finishing elements. It is better to purchase them immediately when purchasing a ventilated facade.
Insulating walls outside with mineral wool is one of the most popular methods of thermal insulation of buildings. Its popularity is due to the low thermal conductivity of mineral wool, due to which most of the heat remains inside the building, as well as the environmental friendliness of the material and its ability to remove moisture from inside the house. In addition, mineral wool is an excellent sound insulator.
Other materials are also used to insulate walls, for example, polystyrene foam or extruded polystyrene. These methods are used for plaster finishing, since slab insulation is an excellent basis for plaster.
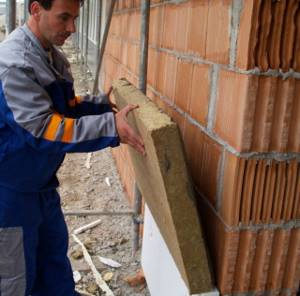
How to attach basalt insulation to a wall for facade thermal insulation?
Let us consider in detail how to attach basalt thermal insulation to walls in plaster facade systems:
- Preparing the base . Basalt insulation slabs are glued to the walls, so their surface must be fairly flat. To do this, repair chips and potholes. Before fixing the basalt wool, priming is performed to strengthen, remove dust from the structure and improve adhesion.
- Gluing mini-slabs . Why are special adhesive compositions selected, designed to both attach basalt insulation to the walls and ensure its tight fit to the surface. Such dry mixtures ensure maximum adhesion of thermal insulation to brickwork, concrete walls and other surfaces, have frost resistance of the hardened layer, and special modifications make it possible to attach mini-slabs at sub-zero atmospheric temperatures. The glue is applied according to a special scheme, carefully working out the perimeter and applying the composition in the middle, after which the slab is pressed to the surface. The position of the miniplates is maintained using a level. After installing the first row, the second is fastened with staggered seams so that the joint of the slabs falls in the middle of the bottom line of the slabs. The rule must be followed for all subsequent stripes.
- Doweling . The basalt insulation should be attached to the wall using disc-shaped dowels after a certain time allowed for the glue to dry. Then all work is carried out both on the installation of plaster and decorative layers, and on the final painting of the facade.
To understand the intricacies of attaching mineral wool slabs to facade walls, we invite you to watch a video about installing a thermal insulation system.
Thermal protection device for a wooden house
Insulating walls with mineral wool slabs is a whole complex of works. Several main stages can be distinguished.
Preparing the base
At this stage, wooden surfaces are treated with special emulsions and primers that will protect the house from mold and rot.
The antiseptic must dry completely.
Creating a vapor barrier layer
Its purpose is to provide the entire structure with ventilation. To do this you will need polyethylene, roofing felt or aluminum foil.
- narrow slats are placed vertically on the walls in increments of 1 m;
- the vapor barrier is secured with staples or nails; the fastening points are sealed with tape;
- holes with a diameter of 20 mm are drilled at the bottom and top of the slats; this will provide the necessary ventilation.
Frame making
To do this, boards are vertically stuffed (40-50 mm cross-section, 100 mm wide) or metal profiles are attached.
They are installed at intervals slightly smaller than the width of the mineral wool.
Installation of thermal insulation
Mineral wool is laid in two layers, shifting the slab slightly so that the joints do not coincide. This type of insulation does not require additional fastening, since it is very elastic.
Often this material is fixed using a special glue (choose in the store the one that says “for mineral wool”).
Laying waterproofing
To protect the insulation from getting wet, waterproofing material is attached to the sheathing with staples or nails. Thanks to this, mineral wool will retain its properties longer and the service life of the thermal insulation layer will increase.
The final stage
On top of the waterproofing, slats with a cross section of 30 mm are stuffed. This creates a ventilation gap that will facilitate the evaporation of moisture. Then the house cladding is installed on the sheathing.
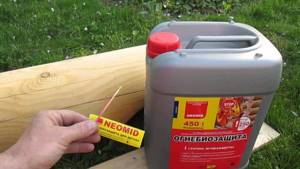
It must be taken into account that the total thickness of the insulation must be at least 100 mm. Also, do not forget to treat all wooden elements with an antiseptic and fire retardants.
Insulation of internal walls
If you have a wooden surface without any finishing, then insulation must be carried out in several stages:
- Secure the metal mesh to the wall using metal brackets. It is better to choose a mesh with cells from 20 to 50 mm. At the joints of the metal tape, you can secure it with construction tape.
- Preparation for applying heat-insulating plaster. Check the walls for bumps, drops and bends - in these places, the amount of mortar must be increased.
- Apply the mortar onto the wall, then plaster the wall with even and smooth movements. Set the level to 0, which you will focus on. Seal all cracks and holes so that the entire surface of the wall is smooth and level.
- Let the solution dry. The drying time is indicated on the packaging of construction mixtures - usually it is at least 12 hours.
- After the rough layer has dried, you can begin applying the final layer of plaster. In order to obtain the desired consistency of the finishing solution, it is necessary to dilute the rough solution with two portions of water. Check the smoothness using a building level: apply it to the wall in different directions.
Next, if desired, the walls are puttied and primed with a water-based solution.
What to do if there is already old plaster on the walls? In older houses, shingles were often used instead of metal mesh. If the plaster is unreliable and crumbles, then it should be knocked down completely. Although clay retains heat well, it is not advisable to attach a new structure on top of the old one.
Lathing
Lathing is used for ventilated facades. This is due to the fact that soft insulation, in principle, is not used for “wet” facades. It does not have sufficient rigidity to support the required weight of the plaster layer.
If you plan to finish in the form of “Bark Beetle” or “Lamb”, proceed to the following methods. Lathing is often used for thermal insulation from the inside. There she fully justifies herself.
So, how is the sheathing done?
- Necessarily! A vapor barrier film secured with staples must be laid on the wall;
- The lower base profile is screwed on;
- On top of the vapor barrier, using self-tapping screws, a beam with a thickness equal to the thickness of the insulation is screwed. The width of the beam should be actually equal to the width of the slab, but be 2-5 centimeters smaller. The most commonly used beam pitch is 60 cm.
- After this, starting from the bottom into the sheathing, the mineral wool is laid.
The slabs in the sheathing should fit tightly. In this case, the cold will not pass through the gap between the timber and the slab. But this approach is not used very often. It is applicable primarily to wooden houses. Also, soft mineral wool slabs necessarily require not only a vapor barrier on the inside, but a windproof layer on the outside. Otherwise the wind will blow. Installing wind protection is an additional expense, so two other mounting methods are often used.
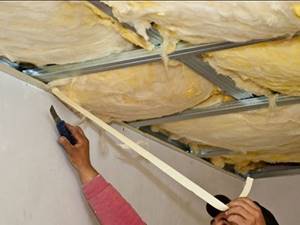
Laying the slabs in the sheathing is the right way when the question arises: how to attach the insulation to the ceiling.
On glue
As the only method of fastening exclusively with adhesive mass, it is rarely used and only under ventilated facades. For plastering work, additional reinforcement with umbrella dowels is required. However, this method has its own characteristics that need to be considered separately.
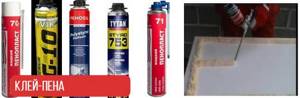
Firstly, there are two types of adhesives:
- Dry mixes;
- Adhesive foam.
The dry mixture is sold in bags and requires dilution. Adhesive foam is sold in cans and does not require preliminary preparation. The latter is a little more expensive, but the convenience is worth it.
First you need to level the wall and smooth out all the unevenness as much as possible, possibly plastering the surface.
Sets the bottom bar, which will be the starting point of thermal insulation. The dry mixture is applied to the slab itself.
In the case of a dry mixture, you need to apply the glue to the slabs in several pieces and spread it evenly over the entire surface using a comb. After this, the insulation board is fixed to the wall. Typically, the installation of mineral wool or other materials begins from the corner and always from the bottom row.
Adhesive foam is applied around the perimeter of the slab and in several strips in the middle. After application, press the slabs flat. The foam hardens in 30 minutes to 2 hours. During this time, it is possible to slightly adjust the position of the slab using a level.
Dry mixtures are often used:
- EK THERMEX;
- Ceresit CT 190;
- Ceresit CT180.
Popular foam options:
- Ceresit CT 84;
- Soudabond EASY;
- Insta STIK.
The cost of one cylinder is from 200 to 500 rubles.
We discussed the basic principles of how to attach insulation to a wall using adhesive. You can decide what exactly to use by reading a couple of opinions.
When we decided to insulate the facade, the master said that he would glue it with foam. We were indignant, saying that the polyurethane foam expands, but he said that he would use adhesive foam. I asked which one to buy, good or simple. We said: “Good.” No regrets, 30 minutes after gluing the sheet cannot be torn off. We decided to conduct an experiment and stuck signs on it with the street name and number. Everything is holding up great.
For large differences in walls, it is recommended to use polyurethane foam, specifically for polystyrene foam. It is also called “liquid foam”. If the wall curvature is one to three centimeters, this is not a problem at all. I bought it at Epicenter a year ago, glued the sheet on just for fun - a year has passed, everything is holding together, the sheet cannot be torn off. The foam breaks, but holds up.
Fastening process
You should not waste time on issues related to the choice of special insulating material, since this material is aimed at solving the issue of its fastening.
Let us immediately mention that there is no ideal method, since everything depends on the chosen material, as well as on the surface (some of them do not allow the possibility of fixing the material in one way or another). Here are the main methods that experts most often resort to:
- using glue;
- on dowels;
- using a self-adhesive coating.
Let's look at the 3 most popular materials, as well as installation methods suitable specifically for them.
How to choose mineral wool products
First you need to pay attention to several characteristics:
- Thickness of mineral wool for wall insulation. The thicker the insulating layer, the higher its fire safety, sound insulation and strength. For interior partitions and frame structures, mats of 5 cm are suitable. For facades - from 5 to 10 cm.
- Density (P). We wrote about it above. The rigidity of the structure and its ability to withstand loads depend on it. For facades, the indicator should be in the range of 100-125 kg/m³. If plaster is chosen as finishing, then 150 kg/m³. For interior partitions - 75-90 kg/m³.
- Thermal conductivity. The smaller it is, the better. In this regard, basalt and fiberglass products have proven themselves well.
- Vapor permeability. The coefficient suitable for private buildings is that of stone wool. Designated MU1. The larger it is, the better the product.
- Fire resistance. The fire resistance level of fiberglass is 600⁰ C, material made of rock alloys is 1000º C.
What else to pay attention to
If you are planning work on the outside of the building, choose basalt slabs. When it is necessary to insulate from the inside, fiberglass coating is also suitable. When purchasing, look at the storage conditions.
- If the product gets even a little wet, there is no point in purchasing it. Check that there are no tears in the packaging.
- Blocks and rolls should be kept under cover and not outdoors.
The most famous manufacturers of mineral insulation are Isover, URSA, Rockwool, Knauf. Their products are certified and quality tested.
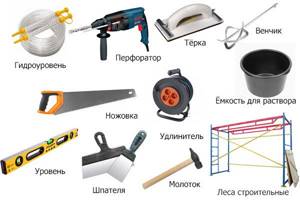
Materials and tools
It is impossible to insulate a house from the outside with mineral wool without tools and devices:
- Scaffolding. They can be rented. Using stairs is dangerous and uncomfortable.
- Hammer.
- Plaster grater.
- Whisk for mixing the solution.
- Wood saw.
- Extension.
- Putty knife.
- Container for solution.
- Hammer.
- Water level. Desired length: from 5 to 10 meters. Ideally use a laser device.
- Building level.
- Corners for reinforcing corners.
- Glue for mineral wool.
- Primer.
- Fabric reinforcing mesh.
- Paint, decorative plaster.
- Fasteners for mineral wool, dowels.
- Sand, cement.
- Cornices.
How to attach stone wool to a wall?
Today, a method has been developed for producing a special type of insulation - stone wool made from basalt. Twenty years ago, such mineral wool was used exclusively for the needs of the defense industry, but today this insulation is widely used for thermal insulation of any buildings.
Mineral wool does not contain components harmful to the environment such as acrylic and phenol-formaldehyde resins. It consists only of natural binders, therefore it is safe for humans. This thermal insulation material not only perfectly retains heat, but also allows you to create reliable sound insulation of rooms. Basalt mineral wool is becoming more and more popular and has already been tested by time, but people still have a lot of questions regarding technological issues, which we will try to focus on in this article.
How to properly attach mineral wool?
In this case, everything depends on the type of insulation and on the type of structure on which the thermal insulation is mounted. Lightweight grades of mineral wool are installed in frame structures by surprise. Rigid mineral wool boards are fastened with special dowels or fixed using special adhesives.
When fastening by surprise, mineral wool is placed very tightly into a wooden frame pre-assembled from slats and bars. The thickness of the frame must correspond to the thickness of the insulation. The interval between the slats is 1.5-2 cm less than the width of the mineral wool, which does not allow the material to slide during operation. The mats are installed starting from the bottom of the structure, and the rolls from the top. In this case, solid pieces are laid first, and free space, for example, near doors or windows, is filled later.
High-density mineral wool is often installed without intermediate/support beams. It is completely inserted behind the frame and pressed against the supporting structure without a gap, after which, for safety, it is fixed with dowels with a wide head, that is, the so-called “dish-shaped” dowels. In such a system, frame elements are placed on top of the insulating layer and press the wool against the wall; in addition, brackets that pass through the mats help to hold the insulation in place.
When using the method of bonded thermal insulation (wet method), frames are not used at all, so adhesives must be used as fastening. In this case, you will have to purchase a dry mixture, but it must be intended for gluing mineral wool insulation. Recently, polyurethane glue in cylinders has become increasingly popular, which allows you to mount dense mineral wool to any base, including wood, metal, and polymer. This technology also involves the use of disc dowels. We discussed in more detail the features of gluing insulation in articles on adhesive compositions and wet insulation of facades.
What is the best way to cut mineral wool?
It is recommended to cut thermal insulation materials from stone wool with a hacksaw or with a sharp long knife specially designed for this purpose, the blade of which is serrated. In any case, the equipment must be well sharpened so that as few fibers are pulled out as possible. Many companies that produce insulation also offer their customers cutting tools: knives about 300 mm long, as well as saws with straight teeth, about 60 cm long. In the absence of special devices for such purposes, kitchen bread knives with fine teeth work well and a wavy edge. Thin soft boards and mats (50 mm) can be cut with a regular mounting knife.
It is best to cut mineral wool produced in rolls before unrolling them. And mineral wool slabs are taken out of the packs and cut one at a time. It should be remembered that when installing thermal insulation, the insulation must fill the entire insulated space very tightly, so allowances should be left before cutting: for slabs - 0.5 cm; and for mats - about 1-2 cm.

Is it true that mineral wool needs to be protected from moisture and wind?
During the operation of insulated buildings, their walls, roofs and other structures should be protected from increased atmospheric humidity and from blowing by strong winds. Therefore, after installation, mineral wool insulation is covered from the outside with sheets of vapor-permeable, moisture- and windproof membrane. This allows you to prevent cold winds and drops of slanting rain from penetrating into the thickness of the wall. In this case, water vapor from the internal space, passing through the walls through diffusion, will be able to exit outside without obstacles.
The undoubted advantage of mineral wool is its vapor permeability, and this property should be used to the maximum. When installing mineral wool thermal insulation materials between the load-bearing wall and the insulation, there is no need to install a vapor barrier, since such sealing will negatively affect the climate inside the building. The lack of artificial ventilation in this case will lead to increased humidity and the formation of condensation, which, in turn, will cause the formation of mold and fungi.
Thermal insulation and its types
The choice of insulation option - inside or outside - is the main point that determines the order of the thermal insulation process and affects the final result of the work performed. Let's look at the features of each option.
Internal insulation
The work is simplified - no scaffolding is needed, surfaces of a small area in each room are insulated one by one, and the ability to independently perform all technological operations, which can be carried out without regard to seasonality and natural factors, is simplified.
But this technology is used in extreme cases (access to the outer wall is complicated, the appearance of the facade cannot be disturbed) due to significant disadvantages and possible consequences:
- The usable area of the room is reduced. The standard thickness of insulation will “regain” 10 cm, and a plasterboard covering with putty and final finishing will take at least another 15 mm of living space.
- Construction waste remains inside the building.
- There is an increased concentration of dust and small sharp fibers in the air.
- It is necessary to dismantle passing communications, decorative elements and interior decoration from the insulated surface.
- It is almost impossible to insulate the junction of internal walls and partitions with a load-bearing wall.
- Complex and labor-intensive finishing of insulated surfaces will be required.
- There will be high humidity in the premises.
- Now about the main drawback, due to which internal insulation has a large number of opponents. The dew point shifts towards the room. As a result: possible freezing of the wall to a great depth, its weak heating, decreased durability of the supporting structure material, and the possibility of condensation appearing under the insulation.
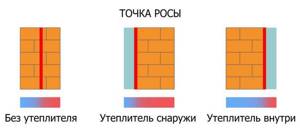
A clear demonstration of the shift in the level of heating and freezing of the wall with different types of insulation
Important! In combination with high-quality insulation of housing, a well-thought-out ventilation system should function. In addition to additional comfort and fresh air, its work eliminates dampness and stops the development of fungi and mold that are harmful to health.
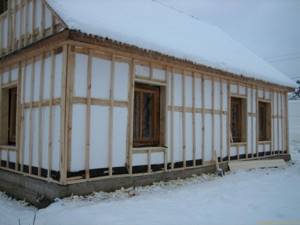
External insulation
With this insulation option, the supporting structure receives additional protection and will last longer. The work is carried out as a single “front” over a large area at high speed. We offer a large selection of finishing materials for quick finishing of an insulated façade. When the heat insulator is located externally, the “dew” point shifts towards the street, increasing the degree of heating of the walls. Vapor-permeable mineral wool does not allow moisture and condensation to linger on insulated surfaces, destroying their material.
Disadvantages of external use of insulation:
- For installation you will have to buy more expensive brands of semi-rigid and rigid material.
- To insulate multi-level structures, you need scaffolding and may need the help of professional builders. And this is an additional expense item.
- Dependence of the possibility of carrying out work on the time of year and weather factors.
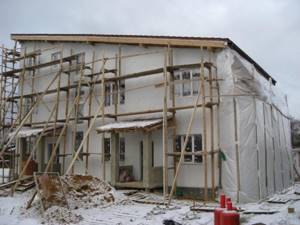
For winter work you will have to build a special “greenhouse”
How to install correctly
In order to start insulating walls, you will need the following tools:
- a screwdriver (preferably a cordless one, since you will have to move around a lot);
- self-tapping screws with galvanized coating;
- tape measure, building level and various rulers - corners;
- fastenings - umbrellas for insulation;
- jigsaw with wood blade;
- metal profiles and corners.
The insulation process occurs as follows:
- It is necessary to attach a frame made of wooden (metal) profiles to wooden walls in increments of at least 50 cm. The distance between the beams is dictated by the width of the insulation - it must fit tightly into the opening. The frame is erected using a building level and attached to metal corners.
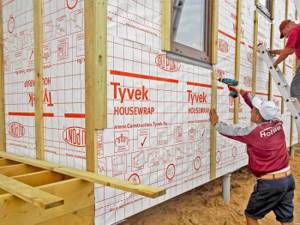
- This is followed by the first layer of ecowool or mineral wool. Install the insulation tightly to the base of the frame. Loose insulation materials should be laid in a special way: a special membrane fabric is attached to the finished frame so that a bag is formed. Insulation is placed on top and secured with a construction stapler.
- Minslabs or basalt slabs are the second layer after the membrane fabric. Secure the insulation pie with plastic dowels in the form of a fungus for the stability of the structure.
- Install membrane thermal insulation on the sheathing. Secure it to the wooden frame using construction staples or small self-tapping screws. This substrate prevents excess moisture from entering the insulation, which reduces heat loss.
- Now you can start finishing: siding, brick or building slabs.
Since siding tends to expand in direct sunlight, do not tighten the screws all the way and leave a small distance between the profiles so that they can “walk” in hot weather. If this is not done, the plastic will begin to bend, which will lead to depressurization of the facade.
Watch the video in which the user demonstrates in detail the process of attaching insulation to a wooden wall:
Types of thermal insulation materials
Materials for building insulation that prevail in the modern construction market:
- polystyrene foam is a popular material used for wall insulation;
- penoplex slabs are a “relative” of foam plastic, in terms of production they are higher than foam plastic;
- expanded polystyrene is a porous material that is used to insulate floors, walls, and various partitions;
- glass wool is an excellent material for insulating floors and ceilings;
- slag wool - blocks heat well, but due to fear of moisture and poor quality it is not widely used;
- mineral wool is an environmentally friendly material, ideal for insulation inside the house;
- ecowool - this material is perfect for insulating the walls of residential and private houses; it is also an environmentally friendly material;
- polyurethane foam attaches well to all painted surfaces, metal, brick, glass, wood, concrete, and is perfect for insulating ceilings, walls and floors;
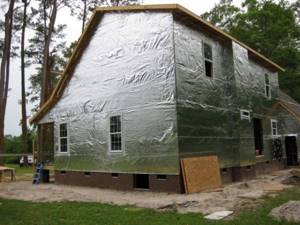
- reflective thermal insulation (foil) - is a layer of reflective material 2 cm thick.
Having familiarized yourself with the types of material, you can clearly conclude: there is no ideal insulation. The choice should be based on the intended goals, funds and the material itself.
Step-by-step insulation of a wooden house with your own hands
The technology for laying heat insulation on the walls of a wooden house lies in the correct sequence.
Wood preparation
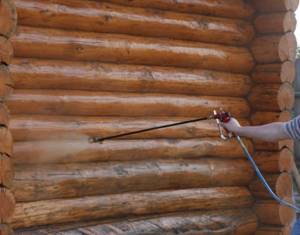
Preparation work includes cleaning the wood surface and treating it with specific solutions with antiseptic properties. This is necessary in order to prevent the possible occurrence of fungal infections on lumber. This composition should only be applied to a dry and clean surface. All subsequent work can be carried out only after the antiseptic has completely dried.
Tip: You can save on the purchase of special products for wood processing by using pre-purified used machine oil. Its cost is relatively low.
Frame structure
The assembly of the frame involves the installation of wooden beams, the height of which will be in accordance with the thickness of the insulator slabs. They are mounted so as to form a sheathing.
- First, attach the vertical bars. The installation of the first beam occurs at the edge from the section of the wall that protrudes forward. After this, the bar is set strictly at an angle of 90 degrees to the horizon using a level. A holder (wood inserts) of appropriate thickness is installed in the gaps between the wall and the beam.
- The end beam is installed in the same way. I pull cords between the outer beams, according to which the other intermediate beams are then placed.
- The distance between the beams corresponds to 60 cm, but it is possible to use a different distance, the main thing is to focus on the width of the insulation boards. After this, horizontal beams running across are fixed. The gap between them should correspond to the length of the insulation boards.
Installation of insulation
The slabs are installed in the resulting sheathing. Installation is carried out with the expectation that the insulator fragment should fit tightly into the cell space. If the calculations turn out to be slightly incorrect, one of the edges of the slab can be cut to the desired size.

The insulation is attached to a wooden wall with a fungus using special long-length screws. One piece of mineral wool slab measuring 1200*600mm requires 8 fungi, 6 of them are attached around the perimeter and 2 in the central part.
The mount for the thermal insulator to a wooden wall must be screwed in, avoiding gaps, otherwise the slab may subsequently bulge forward.
Wind and water protection
Wind protection and vapor barrier film are laid on top of the equipped frame. It is convenient to secure the film using a stapler.
The strips must be placed strictly vertically with an overlap of 10 cm at the edges. The film should be stretched tightly and not move away from the frame.
Decorative finishing
After installation of the insulation is completed, the ventilated façade is attached. It can be made either on the basis of siding or using a block house or economical plastic lining.

The main types of mortars for insulation
Any disc dowel consists of a sleeve, a core and a wide cap. Below are the main types of fungi.
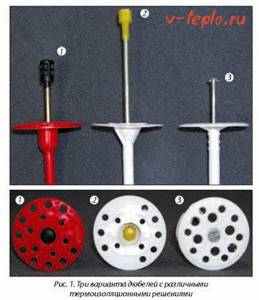
- Umbrellas with plastic anchors are products that consist of a rod with a round cap and a spacer element. Mostly polypropylene is used in production. The main difference between such dowels is that in their outer cap there are conical holes, which, in fact, provide the most reliable fixation of the heat insulator. The thermal conductivity of the umbrella does not exceed 0.004 Watt/K; it can be used at temperatures from minus 40 to plus 80 degrees. To determine the length of the umbrella, it is necessary to sum up the thickness of the insulating layer and the height of the spacer. The load that such a fungus can withstand for attaching insulation is 20-380 kilograms. The elements are used for fixing heat insulators that have little weight (for example, mineral wool) to concrete, brick and stone. Main advantages: affordable cost, resistance to chemical influences, high coefficient of adhesion to the surface. Disadvantage: Heavy cladding material cannot be mounted on top of the thermal insulation layer.
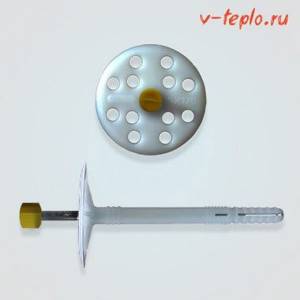
Dowels with an iron anchor include a metal nail with a large cap and the spacer itself. In manufacturing, special polypropylene is used (impact-resistant), while the rod is made of galvanized steel. The nail is coated with a special anti-corrosion layer, which significantly extends the service life of the entire pie. The spacer element can have a diameter of 0.4-0.8 centimeters, the umbrella itself can be operated at temperatures from minus 55 to plus 60 degrees. It is characteristic that the maximum load-bearing load in this case is 750 kilograms. The standard dimensions of the fungus are 20x1 centimeter.
Note! Such fungi are used to insulate ceilings and facades of buildings. Their main advantages include the fact that it is quite possible to lay heavy facing material, as well as plaster, on top of the thermal insulation layer
As for the disadvantages, there is only one: so-called “cold bridges” are formed.
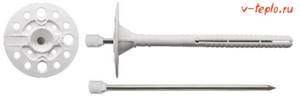
Umbrellas with thermal head. The design of these products is as follows: a rod made of steel, a spacer sleeve equipped with a cap; A plastic head is attached to one end of the rod. Due to the fact that the nail is metal, even fairly heavy materials can be used for insulation. Thanks to the presence of a thermal head, heat loss is minimized to almost zero. The use of these umbrellas involves installing a heat insulator on a wooden surface. Advantages: resistance to chemicals and various environmental conditions, ability to withstand even the most significant loads (but not more than 0.92 kN). The downside is the more than high cost.
Video - Types of fungi for fixing a heat insulator
It is also worth adding that there are still dowels with threaded threads that can simply be driven into the work surface. They are produced in two versions:
- made of metal (we are talking exclusively about the core);
- made of plastic.
The cost of iron mushrooms is approximately twice as high, but they can also withstand much more weight. Field of application: fixation to thin or hollow materials. Plastic dowels, in turn, are divided into:
- PP (polypropylene);
- nylon (used for surfaces made of any material).
It is also worth highlighting roofing fungi. They are intended for installation of soft roofing, acoustic slabs or thermal insulation to a concrete surface. Such products consist of a 5-centimeter cap, a fiberglass rod or self-tapping screw and an anchor.
Note! An element made entirely of plastic is preferable to use for thermal insulation of walls. This can be explained quite simply: iron conducts cold well, therefore, the notorious “cold bridges” will form along the entire length of the metal rods.