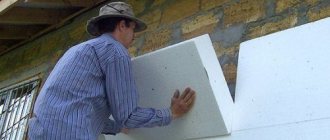
Thermal insulation of the house from the inside avoids the need for exterior finishing. With this approach, you can maintain the attractive appearance of a building made of timber or rounded logs. But the technology has a number of disadvantages that you should prepare for:
- the interior spaces, but not the walls, are protected from the harmful effects of cold;
- the useful area of the building is reduced;
- There are certain restrictions on the materials used.
Which insulation to choose
What is the best way to insulate a house? It’s worth starting from the material of the walls. The tree has gained well-deserved popularity due to the fact that it is able to “breathe”. Wood allows air to pass through well, providing excellent ventilation in rooms.
To preserve the beneficial properties to the fullest when working from the inside with your own hands, you need to use materials that are similar in breathability to wood. To insulate a house, it is better to abandon such heat insulators as:
- Styrofoam;
- extruded polystyrene foam (or more simply “Penoplex”);
- penoizol.
They are highly airtight, so they can create a greenhouse effect in a building. This will require expensive forced ventilation or installation of air conditioners.
The best material for thermal insulation is mineral wool.
Its advantages include:
- high efficiency;
- the ability to pass air without interfering with natural ventilation;
- safety for human health and the environment;
- non-flammability;
- ease of installation;
- availability;
- low cost.
But when using cotton wool, it is worth remembering its disadvantages. The material absorbs moisture well, but ceases to perform its main function. To avoid getting wet, it is also worth purchasing a vapor barrier and wind-waterproofing.
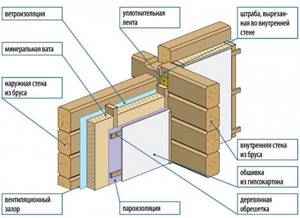
Layer diagram for mineral wool insulation
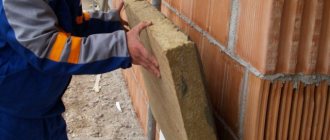
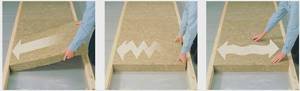
There are several types of mineral wool. The best option would be basalt (stone) insulation in slabs. You can also choose glass wool, which is available in the form of mats rolled into a roll. The second option may cause installation difficulties. The material is very itchy, and particles getting into the lungs or on the skin cause itching. To avoid unpleasant consequences, all work with glass wool is carried out in special clothing and masks.
The most undesirable, but inexpensive option would be slag wool. But when insulating your home, it’s better not to save money. Cotton wool is made from industrial waste. Manufacturers are responsible for safety, but it is not always possible to check which slags the insulation is made from. You can easily come across low-quality material or a fake, with which insulating a wooden house from the inside will be dangerous to health and life.
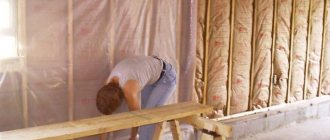
Preparatory stage
Before insulating a wooden house from the inside, you will need to prepare the walls. This is especially true if it is necessary to insulate an old wooden house. In this case, the material that was used for caulking had time to cake. The main task at this stage will be to eliminate cracks - sources of drafts, cold and moisture.
Work begins by cleaning the base. You will need to remove dust and dirt that has accumulated on the walls. Before insulating an old house, it is worth checking the strength of the wood. It should not be damaged by various pests. Otherwise, it is better to strengthen the walls.
To prevent problems with insects and microorganisms in the future, the surface is treated with antiseptic compounds. You can also treat with fire retardants, they increase the material’s resistance to fire.
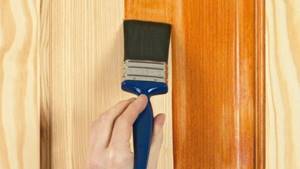
Treatment with antiseptics will protect the wood from rotting
Wood shrinks over time. Because of this, cracks may appear in the walls. Before starting insulation work, it is worth caulking the old walls. Currently, jute is most often used for these purposes. For large cracks, it would be wise to purchase tape tow. The material is hammered between logs or beams using a chisel.
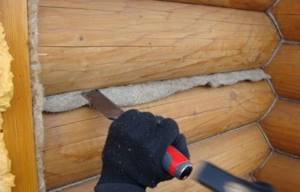
Caulk will protect the walls from blowing and will become an additional heat insulator
It is necessary to carry out the work until the material no longer fits into the space and begins to hang outward. High-quality caulk is the key to a warm home.
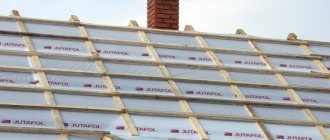
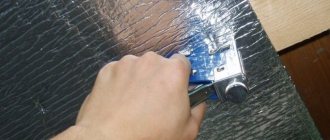
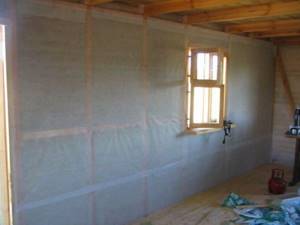
Wind-waterproofing of walls
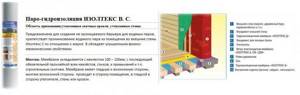
Mineral wool is afraid of moisture. Before you insulate the walls of a wooden house, you should take care to protect the insulation. On the outside of the mineral wool, a layer of wind-waterproofing is fixed. It prevents weathering and penetration of atmospheric moisture. There are several types of suitable materials, but the best option is a vapor diffusion membrane.
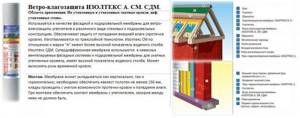
Description and characteristics of the windproof membrane
This modern material reliably protects against water, but does not interfere with the movement of air and steam. This allows you to maintain the ability of the walls to breathe, as well as ensure the removal of moisture from the insulation.
The waterproofing is attached to the walls using a construction stapler. The joints of the canvases are made with an overlap of at least 10 cm and are taped with tape or special tape.
Installation of insulation
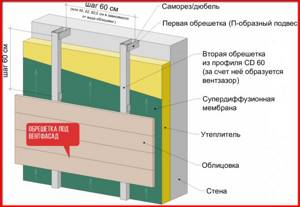
Internal wall insulation is carried out along the frame. It can be made of wood from a metal profile. The easiest way to insulate a wooden building is to use wood for the frame. It is important to correctly select the geometric dimensions of the frame:
- The pitch of the racks is selected taking into account the width of the insulation. It should be approximately 2 cm less than the width of the mats or slabs. This is necessary for a tight fit of the material. For mineral wool, the spacing of the posts is most often used so that there is a clear distance of 58 cm between them.
- The overhang of the frame must take into account the thickness of the insulation and the required ventilation gap. It is needed to remove condensation from the surface and allows you to keep the material dry. The thickness of the ventilation gap is usually taken to be 3-5 cm.
Installation of slabs in walls should be carried out with tension - then it will not begin to slide over time
Mineral wool is placed between the sheathing posts. With the correct choice of the last step, the heat insulator will be held in place due to friction. For additional fastening, you can use special plastic dowels; they are usually sold together with insulation.
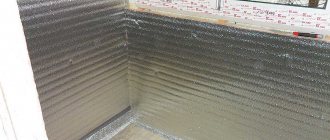
Vapor barrier
How to properly insulate the walls of a wooden house from the inside? It is important not only to choose the right insulation, but also to protect it from all types of moisture. Interiors are characterized by fairly high humidity; water in the form of steam can easily reach the mineral wool and reduce its effectiveness.
Vapor barrier is a mandatory layer when using mineral wool
Internal wall insulation requires the presence of a vapor barrier layer. It is mounted on top of the insulation. A good option for protection is vapor barrier membranes.
Characteristics of the vapor barrier membrane
They are more expensive than films, but do not interfere with the movement of air through the walls. Membranes will become a more modern and efficient option. Insulation of a wooden wall from the inside with their help is carried out according to the manufacturer's instructions. The method of attachment may vary for different types.
Purpose and advantages of disc fastening
Dowels of a special shape, which are used to install thermal insulation, are called mushrooms or umbrellas in construction. They provide a secure fit even to fragile materials.
With their help, the heat insulator can be attached to various materials:
Advantages of disc mounting:
- Thanks to the wide cap of the mushroom, a reliable fit to any building insulation is ensured.
- The umbrella, thanks to its long leg, can withstand significant loads. In the center there is a special hole in the cap into which a dowel is inserted.
- On the inside, the surface of the cap is rough for greater adhesion to the insulation.
- Dowels have anti-corrosion properties.
- The plastic from which the dowel is made is inexpensive and reliable.
- The fungal umbrella is a bendable element. It cannot damage the sealing product.
- For reliability, the dowel inside the structure expands in all directions, which leads to strengthening of the fastener structure.
Types of fasteners for thermal insulation.
The mushroom dowel for attaching insulation can be plastic or steel. Its type depends on the insulation with which builders have to work. Also, dowels differ from each other in the type and quality of production, and in their configuration. The design may include a thermal head.
Features of plastic fasteners
There are cone-shaped holes on the surface of the umbrella. This design feature provides additional adhesion to the material. For installation of non-solid materials, nylon fasteners are used, which are made from high-strength polypropylene, nylon, and polyamide.
The features of such fungi include:
- lack of response to temperature changes;
- low cost;
- reduced thermal conductivity;
- impeccable stability in extremely harsh conditions;
- long service life due to the absence of rot and rust;
- load bearing capacity of 400 kg/m2.
Plastic fungi are widely used for insulating walls made of brick and concrete.
Metal fasteners
The internals of the metal fasteners are made of steel. The sleeve used is polypropylene, at the end of which there are spacers. With this type of fastener, a high degree of load is allowed. Telescopic fasteners TechnoNIKOL are used for arranging the facade. The disadvantages of the material include:
- high price;
- the occurrence of condensation at the entry point of the metal rod;
- possible rust (metal parts come into contact with moisture, rust may appear on the plaster).
Thermal Head Fasteners
It is a metal rod, which is coated with polyamide near the cap. This plastic part prevents condensation from accumulating at the fastening points, thereby preventing rust from appearing on the plaster.
These devices are mainly used for insulating wooden houses. The advantages of these fungi are similar to the positive properties of plastic and metal fasteners. The disadvantage of the product is the high price, which surpasses everything in this segment.
Facade insulation of a summer cottage
- The walls and foundations of small country-type houses do not have the required safety margin to compensate for additional loads, therefore, lightweight slabs with a density of 37-45 kg/m3 are recommended for facade thermal insulation.
- Light Butts, Light Butts Scandic or other 100 mm Rockwool insulation, the price of which is initially aimed at private construction, is mounted in the cells of a wooden sheathing, which, in turn, serves as the basis for siding or any other weather-resistant cladding.
Different installation technologies provide for the use of several options for vapor and waterproofing, and, if necessary, the installation of ventilation slot gaps. In any case, it is recommended to create conditions for converting the dew point into the volume of insulation with the subsequent removal of water vapor into the atmosphere.
Order Rockwool Facade Butts insulation from our experienced managers!
Useful video
Installation of soundproofing slabs Facade Butts
Types of thermal insulation materials
Materials for building insulation that prevail in the modern construction market:
- polystyrene foam is a popular material used for wall insulation;
- penoplex slabs are a “relative” of foam plastic, in terms of production they are higher than foam plastic;
- expanded polystyrene is a porous material that is used to insulate floors, walls, and various partitions;
- glass wool is an excellent material for insulating floors and ceilings;
- slag wool - blocks heat well, but due to fear of moisture and poor quality it is not widely used;
- mineral wool is an environmentally friendly material, ideal for insulation inside the house;
- ecowool - this material is perfect for insulating the walls of residential and private houses; it is also an environmentally friendly material;
- polyurethane foam attaches well to all painted surfaces, metal, brick, glass, wood, concrete, and is perfect for insulating ceilings, walls and floors;
- reflective thermal insulation (foil) – is a layer of reflective material 2 cm thick.
Having familiarized yourself with the types of material, you can clearly conclude: there is no ideal insulation. The choice should be based on the intended goals, funds and the material itself.
Methods of attaching insulation to the wall and their features
Using lathing
Convenient when using soft insulation, such as mineral wool. Before laying, it is necessary to prepare the surface: a frame of bars is attached to the wall, and mineral wool is placed in the resulting cells.
On the street, insulation is attached using lathing when there is a need for a ventilated façade. In this case, the frame is made of a metal profile.
However, this method is not used when preference for cladding is given to a wet facade, since the latter involves plaster and various solutions and mixtures are used during work. Soft insulation is not able to withstand the weight of the plaster layer.
For dowels and nails
To install the insulation, dowels are required. They come in three types:
- plastic;
- dowel with metal nail;
- mushroom dowel with a metal rod equipped with a thermal head.
To attach the insulation to a brick wall, the length of the fastener is required to be 70 mm greater than the thickness of the seal. A plastic product is used with a length of no more than 120 mm. A dowel larger than the specified size will cause the nail to break.
On glue
A large number of adhesive bases are offered for installing thermal insulation. There is no big difference between them. The main thing is that they match the type of insulation chosen. For example, attaching insulation to a wooden wall with glue is quite appropriate. The composition of the glue should not be coarse. If this occurs, this indicates improper storage of the product and the quality of the adhesive composition.
During the installation process, the builder will need a bucket, a drill with a whisk. Thanks to them, the adhesive base is diluted. A spatula and grater are used to apply the base to the walls. To install the fungi, you will need a hammer drill with a drill of the required length and appropriate diameter.
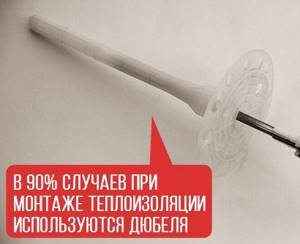
For dowels
In 90% of cases, mineral wool and other materials are attached to the wall using dowels.
Now we will simply describe the sequence of work when using this method.
First of all, if adhesive was initially used to fix the insulating boards, they must be well secured. Most often, fastening with dowels can be carried out 2-24 hours after gluing. A more accurate figure can be found in the instructions for the adhesive composition.
- Select and purchase an umbrella of the required length;
- We drill a hole into which the fastening element will be driven;
- Insert the dowel into the hole;
- Using a hammer, hammer in the anchor (with plastic nails you need to be especially careful when applying force).
Our sheet is securely fixed.
In the case of laying mineral wool, namely its rigid slabs, on the slabs themselves you will have to pre-drill not only holes, but also round recesses for the hats of umbrellas. Otherwise, these caps will protrude above the surface of the insulation, which will create difficulties when installing the finishing trim.
Step-by-step insulation technology using fasteners in the form of fungi
Before attaching thermal insulation, it is necessary to place a vapor barrier material on the area of future insulation. Along with its immediate purpose, it will serve as an additional fastening.
Wall insulation
The installation process consists of simple steps:
- The entire area where the insulation is placed must be marked for drilling in increments of 0.8 m horizontally and 0.3 m vertically.
- Then the holes are drilled. The drilling diameter must match the mounting leg.
- Then the sleeve is inserted into this hole by hand. The core is placed in the sleeve and driven until it stops. At the same time, the umbrella opens with a special protection cover.
To begin installing the insulation, you must first install a guide strip at the bottom of the wall. When installed, it will prevent the material from sliding down.
If the insulation is attached with glue, then the fungi are installed only after the glue has completely dried. The resulting joints between parts of the material are treated with polyurethane foam. You can also use foil tape if foam is used.
Calculation of the required number of fasteners is carried out according to the formula:
W (quantity) = S (coverage area) * Q (number of dowels per square meter).
The Q value for penoplex will be 4, and for basalt wool 6.
Substituting all the data into the formula, you get the required number of fasteners. You should always remember to have a reserve.
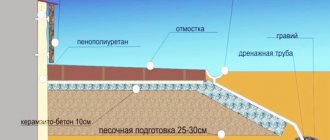
Thermal insulation of the base
The basement of any building must be properly insulated. Due to poor insulation of this part of the building, cold will enter the house through the soil and floor. Installation of thermal insulation is as follows:
- In order to begin attaching the thermal insulation, it is necessary to provide access to the surface of the base. It is best to carry out this operation at the stage of building construction.
- Mastic is applied to the surface, which promotes adhesion of the adhesive base.
- It is better to use polystyrene foam as a heat insulator. It is not affected by moisture. The glue is mastic, which will perfectly fix the insulation sheets.
- To insulate the base, you don’t need to spend money on fungi. The glued sealing material will be covered with soil in any case. This will ensure that the seal is pressed against the perimeter of the base.
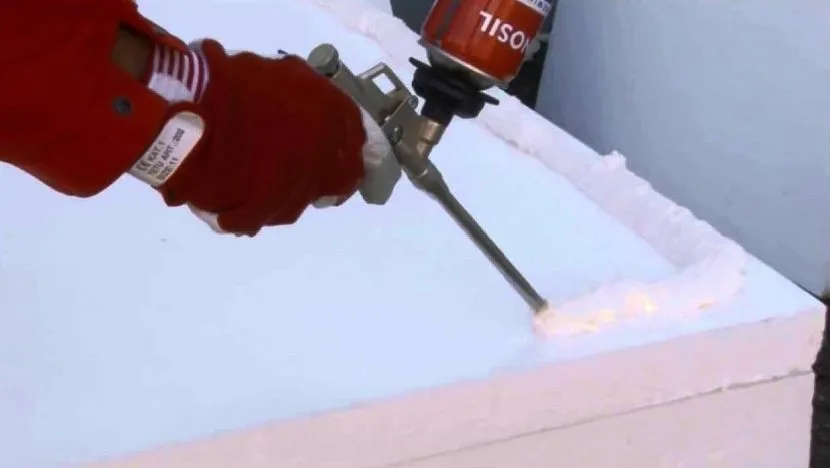
- After gluing the material, the joining seams must be filled with foam.
Waterproofing
- Waterproofing protects the walls of the house from the destructive effects of moisture, mildew, and mold.
- It is strengthened between the insulating material and the siding.
- Installation of the waterproofing membrane is carried out by overlapping the fabric by 10-15 cm.
- The canvases are stapled to the surface of the sheathing, and the joints are sealed with special tapes.
- Ventilation gaps are formed using lathing with a 25×50 block;
- A protective metal mesh is installed below
In conclusion, it is worth saying that insulating the walls of a house made of timber can be done independently. All that is required is your patience and some expenses, which will more than pay off in the future.
What does the mineral wool cover on the wall, how and why should it be attached?
In fact, stone fiber is attached to the walls not to block any elements from view. The purpose of the event is to isolate the vertical surface from the external environment.
Fibrous mineral wool with air perfectly inhibits heat transfer, and the chaotic arrangement of threads can absorb a lot of acoustic noise. But fixing a slab or several products will not solve the issue; a balanced and comprehensive approach is needed. The main task is to select basalt insulation with the appropriate properties, but this is not enough. You need to know exactly how to attach the insulating material and the installation sequence of the entire thermal insulation system.
Outside or inside: what determines the method of attaching mineral wool?
Insulation can be done both from the inside of the premises and from the outside; accordingly, the requirements for the reliability of fixation are different. If gluing with special adhesive mixtures is enough inside, then additional fasteners are required for the facade.
The basic rule for how to properly attach thermal insulation is to tightly fit the edges of the plates to each other, which should completely cover the surface to be insulated. Let's consider methods for installing basalt insulation depending on the location of the system.
Comparison table for mounting methods
External insulation
Installation of mini-slabs in a frame using vapor barrier
Plaster facade: gluing slabs with special glue and doweling
Ventilated facade: doweling using vapor barrier and waterproofing membrane
How to attach basalt insulation for internal thermal insulation?
In general, insulation from the inside is undesirable due to a number of thermophysical processes occurring in external enclosing structures. Moisture from the air and frost can lead to both the accumulation of condensation under the insulation and freezing, as well as damage to the masonry and even concrete structures. However, if a thermal insulation system is the only possible solution, it should be done wisely.
- Alignment of walls . Preparing the base before installing basalt thermal insulation eliminates differences in the walls and, accordingly, eliminates the formation of an air gap between the certified mini-slab and the wall, in which, as is known, destructive condensate can accumulate.
- Installation of the frame under the sheathing . Subsequently, the mineral wool insulation is covered with plasterboard or other materials; for this purpose, guides made of metal profiles should be initially attached. In addition, the mineral wool itself will be easier to place in the frame.
- Installation of waterproofing . A film is unwound directly over the profiles, which will protect the basalt insulation from external moisture and remove vapors from the insulation structure.
- Laying mini-slabs . The cotton wool is measured in the required layers, taking into account the springing properties of the canvas, and placed in the resulting gaps between the profile.
- Vapor barrier layer . This is a special film that prevents even the smallest drops of water in the form of steam from penetrating its inner layer. After this, you can finish the walls.
Consistent placement of layers will protect the thermal insulation from getting wet, and therefore from losing its insulating properties.
How to insulate a wooden house with polystyrene foam
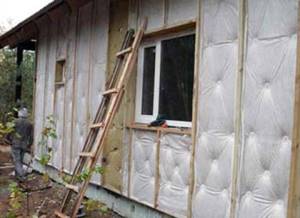
If desired, you can find examples of using polystyrene foam to insulate a wooden house from the outside. Moreover, there is a technology that does not impair the “breathing” properties of the walls and the level of comfort, which is ensured due to natural gas exchange between rooms and the street. This is achieved by creating a ventilated gap between the insulation and the wall. Moreover, in this case, it does not matter what the walls are made of - timber or logs.
In order not to worsen the “breathing” properties of a wooden house, a ventilated gap must be created between the foam plastic and the wall. Source bouw.ru
In our video we will look at how polystyrene foam is produced, is polystyrene foam harmful and where is it used?
What happens if you insulate with polystyrene incorrectly - in the video:
How to attach basalt insulation to a wall for facade thermal insulation?
Let us consider in detail how to attach basalt thermal insulation to walls in plaster facade systems:
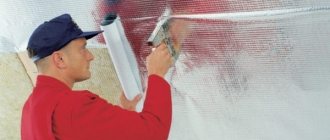
- Preparing the base . Basalt insulation slabs are glued to the walls, so their surface must be fairly flat. To do this, repair chips and potholes. Before fixing the basalt wool, priming is performed to strengthen, remove dust from the structure and improve adhesion.
- Gluing mini-slabs . Why are special adhesive compositions selected, designed to both attach basalt insulation to the walls and ensure its tight fit to the surface. Such dry mixtures ensure maximum adhesion of thermal insulation to brickwork, concrete walls and other surfaces, have frost resistance of the hardened layer, and special modifications make it possible to attach mini-slabs at sub-zero atmospheric temperatures. The glue is applied according to a special scheme, carefully working out the perimeter and applying the composition in the middle, after which the slab is pressed to the surface. The position of the miniplates is maintained using a level. After installing the first row, the second is fastened with staggered seams so that the joint of the slabs falls in the middle of the bottom line of the slabs. The rule must be followed for all subsequent stripes.
- Doweling . The basalt insulation should be attached to the wall using disc-shaped dowels after a certain time allowed for the glue to dry. Then all work is carried out both on the installation of plaster and decorative layers, and on the final painting of the facade.
To understand the intricacies of attaching mineral wool slabs to facade walls, we invite you to watch a video about installing a thermal insulation system.
Facade insulation using technology with a ventilated gap has a slightly different approach to fixing basalt wool.
- Installation of a vapor barrier . A special film coating that supports the removal of moisture and fumes from the walls of the house.
- Frame structure . The design feature of the ventilated façade involves installing the finishing at a distance from the insulation, so initially a rigid frame system is installed from a profile resistant to corrosion and mechanical loads.
- Laying slabs . It is quite simple to lay mini-slabs between the frame guides. Having chosen products with a certain rigidity and insulating properties, they are installed with light compression of the edges. After leveling, practical basalt insulation for the facade fills the allotted space, which ensures sufficient fixation strength.
- Doweling . Supporting disc dowels must be installed according to the pattern and quantity specified by the slab manufacturer or system designer. Particular care should be taken to attach two-layer thermal insulation due to its increased weight.
- Installation of a hydraulic barrier . The membrane is able to protect thermal insulation from drops of water condensing in the air gap of the ventilation facade.
Requirements for fasteners
Reliable fastening of thermal insulation to the wall consists of an adhesive connection and dowels. Gluing is carried out on pre-prepared compounds, which are prepared from dry mixtures.
The solution is applied to the underside of the polystyrene foam sheet and pressed against the wall surface. After drying, this connection ensures the retention of thermal insulation.
Important! Constant temperature changes and significant wind loads eventually destroy the integrity of the heat-insulating layer. In this case, it is possible for the sheets to tear off from the wall; in order to avoid this, the instructions prescribe fixing the insulation using special plastic dowels. The number of mounting points for a sheet size of one meter per meter is determined to be at least five, and the location is in the corners and in the center.
Requirements for facade dowels are determined by regulatory documentation. Building codes and industry standards are developed based on field test data.
The dowel for attaching thermal insulation is subjected to alternating loads that simulate gusts of wind. Fasteners are checked in two directions: resistance to tearing out of the wall or shear when applying force parallel to the surface.
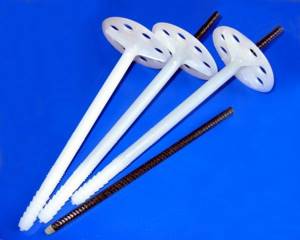
Facade dowels with plastic nails
Certification of fasteners
The compliance of industrial products with the stated requirements is checked by authorized laboratories. The use of substandard materials in the production process, as well as violation of technology, leads to deterioration of characteristics.
This, in turn, can lead to the destruction of the heat-insulating layer, especially on the walls of multi-storey buildings at a height of 15 m or more from the ground surface.
Here, wind loads are especially high, and constant humidity can lead to weakening of the connection to the wall. When choosing a dowel for fastening thermal insulation, you need to find out whether there are certificates of conformity for the products. This will avoid unnecessary costs for restoring damaged thermal insulation.
Review of work options
Let me make a reservation right away - I will not talk about all possible fastening methods, but will only touch on the simplest and most effective options that have proven their reliability among developers. Don't try to find fancy technology; the simpler the workflow, the less likely there are errors and defects.
Option No. 1 - wall insulation
The question of how to attach insulation to a wall is one of the most popular, since this is the type of work that is carried out most often and for some reason causes great difficulties among developers. Let's figure out what you will need to carry out the work when attaching insulation for plastering:
| Bends for fastening insulation | There are three product options: plastic products, elements with a metal nail and dowels with a metal nail and a thermal head. The length of the products should be 70 mm greater than the thickness of the insulation to ensure high-quality fixation of the elements. The plastic version can be used with a length of up to 120 mm; if it is longer, the strength will not be enough; nails in such products often break |
| Adhesive composition | The market sells many options for special adhesive compositions for attaching thermal insulation. There is not much difference between them, the main thing is that they are suitable for the type of thermal insulation material you have chosen. The composition should not be petrified, this is a sign that storage conditions have been violated; the quality of such mixtures is much lower |
| Polyurethane foam | It is needed when using foam plastic and is used to fill the gaps that inevitably form when attaching the material. Usually you don’t need much of it, but it all depends on how well the installation is done. |
| Work tool | It is impossible to prepare glue without a container and a drill with a mixing attachment, and you need to apply it with a special spatula or grater. In order to install umbrellas, you need to drill holes for them, so you must have a hammer drill with a drill of the required diameter and length on hand |
Umbrellas are far from the only insulation fasteners
I want to give you some tips on how to choose high-quality fasteners for insulation, or, as it is also called, a mushroom for thermal insulation:
- First of all, decide on the best option, I wrote above that purely plastic products can be taken with a length of up to 120 mm , if you need larger options, then you definitely need to purchase dowels with a metal nail, as they are more durable. It is best to choose the option with a thermal head, in which the cap is closed with a special plastic plug, which prevents the formation of cold bridges and eliminates the appearance of corrosion stains on the surface;

The thermal head eliminates metal contact with moisture, which is very important
- The length should be at least 70 mm greater than the thickness of the insulation, that is, for foam plastic or mineral wool 50 mm thick, products 10x120 mm are best suited . If you need to attach heavy mineral wool to a wall made of foam concrete, then it is better to take longer dowels, this will provide additional reliability, because the blocks are more fragile than brick or concrete;
- When choosing, pay special attention to the quality of the plastic; products should not bend too easily, but they should not be hard either . I once purchased a batch of rigid dowels, which, when driven in, broke through one because the plastic was too fragile. Choose the golden mean, the rod should bend slightly with moderate force;
- Metal nails should be free of corrosion, ideally if the surface is coated with a layer of zinc . If the thermal head comes separately and is put on during installation, check whether it fits properly onto the head.
Galvanic coating of the nail is a definite plus
Now let’s look at the workflow, first I’ll show you the diagram, and below I’ll describe each point in detail, so you can quickly understand all the nuances:
There is nothing complicated in the work, the main thing is to do everything carefully
- First of all, you need to level the surface; if there are cracks or damage on it, they must be repaired . The more reliable the base, the more firmly the thermal insulation will stick. If sand is falling from the surface or it is too loose, then you need to strengthen it with deep penetration soil;
- So that you do not constantly have to control the level of insulation laying and do not have to worry about attaching the first row, the easiest way is to attach a starting metal profile from below . Firstly, it will protect the material from below from adverse influences, and secondly, it will become an excellent support and guideline when carrying out work. This element is fastened with quick-installation dowels;
The starting profile greatly simplifies the process of attaching thermal insulation
- Next, the installation of heat-insulating sheets begins; for this, a solution is prepared, which is applied to the back of the insulation . As for foam plastic, it is enough to apply glue around the perimeter and at a couple of points in the middle. Mineral wool, due to its large weight, needs to be glued more thoroughly: the composition is applied to the entire surface using a notched grater (tooth size 8-10 mm);
A notched grater allows you to remove excess glue and make the layer uniform over the entire surface.
- After about a day, when the glue has hardened, you can begin the last stage of fastening - installing umbrellas . To do this, holes of the required depth are first drilled, after which the umbrella is first inserted, which is then fixed by driving a nail, everything is very simple. As for the number of dowels, it may vary; for lightweight materials you can use fewer of them; two options for carrying out the work are shown below.
The choice of option depends on the insulation used
This option is suitable for bases made of brick, concrete or blocks; if you have wooden walls, the technology will be different.
If you decide to insulate wooden walls under plaster, the process will look like this:
- First of all, you need to figure out how to attach thermal insulation material to the wall. An ordinary anchor will not work here, a special solution is needed: the insulation is fixed with long wood screws, and in order to prevent them from falling through, a special support washer is put on them, which is called a rondole, it has a special plug that covers the head of the screw, which is very comfortable;
Video description
How to glue foam plastic?
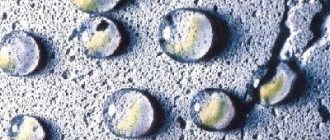
If you have a choice between glue and foam, then it is better to choose the first option, since the consumption of the product will be much less, and the quality of gluing will remain the same. The substance is applied between the wall and the insulation in a thin, uniform layer to securely attach the material to the surface. Before starting the procedure, it is important to thoroughly clean the area, remove traces of paint and varnish, repair potholes and damage, and dry the wood.
Applying glue to polystyrene foam Source balkon4life.ru
This method is well suited for timber buildings, but it makes no sense to use it for log buildings. This is due to the heterogeneous surface of the latter, which reduces the area of contact between the material and the glue. Differences in the size and shape of the logs will make it difficult to create an even and smooth area, so the results of the work may be far from ideal.
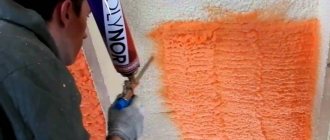
After glue or foam is applied to the foam, sheets of material are laid evenly across the entire work area. Compared to using a frame structure, covered areas are more difficult to process and must be treated with caution in further finishing. The easiest way is to resort to plastering the surface, but this method is not very suitable for wooden houses. It would be better to build additional sheathing for the facade so that the choice of design becomes wider.
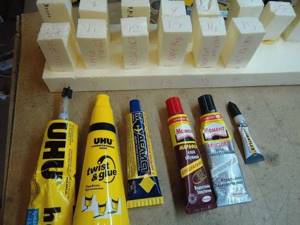
Adhesives for foam plastic in tubes Source samodelino.ru
Finishing
Using polystyrene foam allows you to create a kind of “thermos” that effectively retains heat inside the home and prevents cold from entering the building. This way you can significantly reduce heating costs and save significant money in winter.
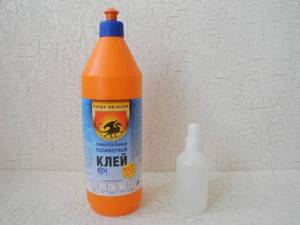
Universal polymer glue Source samodelino.ru
After preparing the base and sheathing, a layer of insulation is laid, and then the finishing of the building begins. If you approach this process responsibly, you will eventually be able to bring almost any idea to life. The most commonly used materials are wood - lining, imitation timber or block house. Sidings are also popular. Each type of finish differs in the method and type of fastening. Usually, to equip the facade, an additional frame is used, which is installed on top of the main sheathing.