Features of the work on insulation with polystyrene foam from inside the house
Insulating walls with foam plastic from the inside of a house has its advantages and disadvantages.
The work on fastening to the wall is not affected by external weather factors; the area of the insulated surface is relatively small, which eliminates unwanted sliding of the sheets. As a disadvantage, one can note the reduction in the internal volume of the building. The additional thickness of the insulating structure further reduces the area of the rooms. For internal installation of insulation, the thickness of the foam sheets can be no more than 40 mm, and fastening can only be done with glue. The use of profiles for laying foam plastic and additional fastening with dowels can be abandoned.
It is quite possible to do this work yourself. How to attach polystyrene foam to the wall. There are two ways to attach foam to the wall - using glue and mechanical fastening with dowels “fungi”. Mechanical fastening is usually used as additional fixation of glued foam. To fasten using this method, it is necessary to profile the wall with thin wooden blocks or special profiles.
They are aligned in a plane; this determines how evenly the polystyrene sheets can be strengthened. Holes are drilled in the profile according to the diameter of the dowels used, usually 8 mm. Using dowels and these holes, the material is attached to the bars. We will not consider fastening with drilling directly into the wall as extremely inconvenient.
Recommendations for installing polystyrene foam
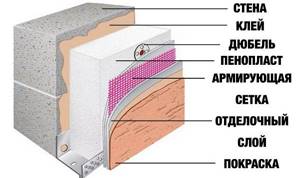
Installation diagram of polystyrene foam.
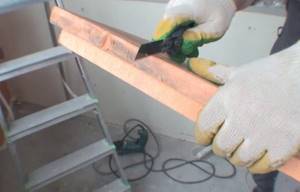
- You can cut polystyrene foam with any sharp tool. This is best done after the installation site has been accurately marked. The best results can be achieved by using a special device with hot nichrome wire.
- Do not treat the insulation and the base on which it will be laid with resins and organic mastics, because they negatively affect the thermal insulation material.
- If wide gaps form between adjacent slabs or between slabs and joists, they can be sealed with fiberglass.
- When installing slabs for ventilation, you need to leave gaps of about 10 mm thick along the wall.
- When using polystyrene foam in combination with parquet boards or laminate, it is necessary to additionally construct reinforcement with lathing.
- Expanded polystyrene can be used in conjunction with a heated floor system. In this case, before installing the vapor barrier, a damper tape is glued over the insulation along the perimeter of the walls, because the screed over the heating system expands as a result of temperature changes.
- When laying carpet, you need a base made of chipboard, fiberboard or plywood, since polystyrene foam can break under heavy weight.
There is nothing complicated about installing polystyrene foam, so anyone can do it if they have the desire and a set of tools. In this case, you need to approach the work responsibly, attach the insulation carefully, without leaving large gaps between adjacent sheets.
Methods for gluing foam boards
To increase the efficiency of thermal insulation, the plates must be glued together
At the same time, it is important to choose the right adhesive that does not contain components that damage the foam. These include:
- alcohol-based solutions;
- solvents containing acetone;
- Oil and gas products.
The best options for gluing foam boards are:
- "liquid Nails";
- polyurethane glue;
- PVA.
It is impossible to give an unambiguous answer to the question of what is the best way to attach polystyrene foam to a particular surface. This depends on a number of factors, including the conditions in which the insulation will be used. If any controversial issues arise while carrying out the work yourself, consult with specialists.
Choosing the right adhesive
Glue the foam to paper, cardboard or wood with regular PVA glue. It is quite durable and tenacious. Ideally, PVA is suitable for use in the manufacture of small crafts, which will subsequently be in a static position and will not be subject to stress.
You can use special glue. It is designed to come into contact specifically with foam. It is usually sold in specialized craft stores or construction stores. This glue is more expensive than PVA and is more difficult to find. Please read the information on the back of the tube carefully before purchasing. Some types are designed for gluing parts of foam plastic only to each other, while others are intended for gluing parts of polystyrene foam to other materials.
This glue is usually called Styroglue.
You can use special glue. It is designed to come into contact specifically with foam.
Spray adhesive is suitable for joining pieces of foam to each other and to other materials. It is sold in large containers and is used quite economically. In addition, aerosol glue has a low price. You can find such products in a hardware or construction store. It is often multifunctional, so with one aerosol you can glue foam to foam, paper, cardboard, wood, and metal.
A glue gun is also suitable for gluing foam.
Please note that it must operate at the lowest possible temperatures. Too much heat will cause the foam to melt, which will not only ruin the appearance of the work, but can also be hazardous to health.
In construction, more viscous and dense types of adhesives are usually used. Among them are epoxy or instant glue, as well as liquid nails.
Fixing sheets using glue
All preparatory work boils down, as in the first case, to cleaning, priming, puttying and protecting the surface to be pasted.
From the materials we will need:
- Styrofoam.
- Special glue for foam plastic. It can be supplied in dry form, liquid form or in special cans.
- Polyurethane foam.
- Special fasteners (fungi and impact screws).
The list of tools must include:
- Spatulas 100mm and 200mm.
- Rule.
- Scaffolding or stepladder.
- Hacksaw and knife for cutting foam.
- A drill or hammer drill for drilling holes in the ceiling.
- Screwdriver for screwing screws.
- Hammer.
- Measuring tool, level and twine.
Algorithm for performing the work:
- We analyze the unevenness and horizontal level of the ceiling.
- We nail and install the necessary beacons and cords.
- Apply the adhesive to a sheet of foam plastic or to the ceiling. When applying glue to the ceiling, you can correct all surface irregularities due to a thicker layer.
- Glue the sheet to the ceiling. All sheets must be glued in a checkerboard pattern to form T-shaped joints. We control the level and straightness according to the rule and beacons.
- After gluing the material to the ceiling, wait 3 days until the adhesive mixture dries completely and shrinks. It is not recommended to fasten the sheets with fungi until the mixture has completely dried.
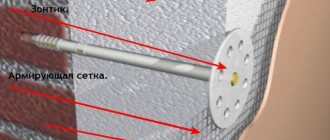
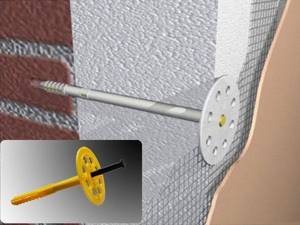
- We nail the insulation with special fungi. This fastener has a leg, a plastic head and a special nail (metal or plastic). The latter is driven into the sleeve and secures the fungus in the hole. To do this, drill holes with a diameter of 10 mm using a hammer drill or hammer drill. The estimated depth of the hole should be equal to the length of the fungus plus 2 cm. The length of the fungus is selected so that it is 6-7 cm greater than the thickness of the insulation.
- We place the holes for the fungi so that the fasteners are located in the butt joint of the corners and in the center of the sheet.
- First, we hammer the fungi with a hammer without nails; the cap should be located in the same plane as the insulation.
- Then we begin to hammer and fasten the nails inside the fungi. High-quality fasteners are recessed 1-2 mm into the body of the foam.
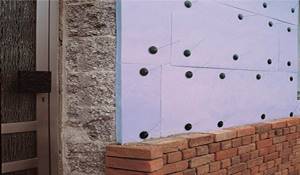
Attaching expanded polystyrene sheets to the wall
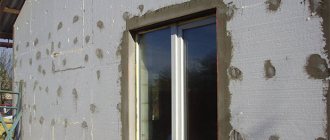
Before further finishing, the façade covered with foam plastic must be leveled. To do this, you need to inspect the wall for protruding edges of the slabs.
They are usually cut off. There are also special graters for this purpose. This kind of work will take quite a lot of time.
To eliminate cold bridges between the slabs, the joints should be sealed with strips of insulation. They are covered with glue used for installing foam panels.
We suggest you read: How to make a foundation for a stove in a bathhouse
A spatula is used to apply the glue. The seams can also be sealed with polyurethane foam, only after drying you will have to cut off the excess. Recessed fungal caps are also sealed with adhesive.
Important! When grouting caps and seams, the surface should be made as smooth as possible. The glue should not protrude to the surface.
How to attach foil polyethylene foam
Reliable and high-quality installation will ensure the proper functioning and durability of the thermal insulation. To install insulation, special adhesives are most often used. Penofol is a fairly lightweight material that is easy to attach to almost any surface. For installation, you can use universal or special glue, which must withstand temperature changes. Some craftsmen allow fastening with liquid nails or polyurethane foam. In some cases, the rolled material can be additionally secured with construction staples. Class C penofol is produced on a self-adhesive base with waterproof glue. This type usually does not require additional installation tools.
Remember that the condition and preparation of the base for insulation is one of the most important factors for reliable fastening. So, the surface should be leveled as much as possible, get rid of bumps and irregularities, thoroughly clean and degrease. Make sure that the inside of the insulation is not dirty. It is recommended to additionally prime concrete, wooden and metal bases before installing penofol. Penofol layers are attached strictly end-to-end, and it is advisable to cover the assembly seams with aluminum adhesive tape.

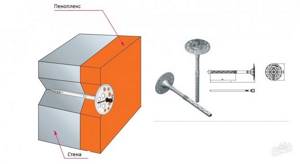
Mushroom fastening
Without stopping at using only glue, extruded polystyrene foam is additionally attached to “fungi” - dowels with a metal or plastic nail, which, thanks to the large “cap,” reliably hold the heat insulator. One slab of standard penoplex (600x1200mm) should have at least 5 “fungi”.
Fastening a slab of extruded polystyrene foam using dowels alone is also used. This method is suitable for low walls with a small load - for example, when insulating a loggia, small basement or garage - where polystyrene foam does not have to bear the load of plaster. If, in addition, a sheathing is mounted on top of the insulation, which in turn must be securely fastened to the supporting structure (wall) through all layers, then there is no need for glue.
It could be mentioned that when installing extruded polystyrene foam to wooden walls, glue is also not used, but only fungi are enough. However, the fact is that such insulation of wooden walls is rarely practiced. Penoplex is not the best insulation for this material. However, this decision is fair when it comes to roof insulation.
Calculation of the required amount of materials
Any work related to repair and construction begins with the calculation of the required amount of material. To do this, it is enough to know the area of the surface to be covered. To insulate residential premises, foam plastic of various thicknesses is used, but the ideal material would be one whose thickness is more than 5 cm, and its density ranges from PSBS-15 to PSBS-35.
To fix the boards, you can use dowels, foam glue or regular cement-based glue. When choosing an adhesive, consider the following points:
- there should be a mark on the package that the adhesive is suitable for fastening polystyrene foam boards;
- the purpose of the glue can be installation of insulation and filling cracks or with the possibility of installing a protective layer.
Calculation of glue should be carried out taking into account the evenness of the surface. The average amount required to install insulation with your own hands is about 5 g/m2. Approximately the same amount will be required for attaching the reinforcing mesh and leveling layer.
There are general rules for preparing the solution:
- The thickness of the adhesive should be such that the solution does not change its shape when applied. That's why sometimes you should deviate a little from the manufacturer's recommendations;
- to attach the reinforcing mesh, the glue should be a little thinner. This is required for better deepening;
- The solution should be even more liquid when using it at the final stage, for installing the leveling layer.
Using dowels
Fastening polystyrene foam using dowels. A simple, inexpensive, quick and durable glueless method of fastening polystyrene foam, however, requiring the use of a hammer drill and the required number of umbrella dowels. Their length is selected sufficient for reliable fastening of the slabs to the concrete base (taking into account the thickness of the sheets). On a clean, flat surface, a lower starting level is set, from which installation begins.
Each sheet is fastened with three dowels: one in the middle and two in the corners, so that their “umbrellas” press the corners of adjacent slabs. A gap of 3 mm is formed between the sheets - a deformation-temperature seam, which eliminates mutual deformation of the plates during daily and seasonal changes in temperature and humidity. Sealant is applied to the seams.
On fasteners
To attach foam plastic in this way, you need to purchase special dowels with a wide head.
They are called "fungi" or "umbrellas". To calculate the required number of fasteners, you should multiply the number of whole sheets of insulation by 5. Since the slabs are fastened with 5 dowels each.
The first step is to install the starting profile in the same way as in the previous version. Next, you need to secure the first sheet of foam. It is placed in the starting profile and using a hammer drill or electric drill, make holes with a depth corresponding to the length of the dowel plus 1–3 mm.
In order not to overdo it on the drill, you can install a limiter or make a mark with a marker. First, the dowel is installed, and then the core is driven into it. The head of the fastener should “sink” into the insulation by 1–2 mm. The fasteners are installed in the corners of the insulation sheet and one in the center. If the head is very wide, then one dowel can hold 2-3 slabs. A gap is left between the elements, which is then sealed with sealant. The place where the dowel is located must be covered with plaster.
The renovation of the façade is completed by installing decorative finishing.
Using polyurethane foam
Here's how to glue foam to concrete quickly and firmly!
The consistency contains polyurethane, which has several advantages:
- Fastening the products occurs without any particular difficulties.
- The adhesion of polystyrene foam and concrete is carried out as efficiently as possible.
- The cost is low;
- You can process seams between the joints of materials.
- It is allowed not to even prime the surface.
The foam is applied to the slabs in a checkerboard pattern, after a few seconds you can glue the sheet to the concrete. There is no need to take breaks so that the foam does not dry out. The temperature when performing gluing work should be no lower than 20 degrees Celsius, the higher the better.
Excess foam should be removed immediately with a special cleaner.
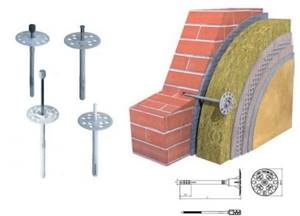
Fig. 3 Technology of fastening foam with dowels
How to glue foam plastic correctly and with what
It is not used for foam plastic.
For high-quality gluing of small surfaces, German-made glue “Styroglue” is used, which is produced only for gluing foam sheets together. It is sold in hardware stores and specialty art stores. Before purchasing, look at the label, which should indicate that the glue is intended only for foam plastic (some formulations indicate which surfaces can be glued together).
Some types of glue, which are considered universal, can dissolve foam, so before purchasing, look carefully at what is indicated on the package. You need to know that polystyrene foam is a type of plastic (also called foamed plastic), and, accordingly, you must choose adhesives for plastic and its derivatives.
Tube or spray?
Since the foam has a porous structure, the glue must saturate all the roughness of the side surface on both one and the other side being glued. For this, it is best to use spray adhesives that have multi-purpose applications. These include instant glue with the “PUR” activator, which has many advantages: it does not corrode the seam, forming a thin film, and can also serve as a reinforcing layer. Among the disadvantages is that it is difficult to wash off hands, and in order to glue the foam together, you must wear gloves.
Hot glue is packaged in tubes, but its use requires the presence of a construction gun designed for low temperatures. Regular one will work, but polystyrene foam is a material that ignites quickly, so hot air can burn a hole, rendering the material unusable. In general, it is better not to heat polystyrene foam, since it contains quite caustic substances that release carcinogenic substances (styrene, benzene) when heated, which can cause allergic reactions in humans. This applies, first of all, to interior decoration.
How to glue foam correctly
The side surfaces of the material must first be cleaned from dust with a dry sponge or soft brush, then they are slightly moistened. Glue is applied to the entire surface using a spray or gun, after which you need to glue the foam to the foam and wait a few minutes for full or partial fixation. If you used the specialized “PUR” compound, then a minute after gluing it will begin to foam a little and “crawl” out of the seams. Until it has completely hardened, the residue can be removed with a sponge, but remember that the glue is almost impossible to wash off the body, so we only work with rubber gloves.
Large foam can be sanded down to make the surface less porous and the bond more permanent. It is recommended to apply compositions that have a liquid structure with a brush in a thin layer over the entire surface to be bonded.
There are several ways to glue foam:
- Glue them to the surface and secure them with dowels.
- You can first place the foam on glue, and then strengthen it with special umbrella dowels.
- Place in the sheathing
- Glue directly onto the ceiling plane
- Mechanical fastening using mushrooms, anchors and studs, etc.
Bonding polystyrene foam ceiling tiles to the ceiling
The tile ceiling is done in stages. First you need to measure the surface area of the ceiling and calculate, taking into account the adjustment, how many slabs you need to purchase. Before you start gluing foam, you need to stock up on the necessary materials and tools.
- Use a drill and a special attachment for a construction mixer to stir the mixture and glue.
- With a spatula-comb.
- With a narrow spatula.
- Use a wide metal spatula to level the surface.
- Primer needed to prepare the surface to be repaired
- Hammer with a 10 mm drill.
- A plastic container for preparing the solution if a dry mixture will be used.
- Wide primer brush.
- Knife or other tool for cutting slabs
- With a hammer.
Foam panels on the ceiling: how to install it yourself
You can very easily make a ceiling in a room with your own hands, you just need to prepare the required materials and tools and put in a little effort.
Polystyrene foam is a very inexpensive but high-quality material that can be laid on absolutely any ceilings, in particular:
- Plasterboard;
- Wooden;
- Concrete.
Polystyrene foam is a fairly versatile material that is suitable for both wooden and plasterboard ceilings
Finishing the ceiling with foam boards is carried out step by step. Before laying the tiles, it is necessary to first prepare the ceiling surface. It is imperative to free the ceiling from whitewashing, leveling and priming any existing defects. If there is fungus on the ceiling, then it must be thoroughly cleaned and then an antiseptic must be applied to it. You need to attach foam boards to the ceiling using special glue. Before gluing, you need to keep the tiles in a dry room for 3 days. You need to mark the ceiling from the center to the edges.
Initially, you need to cut the ceiling tiles into squares or rectangles of the required size, and then use special adhesives to fix them to the ceiling surface. Before performing finishing work, you need to disconnect the electrical wiring. After the surface of the ceiling is completely covered with slabs, you need to eliminate the gaps formed between the ceiling and the walls, using shaped molding for this. Such polystyrene foam moldings will add special style and sophistication to your interior design. Additionally, you need to use special corners, inserts for the chandelier, as well as devices for finishing the outlet. Everything should be in the same style.
A few important tips before starting installation
Regardless of which method you choose for installing foam plastic on concrete, remember that you absolutely always need to clean the insulated surface from unstable areas and dust particles, which in the future can reduce the adhesive properties of the surfaces
In addition, it is important to carry out high-quality work to remove deep cracks and strongly protruding irregularities, as well as carry out soil work over the entire area of the working surface in order to achieve the best results.
So, as you can see, today it is impossible to unambiguously decide on the choice of material for installing polystyrene foam insulation material on concrete, since there are a huge number of parameters that at any time can change the need to use any method. Remember that you need to choose an adhesive solution in accordance with the operating conditions, the characteristics of the wall, as well as your financial capabilities.
Adhesive foam fastening
This method is much cheaper than the frame method, since installation of sheathing is not required. You only need to have the required amount of foam and adhesive. You can even use an adhesive intended for working with tiles, which will significantly reduce the cost of insulating your home.
All actions must be carried out in the following sequence:
Placing foam on glue
- Before fixing the foam to the ceiling, it is recommended to carefully prepare it. This requires cleaning the surface from dust and dirt, after which it is imperative to treat the ceiling with a disinfectant and primer. In the event that it is not possible to completely get rid of the lime coating, the entire surface of the ceiling must be coated with an adhesive solution and left for some time to dry completely.
- Dilute the required amount of adhesive to a certain consistency.
- Apply the solution to the foam board and press it to the ceiling. For a high-quality result, the solution should be applied correctly: along the edges in broken lines, and in the middle with slaps. The sheets must be glued starting from the middle of the ceiling in a checkerboard pattern. After fixing the solution, you need to give it time to dry.
- After complete drying, the material needs to be further strengthened. Dowel nails are ideal for this. They need to be placed in the middle of the slab and in the corners. When driving the dowel directly, you need to ensure that the head is positioned flush with the edge of the material.
- The next step is to remove any possible irregularities after installation. This is where a special corrective brush will come in handy.
- A reinforcing mesh should be placed on top of the foam surface, after which it is recommended to putty the surface.
Regardless of the choice of method for attaching the foam. it is necessary to strictly follow the advice regarding temperature conditions (work can be carried out at temperatures from +5° to +30°), and also ensure that the sheets are laid as closely as possible to each other.
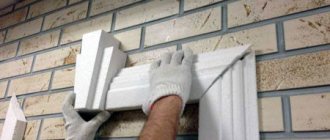
Attaching foam to brick and concrete walls
When insulating such walls, a wooden sheathing is usually made, onto which foam plastic is attached. However, this requires additional costs, so other methods can be used.
Fixing the boards with glue
Having chosen this option, you should take a responsible approach to the selection of the adhesive composition, since some components can damage the integrity of the foam. In addition, not any glue is capable of bonding insulation boards to brick or concrete.
Gluing foam is carried out as follows:
- In accordance with the attached instructions, prepare the adhesive solution.
- Brick or concrete walls are pre-leveled and cleaned of dirt.
- An adhesive composition is applied to the foam boards in such a way that there are uncovered areas for air to escape.
- The insulation is tightly applied to the wall and held until the glue sets.
Fastening with umbrellas
Selections are made for the mounting points on the slabs using a drill and a nozzle corresponding to the diameter of the cap of the plastic fungus. Fastening is carried out at least at five points: in the middle and in the corners. In order to improve thermal insulation, the joints are treated with sealants.
The foam should be attached to the wall in rows, starting from the bottom. Small gaps should be left between the slabs, taking into account seasonal deformation from changes in ambient temperatures.
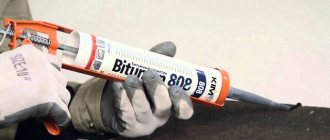
Gluing foam plastic with “liquid nails”
A feature of “liquid nails” is increased moisture resistance and heat resistance. The adhesive should be applied only at a few points; it hardens in literally half an hour.
It should be taken into account that “liquid nails” are a toxic composition that must be handled with care and worked exclusively with special protective gloves.
Fixing polystyrene foam with adhesive foam
With excellent adhesion to brick or concrete surfaces, the foam is relatively inexpensive and easy to use. There is no need to prime the walls before applying the foam - you just need to remove dirt and moisten it.
The adhesive composition is applied to both concrete and foam. A short wait is made, after which the slabs are installed in a checkerboard pattern.
Dowel mounting
Installing foam plastic on the wall using dowels will require the following tools:
- hammer drill or drill;
- pobedit drills;
- dowels;
- glue;
- small spatula.
First, drill a hole in the foam using a hammer drill or, if you don’t have one, a drill. We place an umbrella in this hole and insert the dowel itself - a nail. You need to drive the nail inside using a hammer. After performing these manipulations over the entire surface of the slab, all umbrellas need to be plastered, after mixing a little glue.
Installation using dowels must be done so that the dowel passes through all layers of insulation and enters the wall to the required depth. For this reason, I would advise immediately calculating the required dowel length. The dowel should be closed with a special cap after driving in. This cap should not extend more than 1 cm into the foam. If the cap is set deeper, this may cause the foam to rupture.
In order to be sure of the required landing depth of the head, I recommend buying a cutter for your drill with a depth of 1 cm. This cutter will help you prepare special holes for the diameter of the head. After installing the dowels, these holes should be closed with plugs to prevent them from getting wet due to dampness or precipitation.
Dowels are also called mushrooms for attaching foam plastic or umbrellas. When choosing them, I advise you not to save money. Since cheap dowels can let you down and break right during installation. For one sheet of polystyrene foam you will need about four mushrooms or umbrellas. From this you can estimate the required volume, not forgetting about the reserve.
At the end of my article, I would like to give you a couple more tips. If this is your first time insulating walls, start with the wall that is least noticeable. In case of minor defects, you can correct them without fear of an unsightly appearance.
Try not to interrupt your work on one wall. Or try to finish work with wet materials. Cover the foam with a reinforcing layer in a timely manner, as it may turn yellow. I wish you good luck in such a rewarding task as wall insulation.
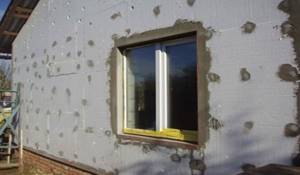
Finishing window sills and slopes with foam plastic
Each additional façade element is installed before the foam is installed.
It is important to take into account the additional thickness that is formed due to the insulation layer and external finishing. If there are already installed slopes and window sills, they should be removed
Such elements will be short.
It is necessary that the window sill protrudes from the wall by 4 cm. With a thickness of insulation material of 60 mm, the window sill is made 100 mm deep. When installing the window sill, all voids must be filled.
The gaps between the foam plates and the window sill are filled with polyurethane foam. After installation, the plastic element is pressed with something heavy and left for 4 hours. It is necessary that the slopes protrude beyond the wall surface by about 1 cm. This will make it easier to install the foam.
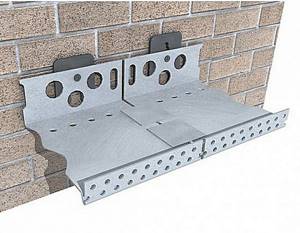
The insulation material when finishing slopes should have a maximum thickness of 30 mm. Otherwise, it will simply climb onto the window. You need to install a drip lining between the foam and the base. This element is a strip of galvanized steel coated with powder paint.
It is installed on the base, secured with self-tapping screws. You can use dowels for fastening. The distance between the fastening elements is left at 20 cm.
The ebb is sold in pieces of two meters each. This element must be installed on the window opening so that moisture that flows down the wall does not flow inside the house. At low tide it flows into the street.
As you can see, preparing the facade of a building before insulation requires quite a lot of effort and time.
Tags: polystyrene foam, wall, installation
« Previous entry
Mounting methods
Specialists use different methods to attach polystyrene foam.
- Glue method.
This is a quick and convenient way to attach. It is enough to choose the right adhesive composition and then apply it to the insulation. Based on their initial state, adhesive compositions are divided into types:
dry mixes are bulk materials packaged in bags. They contain cement with binding additives. To prepare the glue, just dilute the solution according to the instructions;
- liquid formulations are always ready for use. These include the adhesive composition “liquid nails” and cheap PVA glue. If PVA glues foam plastic well to metal surfaces, then “liquid nails” glue different materials, however, the glue is very expensive, so it is used on small surfaces;
- foam - this type includes special adhesive compositions developed for foam plastic. First of all, these include:
- Polyurethane adhesive that has good adhesion to foam. It is packaged in cans, so it is used with a special pistol.
- Adhesive - foam provides reliable adhesion to various materials. A special gun makes it easier to use glue.
- Fastening method.

Dowels with a wide head are intended to strengthen the fastening of slabs. They are used for external wall insulation, as well as when there is an increased load on the heat insulator.
There are several types of dowels, but they all necessarily have a sleeve, a core and a wide head. If the dowel is hollow, then a nail or screw is used in the spacer zone. The plate is fastened in the corners and in the center. Compared to gluing insulation, this method is more labor-intensive.
- Combined method.
The simultaneous use of two methods of fastening the insulation allows you to achieve high quality installation. The adhesive composition isolates the surface from external influences, and the dowels increase the reliability of fastening.
Video instruction:
Types of dowels
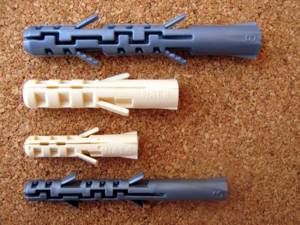
Types of dowels
There are 3 types of fasteners:
- with a polymer nail;
- metal nail;
- metal nail with a thermal head.
Plastic dowels are made from nylon, polyamide or polypropylene. They have low strength and price. They are used for fastening to concrete, brick or other hard surfaces. Plastic dowels are not suitable for fixing to hollow walls or foamed concrete. The thermal conductivity of this type of fastener is 0.004 Watt/K, which allows it to be used at temperatures of -40°...+80°C. The length of the umbrella is determined by the sum of the thickness of the insulation and the height of the spacer. The plastic dowel can withstand a load of 20-320 kg, which allows high-quality fastening of mineral wool or polystyrene foam. However, such a fungus is not able to withstand the weight of heavy facing material.
Fasteners with a metal rod are stronger than plastic ones, but have high thermal conductivity. When using it, cold bridges are formed, which reduce the effectiveness of thermal insulation. Metal nails also corrode, leaving yellow stains on the plaster. To avoid this, you should choose galvanized rods coated with a special anti-corrosion layer. This will increase the service life of the entire thermal insulation layer. The diameter of the spacer element is 4-8 mm, and the dowel can withstand temperatures in the range -55°...+60°C. The maximum bearing load is 750 kg.
The standard dimensions of such fasteners are 200x10 mm. They are usually used for thermal insulation of ceilings and facade walls, because they are able to withstand a heavy cladding layer. The only disadvantages include the appearance of cracks through which the cold will pass.
Insulation mushrooms with thermal heads are an alternative to metal nails. They consist of a steel rod, the cap of which is coated with a metal with low thermal conductivity. Typically, impact-resistant polyamide is used for this. The nail is completely covered with a polymer composition that protects it from moisture. The thermal conductivity of polyamide is 0.027 W/μ, which is comparable to mineral wool and polystyrene foam. This results in the absence of cold bridges when installing insulation. The only drawback can be considered the high price of the product.
The dowel can be of different lengths. There are 3 sizes on the market:
- Fasteners 120 mm long, which are used in solid monolithic bases. It holds the insulation well on a wall made of concrete or solid brick.
- The 140 mm long dowel is suitable for installation in loose material. These can be walls made of aerated concrete, hollow brick, cinder block, etc.
- A 160 mm long fastening is used for hollow materials. Such a dowel provides adhesion to the internal parts of the wall, avoiding voids.
There are also threaded anchors that need to be driven into the wall. They are made from the following materials:
- plastics;
- metal.
Metal dowels are used when installing insulation if a heavy facing layer is planned. Plastic fasteners are divided into:
- polypropylene;
- nylon.
Roofing fungi are used when installing soft tiles, roofing felt, acoustic slabs, thermal insulation for concrete, etc. They consist of:
- caps with a diameter of 50 mm;
- fiberglass rod;
- anchor.
Methods for gluing ceiling tiles
So, we have determined where to start laying tiles, now we will look at what gluing methods exist. Everyone chooses the most convenient for themselves.
Snake
For this method, each subsequent row is laid around the previous one, as if entwining the central elements. The first fragments are glued in the center.
Crisscross
In this case, the panels begin to be laid crosswise. First, glue the first four squares in the center. Then straight lines are formed perpendicular to each of the walls. At the last stage, the resulting quarters are filled.
Rows from the corner
The first tile is placed in the far corner from the door. Next they move along the wall. After this, glue the next row parallel to the first. Work begins from the place that is best viewed upon entering the room. If you start working from the doors, you may find that in the most visible part of the room there will be an unsightly thin strip of scraps.
Advantages and disadvantages of polystyrene foam as insulation
Polystyrene foam is a more modern thermal insulation material, and also less finicky when compared with analogues. This allows you to significantly simplify the insulation process, which still depends on the type of roof of your house. In addition, it is distinguished by its fairly light weight and low thermal conductivity.
In addition, polystyrene foam is so popular because it has the following properties:
- the low hygroscopicity of the material allows you to significantly save on the purchase and further installation of vapor barrier and waterproofing materials. However, in the case of finishing a wooden house, it is better not to neglect this;
- this material does not shrink after installation, which is why so-called cold bridges may appear;
- thermal insulation properties are maintained for a long time, about 10-20 years, provided that all installation rules are followed;
- It is especially good for use in rooms with low ceilings, since a thickness of 5-6 cm is enough for complete insulation.
Despite all the advantages, this insulation also has some disadvantages that should be taken into account when choosing:
- this material cannot be used in those rooms that are characterized by poor ventilation, since it has vapor barrier properties, thereby provoking the formation of condensation and a further increase in humidity. This can lead to the appearance of fungus, mold and a decrease in the effectiveness of the insulation. For people prone to allergies, this is unacceptable;
- upon direct contact with an open flame, the material melts, releasing quite harmful substances in the process that can lead to paralysis of the respiratory tract.
When choosing a material, pay attention to the presence of quality certificates from the seller; this will protect you from purchasing low-quality goods, which may later cause harm to your health.
Thermal calculation
How thick should foam plastic be for wall insulation? Simply sticking it thicker means not only wasting money, but also reducing the strength of the coating.
The initial value is the permissible value of specific heat loss in a given climatic zone, or the thermal resistance of a building R. For walls in the European part of the Russian Federation, the recommended values are:
- South (Krasnodar – Astrakhan – Rostov-on-Don) – 2.8 kW/sq.m.
- Black earth strip (Voronezh – Lipetsk – Volgograd) – 3.5 kW/sq.m.
- Middle band - 4.2 kW/sq.m.
- Boreal zone (Karelia – Arkhangelsk – Naryan-Mar) – 5 kW/sq.m.
In a specific locality and in regions with difficult weather conditions, R can be found from the appendices to SNiP, from the local department of architecture or the Municipal Internal Affairs Committee. For floor R is taken with a coefficient of 1.3; for the ceiling - 1.7. That is, in Moscow, the floor R should be at least 5.5 kW/sq.m, and the ceiling – from 7 kW/sq.m.
The indicated R values are obtained from typical values of the temperature gradient Γ from inside to outside. For example, in the Moscow region it is considered equal to 40 degrees: +20 inside and –20 outside. If Г changes by no more than 1.7 times, the dependence of R on it can be considered linear and taken with the appropriate correction. For example, you want to have +25 at home in Barvikha with -40 outside. G = 25 – (-40) = 65. 65/40 = 1.625. We multiply by it the recommended 4.2 kW/sq.m for the Moscow region, we get 6.8 kW/sq.m. This is the R value that insulation should be calculated at.
Next, you need to know the values of k for various building and finishing materials. What is this k? This is their specific thermal resistance, R of a square of material in a layer 1 m thick, i.e. Through a meter-thick square, at standard G, exactly that much heat will escape. Some meanings are:
- Reinforced concrete grade 400 – 2.00 kW/m.
- Cement-sand mortar grade 200 – 1.16 kW/m.
- Silicate brick – 0.7 kW/m.
- Fired ceramic brick – 0.56 kW/m.
- The same, hollow – 0.35-0.41 kW/m.
- Gypsum plaster – 0.43-0.47 kW/m.
- Warm plaster (HS) on foam plastic or expanded vermiculite – 0.057 kW/m.
- HS on perlite sand – 0.063 kW/m.
- HS on expanded clay – 0.22-0.25 kW/m.
- Expanded clay granules 20 mm – 0.16 kW/m.
- Oak, laminate – 0.20 kW/m.
- Pine, MDF, construction plywood – 0.16 kW/m.
- Fiberboard, OSB, plasterboard – 0.15 kW/m.
- Polystyrene foam PSB-20 – 0.033-0.035 kW/m.
- The same, PSB-25 - 0.035-0.037 kW/m.
- EPPS – 0.028-0.032 kW/m.
Next, we determine R of the available construct. Let's say this is a wall, counting from the inside out, of the following design:
- Laminate 0.012 m (12 mm);
- PSB-20 0.030 mm;
- TS on expanded clay 0.020 mm;
- A wall made of two clay bricks with a layer of 1 cm mortar - 0.50 m of brick and 0.010 m of mortar;
- External cement plaster 0.030 m.
Rn of each layer is calculated using the formula:
Rn = pn/kn, where p – layer thickness in meters; n – serial number of the layer.
We have:
- R1 = 0.012/0.20 = 0.06 kW/sq.m;
- R2 = 0.030/0.035 = 0.85 kW/sq.m;
- R3 = 0.020/0.25 = 0.08 kW/sq.m;
- R4 = 0.50/0.56 = 0.89 kW/sq.m;
- R5 = 0.010/1.16 = 0.008 kW/sq.m;
- R6 = 0.030/1.16 = 0.026 kW/sq.m.
Total R = R1+R2+R3+R4+R5+R6 = 0.06+0.85+0.08+0.89+0.026+0.008 = 1.914 kW/sq.m. This is not enough even for Krasnodar, and already in the middle zone without insulation you will have to freeze, or pay an additional 4.2 - 1.914 = 2.286 kW (approx. 2.3) for heating for each square of the external wall area.
Now let’s calculate the thickness of the external insulation required to bring R to the standard of 4.2 kW/sq.m. We have already found out that we need to retain Rwarm = 2.3 kW/sq.m in the room additionally. We will insulate with EPPS, for which K=0.032 kW/; We take the upper value based on moisture absorption. The thickness P of the insulation is determined by the inverse formula:
P = K*Rwarm
We have: P = 0.032x2.3 = 0.0736 m. Sheathing made of 80 mm EPS or even PSB-25 will allow you to insulate properly, because there will also be plaster on the outside.
Preparing walls before insulation with penoplex
Before fixing the insulation sheets, it is necessary to clean the surface from dust, oil and mastic contaminants, as well as poorly retained old mortar or a layer of paint. Only those coatings that cannot bear the load should be removed.
The old paint layer must be removed to a solid base mechanically or using special compounds. If fungus, mold or other negative microorganisms are present on the surface, then to eliminate them you should use appropriate mixtures with bactericidal properties.
Next, you need to thoroughly check the evenness of the walls, using a building level 2.5-3 m long. If recesses, holes, cracks or irregularities larger than 2 cm are found, then in order to avoid breaking the penoplex during the installation process, you should first plaster the surfaces with cement-sand mortar. After complete hardening, the walls need to be opened with a primer in 2 layers.
Foam plastic and expanded clay
The structure of polystyrene foam resembles foamed plastic material with a cellular structure. Most often it is found in the form of square sheets measuring 1mx1m. Its peculiarity is that it is used not only as an internal insulation, but also as an external one. The thickness of the foam varies from 20 to 100 cm. It is also used as a base for putty. When the ceiling is insulated from the inside with polystyrene foam, it can perfectly level the surface. This material has a number of other advantages:
- universal;
- has a low price;
- durable;
- reliable;
- provides a good level of thermal insulation.
Fastening polystyrene foam is similar to installing penoplex.
Expanded clay is made from clay; in appearance it resembles balls. The principle of installing expanded clay on the ceiling is to pour it on the floor of the attic. Therefore, this method of insulation is applicable only for private houses. But at the same time it has the following advantages:
- does not decompose;
- fire resistant and fireproof;
- eliminates the possibility of insects and rodents appearing in the material;
- has good sound insulation;
- waterproof and frost-resistant;
- has good heat dissipation;
- has an affordable price.
If you are planning to insulate your ceiling with expanded clay, pay attention to the following recommendations:
- Before laying expanded clay, you should take care of the waterproofing layer on which the material will be poured.
- The first thing to cover is the rafters and chimney.
- To ensure high-quality thermal insulation, the expanded clay layer must be at least 16 cm.
How to insulate a ventilated facade with your own hands
A ventilated façade is a suspended structure that looks like a layer cake. The principle itself is that a gap of 30 to 50 mm is left between the wall to which the insulation is attached and the decorative protective panel. Thanks to this gap, the facade got its name, and through this air gap, excess moisture evaporates. Thermal insulating material has an important function here, and its high-quality choice will further ensure the correct functioning of the entire system.
Material selection
Mineral wool has tangible advantages. This insulation is vapor permeable and has excellent, although slightly more modest, thermal performance. Basalt wool is a fairly hard material and tends to cake over the years, becoming even more durable. In addition, mineral wool is a fairly inexpensive material. Another plus is the wide variety of insulation shapes and thicknesses, which allows you to adapt to any technological requirements.
Installation of mineral wool on a ventilated facade
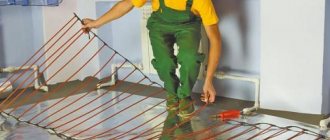
Thermal insulation from mineral wool is inserted into the sheathing, which is made of an L-shaped profile or wooden blocks. To do this, vertical profiles are mounted to the wall, and the distance between them should be slightly less than the width of the heat-insulating slab. It is best to pre-glue the insulation to the wall, but it can only be mounted on disc-shaped dowels, as shown in the photo.
A wind barrier is attached to the insulation. It protects it from destruction from atmospheric influences. After this, a decorative protective panel is installed.
Indoor mounting
Insulating indoors is a simple process, so it can be done on your own. To ensure high-quality fastening, work with foam plastic is carried out in a certain sequence.
- The wall surface, insulation and adhesive composition are being prepared. The walls must be smooth and free of cracks and peeling. Polystyrene foam is easily cut with a hacksaw or a sharp knife. The adhesive used is a dry mixture or adhesive foam in cans.
- The finishing of windows and doors is dismantled. Subsequently, higher quality finishing elements are installed.
- The adhesive is applied along the edges of the slab, in the center and at the ends.
- Fastening the slabs to the walls is done in one of the following ways:
in rows - the insulation is laid with a shift in rows along the entire perimeter of the room;
pyramid - the first row is laid around the perimeter of the room, and then the corners are laid in the form of a pyramid.
- Using a spatula, remove the layer of glue squeezed out from the joints of the plates.
- The surface of the insulation is covered with a mounting mesh, and plaster is produced.
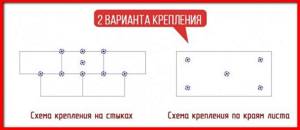
Mounting diagram
Basically, foam plastic boards are fixed according to a certain pattern. It indicates where and how many dowels are required on the surface. One of the popular schemes is fixing along the edges. What is it? In this case, about 5-6 dowels will be needed per 1 m2 of insulation. If you take a sheet of foam plastic, then it is fixed at each corner (4 pieces), retreating 5-10 cm from the edges. To secure the result, fix one or two dowels in the center of the sheet.
The second scheme involves fixing products at the joints of sheets. It turns out that the hat will hold three sheets at the junction. Then one dowel is also driven in in the center. Below is a photo that clearly illustrates these types of circuits.
Some “professionals” among the people, when performing this work, use only one dowel, mounting it in the center of the slab. Saving should be economical, however, this is not the case. With this approach, the foam will fall off soon. When choosing how many dowels are needed for fixation, take into account the number of floors, as well as the area being processed. For example, it is recommended to use more dowels to fix corners. And for a building that is higher than 8 m - about 7 pcs. per 1 m2, when building above 20 m - 9 pcs. It's all about the wind load: the higher it is, the stronger it is.
Types of insulation
First you need to determine the type of insulation for the ceiling. which you can apply and it will suit you. The question is that there is a significant difference: the installation will be carried out from the inside of the room, or will be carried out from the outside. This will determine how to secure the insulation to the ceiling.
Mineral wool
This is perhaps the most common material used today. There are reasons for this. This insulation has many advantages over other materials:
- This is a fireproof material that can also be used to insulate a bath;
- Mineral wool has excellent sound insulation;
- Tolerates temperature changes well;
- Not subject to deformation;
- Environmentally friendly material that does not harm human health.
Note: Please be aware of the following. All porous insulation materials, when compressed during installation, lose their properties.
Therefore, during installation they should be placed tightly, but not deformed.
Mineral basalt slabs
This is approximately glass wool, from which there are actually serious differences:
- This material seriously resists fire and has increased fire safety;
- The material is impregnated with a substance that repels water, which is why it has increased moisture protection;
- Resistant to deformation. Here, a multidirectional arrangement of fibers is used, which increases resistance to deformation;
- During the production process, materials are used that increase service life;
- Can withstand almost any temperature;
- This material can be used to insulate not only ceilings, but also foundations.
Liquid thermal insulation materials
Such elements appeared on the sales market relatively recently and have truly unique properties:
- These are ceramic balls in huge quantities and have rather low thermal conductivity;
- This miracle is prepared in the form of paint, which can be applied to any type of surface;
- Excellent resistance to fire and moisture penetration;
This material is quite common and has many fans.
- In principle, this is a universal insulation. Insulation can be carried out both from the outside and from the inside of the building. Can be applied to almost any part of the house;
- It has a low price, which makes it quite attractive. Therefore, the cost of insulation will be affordable for anyone;
- This is a material that lasts quite a long time, and at the same time reliably protects the home;
- An environmentally friendly product that does not harm human health;
- Even a small layer provides good thermal insulation.
These were the most common materials for ceiling insulation. There are also many bulk mixtures that are used to insulate the ceiling at the initial stage of construction. For example, with expanded clay (see: We do the insulation of the ceiling with expanded clay ourselves).
Attaching expanded polystyrene sheets to the wall
The video image shows a facade with expanded polystyrene.
Today, the technology of insulating facades with extruded polystyrene foam has become quite popular and has found application as a thermal insulator in the construction of almost every building.
This heating technology is called wet façade and its application consists of several phases.
If the order of façade design is changed or if one of the classes is omitted, there is no guarantee of high quality and long-term thermal insulation.
The wet-facade closure method is most often used for houses built on cinder, brick and reinforced concrete.
The process of thermal insulation of facades using expanded polystyrene should be carried out with the help of a specialist to monitor the final process.
In this case, it should be noted that it is better to warm up in clear weather, but not too hot.
Otherwise, humidity, high wind or air temperature may damage the structure of the building material between the building parts.
Among the obvious advantages of building materials are the following: reduced thermal conductivity, increased humidity for firing properties, high strength and durability, resistance to biological and chemical factors, self-extinguishing ability without damage to the human body and ease of handling.
Reduced thermal conductivity is the most important advantage of any thermal insulation material, since it allows the facade to be insulated with the thinnest polystyrene.
In addition, it offers great comfort in decorating the facade of the house with your own hands.
Increased resistance to moisture from foamed polystyrene allows you to dry up to 94% of the material in the most difficult conditions.
The building material can withstand up to 50 freezing and thawing cycles without damaging its own structure. This quality allows the use of polystyrene foam in regions with predominantly cold climatic conditions.
A structure made of polystyrene foam boards can maintain thermal insulation properties for 60-70 years.
The structure of the material is not affected by climatic conditions; it will never rot under the influence of frost, rain or sunlight.
Fungal or mold bacteria do not endanger the thermal insulation of the façade. In this case, unlike other types of heaters, it does not undergo processing that is harmful to human mixtures.
We suggest you read: How to glue penoplex to a brick wall
Therefore, its harmless properties appear as the foam is also used in some types of food products due to its lack of toxicity.
Installation of the plates is very simple as their light weight allows you to work in complete safety.
Common people, and sometimes even the builders themselves, believe that expanded polystyrene and polystyrene foam are the same material. But in fact, expanded polystyrene for wall insulation is a type of polystyrene foam. The insulation is made from polystyrene raw materials, which are processed in extruders. This is special equipment where polystyrene is melted and then poured into a mold, which then forms a homogeneous material with granules of the same size.
Such a long and labor-intensive production process determines the qualitative differences and advantages of this insulation, which, although more expensive than foam plastic, is more durable and dense, has a uniform structure, is indifferent to mechanical damage, better maintains its integrity during transportation, and is hygienic, since it is not a favorable environment for the development of microorganisms and is not damaged by rodents and insects.
When insulating facades with polystyrene foam, insulation of the PSBS-25-F brand is used (f means facade), which is a self-extinguishing, environmentally friendly heat-insulating material and has a flammability class of “G-1”.
In what cases and under what conditions is it possible to insulate the facade with polystyrene foam?!
As a rule, insulation of facades is carried out in this way along the walls of enclosing structures:
- made of sand-lime brick;
- made of porous brick;
- made of hollow brick;
- made of solid brick;
- from OSB board (OSB);
- from cement-bonded particle board (CSB board).

- the use of thermal insulation of the facade in the construction of houses, cottages, and brick buildings, in this case, allows not only to retain heat, but also to save usable space indoors by reducing the thickness of the load-bearing wall and using insulation on the outside of the building;
-option of using façade polystyrene foam on walls made of OSB boards (OSB panels)
wears only an intermediate layer as a “buffer” or “damper” for additional shock absorption, or, more simply put, to reduce the loads at the joints between OSB panels (OSB boards) in order to avoid the formation of cracks on the facade. Of course, in addition to this useful property, an additional insulation contour for the facade is also obtained.
- the use of façade polystyrene foam on a DSP board follows the same scheme as in cases with OSB boards. Here the insulation also plays the role of a “damper”, in which it takes on all the loads.
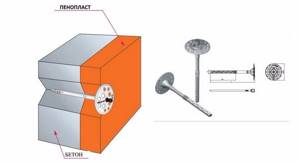
We already know how to glue polystyrene foam to the wall. For this, a certain adhesive solution is used. As for how to attach polystyrene foam to the wall, the answer is simple - use dowels.
This refers to ordinary dowels-nails for concrete, except that the cap of such a “fungus” should hold the expanded polystyrene slab.
Let's tell you a little more about how to attach polystyrene foam to the wall.
- We make holes according to the size of the dowel.
- We lean a sheet of polystyrene foam against the wall
- Insert the dowel
- We hammer in a special nail to space out part of the fungus in the concrete.
It is necessary to ensure that there is no large gap left between the polystyrene and the wall, this will reduce the formation of condensation under it.
Currently, there is a fairly large selection of insulating materials on the market. Among the most inexpensive insulation materials, but very practical, is polystyrene foam. It can be used both indoors and outdoors. It is enough just to know the features and some nuances of its installation.
Expanded polystyrene is basically ordinary foam. Therefore, he is not afraid of either frost or high humidity. As a result, it can be safely used outdoors. And external insulation itself is more effective than internal insulation. When treating a wall internally with insulation, there will be several negative aspects. These include:
- poor ventilation between the wall and the insulation, which will lead to the accumulation of condensation;
- increased flammability properties of the material;
- at high heating temperatures, harmful substances will be released from polystyrene foam;
- the total internal area of the room will decrease.
But if the room will not be used for living or the above disadvantages are not fundamental for someone, due to the fact that there is no other way to make thermal insulation, internal treatment of the wall surfaces can be done.