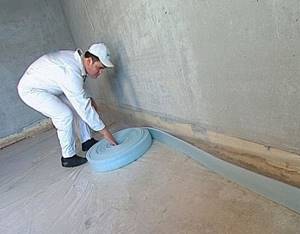
Recently, there has been a growing trend to build “environmentally friendly” country houses using a large amount of natural materials and maximum conservation of all resources used by humans. Such housing requires special finishing of walls and ceilings, and in the latter case, people paid attention to the adobe floor - it is cheap, strong, and durable. But most importantly, it is environmentally friendly. However, most builders and owners of country houses have little idea about working with clay floors, although they would like to know if possible. Do you consider yourself to be in this category of people? Then study this article - here you will get basic knowledge about what an adobe floor is and how to create it.
Clay floor
Making a clay floor with your own hands
The essence of a heated floor system on the ground
Owners of private houses are given a unique opportunity to reduce their costs of creating the foundation of a building, while creating comfort and coziness in the premises, by installing a warm concrete floor on the ground themselves.
Concrete is a material that allows you to make a high-quality and durable foundation. It will not be difficult to lay a water heated floor on it. The heated floor directly on the ground does not affect the foundation of the house and the external walls, but is located on its own foundation.
The installation work is divided into two stages:
- pouring a concrete foundation;
- installation of a water floor heating circuit.
It is important that this heating method can be chosen as the main heating system, since it is no less effective than traditional means, and is also more aesthetically pleasing. To be more precise, the system is simply not visible in the photo and during visual inspection, unlike heating radiators and massive pipelines.
Insulating the floor: making the right pie
Any owner of a private home has encountered a heating problem. Floors are a particularly important heating element. Proper floors do not allow dampness into the house and retain heat in it for a long time. Recently, ground floors have been rapidly gaining popularity.
They are effective because they are practical, reliable and relatively inexpensive. If a basement is not planned during construction, then heated floors on the ground in a private house are one of the best options for thermal insulation.
This structure is built directly on the ground, taking into account all its unevenness and will help prevent cold from entering from its surface. This option is far from the simplest, but it can be implemented independently, without hiring workers or equipment.
What is a heated floor pie on the ground?
Such floors have nothing to do with baking. They are called "pies" due to the fact that their thermal insulation has many layers and they look slightly like a layer cake. If you still decide to build, then keep in mind that heated floors on the ground require some measurements.
For example, groundwater should not be too high, because this will cause your “pie” to “float”. You should also make sure that the soil is strong enough, because the entire structure can simply settle. You should also remember that the “pie” reduces the height of the room, and dismantling such a structure is a difficult task, so everything must be done correctly the first time.
: heated floor pie on the ground
Tools and necessary materials
Naturally, it is necessary to carefully prepare for the creation of such a floor by purchasing certain components and components.
This list includes:
- coarse river sand and gravel;
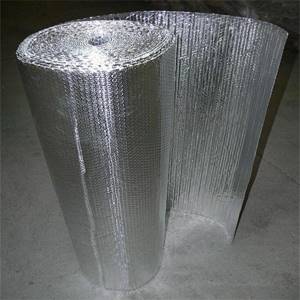
- thermal insulation layer on aluminum foil;
- pipes;
- fasteners for pipes: a special strip for installation, arcs for changing the direction of laying in the circuit, a device for fixing, etc.;
- polyethylene tape (damper);
- mesh for reinforcing the screed or fiber made of polymer substances, which improves the strength characteristics of the mixture for pouring;
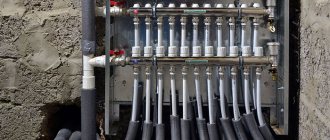
- a manifold for underfloor heating and a distribution cabinet for it;
- components for cement-sand screed or self-leveling mixture.
The initial stage of work is divided into two main tasks:
- it is necessary to clear the selected area of soil from excess debris, weeds, etc.;
- the level of the future foundation is set.
Measuring the base level
It is very important to set the level of the future floor before starting work in order to understand exactly what the rough screed for a heated floor on the ground will look like in the proportional ratio of layers. The level is set in full accordance with the height of the coverings in adjacent rooms.
It is necessary to start measurements and calculations starting from the entrance door of the room. The level of the finished floor is marked by stretched cords secured to nails. Next, using a measuring device, each layer being laid is measured.
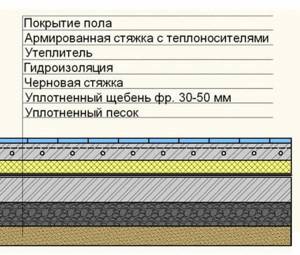
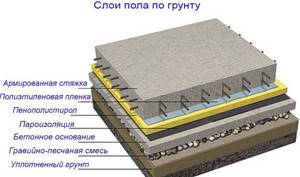
The floors will have the following structure (from top to bottom):
- cladding;
- screed;
- thermal insulation layer;
- waterproofing layer;
- litter;
- priming.
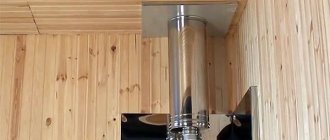
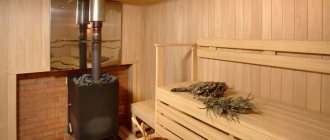
Subtleties and differences of installation in a bathhouse
A heated floor on the ground in a bathhouse is an excellent solution for this type of building. This will help extend the life of the structure, because... the room will dry faster. Due to this, the wood will not rot and mold will not form.
The floor can only be filled inside the MZLF tape or low grillage. In rooms with high humidity (steam room, shower), the level of coverage is 2 cm lower than in others.
There is no constant heating in the bathhouse, so the ground underneath freezes in cold weather, and there is a high probability of swelling. To eliminate or reduce the risk of this phenomenon, the following measures will help:
- Replacement of the arable layer with non-metallic material. For example, crushed stone at high groundwater levels or sand on dry soil.
- The warmth of the bowels of the earth allows you to preserve the insulation layer.
Water drainage can only be drained through a drain using the shower principle. For a small room, 1 drain is used, towards which small slopes are created for gravity flow of liquid. For the final coating, you need to use moisture-proof tiles and porcelain tiles. Installation of underfloor heating on the ground is otherwise identical to a private house.
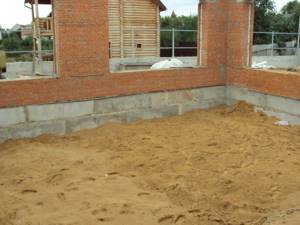
Preparatory stage for soil
So, the installation of a subfloor on the ground begins directly with the cultivation of a plot of land. It is important to know the depth of groundwater to eliminate the risk of foundation flooding. To do this, you can prudently install a drainage system that will perform the function of draining water.
Once the groundwater problem has been resolved, the foundation creation process can begin. Coarse-grained river sand and crushed stone with a fraction diameter of about 3 centimeters are used for this. The depth of the layer of these materials should be about 30 centimeters. Once it is backfilled, tamping is done using a large amount of water. It is unacceptable to use black soil or peat instead of sand, as they are susceptible to leaching. This method is often used to make a heated floor in a garage, which has proven itself well.
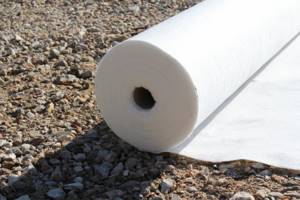
If the soil under the house is not saturated with moisture and is dry, a bedding layer is laid. Otherwise, it is replaced with a material such as geotextiles to prevent the penetration of groundwater above this layer. A mound of coarse gravel or crushed stone is made on top.
Arrangement of the structure
The structure of a floor on the ground may include various elements, this is due to the specific layout of the structure, the characteristics of the soil and construction technology. So, coarse sandy soil will not require geotextiles and sand.
In order to save money during work, the foundation is often not poured under the partitions; therefore, in such structures it is possible to see stiffening ribs, to strengthen which reinforcement cages are used. But in each case, before proceeding with the installation of a floating screed, it is important to properly prepare the base and organize the same horizontal level in all its sections.
Base structure
Despite the strength of concrete, possible subsidence of the base and swelling of the soil will negatively affect the condition of the screed. For this reason, it is necessary to remove the arable layer over the entire building area. Organic compounds found in chernozem and gray soil rot over time, contributing to the subsidence of the cake, which does not occur evenly, but only in certain places. This leads to the formation of cracks with subsequent destruction of the entire floor structure along the ground.
To carry out communications, trenches should be dug, providing for their slope, and then the pipes should be brought out from the outside of the foundation and near the walls located inside the house.
A properly constructed floor on the ground should be like a floating screed, which does not provide for rigid fixation of the material and is separated from the structural parts of the base and foundation by means of a damper layer.
The plate should not rest on their protruding parts. This type of floor in a frame structure, built on joists, is characterized by excellent ventilation, which contributes to the durability of the entire structure.
Separating layer
In order to prevent each of the layers of the floor pie, located directly on the ground, from mixing with the soil, it is necessary to line the entire area of the pit with some type of non-woven material, such as dornite or geotextile. It will act as a separating layer and prevent the roots of various plants from growing through it during operation.
When arranging this element of the pie, it is necessary to place the edges of the fabric on the lower surface of the walls and secure them well. During such work, it is allowed to use needle-punched material with a density of up to 100 g/m2, due to the fact that such a device is not responsible for the walls of the building and does not take on the entire load, which distinguishes it from a slab foundation. As for the latter, for its arrangement you will need geotextiles with a density of 200 g/m2 or higher.
Substrate
To avoid soil subsidence, a layer with increased rigidity should be installed on the ground to support the floor pie. For this reason, non-metallic materials are used, each type of which must correspond to certain soil conditions:
- sand that does not allow capillary suction is well suited for dry soils;
- when the groundwater level is high, it is recommended to use crushed stone, since capillary suction in this case will be completely excluded.
Sometimes rigid support is made using gravelly soil or fine-grained sand; you can also use expanded clay. During the work, it is necessary to take care of high-quality compaction of every fifteen centimeters of the underlying layer. It is recommended to do this using a vibrating plate, but you can do it manually. The sand should not be soaked in liquid; it is best to moisten it with a watering can before backfilling.
Footing for the foundation
The composition of a traditional floor pie on the ground must include a screed made from a thin mixture. This element helps solve some problems:
- arrangement of a flat surface intended for placing film or roll waterproofing on it;
- protection of waterproofing material from mechanical damage (punctures by small fragments of crushed stone).
Often, in order to save material resources during the construction process, other technologies are used instead of installing concrete footings. The footing does not need reinforcement, but with the help of a damper layer it is necessarily separated from the foundation parts along the entire perimeter.
Insulation procedure and waterproofing
Measures to prevent moisture from entering the cake are an important step at the stage of its creation. In addition, it is necessary to prevent heat loss in the floors and maintain geothermal energy emanating from the bowels of the earth. This can be done using insulation and waterproofing material; both of these components of the structure must be arranged in a certain order:
- the waterproofing should always be at the bottom, then moisture will not be able to penetrate the concrete screed and insulation;
- thermal insulation is placed on top of the waterproofing material.
Often developers make a big mistake by laying polystyrene foam first, and then a vapor barrier. The air temperature inside a heated building is higher than under the screed in the soil, as a result of which the laid flooring, such as cork, parquet or flooring boards, which does not have vapor barrier qualities, will promote the movement of steam from top to bottom.
Moisture will accumulate not only on the surface of the vapor barrier membrane, but also inside the cake itself, as well as between the insulation and concrete. All this will lead to the destruction of the screed and the formation of corrosion on the wire mesh.
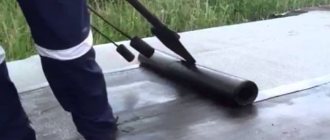
When arranging waterproofing, you can use materials such as:
- roll welded, representatives of which are hydrostekloizol, roofing felt, TechnoNIKOL and Bikrost;
- film made from polyethylene or PVC;
- membranes, characterized by increased strength and a high degree of density, this option can be used without making a footing.
The following penetrating compositions are also popular:
- The Admix additive combines with concrete during its mixing process, which gives the material waterproof qualities.
- Penetron has the same effect as Admix, but this mixture is used to treat the floor after concreting is completed.
This kind of waterproofing materials also does not require the organization of a concrete base. For insulation materials, professionals recommend purchasing extruded polystyrene foam EPS or XPC, which has a higher density, for example Penoplex.
Damper layer
Floors on the ground are not supposed to be firmly connected to parts of the base or plinth, which is why along the perimeter it will be necessary to install strips of gas-filled material (expanded polystyrene) on the edge. They must be pressed tightly against the enclosing structures, located in a vertical manner. In most cases, damper tape made of special materials with an adhesive layer is glued to the walls.
It should be remembered that the cutting layer must have a height higher than the thickness of the floating concrete screed. After the concrete has hardened, the material is cut off using a sharp knife, and after completing the floor covering, the junction points are covered with a plinth.
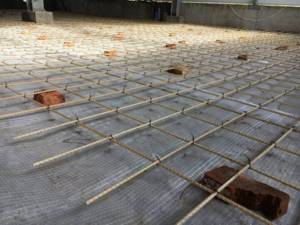
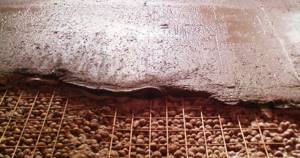
System reinforcement
For this purpose, it is optimal to use a welded wire mesh with a square cell of ten to twenty centimeters. Knitting done on your own will require large material costs due to the high labor intensity and consumption of a large amount of knitting wire. The mesh is laid as follows:
- the bottom layer, which performs protective functions, is equipped with gaskets with a height of one and a half to three centimeters;
- the layer that serves as protection along the entire perimeter should be located at a distance of three centimeters from the damper tier.
In rooms with a small area, grid maps with the appropriate size are most often used. If the room has a complex configuration, additional fragments will need to be cut out.
Equipment of stiffeners
These elements are necessary to improve the mechanical characteristics of the system and are located at the bottom of the partitions; to create them, polystyrene foam is laid out intermittently. Reinforcing frames made of special clamps and rods with a longitudinal shape are placed in the formed cavities.
If the thickness of the thermal insulation layer is insufficient, the base located under the stiffener rib is buried to an additional depth, the value of which varies from twenty to forty centimeters. This solution provides continuity to the layer of insulating material and prevents the formation of cold bridges.
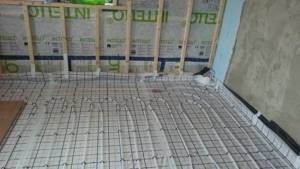
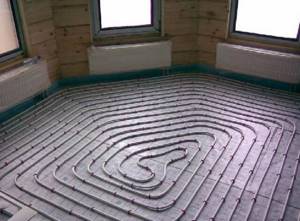
To ensure that living on the ground floor in a building with a floor built on the ground is accompanied by comfort, a “warm floor” structure is often installed in them, the contours of which are laid in the screed. This solution will be an ideal heating option in an individual home. Water pipes are laid directly on the reinforcing mesh before pouring, which inadvertently increases the thickness of the screed.
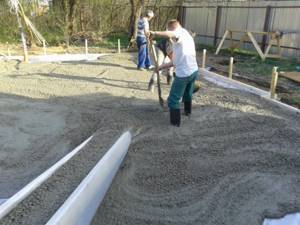
Litter layer
When the thickness of the bedding layer is 4-5 centimeters, it can be considered load-bearing. It is created by pouring a cement-sand screed over a layer of coarse crushed stone using concrete grades B7.5 or B10. This layer will act as a surface level regulator (for more details: “Pouring a heated floor - how to make a screed correctly”).
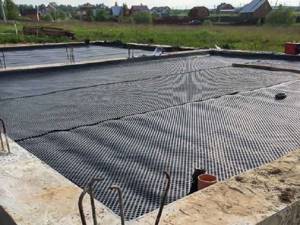
To prevent the mixture from spreading, the surface is limited using slats. It is necessary to wait until the screed hardens and hardens, while moistening it regularly. A modern alternative to pouring mortar is the use of profiled membranes, the use of which reduces the time for laying the layer.
Expanded clay
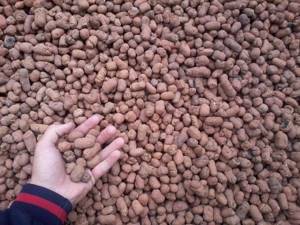
Expanded clay
Expanded clay is a popular thermal insulation material used in wooden floors and floors with dry screed based on gypsum fiber board. In the latter case, in addition to thermal insulation, it is also a leveling material.
Expanded clay is one of the cheapest materials for thermal insulation; it does not burn, is safe for health and is lightweight. At the same time, it easily absorbs water, which reduces its thermal insulation properties and significantly increases its weight. Therefore, the use of expanded clay requires reliable waterproofing. Another disadvantage of expanded clay is that when working with it, a large amount of dust rises into the air.
Expanded clay as thermal insulation
In terms of thermal insulation properties, expanded clay is inferior to most synthetic materials, so it requires backfilling with a thicker layer, which reduces the height of the ceilings in the room.
Using expanded clay for insulation. The photo shows expanded clay being poured with lean concrete
For effective thermal insulation of the first floors of buildings from the ground, the expanded clay layer must be at least 400 mm when using wooden floors and 300 mm when using concrete floors.
Between the floors of private houses, at least 200 mm of expanded clay should be poured into the floors for wooden floors and 150 mm for concrete floors. In apartment buildings, a layer of expanded clay of 50-80 mm is sufficient.
| Indicators | 10-20 mm | 5-10 mm | 0-5 mm |
| Bulk density, kg/m3 | 280-370 | 300-400 | 500-700 |
| Crushing strength, N/mm2 (MPa) | 1-1,8 | 1,2-2 | 3-4 |
| Grading, % | 4 | 8 | 0 |
| Frost resistance 20 cycles, gravel weight loss, % | 0,4-2 | 0,2-1,2 | not regulated |
| Percentage of crushed particles, % | 3-10 | 3-10 | No |
| Thermal conductivity, W/m*K | 0,0912 | 0,0912 | 0,1099 |
| Water absorption, mm | 250 | 250 | 290 |
| Specific effective activity of natural radionuclides, Bq/kg | 270 | 270 | 290 |
Waterproofing layer
The traditional installation of heated floors on the ground implies the presence of a waterproofing layer at the lower level of the base. Thick polyethylene, laid with an overlap, has the lowest cost and quality. It is more practical to use polyvinyl chloride and polymer-bitumen membranes, which contain polyester.
When laying waterproofing, it is important to treat the walls of the room, making a spade 15-20 centimeters high. The protruding parts can be removed using a sharp cutting device upon completion of the work.
Choosing a floor covering for water heated floors
Currently, there is a wide choice of flooring, but not all types are compatible with warm water floors. Some can reduce thermal conductivity, while others, on the contrary, can increase the risk of fire. Therefore, for a water system, the best option would be the following floor coverings:
- ceramic tile;
- carpet;
- laminate;
- parquet board.
Using the attached instructions, you can also install the flooring yourself, without the help of specialists.
As you can see, building a heated floor on the ground is not difficult. Having patience when carrying out all the step-by-step work, and following the recommendations of specialists, you can achieve high-quality heating of the entire living space, without additional costs.
AdminAuthor of the article
Did you like the article?
Share with your friends:
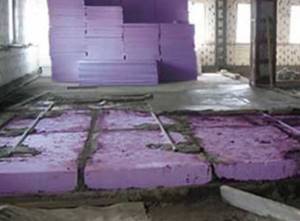
Thermal insulation layer
You can get a base protected from freezing and heat loss by creating a high-quality thermal insulation layer. And the underfloor heating system will be additionally protected from external influences of low temperatures. The functional essence of the design of a heated floor on the ground is that the thermal insulation layer blocks heat leakage (about 20%) and directs it straight upward into the heated room.
A high-quality thermal insulation layer has a number of features:
- low thermal conductivity;
- high strength;
- preservation of basic characteristics at high humidity, etc.
Today, you can choose many types of materials for laying thermal insulation. Particular attention should be paid to polystyrene foam.
There are several options for using this material:
- pure polystyrene foam needs to be coated with polyethylene on both sides;
- expanded polystyrene coated with aluminum foil - the easiest to install and does not require additional fastenings;
- extruded material does not require additional coating.
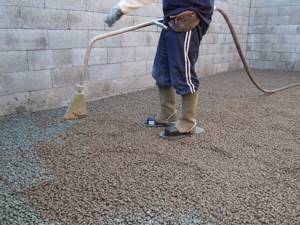
Basic installation of heated floors
Before laying a water floor in a private house, coarse sand and crushed stone should be distributed in layers over the prepared soil. Their depth should be about 30 centimeters. Then they need to be watered and compacted thoroughly. Thus, having made the “pillow”, you can move on to the next work.

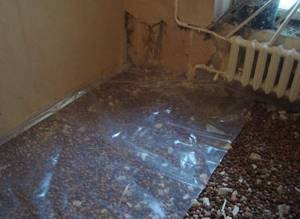
Waterproofing layer
In order for a heated floor to last for a long time, it must be protected from the harmful effects of water and other liquids. To do this, it is necessary to lay a waterproofing layer of thick polyethylene at the lower level of the threshold. Installation is not complicated and is done in the following way:
- The roll unwinds over the area of the room.
- Use a sharp knife to remove excess areas.
- The waterproofing material is laid overlapping.
- The polyethylene joints are taped with construction tape.

Other, more practical polyester membranes can be used as waterproofing. However, they will cost significantly more.
Thermal insulation layer
According to the instructions, it is important to include a thermal insulation layer in the heated floor cake, which will help protect the base of the room from freezing and leakage of heat flow. And the heat-reflecting substrate will direct the heat flow inside the building, and not outside it. Thus, when using a thermal insulation layer, it will be possible to achieve not only uniform heat throughout the entire floor, but also save up to 20% on electricity. There are several types of thermal insulation materials intended for water heated floors, such as: pure polystyrene foam, extruded material and aluminum-coated polystyrene foam. Each type has its own installation technique, which is indicated in the accompanying instructions.
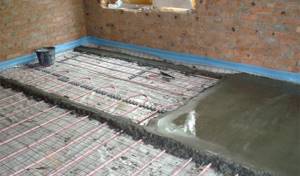
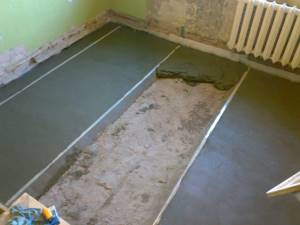
Pouring the concrete layer
For high-quality strength of underfloor heating with a water system, the floor threshold must include a reinforced concrete layer, since it will serve to protect the structure from further loads. Before pouring, you will need to use slats to divide the base of the room into sections, in increments of 1 meter, which will simplify the work process by performing it one by one. Next, a reinforced mesh is laid and the solution is poured. As it dries, the slats must be pulled out of the concrete, and the grooves from the seams filled with mortar. To prevent the concrete from cracking and deforming the walls in the future, damper tape .
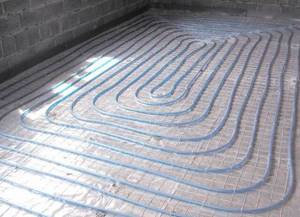
Laying the heating circuit
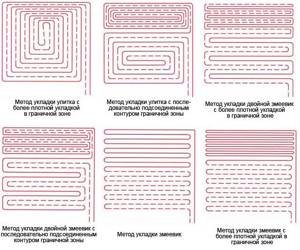
After making sure that the concrete screed is completely dry, proceed to laying the pipes. The choice of coolants is based on the desires of the users themselves. However, according to experts, metal-plastic pipes are more reliable and easier to install. Contours are laid in the following ways:
- snail;
- snake;
- combined.
Regardless of the type of installation, the pipe branches must end in the manifold cabinet. And also during their installation, the following rules must be observed:
- The circuit must be made without joints, from a solid pipe.
- Regardless of the pitch , the length of the coolant should not exceed more than 200 meters.
- The pitch should depend on the diameter of the pipe.
- During installation, stretching of pipes is not allowed.
And also during the installation process, you must not step on the coolants, thereby subjecting them to deformation.
After laying the pipes, it is necessary to carry out pressure testing.
Filling the screed
Having checked the functionality of the water floor on the ground, they proceed to fixing it with a screed. To do this, you need to prepare a solution of fine sand and cement, in a ratio of 3: 1. For the strength of the solution, you can add 1 gram of fiber to 1000 grams of cement. The pouring process is similar to a concrete threshold, but the drying time will take longer. In this case, the screed will dry no earlier than after 30 days.
After making sure that the cement mortar is completely dry, proceed with the installation of the floor covering.
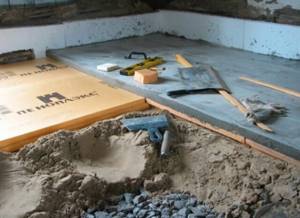
Creating a concrete base
Pouring a reinforced concrete base is required to create a durable, high-quality floor (for more details: “How to make a concrete floor in a private house with your own hands - instructions”). It is best to mark the surface for pouring using slats 5 cm wide and 2 meters long. It is worth keeping a step between them of about 1 meter, which will allow you to fill the solution in stripes. A square meter of reinforced mesh 3 centimeters thick is placed in the center of the room. Along the perimeter of the room, the junction of the base and the walls is taped with damper tape.
This is done in such a way that it protrudes a couple of centimeters above the level of the future concrete screed. It is best to use concrete mixture grade M100. Filling begins from the far corner of the room opposite to where the entrance opening is located. The strips are poured sequentially, and after the mixture has dried, the slats used for marking are removed and the seams are filled with mortar. The screed is covered with polyethylene and regularly moistened for better fixation and achievement of maximum conditions.
As soon as the base is dry, it is cleaned of dust, debris, various stains and priming is carried out. Next, we begin installing a heated concrete floor into our pie, if additional leveling of the base is not required.
What experts recommend doing
First of all, we determine the level to which the soil needs to be removed. The soil must be removed. If the layer of humus or plant residues is not removed, they will begin to decompose and “smell.” Therefore, whether you do a subfloor or not, you still need to remove everything unnecessary. Moreover, the fertile layer is usually the loosest, and it will definitely settle and can pull all the layers above it with it. The underlying rocks are denser, firstly because they experience greater loads, and secondly, because there are fewer living creatures and microorganisms living there.
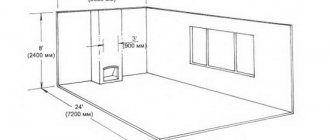
The entire pie of a heated floor on the ground can take 20 cm or more (in some regions - much more). Therefore, you need to start marking from the zero level - where your finished floor will be located. You mark it, and then consider how much you need to go deeper. It is advisable to mark the level of each layer: then it will be easier to navigate.
It is quite possible to make a warm floor on the ground yourself
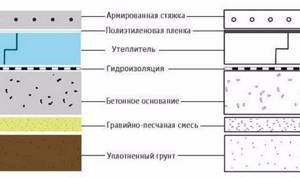
The correct design of a heated floor on the ground is as follows:
- Remove fertile soil, remove all debris and stones. Level and compact the remaining soil. This must be done very carefully and verified using a level. This is the basis for all subsequent materials.
- A layer of compacted sand (level). Any sand can be used for filling. The main thing is to compact it well and level it again.
- A layer of expanded clay or crushed stone (crushed stone is preferable due to lower thermal conductivity). Fraction - small or medium. We compact it for a long time and persistently until it becomes almost a monolith.
- Pre-screed. There are two options:
- Sprinkle crushed stone and sand with a liquid solution (sand + cement in a ratio of 2:1).
- Pour in the rough screed. The desired thickness of this layer is 5-7 cm. And for reliability, lay a reinforcing mesh made of 3 mm metal wire, with a cell of 10*10 cm. This subfloor is more reliable. It will withstand significant loads.
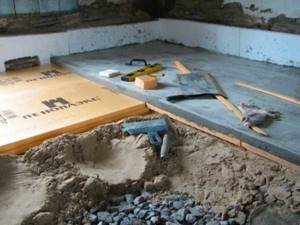
- After everything has set and the concrete has hardened, a layer of waterproofing is laid. If the soil is dry, it is usually a plastic film, preferably 200 mn in two layers.
- Expanded polystyrene boards (glue the joints with tape so that the solution does not flow).
- A layer of metallized waterproofing (not foil, but metallized).
- The mounting system for the heated floor and the heating tubes, cables, etc.
- Heated floor screed, preferably reinforced.

The thickness of all layers of the underfloor heating layer on the ground depends on the region: the colder, the greater. In the south it can be 2-5 cm, but the further north you go, the more massive the layers are required. Each of them is well compacted and leveled. You can use manual tampers, but mechanical ones are much more effective.
Pipe selection
Before making a heated floor, you need to select materials. When considering installing a warm water floor on the ground in a pie, you need to decide which pipes will be used for this.
In fact, the material for manufacturing can be anything:
- metal-plastic;
- polyethylene;
- galvanizing;
- copper, etc.
The most popular are polymer materials and metal-plastic. The quality of pipes depends on the density of the material. It is also very important that the integrity of the pipes is maintained throughout the entire circuit. Such a heating system usually occupies from 5 to 15 centimeters of floor thickness.
Various factors influence this indicator: the thickness of the insulation and screed, the power indicators of the equipment, etc. It is unacceptable for the system to have a significant slope. Pipes should not be allowed to be laid on uneven surfaces with an amplitude of more than 5 millimeters.
What not to do?
Thanks to the Internet, a huge amount of incorrect information is now freely available, in particular advice and recommendations regarding flooring. One of these recommendations is the use of geotextiles. This is the advice of one of the regular visitors to construction forums. He suggested laying geotextiles on the ground. Then it is planned to backfill it with crushed stone or expanded clay. But this is extremely inappropriate. If you remember what was described above, then when you try to compact the soil, geotextiles simply will not allow you to do this. Whatever the tamping force, the geotextile will hold the crushed stone and prevent compaction of the soil. This material has a fairly high tensile strength, so tamping will be useless.
Therefore, the soil must be compacted before laying geotextiles. Logical? No. In this case, the need for geotextiles completely disappears. It is neither a vapor barrier nor a waterproofing material. To make it a little clearer, geotextiles are used in completely different conditions. For example, if you need to make drainage, filter out sand or gravel. Accordingly, such a design is completely ineffective, irrational and unacceptable.
In addition, the recommendation spoke about the use of expanded clay. This point also requires clarification. Expanded clay is a specific material. It picks up moisture very quickly. Accordingly, it is completely unsuitable as insulation for this design. The reason is extremely simple. In just a week, it will be completely saturated with moisture coming from the soil and will stop performing its functions. That is, it will be money thrown away.
After this, it was recommended to make the screed and topcoat without water vapor barrier and insulation. Again, this will be wasted money. That is why it is necessary to be extremely careful about information read on the Internet, be sure to double-check it and not follow the lead of such “experts.”
Also on forums, the question is often asked: “Why is it not recommended to use expanded clay concrete for floors on the ground? It’s light and durable.” This question deserves a more detailed answer. Yes, it is light in weight and is a fairly durable material. But at the same time it is a terrible heat insulator. Today there are many much more suitable materials. This includes extruded polystyrene foam and foam glass. As for glass, it costs almost 2 times more than polystyrene, but is an ideal protection against rodents. Even moles won't be able to break through it. So this is an additional guarantee of peace of mind for the inhabitants of the house.
And if we return to expanded clay concrete as a material, we should take into account that it is very capricious. When an expanded clay concrete mixture is prepared, the expanded clay itself absorbs a lot of moisture. And he takes it out of the concrete. And just a day later, when the cement has just set, the following situation occurs. Porous expanded clay absorbed moisture from the concrete. A day has passed. As a result, the cement mortar, which is a kind of glue, envelops the expanded clay. Accordingly, all moisture is clogged inside. Thus, expanded clay concrete will not dry for a month, unlike ordinary heavy concrete with granite filler. This process will take 2-3 months. And if such concrete is used in a basement with poor ventilation, then no further finishing of the floor will be possible for a long time.
Otherwise, moisture, which will continue to evaporate from expanded clay in the absence of a vapor barrier, will ruin any finishing coating. It will simply undermine the wooden floor, it will simply swell and rise. If ceramic tiles were used, then fungus will appear on its seams, and a persistent unpleasant odor will appear in the room.
Thus, if the decision to use expanded clay concrete was nevertheless made, then a much longer technological break will be required to dry it. It is also necessary to measure the moisture content of the base before laying the final floor covering.
Installation process
When the concrete floor has been embedded into the pie along the ground, the process of laying the heating circuit can begin.
There are a number of rules:
- In order to prevent excessive heating of the coating, proper placement of pipes should be carried out throughout the entire area of the room. More dense installation is carried out around the perimeter, and in the center the contour should be thinner, and the distance from the walls of the room should be at least 15 centimeters;
- regardless of the installation scheme chosen, it is necessary to maintain an interval between adjacent pipes of 0.3 meters;
- if the pipe is located at the junction of the slab and the ceiling, it should be separated with a special metal sleeve;
- The length of the heating circuit should not be allowed to exceed 100 meters, since in such a system the main parameters of coolant circulation will be reduced (read: “How to make a heated floor with your own hands in a private house”).

Laying is done in two main ways:
- bifilar - in a spiral
. In this case, uniform heating of the pipes is characteristic due to the alternation of supply and return sections. A low-power pump is used to supply liquid, and laying pipes is very simple by maintaining a 90-degree angle between adjacent sections; - meander - zigzag
. The coolant in such a system cools down as it passes through the circuit, and the surface heats up unevenly. Pipes can turn in the absolutely opposite direction along the way, which affects the complexity of installation. This method is more suitable for rooms with a linear slope, since the coolant will circulate faster and will not have time to cool down. The cabinet with the equipment is installed at the top point of the circuit. Also, this installation method allows you to heat the most spacious rooms.
Regardless of which installation method was chosen, all pipeline branches end in a distribution cabinet located near the room. It is important to take care of the thermal insulation of pipes that pass through neighboring rooms.
Heat loss through the floor on the ground. How to calculate?
Heat losses through the floor structure are calculated slightly differently than through other building envelopes. Before installing heating, you need to familiarize yourself with the methodology for determining them.
The entire plane is divided into zones of a certain size. There are 4 of them in total:
- The horizontal component of zone I is 2 m from the wall. The vertical component is the thickness of the load-bearing wall that will need to be insulated. It is 1.5 m.
- Zone II is another 2 meters of floor. The area begins directly from zone I to the center of the room for which the calculation is being carried out.
- Zone III – another 2 meters. This area originates from zone II.
- And zone IV is the remaining floor area of the room.
Pressure testing of a heated floor system
Before the screed is poured, which completes the floor layer on the ground with insulation and contains the heating circuit itself, it is necessary to perform pressure testing of the installed equipment and pipes.
This procedure is performed as follows. The pipes connected to the collector must be filled, the air from them must be forced out through the drain valves, and the air vents must be kept closed.
Metal-plastic pipes are tested using cold water, and polyethylene pipes are tested by doubling the pressure in the system. This action is repeated twice and it is checked what the difference was between the pressure for testing and the value after it was reduced. If this range is not very large, then everything is in order. Additionally, the entire circuit is checked for leaks.
A thermal stability test is also performed. The coolant temperature rises to +85 degrees Celsius for half an hour. Then the places where the pipes join and connect to other elements of the system are checked. If everything is in order, then you can start pouring the screed.
Insulation of basement floors
For external insulation of the ceiling from the basement side, it is better to use cheap moisture-resistant foam boards.
The main advantage of this method is that the height of the room is not taken away.
Before gluing the insulation, it is necessary to carefully foam the seams between the slabs and the cracks around the perimeter of the ceiling. To increase the adhesion of the glue to the concrete, it is better to treat the bottom of the slab with a penetrating primer.
Thermal insulation boards are glued to the concrete base using ceresit glue, construction foam or liquid nails. After the glue has set, the seams between the insulation must be sealed with foam to prevent the formation of cold bridges.
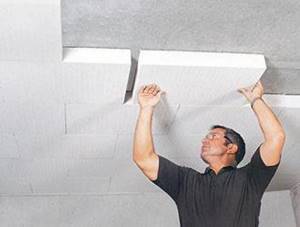
Figure 7. Insulation of the basement floor from below.
I recommend! When sticking insulation onto polyurethane foam, it is necessary to press the slabs against the ceiling every twenty minutes for an hour and a half, due to its strong expansion.
To protect against rodents, I recommend covering the insulation with a metal mesh and securing it with dowels. The slabs must be waterproofed with polyethylene film.
Similarly, you can perform insulation from the bottom of a wooden floor. It should be taken into account that the tree “walks” due to changes in humidity and temperature. Therefore, in addition to glue, the foam must be secured with plastic dowels.
Pouring cement-sand screed
The screed solution is prepared from cement and sand in a ratio of 1:3. Also, for every kilogram of cement, you can add 1 gram of polymer fiber to increase the strength characteristics of the screed (more details: “Installing a cement-sand screed with your own hands”). The pouring process is not much different from creating a base for the entire pie of our floor. True, underfloor heating can be put into operation no earlier than in a month, since this is exactly the time required for the screed to harden properly.
After this period, you can also begin the process of laying the topcoat. Taking into account high-quality floor heating, it is necessary to select facing materials that will not be inferior in presentation. After all, every owner probably wants to have in his home not only warmth, but also a beautiful interior that he is not ashamed to present in a photo or in person to guests.
Bottom line
The process of creating a floor on the ground in a private house is described in detail in this article. We can do all the work ourselves, but if difficulties arise, you can always turn to specialists. The builders will take responsibility for all stages of the work - from purchasing the necessary materials to laying the finishing coating and checking the heating system with subsequent service if necessary.
Step-by-step instructions for work
Clay floors can be made using several technologies, using different mixtures. Clay in the floor composition can be supplemented with straw, lime, cement and other materials. Let's consider the principle of constructing such a foundation using the example of its main options: adobe floor and cast adobe.
Option #1 - adobe floor
This option is the simplest. It is more suitable for arranging the base in sheds, storage rooms and other outbuildings. Although it can also be used at dachas, in temporary (summer) residences.
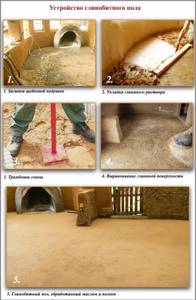
The adobe floor is a clay-sand, tightly compacted layer. It is laid out directly on the ground. To install such a floor you will need fatty clay, sand and a tamper.
Progress:
- Remove a layer of soil 50-60 cm deep.
- Place a layer of sand about 10-15 cm thick on the bottom of the resulting pit. Level it and compact it. To do this, they often use a manual tamper, made from a piece of log or beam about 100 cm long, with a diameter (section) of 10 cm. A grip is nailed to the upper end, with which you can hold the tramping. A board measuring 20x20 cm is attached to the bottom end.
- A layer of crushed stone, 10-15 cm thick, is poured on top of the compacted sand. It is also leveled and compacted.
- Prepare a thick, heavy solution of clay and sand (the amount of water is minimal).
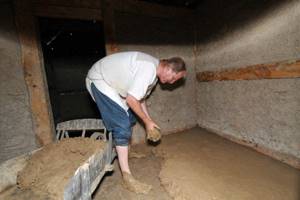
- The solution is spread on a layer of crushed stone, leveling it with a trowel or spatula.
- Compact the clay layer using a tamper. Places where pits form are leveled with an additional portion of the solution. Tamping is continued until the tamper begins to bounce off the surface.
- Sprinkle the surface with coarse sand and try to compact it into the thickness of the clay floor. The remaining sand remaining on the surface is swept away with a broom.
After the floor has dried, it is treated with oil and wax.
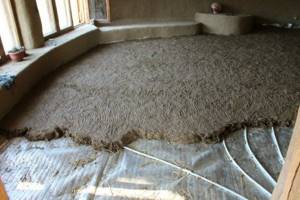
Option #2 - adobe floor
Adobe is a composite material made by mixing clay, sand and straw with water. The finished adobe is laid on a drainage layer of crushed stone or gravel and aligned along the guides. Usually laying occurs in several layers. The first 1-2 layers are basic and act as a base. The last layer is the finishing layer, traditionally coated with oils and wax.
When making an adobe floor, crushed stone (for drainage), sand, clay and straw are used. First, sand and clay are mixed, then water is added. Straw is mixed in at the last stage, trampling it into the mixture. Typically, the ratio of clay to sand in adobe varies from 1:1 to 1:3. The amount of water is from 0.25% of the volume of clay. The amount of straw is 10-15% of the volume of the mixture. You can mix clay, sand and water manually (using a shovel, trowel) or in a concrete mixer.
Let's look at the order of work:
Removing the fertile layer (30-40 cm) . The top fertile layer is removed along the soil, making sure to remove the roots of the plants. They deepen by 30-40 cm, then compact the base.
Drainage is performed from gravel (10-20 cm) . The compacted base is covered with a layer of gravel, 10-20 cm thick. In areas with a harsh climate, it is possible, in addition to gravel, to use heat-insulating bulk materials. Perlite, which has low thermal conductivity, is well suited for these purposes.
Laying the main clay layer (4-10 cm) . Laying is carried out using guides - smooth, straight boards, 4-10 cm wide. They are installed on the edge, secured with sticky pieces of adobe. The step between the guides is 60-80 cm (at this distance it is convenient to “pull out” the mixture, usually alone). The location of the guides is parallel to the wall along which it is planned to begin work. Typically, this is the wall located opposite the front door.
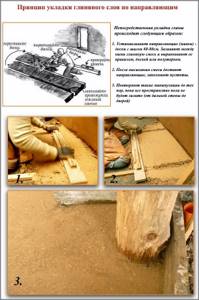
The adobe mixture is laid out between the guides, leveling it with a trowel. To achieve a smooth surface, the mixture is “pulled” along the guides with a wooden or metal rule (you can use a flat board or a long trowel). The result should be a continuous and even, but rough surface. There is no need to sand this layer additionally.
After 1-2 days, when the adobe mixture has set, the guides are carefully removed from it. However, they can be left in the thickness if there is no need for reuse. The voids left by the guides are filled with adobe mixture. In order for the wet portion of the mixture to properly adhere to the already dried layer, the edges of the grooves are moistened and loosened with a sharp tool.
The base layer, depending on its thickness, temperature and humidity, takes 1-2 weeks to dry. Only after this will it be possible to move freely along it. If it is necessary to speed up the process, a fan heater is installed in the room. Simply raising the temperature (using radiators, for example) is not enough. For uniform drying of adobe, air movement and blowing are necessary.
Laying the second (intermediate) layer (2.5-4 cm) . This layer is optional, but it allows you to increase the thickness of the clay layer and improve the heat-saving properties of the surface. Warm floor cables can be laid into the thickness of this layer.
Lay this layer in the same way as the first, using guides. This time, boards (slats) 2.5-4 cm thick are used. The adobe is laid out between edge-mounted boards, on the pre-moistened surface of the base layer - for better adhesion. The surface is leveled with a trowel and “pulled” along the guides. To reduce the likelihood of cracks appearing on this layer, it is recommended that the guides be laid out at right angles to the guides of the first layer. Then two layers of adobe will be laid perpendicular to each other, which will increase the strength and durability of the finished clay floor.
The last, finishing layer (1-2 cm) . The last layer of adobe will bring the floor level to the required level. This layer is the thinnest, so there is a high probability of cracks appearing on it. For this reason, this layer should not be less than 1-2 cm.
If the clay floor will be the front floor surface, thinner and shorter straw stems are added to the adobe mixture for the finishing layer.
Thin slats or metal guides (profiles), 1-2 cm thick, are used as guides. Also, the finishing layer can be applied without guides, carefully laying out each portion of adobe and controlling its horizontalness with a level. The clay mixture is spread with a spatula, spreading and carefully pressing onto the pre-moistened surface of the second layer. The finishing layer is carefully leveled by rubbing the clay, “polishing” it with a grater, spatula or trowel.

When the adobe floor is completely dry (it will take several weeks), you can begin finishing it.