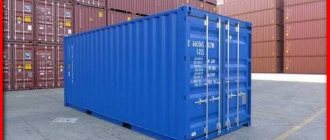
Is penoplex suitable for insulating a wooden house?
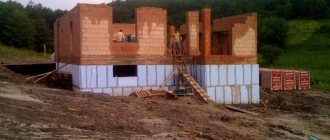
Since ancient times, in order to insulate a wooden building, it was lined with brick. Such buildings can often be found in villages and holiday villages. However, old methods are being replaced by new technologies that allow for quick thermal insulation and the beginning of effective heat conservation. Today, it is increasingly practiced to insulate a wooden house with penoplex, which, however, does not in any way interfere with giving it a “traditional” look using facing bricks. What other options are there for using a material such as penoplex for a wooden house? In a wooden house, you can insulate the facade and interior walls, ceiling and floor with penoplex. You can read more about how to insulate the floor of a frame house with extruded polystyrene foam here. We'll tell you more about the rest below.
Insulation of a wooden house from the outside
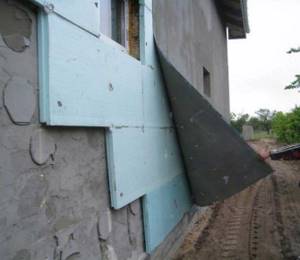
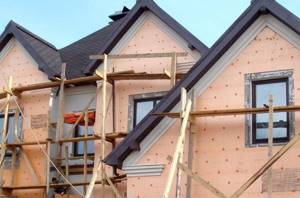
Insulation of the outside walls of a wooden house with penoplex is carried out in compliance with certain rules. The structure itself is built on the principle of a ventilated facade. In addition, it is possible to use extruded polystyrene foam for stone cladding. This means that there must be a gap between the penoplex and the wooden wall of the house to ensure air flow. If this is not done and a wooden house is insulated directly along the walls with penoplex, moisture condensation and, as a result, the “start” of the rotting process can hardly be avoided.
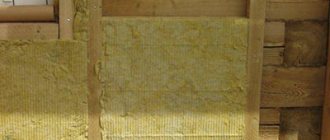
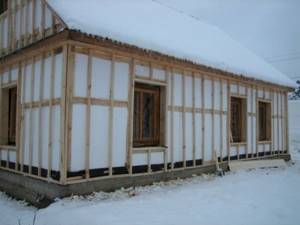
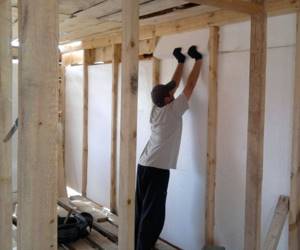
- Insulation of a wooden house from the outside with penoplex begins with the installation of sheathing made of 50x50 mm wooden blocks.
- Insulation boards are laid in the sheathing. If the house is made of logs, then their unevenness will create conditions for ventilation. If it is a flat beam, then slats should be laid between it and the penoplex to create the necessary gap.
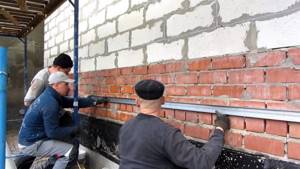
- The exterior finishing of a wooden house with penoplex is completed with cladding - siding, blockhouse or the all-familiar brick.
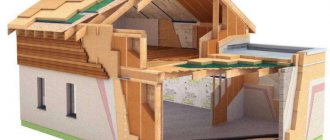
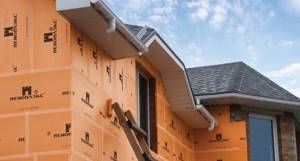
Particularly worth mentioning is frame houses. Along with the widespread use of mineral wool, penoplex for insulating a wooden frame house has also become widespread. At the same time, it can be mounted both outside and inside. Finishing the outside of a wooden house with penoplex is carried out using the technology already described, while the inside layer of insulation is usually covered with plasterboard, fiberboard or other materials for interior decoration.
Insulation of a wooden house from the inside
If insulating the facade of a wooden house with penoplex from the outside is impossible for some reason, then it costs nothing to transfer this process inside. The installation methods are the same here. As already mentioned, the internal insulation of the walls of a wooden house with penoplex is completed with a layer of plasterboard, lining, and decorative panels. The ventilation gap between the insulation and the wall is also important.
A good move to save heat would be not only the floor with extruded polystyrene foam, but also the ceiling and walls. In a wooden house, this material is quite acceptable for a wide variety of structures, as they say, from floor to ceiling. Its benefits are as follows:
- Small thickness saves space. For example, insulating a ceiling with sawdust requires a layer of at least 20 cm, while the thickness of extruded polystyrene foam requires much less.
- In cases where work can only be carried out from below, insulating the ceiling in a wooden house with penoplex foam can be a way out of the situation.
- Simple installation on the lathing does not require much effort.
Thermal insulation of the walls of a wooden house with penoplex is quite effective. True, many people use polystyrene foam and mineral wool for these purposes - the difference in price affects it. Extruded polystyrene foam is preferred by those who, firstly, cannot afford to lose extra centimeters of space (penoplex sheets are thinner than polystyrene foam with the same thermal conductivity, and even more so mineral wool), and secondly, pays fair tribute to the other properties of this excellent material (low vapor permeability, long service life). Insulation of the walls of a wooden house, including a frame one, with penoplex is possible outside and inside; it can also be used for thermal insulation of the foundation, floor, ceiling, roof. An important condition is the installation of ventilation gaps between the penoplex and the insulated wooden surface of the wall or floor. This must be remembered during installation.
Recommendations for laying thermal insulation
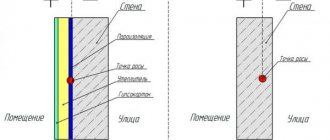
In most cases, external insulation is practiced in private houses, which, when carried out correctly and with accurate calculations, provides effective thermal protection of the entire structure. External thermal insulation allows you to move the dew point towards the insulation, and thereby protect the walls from the formation of condensation.
In addition, penoplex has low vapor permeability, which is why it is not recommended for use inside the house. Negative consequences can be mitigated by installing a high-quality ventilation system.
Thermal insulation of walls outside and inside the house
Over time, the fastening weakens, as a result of which the slabs and finishing sheathing can settle, which will lead to the formation of cold bridges and loss of appearance.
The same thing can happen with the frame finishing option. Therefore, many people have a question: how to attach penoplex to a vertical surface? Experts say that you cannot limit yourself to just gluing or laying insulation into the cells of the frame. In both cases, it is also necessary to secure the heat insulator with special mushroom fasteners with wide lids.
In frame houses, penoplex is placed inside the frame, where it is glued and additionally secured with dowels.
Insulating a log house from the outside can be done in both ways. For thermal insulation of a house made of 150x150 timber and internal structures, it is better to choose a frame option. There should be a small space between the insulation and the walls of the house, in this case the air will circulate freely and prevent the wood from moistening.
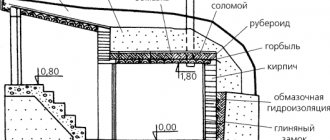
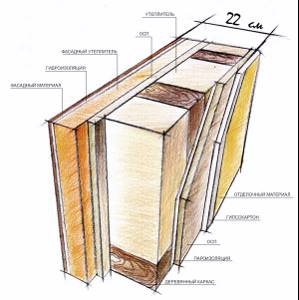
Scheme of insulation of external walls of a house
Due to the roundness of the logs, log walls have gaps where air can penetrate; the surface of a log house is flat, which makes natural ventilation impossible.
For the sheathing, timber with a cross section of 25x50 or 50x50 mm is used. The installation of the frame must be done in such a way that it forms squares, into which the insulation boards will then be laid.
To give greater rigidity to the insulated structure and prevent cold from entering the house, it is better to lay penoplex in two layers. Sheets are installed offset or in perpendicular directions. In the second case, a counter-lattice is made to lay the top layer; the slats are positioned perpendicular to the guides of the main frame.
Insulation with polystyrene foam
When insulating yourself, you need to know about the various nuances of using this type of material. You should also know how to choose the right foam.
Advantages and disadvantages
This insulation has both positive qualities and serious disadvantages. Among the advantages of using the material, the following properties can be particularly highlighted:
- It is relatively inexpensive.
- It has unique thermal insulation characteristics.
- Easily mounted on both horizontal and vertical surfaces.
- Does not allow moisture to pass through.

Disadvantages of the material:
- Ecologically imperfect.
- “Eats up” significant space during internal installation.
- Does not have great tensile strength.
Despite the presence of disadvantages, the material does an excellent job of protecting the frame structure from the negative effects of subzero temperatures.
Which material to choose
When insulating a frame house, you must use only high-quality material. If the foam has been lying in the open air for a long time, then it should be used for its intended purpose. If the material was produced in violation of technology, then in this case it is also necessary to refuse the purchase.
Attention! If the material crumbles or has uneven thickness, then the use of such insulation will not have the best effect on the quality of thermal insulation work.
The type of foam will also depend on where the insulation is installed. For internal use, it is necessary to use sheets of optimal thickness so that the free space of the room is reduced slightly. For outdoor work, it is necessary to use special foam plastic boards that will withstand large temperature fluctuations well.
Criteria for choosing insulation
When choosing a material for insulating the floor and walls of a wooden house, you should take into account such indicators as cost, thermal insulation properties, ease of operation, strength and durability.
When assessing these characteristics, you can answer the question of whether it is possible to insulate a wooden house with penoplex.
The main feature is its low price. It is almost three times lower than the cost of mineral wool.
At the same time, the thermal insulation characteristics of penoplex and mineral wool are practically the same. In addition, penoplex has a very low water absorption rate.
Installation of thermal insulation using penoplex is extremely simple. Therefore, it can be used when insulating your home yourself.
Its low weight allows even one person to work with it. And in order to cut into pieces of the required size, just use a stationery knife.
Technology of insulating facade walls with Penoplex
To properly insulate the facade with penoplex, compliance with the installation technology is required. The necessary tools are pre-selected and the base is prepared.
Preparatory stage
According to the technology of penoplex insulation, the preparation stage is the first, and this procedure concerns not only the surface of the wall, but also the insulator itself.
Preparation of materials
To insulate a house with penoplex, the material needs to be prepared. The surface of the slabs should be slightly rough. To do this, polystyrene foam is processed with a needle roller. If it is not available, a stationery knife is suitable, which makes small notches.
Preparing the walls
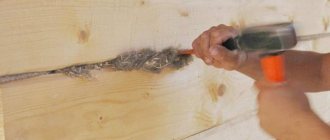
Before insulating a wall with penoplex, it also needs to be prepared. It is cleaned of dust, old finishes, grease stains, and weak areas of plaster. If there is fungus or mold on the surface, they must be removed and the base treated with fungicides and antibacterial agents. Protrusions on the wall or remnants of masonry material are knocked down to the general level.
Cracks of any size are cleaned, treated with a priming liquid, and then covered with a repair compound. As for wooden walls, it is necessary to completely eliminate damaged areas, which are treated with antiseptics. The cracks between the logs need to be caulked.
After cleaning, the vertical and horizontal level of the base is checked. If the differences are significant, the problem needs to be corrected. For this, a solution based on cement and sand is used. All metal structures are treated with a special anti-corrosion compound. You can begin attaching the thermal insulation a month after the preparatory procedures.
Marking the zero line and setting the starting profile
Before insulating walls with penoplex, you need to mark the location of the lowest row of sheets. For this, a laser or water level is used. The material must be attached so that it is 30 cm below the floor level of the first floor. This way you can avoid the appearance of dampness in the room. The markings are carried out in such a way that there are no even minimal errors that could lead to significant distortion of the slabs in the upper part of the wall.
The starting profile is attached along the perimeter of the building (below the highest point of the building foundation). The clamps are mounted every 30-50 cm. At the points of contact with the base, the elements must fit tightly to it. If there are even small gaps, they can be eliminated using spacer washers. To connect adjacent profile elements on a straight wall, special fasteners are used. In addition, there must be a gap of 3 mm between them.
Preparing and cutting penoplex boards
The insulation of the wall is carried out after adjusting the foam boards. At the corners, the sheets are mounted with a toothed lock. To do this, the fragments through the row are shifted outward at a distance slightly greater than the thickness of the material. All pieces that border the profile should not be narrower than 20 cm.
In the area of window and door openings, you need to use elements cut in the shape of the letter “L”. In this case, it is important to leave an allowance inward for proper joining with the slope insulation. For cutting slabs, heated wire (nichrome), a hacksaw with fine teeth, and a stationery knife are used.
Preparation of adhesive composition and installation of insulation boards
To insulate walls with penoplex from the outside, special glue is used, which is prepared immediately before starting work. Preparation of the mixture and fastening of the material is carried out according to the following instructions:
- The glue must be mixed in accordance with the proportions and in the sequence indicated on the package. The first stage lasts 5 minutes, after which the composition should stand for 10 minutes. Next, it is kneaded again for 5 minutes. The product must be used within 2 hours. The glue must be used at a temperature of at least +5 degrees.
- Glue is applied along the perimeter of the slabs in a strip of 10 cm. The maximum layer thickness is 2.5 cm. The sheet must be filled to 40% of the entire area.
- The first row is laid on the starting profile so that the edge of the material rests tightly against the limiting edge and does not extend beyond it.
- After applying the glue, each fragment is pressed tightly to the base. Excess mixture is removed immediately. In this case, you need to constantly monitor the horizontal and vertical levels. You can adjust the position of the plates by tapping with a grater.
- 3 days after laying the panels, they are additionally secured with “fungi” dowels.
Since when using penoplex to insulate walls, gaps may remain between the slabs, which are filled with polyurethane foam-based polyurethane foam.
Creation of a reinforced protective plaster layer
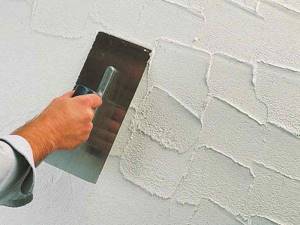
After installing the insulation, it is covered with plaster reinforced with fiberglass reinforcing mesh. Its specific density is 140-160 g/m2. The insulated facade is plastered with the same compound on which the slabs were attached, but its consistency should be more liquid.
Strips of mesh, 30 cm wide and 1 m long, must be fastened starting from the corners and slopes. Next, an adhesive composition is applied to it. The layer thickness is 0.2 cm. After this, a metal corner is mounted. The mesh must be completely hidden in the plaster. There is no need to make the stripes too long. Adjacent elements must be overlapped by up to 10 cm.
After the solution has hardened, it is grouted. Next, a leveling layer of adhesive plaster is applied. Its thickness is 4-5 mm. After hardening, the surface is thoroughly rubbed.

Decorative finishing
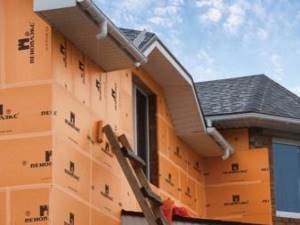
When insulating walls from the outside with penoplex with siding, you will have to make wooden or metal sheathing. It is attached directly to the insulation using dowels or long screws. The sheathing must be fixed firmly, but the insulation must not be allowed to crumple. Sometimes another method of forming a frame is used: fixing the brackets to the base before laying the insulation. It is on them that the sheathing will be fixed.
There must be a ventilation gap 2 cm wide between the siding and the penoplex. In this case, there is no need to use a vapor barrier. Another finishing method is decorative plaster.
How is installation carried out?
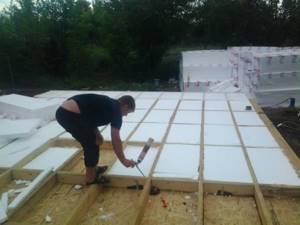
When the outer walls of the frame house are erected, you can begin insulating them with penoplex. The process is so simple that it can even be described schematically. There are no special tricks here:
- First, the space inside the frame cells is cleaned.
- Next, the slab fragments, cut to cell size, are placed in their places. They should fit into the cells as tightly as possible. If there are cracks or gaps between the penoplex and the frame posts, they are filled with polyurethane foam.
- From the outside, the frame is sheathed with OSB slabs.
- From the inside, the entire structure is covered with a vapor barrier film.
- A sheathing is placed on top of the vapor barrier and the finishing interior is installed with a ventilation gap to remove moist air.
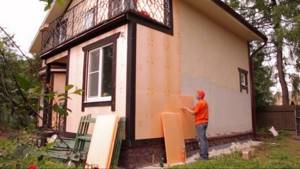
If external insulation is carried out, then everything will be even simpler. Plates of material are cut into elements of the required size and simply glued to the walls. At the same time, there is one nuance - the parts with glue applied to them are applied at a distance of a couple of centimeters from their final position and, after pressing, they are moved to the desired place. After the slab is glued, it is additionally secured with plastic “umbrellas”. The consumption of plastic dowels is four pieces per square meter of area. At corners you can use up to eight pieces per meter.
Insulation of the foundation with penoplex
Proper insulation of a future home must begin from the foundation; this will make it possible to avoid the creation of cold bridges and protect against signs of frost heaving. The use of penoplex as insulation will act as protection against groundwater by creating excellent drainage, which will allow:
- form a reliable waterproofing layer;
- prevent water from entering the basement, which will prevent the foundation from collapsing;
- reduce groundwater pressure on the foundation.

Roof insulation with penoplex
Protection and insulation of the house from the cold will not be complete if the roof is not insulated, through which warm air rises and easily evaporates. Reliable roof insulation has a number of advantages:
- the slabs are mounted reliably and easily due to the specially L-shaped edge;
- the possibility of creating a continuous layer of thermal insulation;
- creation of a hard, light, reliable insulating layer;
- comprehensive insulation of the house (including the roof) will allow it to withstand decent mechanical loads for a long period.
How to insulate a wooden floor
Thermal insulation of a wooden floor with penoplex is usually carried out along the joists. Warming is carried out in the following order:
- Installation of rough ceiling.
- Laying a waterproofing layer.
- Installation of foam boards.
- Fixing the insulation with self-tapping screws.
- Filling gaps between slabs with foam.
- Laying vapor barrier film.
- Laying the finished floor on beams.
- Installation of finishing coating.
The technology for insulating the floor in a wooden house from below along joists, as well as the rules for installing insulation under a concrete base, are described in more detail in the article “How to properly insulate the floor from below - rules and nuances.”
Penoplex is different in that it can be laid directly on open, dry and well-compacted soil. This insulation option is usually used under a concrete screed.
In this case, the following installation scheme is used:
- A 30 cm layer of compacted crushed stone is laid below.
- Next comes a layer of sand, compacted to a thickness of 10 cm.
- Then lay penoplex 100 mm thick (thinner sheets can be laid in two layers perpendicular to each other). The plates are glued together with special metallized tape.
- Next, a waterproof film is laid.
- A fiberglass mesh is laid on top.
- A 5 cm thick screed is poured on top.
Flaws
When choosing penoplex for thermal insulation of a wooden house, you should also take into account the disadvantages of the material. The main one is flammability.
A wooden house itself is a fairly hot structure, and the use of materials with a low fire safety rating only increases the likelihood of a fire.
Another important disadvantage is the high vapor permeability rate. However, if a high-quality vapor barrier is carried out before thermal insulation of the house, then this drawback can be ignored.
In addition, polystyrene foam, which is used for insulation, is usually treated with fire retardant compounds that prevent it from burning.
As a result, such material does not burn, but slowly melts, gradually fading.
Tips for quality insulation
- During the construction of a house, insulation slabs are strengthened over the rafters, which will create a leak-free insulation layer;
- If repair work is being carried out on an already finished building, the option of fastening from the inside is allowed, and additional thermal insulation of the attic will further improve the thermal insulation characteristics;
- The installation process occurs by attaching it to the sheathing with ordinary nails and does not require much labor;
Choosing penoplex as the main insulation will reliably protect your building not only from cold weather. It is safe because it does not contain various resins, dust, and is environmentally friendly.
Advantages
Expanded polystyrene as insulation for walls, floors, and roofs is very popular among owners of frame houses. This is due to a number of its advantages compared to other heat-insulating materials:

- moisture resistance (can be used to insulate foundations and basements where there is direct contact with water);
- fire safety (modern foam plastic does not support the combustion process);
- not subject to rotting;
- low cost;
- light weight;
- low level of thermal conductivity;
- environmental friendliness (does not emit toxins during installation and operation);
- ease of installation.
This heat-insulating material is not afraid of temperature changes. Foam insulation creates an additional soundproofing layer. Over time, its slabs do not shrink and do not change their geometric parameters.
Due to its many advantages, this material has been used in construction for more than 40 years. More than 60% of all expanded polystyrene produced in Europe is used to insulate houses.
Flaws
Polystyrene foam cannot come into contact with organic solvents (acetone, turpentine), saturated hydrocarbons (alcohol) and petroleum products (kerosene, gasoline and others): under their influence it is damaged or dissolved.
With prolonged exposure to ultraviolet radiation, the material may begin to deteriorate, so it is always covered during storage.
Styrofoam
Flaws
- Low mechanical strength. At the slightest impact, the material bends, breaks, and crumbles.
- Rodents love to live in it, which over time destroys the slabs. Consequently, you will have to periodically engage in “spot” repairs.
- When subjected to strong thermal effects (fire), the foam releases toxic fumes.
- Convenient for finishing smooth surfaces. If they have a complex configuration (bends, turns), then it is better to use a different insulation.
Advantages
- It does not absorb moisture, although a lot depends on its density. Too loose, with many pores, capable of accumulating water. But if you make high-quality waterproofing, you don’t have to worry that the thermal insulation layer will get wet. The use of dense foam plastic (extruded polystyrene foam) eliminates the need to install high-quality vapor and waterproofing. Although this should not be completely ruled out, since the remaining structural elements of the building need such protection.
- Low cost. Perhaps one of the cheapest insulation options.
- Easy to process (cut, saw).
- It dampens sounds well.
- It “holds” its shape, therefore it is suitable for finishing any surfaces (horizontal, vertical), as it will not “slip”.
Technology
The peculiarity of the installation is that the surface to be finished must be flat, otherwise various “samples” (recesses) will have to be made in the slabs, and this is undesirable. The foam should fit tightly over the entire area of the sheet.
As a rule, the outside is laid in 2 - 3 layers, depending on the climatic conditions in the region. The easiest way to seal joints between sheets (plates) is with polyurethane foam.
It is necessary to pay attention so that the joints of adjacent rows do not coincide in place, otherwise a “through” gap will form, which will increase heat loss
Insulation of external walls with penoplex with siding
Carrying out work on insulating external walls must follow certain rules:
- First. Preliminary preparatory work on the surface must be carried out; the wall must be free of flaws and treated with antifungal agents;
- The second step is the installation of the base profile on which the penoplex will be installed. These manipulations are necessary for an even layer of future insulation, this will provide additional protection from harmful factors.
- The next step is to install the foam boards so that there is a gap of 2 millimeters between the sheets.
- After installing the penoplex boards, they must be secured; for this purpose, special dowels or an adhesive mixture are used, which is used to pre-treat the wall surface and the penoplex sheets.
- The last stage is decorative processing or finishing of the facade with siding.
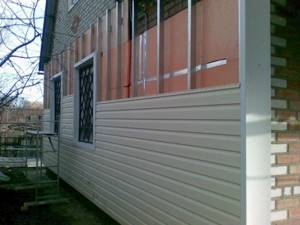
Penoplex for siding
Fill the joints with polyurethane foam
Insulation of external walls using penoplex is possible due to the lightness of the material and installation work. After completion of the repair, subject to technical nuances, you will receive additional insulation and insulation from many unpleasant external factors. Good luck with the renovation.
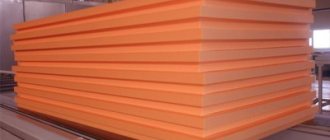
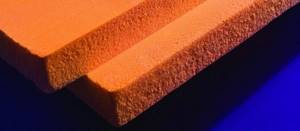
What kind of material is this
Penoplex has another name - foamed polystyrene. It is made from liquid polystyrene passed through a special apparatus - an extruder. In it, the liquid substance foams and is formed into large slabs under high pressure. After such processing, the output will be a very light, dense and rigid material with a low thermal conductivity. It differs from polystyrene foam in its denser structure and strength. In addition, various additives used during the production process change the basic characteristics of this material:
- It retains heat very well. A low thermal conductivity coefficient will ensure maximum heat retention in the house.
- Since the material is waterproof, it can also serve as protection against moisture. By following the installation instructions, you can obtain a reliable barrier to moisture.
- The sound insulation performance of a structure covered with penoplex will also increase. However, you shouldn’t expect a miracle; it’s still warm, not a sound-proofing material.
- It is durable, unlike looser foam, and can withstand significant loads.
- This insulation is fire resistant and melts under high temperature. However, the addition of fire retardants during the production of the material makes it not as fire hazardous as many people think.
- You should not use various chemicals to clean penoplex - solvents can corrode the surface.
- It is universal in terms of use inside or outside buildings, as it does not have any adverse effects on health.
- In terms of cost, this thermal protection option will be one of the leaders - it is difficult to find an equally effective, lightweight and easy-to-install thermal insulation option at a similar price.

With all this, processing and installation of penoplex does not cause any problems at all. The light weight of the plates allows you to work even alone, and processing is carried out using a regular saw or hacksaw. To secure this heat insulator in the walls, you will need polyurethane foam, and for external insulation, special plastic dowels, simply called “umbrellas,” are suitable. Installation with glue is also possible.
How to calculate the thickness of penoplex for high-quality insulation?
Before you start calculating the thickness of the foam sheet, you need to know what material the walls of the house are made of. Any material has its own thermal conductivity properties, so each wall requires its own thickness of insulating material.
What thickness of penoplex should I choose for wall insulation? Formula for calculating the thickness of penoplex :
P (design thickness, m) = R (heat transfer resistance) * k (0.028 W/(m2*°C).
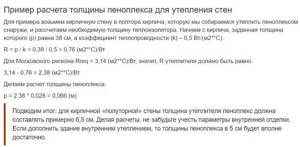
Example of insulation calculation
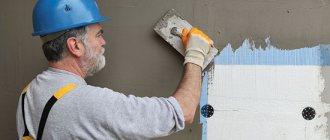
Preparing the wall surface
Before starting installation work on placing thermal insulation on an external wall, work must be carried out to clean and treat the surface . All irregularities are completely removed, then using putty and other repair materials, all defects in the wall surface are corrected, namely:
- cracks;
- chips;
- holes.
IMPORTANT! Afterwards, the surface is treated with special solutions that prevent the development of fungi and mold. After the wall has completely dried, an adhesive composition is applied to which the insulation is fixed.
Preparing the wall surface
Methods for attaching penoplex to the wall, the most optimal method
To install penoplex sheets as insulation for aerated concrete and other types of walls, several fastening methods are used:
- EPS is attached with special glue or mastic;
- Use of special polyurethane foam;
- Fastening penoplex using dowels.
Each option has its own characteristics. Experienced builders use several methods simultaneously to better fix penoplex . For example, the use of glue, and additional fixation on top with dowels.
Subject to the recommendations and requirements for the use of each method, the strength of the insulation is guaranteed, which can withstand the additional protective layer of finishing.
Fastening with dowels
Fastening with polyurethane foam
Installation of a wet facade
First of all, let’s look at how to perform penoplex insulation using the “wet facade” technology, since it is this technology that raises the most questions and disputes. The advantage of this technology is that it can be used not only for thermal insulation of houses, but also apartments (for this you must obtain the appropriate permit).
In addition, this solution allows you to give the building a respectable appearance. The only thing I note is that for a number of reasons this technology should not be used for thermal insulation of wooden houses.
The insulation process consists of several stages:
Work order
Next, I will introduce you to all the nuances of work at each of these stages.
Preparation of materials
First of all, you need to prepare the materials. At this stage, it is extremely important to choose the right glue for penoplex. I recommend using a special adhesive foam for these purposes, for example, FastFix from the same Penoplex .
Adhesive foam FastFix from Penoplex
In addition to glue, you also need to prepare some other materials:
- Ceresit CT83 glue, which will be used for plastering;
- fiberglass reinforcing mesh for exterior use;
- perforated corners;
- facade decorative plaster;
- facade paint;
- adhesive primer;
- deep penetration primer.
The thickness of the penoplex for insulating the facade should be at least 5 cm. But, it is advisable to lay the slabs in two layers so that the thickness of the insulation is 10 cm.
After preparing all these materials, you can start working.
Treating the wall surface with primer
Preparing the walls
So, before covering the walls with penoplex, you need to prepare them.
This work is carried out as follows:
- remove from the walls all elements that may interfere with the finishing - canopies, antennas, etc.;
- Next, it is necessary to provide a reliable foundation, i.e. if you notice, for example, peeling areas of old plaster, you need to get rid of them;
- after this, wipe the facade with a damp cloth or vacuum so that there is no dust on the surface;
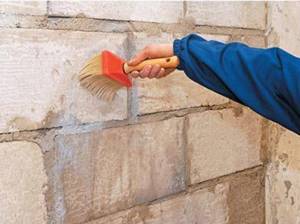
- Now the surface of the walls needs to be primed with a deep penetration façade primer. The most convenient way to do this work is with a paint roller; you can also use a brush.
The primer must be applied in an even, thin layer. After the walls dry, be sure to repeat the procedure. .
This completes the preparation process.
Setting up a starting profile
Gluing penoplex
Now you can start gluing the facade with penoplex.
Instructions for doing this work look like this:
- First of all, it is advisable to attach a starting profile from below along the perimeter of the facade, which will allow you to level the bottom row of insulation. The profile is installed using dowel nails. In this case, it is extremely important to position the profile correctly, so during the work use a level ;
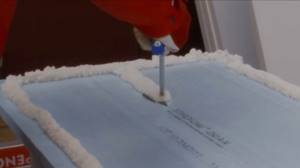
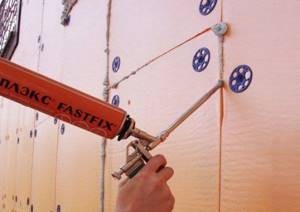
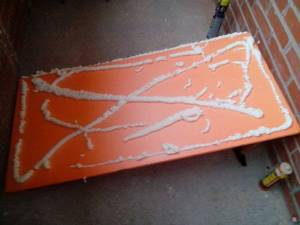
Applying foam adhesive to penoplex
- after this, the adhesive foam is applied to the penoplex around the perimeter and center of the slab, as shown in the photo above. Moreover, it is advisable to apply even a few strips of foam in the center;
- Now you need to glue the plate to the wall. Work starts from the corner - insert the slab into the guide profile and lightly press it against the wall. Be sure to check the position of the insulation with a level;
- then the entire first row is glued using this principle. Try to place the slabs as closely as possible to each other so that there are no gaps;
- then the second row is glued on. It must be mounted offset, i.e. in a checkerboard pattern, and with bandaging of the corners;
Example of dowel placement
- After all the walls are covered with insulation from top to bottom, it is necessary to install penoplex on the slopes. To do this, cut the slabs into panels of the required width and cover the openings of windows and doors with them;
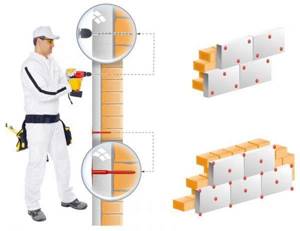
- now it is necessary to additionally fix the slabs of extruded polystyrene foam with special dowels, which are popularly called “umbrellas” or “fungi”. To install the dowel, you need to drill a hole in the wall directly through the insulation. The hole must match the diameter of the dowel, and the length should be 5-10 mm longer .
As for the location of the dowels, it is advisable to install them in the corners at the joints so that one head fixes several slabs at once; in addition, one or two dowels should be placed in the center. Keep in mind that the caps must be recessed.
As for the slopes, there is no need to fix them with dowels.
For complete external insulation of the house, it is advisable to insulate the foundation. The technology is quite simple - the foundation is dug up, cleared of dirt, then covered with penoplex (can be glued to the bridge), and then buried.
This completes the process of gluing the facade.
Frame houses
Frame houses are becoming increasingly popular in the field of country house construction. Lightweight, economical, and quickly transportable, they make the dream of a country house real for almost every family.
- At the moment, there are two technological directions in frame housing construction:
- Canadian technology;
- Finnish technology.
Canadian technology
Due to the peculiarities of the construction region (Canada and the USA), when implementing this technology, local common materials are used - laminated particle boards (OSB), polymer thermal insulation (for example, extruded polystyrene foam), prefabricated SIP panels. Vinyl siding is most often used as exterior finishing. Due to the use of OSB (virtually vapor-tight material), the problem of protection against moisture accumulation is not acute.
Scandinavian (Finnish) technology
A feature of the technology is the use of local high-quality lumber; the supporting frame is made of beams of a larger section. Mineral wool is often used as insulation. For exterior finishing, the most common type of façade board is paintable. Polymer thermal insulation (for example, extruded polystyrene foam) is used as additional insulation. OSB is practically not used for cladding the frame; more often, façade and moisture-resistant plasterboard is used. During the design and construction process, the order of layers in the structure is observed - increasing the vapor permeability coefficients of the materials used in the direction - to the external environment (preventing moisture accumulation).
In general, the technology for constructing frame houses is almost the same for both technological directions, the main differences are due to the availability of certain materials, as well as the culture of local construction.
The use of additional PENOPLEX® insulation for frame houses in the Russian Federation will reduce the volume of wood used for constructing the frame by an average of 25-35%, due to a reduction in the cross-section of the load-bearing beam, as well as significantly increase the energy efficiency of the structure.
Advantages of using PENOPLEX® boards for thermal insulation of a frame house:
- Low thermal conductivity coefficient (λ = 0.034 W/m-K). To insulate the outer wall of any building, a layer of PENOPLEX® material is required that is 1.5 times thinner than other insulation;
- There is practically zero water absorption, therefore, at negative air temperatures outside, when the dew point is in the insulation, condensation does not form in it, the material does not become moistened and does not lose its heat-protective properties.
- Durability of more than 50 years and high compressive strength (at least 20 tons per 1 square meter), which ensures a long maintenance-free service life of the structures.
- Environmental safety - the material is made from safe raw materials, does not contain small fibers and dust, phenol-formaldehyde resins and other harmful chemicals.
Employees have developed a technical map that contains a step-by-step description of the process of constructing a frame house with additional insulation with PENOPLEX® slabs. The document includes diagrams of all structures, technical characteristics of the materials used, and installation recommendations. The technical map is available for download.
Coating properties
Currently, on the market of insulating materials you can find products with a wide variety of performance characteristics. Without these components it is impossible to imagine a modern private building. In such dwellings it is simply impossible to do without reliable insulation, especially in the cold season.
Modern thermal insulation materials are also good because they can help you save on heating systems. Moreover, in a well-insulated house it will be possible to do without purchasing additional heaters, which often “eat up” a lot of electricity. Moreover, in a well-insulated house it will be possible to do without purchasing additional heaters, which often “eat up” a lot of electricity.
One of the most popular thermal insulation materials today is penoplex. It is polystyrene foam, which is extruded during its production. In addition, this high-tech material is manufactured exclusively using special technology.
This insulation is based on foam plastic. This material undergoes heat treatment, after which it becomes much tougher and stronger. At the same time, penoplex acquires increased thermal insulation properties, which make it possible to use such a coating for insulating residential buildings.
The main feature of penoplex is that it has a minimal degree of water absorption. Thanks to this distinctive feature, this material can be safely used even in spaces with high levels of humidity.
Penoplex has a smooth surface, which affects its adhesion to other materials. When installing this insulation, it is recommended to use the most reliable and effective adhesive mixtures, otherwise the insulation will not adhere very firmly to the wall bases.
In addition, it is strongly recommended not to apply “wet” finishing to a house if it is insulated with penoplex. This will worsen its adhesion even more. This feature should be taken into account when installing facade thermal insulation.
Many homeowners are wondering whether it is possible to use cheaper and more accessible polystyrene foam instead of polystyrene foam. Experts still recommend using extruded polystyrene foam, since it has a more reliable and dense structure. In addition, it is vapor permeable and has low thermal conductivity. Cheap polystyrene foam cannot boast of sufficient strength: it is easily destroyed over time, and the thermal qualities of this material are inferior to polystyrene foam.
When installing penoplex yourself in a private house or apartment, it is very important to choose the right installation technology. Craftsmen who have very little experience in such work often install this thermal insulation material in the same way as simple polystyrene foam. When working with extruded coatings, you need to take into account many important nuances, which we will review below.
Tips and tricks
Some tips and recommendations will be completely unnecessary for experienced builders, but if work on insulating a frame house is being carried out for the first time, then the following nuances must be taken into account:
- When foam is heated, substances can be released that can cause irreparable harm to human health. For this reason, you should not insulate the section of the wall where the heating pipe runs with this material. It is recommended to use natural stone wool for these purposes.
- External insulation is recommended to be carried out only using extruded material. This foam is more resistant to negative environmental influences, has greater density and tensile strength.
- It is recommended to install siding on top of insulation only after a layer of vapor barrier.
- When placing foam plastic inside the frame, you can soon expect uninvited neighbors in the form of mice and rats. This material is easily damaged by these rodents and they can make nests in the wall space. To prevent the appearance of living creatures in the walls, it is recommended to make an “expanded clay castle”. For this purpose, expanded pieces of clay are placed between the rough and finishing floors, as well as in the lower cavities of frame walls.
If the work of insulating a frame house seems too difficult, then you should not take risks. A professional team of craftsmen will perform all the necessary operations for thermal insulation of walls, roofs and ceilings with high quality and with a guarantee.
If the owner of a frame house is not against the use of modern insulation, then polystyrene foam is an ideal material for thermal insulation of such a structure. Otherwise, you can use “folk” methods and use sawdust or straw. A good insulation effect can be achieved if you use cork material. Such slabs are environmentally friendly, have low thermal conductivity, but have one serious drawback - high cost.
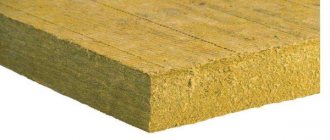
What is the difference between polystyrene foam and penoplex?
Having acquired a light granular structure permeable to air as a result of foaming, polystyrene foam (also known as ordinary polystyrene) simultaneously becomes excessively fragile, which leads to certain difficulties when cutting sheets.
Penoplex (also called extruded polystyrene foam) has a softer structure, which makes it easier to fix on uneven surfaces when performing such a task as insulating a frame house with penoplex.
The disadvantages of this material include the maximum critical temperature of structure destruction + 75⁰C, at which toxic substances are released from it. Also, the material does not withstand the effects of acetones, benzenes, alcohols and their vapors.