Is it a good idea to cover the battery with plasterboard? Many people don’t even understand why to do this. Let's discuss this in detail. Old cast iron radiators and steel gas pipes, which are found in so many houses, can hardly be called works of art. Their presence can spoil any interior in the room. If you create a special box from plasterboard, you can hide the presence of heating pipes and unpleasant parts.
The main advantage of this process is that anyone can do it. You don't need to have special knowledge or be a repair professional. A small layer of drywall will completely hide the radiators. It's also very cheap. In this guide, we will look at not only the process of installing drywall, but also many interesting nuances on this topic.
Technology for assembling gypsum plasterboard structures - step-by-step instructions
The general technology for assembling frames consists of three main stages of work:
- Creating a frame.
- Sheathing the frame on the outside with plasterboard.
- Finishing the surface of the box.
Let's look at these stages in more detail.
Frame making
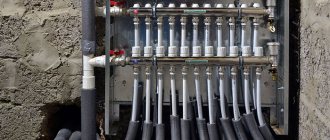
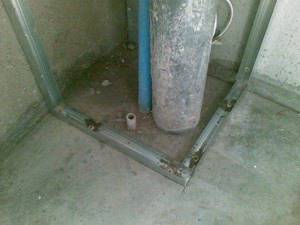
The pipe box consists of two mutually perpendicular planes, attached to the wall and the floor (for horizontal distribution) or to two adjacent walls (for a vertical riser). Therefore, the frame is also made of two gratings perpendicular to each other, fixed to the corresponding surfaces of the walls or floor. The order of assembling the frame is determined by the configuration of the room and the location of the pipelines.
First, you need to attach the main guides to the load-bearing surfaces of the walls or floor, to which the rack elements will be attached, connected by an edge from another main profile. They are connected using special self-tapping screws; at the joint areas, the side shelves are cut with metal scissors and bent to connect the elements more tightly. If wooden blocks are used, first assemble two gratings, which are then attached to the wall on one side and to the floor on the other (or an adjacent wall if you need to cover the riser).
Wooden frame for the box
Step by step procedure:
Step 1. Surfaces are freed from foreign objects (hooks, hangers, mirrors, etc.).
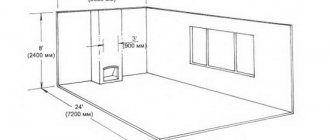
Step 2. The frame is carefully marked. The position of all lines is controlled by a building level or plumb line. The distance to the edge of the frame is determined by the area where the pipes protrude further from the walls, plus 5 cm for the width of the guides or wooden blocks.
We make markings
Step 3. Using an electric drill or hammer drill, prepare sockets for installing dowels. The installation step of fasteners is determined by the size and location of the box, but not less than 0.7 m.
Making holes for dowels
Step 4. Cuts are made on the side walls of the metal main guides where the crossbars are attached.
Step 5. The main guides are installed on the walls and fixed with self-tapping screws.
Fixing the guides
Step 6. Install pre-cut cross members.
Step 7. Both sides of the lattice are connected with an external rib from the main profile, in which cuts have been made in advance for attaching the crossbars.
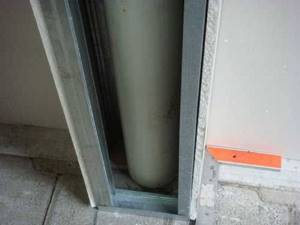
Metal frame for vertical pipes
Installation must be done as firmly and accurately as possible. It must be taken into account that any mistake made when assembling the frame will subsequently affect the appearance of the box. Distortions will become noticeable when laying tiles or wall panels that have clear geometric shapes.
Self-tapping screws for metal with a drill tip
Drywall installation
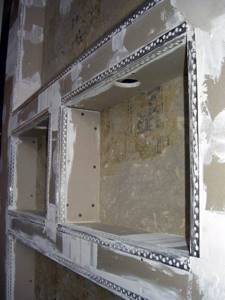
After completing the assembly of the frame, they begin to cover it with plasterboard. First of all, you need to cut pieces of material corresponding to the sides of the box. It should be noted that the first will exactly repeat the shape of the frame, and the width of the other will increase by the thickness of the sheet. It is best to cut off and immediately attach one of the pieces (either horizontal or the one without inspection hatches) so that the size of the second piece can be measured without errors.
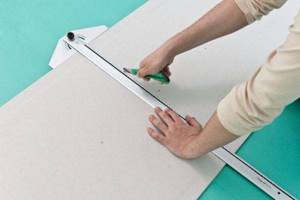
To cut drywall, use a hand saw with fine teeth and a slight spread, a jigsaw, and sometimes a regular stationery knife. They cut the sheet along a ruler, break it along the smooth edge of the table and finally cut it off along the fault line.
Cutting drywall with a utility knife
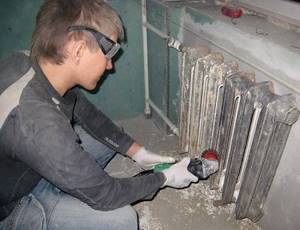
The resulting edge is rarely perfectly smooth, so it is additionally processed with a plane or a special grater. During cutting and processing, a large amount of gypsum dust is raised, so you should work with safety glasses and a respirator. In addition, you cannot work in rooms where computers are installed - fine gypsum dust has a fatal effect on fans, completely depriving them of their functionality and jamming the bearings.
The material is fastened to the frame using phosphated plasterboard screws. They are black with a fine thread pitch. You can also use ordinary wood screws, but you need to be more careful at the final stage - they have a larger thread pitch, so the head may go too deep into the surface of the gypsum board. It is recommended to make the distance between adjacent fasteners in the range of 10-15 cm.
Self-tapping screws for drywall
A socket for installing an inspection hatch or a window for taking meter readings is cut in place. First, mark the surface and drill holes in the corners. Then a hole is cut out of them according to the markings, the dimensions of which correspond to the size of the hatch frame.
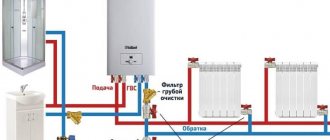
Unusual indoor decor: how to hide heating pipes using different materials?
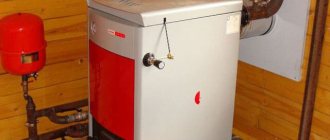
Most owners of apartments and private houses use water heating . This method has many advantages: durability, reliability, warmth.
But the main disadvantage is considered to be lack of aesthetics .
In addition, it is not possible to install pipes in every apartment, or rather, not against every wall, since in the event of an accident the wall will need to be cracked , so this point must be calculated during installation.
There are to eliminate shortcomings . They begin to think about this during the construction process so that difficulties do not arise in the future.
ontakte
Odnoklassniki
Major masking of heating pipes into the room through hiding in the floor or wall is prohibited. The law stipulates that permission must be obtained to alter utility lines.
For this purpose a rework project is ordered and agreed upon with the operating organization.
The chances of obtaining such permission are practically negligible, and it is impossible to change common property without permission, since the punishment may be confiscation of housing. speaks about this . 29 Housing Code. Therefore, there are legal aesthetic methods of masking.
How can you cover the radiators on the wall and hide them in the floor?
To hide the pipeline in the apartment, it is recommended to choose any available method rather than walling it into the partition of the room or into the floor, since absolute accessibility is necessary in the event of a breakdown.
The possibility of such a process depends on the metal . It is allowed to lay stainless and copper risers, metal-plastic, with press connections, cross-linked polyethylene. Polypropylene, metal-plastic with a compression fitting is not installed in the wall.
To hide the pipe in any living room, a groove is made in the room partition to the required width and depth.
A heat-insulated riser is placed and finishing is carried out.
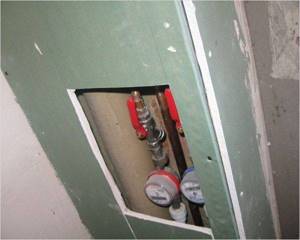
Only the smooth part of the pipe that does not have joints is walled into the wall , because, according to technical requirements, accessibility to:
- counter;
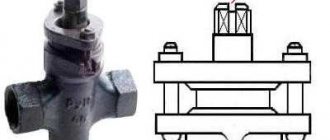
- a valve that shuts off the flow;
- flange, threaded connection;
- pump;
- expansion tank and other systems.
Before closing the heating riser in the room in the wall or floor, a special casing is put on to reduce heat losses and to conduct system tests.
Attention! A heating pipe routing diagram is required. This will be required to ensure that future possible repairs do not destroy the integrity of the hidden highway.
How to disguise with plasterboard?
The most common method of hiding a radiator. In a living room, near horizontal or vertical risers, a frame is built from a galvanized profile or wood, sheathed with plasterboard. Options for using materials: box or false walls.
How to close a radiator and how to close it
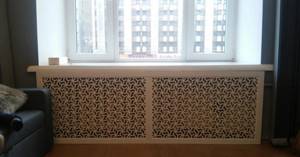
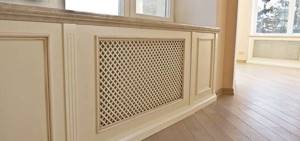
Using decorative grilles and screens that match the interior of the room, you can hide massive cast-iron heating radiators from view. This allows you to obtain the necessary aesthetic compliance of the room with the planned renovation. In addition, such structures also perform practical work, protecting children in institutions from possible injury.
The industry offers a wide range of similar products, so today our task is to help you choose the right one. Most often, inexpensive plastic screens are chosen for office and residential premises, which are produced in a wide range of colors, which makes it easier to match the interior. Only products made from natural wood are allowed in government institutions.
When choosing how to cover radiators, buyers most often pay attention to screens and decorative grilles, which have their own design features. They can be divided into the following groups:
| Mounted | May be with or without lids. Designed to disguise cast iron radiators placed in a niche under the window sill or slightly protruding forward. Their price depends on the size of the products. |
| Flat | Used for fencing batteries installed in deep niches. |
| Attached | Used to completely hide the installation location of the heating device. |
The following products are made from:
False wall or plasterboard box
Most of us, when carrying out repairs, want to remove from sight not only the batteries, but also the supply pipes to them. The latter also prevent the suspended ceiling or flooring from being properly made. In this case, the entire supply line along with the radiators is often hidden behind a false plasterboard wall.
Instead, you can install a gypsum plasterboard pipe box if every centimeter of usable space in the room is important. Below you will learn how to cover a heating radiator with plasterboard yourself.
- Prepare materials and tools:
- pencil;
- roulette;
- building level;
- metal scissors;
- screwdriver;
- dowels and screws;
- UD and CD profile;
- drywall;
- decorative lattice.
- Make a frame from a metal profile to mask a heating radiator installed in a niche around the perimeter of this recess. Create a single frame using a UD guide profile, which must be attached to the bottom of the window sill, to the walls and floor with self-tapping screws.
Insert the CD profile vertically into the resulting frame on both sides of the radiator. Make sure that the distance between them is slightly larger than the size of the decorative grille.
After this, connect the vertical CD profiles to each other with 4 pieces of UD profile 60 mm long. Moreover, place the segments with the open side facing the heating device. They will become the basis for horizontal profiles indicating the height of the decorative frame. Install additional vertical CD profiles, if necessary, every 600 mm.
- Sew up the frame with your own hands with sheets of plasterboard and putty them. After this, hang the decorative grille. Fasten the profiles together with small LM screws.
Advantages of decorative grilles
- The amount of dust settling on batteries, which have a difficult shape for cleaning and washing, will be reduced.
- A large selection of protective screens that match the interior of the room in style and material.
- They will be able to protect small children from injury when falling on metal heating appliances. In addition, there is no need to fear that the child will get burned from touching them.
- The practicality of the equipment - it ensures uniform distribution of warm air flows in the room.
- In a short time you can hide old cast-iron radiators, which with their appearance only spoil the interior of a newly renovated room.
There is another opinion of specialists who do not deny the beauty of the products and their contribution to the overall atmosphere of the room, but at the same time believe that in this way the heat transfer of the equipment is significantly reduced. At the same time, this is easily refuted by the practice of operating such grilles and screens that do not prevent heat from escaping through their openings.
How to close radiators with circulating air outlet
Before covering a heating radiator or decorating it, find out the recommendations of professionals:
- Do not completely block convection air flow paths. As a result, the temperature in the room will drop and condensation will appear on the windows.
- Opt for a design that is easily removable or has a window that provides quick access to pipe threads and batteries.
- The instructions oblige to provide access to the control components - taps and thermal heads.
Design options
Before actual work, we select the type of structure. Finishing can be:
- Hinged screen and cover. Better for a large, cast iron radiator. Suitable for structures with large dimensions.
- Hinged screen without cover. For cast iron batteries, as well as other types of structures.
- Flat screen. It is better for installation on a modern radiator, which will be located inside a niche.
- Attachment box. It hides the entire battery well, as well as all the mounting points.
Each design must be selected individually. Consider the variety of your batteries, only then make a decision.
How to sand the walls behind the battery
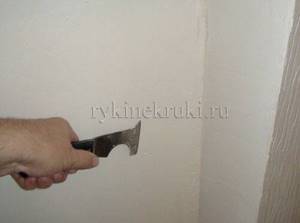
Now here is another important nuance. After puttying, if we follow the correct technology, we must sand the wall. But don’t forget that sanding with sandpaper is a sea of dust. But the main repairs have already been done. Therefore, here you can go for simplification, as in the case of plaster without beacons. We will not sand the wall with sandpaper. We'll just take a sharp spatula and cut off all the extra putty microtubercles. There will be minimal dust, and the wall will still be quite smooth. Even if the wall doesn’t turn out to be perfect, then for the case of batteries, as they say, it will work. Work for 0.5 hours:
Preparing for finishing
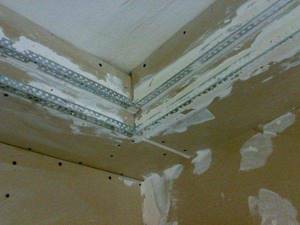
The assembled plasterboard structure is prepared step by step for finishing:
- All corners are additionally reinforced with special perforated corners: this will protect them from damage during operation. A small layer of putty is applied to the corners, after which the corner is pressed into it. Excess mixture comes out through the holes and is removed with a spatula.
- The seams are glued with reinforcing mesh and then sealed with putty. After it dries, grouting is done using fine sandpaper. The technology of work is described here.
- The holes formed by the heads of the self-tapping screws are sealed with putty and then rubbed down.
- The entire niche is coated twice with primer. The second layer is applied only after the first has completely dried.
Before finishing with wallpaper or paint, the structure is puttied; before laying tiles or decorative stone, this is not necessary.
Adhering to simple rules and recommendations, creating a niche from plasterboard yourself will not be difficult even for a novice craftsman. Ask questions about the installation process in the comments!
Factory options or the best way to close heating radiators in an apartment or house
Modern industrial decorative grilles fit well into a residential interior, while simultaneously masking unsightly heating devices. The price of most copies is quite acceptable, all that remains is to make the right choice.
Hinged shields with top cover
Most often they are made of metal. Inexpensive products are made of painted iron, more expensive ones are made of stainless steel. The advantages of such panels include:
- Ease of installation - knowing how to cover a heating radiator with a decorative screen, the main work can be done with your own hands without the help of specialists.
- No obstacles to heat transfer - almost all products are manufactured with holes to improve convection. The shape of the holes is for every taste.
- Manufacturability - hinged panels are designed for one- or two-sided pipe connections.
Flat panels
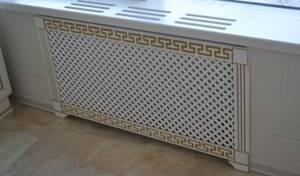
The most common category, which is used to decorate heating devices located in niches. At the same time, such grilles play a decorative role in the interior of residential premises. In stores you can find a large assortment of screens with various designs, carvings and forgings, some of them can be compared to works of art.
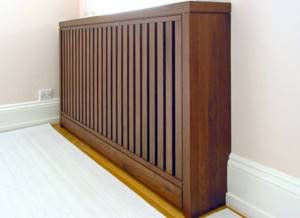
Made of wood
Such false panels are ideal for any interior. If you have experience assembling at least small gazebos for your summer cottage, then the problem of how to hide the battery with your own hands does not exist for you. Products can also be made to order, in some carpentry workshop.
Wooden structures will help to withstand the elegant component of country style or all the rigor of classicism. When thinking about the topic of how to cover heating radiators in your own apartment, it is worth remembering the cost of handmade individual work - it is several times higher than consumer goods copies.
And yet, deformation of the wood due to temperature changes and humidity fluctuations cannot be ruled out. You can avoid such consequences only by purchasing a product made from high-quality wood.
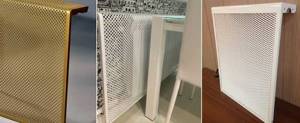
Made of metal
Such fences attract, first of all, their affordability. The design component of such products is quite primitive, which is why they have a low price. However, despite this, they perform their function fully.
The panel is made of a thin sheet of metal, which can be painted in any color. More expensive specimens are made of stainless steel; their appearance is aesthetic and elegant.
Made of plastic
Taking into account the affordability of plastic products, you should not count on their durability. Moreover, not all of them meet the standards, as a result of which, when heated, they can release a bunch of harmful substances
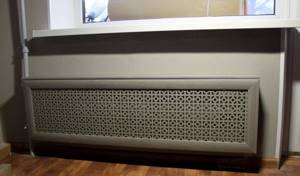
Box screens
You can find out how to hide a battery in a room from photos of similar interiors. However, even modern heating devices do not always correspond to the design concept of the room. Then you have to completely isolate them “out of sight.” Box-shaped grilles are classified according to the type of material from which they are made.
MDF screens
One of the most common options for decorating heating appliances. Craftsmen who know how to carefully cover a heating radiator with a screen insist on this particular material. The MDF structure is not as difficult to maintain as wood, and is easy to install with your own hands.
An important advantage of such products is that their cost is 50-70 percent less than wooden ones. And this with characteristics that are not inferior to analogues made from natural wood.
Glass panels
The glass screen looks very aesthetically pleasing and can easily complement the stylish design of any room, including a corporate building. Depending on the appearance, glass panels are divided into:

- Matte.
- Transparent.
- Plainly colored.
- With unique photo printing.
Of course, the glass structure is fragile, so manufacturers produce samples with a thickness of at least 6 mm. For greater safety, you can buy tempered glass; it combines mechanical strength and heat resistance. Even if the panel manages to break, the fragments will be small and have blunt edges.
Types of boxes for radiators
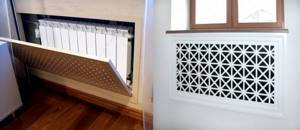
MDF grille under the window sill
First of all, boxes are divided according to the type of construction. The following options are available:
- Flat box - an example of such a product is shown in the photo above. This is not so much a box as a decorative panel that can be made of different materials. It is installed on a window left in an installation assembled from plasterboard, MDF, wooden paneling and other materials of a similar type.
Advice! The size of the grille is selected so that it is slightly wider than the radiator itself, along the edges of which input and output connections are made and taps are installed. That is, in this way we create access to these technical nodes.
- Oddly enough, the installation of such a box is the most difficult, since it also includes assembling the installation. We will talk about this in detail in the second part of the article - we will provide step-by-step instructions, analyze the intricacies of installation and give useful tips. The only exceptions are situations when the battery is initially installed in a wall niche, for example, under a windowsill.
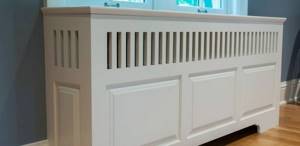
Closed wooden box
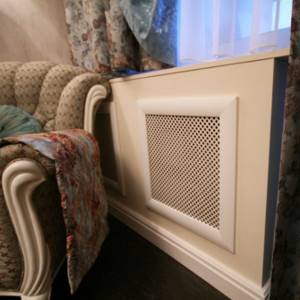
- The other option is called closed . Depending on how the radiator is connected, it may include side parts, have holes in them for pipes, or be completely devoid of them.
- Such boxes are sold as one-piece products. There are a huge number of them on the market - the options differ in shape and design, so choosing the best box for a specific interior is not difficult.
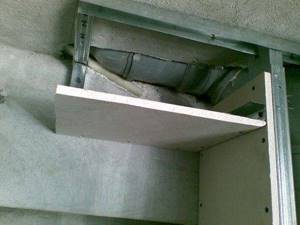
Closed hanging box
- The dimensions and shape of the products will also differ from model to model. The same applies to the principle of fastening such a box. The photo above shows a compact hanging type option. Its front panel can be carefully removed, which will allow you to get to both the battery itself and the mounting system that holds the entire product on the wall - very convenient and practical.
- Floor boxes are also attached to walls using mechanical fasteners, but they have additional support, which makes the installation process somewhat easier. They look more massive and solid, and if hanging options are better suited for typical rooms, which are found in our apartments, then these will fit perfectly into the interior of a house with high ceilings and spacious rooms. This is also facilitated by the fact that water pipes often approach the radiator from the floor, or come directly out of the walls where they are installed. That is, the box will completely hide all communications.
- In apartment buildings where risers enter the rooms, this will not work, so you have to choose the most accurate option.
Different access systems for heating radiators
Each type of box has its own way of accessing the batteries. This point should also be taken into account before installation. The options may be as follows:
- As mentioned earlier, radiator grilles are placed in holes in installations, or cover niches in the walls. Depending on the shape of the product, its fastening will also differ. Plastic options have a mounting base and a decorative trim around the perimeter of the grille. This allows them to be inserted into a hole of a certain size and shape without using any fasteners. When needed, they simply pull out, revealing the radiator.
- The photo above (left photo) shows the hinged opening model. Such a grille will cost a little more due to its complicated design, but it is much more convenient to use than other overlays. Stoppers that can be removed prevent the door from opening completely. If technical work is necessary, the door can be removed completely.
The panel is glued to the installation
- Models made of wood and MDF are for the most part constructed as a regular overlay, which does not have any mounting devices. They are placed on glue. This installation option is very simple to perform, but later it results in certain difficulties. Imagine that you need to turn off a tap. You rip the grille off (it's quite possible to damage the wall finish in the process), do what needs to be done, and want to reattach it. But not everything is so simple, since there is old dried glue on the back of the product and on the installation itself, which will not allow the parts to fit tightly together.
- As a result, these residues will need to be cleaned off, which takes a long time and sometimes is completely impossible. Therefore, we consider the built-in option to be more preferable.
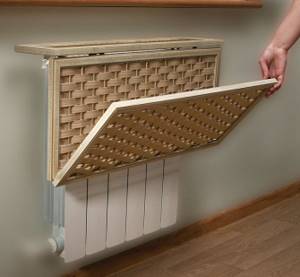
Double-sided folding grille
- If we talk about closed boxes, then there are a lot of options for accessing batteries. Moreover, such products can be completely removed in the shortest possible time and then returned back, which will give complete freedom to the craftsmen who repair the heating system.
- The photo above shows the folding model. Not the most successful solution, in our opinion, since the gratings that make up the front side will dangle and sway without additional fastenings.
All the beauty is spoiled by the pipes going to the heating riser
Prices for radiator grilles
Radiator grille
Manufacturing materials
Radiator boxes are made from different materials. Let's look at the advantages and disadvantages of the most popular solutions:
Quite a rough metal box
- Metal – looking at the photo, many have probably already winced, because the solution is not very attractive in appearance. And why cover a metal battery with the same metal box? It doesn't add beauty! The fact is that the function of the box is not only to decorate the room. It is also installed for protection - some radiators are so hot that you can actually get burned on them. But such a box will save you from troubles. In addition, it has high thermal conductivity, which reduces heat loss and promotes a more uniform distribution of heat in the room. It is very durable and, unlike the same wicker options, will not be damaged in any way by an accidental blow. The boxes are not afraid of changes in temperature and humidity, they last a long time and are inexpensive when compared with closed wooden models.
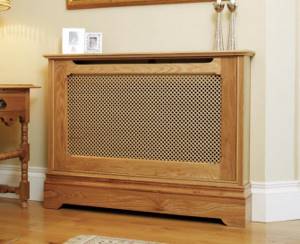
Natural wood is always in price
- Wood , unlike the previous option, looks noble and can be matched to any interior style. The buyer always has a choice according to the type of wood, which will change the natural pattern of the material and its performance characteristics, according to the type of processing - it is varnished, brushed, painted, coated with oils, and so on. Moreover, if the material has gone through all stages of processing, it tolerates temperature changes well. It is environmentally friendly and safe for humans, does not cause allergic reactions and is pleasant to tactile contact.
- Disadvantages include the high price and intolerance to high humidity, although this does not apply to all breeds. For example, larch doesn’t care about moisture; you can even put it in water for a long time - it will only become stronger from this. Another disadvantage is reduced thermal conductivity, which is why it is so important that the product design includes properly positioned convection holes. Their size also matters, so we give preference to larger ones.
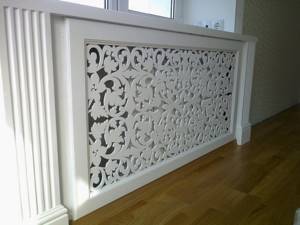
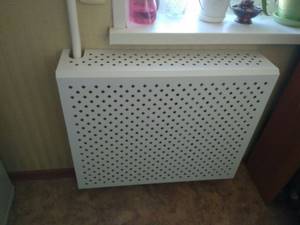
Milled MDF grille
- The next group of popular materials are MDF, fiberboard and plasterboard . We combined them together for the reason that they are perfect for milling. An example of such a lattice is shown in the photo above. Its essence is that various figures are cut into a solid panel, which can be of absolutely different complexity, ranging from simple holes to complex filigree patterns of any format.
- Milled panels look very beautiful and, due to their pattern, can be suitable for one or another type of interior. If we talk about thermal conductivity, it is also quite low, but due to the large number of holes, the flow of warm air from the radiator passes almost unhindered.
- These materials and some of their properties are also combined. For all three, exposure to moisture is not advisable. Together with temperature changes, such conditions can lead to rapid deterioration of the boxes.
Video - Drywall battery boxes
Prices for drywall and sheet materials
Drywall and sheet materials

Plastic radiator grille
- Here is the most budget-friendly option for a radiator grille. It is a set of inclined slats mounted on a frame . We wrote more about the design above.
- Plastic also transfers heat poorly, so when installing, you need to be prepared for a decrease in battery efficiency. However, they can be safely used in rooms where other models could be damaged by water and steam. These are bathrooms and stuff.
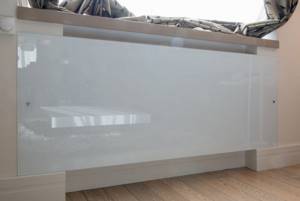
Glass panel for radiator
- And the last, so to speak, exotic option is glass . Such boxes look very impressive and fit stylistically into many modern interiors. They have good thermal conductivity (better than wood), but from a practicality point of view they clearly do not meet safety standards. Glass is a fragile and unreliable material and can be broken by accident. There are no convection holes in it, as this will further reduce the strength of such protection, so air can only circulate through the openings at the top and bottom of the panel.
It's up to you to decide which box to buy. We have given you the information, and you can decide for yourself what happens next. Therefore, without delaying any more, let’s move on to assembling and installing the box under the radiator.
Find similar information about making a plasterboard box in our special article! All about the types of drywall, the advantages and disadvantages of the protective box, components for drywall. Step-by-step instructions for making a frame!
Installation of a frame for a box: how to cover a battery with plasterboard
- To install the box, use the CD and UD profiles. Its use is convenient because the thickness of the CD is 27 mm with a width of 60 mm, and the UD has 27x27 mm - these dimensions will allow you to make the structure the most compact, pressed against the main wall. With such a device you can camouflage not only the battery, but also the heating pipes , making shelves on top for flowerpots.
- To install a plasterboard box with your own hands, you need to accurately determine the edge of the protrusion of the structure and screw the UD profile along it to the floor. If you intend to cover the pipes, then extend the guide from wall to wall, and if not, then limit yourself to the size of the battery. Connect the front line to the wall with the same profile.
- Along the wall, near the radiator, screw two UD strips vertically, marking the inner corner of the box. After this, determine the height of your structure and cut pieces of CD for vertical sheathing of the plasterboard floor. Insert the cut pieces into the floor UD and put the same profile on top, mirroring the location of what is on the floor - fasten all this together with self-tapping screws.
- Now you need to find a lattice for the facade and for the top of the box in order to make a frame according to its size. This same contour can be made from the same CD, cutting the side flanges at the junctions with the profiles of the same name. This way the frame for the drywall will acquire additional rigidity, and fix the profiles to each other using special small screws for sheet steel.
- Cover the metal frame with plasterboard sheets and, before puttingty or wallpapering, install a galvanized perforated profile at the corners for rigidity. In these cases, any gypsum board is suitable - wall, moisture-resistant and even ceiling - the main thing is that the instructions for its installation are followed. These prescribed rules mean the frequency of self-tapping screws (at least 30 cm from each other) and the depth of immersion of the screw head (1-1.5 mm below the gypsum board plane).
Installing the frame
To disguise the heating battery, you need to create a special metal frame. To do this we need several metal profiles, dowels and screws. The structure is held together and is reliable. Then we will use scissors, a hammer drill, a screwdriver and pliers. First, we cut and secure the main parts of the structure, then they need to be installed in the wall:
- Using the U-shaped profile, press it tightly against the wall.
- Use a screwdriver to create a small mark.
- You need to create several holes for future fasteners.
- Then a dowel is inserted there.
- We press the profile in the right places.
- We screw in the screws, securely and firmly.
Each hole in the profile must be at least 15 centimeters apart from each other, the maximum distance is 25 centimeters. The markings are created in advance so as not to cause trouble during installation. All guides are mounted on the wall. Where there are corner joints you need to use metal scissors. Now it remains to form the final depth of the box.
Step-by-step installation instructions
Preparing the base
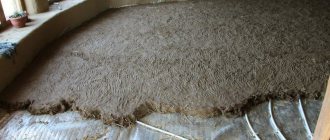
To build a structure, the foundation must be properly prepared. The old coating is cleaned from the surface, dirt and dust are removed, and primed.
If the wall on which the battery is located has significant unevenness, then it should be made smooth using gypsum plaster. Then it is advisable to putty the surface, since it will be impossible to do this after the construction of the structure.
Markings and drawings
If you plan to make a floating box to disguise the battery, then:
We measure the required distance from the bottom of the radiator and draw a straight line along the level - the bottom of the box. Draw the side lines using a construction corner
It is important not to forget about the 15 centimeters that should be between the edge of the batteries and the beginning of the structure. We connect the upper edges of the perpendicular lines by level. We inspect all straight lines according to the level. If a box standing on the floor is mounted, then the markings begin from the top edge of the battery, and perpendicular lines are drawn from top to bottom
You can see how to do this in the photo
If a box standing on the floor is installed, the markings begin from the top edge of the battery, and perpendicular lines are drawn from top to bottom. You can see how to do this in the photo.
In addition, the box is marked on the floor so that the end of the box on the front side protrudes 15 cm relative to the radiator.
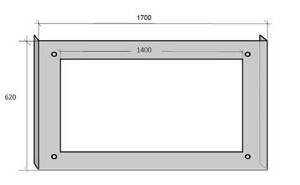
Example of a screen frame drawing
In some apartments, heating radiators are installed in niches that developers provide under the windows. In this situation, only the second method of constructing a box is suitable.
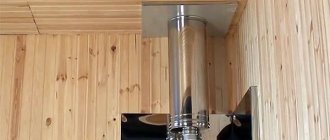
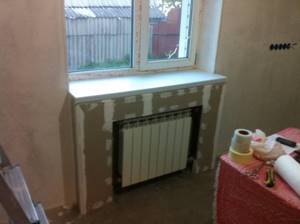
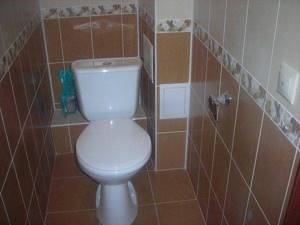
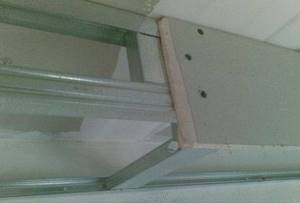
Friends, good day. I decided to cover the radiator in the kitchen with plasterboard. The kitchen area is quite large, allowing you to implement the idea without much damage to the space. And the presence of individual gas heating in the apartment and not too severe winters make it possible to lose some of the heat from the battery without compromising the overall temperature in the apartment. To begin with, I dismantled the old window sill and began to build a frame around the battery from ceiling metal profiles.
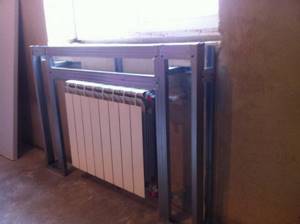
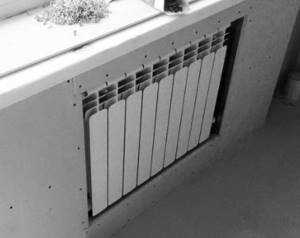
For rigidity, I additionally strengthened the long horizontal crossbars.
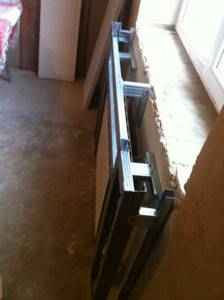
After assembling the frame, I installed the window sill, covered the frame with plasterboard and began to putty the structure.
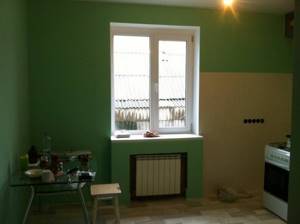
After filling and cleaning, I painted the box along with the walls with water-based paint in two layers. That's what came out of it.
After that, I installed the decorative grille.
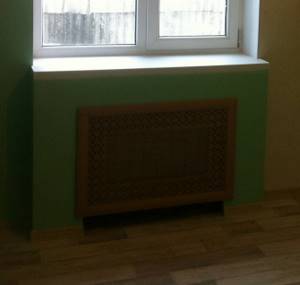
For normal heat exchange of the battery, I made holes in the window sill and installed ventilation grilles.
- Advantages
- Preparatory work
- Marking for the box
- Frame making
- Sheathing with plasterboard sheets
- Finishing features
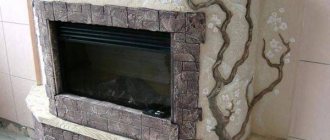
The battery box is an excellent solution for disguising the heating device. This is especially true if the appearance of the radiator leaves much to be desired and disrupts the harmony of the interior. A home-made battery box can be adapted to match the color of the furniture, simply painted, covered with wallpaper, decorated with decorative stone or tiles. Today we will tell you how to make it using plasterboard sheets and metal profiles.
Useful tips
In order not to deteriorate the quality of heating and to disguise the battery as beautifully as possible, it would be a good idea to listen to a few useful tips:
- It is better to install a decorative screen made of plastic or metal. The material has good thermal conductivity. The wooden lattice looks beautiful. However, such a screen is bulky, heavy, and has low thermal conductivity.
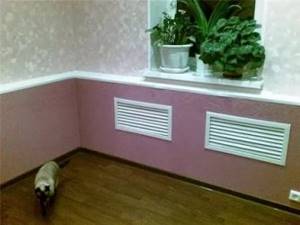
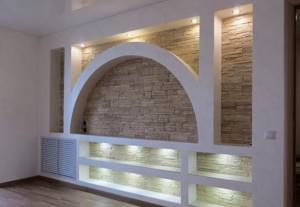
- When the heating is running, warm air from the battery, according to the laws of physics, is directed upward, where it encounters an obstacle in the form of a window sill or the upper edge of the box. For better convection under the window, it is optimal to make a false wall where the lower and side ends of the niche will be closed. The upper end is not closed so that warm air is directed to the window sill, and a decorative ventilation grille is cut into it. The front part of the niche is similarly covered with a screen.
- To improve heat transfer, the surface of the niche is covered with foil material.
The grille on the windowsill will improve the convection of air masses.
It is optimal to develop the simplest casing design so that the battery can be easily reached if repairs are necessary.
The video shows an example of battery casing:
How to attach a battery to drywall: step-by-step instructions
Let's look at how to secure a cast iron battery - an outdated method, but many still use it.
The video shows how to properly mount the battery on a plasterboard
.
For structural strength, shaped legs can be welded to the cast iron structure, which will take the load from the weight of the battery. To prevent the battery from collapsing, brackets are screwed into the profile. In addition, iron pipes will support the battery. But we are looking at how to fix a radiator to drywall.
Attaching the battery to drywall: step-by-step instructions
First of all, using a drill with a wood drill bit, drill holes in the plasterboard. This must be done carefully, without pressing, as the drywall may break.
Important! The distance between the gypsum board and the base can reach up to 10 cm, so a drill bit for a hammer drill is taken 20 cm. Once the holes in the gypsum board are ready, you need to take a hammer drill with a drill 10 mm in diameter and drill holes for fasteners in the main wall. Try to keep the tool exactly parallel to the floor so that the bracket does not move sideways later. Then we hammer the hooks into the holes
Ideally, you need to install a dowel and screw a threaded fastener into it. But such elements are difficult to find, especially for a cast iron battery, so let's assume that we have a hook with a pointed end. If the hook moves or does not fit at the required distance, you need to pull it out and drill a hole with a larger diameter and deeper. Then prepare a wooden cap, into the middle of which fasteners are driven, and only then hammered into the wall. Hang the battery on the bracket and check the level. If the battery hangs unevenly, you can slightly knock down the fasteners with a hammer. Try not to knock too hard on the bracket, since in a brick wall made of old material, you can loosen the fasteners and have to do the work again.
These are all the instructions for attaching a cast iron battery to a plasterboard wall. Now let's look at how to fix an aluminum radiator.
What is needed to hide batteries with drywall
Working with plasterboard is simple and does not require expensive tools. You need scissors for cutting the profile, a level, a ruler, a simple pencil and a knife for cutting drywall. It is best to drive the screws in with a screwdriver.
In its absence, there is no point in buying one for work. The amount of work is small. Self-tapping screws can be screwed in manually with a screwdriver.
To work with drywall you will need a simple set of tools. The materials you will need are drywall, a profile for creating a frame and self-tapping screws. You definitely need a primer, a sickle, a perforated metal corner, and putty. The choice of other materials for finishing the box is at the discretion of the owner. You can simply paint it with water-based paint or cover it with wallpaper or plastic panels.
Advantages and disadvantages
The main advantages are:
- Completely environmentally friendly material. There are no harmful or dangerous emissions into the air, the material itself does not burn.
- Assortment on the market.
- This is a cheap and economical method.
- Easy installation that does not require rare tools or specific knowledge.
- Everyone can use their imagination and mount the structure the way they see it in their head.
Main disadvantages:
The material is fragile and can crumble easily, which makes it necessary to work with it very carefully and carefully. The drywall needs to be finished additionally; prepare a spatula and other tools. The material should not be installed in the bathroom or other rooms with high humidity. Drywall absorbs water and begins to warp. We do not recommend storing such material; it can become deformed if left in a vertical position for a long time.
Working with drywall
Labor-intensive work is left behind. Now we are hiding our battery under drywall, and for this we need to cut rectangles of appropriate sizes.
Sequencing:
- Attach the plasterboard sheet to the profile frame.
- Apply markings to the surface of the sheet and mark the locations of the cuts.
- Take a utility knife and carefully cut the elements according to the size of the box.
- Lean the prepared fragments against “your” parts of the structure.
- Secure the plasterboard rectangles with screws.
The drywall that covers the battery is very fragile, so the knife must be sharp. There should be 3-4 self-tapping screws per linear meter of drywall. The caps are recessed a millimeter so that they do not tear the cardboard covering.
An important point: the room must receive heat. The problem can be solved in two ways, the simplest of which is to drill ventilation holes in the sheets (their recommended diameter ranges from 5 centimeters). A more aesthetic solution would be to install a removable grille. If you decide to equip the front wall with a plastic screen, please be patient and have additional fasteners. Plastic sometimes cracks, so handle it carefully.
Box finishing
The final stage of work with the box is its finishing. The work depends on the material to be processed. Ceramic tiles or paint are used to decorate plywood, drywall or MDF. Covering with plastic panels does not require finishing. Closing the box with such material does not reduce the area of the room and does not spoil the appearance.
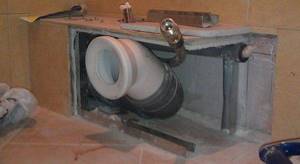
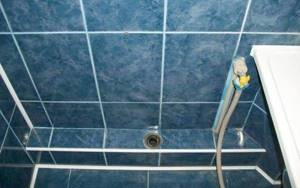
In addition, this method is used to close the pipes running under the bathtub. To do this, a frame is initially constructed from guide profiles, after which it is covered in the same way with the selected material. Remember about mandatory access to communications.
Ready decorated box
Puttying the box is one of the important stages of direct decoration. In this case, it is necessary to correctly design the corners. An even angle is obtained by using special metal corners, which are applied to the corner on top of a layer of starting putty. They are pressed in using a spatula, and then the excess putty is removed.
Another layer of special mixtures is applied to this corner. Repeat these steps until the surface is completely leveled. This makes it easy to make an even angle yourself.
You can watch the video on how to hide pipes yourself
Having processed the corners, the surface is primed and then covered with starting and finishing putty. After drying the surface, grind the putty using a special grater with fine-grained sandpaper.
Remember that to solve lighting problems, you can install several small LED lamps in such a “niche”. This means that after constructing the box, such lamps will need to be properly connected to electricity.
After installing and finishing the box, the appearance of the room will change significantly. The interior of the room will become complete and harmonious. In addition, such measures help reduce the noise level from pipes.
How to keep warm?
There are several simple methods that can solve this problem. The first concerns a special heat reflector screen. It is mounted behind the battery itself and has a foil color, glitters and shimmers.
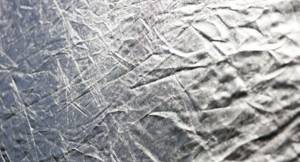
Heat reflective screen
As it heats up, it reflects heat into the room, a negligible percentage. Sintepon, which is covered with aluminum inserts on both sides, is a version of a homemade reflector. You will receive enough warmth even in the harshest winters. Another option is aluminum foam, it does not bend at all.
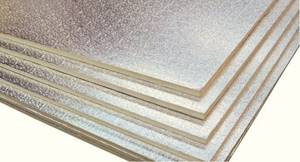
Aluminum foam
Also remember that screens should not have very small holes, the holes should be medium sized. This guarantees a normal amount of heat in the room. But don’t overdo it; you shouldn’t make them more than five centimeters in diameter. Holes must be made on the front side and on top of the entire structure. This ensures heat distribution throughout the room.
Other solutions
You can cover radiators in a room not only with sheets of drywall. Some apartment owners install standard boxes from this material, and change the front panel to something more original.
Here are the most typical solutions:
Radiator grille (plastic or metal). Among the advantages of such designs, it is worth noting good heat transfer and constant access to the battery. The main disadvantage is the trivial design.
- Built-in niche. The pipes are covered with casing, and the battery itself is hidden behind a folding screen. The main advantages are the easy accessibility of the unit in case of breakdown and minimal heat losses. A good option for a kitchen where saving space is important.
- Wooden lattice wall. It harmonizes with classic interiors and allows you to quickly get to the battery in an emergency. Cons: cumbersome, low functionality.
The technique of installing a plasterboard box is quite simple; anyone can master it in a short time. Don't let radiator pipes ruin your interior.
Is it possible to cover batteries with plasterboard?
In his own apartment, the owner has the right to decide for himself whether or not to hide heating radiators inside a plasterboard box. From the legislative side there are no violations here. It’s just that all the disadvantages of this design will be received by the homeowner himself.
Firstly, the convection of air masses will decrease, which will lead to a decrease in heating of the room. Secondly, when repairing the heating, the boxes from the batteries will have to be removed. If a pipe accidentally bursts, the drywall will warp from the hot water.
You can close the radiator so that convection of air masses occurs freely. It should be noted right away that the heating radiator cannot be completely closed, since its presence in the apartment becomes useless. Warm air will not penetrate the room through the drywall. Only the side parts are covered. A kind of box is constructed from plasterboard, forming a niche for the battery. Heating pipe connections are hidden behind the structure, a section of the wall that is inaccessible for normal painting or other finishing.
Advice! If an old Soviet-style battery is installed, which you want to completely hide from view, the front part of the niche can be covered with a decorative screen.
When deciding to partially hide the battery under drywall, you need to follow two rules:
- The side walls of the box should not fit tightly to the ends of the battery. Gaps are needed for free air convection.
- The dimensions of the niche must allow access to the control units. This includes shut-off valves, valves for bleeding air from the heating system and other elements.
A box of plasterboard sheets is erected after a thorough check of the radiator and heating supply pipes for leaks. Attention! Even if the battery is partially closed while maintaining all clearances, air convection will still be limited. The room temperature will drop by 4-6
O
WITH.
Photo gallery
Several options for constructing boxes for placing communications in them:
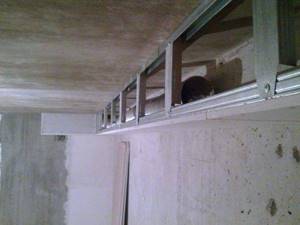
Box under the ceiling for placing electrical wiring
Frame for the future box
The convenience of the box is obvious
Only with a box can you achieve an aesthetic look in the room
Ceiling box to hide wires
If necessary, take care of the door in advance
Horizontal design
After covering with plasterboard, all joints must be puttied.
Drywall for the bathroom is the ideal solution
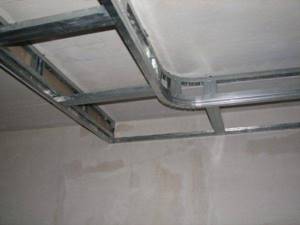
Ceiling frame for suspended ceiling
A major renovation of a premises faces the problem of the impossibility of moving various elements of water pipes and communications. The design ideas will be disrupted by an old pipe or a bulky riser. The way out of this situation is to cover the pipes with plasterboard.
Drywall processing
To make the box, not only drywall is used. However, it is more suitable for these purposes and easier to process. And its surface lends itself to a variety of finishing methods. Drywall provides high reliability and strength to the future “pipe covering”, and does not limit the choice of design. Batteries are also covered with this design. Making a box without the help of craftsmen is not difficult.
Let's start creating the box
You already have an idea of what a box is; essentially it is a structure made of a metal frame covered with plasterboard. But even this matter has its own nuances.
The first step is marking for the future pipe frame. Using a level, markings are made on the floor, wall or ceiling. Next, proceed to fastening the guide profile. Having drilled holes for the dowels and secured the guide profiles, install the jumpers. The recommended distance between jumpers is from 50 to 70 centimeters. The front edge, which is not adjacent to the walls, is mounted after the installation of the other two is completed.
Finished box after tiling
When creating a frame for pipes, remember the places where you need to ensure their exit. And in places where valves or meters are installed, provide space for a door or a removable part of the box. If the frame is made over noisy sewer pipes, special materials are used for sound insulation that reduce the noise level. Since such a box is not dismountable after installation, think in advance about access points for pipe repair.
Later the doors can also be made
less noticeable by covering them with the same material as the rest of the walls. From an aesthetic point of view it is very beautiful. The main thing is to make sure that the door can open and close easily.
In the future, a door will be installed in this place to facilitate monitoring of water meter readings
The next stage is the installation of drywall on the frame. The sheets are cut so that the frame consists not of pieces of plasterboard, but of solid sheets. Remember that the side edges of the box are sheathed first, since the front strip should also cover the side sheets. The sheets are secured with self-tapping screws every 25-30 cm. Screw in the screws so as to recess the caps into the sheet by a millimeter. This will hide them while puttying the surface.
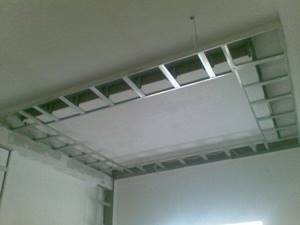
Installing a box on the ceiling, the main thing is to attach the jumpers, which will ensure the strength of the structure. Using the same technology, you can decorate the space under the bathroom. You can carefully hide communications only with the box. Example of using plasterboard boxes in the living room
Example video:
Having secured all the sheets of drywall, we begin to putty and process the corners. The corners are formed using special perforated corners, which are attached to the starting putty. At the last stage, final puttying or preparation for laying tiles is carried out. At this point, we can assume that the process of creating your box has been successfully completed.
Sooner or later the moment comes when it is necessary to make repairs in your apartment or office. I want a beautiful and stylish design of the room, regardless of its purpose and price factors.
Therefore, in such a situation, the most pressing question arises, requiring a prompt solution: how to make a box from plasterboard with your own hands.
GCR box for pipes in the bathroom
DIY installation
Do you want to sew up the battery and have already acquired everything you need for this process? Then what are you waiting for, let's get started. And it all starts with markings for the box. You need to measure the entire battery very accurately; the error can be a maximum of a millimeter. To speed up the process, you need to use a tape measure, a building level, a square ruler and a pencil.
The depth varies depending on the dimensions of the radiator. Speaking about the edges of the structure, you should retreat no more than 10 centimeters. If the window sill is too narrow, it must be dismantled. How do you know if there is not enough clearance? The minimum level between the battery and the window sill is three centimeters.