- home
- Services
- Residential insulation
- Insulation of vegetable pit
—
—
—
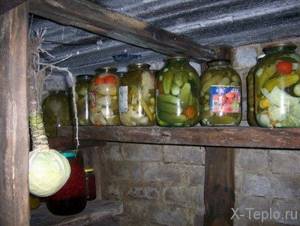
Long-term storage of food (in particular vegetables) is an issue that is relevant at all times. To solve this problem, ordinary vegetable pits (or simply cellars) are often used, which do a good job of the task. Storing large quantities of food is especially in demand in winter, when the cost of food in stores increases significantly, and the quantity decreases just as significantly. Therefore, many people, since ancient times, have retained a fairly useful and practical habit - stocking up on the necessary amount of food for the winter.
Typically, cellars are built in garages or summer cottages (both inside and outside the house). An ordinary hole dug in the ground, lined from the inside with brick (concrete, or any other selected material), into which a ladder leads, is one of the most practical and decades-tested methods of storing food...
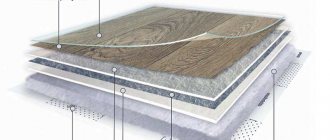
We insulate the floor in the cellar
Answering the question of how to insulate a basement in a garage, we go directly to the insulation process and start with insulating the floor covering.
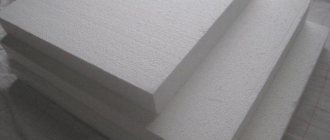
Rigid polystyrene foam is effective for thermal insulation of floors
To insulate the floor, you will need to perform preparatory operations:
- we deepen the floor, digging a hole about 30 centimeters deep around the entire perimeter, and level the entire surface of the floor;
- we add fine crushed stone about 10 centimeters deep along the entire perimeter of the floor;
- Next, apply a layer of sand approximately 5 centimeters thick (this will avoid the formation of moisture on the floor);
- apply a layer of insulation - it is best to choose extruded polystyrene foam, at least 5 centimeters thick;
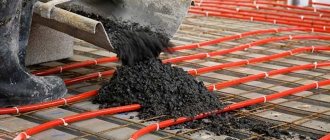
- We reinforce the floor with mesh and fill it with concrete screed.
Recommendation! You should not use sawdust or wooden platforms made from boards to insulate the floor, as wood tends to absorb moisture. Within a short time, an unpleasant odor will appear and the wood will begin to rot, which will require replacement of the floor covering, and as a result, additional costs.
Warm floor
Insulating the earthen floor of a vegetable pit is a task no less important than thermal insulation of the foundation.
We carry out this work as follows:
1. We deepen the cellar by removing about 30 cm of soil from the floor and level the surface.
We deepen the cellar, removing about 30 cm of soil.
2. We form a layer of crushed stone 10 cm thick.
Formation of a layer of crushed stone.
3. Pour 5 cm of sand on top of the crushed stone and thoroughly compact the layer.
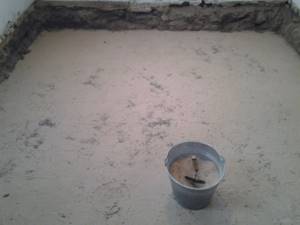
Pour sand on top of the crushed stone layer.
4. Fill the sand with hot bitumen, and after the bitumen hardens, we make a concrete screed.
We treat the surface with bitumen, after which we fill it with concrete.
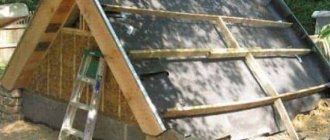
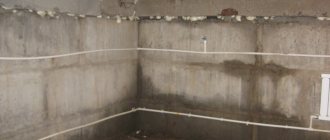
Excavation
If you are not going to refurbish an old basement or inspection pit, then work should begin with laying a foundation pit.
- In the selected area, a pit is dug up to 3 - 3.5 m deep.
- The walls and floor of the pit are carefully leveled and compacted to prevent crumbling.
- Several alternating layers of crushed stone and gravel with a total thickness of up to 50 cm are laid on the floor. Each layer is carefully compacted to avoid further subsidence of the floor.
- A “concrete footing” is performed: the crushed stone and gravel backfill is filled with a thin layer of low-quality concrete to limit its mobility.
If necessary, a pit can be dug even in a previously used garage. But for this you will have to dismantle a significant part of the floor covering. Due to the high labor intensity, this method is used extremely rarely - at best, they are limited to a semi-buried cellar.
Materials
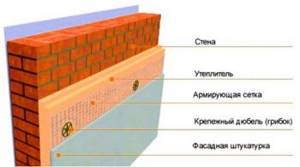
Materials for wall insulation.
Modern manufacturers offer consumers a fairly wide variety of heat-insulating materials, however, one should not think that all of them are applicable for insulating a basement in a garage.
For example, the features of such a room do not allow the use of wooden or fiber boards to insulate its walls or ceiling, even if they are treated with a special bacteriological impregnation.
The traditional insulating material called “foam plastic,” which is so often used for insulation work, also cannot be used, because it is characterized by high flammability. It is not suitable from the point of view that rodents too often like to build their nests in it.
Important! Holes in the polystyrene foam from rodents will reduce its thermal insulation qualities, which will lead to disruption of the microclimate and temperature conditions.
Despite the low cost and high thermal insulation qualities, you should not insulate the wall in the basement with mineral wool. As practice shows, mineral wool absorbs moisture excessively, which leads to the loss of its advantages.
Therefore, you will have to take care of serious waterproofing of the mineral wool insulation layer, which will slightly increase the cost of insulation work.
Ventilation and exhaust for the cellar.
The best options for insulating a garage basement are as follows:
- Polymer sprayed materials. They are heat-insulating powders that need to be sprayed over the surface using special equipment;
- Sheet insulation. The materials are fixed to the wall and ceiling surfaces using pre-prepared lathing, dowels, and glue;
- Rolled insulating materials. To work with such insulation, you will need to organize an additional finishing layer, a sheathing frame, and a waterproofing layer.
What thermal insulation will be most successful? There is no single correct answer to this question, since all the materials described have their own disadvantages and advantages.
Next, we will answer in as much detail as possible the question that interests many people: how to insulate a cellar in a garage.
Thermal insulation of vegetable pit
A vegetable pit in a garage of this size will allow you to store a sufficient amount of food, and due to its small size, heat loss through the walls and ceiling will be minimal. But to truly maintain temperature control, you need to do a few little tricks to ensure everything is truly top notch and you can be proud of your work.
Insulation of the pit can be done as follows:
- Choose a heat-insulating material that meets the following properties: chemically non-hazardous,
- ecologically pure,
- withstands long-term use without loss of quality,
- not affected by moisture.
Such a heat-insulating material can be, for example, foam plastic. On the floor, you can lay a floor made of boards on top of the foam.
Advice: you need to ensure that the thickness of the heat insulator is at least 10-15 centimeters!
Walls can be thermally insulated using expanded polystyrene. For effective operation, insulation must be applied to the plastered surface of the wall. The ceiling, floor and walls can be tiled for a beautiful and modern look.
Brief overview of the most popular methods
Expanded polystyrene
The first material on the list of what can be used to effectively insulate a vegetable pit is polystyrene foam. Most often, expanded polystyrene slabs are attached to the outside of the cellar when work is underway to lay and insulate the foundation.
Significant advantages of expanded polystyrene are moisture resistance, resistance to rotting and long service life.
Experts advise using expanded polystyrene type PSB-S-25 with a thickness of 5 cm. Plates with such parameters will be quite enough to maintain a stable temperature and prevent walls from freezing even in the most severe frosts.
However, it is not recommended to glue polystyrene foam inside the vegetable pit, since condensation can accumulate between it and the concrete wall, which will gradually “undermine” the foundation.
Hot bitumen
When talking about how to insulate a vegetable pit located in a private house or garage, one cannot help but pay attention to the reliable waterproofing of the ceiling. Hot bitumen is indispensable in this matter.
They should treat the ceiling surface twice.
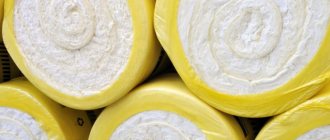
Glass wool
Using this material, previously steam- and waterproofed, you can insulate the ceiling and the entrance hatch of a vegetable pit.
To protect the glass wool layer from damage during operation, it is covered with clapboard or slate.
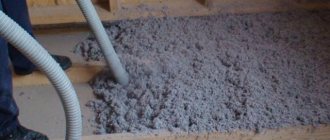
Sawdust and cement solution
Sawdust and cement are added in a ratio of 1 to 8. The solution is applied to the inner surface of the walls and ceiling of the vegetable pit in a layer of 15-20 cm, and then after a few days it is plastered.
A mixture of sawdust and cement
Thermal insulation paints
Paints of this type are a new generation material, as they not only prevent the release of heat from the cellar into the environment, but also reflect up to 70% of infrared radiation back into the room.
This effect is achieved due to the vacuum environment inside the paint filler. In addition, thermal insulation paints are non-toxic, do not require dilution with solvents and have low flammability.
For comparison: 1 mm of thermal insulation paint protects a vegetable pit from the cold in the same way as a 50 mm layer of mineral wool.
Penoplex
This material also effectively eliminates the cold bridge and is not afraid of moisture. According to its characteristics, a sheet of penoplex with a thickness of 50 mm corresponds to brickwork with a thickness of 740 mm.
There are no fundamental differences between how and what to insulate a pit for storing vegetables and supplies located in a garage or in a private house.
It is required to strictly adhere to safety precautions, which impose some restrictions on household and technical premises. For example, installing refrigeration equipment for storing vegetables in a garage is prohibited.
Do-it-yourself insulation of a pit for storing vegetables
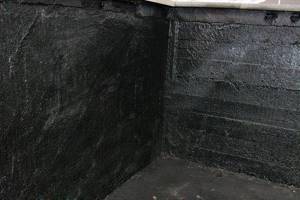
A vegetable pit, located in a private house, garage or country house, is a room with an earthen floor, concrete walls and ceiling.
Concrete blocks only at first glance seem to be a monolithic building material. In fact, inside they are riddled with many small cracks and channels that conduct moisture into the slab.
A waterlogged concrete slab, in turn, freezes very quickly during the cold season.
In this regard, let's talk about how to insulate a vegetable pit located in a garage or private house.
What materials exist
The choice of consumables depends on the degree of soil freezing, the type of structure and the depth of groundwater flow.
Naturally, insulation materials must meet important requirements: maintain water resistance, heat and protect against fungal infection. Thermal insulators are different for walls, ceilings and floors.
Mineral wool
Mineral wool is an excellent thermal insulation material that, in addition to everything, allows air to pass through. To insulate walls and ceilings indoors, you can use slabs of medium and soft hardness. This material does not burn and is easily attached to the surface.
Basalt wool, which has higher thermal conductivity and noise insulation properties, has proven itself especially well.
It is important to remember that additional vapor barrier protection will be required to prevent moisture accumulation
Expanded polystyrene
This is a high quality thermal insulation material that is perfect for a basement. It has high resistance to mold and the spread of rot.
Its important characteristic is almost absolute waterproofness. In addition, the material has a long service life
Styrofoam
Often used for cellar insulation. It differs from expanded polystyrene in its manufacturing technology and higher vapor permeability. Has the following distinctive characteristics:
Reflective Thermal Insulator
New materials include reflective insulation.
In its production, special rolls are used, which, on the one hand, are made of foamed polyurethane foam, and on the other, of polished foil.
Glass wool
Glass wool is used less and less today. But it has one undeniable advantage. It's cheap.
When working with such material, it is worth stocking up on protective gloves, and you also need to protect your eyes. It is necessary to additionally insulate with film or foil.
Warm plaster
This material performs both decorative and heat-insulating functions.
Plaster can be used as an independent raw material, or can be combined with other thermal insulators. In any case, it must be applied in a very thick layer.
Expanded clay
The floor in the basement can be insulated with expanded clay. This is an inexpensive option, very easy to use and effective. The thickness of the expanded clay layer depends on the expected load.
It is recommended to choose two types of expanded clay with fractions of 5-20 mm, this will protect the floor from subsidence. The size of the bulk layer should not be less than 10 cm.
Sand and crushed stone
The construction of sand, crushed stone and screed is also quite effective.
First we deepen and level the floor. The first layer is crushed stone, 10 cm thick, then sand, 5 cm thick. After thorough compaction, fill it with hot bitumen and make a reinforced concrete screed. This is a traditional and inexpensive option.
Final works
At the final stage, the walls are finished. In the cellar it does not have any decorative value. The main task is to provide the necessary microclimate for the preservation of food supplies.
Final lining of the cellar with clapboard
If the room is dry, you can line the walls with plywood or wood. In this case, it is imperative to treat the cladding material with an antifungal agent. For a basement with high humidity, lining is more suitable.
Wall insulation is not always required in a garage cellar. It happens that it is enough to insulate only the floor. In this case, conventional lime whitening or painting is used to finish wall surfaces.
Ceiling
Concrete ceiling slabs in the cellar are subject to the greatest freezing.
You can ensure a dry and warm atmosphere by using moisture-proofing substances to treat the ceiling. After drying, foam sheets are glued on top of the dry concrete and additionally secured with dowels. It is also possible to stuff the slats and then lay insulation in them.
After this, it is necessary to seal all the seams of the structure with polyurethane foam. Then the mounting mesh and layer of plaster are adjusted.
Why is garage floor insulation done?
Work on floor insulation increases the financial costs of construction or repair of an operating facility, but nevertheless, these costs are justified, because Floor insulation allows you to achieve the following results:
- The ability to maintain indoor temperature within the specified parameters with minimal heat loss through the floor surface;
- Creating comfortable conditions when repairing various types of equipment and performing other work;
- Maintaining an indoor microclimate that will be optimal for storing equipment, spare parts and other materials.
Many users think about how to make a warm floor in a garage, and depending on the design of the floor, there may be several options for such arrangement.
Brief description of insulation technology
The process of insulating a vegetable pit, in fact, looks almost the same as insulating any other room: bathhouse, garage, apartment, attic. However, there are also significant nuances that you should definitely pay attention to. We will talk about them in more detail a little later, but now we will focus on the insulation technology itself.
The essence of the work being performed is, in principle, simple. It all lies in the correct and high-quality installation of a layer of insulating material. It should be placed on all surfaces: floor, ceiling, walls. We should not forget about the cellar hatch (lid), especially if it is located outside - it is often this that causes low temperature and humidity inside the pit.
Creating a ventilation system
Another point that requires attention is the need to use ventilation.
Another point that requires attention is the need to use ventilation. Air circulation will ensure faster removal of excess moisture and improve the microclimate inside (which will have a positive effect on the condition of the products).
Usually the issue is resolved as follows: 2 pipes connected to the surface are placed into the pit. A small “roof” protects them from moisture getting inside. This method will be quite enough to ensure the flow of fresh air from outside.
A much more important nuance is the correct choice of material with which we will insulate the vegetable pit - the result directly depends on its quality (as well as on the quality of the work on its installation). Therefore, this issue should be given special attention.
How to do insulation yourself
When using rolled or sheet materials, the sheathing is first made from metal or wooden profiles.
Walls
When starting to install the sheathing, it is correct to first waterproof the walls with roofing felt or ordinary thick film, the joints of which are easily fastened with tape. In rooms with high humidity it is better to use special waterproofing materials.
Main nuances:
- Wooden sheathing is cheaper; any available pieces of wood or leftover building material are suitable for it. But you will definitely need to apply a special antibacterial impregnation, which will not only save the wood from damage, but also make it less flammable.
- In accordance with the size of the cells of the installed sheathing, the insulating material is cut and laid tightly.
- Between the insulation and the lining sheet, you need to leave space for ventilation of the room, this helps to increase the service life of the entire structure.
- In places where racks and shelves will be installed according to the plan, it is necessary to strengthen the frame (wooden beams must be taken with a larger cross-section).
- The easiest way to do the lathing is according to a pre-marked pattern.
Installation of sheathing
If the basement is small, you can do without sheathing. The algorithm for performing the work in this case is as follows:
- The sheets are carefully joined together.
- Seal the seams with suitable glue. You can use polyurethane foam for fastening (when its remains have completely hardened, they are cut off).
- Fix the material to the walls with dowels.
Ceiling
The ceiling of the cellar has direct contact with the floor of the garage, which causes a significant difference in temperature (condensation will collect on the ceiling). To prevent this from happening, it also requires insulation, which is performed in the same way as wall surfaces.
You can insulate the ceiling with polystyrene foam by simply placing it on glue, and then reinforcing it with mesh or securing it with a finishing layer.
Luke
Due attention should be paid to the door through which you enter the cellar. Whether it is necessary to insulate it like the walls and ceiling is decided by the owner himself
Sometimes it is enough to simply fit it well, leave no gaps and cover it with a rubber seal.
Floor
One of the primary tasks is to insulate the foundation and floor in the cellar. In this case, there is no way to do without waterproofing; in the spring, when the snow melts, it will save the basement from rising groundwater.
Insulating the floor in the garage basement
The most common option for insulating the foundation and floor is concrete. A sand cushion and crushed stone are placed under it. Be sure to compact all layers thoroughly. The top layer is performed by pouring bitumen or installing a concrete screed on a reinforced mesh.
Once the concrete floor hardens, you can leave it as is. As an option, flooring made of decorative materials or additional sheathing made of wooden beams is suitable.
A simpler and not too expensive option for floor insulation is an expanded clay layer. It is poured with a thickness of at least 10 cm. To protect the floor from subsidence, you will need two types of expanded clay with different fractions.
Work order
In the basement located under the garage, the ceiling and walls are insulated to the freezing depth. If the depth is small, the floor will also have to be insulated. The process of insulating a cellar depends on the material chosen. However, at the preliminary stage you will have to perform a number of simple operations:
- remove all items and existing structures from the premises;
- provide good lighting;
- remove old paintwork, peeling decorative and base materials;
- treat surfaces with an antiseptic, antifungal agent (quicklime, copper sulfate, etc.);
- ensure insulation of electrical wiring (if any) - the wires are laid in non-flammable corrugation.
If the groundwater level is high, it is important to take care of waterproofing the basement in advance. An effective material for this is bitumen. Different types are applied cold or hot.
How cold and hot bitumen is used
If possible, waterproofing is carried out from the outside of the garage. To do this, a trench is dug around the building. The walls are cleaned of soil and dried.
The cold method uses liquid formulations. They are applied to the surface in an even layer using a spatula or roller. The hot method uses solid bitumen. They should be warmed up before use. They are applied with a brush or roller in several (up to 3) layers.
Floor insulation
To make using the pit comfortable, it is important to take care of the thermal insulation of the floor. The insulation process depends on the type of base. In the case of a ground surface, you will have to follow the steps step by step:
- excavate the soil to a depth of about 30 cm;
- fill in crushed stone of medium fractions - height of at least 10 cm;
- arrange a sand cushion (5 cm) - fill it and compact it;
- pour the surface with hot bitumen to ensure waterproofing;
- the cooled surface is reinforced with metal mesh;
- pour the concrete screed.
If there is significant freezing, experts recommend adding a layer of insulation to the pie. The optimal solution is to lay polystyrene foam on a waterproofing material.
Insulating a reinforced concrete garage basement floor is a less labor-intensive process. A layer of roofing material is laid on the base and expanded clay 10-25 cm thick is backfilled. Some craftsmen recommend using dry sawdust to reduce the cost. However, if such insulation gets wet, putrefactive processes will begin to occur and the thermal insulation will have to be changed. Expanded clay is poured into a concrete screed with reinforcement.
How to insulate basement walls from the inside
The process of insulating a basement in a garage can only be done on dry surfaces. Therefore, it is better to carry out work in the warm season.
When applying liquid materials, preliminary leveling of the walls is not required. Spraying is carried out under pressure, so the work will require special equipment. It is also important to moisten surfaces in advance and follow safety precautions. The application of insulation should be carried out using a respirator.
When thermally insulating basement walls in a garage with polystyrene foam or polystyrene foam, you will have to do the following steps with your own hands:
- fix the insulation using a special solution and dowels. The latter are driven in along the edges and in the middle of the sheet.
- seal existing cracks and voids with construction tape or blow out with foam;
- stick the mounting grid;
- plaster the walls.
If mineral wool is chosen as insulation for a vegetable pit in the garage, then to fix it, you will need to create a wooden frame.
You should also take care of the water barrier. The easiest way is to stuff it with thick plastic film. It is attached with an overlap using a construction stapler. Drywall is mounted on top.
Insulation of the cellar ceiling
The optimal solution to quickly and economically insulate the ceiling in a cellar is to lay lightweight sheets of inexpensive foam plastic. To fix it, an adhesive composition and special dowels (umbrellas) are used. When insulating the ceiling with polystyrene foam, it is important to ensure that the sheets fit well. The resulting gaps should be filled with foam.
It is also important not to forget to insulate the cellar lid in the garage. To do this you will need:
- cut a piece of polystyrene foam or polystyrene foam - it is better to take high-density material;
- knock down a frame from wooden planks that will cover the sides of the foam;
- cover the insulation on top with plywood.
For aesthetics and additional protection, plywood should be painted.
Thermal insulation of a cellar in a garage is a responsible process that ensures a comfortable microclimate inside the room. The safety of preparations and agricultural products depends on the quality of its implementation.
What materials exist
The choice of consumables depends on the degree of soil freezing, the type of structure and the depth of groundwater flow.
Naturally, insulation materials must meet important requirements: maintain water resistance, heat and protect against fungal infection. Thermal insulators are different for walls, ceilings and floors.
Mineral wool
Mineral wool is an excellent thermal insulation material that, in addition to everything, allows air to pass through. To insulate walls and ceilings indoors, you can use slabs of medium and soft hardness. This material does not burn and is easily attached to the surface.
Basalt wool, which has higher thermal conductivity and noise insulation properties, has proven itself especially well.
It is important to remember that additional vapor barrier protection will be required to prevent moisture accumulation
Expanded polystyrene
This is a high quality thermal insulation material that is perfect for a basement. It has high resistance to mold and the spread of rot.
Its important characteristic is almost absolute waterproofness. In addition, the material has a long service life
Often used for cellar insulation. It differs from expanded polystyrene in its manufacturing technology and higher vapor permeability. Has the following distinctive characteristics:
Reflective Thermal Insulator
New materials include reflective insulation.
In its production, special rolls are used, which, on the one hand, are made of foamed polyurethane foam, and on the other, of polished foil.
This insulation effectively saves room space, since its thickness is 3-5 mm.
Glass wool
Glass wool is used less and less today. But it has one undeniable advantage. It's cheap.
When working with such material, it is worth stocking up on protective gloves, and you also need to protect your eyes. It is necessary to additionally insulate with film or foil.
Warm plaster
This material performs both decorative and heat-insulating functions.
Plaster can be used as an independent raw material, or can be combined with other thermal insulators. In any case, it must be applied in a very thick layer.
The floor in the basement can be insulated with expanded clay. This is an inexpensive option, very easy to use and effective. The thickness of the expanded clay layer depends on the expected load.
It is recommended to choose two types of expanded clay with fractions of 5-20 mm, this will protect the floor from subsidence. The size of the bulk layer should not be less than 10 cm.
Sand and crushed stone
The construction of sand, crushed stone and screed is also quite effective.
First we deepen and level the floor. The first layer is crushed stone, 10 cm thick, then sand, 5 cm thick. After thorough compaction, fill it with hot bitumen and make a reinforced concrete screed. This is a traditional and inexpensive option.
Ventilation natural and forced
It is easy to make a natural ventilation system with your own hands from metal-plastic pipes. The main thing is not to forget about installing a garage basement with ventilation during the construction stage. Proper arrangement of a cellar without a ventilation system is impossible.
Natural ventilation
The main disadvantage of natural cellar ventilation is considered to be uneven air supply. In winter, the pipes are covered with frost and clogged with snow, and in summer the temperature outside is higher than in the cellar and the flow of fresh air into the basement is limited.
These problems can be avoided if you install a small household fan at the inlet of the pipe, which can be turned on as needed, so as not to waste money on electricity.
It’s easy to make natural ventilation in the cellar with your own hands:
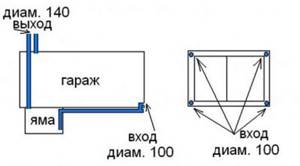
- We install an exhaust pipe under the ceiling; the height of the pipe above the roof must be at least 35 cm. The higher the exhaust pipe, the stronger the air circulation in the room;
- the supply pipe is located 10 cm above the floor level in the garage and is discharged outside. A good flow is ensured by the height of the inlet opening - 30 cm from the ground.
It is necessary to install dampers in the pipe to be able to regulate the air flow and protective grilles from mice, leaves and debris.
Forced ventilation of garage basement
The garage and cellar will always be dry and comfortable if you install a forced ventilation system. The simplest option is to install a regular low-power fan on the supply pipe of the air duct.
If repairs and painting work are often carried out in the garage, then the fan should also be installed on the hood.
Pipes for the ventilation system are suitable: ordinary plastic ones for plumbing or corrugated metal ones. They are inexpensive, and the corrugated pipe can be easily installed in any garage or cellar design.
If you spend money and take the time to properly finish the cellar under the garage, the room will always be dry, warm and comfortable. Damp cellars and basements cause enormous damage to your car. Corrosion of the metal of a car in a wet cellar in a garage is guaranteed.
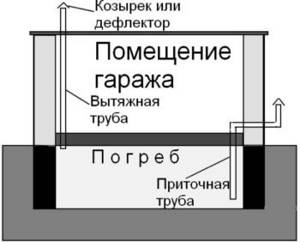
Ventilation system
One of the most important parts of creating a vegetable pit. Products always need fresh air, otherwise they will lose all their properties, become moldy and rot. In order to avoid such incidents, you need to take the issue of ventilation seriously. How to achieve this? You need to install two pipes, one of which is a supply pipe, and the second is an exhaust pipe. The supply air supply should be installed near the basement floor, and the exhaust air supply near the ceiling. They should be along the same line. Then they form a ventilation system that can effectively perform its function. Also, if necessary, you can install a ceiling fan that will run on electricity.
Vegetable pit ventilation diagram
We must not forget that ventilation in our case can serve as an excellent chance for rodents to eat your supplies. Therefore, additional mesh must be installed on all ventilation pipes to prevent rodents from entering! And because condensation or, for example, melted snow can get through the pipes, then you need to put umbrellas on the ends of the pipes that will avoid these undesirable phenomena.
Drying the room
Often, when building such a cellar, the humidity may be too high. And such a problem, unfortunately, can lead to damage to food stored in the basement and to damage to the basement itself. The walls will become covered with mold, and condensation may collect on the ceiling. In a word, the picture will be terrible, and you simply need to avoid this. After you install coverings that protect against moisture, you will need to dry the room. To do this, you can take a couple of burners or portable electric heating pads and leave them on for two to three hours. You can also take a tin bucket and make a fire in it. This will avoid many problems and protect your vegetable pit in the basement.
If the reason for drying the vegetable pit is because it is flooded with groundwater and the depth of the water layer is more than ten centimeters, then you first need to get rid of the water using a pump, and then fill up the leakage area.
Advice. When using various methods of heating with fire, make sure that no soot remains on the ceiling!
Choosing insulation
We decided to insulate the cellar, but we don’t know how to do it, and most importantly, what material to use.
Let's look at how to insulate a cellar in a garage using modern materials that experts use to insulate basements:
- polystyrene foam or extruded polystyrene foam;
- mineral wool;
- warm plaster;
- glass wool;
- reflective thermal insulation.
Insulating a cellar in a garage with the materials described above allows you to achieve good thermal insulation properties and prevent the appearance of fungus in the room, but each material has its own advantages and disadvantages.
Extruded polystyrene foam or polystyrene foam
- simple installation;
- environmental friendliness;
- you can use extruded polystyrene foam for floor insulation;
- service life up to 40 years or more;
- excellent water resistance;
- low cost;
- perfectly tolerates sudden temperature changes.
- is flammable;
- does not allow air to pass through.
Expanded polystyrene PSB-30
Foam plastic PSB-35
Density (kg/m3)
Thermal conductivity coefficient (W/mK)
Compressive Strength (MPA)
Mineral wool
- allows air to pass through, allowing the room to breathe;
- excellent sound insulation;
- excellent thermal insulation;
- affordable price;
- long service life of 30 years or more.
- an additional frame for installation is required;
- allows moisture to pass through;
- work is performed in special clothing and gloves.
Warm plaster
- excellent thermal insulation;
- affordable price;
- excellent sound insulation.
- it is necessary to apply a thick layer for good thermal insulation;
- difficulty in installation.
Glass wool
- low cost;
- good thermal insulation properties;
- good sound insulation properties.
- work is performed in special clothing and gloves;
- an additional frame for installation is required;
- allows moisture to pass through;
- If exposed to moisture, it may emit an unpleasant odor.
Reflective Thermal Insulation
- high thermal insulation properties;
- material thickness is only from 2 to 5 mm;
- simple installation;
- possibility to use facing material.
- price;
- possible heat loss
Possible problems
When building a basement, many people may encounter some problems that they need to be prepared for in advance.
First of all, you will need to get rid of the water that is present in the cellar. Excess moisture leads to the formation of fungus. Mold is considered the main problem in the operation of cellars. It is formed due to a poor waterproofing layer and poor-quality ventilation, which cause an increased level of humidity in the room. Also, fungus can appear due to prolonged exposure to spoiled food in the cellar or the use of contaminated wood.
Some basement owners are faced with the fact that food in the room freezes
Therefore, special attention should be paid to insulation measures. Insulation not only eliminates sub-zero temperatures, but also maintains an optimal microclimate in the room
If the basement in the garage freezes, you will need to buy heat-insulating materials. There is a wide range of special raw materials on sale that can be used for insulation. The insulation must retain its geometric shapes, have high-quality insulating properties and be resistant to moisture and soil.
Most often, expanded clay, fiberglass, expanded clay concrete, mineral wool, red ceramic brick, expanded polystyrene and cellulose insulation are used to insulate basements.
Step-by-step instructions for insulation
Most experts recommend using polystyrene foam as a heat insulator. To insulate a cellar in a garage, you should choose a material with a thickness of 40-50 mm. Such insulation will maintain a stable temperature for a very long time.
Foamed sheets have a cellular structure, due to which they have lightness and low thermal conductivity. You can do the installation work yourself.
Selecting installation tools
When insulating, you need to stock up on numerous construction tools:
- level;
- hammer;
- trowel;
- spatulas;
- glue;
- dowels;
- plaster mortar;
- primer and putty;
- brush for applying primer.
Preparing the premises
Before installation work, we clean the basement from dirt. If the surfaces are uneven, then we perform putty and primer. Moreover, the latter procedure effectively protects against fungus. We moisten the surface and polystyrene. This can be done using a garden sprayer.
You can also create a ventilation layer between the wall and the material. To do this, we attach a special frame to the wall, and then mount the slabs on it. Ventilation can be installed after laying the sheets, but you will have to use drywall.
There are two ways to attach the material to the surface: adhesive and fungal.
Fastening with adhesive method
The first method is mounting using an adhesive solution. This is a great option as the glue has excellent adhesion. We dilute the solution in a plastic container and mix well with an electric drill. After moistening the surface, apply the glue in the form of spots with a distance of 20 cm from each other.
Using a trowel, apply another layer of glue to the resulting stains. It can also be applied to the end parts, this will make it easier to join the slabs. Press the sheet against the wall and tap it well with your palm. The slabs should be laid from top to bottom, that is, from the ceiling to the floor.
Mushroom fastening
For the second method you will need dowels. These are small screws with a head. For this material, it is better to select disc-shaped screws, which can be metal or plastic. It is better to choose plastic products: they are not subject to corrosion and will not allow cold to pass through.
Using a drill, we make through holes in the wall and material for dowels. In the corners we leave indentations of 10-15 cm. When choosing the length of the screws, you should take into account the thickness of the polystyrene foam, plus 4-5 cm.
Eliminating cracks
After 5 days, when the glue has completely hardened, we seal the cracks with polyurethane foam using a construction gun.
Finishing materials are attached to polystyrene foam using lathing. You can install drywall first, and install panels on top or simply paint. The most popular method is plastering.
Before plastering, it is recommended to perform a certain sequence of actions:
- prime the polystyrene foam coating;
- we perform reinforcement with a special mesh;
- level the surface, grind thoroughly;
- prime again;
- and do the finishing touches.
You can use mineral and acrylic plaster. A basement with an acrylic finish will last for decades. It also has excellent adhesive properties and protective functions.
Pit construction
Firstly, to create a vegetable pit with your own hands, you will need to dig a pit of the given dimensions (we have already discussed the dimensions above). Crushed stone will be poured into the bottom of the pit and carefully compacted. Above the layer of crushed stone there is a layer of construction sand. After everything is laid, you can proceed to filling the bottom with concrete.
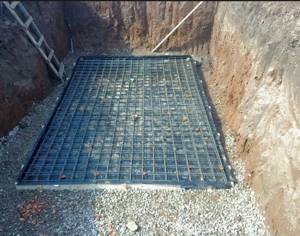
The subfloor is prepared
For the walls of the vegetable pit, ordinary solid brick is used. Even those who have never encountered it can do manual bricklaying. To do this, you lay layers of brick in the floor so that the middle of the next layer of brickwork falls with the middle of the brick onto the seam in the previous layer.
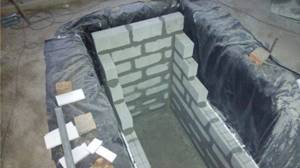
The walls of the pit in the garage are made of bricks
Advice. It is necessary to take into account that when constructing such a pit, the earth may not behave as you expected. After a long time, it can crumble and fill up your entire cellar. To prevent this from happening, the corners of the excavated pit must be reinforced with metal corners, and protection must be placed along all the walls. A chain-link mesh is suitable as such protection, which will protect against shedding. After all protective techniques have been implemented, you can lay brickwork along the walls.
The walls of the pit are effectively reinforced with chain-link mesh
Decorating the ceiling will also be easy. To do this, you need to lay the boards at the required level, and put reinforcement on top and concrete it. This method will allow, firstly, to avoid heat loss, and secondly, it will serve you as reliable protection. Such a ceiling will not fail even from a huge weight from above.
But there is one important condition: you need to decide in advance on the door to the cellar. The most convenient place is next to the wall
This way he will be in a more secure position. Afterwards, the ceiling and the crawl space will need to be insulated. This way you can carefully place the stairs, and fill everything around it with shelves, racks and boxes for storing food.
It is necessary to pay attention to the fact that the basement cannot be under the car or under one of its wheels. This situation is considered unsafe and can lead to an emergency situation.
Therefore, if you don’t have enough space in your garage to place such a vegetable pit, then we strongly advise you not to do it!
How to design a vegetable pit in the garage with your own hands
To build a vegetable pit correctly, you will have to understand the main stages of construction.
We build a hole
The cellar begins to be created by digging a pit in which a basement will be built for storing vegetables and preserves. After this, the floor is arranged. To make the floor covering reliable, it is made of several layers. First, the bottom is covered with a small layer of crushed stone, which is compacted with a vibrating plate. Then the compacted crushed stone is covered with construction sand and filled with concrete.
When the flooring has hardened, the walls are finished. A solid brick that is resistant to high humidity is suitable for this. The walls are laid out in such a way that the seams of each subsequent row of bricks do not coincide with the previous one.
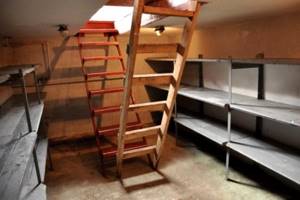
After creating the walls, a reliable ceiling is created that can withstand any load. When making a ceiling, boards are laid at the top of the pit, on which reinforcement is laid and concrete is poured. Having finished with the ceiling, you can make a staircase, which is installed near the entrance inside.
Drainage
Before using the vegetable pit, dry the room so that the walls, ceiling and floor are completely dry. There are several methods that help dry out the cellar:
- Place a metal bucket in the center of the basement, fill it with firewood and build a fire. When using this method, you will have to maintain the fire for an hour and a half.
- Place a metal pipe outside and place a burning candle underneath it, which will provide natural draft.
Waterproofing
Sometimes vegetable pits are made in areas with high groundwater levels, which increase humidity. In this case, you need to install waterproofing inside the basement, which will help keep the humidity level within normal limits.
Experienced builders advise taking care of waterproofing at the stage of creating walls and floors. To protect against high humidity, special waterproofing compounds are added to the concrete mixture, which close all cavities in the concrete.
Choice of insulation
To maintain the optimal temperature inside the cellar, additional thermal insulation will be needed. The selected thermal insulation material must have the following properties:
- environmental friendliness;
- chemical safety;
- reliability;
- protection from moisture.
To insulate storage for vegetables, use polystyrene foam or polystyrene foam.
Ventilation opening design
Any cellar must have ventilation, since it is responsible for the circulation of oxygen inside. When organizing a ventilation system, they install supply and exhaust pipes. The supply air is located near the floor, and the exhaust is led out through the roof.
Ceiling insulation
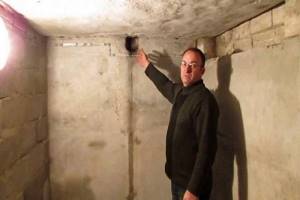
Particular attention should be paid to insulating the ceiling surface in the basement of a garage. If the room is filled with cold air, this will provoke the formation of condensation, mold, and mildew.
If the basement ceiling is a reinforced concrete structure, you will need to create a false ceiling and insulate it.
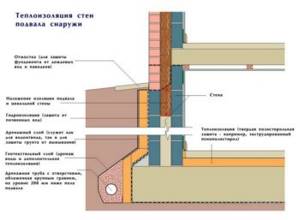
Thermal insulation of basement walls from outside.
Perform the work as follows:
- pipes with a diameter of 2.5 cm are fixed on the wall surface 15 cm lower than the reinforced concrete slab. The pipe fastening pitch will be 60 cm;
- using reinforcing rods with a diameter of 0.08-0.10 cm, an enclosing mesh is made on the ceiling;
- the structure is carefully painted with a waterproof composition;
- the gap between the surface of the ceilings and the structure of rods and pipes is filled with many plastic bags with chopped straw or natural moss. This layer is necessary to improve the thermal insulation qualities of garage ceilings from the inside. The packages must be laid out in rows, pressed tightly against each other to avoid the appearance of cracks;
- Insulating material is attached to the metal sheathing and plastered.
On a note! If you absolutely want the cellar to be filled with a pleasant, cozy atmosphere, the ceiling surface can be plastered with a decorative composition, painted, or covered with decorative slabs.
Walls
Insulation of concrete walls of a vegetable pit in a garage is carried out from the inside using materials such as wooden blocks, insulation in the form of slabs and polyurethane foam. The work is carried out in the following order:
- we screw wooden blocks (joists) to the walls of the cellar using a drill;
- we fill the space between the joists with insulation, fixing it to the wall with glue or plastic dowels;
- Blow out the gaps and voids remaining after laying the insulation with polyurethane foam;
- We reinforce the walls with mounting mesh and plaster the surface.
When thermally insulating the walls of a vegetable pit, it should be taken into account that the “dew point” will shift into the insulation layer, so preference should be given to materials that do not absorb moisture and will last a long time in a waterlogged environment.