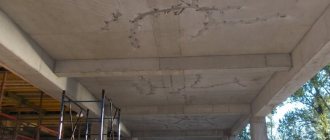
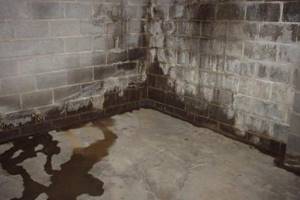
In some homes, a moldy smell appears over time, this is due to dampness. This especially applies to basements and first floors; this occurs where the waterproofing has lost its integrity. Any building during the construction stage must be protected from moisture, this applies not only to the walls, but also, of course, to the floor. Sources of moisture can include groundwater, air humidity and precipitation.
Waterproofing is especially important on the first floors, in basements with masonry, as well as concrete foundations, which are easily saturated with moisture. It is necessary to waterproof the walls in those rooms where there is a possibility of flooding, this should include:
- kitchens;
- bathrooms;
- swimming pools;
- bathrooms.
Basic materials
Waterproofing indoor walls is important not only in the house, but also in the underground space, which has recently been used very actively. There, excess moisture can be caused by uneven soil pressure, as well as shrinkage of the foundation and walls. If water penetrates into the basement, it begins to rise into the living space along the unprotected wall. In order to exclude such a phenomenon, it is necessary to carry out hydro- and vapor insulation of the walls.
To prevent moisture from precipitation and groundwater from damaging the building, appropriate work is carried out. Prevention of fungus and mold is also necessary. To date, special norms and rules have been drawn up, which are spelled out in the relevant documents.
Waterproofing of internal and external walls can be made with the following materials:
- expanding cement;
- penetrating mixtures;
- waterproofing membranes.
In the first case, we are talking about a material that, when hardened, increases in volume and fills cracks and joints. Waterproofing of walls indoors can also be carried out using penetrating mixtures, which are represented by:
- cement-bitumen materials;
- liquid glass;
- quartz sand.
The latter has a granulometric composition and contains chemically active additives. Penetrating mixtures can be used not only inside, but also outside of buildings. Recently, a waterproofing membrane, which is a polyethylene film with different densities, has been used quite often. The components contain antioxidant substances that improve technical characteristics. The canvas can have a thickness ranging from 0.5 to 3 mm. Dense membranes are not as elastic as thinner ones. To protect walls from exposure to alkaline and acidic environments, you can also use injection materials.
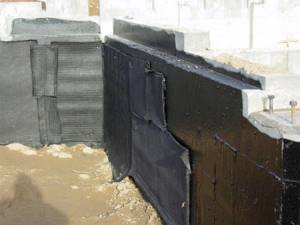
Waterproofing with roll materials in the basement
If you decide to use rolled materials, then the work must be performed in the following sequence:
- Plaster the basement walls with cement mortar.
- Glue the rolled waterproofing material in two layers.
- Build a clay brick wall to support the roll insulation.
- In this case, you need to retreat approximately 0.5 meters from the wall.
- Soil must be poured between the wall and the clay castle.
- Coat all joints and cracks with bitumen mastic.
- Finally, you can also treat the surface with a coating mixture.
Roll insulation against moisture and water
After all the work has been completed, you can assume that your basement is reliably protected from moisture penetration.
Additional types of waterproofing based on other factors
Depending on what material is used during the work, waterproofing can be:
- pasting;
- painting;
- plastering
Depending on the features, the following types of waterproofing can be distinguished:
- single-layer and multi-layer;
- reinforced, non-reinforced;
- ventilated with or without a protective layer.
Professional advice on choosing
We have prepared several useful videos for you. They contain advice from professional builders on the use of various waterproofing technologies. After getting acquainted with this material, you will better imagine the stages of work, and also get acquainted with some tricks that make it easier to apply waterproofing to walls:
Applying waterproofing indoors is an important component of finishing work. If you neglect this operation or violate technology in order to save money and time, the consequences can be extremely unpleasant. Carry out all stages of the work carefully and without unnecessary haste, and you will forget about problems with damp walls. Glad this result is worth the effort, isn’t it?
Technologies for waterproofing internal and external surfaces
Waterproofing walls from the outside and inside can be done using horizontal or vertical application of materials. In the first case, we are talking about an inexpensive and effective method, which may involve the use of waterproof materials or an injection method that blocks capillaries and makes the walls hydrophobic.
Vertical waterproofing is not so effective, because it prevents water from penetrating into the building, but is not able to protect the walls from rising moisture in height. This creates a favorable environment for the growth of fungus. This method is more effective in complex activities that involve horizontal and vertical application of materials.

Waterproofing walls by injection
Injection is a unique technique today, based on the creation of a waterproof membrane in the thickness of the wall or on its surface. Hydrophobic materials are introduced under pressure and gravity into pre-drilled holes, all existing voids, cracks and capillaries are filled.
A wide selection of injection materials allows you to adjust the degree of hardness of the finished coating, setting time and volume of the injected composition.
Injection technology has opened up the possibility of performing both internal and external waterproofing of deep penetration walls from inside the building. This is especially true for brick walls.
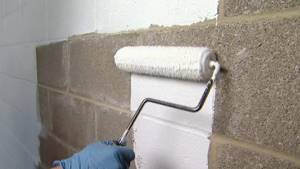
Coating waterproofing technology
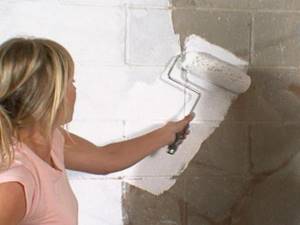
Waterproofing walls from the inside of a room can be carried out using a coating method, which involves the use of polymer materials, cement mastics and synthetic resins. The work is carried out according to a certain algorithm. At the first stage, it is necessary to level the wall in order to save materials. This is true for monolithic structures, on the surface of which it is necessary to perform a cement-sand screed.
For good adhesion, the wall should be coated with a primer, and then the surface should be left to dry. Next, you can begin applying coating waterproofing; among the recommended materials, the following should be highlighted:
- "Disperbit".
- "Cemizol 2EN".
- "Stirbit 2000".
- "Streammix."
- "Izobit DK."
- "Ascoville."
- "Cemizol 2EP".
If the wall consists of reinforced concrete structures, then there is no need to level it, and further technology remains the same.
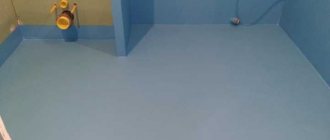
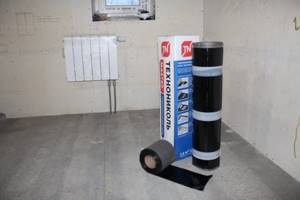
How to install TECHNONICOL self-adhesive floor waterproofing yourself
To do this, you will need a minimum number of tools: a construction knife with a retractable blade, a roller or stitching roller and a construction level.
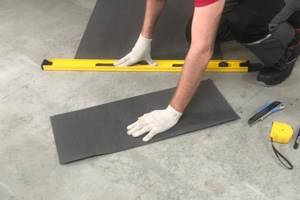
Stage 1 – preparation
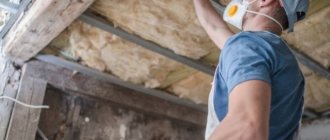
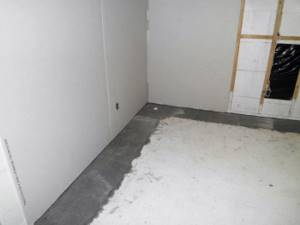
You need to remove everything from the floor that will interfere with the adhesion of the rolled material to the surface. You can get rid of debris and dust with an ordinary broom, but a construction vacuum cleaner does this job more effectively. Ideally, it is better to use both. The main thing is not to forget that waterproofing cannot be glued to a wet base.
Before gluing, you need to check how level the base is. If the distance from the slats to the floor exceeds 5 mm, you should use a self-leveling composition made from a mixture of cement and mineral fillers. It needs to be diluted with water and poured onto the floor, and then rolled over the spreading material with a needle roller to eliminate air bubbles.
Stage 2 – applying primer
A primer is a primer for the floor. It is best to use TECHNONICOL bitumen primer, since it is based on water. You can also use a latex primer instead of a water-based primer.
The water-based bitumen primer does not smell, which allows you to work indoors. At the same time, 20–30 minutes at room temperature 20 °C are enough for it to dry. The primer or latex primer is applied with a regular roller. The corners need to be treated especially carefully; you can use a brush for this.
You can check if the primer has dried with a regular napkin. It must be applied to the base: if the primer is dry, there will be no traces left.
Stage 3 - gluing waterproofing
After the primer or latex primer has dried, you can begin laying the roll waterproofing. First measure the desired length and cut the fabric.
Unroll the roll
and let the material “rest” so that it straightens, and immediately before installation, roll it up again.
Roll out the material
, pulling the protective film towards you. In this way, the waterproofing will gradually be laid and glued to the floor.
To ensure that the material sticks as securely as possible, without waves or air bubbles, roll it with a roller and a wide brush.
Laying the material overlapping
for complete sealing:
- the width of the side overlap must be at least 100 mm;
- end - at least 150 mm;
- the discrepancy between the end overlaps of adjacent rolls is at least 500 mm.
Processing of material overlaps depends on further installation: if a screed is laid on top
– to glue overlaps, use bitumen mastic,
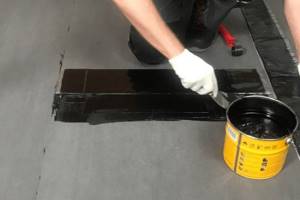
if the tile is mounted on waterproofing without screed
– treat the overlaps with a water-based bitumen primer or latex primer (be sure to wait until the primer has completely dried before gluing).
After gluing, the overlaps must be rolled with a rolling roller.
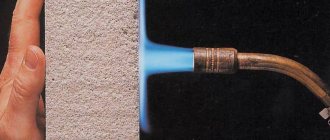
Penetrating waterproofing technology
Waterproofing from the inside of a room can be carried out with penetrating materials, which are mixtures that clog the pores of concrete at the capillary level. However, the concrete remains breathable. This method is used for monolithic reinforced concrete structures. Leveling the surface is not required, and proper preparation involves removing the screed, if any, and cleaning the base with fluffy metal brushes.
If the house has already been built
It is not recommended to carry out insulation work on the outside of an already built house yourself, because this procedure requires a professional approach and the use of special equipment. Therefore, if it is impossible to waterproof from the outside, then all work can be done from the inside, however, in this case the insulation efficiency will be lower.
Comprehensive waterproofing and insulation of the basement.
Application of penetrating compounds
Some experts consider the use of penetrating waterproofing to be the most effective method for external treatment. In the process, you will have to apply a dry mixture to the wall so that it penetrates into the concrete. A chemical reaction occurs there, thanks to which small cracks and micropores are sealed. At the same time, the wall surface retains vapor-permeable properties.
Cellar waterproofing scheme
Processing does not require any special skills or special tools:
- The plane is being cleaned.
- In a separate container, you need to dilute the chemical composition in the proportions specified by the manufacturer.
- To apply over a large area, use a roller. In the inner corners we recommend using a brush.
- The layer should be about 1 mm.
- The drying process lasts from 40 to 60 hours.
You need to know that in this way it is possible to plug microcracks at a depth of up to 30-40 cm. The period of effective protection, according to the manufacturer, is up to 50 years.
External protection from inside
This method allows moisture protection to penetrate to the outside if it is not possible to dig a pit around the constructed foundation. This injection method is labor-intensive, but quite effective and feasible to perform independently.
Injection protection on the inside
- We drill holes with a hammer drill in a convenient sequence with a certain step of 30-60 cm.
- We place a tube in the resulting cavities and pump the prepared solution through it with a pump until it comes out of the adjacent holes.
- We repeat the process around the entire perimeter.
On the outside, the composition will gradually harden and form a reliable insulator against moisture. Acrylic gels or polymer resins are used as a solution. Microcement is also used.
Work algorithm
The above-described technology for waterproofing a wall in an apartment from the inside involves cleaning the surface using brushes or a sandblasting machine. The goal is to remove dust and dirt from the base. The surface is treated with an antifungal substance or impregnated with water by spraying. Next, you can begin applying the waterproofing mixture. Its main purpose is protection from moisture, complemented by increasing the frost resistance of concrete, as well as its resistance to aggressive environments.
Particular care must be taken to treat potholes, cracks, holes, as well as those places where walls adjoin each other. Among the materials for waterproofing walls indoors, we can highlight “Penetron” and “Infiltron-100”. Next, you should start sealing the seams, junctions and joints with suture materials. It is recommended to use Remstream-T or Penecrit for this. The treated surfaces should remain moist for the first three days, the coating should be smooth, without cracking or peeling.
Basement protection
If your cellar is located under the house, then it must be protected from excess moisture. Otherwise, the structure will begin to collapse over time from excessive dampness, and this will entail damage to the structures of the entire house.
If you are building a house with your own hands, then this problem must be taken care of at the construction stage, although waterproofing the basement walls from the inside can be done at any time.
All work can be carried out using various means, which can be divided into several types:
- Anti-pressure type of insulation. It will protect against the effects of groundwater; for this purpose it is treated with polymer-bitumen mastics.
- The non-pressure type will protect against the influence of melt water and various precipitation. The same material can be used.
- Anti-capillary insulation protects against moisture that can penetrate through the smallest pores in the floor. In this case, solutions, mastics and impregnating mixtures are used.
When choosing a material for work, it is necessary to take into account all its qualities and features of the floors.
In order for all waterproofing work to be carried out efficiently, it is necessary to follow some recommendations:
- Before applying protective coatings, the surface must be cleaned of dust and dirt.
- If there are large irregularities, it is advisable to level them.
- After all the preparatory measures, you need to dry the walls thoroughly.
- Apply primer mixture.
- The next layer should be a waterproofing material.
The instructions are not at all complicated, but all of its points are very important.
As materials for work you can take:
Liquid wall insulation
- Binding compounds.
- Dry mixes.
- Roll materials.
- Liquid solutions.
- Metal sheets.
Choosing the right material is quite important; the quality of the work performed, and, therefore, the service life of this room will depend on it.
The most suitable for work in the basement are:
- Cement based mastics. They are preferable when groundwater is close.
- Painting materials.
- Penetrating materials. To eliminate cracks that have appeared.
- Roll materials combined with insulation give excellent results.
Waterproofing a brick wall from the inside of the basement with a solution of sand and cement is considered the most successful option. Modified additives are also added to the mixture, which increase waterproof properties. These can be: polymers, liquid glass.
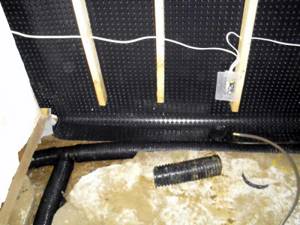
Waterproofing with profiled membrane
When considering materials for waterproofing walls from the inside of a room, you should pay attention to a profiled membrane, which has many advantages, among others, a long service life that reaches 50 years should be highlighted. In addition, the material is resistant to ultraviolet radiation, safe for the external environment, human health, and retains elasticity when changing temperatures. The membrane is non-corrosive and resists low damage and chemical elements.
This method of waterproofing is also good because it is economical, because you do not need to spend effort and money on concrete work. Installation is quite simple, so the work can be completed efficiently and quickly, especially during repairs. Waterproofing indoor walls with a membrane has one more nuance: films are more often used to eliminate excess moisture in basements. They are presented in the form of rolls. But if you want to carry out waterproofing work in a toilet, bath or shower, then it is better to use elastomer membranes in liquid form. The layer is durable and elastic, it has no seams, and is applied with a roller, brushes or in the form of a plaster mixture under tiles or gypsum panels. An example of a liquid membrane is ISOMAT SL 17.
Garage moisture protection
The garage is home to the car, which means it must also maintain an appropriate microclimate in which your four-wheeled friend will feel good.
Most of the machine parts are made of metal, so exposure to moisture is extremely contraindicated. This will lead to the appearance of rust, which may result in deterioration, that is, unnecessary expenses for repairs and replacement of spare parts. Even the most car enthusiast is not entirely comfortable staying in a room with high humidity for a long time, so there is no escape from waterproofing.
What materials can you recommend? The list can be called decent, but it’s up to you to choose:
- Tape and roll materials. The most common of this group is considered to be roofing felt.
- Coating or liquid sealants. These compositions are prepared on the basis of a bitumen or rubber base.
- Concrete mixtures.
The entire process of waterproofing a garage comes down to the following procedures:
- Foundation waterproofing.
- Roofs.
- Wall insulation.
If you don’t have a cellar in your garage, then you can get by with a minimum of funds.
- During the construction of a garage, roofing felt is placed on the foundation.
- If the garage has already been built, then the foundation can simply be coated with mastic or plastered.
If a basement is provided in this room, then this process must be approached more seriously, almost the same as in a free-standing basement.
To insulate the roof, you need to choose a material based on its type:

Internal waterproofing
- If the surface is flat, then it is best to use roofing felt, warming up the joints well, and then fill the entire surface with resin.
- A roof with slopes must be covered with waterproofing material before laying the coating. To do this, they buy a special film and nail it directly to the rafters, and then the coating is laid on top.
- If you wish, you can use slabs. The seams between them must be sealed with sealants.
Waterproofing garage walls from the inside is extremely rare. But for greater reliability and maximum protection from moisture, this process is still better done.
- You can cover the walls with concrete mixtures. They are purchased ready-made and diluted with water according to the instructions. For better adhesion, it is advisable to moisten the wall surface with water before application.
- The second option is to use vapor and waterproofing film. Before using it, all cracks and crevices must be sealed.
After completing all the recommended procedures, you yourself will notice how the microclimate in the garage will change.
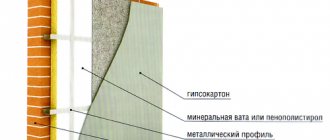
Internal and external insulation restoration of recessed walls
If the walls of structures and buildings are buried in the ground, then insulating and repairing them is quite difficult. To prevent groundwater from penetrating into the recess, drainage is installed. For these purposes, you can use a profiled membrane that is laid vertically. At the same time, water flows through the channels without interference. The material is laid on top of the waterproofing of the wall, and its protrusions are turned towards the foundation. This will help remove any condensation that forms.
If the waterproofing needs to be restored from the inside, then a drainage gap of 8 mm must be installed around the perimeter of the room; it is formed when the membrane is fixed with protrusions to the wall. Air gaps should be left in the lower and upper parts. If moisture seeps in, it will go down the drain. An alternative solution is to create a false wall on a plasterboard frame.
Application technology on a brick wall: step-by-step instructions
So, the wall is prepared. Next we proceed like this:
- We dilute the dry mixture with water based on the proportions indicated on the can. For indoor use, impregnations such as “Penetron” or “Infiltron-100” are ideal.
- We thoroughly moisten the wall.
- Apply the composition evenly with a brush or spray, leaving no gaps.
- We pay special attention to processing corners and places with complex terrain.
The second layer of coating is applied to the first one, which is still wet but has already begun to set. The holding time is indicated in the instructions. To learn how to properly waterproof a brick wall, read this article.