But, despite the fact that it has enormous advantages, it is a cold material because it has a high thermal conductivity coefficient.
For this reason, heat from a hotter source - the internal wall of the house, quickly goes to a less heated source - the external wall.
To maintain the thermal balance in such a house with an internal temperature of +20 C, significant financial costs will be required for the heating system to ensure such significant heat losses through the walls.
The only possible way to maintain the optimal internal temperature in the house of +20 C is to insulate the wall structures. It can be carried out both outside the walls and inside the rooms. Depending on the climate zone, the characteristics of the wall and insulation, it can be complex, that is, it can have additional layers in the form of noise protection, hydro- and vapor barriers.
Why is it necessary to insulate?
According to modern requirements, single-layer insulation is practically not performed. The composition of the heat-protective cake is determined by:
- installation location: outdoor/external;
- characteristics of the wall;
- the type of insulation chosen.
If you ask a professional how it is preferable to insulate the walls of a residential building, from the outside or from the inside, the answer will be unequivocal - from the outside.
Internal thermal insulation is installed only as a last resort, when there is no other possibility, for example, the building is an architectural monument or the small distance between adjacent walls does not technologically allow the installation of insulation.
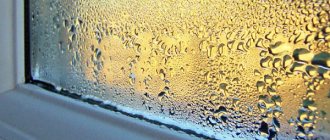
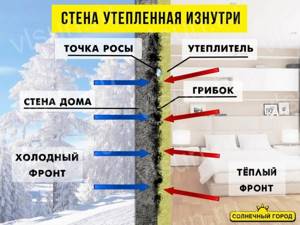
The installation of internal insulation must be treated with great care, this is primarily due to the occurrence of a dew point at which condensation begins to flow along the wall, and in addition, the insulated wall is no longer protected by heat from the in-house heating system, since the heat barrier will not be able to transmit heat to it .
External insulation protects at cold temperatures, and to prevent household moisture from getting on the thermal insulation material , waterproofing is installed, in this case the dew point moves much further from the room to the street.
To prevent water from collecting between the wall and the heat insulator, a vapor barrier will need to be installed. Innovative heat-protective building materials are produced with a pre-installed vapor barrier layer.
In cases where the heat insulator is applied to the outside of wall structures, a wind barrier made of a vapor-proof membrane must be installed on top. It fences off the heat insulator from cold air masses hitting it.
Many novice craftsmen believe that there is no such thing as excess thermal insulation; this is not entirely correct. In thermal protection of buildings, the term used is excessive or excessive insulation.
A thick layer of insulation can disrupt the ventilation system of building structures .
In connection with this, condensation will begin to accumulate, increasing the humidity in the room, which contributes to the occurrence of rotting processes and the formation of mold.
Nuances of arranging a “warm floor” system
The water system is more complex to arrange. It requires not only the installation of pipes under the screed, but also the installation of special equipment designed to heat and ensure forced circulation of water.
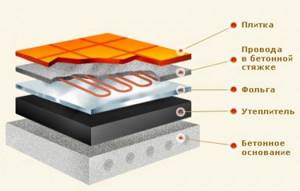
Nuances of arranging a “warm floor” system
The heating system is installed directly on top of the thermal insulation material
It is important that the insulation has a foil coating, due to which more heat will be reflected into the room. If there is no foil barrier, it is recommended to lay it manually
The system is installed according to the instructions provided by the manufacturer. After checking its performance, you can lay a reinforcing mesh to strengthen the structure and begin arranging the screed. When using a “warm floor” system, the solution can be prepared without crushed stone, expanded clay and other fillers.
Consequences of the lack of protective layers
Thin insulation that does not have important protective layers or excessively thick insulation cause equal damage to a home. In this case, a distinction is made between mechanical and chemical destruction of concrete structures.

The absence of a heat insulator leads to the following mechanical damage:
- temperature changes, freezing/thawing cycles of building structures;
- frequent cycles of drying/wetting walls;
- destruction of concrete under the influence of wind and water.
Chemical damage includes bimetallic corrosion, the action of acid and alkaline vapors in the air, as well as corrosion from stray currents, as a result of which the carbonization process occurs on concrete, when alkalinity around steel embedded parts and reinforcement units is lost.
Thus, the reasons for the destruction of concrete partitions are complex with a number of factors, but most of all they are associated with the appearance of humidity, which contributes to the appearance of dampness in the room and black mold, which is extremely harmful to people, which is one of the strongest allergens.
How to insulate a concrete floor using chipboards?
This option for arranging floor thermal insulation, using the heat-retaining properties of shavings, involves creating a structure from three layers of different coatings, which are laid on a ready-made concrete base.
In this case, a sufficiently thick layer (several thin layers) of polyethylene film is placed on the hardened concrete. It will serve as a waterproofing protection.
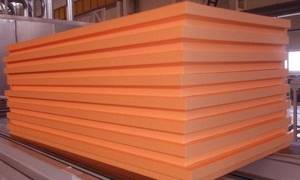
Scheme of insulating a concrete floor with polystyrene foam.
Then a layer of particle boards is installed. In this case, you should definitely leave a thermal gap of approximately 15 mm between the walls and the edges of the chipboard panels. It is necessary so that if the slabs expand or swell due to moisture, they do not rest against the walls and become deformed, which leads to damage to the floors.
When laying particleboard material, you should pay attention to the tightness of the joints of the boards with each other. To prevent the formation of cracks in the joints, these places are covered with construction mesh and then thoroughly rubbed with putty, which is mixed with oil paint.
The slabs themselves are attached to the concrete base using powerful dowels.
After the wood insulation layer has been fixed, the floor is equipped with a finishing coating. It can be any of the modern floor coverings that the customer chooses according to his taste. Decorative skirting boards are attached along the walls.
Work order
In order to correctly determine the composition of the cake and the size of its layers, you need to start with a laboratory study of the wall for heat loss.
Energy audits of houses and buildings today are carried out by many licensed companies in Moscow and the region, and their services will help in the future to reduce heating costs by up to 30-50%, as they help to correctly calculate thermal insulation. Thus, the costs of insulation, including an energy audit of the house, will pay off in the first 2-3 years.
Waterproofing is a set of building materials laid on a concrete wall according to the manufacturer’s technology, which will ensure the waterproofness of the heat insulator and wall structures. You need to understand that today there is no universal waterproofing. This technology is individual, just as the house and the brand of insulation that will be used are individual.
There are several technological solutions for waterproofing:
- cast;
- penetrating;
- impregnating;
- coating;
- based on polymers with anti-corrosion and anti-filtration effects.
After waterproofing comes a layer of insulation. The most popular are mineral wool and polystyrene foam. Since their characteristics differ significantly from each other, they require the installation of different fixing systems and protective layers.
Materials for work
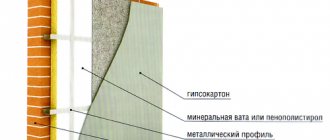
Among building materials, concrete stands out as the worst thermal insulator, and therefore, to reduce heat loss in a house, reinforced concrete walls are insulated both inside and outside the house. In the first option, in the room, most often, a layer of Penoplex is placed under the drywall, and on the outside, “warm plaster” is installed with a ventilated structure on the facade.
The construction trade market has a wide range of insulating materials:
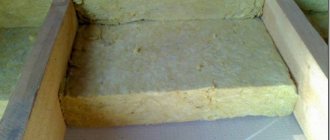
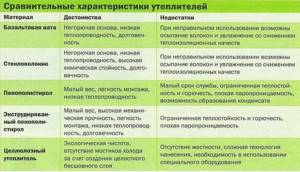
Minvata . Its main advantages are low price, high heat-protective and noise-protective characteristics; users attribute high moisture absorption to its biggest disadvantage, which complicates the technology of creating a protective cake.
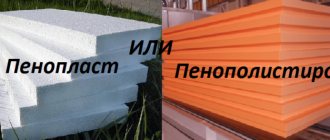
- Expanded polystyrene , an inexpensive insulation material with high protective characteristics, is susceptible to direct sunlight and is damaged by rodents.
- Sandwich panels , a modern heat-insulating material with high assembly speed.
- Polyurethane foam is the most effective insulation with a high application rate, but the cost of the work is very expensive, and special equipment is also required to perform insulation.
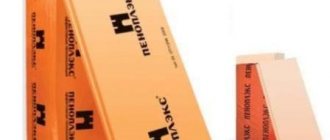
- Extruded polystyrene foam - Penoplex.
- Liquid types of heat insulators - Akterm Beton TM 20 l.
Outside
AKTERM Concrete TM 20l is a modern liquid heat-insulating material prepared for concrete walls. This is a complex thermal insulator that protects walls not only from condensation of water vapor from the air, preventing them from freezing, but also includes inhibitors to remove biocontaminants.
The product is absolutely safe for others , since it does not have organic thinners or volatile toxic substances, and can be used both outside and inside buildings.
Indoors
Penoplex is extruded polystyrene foam, also one of the newest types of thermal insulation, it is environmentally friendly, therefore it can be used both outside and inside the building.
This insulation is durable, does not absorb moisture and has a low heat transfer coefficient . The service life of such plates is more than 50 years. Penoplex can be easily cut with the most ordinary knife, so its slabs can be easily installed in any weather.
How can you glue insulation to concrete?
To install thermal protection from foam boards, you will need waterproofing compounds and polyurethane adhesive. In addition, you will have to purchase an antiseptic, a primer with deep penetration into the concrete and finishing plaster.

Among the tools, the master should have at hand:
- roulette;
- construction level;
- reinforced mesh;
- dowel nails;
- knife and spatulas;
- containers for diluting and carrying adhesives.
To apply Akterm liquid insulator you do not need complex tools. First, when preparing the surface for applying a protective layer, you will need ordinary construction tools:
- Master OK;
- putty knife;
- hammer;
- brush and drill with an attachment for preparing solutions.
To treat surfaces with insulation, you will need a roller or sprayer and Akterm Beton TM itself.
Step-by-step instructions for creating thermal insulation
The technology for creating a heat-protective layer depends on the selected material. As a rule, a manufacturer, when selling its product, is obliged to provide the buyer with complete information about the technology of its use.
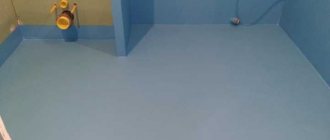
Liquid material "Akterm Concrete"
For thermal insulation with Akterm Beton liquid composition, a spray thickness of 1.0 mm to 2.5 mm is allowed. With a layer of 1 mm, the material consumption will be equal to 1 liter per 1 m2 of wall.
Instructions for use "Akterm Beton":
- Clean the surface from dirt and repair chips and cracks so that it becomes even and smooth.
- After the repaired wall has dried, treat the surface with an acrylic primer.
- Next, apply the first layer of Akterm Concrete using a roller or sprayer.
- 1 mm, which should dry at 20 C during the day.
- Next, apply a second layer and also allow it to dry.
- Decorative plaster is applied or wallpaper is pasted during internal heat-insulation work.
Sheet materials
It is much easier and more economical to install foam plastic indoors, however, it should be taken into account that the wall will remain cold, since warm air from the heating system will not flow to it, and therefore, at low atmospheric temperatures in winter, it will cool further more.
Algorithm for internal installation of foam plastic:
Preparing walls for installation involves cleaning them from dirt and any biological contaminants; it is advisable to rinse them thoroughly with water. If cracks and other irregularities are found, they are carefully repaired.- Lay the waterproofing layer with mastic materials or treat the surface with a deep penetration primer.
- Wait until the waterproofing is completely dry.
- Vertical sags are secured in order to control the vertical installation of slabs.
- The laying of slabs begins from the bottom up, the first row lies on a strictly horizontal mounting angle.
- The installation is controlled in the horizontal direction using measuring instruments.
- The slabs are fixed to the wall surface with glue, stacked tightly against each other, with the next row offset in a checkerboard pattern.
- Carefully seal the seams: with foam, tape or putty.
- After the adhesive solution has hardened, the slabs are additionally fixed with dowels, for which a hole is made in the wall.
- Install the fiberglass mesh with the same installation solution for the insulation.
- After the solution has dried, a protective plaster layer is applied, followed by painting, or the insulation is covered with plasterboard.
Choice of insulation
Many materials are used to insulate the floors of a wooden house. The simplest and most inexpensive is expanded clay or sand, which is poured between the rough and finishing coating. They are hygroscopic and protect the boards from rotting, the spread of fungus and provide ventilation. However, bulk non-metallic insulation has its own drawback - over time, their hygroscopicity decreases.
Today on the market you can find many materials for insulating a wooden house. In addition to good thermal insulation, it must meet basic requirements:
- ecologically pure;
- be safe for the residents of the house;
- long service life.
For insulation, fiberglass, mineral wool, penoplex, expanded polystyrene, etc. are used. Each of them has its own advantages and disadvantages:
o Mineral wool. It can be slag, stone and glass. The form of release is also varied - plate, roll, mat. Mineral wool has a high density, does not burn, conducts heat poorly and is quite economical. The main disadvantage is considered to be low moisture resistance.
When using mineral wool, you should carefully consider the vapor barrier system and ventilation. The side of the stove that is not covered with foil should be on the bottom.
When purchasing mineral wool, carefully read the composition, since the impregnation often contains substances hazardous to the body. The more saturated the yellow color of the material, the more dangerous it is.
The following are more in demand in construction stores:
- Izovol is a mineral fiber product. A distinctive feature is its high hydrophobic efficiency in comparison with conventional mineral wool. Additionally, it has low thermal conductivity, is non-flammable, biologically and chemically resistant.
- Rockwool is a basalt tile. Its peculiarity is that it does not cake, does not lend itself to deformation and shrinkage, like mineral wool. Rockwool resists mechanical stress well. The material is additionally used for sound insulation, since the porous structure absorbs noise well at any frequency. Like Izovol, Rockwool conducts heat poorly, does not burn and is resistant to biological and chemical influences.
- Expanded polystyrene - has a high thermal insulation rate. It is resistant to moisture and does not absorb water, holds its shape well under temperature changes, is durable, environmentally friendly, durable and is not subject to the destructive effects of microorganisms. Expanded polystyrene is easy to process and use.
- Penofol is a modern heat insulator. Sold in rolls, it is insulation with a layer of foil. The thickness and weight are small. The base may vary, but in most cases it is penofol (foamed polyethylene). Thermal insulation properties are maintained under high mechanical load. Laying occurs overlapping or butt. The seams must be taped with metallized adhesive tape. Penofol does not require an additional layer of hydro- and vapor barrier, since the foil already performs these functions.
- Ecowool is a natural heat insulator made from cellulose. The fibers are bound with boric acid and lagnin (an organic antiseptic). The uniqueness of the material is that it does not absorb water and removes it outside. The composition contains no components hazardous to health. Ecowool is fire- and bio-resistant, absorbs sound well and does not conduct heat. A special sprayer is used for application, but the material consumption then increases by 40%.
- Isolon is a new material in construction. With a thickness of 2-10 mm, it insulates well heat and sound, has high moisture resistance, is not subject to rotting and is durable.
For insulation, ordinary sawdust can be used. This heat insulator has been used for many centuries. The natural material is quite cheap and completely safe for the body. Sawdust is often left behind after building a house. This is the most affordable insulation for a wooden house.
Sawdust is added to some building materials:
- sawdust concrete consists of sawdust, cement, sand and water;
- granular heat insulator - sawdust, glue and antiseptic-fire retardant;
- wood concrete – sawdust with cement and chemical additives;
- wood blocks - sawdust, cement and copper sulfate.
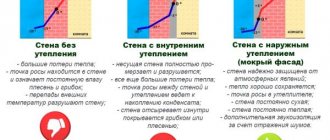
Features and differences of thermal insulation from the outside of the building and from the inside
Each option for installing thermal protection for a building - external or internal - has its own nuances in execution.
The main differences are in the environment:
- when installed externally, this is a strong influence of the atmosphere with sudden temperature changes and wind loads;
- with internal protection it is a more uniform air environment with average annual temperatures of 18-25 C.
The next difference between the two options is the thickness of the protective layer:
- for outdoor work it is higher than 100 mm;
- for internal ones - does not exceed 50 mm.
And the last significant difference is the formation of the dew point:
- With external insulation, it is brought out onto the outer surface of the wall.
- If it’s internal, it’s on a surface that opens into the room, which is very dangerous, since condensation can accumulate on the wall. It will not only spoil the external decoration of the house, but also penetrate into the structure of the base and foundation, causing their destruction.
Fixation methods
Basically, four fastening methods are used to fix joists on a concrete floor. Therefore, if you do not know how to attach joists to a concrete floor, then after studying all these methods you will understand this issue.
Fixation with self-tapping screws
This method is considered simple, but it is not suitable for all cases.
- First you need to prepare the concrete surface. To do this, it is cleared of debris (it is allowed to use a vacuum cleaner). Then they repair cracks, chips and other defects with cement mortar or polyurethane foam.
- Next, in the logs (treated with antiseptics) you need to drill holes with a drill to install plastic dowels. Then you need to drill counter holes in the concrete using a hammer drill.
- Then the dowels are driven into the concrete with hammer blows, and then self-tapping screws are screwed into them with a screwdriver. Moreover, the head of the screw is driven into the hole 2-3 cm.
Fixation with anchors
- First, you also need to prepare the concrete floor (remove debris from it and repair all defects with mortar).
- After which it is necessary to make through holes in the timber (treated with antiseptics) with an electric drill.
- Next, you need to drill holes in the concrete opposite each hole with a hammer drill.
- Then the anchors are mounted on a concrete base and tightened with keys. The main thing here is not to overtighten the bolt, because this will cause the beam to bend. This is especially true for those places where there is a gap.
Before installing the anchors, trenches (small recesses) are made in the joists to hide the bolt heads.
Anchors need to be installed every 600-1000 mm. This distance is selected taking into account the partial immersion of the anchors in concrete (approximately 60 mm). Many people fix the beams to the concrete with 4-5 anchors ⌀ 10 mm.
Cost of work
Table with approximate prices:
| Thermal insulation grade | Size | Material price, rub. | Cost of work, rub. Moscow | Cost of work, rub. Yaroslavl | Cost of work, rub. Voronezh |
| Akterm Concrete | 20 l | 7000 | 350 m2 | 200 m2 | 230 m2 |
| Polyurethane foam spraying method | Packaging, 4 m3 | 5300 | 900 m3 | 790 m3 | 800 m3 |
| Basalt mineral wool GREENGUARG | 0.288 m3 | 510 | 300 m2 | 250 m2 | 270 m2 |
| Insulation: Expanded polystyrene boards. extrusion TECHNONICOL | 0.273 m3 | 1356 | 500 m2 | 350 m2 | 300 m2 |
| Penoplex Facade, glue, doweling | 1185 mm x 585 mm x 50 mm, pack of 4 pieces | 1370 | 600 m2 | 450 m2 | 430 m2 |
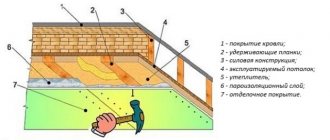
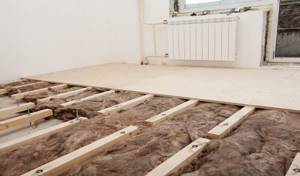
Floor with joists on a concrete base
One of the oldest methods of insulating the floor in a private house is a floor on joists. Only earlier they did it without insulation, but today insulation is laid between the joists. This increases energy efficiency - heat loss is reduced and heating costs are reduced. The disadvantage of such a floor is that it “eats up” quite a lot of space, and secondly, creaking is possible. It’s not even like that - it’s rarely possible to make a floor using joists without squeaking. The advantage of this method of insulating a concrete floor is that it is relatively inexpensive and installation does not take very much time.
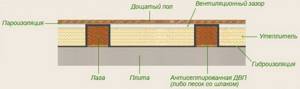
Insulation of concrete floors using joists
Insulation scheme by logs
If the base is uneven, pour a layer of sand to level it, tamp it down, and level it. Logs are installed on the sand. Instead of sand, fiberboard cut into pieces of varying thickness is used. The sections are impregnated with a protective compound, dried and used to level the logs.
Logs are dry timber or boards of sufficient thickness. They are placed around the room at a certain step and the flooring is laid on them. The pitch of the lag and the thickness of the flooring are interrelated. The thicker the flooring material, the less often you can install logs and vice versa. The main criterion is the load-bearing capacity of the structure. The floor should not sag under load. In this design, it is more convenient to choose a lag pitch that matches the width of the insulation. And the thickness of the flooring is determined based on this parameter. This way the insulation will be installed with a minimum amount of waste.
How to insulate floors in a private house: comparison of materials
What to put on the logs
You can lay boards or any sheet material on the logs. Sheet material is usually laid in two layers. The sheets are laid with seams spaced apart to avoid cross-shaped joints. Moreover, the sheets of the second layer are laid so that the seams also do not coincide. The first and second layers are connected using screws and/or glue. The choice of method depends on the type of sheet material selected.
This is what insulation of a concrete floor looks like using joists
In regions where boards are inexpensive, you can do a combination - lay boards on the joists, sheet material on them, and then the finishing floor covering on it. Is it possible to lay the topcoat on boards? If the surface meets the requirements for the base of a particular material, then it is possible. But, if they do not want to have a plank floor, they prefer to lay sheet material on top of the boards. Most often this is plywood. It provides a more stable base that is less prone to warping than planks.
Possible mistakes

High-quality insulation of external and internal concrete walls requires a professional approach, since the process is multi-stage and requires careful implementation of each stage.
Most mistakes are made when performing internal insulation, since the brand of insulation and its thickness are chosen incorrectly.
Therefore, the wall will be completely cut off from the heat of the heating system and will freeze, absorbing moisture.
The insulation pie from the inside must be carefully calculated by specialists, determining the actual heat loss through the wall. After which a heat insulator with a low level of moisture absorption and vapor permeability is selected.
The main mistakes in external insulation are: poor preparation of walls, violation of layer laying technology, lack of waterproofing, incorrect placement of slabs without seam displacement, loose fit of slabs to the walls, incorrect type and thickness of insulation.
Despite the fact that concrete is considered the most practical and reliable building material, it has a significant drawback - the highest heat transfer coefficient, which leads to the rapid removal of thermal energy from a warm room to the environment.
Therefore, everyone knows that concrete houses are the coldest. In Soviet times, this problem was solved by increasing the specific heat supply standards for such houses, that is, they simply overheated them.
Current budget insulation materials
The choice of insulation product for a wooden house is also influenced by the material factor. Therefore, if you decide to insulate the floor in your dacha yourself with a limited budget, then you can choose the following materials:
- clean dry sawdust;
- sawdust pellets;
- mineral wool;
- Styrofoam;
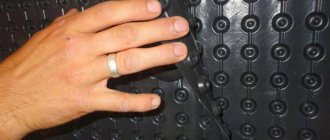
- expanded clay
Clean, dry sawdust or granules are most often used for the subfloor, but they require careful waterproofing from the ground, since the material quickly absorbs moisture, losing its unique performance qualities.
Clean dry sawdust
Mineral wool is laid both below the floor and in the interfloor ceiling, where it can flawlessly perform its functions for several decades.
Mineral wool
Polystyrene foam insulates almost all structures of a wooden house, from the basement to the roof, since its unique structure does not weigh down the structure. However, such material should first be protected from attacks by rodents, as well as protected from exposure to open flames, because polystyrene foam is the most dangerous in terms of instant fire.
Styrofoam
Expanded clay, as a rule, is used to fill the basement floor or the space under the joists, while the optimal layer thickness for our latitudes is considered to be 30–35 cm.
Expanded clay
Mineral wool
The insulation is available in the form of rolls or in a modern version in the form of slabs. The benefits consist of many factors that deserve the consumer's attention.
Pros:
- thermal conductivity is low;
- the product is environmentally friendly;
- Rodents do not like mineral wool;
- fire-fighting properties - not susceptible to persecution;
- long service life.
Minuses:
- moisture resistance at a low level;
- installation requires preparation in choosing a waterproofing coating;
- When compressed, it loses its thermal insulation properties.
Due to the price/quality ratio, mineral wool is in consumer demand.
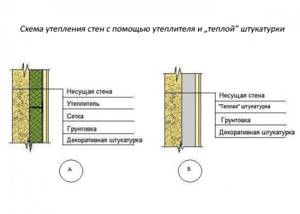
Insulation of walls from the inside with foam plastic
The technique of using polystyrene foam is profitable, practical and expedient. The product is environmentally friendly and resistant to high temperatures. Unfortunately, the insulation has its drawbacks; after a fifteen-year service life, it loses its thermal insulation properties. The fragility of the slabs is also a disadvantage. Today you can purchase products of different densities with better characteristics, and accordingly the price is several times higher.
The slabs are glued to a flat surface with a special glue; you can use adhesives for ceramic tiles. Preliminary preparation is accompanied by cleaning the walls from wallpaper and other existing coverings. The insulated area is pre-primed to improve adhesive quality. It is recommended to additionally fasten with disc dowels. For high-quality installation, you need:
- cover the base with glue;
- apply a reinforcing mesh to the adhesive base;
- glue is applied again with a thickness of 2 mm;
- The corners are reinforced with aluminum profiles.
The adhesive application must dry, after which, taking into account the intended purpose of the functionality of the room, they use finishing materials in the form of ceramic tiles or reproduce the application of plaster. The technology method is an analogy for insulating a facade from the outside.
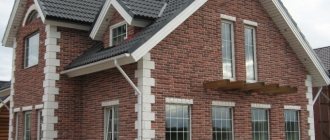
Insulation of external walls with penoplex with siding
Carrying out work on insulating external walls must follow certain rules:
- First. Preliminary preparatory work on the surface must be carried out; the wall must be free of flaws and treated with antifungal agents;
- The second step is the installation of the base profile on which the penoplex will be installed. These manipulations are necessary for an even layer of future insulation, this will provide additional protection from harmful factors.
- The next step is to install the foam boards so that there is a gap of 2 millimeters between the sheets.
- After installing the penoplex boards, they must be secured; for this purpose, special dowels or an adhesive mixture are used, which is used to pre-treat the wall surface and the penoplex sheets.
- The last stage is decorative processing or finishing of the facade with siding.
Laying slabs
Penoplex for siding
Fill the joints with polyurethane foam
Insulation of external walls using penoplex is possible due to the lightness of the material and installation work. After completion of the repair, subject to technical nuances, you will receive additional insulation and insulation from many unpleasant external factors. Good luck with the renovation.
Application of ceramic-isol
In the modern market, new promising technologies are replacing traditional building materials; production produces universal products that have increased efficiency when used. Keramo-izol is an environmentally friendly composition and does not pose any danger to human health, which is an important aspect in its application. Installation does not require complex preparatory processes, application is simple with a long service life. Liquid thermal insulation suspension successfully protects against cold, creating coziness and comfort in the rooms.
Keramo-izol is used for everything that can be painted. Application is carried out with a brush, spray gun, or foam roller. The suspension has good adhesion and is easily applied to the surfaces of monolithic structures. The environmentally friendly product has advantages that are appreciated in the construction industry.
• good thermal insulation properties – reduction of heat loss by 1/3;
• easy to use, application can be done independently;
• can be applied to structures of different shapes;
• the range of shades for painting is varied;
• resistance to ultraviolet radiation;
• has anti-corrosion properties.
Keramo-izol is a universal means for creating an atmosphere of warmth in your home.