Review of insulation materials
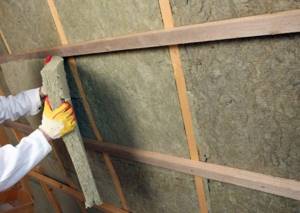
Mineral wool
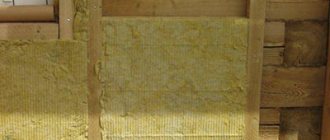
Mineral (stone or glass) wool is the most versatile insulation material, which is produced with various densities. For internal insulation, a less dense version of the heat insulator is used; for external installations, a denser one is used, which can withstand various negative influences. In general, mineral wool differs from other types of insulation in its high thermal insulation ability, durability, non-flammability, and mechanical strength. Its disadvantages are poor resistance to moisture and fairly high cost.
How to properly insulate a country house?
What country house owner would want to pay exorbitant amounts of money for heating? However, if the house is not insulated correctly, this is inevitable. To prevent this, it is important to familiarize yourself with existing standards in advance and choose the right material for insulation. A house insulated according to all the rules will not only warm you in winter, but also save you from the summer heat. You will learn about how to properly insulate a house and what criteria you need to rely on when choosing the right material in our article.
Where does the heat go?
How to detect heat loss in a house?
Criteria for choosing insulation for a country house
Types of insulation for a country house
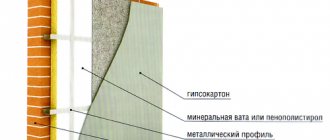
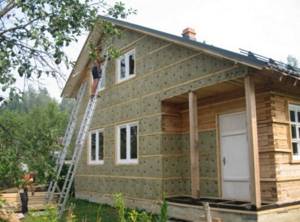
Methods for insulating the external walls of a country house
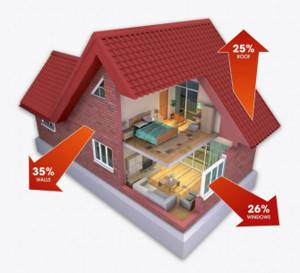
Where does the heat go?
The most popular materials for building a house are brick, gas and foam concrete blocks and wood. However, no matter what your home is built from, the heat in it is lost through the enclosing structures. Thus, according to information provided by experts, from 35 to 45% of heat loss occurs through external walls, 20-30% through the roof, 10-15% through windows and doors, and about 5-10% through the foundation and floor of the first floor - 5- 10%.
Related article: How to obtain permission to build a house. Step-by-step instructions from a specialist
In addition, heat loss can occur through ventilation. That is why it is important to approach the process of insulating a house comprehensively. The exterior of the house must have good waterproofing, and the interior must have a thorough vapor barrier.
How to detect heat loss in a house?
Detecting with the naked eye where heat loss occurs in a house is not easy. This task will be greatly facilitated by the use of a special device - a thermal imager.
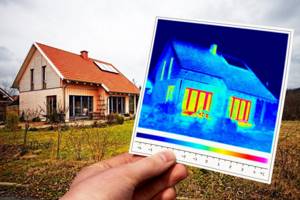
It allows you to clearly see the uniformity of heat distribution around the perimeter of the house and detect hidden leaks. The radiation of heat and cold is displayed on the device display in the form of a specific color field. Measuring the thermal contour of a house using a thermal imager must be carried out in the winter season.
Criteria for choosing insulation for a country house
Video on the topic: Gas blocks on adhesive foam. Builder's tips for laying gas silicate
What does the result of insulating a country house depend on, in addition to correctly performed work? Of course, it depends on the type and quality of the insulation used. Today there are a huge variety of insulation solutions on the market. When choosing insulation, it is important to consider not only affordability, but also the environmental friendliness of the material.
Today, Russia already produces safe plant-based materials in the form of flax, cotton, hemp, wood, cellulose, etc. They are not only completely safe for health, but also have a long service life. For example, the service life of linen insulation is over 75 years.
In addition, it is important to take into account the purpose of the insulation, its properties (density, strength, thermal conductivity, fire safety, water permeability, sound insulation properties and, of course, cost.
Types of insulation for a country house
Today, the construction market offers fibrous insulation in the form of slabs and rolls of rock wool and fiberglass, slabs of polystyrene foam and extruded polystyrene foam, foam glass in the form of granules and slabs, fiberboard slabs or materials for backfilling and spraying.
Stone fiber or mineral wool insulation
Related article: How to sheathe the outside of a frame house. Facade finishing options
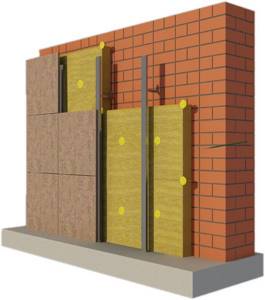
Most often they are used to insulate walls, attics, interfloor ceilings, and floors above a cold basement. This material has low thermal conductivity, high chemical resistance of fibers, biostability, hydrophobicity, good vapor permeability and durability. Among the disadvantages, it should be noted the possibility of moisture absorption and, as a result, loss of insulating qualities, as well as the likelihood that small rodents may live in it. Mineral wool insulation is suitable for thermal insulation of frame walls and for installation under siding. After it there is practically no waste left during installation.
Fiberglass-based insulation for a country house
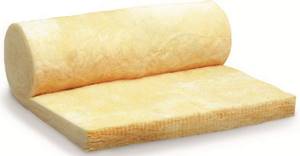
This material provides good heat and sound insulation, it is non-flammable, durable and has low thermal conductivity. During the packaging process, fiberglass products are compressed several times for ease of transportation, and after unpacking they are restored to the stated dimensions.
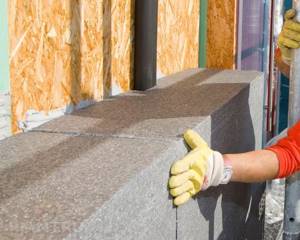
Polystyrene foam, or foamed polystyrene
Today these are one of the most popular insulation materials. It is resistant to moisture, does not absorb water, does not dissolve or swell;
Article on the topic: Septic tanks and treatment facilities at the exhibition “Country House 2019”
Expanded polystyrene is durable and strong and retains its properties well during prolonged contact with saline solutions, acids, lime, etc.
Methods for insulating the external walls of a country house
There are several basic ways to insulate the exterior walls of a private home. Can:
- glue the insulating material to the façade wall and then finish the walls with plaster. This method is called “wet facade”.
- build walls of three non-ventilated layers. The insulation is fixed using a solution. Then a small air space is left and an outer wall one brick thick is erected;
- install a façade with ventilation. To do this, the insulation is applied to the waterproofing layer, covered with wind protection and sewn up with vinyl siding or other decorative and protective material.

When deciding how to insulate brick houses from the outside, you must keep in mind that each option for thermal insulation has its own technology and, depending on this, can be produced at different times of the year.
Which material to choose
To insulate houses, it is recommended to use environmentally friendly materials that allow the walls to “breathe”: mineral wool, foam glass, stone or ecowool.
But, along with excellent heat-saving properties, insulation materials of natural origin have increased hygroscopicity - they quickly absorb moisture, retain it in their thickness, and when frost sets in, they freeze and lose their ability to shield the cold.
In order to protect the insulating layer made of natural materials, it is recommended to use vapor barrier and waterproofing membranes, which screen out moisture and do not interfere with the ventilation of the walls.
Unlike mineral wool and other types of insulation made from natural raw materials, thermal insulation made from foamed polymers practically does not absorb moisture and lasts quite a long time. If the installation of stone or glass wool involves certain difficulties and requires compliance with safety standards, then the installation of polystyrene foam, polyurethane foam or polystyrene foam can be quickly and easily done independently. At the same time, the thermal insulation properties of these materials are slightly worse than mineral wool.
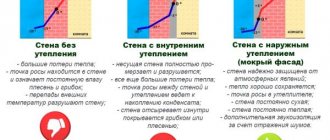
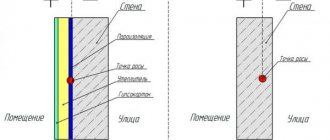
Where to insulate the house: outside or inside?
The theory of construction science, based on the bitter experience of unsuccessful decisions, is categorical: you can only insulate a house from the outside.
There are several reasons for this. For example, insulation from the inside “eats up” the usable space of the house. But that's not the point. A house that is insulated from the inside inevitably begins to become damp. Mold often appears on the walls. Why?
The fact is that if you lay insulation inside, the outer walls will not warm up (that’s what insulation is for, so as not to allow heat to pass through). As a result, the moisture in the air of the room will begin to condense inside the insulation. Which will make the atmosphere in the house not very pleasant.
Some believe that the problem can be solved with special membranes. Alas, they are often disappointed.
Features of insulating the walls of a house outside
Insulation of walls from the outside is mainly carried out using curtain-wall facade technology, leaving a ventilation gap between the insulating layer and the finishing cladding - this way the walls of the house are ventilated more effectively.
Stages of insulating a house from the outside when installing a curtain wall:
- Cleaning and drying, treating walls with antiseptic compounds.
- Installation of vapor barrier film with sealing of panel joints with mounting tape.
- Installation of a frame for installation of insulation and external cladding.
- Laying insulation, fixing with disc dowels.
- Installation of a waterproofing, windproof multifunctional membrane.
- Fastening the façade finishing to the frame using clamps.
Insulating the facades of a house can also be done using “wet” technology - gluing a layer of heat insulation to the outer walls and applying a layer of decorative paint or plaster.
Insulation of facades using the “wet” method
This thermal insulation option is applicable to all types of stone walls - brick, concrete, aerated concrete. It is also used for external insulation of apartments in multi-storey residential buildings. This method is not suitable for walls made of timber and rounded logs; wooden houses should be insulated using the “ventilated facade” technology.
The essence of the method: the heat-insulating material is attached to the wall surface with a construction adhesive mixture, then fixed with dowels. The top of the insulation is covered with a protective waterproofing layer of the same glue, plastered and painted. That is, all insulation work is accompanied by “wet” processes.
External insulation of the walls of a private house using the “wet” method is carried out in 4 stages:
- Calculation of quantities of materials, purchase.
- Preparatory work.
- Installation of the thermal insulation layer.
- Application of waterproofing, decorative plaster, paint.
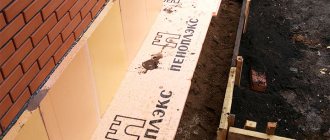
The insulation is polystyrene foam with a density of 25 kg/m³ or mineral wool made of basalt fiber (over 100 kg/m³), less often extruded polystyrene foam. Mineral wool is not suitable for thermal insulation of the base; only polystyrene polymers that do not absorb moisture are used.
Clarification. For external insulation followed by plastering, slab insulation is used. Cheaper rolled glass wool used in roofs, ceilings and attics is not suitable. The best way to insulate a country house, read our other publication.
Calculation of material consumption
To find out the amount of insulation, building mixtures and other related building materials, we will use the long-developed technological map “Ceresit Bonded External Thermal Insulation System”. This document clearly describes the insulation technology, determines the consumption of insulating materials and fasteners per 100 m² of surface.
To calculate, you need to measure 3 parameters:
- area of the external surface of insulated walls in square meters;
- area of window and door slopes;
- linear footage of all corners of the building - external and internal, the corners of window openings are also considered.
Reminder. Don't forget to measure the length and area of the lower window slope, hidden under the ebb. The existing flashings will still have to be changed - after installing the insulation, they will turn out to be too short.
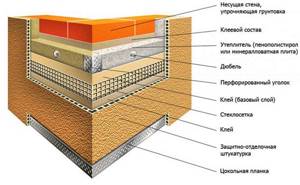
Scheme of external thermal insulation of a wall with polystyrene foam.
According to the technological map from Ceresit, the following amount of materials will be used for insulation and exterior finishing of the building:
- PSB-S foam plastic or mineral wool - 108 m² for every 100 square meters of wall;
- to insulate 100 m² of slopes you will need 117 m² of polystyrene or mineral wool;
- primer for surface preparation – 20 l/100 sq. m.;
- adhesive mixture for installation of foam plastic/mineral wool boards – 600 kg/100 m² of all surfaces;
- another 140 kg of glue will be used to strengthen 100 m. corners;
- waterproofing adhesive layer 3 mm thick – 600 kg of mixture, 5 mm – 750 kg/100 m²;
- fiberglass mesh with a cell size of 5 x 5 mm, resistant to alkali, – 130 m² (consumption is the same for walls and slopes);
- metal base profile – 102 m for every 100 meters of foundation length;
- perforated corners with fiberglass mesh - 105 m/100 m. p. for all corners of the house;
- disc dowels for mechanical fastening of foam plastic – 500 pcs., mineral wool – 800 pcs/100 m².
The thickness of the waterproofing depends on the choice of finishing option for the “pie”. An inexpensive way is to apply a thicker layer of 5mm glue, then paint. The second option is to apply 3 mm of adhesive mixture, and on top - decorative plaster such as “bark beetle”, “shagreen” and the like. Plaster mixtures can be immediately tinted or painted after drying.
We do not indicate the consumption of paints and plasters, since it greatly depends on the type of material. Before plastering, it is advisable to prime the waterproofing layer with a special compound, for example, Ceresit ST15/ST16.

Thermal insulation of a corner of a house with reinforcement with a perforated profile
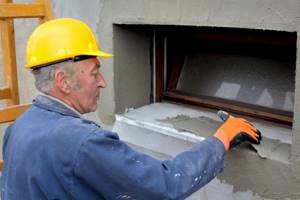
Preparatory stage
To successfully insulate a house from the outside using “wet” technology, you will have to wait for favorable weather conditions. The air temperature outside is within 5...30 °C, no precipitation. If it starts to rain during the insulation process, work is suspended until the surfaces are completely dry.
Foundation preparation includes the following operations:
- Dismantling window sills and other decorative elements that interfere with thermal insulation work. It is advisable to paint the wooden parts of roof overhangs.
- Removing old plaster from window and door slopes. The plaster layer is also removed from the insulated wall if it does not hold well or is covered with cracks.
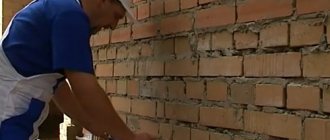
- Protrusions, cracks and depressions larger than 10 mm must be eliminated. The first ones are knocked down, the second ones are sealed with cement-sand mortar. It is better to trim off protruding jointing on a brick wall.
- The damp surface should be dried in the sun or use a heat gun.
- Removing dust with a brush or compressed air from a compressor.
- Applying a deep-penetrating primer using a roller or spray gun (including on slopes).
Advice. Take care in advance about the means of carrying out high-altitude work - ladders, stepladders, scaffolding (if we are talking about the second floor). Another recommendation: be sure to cut off tree branches located too close to the cottage. Later they will grow and under the influence of the wind they can open the entire facade, clinging to the fiberglass mesh.
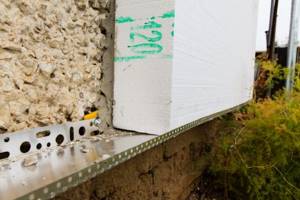
Since external insulation begins from the bottom, base profiles are installed along the upper edge of the foundation. They serve as a support for the first insulation slabs and align them horizontally. If the house has an unheated basement, the profiles are attached 30–40 cm below the ceiling.
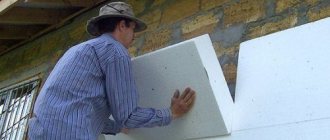
Installation of the thermal insulation layer
The insulation of the wall structure is carried out from the bottom up, the first row of slabs rests on the base profile. The glue is mixed according to the manufacturer's instructions (on the bag), the mixture should be worked out within 1.5 hours.
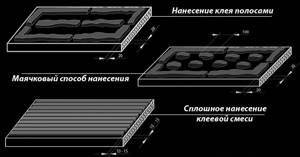
Methods for applying adhesive building mixtures to polystyrene boards
The foam insulation technology looks like this:
- Apply the adhesive solution to the slab using 1 of 3 methods (shown in the diagram above). From the moment of application until gluing to the surface, no more than 20 minutes should pass.
- We insert the first slab into the profile and attach it to the wall at the corner of the building, carefully pressing it along the entire plane. The goal is to squeeze out air pockets as much as possible. We remove excess glue from the sides and check the vertical and horizontal levels.
- We apply the next slab to the wall at a distance of 1.5–2 cm from the first, then move it close to it. We press the insulation so that the outer surfaces of the slabs are in the same plane, without differences. The permissible width of the joint between them is 2 mm.
- We cut the last slab in the row along the corner of the house + overhang to the thickness of the thermal insulation of the adjacent wall to ensure a jagged connection. We glue the second row in the opposite direction with an offset relative to the first, starting from the corner.
- If the insulation does not stick well, tear it off and remove the solution from both surfaces. Then we reapply the glue and put the slab in place.
- If the seam width exceeds 2 mm, fill the gap with foam cuttings. You cannot cover the joints with an adhesive mixture.
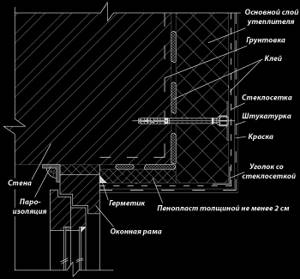
- We cover the slopes of windows and doors with foam plastic 20 mm thick, fill the joints with sealant, as shown in the drawing.
Recommendation. Homeowners without experience in façade work should practice first. Prepare half a bucket of glue, try to apply it correctly to the foam and attach it to the wall.
Too wide gaps or voids can be blown in with polyurethane foam. Taking into account the expansion of polyurethane foam, fill the gaps after the glue has dried (at least 2 days).
To apply the solution to slab insulation, 3 schemes are used:
- if the wall unevenness does not exceed 10 mm, the glue is applied in strips with a 20 mm indentation around the perimeter;
- for differences of 10–15 mm, the beacon method is used - stripes along the perimeter of the slab 6 cm wide, inside - beacons Ø100 mm and 2 cm high;
- for gluing mineral wool and for unevenness up to 5 mm, the mixture is applied completely and leveled with a notched trowel.
After 3 days, when the glue has completely hardened, you need to perform 2 more operations:
- Eliminate differences at the joints between foam plates. We take a wooden float for plastering work, wrap it in coarse sandpaper and sand the protruding edges of the insulation.
- Additionally, secure the thermal insulation with special umbrella dowels.
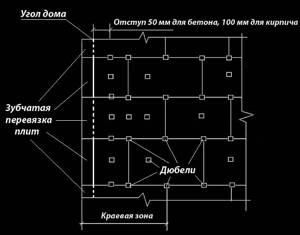
In the edge zone, dowels are placed more often, polystyrene slabs are tied at the corner using the notched method.
Attachment points are determined according to the following scheme: 4 dowels are placed in the corners of each slab directly in the seams, 2 more in the middle. In the edge zones near the corners of the cottage, additional umbrellas are placed, as shown in the drawing. The depth of the holes (and the length of the dowels) for concrete is 5 cm, hollow brick is 9 cm, aerated concrete is 11 cm.
Waterproofing and finishing
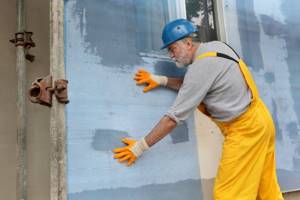
The protective waterproofing layer, reinforced with fiberglass mesh, is applied with the same adhesive mixture. The first step is to strengthen the most vulnerable areas of the insulation system, following these instructions:
- Using a drill with a stirrer, prepare 1 bucket of adhesive solution.
- Glue perforated corners with fiberglass mesh to all outer corners of the building, window and door openings.
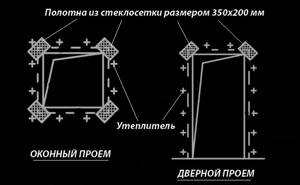
- To avoid the appearance of oblique cracks in the corners of the openings, stick fiberglass mesh sheets measuring 350 x 200 mm onto the walls, as shown in the diagram.
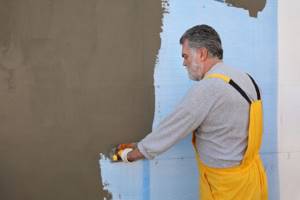
When the solution on the strengthening elements has hardened, you can proceed to installing continuous waterproofing. Prepare the required amount of adhesive mixture and start working in the following order:
- Cut the fiberglass mesh sheets, the length should be equal to the height of the insulated wall plus 10 cm. First, prepare 1 sheet.
- Using a metal float, evenly apply a 2 mm thick layer of glue to the insulation. Apply the solution from top to bottom, in a vertical strip 1100 mm wide.
- Using a float, press the cut strip of fiberglass mesh into the adhesive layer to a depth of 1 mm. Once you are sure that the length of the first canvas is enough, you can further cut similar canvases.
- Apply the next strip of mortar and glue in the second mesh sheet. Maintain an overlap of 10 cm on the adjacent strip of fiberglass mesh.
- After installing the reinforcing layer, apply a 2 mm thick solution on top. If you do not plan to plaster the insulation pie, apply a thicker layer of glue - at least 3 mm.
- Shape and straighten the corners, and after pre-drying, eliminate minor defects.
Advice. It is better to glue a second layer of mesh at a height of 2 m from the ground, which protects the waterproofing from mechanical damage.
If you are doing external insulation with your own hands and do not have experience in plastering, we recommend implementing a simpler and cheaper option - waterproofing with a thickness of 5 mm, then simply painting the wall with acrylic or silicone paint. The second option is to apply a thin layer of 3mm glue and hire plasterers to apply a decorative finish such as bark beetle.
Video: instructions for insulation
Plastering walls with insulation
The plaster layer is applied to the foam plastic very simply. But the wall must be reinforced with fiberglass mounting mesh. This will strengthen the surface, making it more durable and less susceptible to mechanical damage.
The mesh is applied from right to left or, conversely, in a convenient direction for working with your hands.
Apply a little mortar with a spatula (and this can be the same tile adhesive, which will create a quickly setting, durable layer), and then press the edge of the mesh to the PPS slab through the plaster. Holding the other edge of the mesh, press it against the PPS with the solution, and move it with a spatula, stretching the solution. It turns out that you simply spread the solution, and the mesh sinks into it, turning into a single reinforced structure. It is very important to place the mesh on the corners, and also to fasten the sections together with at least the staples of a mounting stapler, so that until the solution dries, the corners do not turn away.
Another method that is used for additional fixation of the reinforcing mesh is pressing with plastic umbrellas. To do this, you can take smaller consumables than for direct fastening of the plates!
When installing the mesh, it is necessary to simultaneously level the wall, as with a standard plaster layer. To do this, apply a little less material to the protrusions, and a little more to the depressions!
Mistakes when insulating a dacha, problems and their solutions
Insulating a country house in a hurry, without experience, but with additional cost savings, is fraught with many mistakes that lead to unsightly appearance of facades, ineffective thermal insulation, as well as major repairs with the replacement of materials in just a few years. You need to try to avoid such unpleasant situations. And for this, it is recommended to study ways to solve possible problems in the process:
- Incorrect insulation calculation. Excessive savings on insulation leads to a significant decrease in the efficiency of the process. Cases are repeatedly observed where incorrect calculations completely affect the result. You can get a house with new facades, but with virtually no change in energy efficiency. Experts recommend starting from the weighted average decisions in the region, but producing thermal insulation based on a material thickness of at least 100 mm;
- Ignoring the preparatory stage. Labor-intensive preparation, which sometimes requires cleaning a significant part of the facade, as well as priming the walls, is really important. Trying to reduce costs and labor costs, it is quite possible to get a swollen or fallen façade even in the first winter season;
- Saving on consumables and other materials. At least 40-50% of facade insulation is installed in violation of technological standards. One of these is the fastening of thermal insulation and finishing. Simple savings on plastic fasteners, which will amount to only 500-1000 rubles for a small dacha, can lead to a situation where a heavy plastered facade simply falls off the wall. This is not just an expensive problem, but also a very dangerous one;
- Internal insulation. The technology is quite complex for a beginner, which is not an error or a problem, but requires a professional approach. Often, ignoring the requirements of the material and the technology itself, beginners get a thermos effect, condensation and dampness on the walls, mold in unventilated corners. And, if with the installation of basalt thermal insulation all such issues are resolved by the use of membranes and additional insulation, then insulation of PPS inside residential premises is generally considered incorrect and unsafe;
- Partial insulation of the dacha. You will not get the desired effect if you insulate only one or two walls, only walls without thermal insulation of the floor and ceiling... just as in the case of thermal insulation of facades, floors and ceilings, but without replacing doors and windows. You need to understand what heat loss is and how it is reduced, and also work comprehensively;
- Incorrect application of glue to EPS and EPS boards. Two or three points are not enough, as is greasing the slab only along the perimeter. The correct approach is 3-4 dots with gaps and mandatory application of glue along the edge of the slab, or applying 5-6 stripes along the slab 4-5 cm wide;
- Ignoring additional accessories at work. It is important not to forget about the installation and starting strips, which are mounted on the lower level of the façade insulation, as well as the canopies above the insulation system for the walls and the basement of the building. Flashings embedded in the wall above the insulation system make it possible to prevent moisture from penetrating between the system and the main wall. If water from the roof gets under the insulation, the system will become unusable in the next 2-3 years;
- Step by step work. It is best to work in dry, calm and warm weather. Spring, summer, early autumn, when humidity is minimal or average, are excellent for this. But even in the warm season, you should not stretch the process for weeks or months. Adhesive compositions deteriorate under the influence of the external environment, the plaster becomes wet, and the foam is destroyed under the influence of ultraviolet radiation. It is important to complete the work quickly, within 2-3 weeks;
- Incorrect laying of slabs near openings. There is one slab for each corner of a window or doorway. Not a slab on top of the window, but another on the side, but one slab with a rectangular cutout that “hugs” the corner. This method of installing PPS will prevent cracking;
- Working with the grid. There are many problems with installing the mesh, but they should be minimized. The mesh is completely immersed in the adhesive composition and laid without folds. An additional layer of reinforcing mesh is glued around windows and doors - 25-35 cm wide. You can glue the mesh diagonally to the corners of the openings. In this case, you need cuts measuring 25x35 cm;
- Ignoring corner reinforcement. The mesh should not come to the corners and be cut off. It must be wrapped around it, overlapping another wall by at least 20-25 cm. Also, reinforcements are installed - perforated corners or plastic corners;
- Seams between slabs. All seams, especially wide ones, formed due to errors with dimensions and cutting, are filled not with glue, but with polyurethane foam, which is later cut flush with the plane of the wall;
- Saving on primer. Everything is simple here - modern materials are produced with the obligatory use of primers when working with them. Plastering, gluing slabs or mesh, painting - each stage after mandatory priming;
Selection of cheap materials. Often, at construction sites you can receive an offer to buy illicit or defective, expired goods. This should not be done, because expiration dates are written for a reason, and you will not receive a guarantee for these materials. And the overall savings, which will definitely lead to problems in the future, will be minimal!
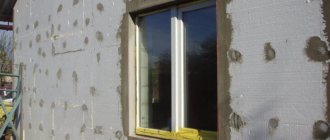
Preparing the external walls of the apartment for insulation
Before applying any thermal insulation material, the walls must be cleaned and primed. If you neglect this stage, the insulation will not adhere well, will come off, and cold air will get into the voids between it and the wall of the house.
It is advisable to carry out all work in the summer, when the outside temperature is above +15 degrees and the air is quite dry. In such conditions, the primer will be absorbed into the brick or concrete as deeply as possible, will not harden and will not be washed off with water.
After the primer has dried, you can glue the insulation to the wall.
As a rule, sheets of polystyrene foam and expanded polystyrene are fixed with both glue and dowels. This method of fastening prevents the cold from penetrating the wall and securely fixes the heat insulation slab to the surface of the building.
For more reliable thermal insulation, it is necessary to cover not only the wall itself, but also the interpanel seam with a sheet.
Insulating a house using blown mineral wool
Heat insulation in the room is carried out using blown-in technology. The advantages of this method of thermal insulation include:
- the ability to carry out work of any complexity;
- no waste, which allows you to save on the purchase of material;
- efficiency of work execution;
- absence of joints, unfilled spaces;
- laying thermal insulation over old insulation.
If you want to know how to insulate a wooden house, then you won’t find a better option. The materials used are distinguished by their safe composition, non-flammability, and long service life. The raw materials are of natural origin, so they are resistant to chemical compounds and combustion. This technology appeared quite recently, but it quickly became in demand. Using blown-in wool, you can insulate floors, walls, ceilings and floors, as well as the most inaccessible areas.
Blown wool contains minerals that provide excellent thermal insulation. Installation with its help is carried out using an automated method. The material is supplied through a hose, so it can be directed to the most difficult to reach areas. The cotton wool supplied under pressure is distributed in an even layer, enveloping the roof and ceiling structures.
Installation of wool does not require the use of loading/unloading services. All equipment in which cotton wool is produced and supplied to the site is mounted on special equipment. This technology allows you to insulate your home efficiently and inexpensively. All you need to do is contact a specialized organization and pay for the services of a team of craftsmen.
When choosing the optimal method and materials, every person asks the question? How is installation carried out and what equipment and special equipment may be required. Prices for installation of blown-in wool depend on the complexity of the work and the area of the surfaces being treated. The main distinguishing feature of the blow-in method is the convenience and efficiency of installation. It is suitable for thermal insulation of horizontal surfaces, hard-to-reach areas with limited maneuverability. This method is one of the most budget and economical.
How much can insulation cost?
If you need to keep your house warm, the first thing you should do is insulate the attic. If you are interested in how much money is needed to insulate a home, what is the price of insulation and the cost of work, then just contact the employees of a specialized company. Various organizations offer turnkey work. At the same time, the cost of the service can vary widely, since it is possible to insulate the house from the outside. All you have to do is choose the best option and invite a team of specialists.
Cottage owners are often interested in questions about how to insulate a house and how much the materials cost. The cost of insulation depends on many factors, including the area of the walls, the type and cost of insulation. The involvement of a team of craftsmen also plays an important role in determining the cost of expenses. Of course, you can do all the work yourself. But you can only count on a successful outcome if you have specialized knowledge.
A person who is far from the issues of construction and repair will find it difficult to insulate a house from the outside on his own. In addition, this can lead to sad problems - damage to the material. Expensive corrections after incorrect installation. If you are focused on quality results, then you should contact a specialized company. Competent craftsmen will select an economical, effective method of insulation and install the insulating layer efficiently and professionally.
| Cost of insulation: | Cost ₽ | Volume |
| Insulation of horizontal surfaces (floors, ceilings) with mineral wool using the blow-in method. | 2200 | 1m.3 |
| Insulation of inclined surfaces (roof) with mineral wool using the blow-in method. | 2300 | 1m.3 |
| Insulation of vertical surfaces (walls) with mineral wool using the blow-in method. | 2400 | 1m.3 |
| Visit to the site for measurements, calculations and consultation on the design of insulation (free when ordering insulation, counted as an advance payment). | 2000 | 1 time |
| Delivery of materials and equipment for insulation with mineral wool using the blown method. | from 1500 | 1 time |
| Preparation of surfaces for insulation with mineral wool. | By agreement | 1 m.2 |
| The cost of insulation work includes material! | Yes | Yes |
Video description of a wooden house
The result of proper internal insulation of a house in the video:
Even such protection from the inside will not provide a 100% guarantee against the wall getting wet - water vapor will find its way into the film joints and fastening points
That is, when deciding how to properly insulate a house, in the vast majority of cases, the answer will be based on clear regulatory recommendations - from the outside.