When building a house, the number one task is to make a strong and reliable foundation. And so that it doesn’t feel cold, you need to make high-quality thermal insulation and finish the base. Here it is important to choose a good, but inexpensive insulation that will allow you to implement different cladding ideas.
In this article we will tell you how the foundation is insulated with penoplex - a durable insulating material in the form of slabs, we will analyze the installation technology step by step, and compare prices for this service.
Do-it-yourself insulation of the foundation with penoplex.
Preparation of the work front.
To carry out the work you will need the following tools: tape measure, construction knife, hammer drill, concrete drill 200 mm long (according to the diameter of the dowel), mixer for mixing glue, wide brush, shovels, tamper.
You can calculate the number of slabs knowing the area of the insulated foundation and the area of the slab. The area of the foundation is calculated by multiplying the perimeter by the height of the foundation, and the area of the slab is 0.72 m2.
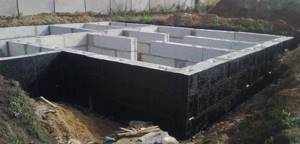
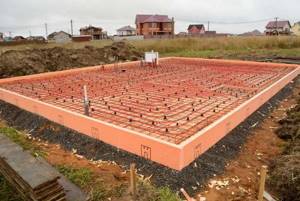
It is ideal to carry out insulation during the construction phase
But this can be done in a house that has already been built and it doesn’t matter how long the building costs
To insulate the foundation from the outside, it is necessary to dig it around the perimeter to the depth of soil freezing. This is a different indicator for each region, but usually it fluctuates in the range of 0.6 - 1.2 m, unless we are talking about the permafrost zone.
The width of the trench should allow work to be carried out on fastening slabs and applying waterproofing without being particularly crowded.
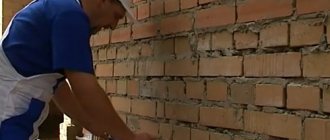
The exposed walls must be cleared of any remaining soil and roots. If the foundation wall is uneven, it is necessary to level it with cement mortar. After the leveling layer has dried, you can begin insulation.
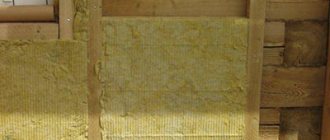
The thickness of the foundation walls in private housing construction is usually 0.4 or less than 0.6 m. To insulate such walls, 10 cm thick penoplex is used.
Installation of polystyrene foam boards.
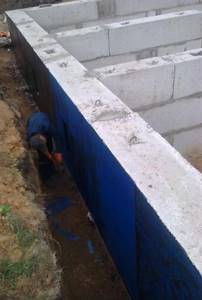
Before installing penoplex slabs, a layer of waterproofing must be applied to the walls. This work is carried out using a wide brush and bitumen mastic. To make the work easier, you can use a ready-made bitumen primer that has the consistency of slightly thickened paint.
The primer has high adhesion to concrete surfaces and adheres well to the wall. The drying time for the primer is one day. The next day you can begin attaching the insulation.
Penoplex boards are attached to the wall using cement adhesives for fastening polystyrene foam. You need to dilute the glue according to the instructions on the package and let it sit for a while.
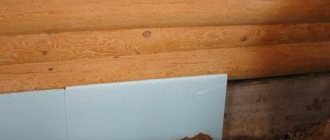
The slabs can be glued in both vertical and horizontal orientation. It all depends on the depth of the foundation. At a depth of 1.0 m, you can dig below the laying level in order to attach the insulation vertically without cutting off the remainder. If the depth is no more than 90 cm, then you can turn the slab in a horizontal plane, and cut the slab installed in the second row in half along the long side.
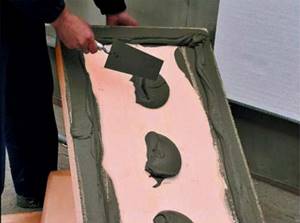
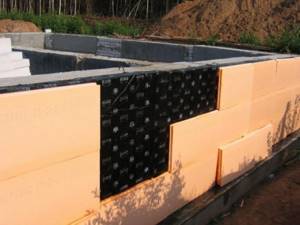
The adhesive must be applied pointwise to the slabs. A continuous layer of glue can be applied if the foundation wall is perfectly flat. After applying the glue, the insulation is pressed against the wall and left for a short time. The next slab is combined with the groove of the previous one and thus moved along the perimeter of the house. Fastening the slabs begins from the bottom. The groove in the slab gives a tight fit to each other and eliminates the appearance of gaps, cracks and cold bridges.
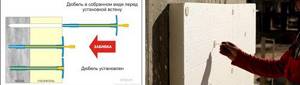
Then, additional fixation is performed using dowel nails
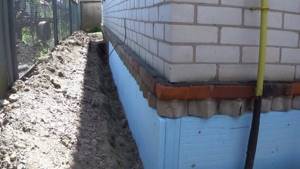
This is especially important when the insulation of the foundation is combined with the formation of the base of the house and part of the insulation extends above ground level. On each slab it is necessary to install five dowels in an “envelope” pattern - one in the center and two in the corners
Having finished fixing the slabs with dowels, some of the slabs that extend above ground level and form the base are plastered over a plaster mesh.
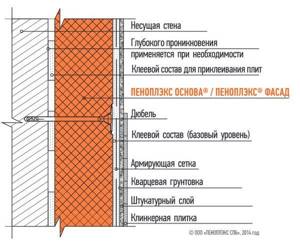
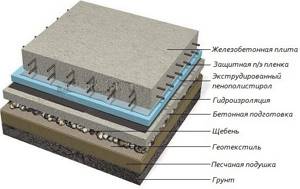
Scheme and procedure for insulation with penoplex
The main task of insulation is to prevent freezing and swelling of the soil. By following the order and installation rules, everyone will be able to insulate the blind area around the house, even if they are doing it for the first time.
First of all, you need to take care of the necessary materials. Need to purchase:
- foam sheets;
- cement, sand and crushed stone;
- slats and polyethylene;
- bitumen and bitumen mastics;
- polyurethane foam;
- metal pipes;
- boards for formwork;
- shovel and plaster trowels.
Stages of the thermal insulation process for the blind area:
- Preparing the area. Space is freed up, trenches are dug and the top fertile layer of soil is removed. The trench should be close to the house. The depth of the trenches is approximately 30 cm. And its width is usually selected taking into account the width of the expanded polystyrene sheet, which is approximately 100 cm. This approach significantly reduces the amount of material waste. It is also necessary to remove all remnants of roots, since the root system easily extracts moisture and, when germinating, can destroy the foundation.
- 15 cm of sand is placed on the cleaned area as a layer. Then the sand layer is compacted and slightly moistened with water.
- The next layer is crushed stone 10 cm thick, which must be thoroughly compacted.
- At the next stage, sheets of insulating material are evenly distributed onto the prepared base of sand and crushed stone. If necessary, a reinforcing mesh is installed on top of it.
- The gaps between the wall and the sheets will be filled with polyurethane foam.
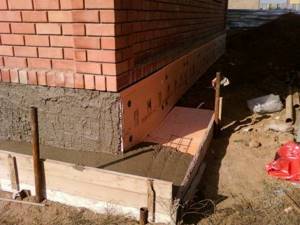
- Along the edge of the trench, I make formwork from boards 10 cm high above the ground level.
- Lay a mixture of concrete or asphalt. It is taken into account that there should be a slope of 10 degrees from the wall. When pouring concrete, through gaps (slots) must be left every 2 m. This is done using thin slats that are inserted into the concrete. After the concrete has hardened, the slats are removed. Then the resulting seam is treated with hot bitumen. If the slats are left in concrete, then they must be lubricated with bitumen mastic.
- Afterwards, along the edge of the blind area you need to make a drainage system. This is done in one of two ways:
First way. Asbestos-cement pipes are laid on the covered sand layer.
Second way. Install a concrete trench on the sandy base of the foundation, which can be given the desired shape using a piece of metal pipe or log.
Brief instructions for insulating the foundation:
- Prepare the foundation: remove construction debris, grease, dust and rust. If there are cracks or holes on the surface of the foundation, then they must be leveled with cement mortar and a level;
- An important step is to waterproof the surface. This is done using water or bitumen mastic. Solvents should not be used; they may destroy polystyrene foam;
- Using penoplex glue, the sheets are attached to the foundation. It is best to arrange them in a checkerboard pattern. Thickness - up to 10 cm.
Owners of strip foundations need to pay attention to the differences in the instructions for installing insulation. First, slabs are laid on the concrete base. Then a durable polyethylene film is glued, which is secured at the joints of the foundation with construction tape
The formwork is prepared and, after reinforcement, it is poured with concrete. After removing the formwork, the foundation needs to be insulated again, so polystyrene foam is again applied to the side walls
Then a durable polyethylene film is glued, which is secured at the joints of the foundation with construction tape. The formwork is prepared and, after reinforcement, it is poured with concrete. After removing the formwork, the foundation needs to be insulated again, so polystyrene foam is again applied to the side walls.
The re-insulated blind area is filled with concrete solution and leveled. Sometimes, in order to give it a beautiful and well-groomed look, the top is decorated with decorative stone.
What is penoplex?
There are a great many types of insulation. Penoplex and expanded polystyrene occupy a special place in this list.
Actually these are names of the same material. Expanded polystyrene, or to be precise, extruded polystyrene foam, is the general name for polymer insulation made from styrene. Penoplex is the brand name for expanded polystyrene.
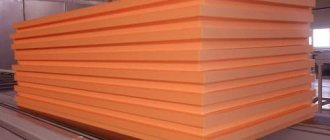
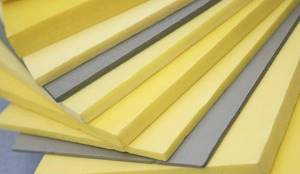
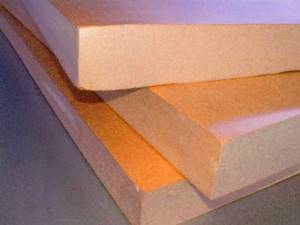
Penoplex is produced in the form of slabs with a thickness of 2 to 15 cm. Size 60x120 cm with a mounting groove on the long side.
The advantages of the material are:
- Low thermal conductivity;
- High strength (compression index – 27t/m2);
- Low water absorption coefficient;
- Durability (does not rot and decay up to 50 years);
- Resistant to temperature changes.
Penoplex has one drawback - low fire resistance.
But since the entire volume of material will be hidden underground, this indicator will not have a negative impact on the structure of the foundation. However, this should be taken into account if you want to insulate the entire house from the outside.
This material should not be used indoors either. Styrene emissions can have negative health effects.
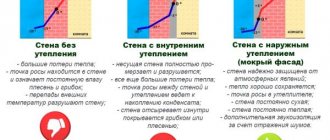
How to insulate correctly: from the outside or from the inside?
For maximum protection from cold, water, and swelling of the soil, the foundation of the house is insulated from the outside. It is better to carry out the work at the construction stage, so as not to have to do excavations later. The advantages of external insulation include:
- protection of the foundation from freezing;
- prevention of concrete cracking during freezing/thawing;
- protection of waterproofing from mechanical damage;
- increased resistance to temperature changes;
- creating a favorable microclimate in the basements and ground floor;
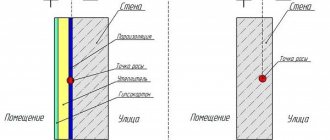
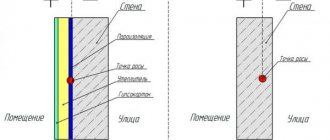
- shifting the dew point, which prevents the appearance of dampness on the walls due to condensation of moisture vapor contained in the air.
With the internal method, only the room is insulated, and the foundation remains unprotected from the adverse effects of the external environment. Through it, the cold will penetrate the walls of the first floor.
Briefly.
Insulation from the outside maximizes the protection of the foundation from cold and water. Internal insulation does not protect the foundation from external factors, which leads to its gradual resolution.
Sequence of activities
Controversial issues have been resolved - it’s time to get to work. The first step is to prepare the object, namely: concrete structures that will be subject to finishing measures must be freed from soil.
The technology for insulating the base with penoplex is similar to the sequence of work using polystyrene foam. There are some deviations towards complicating the process.
Excavation
A trench is dug around the house, sometimes reaching the bottom of the foundation. For a shallowly buried tape this is justified. Deeply lying belts that go below the soil freezing level do not require such drastic measures. It is enough to open the concrete below the soil surface by 25-60 cm.
Concrete structures are freed from soil, leveled, and allowed to dry. Then they are cleaned of dust and treated with a deep penetration primer. Irregularities with height differences of 2.5 cm or more require leveling with mortar. The base walls are plastered, rubbed, and left to dry. The presence of significant protrusions and depressions makes it necessary to perform priming several times.
Waterproofing of concrete structures
The next step is waterproofing. It is done in two layers. Bituminous mastic is applied first. It can be purchased ready-made at retail outlets. If you have a dry bitumen block, then by heating it, then mixing it with used motor oil, you obtain a suspension suitable for waterproofing a concrete base. A layer of 2-4 millimeters is applied to the concrete.
Next, Technonikol sheets are laid. Heat the film with a gas burner, stick it on, smoothing it out and squeezing out air bubbles from under it. The sheets are applied with an overlap of 10 cm, the joints are coated with mastic.
From this point on, the technology for performing work proceeds in two ways: from the soil level - up and down. The underground part of the base is insulated with bedding, the above-ground part with penoplex.
Drainage arrangement
Foundation drainage
For houses with a large roof area, there is a need to lay drainage and drainage (blind area) around the perimeter of the foundation. Geotextiles are laid into the existing trench. Its edges are brought to the surface of the soil. Pipes with holes (drainage) are laid on top of the canvas. They are then connected to the storm sewer system. The pipes are covered with a layer of crushed stone 10 cm thick and the whole thing is wrapped in geotextiles. The trench is filled with expanded clay backfill. The slope of the pipes must be at least 3 degrees. The structure of the backfill promotes intensive outflow of water, and also serves as an insulating layer to protect concrete from freezing and damage from frost heaving of the soil.
Installation of EPS
Mark the level of the bottom row of insulation. Using pre-prepared dowels and screws, the start profile is attached, on which the penoplex will rest. A special adhesive is applied along the perimeter of the slabs. In the middle, add a few dots of glue. The mortar on the slab, after pressing it against the wall, should occupy at least 40% of the surface area.
The EPS is placed in the profile and pressed against the wall. The slabs are placed so that the protruding parts of the selected quarter are on the side of the foundation. In this case, water will not have a chance to get under the insulation. The adhesive composition is also applied to the ends of the slabs. This will ensure their gluing together and the formation of a monolithic ring around the entire base.
The front surface of the EPS is again coated with an adhesive composition. It is recommended to secure the above-ground part of the insulation with special plastic mushrooms. Each plate should be secured with five clamps: in the corners and in the center. A perforated metal corner is fixed along the upper edge of the insulating layer, protecting the penoplex board from damage. A reinforcing mesh is applied. Use a spatula to embed it into the adhesive.
Watch the video: using extruded polystyrene foam
Laying the blind area
Depending on the size of the roof canopy, a warm blind area is installed. Based on a depth of 30 cm, a 10 cm layer of sand is poured. It is compacted, covered with waterproofing, on top of which a layer of penoplex is placed. This entire sandwich is filled with cement mortar. The resulting concrete screed should have a reverse slope in order to drain water away from the house. The width of the blind area should exceed the overhang of the canopy by 50%.
External construction progress
Attaching foam plastic to the surface of the foundation from the outside is a labor-intensive process and is performed only in the warm season.
Excavation
First, excavation work is carried out. A trench is dug around the house - with your own hands, using special equipment.
Width
The width of the trench is the thickness of the foam plus the space required for the work.
The bottom of the trench, at least the area for insulation, is cleared of debris, compacted and covered with sand, expanded clay or crushed stone.
Excavation work can make adjustments to the overall construction plan and cost estimates.
Causes:
- serious defects in the foundation structure;
- damage or wear of communication lines.
Eliminating such phenomena with your own hands will require time and material costs.
Preparing the base
The process of insulating the foundation may take you about two weeks, or even more.
It is better to let the foundation exposed to the soil dry out - at least 2 weeks. The exact timing is determined depending on the condition of the structure and weather conditions. A dry surface makes it easier to clean dirt and debris.
At the same time, the base is carefully examined for various damages.
All identified defects are eliminated. The process of treating the foundation with your own hands using deep penetration primers will allow you to better remove soil residues, protect the structure from moisture and improve the adhesive qualities of its surface.
Preliminary leveling - ease of operation, no risk of voids forming under sheets of foam plastic.
Important! Primers and impregnations increase the “adhesion” of building materials to each other, turning the thermal insulation into a single monolith. The leveled surface is covered with moisture-proof mastic, for example, bitumen. The leveled surface is covered with moisture-proof mastic, for example, bitumen
The leveled surface is covered with moisture-proof mastic, for example, bitumen.
The polystyrene foam is attached from the outside to the surface of the foundation using adhesive compounds.
The use of dowels is unacceptable - the integrity of the foam layer is compromised.
Important! Each subsequent layer of the thermal insulation system is attached only after the previous one has completely dried!
The foundation is insulated with foam plastic in rows from bottom to top. The second row starts with half a sheet. Using two layers of polystyrene foam to construct thermal insulation is more effective than one layer of the same thickness.
Protection of insulation from the aggressive effects of groundwater - brickwork, membrane. The rest of the trench space is filled with expanded clay, sand, and crushed stone.
Nuances that should be taken into account when insulating the base
Upon completion of the work, the trench is buried with the same soil or it will be replaced with expanded clay and sand, which improve thermal insulation.
and at a depth of about 30 cm from the top of the trench, a ten-meter layer of sand is poured and compacted tightly. After this, roofing material is laid, the width of which is slightly greater than the width of the dug trench, and its joints are coated with bitumen.
When the bitumen has hardened, penoplex is glued to the bottom of the trench on top of the roofing felt with acrylic glue, its joints are coated with polyurethane foam or the same glue. After the glue has dried, you should make a concrete screed with a slope away from the base, which will allow excess moisture to be drained away from the house.
The final finishing of the base can be done from clinker tiles, stone or using other materials. Insulating the foundation base helps reduce heat loss by more than 20%. Carrying out the work also protects the base from mechanical damage, protects against the formation of cracks and mold, and the development of fungus.
If external thermal insulation is not done, the service life of the foundation is significantly reduced due to the fact that it is exposed to harmful factors - frost, moisture. You can carry out external insulation of the foundation plinth with your own hands; for this you should purchase materials and carefully study the technology for carrying out the work.
For a master class on insulating the foundation base from the outside, watch the video step by step:
Insulation of a pile foundation
This type of foundation consists of column-shaped supports buried in the ground and connected at the top by a grillage. Since it makes no sense to insulate the supports (piles) themselves, thermal insulation is provided only for the grillage. Expanded polystyrene slabs are laid on it from below and from the outside so as to protect the surface as much as possible from freezing.
If these measures are not enough for high-quality insulation, build an enclosing structure from the lower crown or grillage to the ground with a slight penetration into it, which is insulated with sheets of expanded polystyrene.
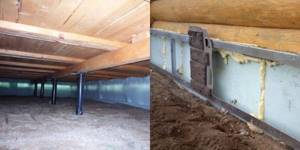
In this case, the gaps between the slabs are filled with polyurethane foam, and the outside of the fence is lined. Excellent for covering panels with imitation brickwork or wild stone, they create full visibility of a strip foundation.
It is worth noting that such an underground, if there is a good compacted cushion of sand and gravel around the piles to a depth of at least 30 cm, is suitable for storing food and things that are not afraid of short-term freezing. If winter is not “pleasant” with critically low temperatures, the air in such an underground remains warm enough due to heating by the living quarters from above.
A diagram of the installation of such insulation of a pile foundation based on bored or concrete piles is shown below.
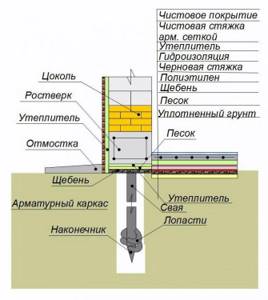
This diagram shows a “low” grillage, actually lying on the ground, and the finished floor level is also very low. A mandatory measure in this case is the installation of a blind area, preferably also insulated. If this is not done, the frozen soil will too actively “take away heat” from the walls and grillage.
Advantages and disadvantages of insulating the base with penoplex
The main advantages of penoplex include the following:
- High density, thanks to manufacturing technology (20-22 t/m2);
- Low moisture permeability;
- When burning, it does not emit harmful chemical compounds;
- Relatively low price;
- Light weight of a structure made from this insulation, which does not carry additional load on the walls, foundation, and basement of buildings;
- Long service life (up to 50 years).
The disadvantages of penoplex include:
- Low vapor permeability (steam does not pass through, but is blocked);
- Combustion class G3 - the material melts and burns;
- Like polystyrene foam, it attracts rodents.
Material characteristics
Several types of polystyrene are produced under this brand; we are interested in Penoplex Foundation insulation. These are slabs measuring 1200 by 600 mm. They have different thicknesses from 20 to 100 mm. We especially highlight 3 features of this material:
- Thermal conductivity - 0.030 W/(m×°K);
- Compressive strength (density) - 0.27 (2.7; 27) MPa (kgf/cm2; t/m2);
- Water absorption for 28 days is 0.5% by volume.
The table below shows more complete characteristics of Penoplex.
Insulating the foundation with penoplex from the outside
The width of the foundation should be sufficient for ease of work.
The excavated soil should also not create obstacles to work or movement on the site. It is better to immediately determine most of it. Take it to the garden or off site.
Construction of a foundation drainage system. If the groundwater level is high or the drainage from the roof of the building is improperly organized, water collects below and seeps to the foundation. As a result, he suffers significant damage. To avoid this, you need to build drainage for the foundation. Its installation will not take much time, especially since the trench for insulation has already been dug.
How to make foundation drainage:
- dig a trench;
- the bottom of the trench should have a slope of 5-6°;
- the bottom is covered with gravel. Layer thickness 70-100 mm;
- geotexile is laid on the gravel, in which the drainage pipe is wrapped;
- The structure is covered with gravel from above.
Now you can continue work on insulating the foundation yourself with penoplex.
Dry the foundation surface well. It is easier to remove all excess from a dry surface.
Eliminate foundation defects. Over time, the foundation could become deformed. The presence of cracks is highly undesirable. Therefore, the cracks need to be widened and treated with a primer. When the primer dries, seal the gap with sand-cement mortar. It is worth noting that it is better to level out all deep recesses or depressions. Otherwise, an air gap will appear at the junction of the sheet and the surface. In itself, it does not pose any threat. But if water gets into it, then the surface of the foundation will gradually collapse.
Treat the foundation with bitumen mastic. In this way, reliable waterproofing is created, because the foundation is the part of the house that comes into most contact with moisture.
Break off the foundation level. You will use this upper edge as a guide when installing the insulation.
Attaching penoplex to the foundation. After the waterproofing layer has dried properly, you can begin installing the penoplex. The sheet is attached to the solution using the “blot” method or with a notched trowel over all surfaces. Many people use foam adhesive. Next, it is installed in place and pressed tightly for better adhesion to the surface. The presence of a tongue-and-groove system simplifies installation.
Attach the penoplex with umbrella dowels. This stage is performed only if it is planned to insulate the foundation and basement of the house at the same time.
Installation of mesh for insulation (protection of foundation insulation from rodents). A reinforcing polymer or metal mesh of fine weaving is used. The metal one is more difficult to fix, but this is the only way to protect the house from rodents. Polymer is easier to work with. To attach it, you need to apply a strip of glue on the top of the sheet and attach the mesh. Next, use a spatula to pull the adhesive mixture down. When leveled, it will hide the mesh.
Finishing the insulated surface with glue or plaster. It is better to apply the glue in two thin layers rather than one thick one. Firstly, this will make the layers dry faster. Secondly, the penoplex will be protected from mechanical damage when backfilling the soil.
Fill the trench with the excavated soil. But it is better to use expanded clay. It will serve as an additional heat insulator.
Insulation with expanded clay
The main advantage of expanded clay over other materials is durability. The layer of this insulation will last as long as the concrete foundation itself. In addition, the insulation technology is quite simple: expanded clay is simply poured into the cavity between the base with waterproofing and the ground, and a blind area is placed on top. How to do this correctly is shown in the diagram:
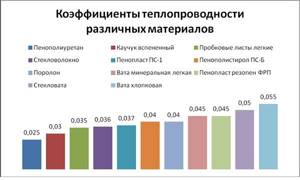
The problem with expanded clay is its thermal conductivity; as a thermal insulation material, it is significantly inferior to any modern polymers in this indicator. To verify this, just look at the table, which shows the thermal conductivity values for different insulation materials:
It turns out that to create a layer with the same properties of expanded clay, you will need to pour several times more, which is reflected in the diagram. If you need to use it to insulate the base, you will have to build a retaining wall from facing bricks, which immediately complicates the whole process and leads to higher costs. In addition, a retaining wall also requires its own foundation or it must be erected on an existing one and, again, its underground part must be insulated.
What is extruded polystyrene foam
Not everyone clearly understands what polystyrene foam actually is. In general, this is nothing more than ordinary and well-known foam plastic, used in everyday practice, mainly for packaging fragile items. This is a durable, lightweight, heat-saving, biodegradable and almost insoluble material obtained by filling styrene granules with gas and then heating them.
When exposed to temperature, the granules “swell” until they occupy the entire volume available to them and sinter together.
Extruded or extruded polystyrene foam is distinguished by a special manufacturing technology. For ordinary polystyrene foam, polystyrene granules are simply heated with water vapor, while to obtain EPS, several processes are used at once: the granules are mixed and heated, a foaming agent is introduced, and then extruded under high pressure, i.e. pushed through the molding hole.
This technology provides greater uniformity and, therefore, greater strength of EPS compared to foam plastic.
Additional insulation elements
When planning thermal insulation of the underground part of the building using polystyrene foam, it is also worth thinking about how to insulate the basement of the house from the outside. Of course, it is possible to arrange a “wet facade” or “ventilated facade” system using mineral wool or other insulating materials. But it is more logical to continue work using penoplex.
They can - and they should! – insulate the blind area near the house, garden paths, porch and entrance areas. Thanks to this, the thermal radiation of the house into the space will be noticeably reduced, thereby reducing the cost of heating and air conditioning of the building.
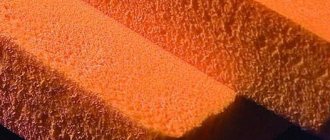
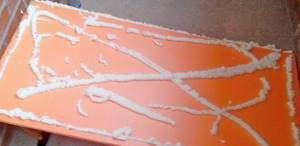
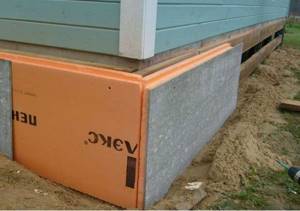
How to finish a base on top of penoplex?
So, the penoplex is installed, but the base of your house is ugly, it has acquired the characteristic appearance of an orange inflatable boat! How to fix it? To do this, firstly, you need to apply plaster over the penoplex.
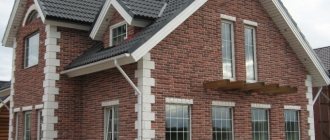
Well, now, on top of the primer, you can install the selected finishing material. There is no limit to imagination here. You can decorate the base with natural wild stone to create the impression of “my home, my fortress.” You can use a brick finish. There are ceramic tiles of various types and textures, and there are decorative plasters - the so-called textured ones.
Having finished finishing, you can rejoice: you have significantly increased the thermal insulation properties of your home.
What you should know about Penoplex
If the basement of the house will be used, then it is necessary to properly insulate its walls to prevent heat loss. Penoplex has high moisture resistance, mechanical strength and a long service life. The material has zero water absorption, thanks to which extruded polystyrene foam does not lose its excellent thermal conductivity characteristics even in a humid environment.
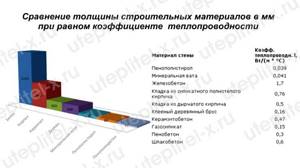
Comparison of building materials by thermal conductivity
The final stage of insulation of the basement part of the foundation
There is one important point here. The walls of the house should always be slightly wider than the basement. Otherwise, water will flow from them into the cracks, which will cause not only excessive moisture in the structure, but also a breakdown in strength.
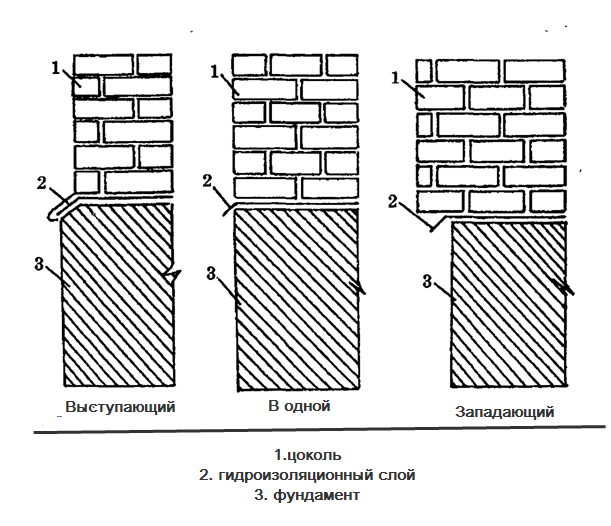
Types of base
If a mistake was made during the design or construction of the house and the base part of the foundation is wider than the wall, then additional measures will have to be taken to drain rainwater. The easiest way is to use metal canopies around the entire perimeter of the base.
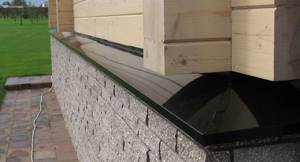
Protection of the base from precipitation
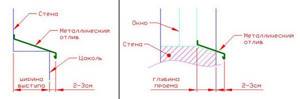
Flashings for the foundation plinth
If the excess thickness is insignificant, then it is eliminated after insulation of the facade walls. And in the vast majority of cases they will have to be insulated; these are today’s state requirements for the thermal protection of buildings. And not only public, but also private houses. Building a residential building without a project is prohibited by regulations, and no one will sign the project if the latest building codes and regulations are not followed.
As for the use of dowels to fix the insulation on the base part, there are two opinions among professionals.
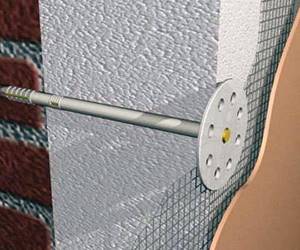
Dowels for thermal insulation
First, if you wish, you can drill holes and use special dowels with large heads. The practical effect in terms of the strength of the insulation will be insignificant, but it will take a lot of time and labor
We don't even take into account the cost of materials
Second. Carefully fix all slabs protruding above the ground. If in the lower part air pockets are allowed between the slabs and foundations, then on the base part the fit should only be continuous. Is the concrete surface on the plinth too uneven? You will have to carefully scrape off all the protrusions or pre-plaster them.
Glue, foam or dowels?
This question is very relevant for a correct understanding of the process of insulating the foundation and blind area of the house from the outside with polystyrene foam. Experts recommend using simultaneous fastening with glue and dowels for those areas of the surface that will later be finished with any facing materials. The glue creates a dense, without large voids, base for the insulation sheets; disc-shaped dowels make it possible to more securely fix the slabs on the facade. For underground sections of the wall (lower part of the plinth, foundation), the use of dowels is not considered mandatory, since the soil, backfilled after insulation and compacted, does not allow the heat insulation panels to move.
recommends this installation scheme.
The choice between cement-based adhesive mortar and foam adhesive is related both to the convenience and speed of work, and to the cost of the material. Cement-based adhesive compositions are applied to the surface of the slabs using a spatula and either leveled with its jagged edge or form “blots” with a more or less uniform arrangement. After this, the side of the sheet with the solution is pressed against the wall and held until initial setting. The hardening time before completing finishing work is 12...48 hours, before continuing to stick adjacent slabs - 5...10 minutes.
The diagram below shows options for applying adhesive composition to the surface of sheets.
Foam adhesive is applied according to the same principle, the main difference is that it cannot be spread over the surface with a spatula, since the foam is highly sticky and will not stick to polystyrene foam. Using a special gun, the adhesive foam is blown out in relatively thin strips, placing them in a zigzag or chaotic manner, but with the obligatory edging of the slab along the edges.
Important: with both adhesive options, it is necessary to limit the area of application so that the adhesive composition is located at least two to three centimeters from the edge. Otherwise, the foam or adhesive mixture will be squeezed out into the spaces between the sheets and make further work difficult.
The main stages of the process of insulating the foundation of an already built house are shown in the video.
Insulation of the foundation from the outside with polystyrene foam
Carrying out installation work on insulating the foundation with foam plastic is not difficult. Insulation should be applied to the waterproofing. Insulation of a strip foundation with polystyrene foam is carried out as follows:
- the wall is treated with a heat-insulating coating;
- the surface of the wall is covered with a waterproofing layer;
- measurements are taken of the freezing depth, to which 5-10 cm is added;
- the container (bucket) is filled 1/4 with water and foam glue is added;
- the composition is thoroughly mixed with a mixer until the consistency of thick sour cream;
- glue is applied to the foam sheet in several places and leveled using a notched trowel;
- the insulation sheet is pressed tightly against the foundation wall;
- the subsequent sheet is inserted into the lock of the previous one, if provided;
- the sheet is glued to the wall by pressing the material;
- the foam is covered with a PVC membrane;
- the dug trench is filled with sand.
All steps to insulate the foundation with foam plastic are not complicated. At the same time, experts do not recommend nailing the insulation to the foundation wall with nails, since you can break through the waterproofing.
Foundation slab: insulation
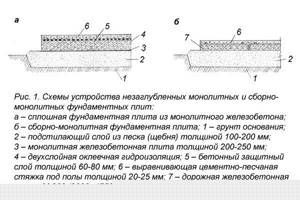
Schemes for the installation of non-buried monolithic and prefabricated monolithic foundation slabs.
Insulating the slab will help reduce heat loss through the slab and, accordingly, prevent subsidence of the soil under the slab. To do this, lay a 10- or 15-centimeter layer of heat-insulating material. Insulating the slab foundation between the slab and the ground will help protect it from freezing.
Is foundation insulation really necessary?
The issue of thermal insulation of the foundation should be given special attention to residents of regions with harsh climatic conditions and deeply frozen soil. The zone of heaving soils makes up about 80% of the entire territory of Russia
When heaving soils freeze, they increase in volume and rise, which causes destruction of the foundation structure
The zone of heaving soils makes up about 80% of the entire territory of Russia. When heaving soils freeze, they increase in volume and rise, which causes destruction of the foundation structure.
How to insulate a foundation with your own hands
We clean the surface from dirt and construction surplus. We use an iron and coarse synthetic brush;
We level the walls if the difference is more than 10 mm. To do this, we use beacons fixed at intervals of 1-1.5 m and cement mortar. If the difference between the foundation walls is more than 25 mm, reinforcement is made using a chain-link mesh and the solution is applied over it.
We apply waterproofing. The simplest and most affordable option is liquid bitumen. It is rolled out hot with a roller. Not very comfortable. A dirty process and also harmful. A respirator and protective clothing (which you don’t mind throwing away) are required. Usually bitumen is heated in iron barrels, mixed with used machine oil in the proportion: 30 liters per 100 kg of bitumen. Oil is needed to increase the plasticity of waterproofing in severe frosts. The coating is applied inside and outside, both outside and on the base part of the foundation. Layer 2-4 mm.
“Be careful to apply it evenly over the entire area.” For information: Special waterproofing is also sold, including in the form of bitumen mastic and built-up rolls
I won't talk about her. But if anyone is interested, follow the links. There are instructions and detailed descriptions...
For information: Special waterproofing is also sold, including in the form of bitumen mastic and built-up rolls. I won't talk about her. But if anyone is interested, follow the links. There are instructions and detailed descriptions...
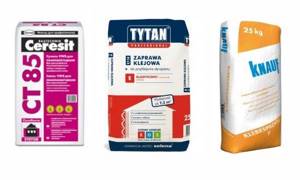
The insulation is fastened by gluing it to the waterproofing (applied to the base of the foundation) and using dowels. The adhesive composition can be found specially designed. It comes in the form of a dry mixture (which must be diluted) or ready-made. Some of them are pictured.

Applying glue to the surface of the sheet is done approximately as shown in the figure below:
After which the slab is pressed against the foundation 2 cm from the intended placement location and, with pressure, moves in the desired direction (this ensures uniform “flattening” of the glue). The connection of the plates is done using the tongue-and-groove method. The gap is covered with acrylic-based glue. If your penoplex does not have such a connection, then the correct solution would be to lay the sheets in a staggered pattern with an offset. To do this, take a heat-insulating board that is twice as thin as required (that is, instead of one sheet of 100 mm, we take two of 50 mm each). Lay accordingly in two layers, with a slight offset to cover the joints of the first layer.
After the glue has dried, you can begin to thoroughly fasten it with umbrella dowels. The dimensions of the dowels are selected based on the thickness of the penoplex. For example, for a slab with a thickness of 50 mm, a dowel with a length of 120 mm and a diameter of 8-10 mm is needed. One sheet requires 5-6 dowels, and at the corners of the house - 6-8 pieces.
A hammer drill is used for drilling. Operating mode for concrete – drilling with impact function. For the above dowel sizes, you will need an SDS/plus type drill, 160 mm long.
“All excess penoplex protruding beyond the foundation is cut off with a hacksaw.”
After completing the installation, you need to cover the places where the dowels fit with acrylic glue. By the way, you can read about all the ways to attach polystyrene foam to the wall in this article - link.
Penoplex protection. Now we need to protect the slabs from direct mechanical and atmospheric influences. We do reinforcement. We use fiberglass mesh for facade work. Using a spatula, apply a layer of wet plaster, into which we “sink” the mesh with an overlap of 10 cm.
“To reduce the number of seams, place the mesh horizontally relative to the foundation.”
After gluing the mesh, wait until it dries completely and apply a second (leveling) layer. Perforated metal corners are used to fasten the corners. After the second layer has dried, we clean the surface using sandpaper.
All. All that remains is to apply a protective and decorative coating. Here the choice is yours (siding, facade panels, block house, facade plaster, etc.).
Another important point is the insulation of the area adjacent to the vertical foundation. That is, horizontal insulation.
Why Penoplex?
Penoplex or, to be more correct, “Penoplex” is a Russian brand for the production of insulation from expanded polystyrene (high-density foam). For the sake of fairness, it is worth mentioning other brands, for example:
- Technoplex;
- URSA;
- Primaplex.
However, in the domestic space, the word “Penoplex” has become an eponym - a case when a proper name becomes a common noun. And, in fact, the name of this brand is now applied to many types of polystyrene. However, for the sake of fairness, in this article we will focus specifically on Penoplex insulation in the classical sense of the word. What's so good about this material?
By the way, in one of the articles we compared two brands of polystyrene: Which is better, Technoplex or Penoplex?
Extruded polystyrene (Penoplex)
Extruded polystyrene foam in our country is better known under the brand name “Penoplex”. Expanded polystyrene, or more precisely, its extruded variety, is the general name for a polymer insulation material produced on the basis of styrene. Penoplex is the brand name. Thermal insulation is produced in the form of sheets or plates, the thickness of which can vary from 2 to 15 centimeters. The sheet size is 60*120 centimeters; there is a special groove along its long side to facilitate installation.

The advantages of this material include:
low thermal conductivity coefficient;
high level of strength compared to brittle foam;
low moisture absorption rates by the material;
long service life due to resistance to destruction and rotting - up to 50 years;
good resistance to temperature fluctuations.
Penoplex has only one main drawback - its increased flammability. Since during external insulation of the foundation the bulk of the material will be below ground level, this nuance will not have a negative impact on the structural parts of the foundation. However, if you decide to insulate the entire building from the facade with this material, this point should be taken into account.
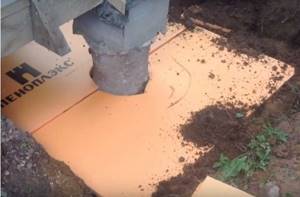
We equip the blind area with penoplex
- After insulating the foundation, we backfill it 15–20 cm below ground level. At a distance of one meter we assemble formwork with a height of 20-25 cm;
- Level and compact the soil. After this, Penoplex slabs are installed along the entire perimeter;
- A waterproofing film and reinforcing metal mesh are laid on top of the insulation with an overlap.
- After that, cement mortar is poured into the formwork. The surface is leveled so that there is a slight slope away from the house;
- After the time required for hardening has passed, the formwork is dismantled and the surface of the screed is covered with “street” material, such as tiles. Or you can treat it with a water repellent for concrete. This is a very effective means of “removing” moisture. Insulating the blind area together with the foundation reduces humidity in rooms located below ground level.
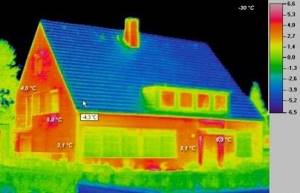
A few words about insulating the foundation in a bathhouse. A very good thing. Its thermal insulation reduces heat loss, which means the bath warms up faster and cools down longer. The room will have a warmer floor. In addition, the level of humidity and the risk of condensation on the internal surfaces of the foundation are reduced. Well, biological destruction in the form of mold, rot, etc., slows down significantly.
In the photo on the left, the photo was taken with a thermal imager. See the temperature difference.
That's probably all I wanted to tell you. As I promised last fall, I try to bring interesting material to the reader. Don't want to miss blog updates? Then subscribe to the news. Good luck to your family and a warm, cozy home! See you soon!
Wisdom Quote: The cruelest lies are often told in silence.
Important points of thermal insulation
External basement insulation First of all, when building a house, you need to decide whether the house will have a basement or not. In the case of a house with a basement that will be used as a living space, there is a need to insulate it to prevent heat from escaping through its walls. In this case, the total heat loss can reach up to 15% of the heat loss of the entire building. To reduce the cost of insulation work and to avoid errors associated with the installation of insulation, it is necessary to solve many factors at the design stage.
It is worth paying attention to:
- functional purpose of the basement;
- original building materials used to construct the walls;
- climatic zone of residence.
Calculation of quantity and selection of the “right” penoplex
If high-quality material is used for insulation work, you can count on a good result. By appearance, you can determine whether the material is suitable for insulating the support of a house.
The surface of high-quality material is smooth without signs of destruction, and when broken, the penoplex cells have a polyhedron shape.
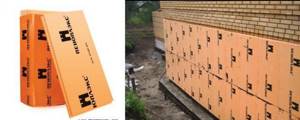
To insulate the foundation, a special series “F” material is used. This type of insulation is more resistant to biological decomposition, mechanical stress and wetness. The material is ideal for external insulation of the base, basement or basement, so when purchasing, be sure to pay attention to the markings.
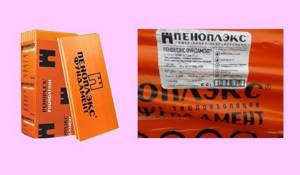
To simplify the process of selecting penoplex, you should pay attention to products from well-known manufacturers, which are used not only in the construction of private buildings, but also for insulating apartment buildings.
Among domestic manufacturers, preference should be given to products. Which is not inferior in quality to European materials, and the cost will be noticeably lower than that of imported insulation materials.
Before purchasing polystyrene from any trade organization, you should correctly calculate the amount of material that will be used to insulate the foundation and basement of the house.
- To determine the area of insulation, it is necessary to measure the perimeter of the base, multiply the resulting value by the sum of the depth of the foundation and the height of the base.
- For example, if the perimeter of the building is 36 m, the depth is 1.5 and the height of the above-ground part of the base is 0.5 m, then 36 * (1.5 + 0.5) = 72 m2.
In this way, you can easily calculate the amount of penoplex that will be required for work.
Do-it-yourself technology for insulating the foundation plinth from the outside with penoplex
Before you begin installing the insulation after the initial preparation of the base, you should apply a waterproofing material.
The most commonly used is bitumen mastic, which is characterized by its low cost and ease of use.
The mastic is applied to the entire area of the base with a brush and left until completely dry. It is not recommended to preheat the material and glue penoplex directly onto it - this design will not last long.
Do not dilute the mastic with acetone or gasoline, since these solvents will destroy the penoplex by reacting with it. Mastic can be purchased in a ready-to-use form or made independently by melting the bitumen in a container and mixing it with used machine oil in a ratio of 1:3, which will give the material greater elasticity and the mastic will not crack even in severe frosts.
It should be applied in a layer 3-5 mm thick. After application, you must wait until it dries completely. The next stage is gluing sheets of waterproofing, for example TechnoNIKOL, carried out using gas burners, which should be kept at a distance of at least 20 cm from the surface to be treated so as not to damage the material.
Technology for attaching penoplex to the foundation
Scheme of insulating a slab foundation with penoplex.
Penoplex is a very technologically advanced material. However, in order to fully take advantage of its benefits, it is preferable to follow the application technology, and in some cases it may be different. Insulation of a strip foundation should be carried out in the following sequence (from the inside out): foundation wall, waterproofing layer, penoplex, layer of sand-cement plaster, backfill with sand or soil, expanded clay, penoplex, blind area.
Insulation of a slab-type foundation is carried out somewhat differently; the following is the sequence from bottom to top: sand, penoplex, concrete slab, waterproofing layer, screed, waterproofing, penoplex, blind area. The slabs can be mounted on a foundation under a screed.
It is more expedient to carry out insulation before the foundation pit is filled, which is dug around the foundation.
The first stage of the work is digging out the foundation. To do this, a trench should be dug around the perimeter of the house, the depth of which should be equal to the level of the sand, that is, to the depth of the foundation, the width should not be less than 1.5 m. The depth of the strip-type foundation goes down to the freezing limit of the soil.
Despite the fact that insulation is not capable of transmitting or absorbing moisture, it makes sense to arrange high-quality drainage. It will be especially necessary if the construction area has a high groundwater level or heavy floods. Drainage should be arranged at the level of the sand cushion under the foundation. At a distance of 50 cm from the foundation walls along the perimeter of the house, you should dig a shallow trench, which will be necessary for drainage pipes. Sand should be poured onto the bottom, the layer of which should be a maximum of 10 cm, then crushed stone should be laid, its layer should be the same, then geotextiles should be spread, bringing its edges behind the trench. Drainage pipes should be laid inside, on the geotextile sheet. The slope of the drainage pipes should be equal to 2 cm per m. Then a layer of crushed stone should be placed, it should be equal to the previous one, the edges of the geotextile should be wrapped so that the pipe is wrapped with them. The pipes are discharged into a well intended for storm drainage.
Do-it-yourself insulation of the foundation with penoplex.
Preparation of the work front.
To carry out the work you will need the following tools: tape measure, construction knife, hammer drill, concrete drill 200 mm long (according to the diameter of the dowel), mixer for mixing glue, wide brush, shovels, tamper.
You can calculate the number of slabs knowing the area of the insulated foundation and the area of the slab. The area of the foundation is calculated by multiplying the perimeter by the height of the foundation, and the area of the slab is 0.72 m2.
It is ideal to carry out insulation during the construction phase
But this can be done in a house that has already been built and it doesn’t matter how long the building costs
To insulate the foundation from the outside, it is necessary to dig it around the perimeter to the depth of soil freezing. This is a different indicator for each region, but usually it fluctuates in the range of 0.6 - 1.2 m, unless we are talking about the permafrost zone.
The width of the trench should allow work to be carried out on fastening slabs and applying waterproofing without being particularly crowded.
The exposed walls must be cleared of any remaining soil and roots. If the foundation wall is uneven, it is necessary to level it with cement mortar. After the leveling layer has dried, you can begin insulation.
The thickness of the foundation walls in private housing construction is usually 0.4 or less than 0.6 m. To insulate such walls, 10 cm thick penoplex is used.
Installation of polystyrene foam boards.
Before installing penoplex slabs, a layer of waterproofing must be applied to the walls. This work is carried out using a wide brush and bitumen mastic. To make the work easier, you can use a ready-made bitumen primer that has the consistency of slightly thickened paint.
The primer has high adhesion to concrete surfaces and adheres well to the wall. The drying time for the primer is one day. The next day you can begin attaching the insulation.
Penoplex boards are attached to the wall using cement adhesives for fastening polystyrene foam. You need to dilute the glue according to the instructions on the package and let it sit for a while.
The slabs can be glued in both vertical and horizontal orientation. It all depends on the depth of the foundation. At a depth of 1.0 m, you can dig below the laying level in order to attach the insulation vertically without cutting off the remainder. If the depth is no more than 90 cm, then you can turn the slab in a horizontal plane, and cut the slab installed in the second row in half along the long side.
The adhesive must be applied pointwise to the slabs. A continuous layer of glue can be applied if the foundation wall is perfectly flat. After applying the glue, the insulation is pressed against the wall and left for a short time. The next slab is combined with the groove of the previous one and thus moved along the perimeter of the house. Fastening the slabs begins from the bottom. The groove in the slab gives a tight fit to each other and eliminates the appearance of gaps, cracks and cold bridges.
Then, additional fixation is performed using dowel nails
This is especially important when the insulation of the foundation is combined with the formation of the base of the house and part of the insulation extends above ground level. On each slab it is necessary to install five dowels in an “envelope” pattern - one in the center and two in the corners
Having finished fixing the slabs with dowels, some of the slabs that extend above ground level and form the base are plastered over a plaster mesh.
How does insulation work?
The rationale for using the material as a heat insulator is based on its low thermal conductivity with sufficiently high strength and durability. Therefore, when deciding how to insulate the foundation of a house from the outside, it is necessary to select a material that is strong enough, comparable in durability to the building and at the same time creates the desired thermal insulation effect - for example, polystyrene foam boards.
Depending on the density and characteristics of the composition, extruded or extruded polystyrene foam can be used for:
- insulation of building structures, from foundation to roof;
- devices of heating systems “warm floor”;
- preparation of embankments for roads and railways (to reduce the effect of frost heaving of the soil), as well as for the creation of airfield runways. For these purposes, a high-density type of polymer is used;
- thermal insulation of refrigeration units, ice arenas, sports grounds and other similar structures.
The technical characteristics of the material are as follows:
- the diameter of the cells (granules) is 0.1...0.2 mm, while the structure is uniform, with closed pores;
- moisture absorption 0.2...0.4%;
- specific gravity 25...47 kg/m3;
- thermal conductivity coefficient 0.029…0.034;
- flammability class G3...G4 (high flammability). Taking into account the requirements of SNiP 21-01-97, extruded polystyrene foam class G3 is used for increased fire safety requirements. Toxicity index of combustion products T2 (moderate);
- service life – 25...40 years.
For comparison, a table of thermal conductivity indicators of different insulating materials is provided.
If you decide to insulate the foundation with Penoplex (extruded polystyrene foam boards produced in Russia), it is worth studying the characteristics that the manufacturer gives to its products.
| Material name/indicator | Penoplex Foundation | Penoplex Comfort | Penoplex Wall |
| Sheet dimensions, mm (width x length; thickness) | 585x1185; 50 and 80 | 585x1185; 20, 30, 40, 50, 100 | 585x1185; 50 |
| Coefficient of thermal conductivity | 0,034 | ||
| Sound insulation, up to (dB) | For a 50 mm slab 41, the overall structural noise improvement index in the structure is 23 | ||
| Operating temperature, degrees Celsius | -70…+75 | ||
| Application area | Small and deep foundations, including strip foundations with permanent formwork. | ||
Blind area, insulation of socles and basements.
Floors on the ground, on a concrete slab, over a ventilated underground.
Insulation of loggias, balconies, roofs, utilities, greenhouses
To insulate the foundation of a house from the outside with polystyrene foam in those places where complex geometry or small size elements do not require the use of sheet materials, the same company offers FASTFIX spray insulation. It has properties similar to sheet heat insulators and allows you to completely protect the structure from temperature changes regardless of the complexity of its shape.
You can read more about the company's materials on its website.
Insulation of the foundation slab
Today, more and more often, as the foundation for their home, they choose a type of shallow foundation - an insulated Swedish USHP slab. It is a structure made of layers of thermal and waterproofing, reinforced concrete with built-in communications and a “warm floor” system. Such a base is not deformed by heaving, is economical in operation and at the same time serves as the floor of the first floor.
Penoplex is laid on a compacted sand preparation with communications carried out in advance. The slab, base and blind area are comprehensively insulated. After installing the reinforcement cages, concreting is carried out.
Installation of USP is more labor-intensive and costly than other analogues. But the finished design is very thermally efficient, saving up to 30% of energy for heating. Further construction of the house is speeding up, since communications have already been installed and there is a subfloor.
Thermal insulation of columnar foundations
Columnar or pile foundations are used for light or small buildings - frame houses, bathhouses, extensions or verandas. Even if the structures rest on solid soil below the freezing level, the supports experience uneven lateral soil pressure and loads from heaving forces that tend to twist or push the pillars outward.
To avoid skewing of the pillars, it is necessary to insulate the foundations using one of these methods:
- thermal insulation of the false base and blind area, in which the soil under the house does not freeze during the winter;
- insulation of the area directly around the support, when a small volume of soil adjacent to the pillar is protected from freezing.
In the first case, penoplex is mounted on a sheathing attached to poles or piles. From the outside, the false base is covered with finishing materials - base siding, corrugated sheets or plastic panels. You can lay out the base with facing bricks on a pre-filled monolithic reinforced concrete strip or metal supporting profile.
In the second case, a hole is torn out around the support, polystyrene foam slabs are laid as tightly as possible and sprinkled with sand or dry soil. This is a more budget option than the first. It is used if the basement is not planned to be finished or the building is unheated.
Installation instructions
The work is carried out after complete hardening of concrete structures poured or excavation of foundations operated without an insulating layer. A trench is prepared along the perimeter of the structures, providing free access to the foundation and protecting it from crumbling soil. Read more about how much it costs to dig a trench for a foundation and how to do it correctly here.
The installation technology for different structures may differ, but Penoplex slabs are in any case mounted on clean, dry, intact and even surfaces, insulated from moisture with mastics or rolled materials.
Violation of the integrity of the slabs in buried areas is not allowed and is considered a critical violation ; fixation by mechanical means is carried out only in the outer areas of the base. Adhesion is provided by glue or liquid waterproofing, tight pressing of the slab and the pressure of the soil itself.
Ideally, the slabs are laid in two or more layers, with the joints necessarily offset. The best results are achieved when using slabs with an L-shaped edge. If this is not possible, the slabs are mounted as tightly as possible, followed by sealing the cracks.
The external finishing of the insulation deserves special attention. Areas covered with soil do not need it; open basement areas, on the contrary, are protected from UV and mechanical influences.
Slabs that are not pressed down by soil are fixed mechanically , namely with disc-shaped dowels according to the scheme recommended by the manufacturer (from 4 fasteners per slab). When choosing cladding, preference is given to moisture-resistant plaster, porcelain stoneware, tiles and similar materials for finishing the basement area.
From the video you will learn how to insulate the foundation of a house from the outside with Penoplex: