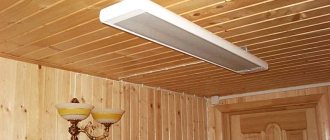
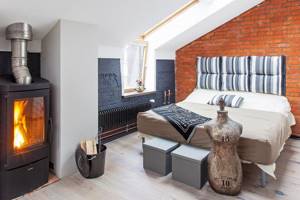
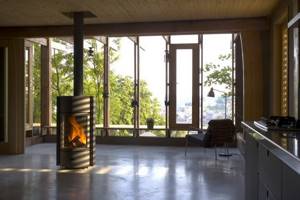
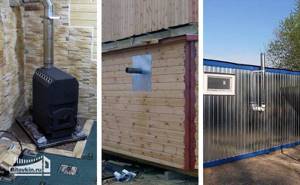
Start of installation: screen, wall protection
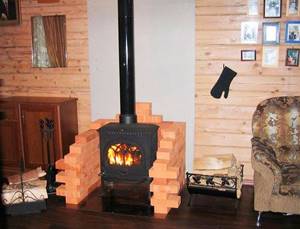
In one of the photographs you can see that only the lower part is sealed; if it gets cool in the room, then the part on top will also need to be sealed. Clinker tiles under the brick will be laid on a glass-magnesium sheet using a special heat-resistant tile adhesive. The resulting distance from the tile to the stove will be 25 cm. A sheet of drywall will be laid under the stove, and the tile will be placed on top of it using the same heat-resistant adhesive. There will be a varnished wooden plinth around the entire structure.
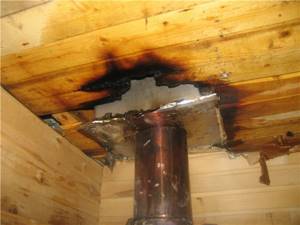
How to protect a country house from fire when installing a stove

Clinker tiles will protect the walls from extreme heat.
Even with the most careful adherence to work technology, it is impossible to foresee everything. Where there is fire and heat, there is always the possibility of a fire. The risk of its occurrence can be reduced to a minimum if interior elements are properly protected.
In addition to impregnation with fire retardant, it is advisable to cover the wood with plasterboard. After priming, the beauty sheets can be coated with fireproof paint that matches the color of the interior. Another option is ceramic tiles. The material has low thermal conductivity and is excellent insulation against fire.
Clinker tiles are considered a good solution. It looks good in any interior, while simultaneously creating an effective screen from even the most intense heat. For thermal insulation of pipes, basalt wool is considered the best option.
About the chimney for the stove
The chimney was originally planned to have a straight shape in a certain place, but there was a wooden beam going through it, so it was decided to choose a different place. An additional two 45 degree angles were ordered, one of them has a clearing. The sweep could first be opened, allowing the chimney to be viewed and the inside of the chimney to also be thoroughly cleaned.
Black pipes and corners from the Polish company Kominus. I didn’t really like the quality of this brand, as the paint is peeling and the corners are poorly finished. The sellers recommended pipes made in Austria. Another difficulty was during installation, when connecting the black corner with the insulated sandwich adapter. All the black pipes were connected only by smoke, the sandwich was connected by water and the adapter did not fit into the corner, so the corner had to be cut as a result.
Construction of a chimney for a potbelly stove
Making a pipe for a potbelly stove in the garage is not difficult. We have already left the pipe for installing the chimney; all that remains is to punch a hole in the wall or ceiling. We remind you that the height of the pipe should be 4-5 meters. A lower chimney for a potbelly stove can lead to loss of draft or air blowing in the opposite direction.
The pipe for a potbelly stove in the garage can be straight or curved in an L-shape - it all depends on the characteristics of the garage space. For example, if there are some rooms above the garage, the pipe is led out of the wall, then bends and goes up. It is desirable that it be higher than the roof of the entire building. The upper part of the chimney is closed with a tin or metal cone to prevent water and snow from getting inside.
Installing a chimney in a window is quite possible, but unsafe. A wooden window frame can catch fire if it comes into contact with an overheated pipe. Therefore, it must be insulated - for example, with mineral wool running between the metal and the frame. When venting the chimney through the roof, it is necessary to isolate it from the roofing and seal all cracks.
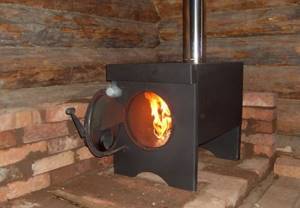
Firebox of the new furnace
What we have:
1. The floor under the stove was quite hot after burning for half an hour, but you could hold your hand. 2. The wall behind the stove also became warm. 3. The sandwich in the attic is warm - about 40-45 degrees. The valves were also carefully checked. When fully tightened, the combustion will stop, and when opened, the coals will turn red.
After there were a few red coals left in the stove, it was decided to add another portion of firewood. The floor under the stove became very hot, you can touch it, but you cannot hold it with your hand. The wall behind the stove, opposite the stove, is hot, but you can hold your hand for a couple of seconds.
After the first fire, the temperature in the room was +22 degrees, after the second - +25.
After the first fire, it was possible to say that the stove worked well and I really liked it, the power adjustments were simple, but at first it was not clear how the glass blowing worked.
The glass remained clean after operation of the firebox. After finishing the fire, two hours later the stove was quite warm. I won’t argue about the heat capacity comparable to brick stoves; one must demand from each heating device what it can give, and receive from it what it is designed for. We can conclude that Chinese-made cast iron stoves are very functional in operation and give impressive results.
Types of potbelly stoves for dachas
First of all, these stoves are divided by purpose:
Further on the material:
- Cast iron. Relatively low thermal conductivity is practically the only drawback. Most of the heat remains inside the installation, but the device heats the room for a long time and gradually releases energy into the external space - into the room. Cast iron weighs a lot – it’s a thick material. Transporting equipment is more difficult.
- Metal. To increase efficiency, screens are installed. A simple potbelly stove quickly heats the room, but releases heat for a shorter period of time due to its rapid release. It is recommended to purchase a device equipped with additional external metal sheets. The unit remains hot for a long time after switching off.
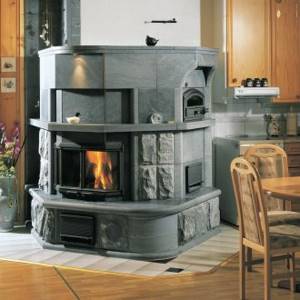
Each of the presented types can be finished with different decorative options, especially brick.
For example, you can cover a potbelly stove like this
Furnaces are also classified according to the following areas related to combustion duration:
- Classic option. The efficiency is lower, the fuel burns faster, but the heat is retained for a long time. The design of the device is made in such a way that the intensity of heat transfer depends on the flow of incoming air.
- Long burning. Wood-burning cast iron stoves of this type are more expensive. The design is single-chamber, unlike the classic type. You need to add fuel less often; it burns slowly. However, it is more difficult to light the stove; air is supplied in doses; it will not be possible to add a little fuel if the previous portion has not yet burned. But there are such advantages: high efficiency, economy, no need to add fuel often.
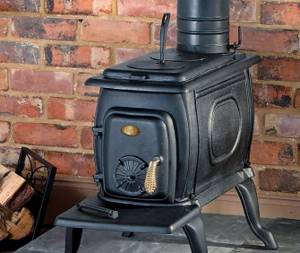
An example of a simple potbelly stove
Insulating the house to improve the operation of the stove
A week later, the opening, which is located above the stairs leading to the 2nd floor, was insulated. The frame was made of bars and insulated with foam plastic. Plastic panels were attached to the frame. On the left, near the window, the entire structure is attached to hinges. In general, the entire structure rests on aluminum corners 20x20 mm. All that remains is to fix a couple of blocks at the top right, stretch the cable and make this entire structure rise up. Standing below, I pulled the cable - the door opened, and the cable was secured. I released the cable and lowered the door down. It turned out that the heat remains in the house, but the street remains unheated; now the stove heats even better.
A fan was also installed to improve heating capabilities. From the room where the stove is located, a hole was cut in the wall under the ceiling and a fan with a diameter of 100 mm and a capacity of up to 80 cubic meters was installed. meters of air per hour. A ventilation grille was installed on the back side of the wall. The fan turns on when the stove is lit. The noise is practically inaudible, but warm air enters the next room much faster and all rooms are heated more evenly.
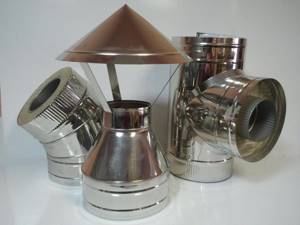
The process of manufacturing and attaching a chimney
A potbelly stove is considered a portable structure, so it is not recommended to make a brick chimney for it. This leaves two types of chimney to choose from - asbestos-cement or metal. It has been proven that metal performs better in work and is much lighter in weight. As for the asbestos-cement pipe, it can only be placed on top of the stove and its maximum heating temperature is only 300 degrees Celsius.
The chimney for the future furnace must be collapsible and compact
Note! The design of the chimney for the future furnace must be collapsible and compact. And the pipe must pass to the street along the shortest possible path and consist of at least two elements connected to each other. So, if one element wears out, it can be easily replaced without disassembling the entire device.
Parts and materials for chimney assembly
- metal pipes - required for the construction of the base of the chimney, the most suitable diameter is 16 cm;
- the tee is also 16 cm in diameter with a plug on one side - it will be needed in the process of connecting the outlet pipe;
- several elbows for forming joints - they will help to turn and lay the chimney in the required direction. The size of one of them should be 10 by 120 cm, the rest 16 by 120 cm;
Elbow for forming pipe joints
- “mushroom” with a diameter of 20 cm, which serves as a nozzle to protect the pipe;
- sealant for processing seams;
- materials for thermal insulation;
- bitumen resin.
Any stove needs a high-quality chimney. The main task of this design is to remove hazardous combustion products from the room. But a proper smoke exhaust also ensures a good supply of oxygen to the furnace firebox, and all safety standards must be observed.
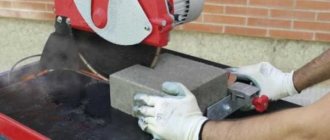
In the absence of metal pipes, the main pipe can be made from sheet iron by bending it with hammers and tongs, as well as using a welding machine. If such metal is too thin, then you can cut it with metal scissors; if not, then you will need a grinder and metal discs for it.
Chimney assembly
- Installation must begin by determining the location for installing the pipe, where the internal element of the furnace will be connected to the external one.
- The first chimney element is attached to the potbelly stove, the second one is attached to it, and so on, depending on their number. At the outlet of the potbelly stove, it is better to replace thin metal with a cast iron elbow up to 50 cm in height. It will make it possible to increase the operating efficiency of the chimney and extend its service life, preventing the melting of thin-walled metal.
The first chimney element is attached to the potbelly stove, the second one is attached to it, and so on, depending on their number
- Next, the chimney pipe is extended until it reaches the junction with the next structural element.
- A hole is made in the ceiling; its dimensions should exceed the diameter of the pipe by 10 cm, since it is first covered with heat-insulating material.
A hole is made in the ceiling for the pipe
- If flammable materials are found in the cracks, they must be removed, because after the pipe heats up, the risk of nearby objects catching fire will also increase if they are not protected.
- A pass-through glass is first installed into the hole created in the ceiling, and the pipe itself passes through it.
Ceiling passage
To allow the sandwich to pass through the ceiling, a rectangular hole was cut to the size of the stainless ceiling cutout. An SML slab 8 mm thick and 60x60 cm in size was laid for cutting. This entire structure was screwed with self-tapping screws to the bars in the ceiling between the floors. In the ceiling around the pipe, insulation with foil two layers thick was laid, the foil was laid towards the sandwich. I taped all the seams with aluminum self-adhesive tape and covered the top with the same LSU sheet measuring 60x60 cm. The roof passage has not yet been laid in any way, because it is planned to redo the roof next year. Masterflash was placed on top and sealed with sealant.
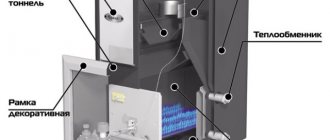
Design features and operating principle
A classic potbelly stove for a summer residence is a metal cylinder or a rectangular box on legs. It consists of main components:
- firebox;
- grate;
- ash pan;
- chimney pipe.
Furnace and ash pan arrangement
The lowest part is the ash pan, and above it there is a grate, which serves as the basis for storing fuel. When wood burns, ash is formed, which spills through the holes into the bottom drawer. The design of the ash pit is made retractable so that combustion waste can be removed.
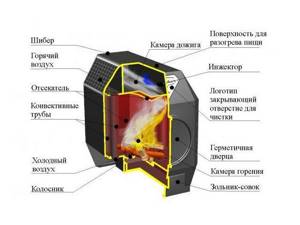
The ash pan and firebox have doors that prevent smoke from entering the room. To regulate the intensity of air passage, air intake holes are made in the doors. They are equipped with valves that help regulate the air flow.
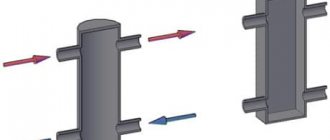
Chimney structure
It consists of two components:
The heat exchange section is located inside the housing. Its shape depends on the type of oven. The pipe can be made in the form of a knee chimney or a “bag”.
An exhaust pipe is inserted into the heat exchange chimney. It can be connected to an existing chimney duct or taken outside the room. A damper is installed at the beginning of the pipe, which must be closed after the combustion process is completed.
A little history
Where did this design come from, and why does its popularity continue unabated these days? The history of the appearance of the potbelly stove begins at the end of the 18th century. Essentially, it is a cheap alternative to expensive fireplaces and stoves. The device gained particular popularity during the October Revolution, when all the norms and foundations of life were turned upside down. Heating residential and non-residential premises became problematic, so this simple unit quickly spread throughout the country. After all, everything solid that could burn was used as fuel here. And this is firewood, coal, peat, furniture, wooden windows and doors.
Potbelly stoves gained a second round of popularity during the Great Patriotic War. In many cities, centralized heating networks did not work, and the country saved energy by sending it to the front. The population had no choice but to use the old proven method - install potbelly stoves in their own apartments.
This stove saved a large number of people from freezing. It worked flawlessly, although it consumed a lot of fuel. And this is its big disadvantage. But this is the simplest and cheapest device that you can make with your own hands, and it is easy to operate.
Currently, potbelly stoves have found their application in country houses, garages, bathhouses and other outbuildings. In modern apartments they were practically not used, if only as a decorative element, creating an antique style. But recently the fashion for them has returned.
True, consumers began to impose more stringent requirements on potbelly stoves:
Let's look at these requirements separately and reveal the secrets of new popularity.
Possibility to make a furnace with a water circuit yourself
Why is it necessary to make such a stove yourself? In fact, such devices are quite expensive in price and, accordingly, are not available to all buyers. And the need for such a stove is great among the majority of the population. That is why, using the experience of experienced craftsmen and home craftsmen, you can quite successfully make such a “potbelly stove” with your own hands.

A potbelly stove with a water circuit serves as an ideal source of heat in the absence of centralized heating. This water heating design has a number of advantages:
- high performance indicators. The cost of a homemade appliance is several times lower than factory stoves, and when using waste material as a base, it is completely zero;
- the stove operates regardless of the fuel supplied. It is permissible to use coal, peat, firewood, and plant waste;
- the autonomous nature of the potbelly stove’s operation, since the design is absolutely not connected to any source of electricity.
The "potbelly stove" stove system operates in accordance with the principle of natural circulation. Heat comes from the carrier and is distributed throughout the entire internal space of the device. During the combustion of fuel materials, a potbelly stove does not require additional energy sources, including electricity.
In order for the contour potbelly stove to please you with its work, it is necessary to follow a certain step-by-step approach:
- choosing the material from which the stove will be made and the desired shape of the device;
- production of the basic body of the potbelly stove. The basis is most often taken either a pipe with a diameter of about 300 mm, or a metal sheet 5 mm thick;
- “cut” metal or pipe. Schematic drawing of all planned holes, bends and welds;
- production of a heat exchanger, its installation and connection to the general heating system;
- installation of working radiators.
A contour stove consists of an expansion tank, pipes, an internal heat exchanger and built-in radiators. As a result, due to the multi-component design, it is necessary to take care of the reliability of fastening of the elements and the quality of all welding seams. Reliable seams will eliminate the possibility of leakage in one of the parts of the structure.
Water contour “potbelly stoves” are heated by the movement of water, starting in the internal heat exchanger, entering the pipes, and then into the radiators, where heat energy is released into the external space. The cooled water again enters the heat exchanger.
Fire safety requirements
It is this selection criterion that is fundamental. Older designs of potbelly stoves are metal stoves made from cast iron segments or metal sheets. Such units were not famous for their wide variety of forms. These were mostly cubic or cylindrical structures. The inside is a firebox where wood or coal was burned.
The fuel burned in the firebox and heated the device to very high temperatures. In essence, the oven was one hot element, from which any thing that fell on its surface could catch fire. According to statistics, fires from operation occurred more often than from all other heating devices in general.
If we talk about modern models, we should divide them into two categories:
In factory conditions, where each technological stage is quality controlled, it is possible to produce potbelly stoves that meet all fire safety standards and requirements. With homemade analogues, things are worse. Nobody controls this production. Each master himself comes up with devices and devices that will supposedly protect consumers’ property from fire. That is, there is no guarantee.
Therefore, when the question arises of which option to prefer, everyone decides for themselves. It is important to prioritize here:
Making homemade horizontal "stove stoves"
A homemade potbelly stove is usually made from a used gas cylinder. A potbelly stove made from a gas cylinder is the best option for a mini-heating device for garden houses and small household premises. There are two options for a homemade design depending on the location of the cylinder:
With any method of manufacturing “potbelly stoves” that burn for a long time, you must take care of your safety and take all fire safety measures. To do this, it is not enough to remove the remaining gas from the cylinder; you must additionally rinse the inside of the container with clean water. Such manipulations will ensure the safety of using used containers and completely clean the inside of the cylinder. When considering the horizontal arrangement of the stove, it is worth considering how the device will be heated in the future. If you need a wood stove for your home, then by placing the cylinder horizontally, we will get an ideal heating device that is in no way inferior to powerful factory boilers.
In addition, horizontal wood stoves can be used not only for heating rooms, but also for cooking and heating food. After cleaning and washing the cylinder, you can begin the actual work of creating the furnace. There are quite a lot of ways to produce a homemade “potbelly stove”, but it is recommended to adhere to the following algorithm of actions:
- Cutting off the top of the container with a grinder or other suitable tool.
- Fixing (welding) of reinforcement pieces in the internal space of the cylinder.
- Marking the combustion compartment, cutting a rectangular hole at the bottom of the cylinder, which subsequently serves as an entrance.
- Drilling several holes in the bottom of the stove blank to remove excess ash accumulations.
- Determine the desired height of the structure. Taking this into account, measure the legs of the “potbelly stove” that are suitable in length and weld them to the bottom.
- Provide the top of the workpiece with a chimney pipe. The element is welded to a pre-cut hole.
In the case when a potbelly stove with a hob is made, a metal frame is additionally welded onto the top of the cylinder, which is the most suitable size. A similar potbelly stove with a hotplate will perfectly cope with the tasks of heating the air and cooking food not only in the country, but also in other buildings without central heating, for example, in warehouses, garages and work rooms.
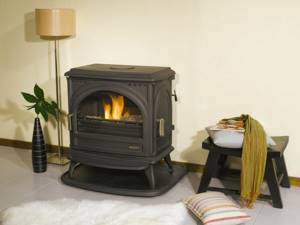
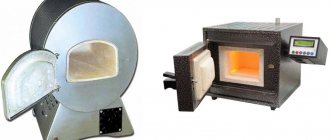
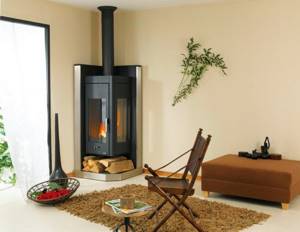
Design of modern potbelly stoves
This category is more extensive. We won’t break down the models, we’ll just look at a couple of options that will show how wide the variety of stoves offered is.
For example, the Marina potbelly stove. This is a cast-iron-steel unit, which is lined with special heat-resistant ceramic tiles. The manufacturer today offers a fairly wide color palette. Here the color is sandy, creamy, red, green, brown and so on. That is, every consumer will find an option that fits perfectly into the design of a city apartment.
We add that the weight of the device is only 195 kg. This allows the device to be placed directly on a concrete floor slab without an additional slab foundation or pedestal. With a power of 9 kW, this heating device will warm up a city apartment with a total area of up to 90 m², not to mention a separate room.
What is a potbelly stove
A short historical excursion
Initially, a “potbelly stove” was a name given to a steel stove of a certain design, the creation of which took place during the dramatic years of the Civil War for our country. It is not known exactly which of the Russian engineers came up with a very simple, but very effective steel furnace, relatively easily made in a handicraft way from more or less available materials. During the times of “war communism”, after the urban economy with centralized heating in large cities collapsed, this tiny stove, which could be installed almost anywhere in a “bourgeois” apartment densely packed with house committees, saved many lives. By the way, the statement that the stove got its name due to excessive consumption of firewood is a stupid legend born on the Internet. In fact, the potbelly stove is very economical for its type. In conditions of a severe shortage of coal and firewood, the owner of a walnut set by master Gumbs had the opportunity to survive a terrible winter, using the precious furniture as firewood. The name of the furnace was determined by the fact that at first it became widespread among “former” engineers, office workers, and intellectuals who did not emigrate from the country. That is, according to the concepts of the proletariat, “bourgeois”.
The design and principle of operation of a potbelly stove
Today the term “potbelly stove” is used by everyone. Often this is what all steel furnaces are called. But we believe that only those stoves that have inherited the main design features and properties of the prototype are worthy of bearing the proud name “potbelly stove”. In the modern version, the potbelly stove often has a horizontal design, this is more convenient for laying full-size firewood about 40 cm long, and is also equipped with a blower and grate, which makes it easier and more accurate to regulate the air flow and fuel burning rate.
Fuel economy
This is the last criterion for potbelly stoves, which are used in modern apartments. Long-burning designs have already been mentioned above. They are the most popular option today when it comes to installing a potbelly stove in an apartment.
What is the design feature of this model? The thing is that the firebox of the device is divided into two parts - lower and upper. The separation boundary can be horizontal or angled. It all depends on what conditions for combustion of flue gases we are trying to achieve. When the boundary is placed at an angle, the combustion efficiency is slightly higher due to the higher gas concentration inside the narrowed part of the chamber.
In the lower firebox, wood or coal is usually smoldering. Oxygen-enriched flue gases burn at the top. Channels are specially installed to allow oxygen to enter the chamber. At the same time, there is one very important criterion that ensures complete combustion of fuel in the first chamber. The fuel must be placed correctly, that is, with a minimum number of gaps between its parts.
For example, if it is firewood, then it should be laid out horizontally in a row or in the form of a cage. The distance from the walls of the potbelly stove should be minimal. If the stove has a cylindrical shape, then in addition to horizontally laid logs, it is necessary to lay firewood in the vertical direction. They must be placed in the gaps between the walls of the unit and the corners of the stacked pyramid of firewood. In this state, a minimal amount of fresh air penetrates the firewood, but it is quite enough for the fuel to smolder.
The combustion gases flow through the outlet channels under the influence of physical laws upward into the second combustion chamber, where they burn, releasing additional heat.
Attention! One load of solid fuel is enough for a whole day. In potbelly stoves of traditional design, the fuel supply is enough for only a couple of hours.
Pros and cons of potbelly stoves
Heating garages using potbelly stoves is quite justified. Electric heating leads to high energy costs, given the large amount of heat loss. The same applies to heating with diesel fuel and liquefied gas. All that remains is to heat the garage space using a potbelly stove. This stove, simple in design, can operate on wood, coal, fuel briquettes and other types of fuel . It is omnivorous and does not require permission for installation and operation.
Let's consider the positive qualities of potbelly stoves:
A potbelly stove has a very reasonable efficiency indicator - it varies between 70-80%, which depends on its design and the type of fuel used.
- Suitable for heating garages and any other technical premises;
- They produce a large amount of heat, which depends on the type of fuel used - using firewood with a high calorific value, you will achieve good heat;
- Quick warming up - we remove the remaining ash from the previous kindling, load fresh firewood, wait 15-20 minutes. After this time, the garage will become noticeably warmer. In 30-40 minutes the temperature will reach a comfortable limit (do not raise it above +23-24 degrees);
- Simple installation - you need to mount it on a non-combustible base and connect the chimney;
- Possibility of modernization - the potbelly stove can be easily converted to use liquid and gas burners. There are also certain methods for increasing efficiency - we will touch on these points in the review.
Flaws:
- Not the most presentable appearance, but in a garage or other technical room this does not matter in the slightest;
- An incorrectly assembled potbelly stove may turn out to be too voracious and ineffective - 40-50% of the heat will fly out;
- You need to install a high chimney - proper draft is ensured by installing a chimney up to 4-5 meters in height.
In addition, potbelly stoves require regular cleaning. It is one thing to remove accumulated coals and ash, and another thing to remove resin from a pipe . The problem with resins is solved by installing a chimney from a pipe with a diameter of at least 100 mm (and preferably 120 mm).
Installation steps
When the power of the device is calculated for the dimensions of the house, you can begin installation work. Potbelly stove size 1 square. m. is capable of fully heating 35 sq. m. area.
Choosing a place in the house
Be guided by the following criteria for choosing a location for installing a potbelly stove:
Choose your location wisely
Wall protection
To preserve the surface of the walls, you need to install a protective screen for the potbelly stove. There should be a gap between it and the furnace body, averaging 3-4 cm. This is necessary for the unhindered entry of air. Screens are installed to protect the nearest wall, which may gradually turn yellow as a result of exposure to high temperatures. Also, an additional layer will ensure a high level of security.
How to properly install a potbelly stove in a wooden house?
For heating houses that cannot be connected to a central heating system, the most optimal, affordable and economical option is the installation of standard stoves. They can be different, but potbelly stoves are considered the most popular and traditional. They can be formed using various elements and materials, and their sizes and other parameters can differ significantly. They work from firewood or sawdust, so when installing a potbelly stove, it is important to remember the rules fire safety , as well as installing such a stove on surfaces that are resistant to fire . Due to this, many people have a question: is it possible to equip this structure in a wooden structure? This can really be done if you approach the choice of stove wisely and thoughtfully , as well as its installation.
Oven characteristics
Wooden structures are very popular, and for them it is important to choose heating devices that are safe and reliable. If you approach this issue incorrectly, you can expect a fire, which is dangerous for people’s lives and the entire house as a whole . The potbelly stove has the following positive parameters:
- ease of creation and installation;
- inexpensive cost of all elements;
- accessible and cheap raw materials for heating;
- light weight and the ability to choose the appropriate size ;
- simple and quick installation;
- With proper installation and reliable protection, operation will be safe .
Among the disadvantages, the following stand out:
- the rooms cool down quickly after stopping use of the stove;
- the danger of using an element in a wooden structure if reliable protection is not created ;
- it is not advisable to use it in a house intended for permanent residence, since the regular presence of a person is necessary to add firewood;
- the need for constant availability of fuel, without which there will be no heating in the building .
How to choose a stove for a wooden house?
You can build a potbelly stove yourself , for which it is advisable to use competent and detailed instructions, as well as watch a training video, or purchase a ready-made version .
The following can be fixed under stainless steel as thermal insulation:
The need to install protective casings and screens does not always arise. If a fire-safe distance is maintained between the stove and the nearest flammable surface, additional protection is not needed. At this distance, the IR rays dissipate, weaken, and the amount of them that the wooden wall receives can no longer lead to damage. It is believed that the safe distance from the wall to the brick oven (quarter-brick laying) is at least 0.32 m , from the wall to a metal stove (not lined) - at least 1 m. For a metal stove lined from the inside with brick or fireclay, the distance is reduced to 0.7 m. Thus, maintaining fire safety distances is more possible in large baths, where saving space is a question not relevant. In family steam rooms, where every centimeter of space counts, installing a stove 0.3-1 m from the nearest walls is impractical. In this case, the safety distances established by the standards must be reduced using screens and casings.
Protective screens near (around) the stove
Protective screens are insulation panels that cover the side surfaces of the furnace and reduce the intensity of thermal radiation. Screens can be metal or brick. As a rule, they are used for metal furnaces. The most common protective screens are factory-made steel or cast iron sheets. They are installed around the stove, at a distance of 1-5 cm from the walls of the firebox. Depending on the need to insulate one side or another of the furnace, you can purchase side or front (front) screens. Many metal stoves are initially manufactured with protective screens in the form of a protective casing. Protective screens can reduce the temperature of external metal surfaces to 80-100 ° C and, accordingly, reduce the fire safety distance to 50 cm. The total distance from the firebox to the wall (together with a gap of 1- 5 cm) will be 51-55 cm. Installing protective screens is not difficult. Thanks to the presence of legs, metal panels are easily bolted to the floor. A brick screen can cover all the side surfaces of a metal furnace, representing its outer cladding. Then the stove will be in a casing made of brickwork. In another case, a brick screen is a wall separating the stove and the flammable surface. Protective screens are special shields that surround the side surfaces of the stove body and reduce the intensity of the heat when it is heated. Factory-produced metal screens are made of cast iron or steel and are sheets of various sizes equipped with supports.
Brick screens are fire walls built around the stove body. If the stove is made of metal, then brickwork can surround all of its side surfaces. If the brick screen is not a furnace casing, it should be located at a certain distance from both the heating device and the wooden wall.
If necessary, you can make brick fire walls with your own hands. For this you will need:
- fireclay (kiln) brick;
- level;
- cement;
- Master OK;
- fishing line
Brick screen Before starting construction, please note that the height of the protective wall should be 20 cm higher than the furnace body. In this case, the screen should be located at a distance of 5-15 cm from the device. Fire walls are erected by laying ½ brick, the fastening element is cement. Before starting work, you should determine the boundaries of the screen and tighten the fishing line along which the masonry will be carried out. The verticality of the structure is verified using a level.
Choosing a stove for a change house
The cabin is very compact. This has its advantage - you don’t need to spend a lot of resources to heat it. Therefore, for insulated cabins, you can choose low-power stoves. There are a lot of them now. When choosing a stove, you should consider the following set of criteria:
According to these requirements, the most optimal option for a change house is a wood-burning stove, better known as a “potbelly stove.” It is cheap, fuel for it is easy to find, and installation will not be a problem either. The only difficulty may be the installation of a steel block container that protects the cabin from dangerous open flames.
Kindling rules
Owners of private houses with stove heating may not have any difficulties with the operation of a potbelly stove. But if this is your first time encountering such a design, then you need to follow the sequence:
- for kindling you will need paper, wood chips, logs and solid fuel;
- paper is placed on the grate;
- chips and several small logs are poured on top of it;
- open the blower halfway and set fire to the paper;
- the combustion process must be monitored, and as soon as the logs are well lit, you can start adding fuel.
If coal is used to heat the dacha, then you cannot do without firewood. Coal combustion requires a high temperature, which wood chips and paper cannot provide. Potbelly stoves are compact devices that do not require a solid foundation. The design is quickly assembled and provides the necessary heat in a short period of time.
Where is the best place to install a stove in a garden house?
From a planning point of view, the stove is installed based on the placement of rooms (if any) and the arrangement of furniture. But there is also a technical aspect that affects the location of the furnace. The fact is that according to existing standards, in order to create sufficient draft, the height of the chimney from the grate to the top on the roof must be at least 5 meters. Garden houses are low, and if there is a mansard roof, it often has a significant slope. Based on the above, we can conclude that the best place for a stove in the house is closer to the ridge, the highest place on the roof. Ideally - in the center of the ridge. This placement makes it possible to place almost the entire chimney inside the house. As a result, the heat from the chimney heats the attic, and the draft is stable due to the fact that the chimney is not cooled from the outside.
What's good about a potbelly stove?
Using a potbelly stove has both its advantages and disadvantages.
The advantages include the following:
- quick installation and dismantling - no foundation laying or other construction work required. In this regard, some owners install the stove for the winter and remove it for the summer;
- ease of use - no complicated steps are required for kindling;
- fast heating;
- safety - such a stove is safe, but only if installed correctly;
- versatility - the potbelly stove runs on almost any fuel;
- easy oven maintenance;
- compactness - such a stove does not take up much space in the room;
- the ability to make a stove yourself;
- variety – among modern stove models you can choose almost any shape, thanks to which the stove will become a decorative element.
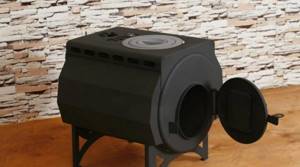
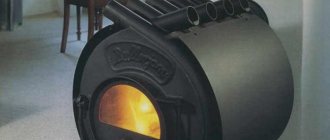
Potbelly stove in the shape of a cylinder
The disadvantages of a potbelly stove are:
- mandatory presence of a chimney system;
- regular cleaning of the chimney;
- fast cooling - such a stove heats up quickly, but also cools down quickly.