Briefly about the norms and requirements
The installation of utilities for water supply from thermoplastic pressure pipes is carried out taking into account the requirements prescribed by GOST 52134 of 2003. Here we consider the technical conditions for fasteners, fittings, connecting parts and tubular products made of polypropylene, polyethylene, PVC and similar connections.
Another regulatory document is SP 40-101 of 1996. Here are the rules for the design and installation of cold and hot water supply systems made from polypropylene products. These are recommendations for building codes that were drawn up in the period 1980-1985.
The preparation of design documentation and installation work on the installation of steel communications are regulated by GOST 32569 of 2021. Maintenance of large and industrial facilities is carried out under the guidance of the current GOST 14202 of 1969. Here we consider networks for transporting various types of liquids, gases and, less commonly, dry mixtures.
Using clamps
Fastening pipelines using clamps is very similar to the previous installation option, however, such fastening also has some features that are worth paying attention to:
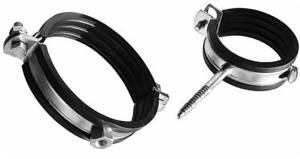
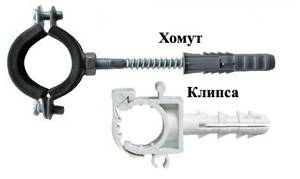
- The main difference between clamps and clips is that the former have a closed design. Thus, when securing a pipe, you first need to open the clamp, and only after that the pipe snaps into it. The assembled structure is more reliable and durable. This type of pipe fastener is ideal if you need to fix a section of communication located in a vertical plane to the wall;
- Today on the construction market you can find two types of such devices. The first type includes products in which the self-tapping screw is connected directly to the dowel and pipe fastening. In the second case, the part that clamps the pipe does not fit with the screw, which allows you to easily remove the pipe from the clamp;
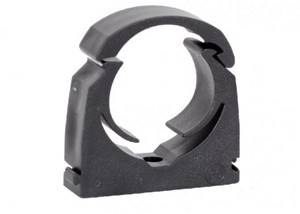
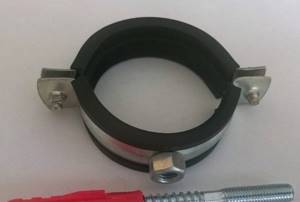
The clamp is a closed version of the clip; in order to insert a pipe into it, you need to open the upper part - the clamp
Note! When purchasing a pipe clamp, it is recommended to pay attention to the quality of the latches.
- There is a separate type of clamps, which differs in that it does not have a dowel. For such products, you must purchase a dowel separately. The main advantage of these clamps is their low cost, so purchasing such devices will save on pipeline installation.
Most often, clamps are used for fastening metal-plastic communications that require reliable fixation on the working surface. The installation of these fasteners is practically no different from the installation of clips; however, differences in the design of the fastener require its preliminary opening.
Criterias of choice
Fasteners may have different composition, configuration, and shape.
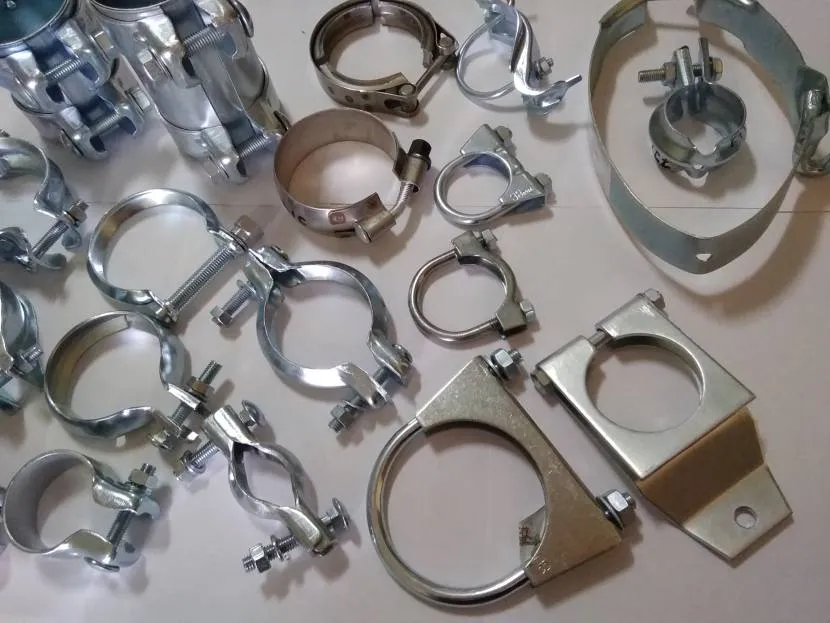
Variety of metal clamps Source grodno.in
They are designed to solve various problems. There is also a difference in the installation methods. Let's consider what you need to know to select fixing elements.
Material
Conventionally, pipe fastening to the wall can be divided into two groups: plastic and metal. The fasteners can also be equipped with plastic spacers. As a rule, these are rubber or alternative analogues.
For the production of plastic fasteners, PVC, styrene, propylene, analogues and their modifications are used. The finished product is characterized by the following positive properties:
- can be used for almost any type of engineering system;
- It weighs little, so it does not put a load on supporting structures;
- exhibits resistance to biological, corrosive and chemical influences, to changes in temperature and humidity;
- can maintain a given shape in the form of almost any type of pipe fastener;
- As a rule, it lasts as long as the pipeline itself.
Plastic plumbing clamp Source ozone.ru
The disadvantages come down to strength characteristics. The solution in this case is metal fasteners. It is characterized by:
- Mechanical strength. The main part of the products is made of high-strength steel with increased resistance to environmental operating conditions.
- Versatility. Fastenings are used for fixing plastic and metal pipes to the wall of any type of utility lines.
- A wide range of. It is permissible to manufacture any fasteners here. Manufacturers are also expanding their choice by using various alloys: stainless or galvanized steel, brass and others.
- Durability. Quality products serve no less than communications.
- Maintainability. Most products consist of several elements that can be replaced if necessary. Some samples can be restored if deformed.
Users highlight fewer disadvantages.
Metal wall bracket Source teploten.ru
In particular:
- greater weight compared to fasteners for polypropylene plastic pipes, which may affect the overall load of the system on supporting structures;
- inertness to corrosion, chemical reagents, and humidity changes often turns out to be worse than stated;
- Continuous maintenance is required for tightening, updating the protective coating, and less often, repairs.
Also, the disadvantages include a higher cost than polymer analogues. However, this is justified by the durability and reliability of the clamps. A metal pipe mount to the wall is often indispensable.
By installation method
Depending on the type of engineering communication, the requirements for fastening channels differ. There are only 2 methods: rigid fixation or free. The second option is otherwise called the floating method.
Reliable adhesion of fasteners to pipeline walls is achieved in the case of three types of systems:
- hot and cold water supply;
- heating main;
- sewerage
Free fastening of the air duct Source 1001krep.ru
The purpose of rigid fixation is to prevent the movement of communications during operation. The blocking also prevents any displacement of the mains during size changes due to temperature changes inside and outside the network.
The floating technique involves creating a small gap between the walls of the clamps and the pipeline. The free space allows the channel to move in width and allows for quick replacement of a section or its dismantling.
Another installation method involves installing the pipe away from the surface of the wall or ceiling. For this, brackets or crimp clamps with a metal rod can be used.
The choice of methodology is carried out taking into account the temperature conditions of operation of communications. Thus, inside a heated room, the thermal expansion of the pipeline is insignificant, so a rigid fixation device is allowed. Temperature changes are observed in the basement, outbuildings, and outside the building. Here it is necessary to leave space for the movement of channels.
Installation of pipes in an unheated room Source 1001krep.ru
Pipelines are fastened according to the rules at specific points. These include all node connections: fitting, rotary, branching. The requirements for a straight channel are also met (the distance between fasteners is determined by the direction, weight of the line, type of system).
If you plan to lay communications inside a wall, floor or ceiling structure, then the coefficient of thermal expansion of the pipe is not taken into account. Here fasteners are practically not used. An exception is the underfloor heating system, the base in the form of thermal insulation material.
By constructive decision
Pipeline fixation is carried out in three main ways. Some channels just need to be supported. To do this, use metal fasteners for the pipe to the wall with reinforcing cross members or stiffeners. As a rule, this is sufficient for heavy pipelines that consist of large-diameter metal pipes.
On the contrary, simple products are used for thin and light channels. Here, additional elements may include dowels. Installation of the pipeline is carried out by snapping the channel. The fastener partially covers the highway.
Simple fastening with plastic clips Source rocketrooter.com
The most common option for fixing pipe communications is crimping. Here the range of products is presented in greater variety. This applies to configuration, functionality, size and technical characteristics.
See also: Catalog of companies that specialize in engineering systems (heating, water supply, sewerage and others) and related work
Varieties
Clamps are presented on the construction market in a wide range. Models are produced in a wide variety of standard sizes and are divided according to such characteristics as the method of fixation, the presence of a seal, shape, material of manufacture and purpose.
Based on the material used, products are divided into plastic and steel. Moreover, steel elements can be made either with or without galvanization. Compared to plastic models, steel clamps are considered more in demand and popular. This is due to the low cost of the products, good tensile strength of the metal and high strength. The disadvantage of metal clamps is the low resistance of non-galvanized models to corrosion processes. Therefore, in cases where the installation of clamps is planned in extremely humid rooms, you should choose models made of stainless steel or clamps coated with zinc.
Plastic options are characterized by increased elasticity, high resistance to vibration and the ability to create movable fixation. Models can be used for fastening pipelines with a diameter of no more than 10 cm.
Depending on the tasks assigned to them, clamps are divided into spiral, power, wire, worm, pipe and mortise options.
A spiral clamp is a fairly common device and is intended for rigid fixation of pipes in the system.
The power one has the shape of a tape with holes for bolts and is indispensable when working on lines with increased operating pressure, at pumping stations, pneumatic and hydraulic systems.
Wire clamps are presented in the form of one or several steel rings equipped with tightening fasteners. The model is designed for corrugated pipes and is indispensable for fixing them during strong movements.
The worm model is a steel strip with a track, equipped with teeth and screws for tightening. The model is used in the construction of heating systems, as well as as a fixing mechanism for pipelines exposed to severe vibrations.
Pipe clamps are presented in the form of rings with brackets and are installed to secure the pipeline in cases where it is necessary to reduce the internal stress in the system during repairs.
The spring clamp has a fairly narrow specialization and is used on pipes subject to linear expansion.
A mortise, or saddle, clamp with a branch is a more complex mechanism and is designed for installation in places where the pipeline branches. Its main difference from traditional models is the presence of a coupling equipped with threaded pipes, which allows you to insert the clamp into the system and quickly connect an additional branch. The tightness of such a connection is ensured by a gasket located inside the clamp and made of profiled rubber.
Pivot models, also known as hinge locks, are used to install scaffolding and are used when attaching diagonal type braces. Thanks to the rotary clamps, all elements can be fixed at any angle, which gives additional strength to the structure and ensures its stability.
According to the type of fixation, all clamps are divided into two types:
- The first include models that form a rigid type of fastening, in which the pipe becomes completely motionless. The crimping brackets of such products are securely tightened with bolts, and the clamp itself is firmly attached to the wall. This type of fastening is used in areas where the pipeline bends and in the presence of branches.
- The second type includes models with movable fastenings, used for fixing heating and hot water pipes. The specificity of the fastening does not create obstacles to the elongation and compression of the pipeline and ensures its longitudinal mobility. As a result, an optimal line voltage is created, significantly extending the life of the networks.
Structurally, clamps are available in several types:
- a split ring, formed in the form of a circle and having one fastening mechanism, fixed with a bolt;
- a ring consisting of two semicircular plates and having fastening ears on both sides;
- a tape folded into a ring and having several positions for fixation;
- A U-shaped model, often made of plastic, equipped with a locking latch and capable of being attached in a rigid and movable manner at the same time.
Species diversity
In addition to functionality, when choosing fixing elements for a pipeline, the installation method and external data are considered. The option of using products once or several times is also taken into account. Let's take a closer look at what can be used to attach polypropylene, metal-plastic or metal pipes to the wall.
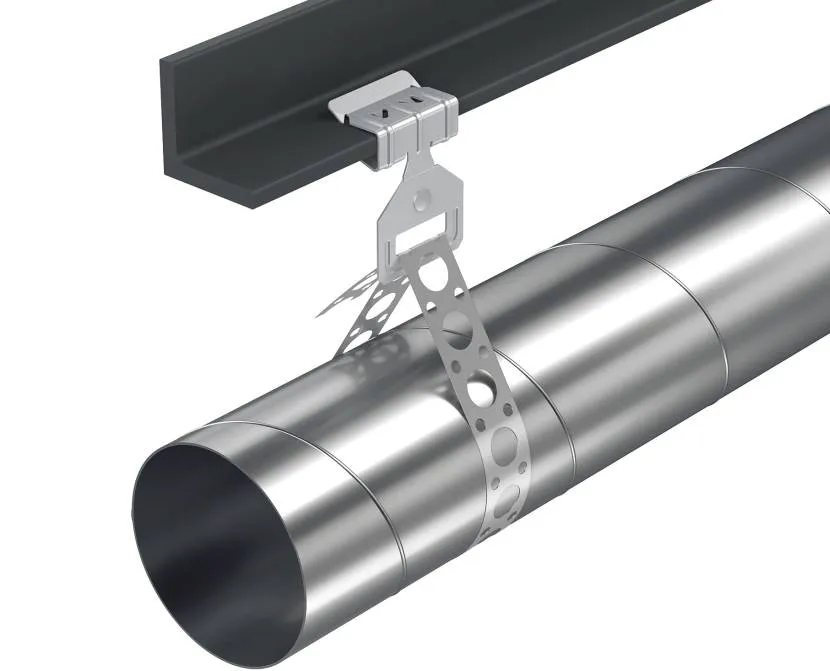
bracket
Functional fasteners are relevant for laying utility lines along walls, floors and ceilings. The clamp is used for working with water pipes with heated coolant. That is, installation is carried out using a floating method.
The design looks like this:
- Console. Made from metal or polymers. It has a curved shape with a base for attaching plastic and metal pipes to the wall. May consist of one or two parts. This is a supporting part that allows you to secure the pipeline at a small distance from the base.
Bracket for manifold channels Source shopify.com
- Accessories. A bolt with washers and a nut to close the ring in a given position. There may also be additional suspensions and clamps, rubber seals.
The individual components are fastened together without welding. This way you can adjust the diameter of the bracket. Installation of fasteners can be done using self-tapping screws, dowel-nails, anchor bolts or a welding machine.
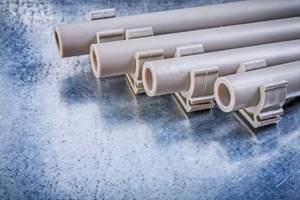
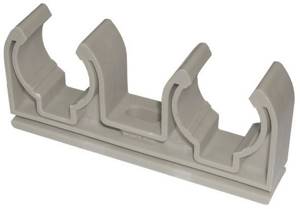
Clip
For the manufacture of fasteners, polystyrene with fibrous inclusions made of polyester is most often used. Less common are plastic products with similar performance characteristics. This takes into account the preservation of quality under changes in temperature conditions. This explains the main application - fixing hot and cold water supply channels.
The shape of the clips is similar to a bowl with a widened base and narrowed edges. This is necessary for fastening polypropylene pipes by snapping. The range includes single and double products for separate and parallel fixation of water channels. The second type can be extended using special connectors or mounting protrusions (a protrusion and groove are provided in the side of the base).
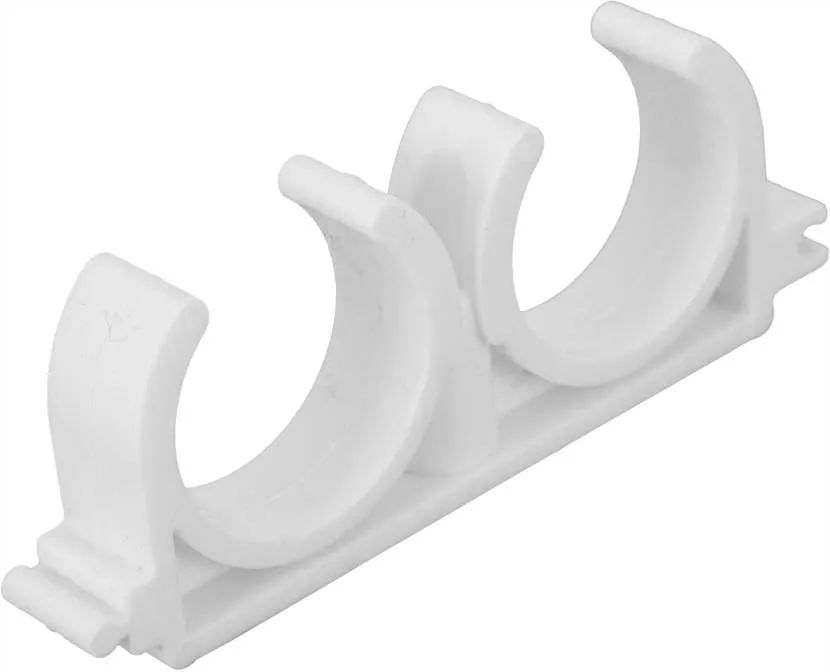
Pair clip Source leroymerlin.ru
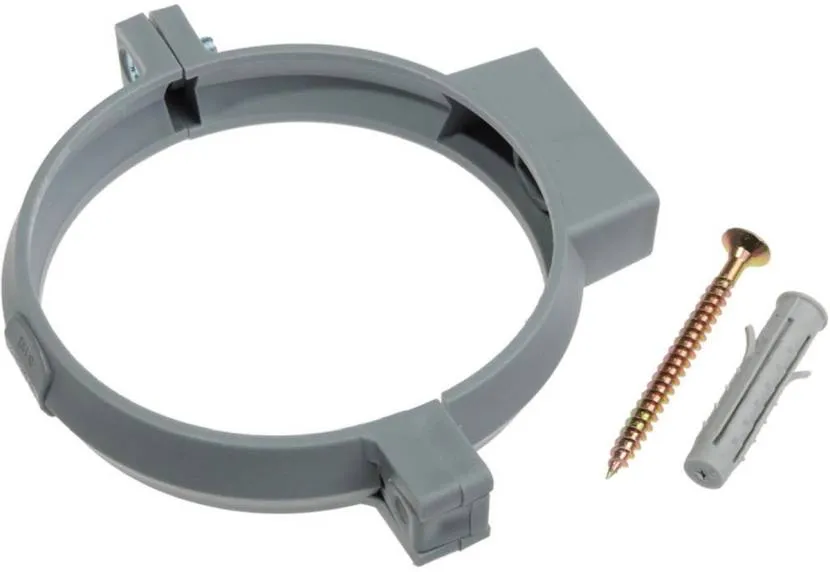
According to their design, clamps are divided into two types:
- solid cast with a dowel (easy to use, but cost a little more than analogues);
- simple or collapsible in the shape of a bowl without additional elements.
Clamps are used for pulling pipelines made of metal-plastic and polymer alloys (rigid, flexible and corrugated channels). The outer diameter of the channel is limited to 5(16) to 50 mm. This is enough for the private sector.
The main advantages of such fasteners are simple installation, reusable use and the ability to fit into the interior. The disadvantages include two points. Application limited to lightweight polymer pipelines. Fragility, ductility and low mechanical strength can lead to breakage or deformation of the “bowl” walls. This mount requires complete replacement, as it cannot be restored.
Installation includes three steps. Before fixing the pipe to the wall, markings are applied to the base. Next, the clip is fixed on the working surface using a self-tapping screw or dowel-nail. The final step is to insert the pipe by pressing the channel into the clip with slight pressure.

Clips with dowel for mineral base Source stroykaydoma.ru
Clamps for fastening metal and steel pipes - varieties
Since the clamps are made of steel, the sharp and hard edges of which can damage the polymer pipeline and do not provide a tight fit to the pipe shell, they are often equipped with rubber seals.
For fixing to pipes in clamp assemblies, bolts with nuts and special clamping units are used.
Clamps are attached to elements of building structures using screws and dowels, to nuts and threaded bolts, and by welding.
Snap-on (staples)
The design of cap clamps is given in GOST 24193-80; the document states that they are intended for fixing glass pipelines.
Structurally, the metal clamp for fastening pipes is made in the form of a semicircular bracket with bends along the edges, which have two through holes for fastening with screws or bolts.
The sizes of clamps for cap-type pipes are designed for their nominal diameter of 40, 50, 80,100, 150 and 200 mm.
In everyday life, these varieties can be used to secure 40 mm water pipes and 50 mm sewer pipes.
It is clear that in the retail chain you can find a wide range of metal brackets of a similar design in a wide range of nominal diameters that have nothing in common and are not regulated by the given state standard.
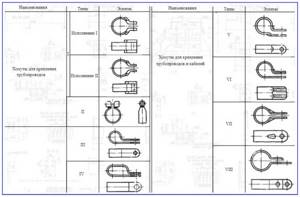
Fig. 3 Types of clamps according to GOST 17679-80.
Lightweight (loop)
The designs and dimensions of lightweight clamps are given in GOST 17679-80, which states that they are intended for securing pipeline and cable lines.
Almost all products are plates of metal of various profiles curved in the form of a round loop.
The internal diameter of the clamp loops is related to their design and ranges from 3 to 155 mm.
It is worth noting that lightweight fasteners are often made of St25 steel with zinc, cadmium coating and surface chromating.
Another material for their manufacture is stainless steel grade 12Х18Н10Т with chemically passive protection.
Also, coated metal pipe clamps are made from soft duralumin alloy grade D16AM with an anodic-oxide protective coating and chromate plating.
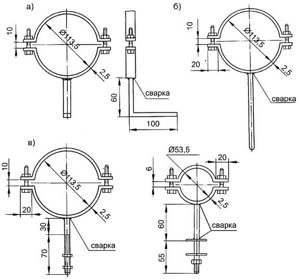
U-shaped
The design and dimensions of these products are given in GOST 24137-80, where they did not come up with another name other than just clamps. Products in the form of a horseshoe are made of steel rod with metric threads at the ends with zinc and chrome coating. They are designed for fastening pipelines with diameters from 14 to 540 mm.
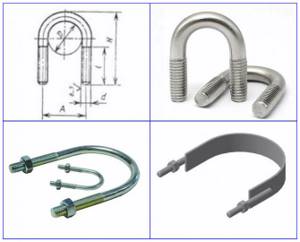
Rice. 4 U-shaped types of clamps according to GOST 24137-80
Clamping
Specifications for clamping clamps (ties) are given in GOST 28191-89. In essence, they are not fastening pipelines to various structures, but serve to connect their sections (sleeves) to each other.
The following types of clamps are produced (Fig. 5), which are also called tape clamps:
- with a worm, light and heavy varieties with diameters from 8 to 160 mm and above (type 1);
- narrow with bolts of two different designs with diameters from 6 to 120 mm for the first design and from 60 to 350 mm for the second (type 2);
- wide with bolts with diameters from 20 to 80 mm (type 3).
Working with polypropylene pipes
According to regulations, it is recommended to use sliding type fasteners. Here the possibility of thermal expansion of the line must be observed, while the fixing element continues to fulfill its role. Plastic clips and clamps meet this requirement.
Recommendations for installation work look like this:
- operating temperature above +5 degrees Celsius;
- the diameter of the channels along the outer wall is from 16 to 32 mm;
- the bending radius of the pipe is less than 8 times the diameter of the product (performed at more than +15 degrees Celsius);
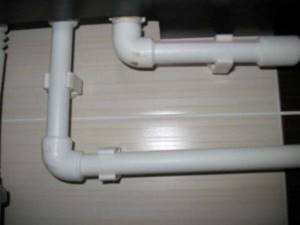
- in places where the channels intersect, a clamp is installed to form a crossing;
- The highway slope is maintained at 0.5%.
The table provides information on the distance between the fastenings of polypropylene pipes in the horizontal direction, depending on their diameter and operating temperature. If you need to perform a vertical installation, then the tabular data is multiplied by 1.3.
| Diameter (in mm) | Distance in degrees Celsius (in cm) | |||||
| 20 | 30 | 40 | 50 | 90 | 70 | |
| PN 10 | ||||||
| 16 | 75 | 70 | 70 | 65 | 65 | 55 |
| 20 | 80 | 75 | 70 | 70 | 65 | 60 |
| 25 | 85 | 85 | 85 | 80 | 75 | 70 |
| 32 | 100 | 95 | 95 | 90 | 85 | 75 |
| 40 | 110 | 110 | 105 | 100 | 95 | 85 |
| 50 | 125 | 120 | 115 | 110 | 105 | 90 |
| 63 | 140 | 135 | 130 | 125 | 120 | 105 |
| 75 | 155 | 150 | 154 | 135 | 130 | 115 |
| 90 | 165 | 165 | 155 | 150 | 145 | 125 |
| 110 | 185 | 180 | 175 | 165 | 160 | 140 |
| PN 16 | ||||||
| 16 | 80 | 75 | 75 | 70 | 70 | 60 |
| 20 | 90 | 80 | 80 | 80 | 70 | 65 |
| 25 | 95 | 95 | 95 | 90 | 80 | 75 |
| 32 | 110 | 105 | 105 | 100 | 95 | 80 |
| 40 | 120 | 120 | 115 | 100 | 105 | 95 |
| 50 | 135 | 130 | 125 | 120 | 115 | 100 |
| 63 | 155 | 150 | 145 | 135 | 130 | 115 |
| 75 | 170 | 165 | 160 | 150 | 145 | 125 |
| 90 | 180 | 180 | 170 | 165 | 160 | 135 |
| 110 | 200 | 195 | 190 | 180 | 175 | 165 |
| PN 20 | ||||||
| 16 | 90 | 85 | 85 | 80 | 80 | 65 |
| 20 | 95 | 90 | 85 | 85 | 80 | 70 |
| 25 | 100 | 100 | 100 | 95 | 90 | 85 |
| 32 | 120 | 115 | 115 | 110 | 100 | 90 |
| 40 | 130 | 130 | 125 | 120 | 115 | 100 |
| 50 | 150 | 160 | 140 | 130 | 125 | 110 |
| 63 | 170 | 180 | 155 | 150 | 145 | 125 |
| 75 | 185 | 180 | 175 | 160 | 155 | 140 |
| 90 | 200 | 200 | 185 | 180 | 175 | 150 |
| 110 | 220 | 215 | 210 | 195 | 190 | 165 |
Fasteners for reinforced polypropylene pipes STABI PN 20 to the wall are installed without taking into account the temperature conditions.
| Diameter (in mm) | Distance (in cm) |
| 16 | 110 |
| 20 | 120 |
| 25 | 140 |
| 32 | 145 |
| 40 | 150 |
| 50 | 155 |
| 63 | 165 |
| 75 | 170 |
| 90 | 190 |
| 110 | 205 |
The clamps are also installed in the following places:
- turn or splitter - on each pipe;
- pipe fittings - on both sides;
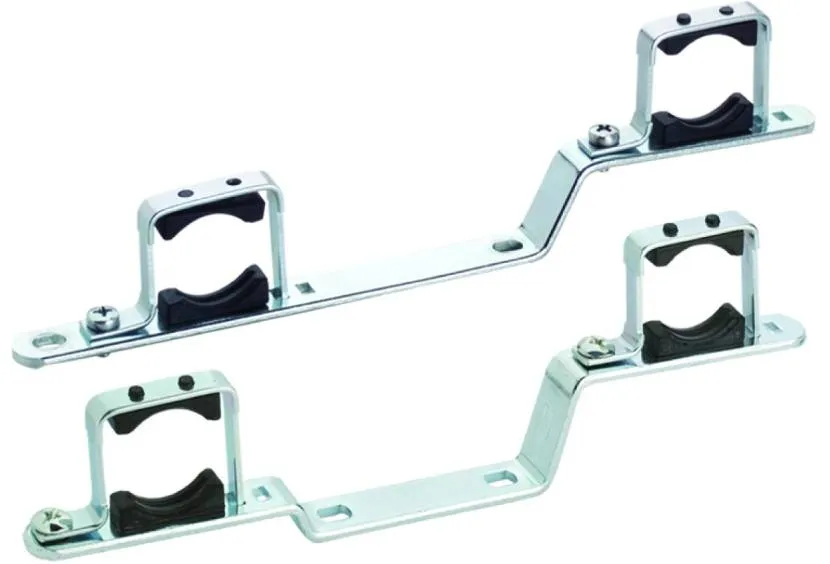
- direct connection - between parts or on the sides with centering using an additional bracket or other strip.
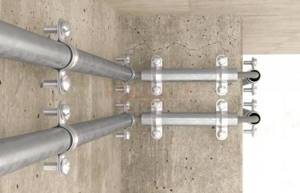
Double fastening on one bracket Source fischer24.ru
Plastic clips are used to install plumbing and heating systems made of polymer pipes. For flexible channels and high-pressure communications, you can use products with an additional clamp for closing the ring. If you attach polypropylene pipes to the wall beyond the recommended distance, then over time the line will sag.
Kinds
Depending on the design, the following types of brackets for chimneys are distinguished:
Starting
This is the most durable and powerful type - the entire chimney rests on it. Usually it is made of two cantilever triangles made of a durable metal profile with a wall thickness of 1-3 mm. From the wall side and from the street side they are connected by jumpers, giving additional rigidity to the structure. A support platform with a cutout for inspection and a tap for draining condensate is attached to the top. Sometimes, instead of a platform, another jumper is used, and the lower edge of the pipe rests on a square contour.
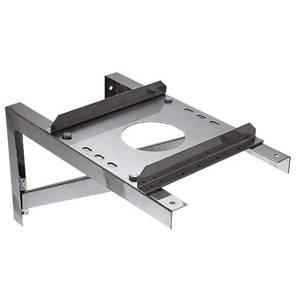
Chimney support bracket
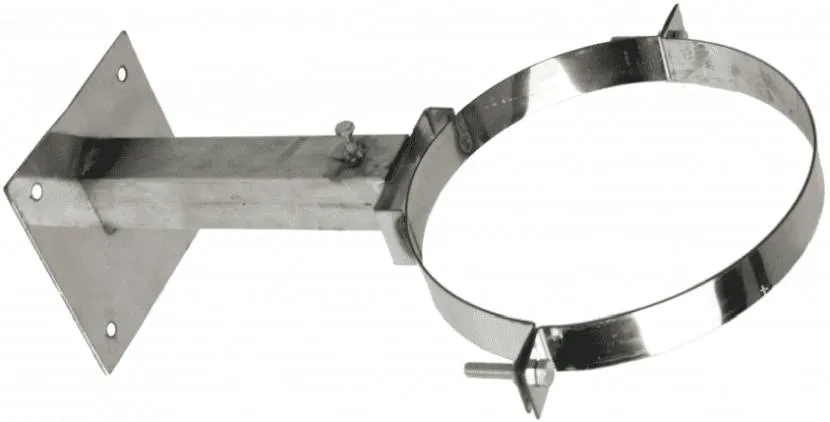
Wall (wall)
These are lighter structures, they do not carry a weight load, their function is limited to fixing the vertical position of the pipe. They are a split ring and a lightweight cantilever structure connecting the clamp and the wall mounting panel.
Manufactured by stamping and welding from stainless steel, galvanized or painted ferrous metal.
At a small distance from the wall (up to 100 mm), a metal plate located perpendicular to the wall can be used to connect the ring to the mount. Part of the split ring is welded to a semicircular cutout in this plate, and the other end of the plate is bent and attached to the wall.
At a large distance, the ring is attached to the plate with two consoles made of metal profiles.
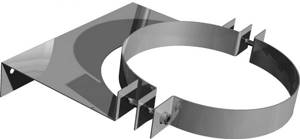
Wall bracket for chimney
Telescopic
In such designs, you can change the distance from the ring to the wall; one square profile tube can move inside another. Such brackets are very convenient for installing a chimney on a wall made of solid logs and on other uneven surfaces. After adjusting the extension of the tube, they are fixed with a bolt and nut. A telescopic pipe mount is less reliable than an all-welded one, so they have to be made from a profile of a larger cross-section.
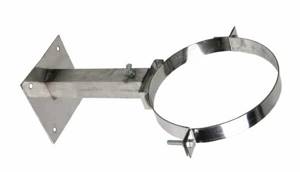
Telescopic pipe mount
Heels
Lightweight budget mount. It uses a standard pipe clamp welded to a threaded rod. The pin is wrapped into a wooden wall or into a dowel. Due to the single point of attachment to the wall, rigidity and ability to withstand wind loads are reduced.
Bracket with studs
Console
This mounting option does not use crimp rings or clamps; the chimney is attached to a pair of cantilever guides. With this method of fixation, the ability to withstand lateral wind loads is reduced. Recommended for budget-friendly starting fastening of indoor chimneys. fastenings
Installation of steel pipeline
A metal pipeline weighs more than its polymer counterpart, so staples, brackets and clamps with rubber seals are used here. The latter are used more often, since they are disassembled many times. This is convenient when temporary communication is being assembled, or channels need to be replaced or transferred.
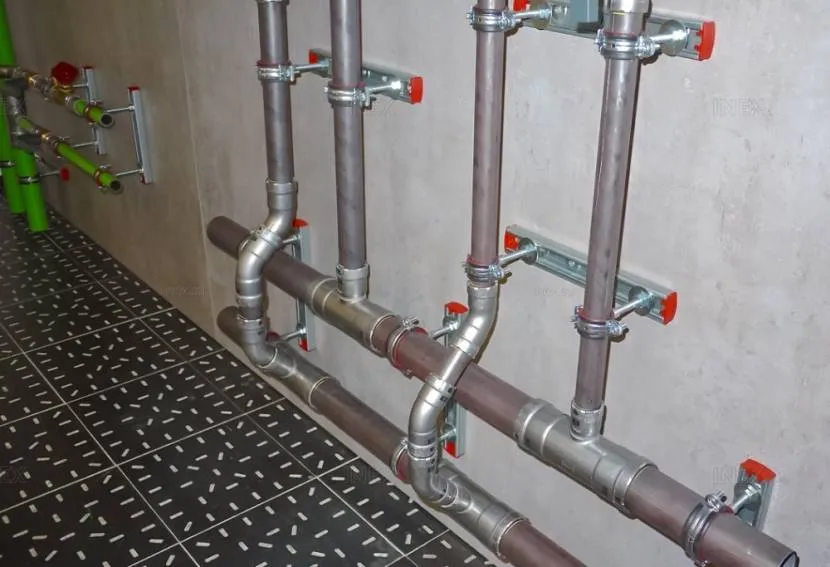
Installation of steel water supply Source inex.su
During installation work, the following rules are followed:
- for vertical and inclined lines, a larger number of fasteners are used;
- to fix pipes of smaller diameter, a sparser step between fasteners is observed;
- a clamp is installed on the horizontal part of the bend to absorb vibrations from the vertical line;
- on the riser, the clamp is mounted in the center, provided that its length exceeds 3 meters;
- on the pipeline, which is routed to the heating equipment, fixation is carried out in increments of 1.5 m.
The table provides the maximum distance between fasteners on a horizontal line made of steel pipes, depending on the method of fastening.
| Section (in mm) | Floating (in cm) | Hard (in cm) |
| 15 | 250 | 150 |
| 20 | 300 | 200 |
| 25 | 350 | 200 |
| 32 | 400 | 250 |
| 40 | 450 | 300 |
| 50 | 500 | 300 |
| 70,8 | 600 | 400 |
| 100 | 600 | 450 |
| 125 | 700 | 500 |
| 150 | 800 | 600 |
The selection of fasteners is made taking into account the load that is placed on the load-bearing part of the products - dowel, anchor, stud. It is also important to consider the base material: wood, porous or high-density monolithic walls. So, for the former, reinforced and more powerful fasteners are used, the distance between them is reduced.
Distances between pipeline supports according to the SNIP table
A correctly selected distance between the support fasteners is one of the operating conditions for the system. The supports allow you to distribute the load, minimize stress, and in certain cases - when arranging heating mains, for example, distribute the temperature load.
SNiP standards include requirements for the distance between supports for pipelines with different diameters, wall thicknesses and purposes. Such data is entered into special tables, which greatly facilitates calculations. It is worth remembering that the table does not contain recommended data, but an exact indication, corresponding to SNiP, how many and what structures are needed.
The table of distances between pipeline supports given in the article concerns sliding structures for steel pipes.
| Outer diameter, mm | Wall thickness, mm | Maximum distance between supports, m | Accepted distance for above-ground and underground installation, m | Accepted distance for underground installation in impassable channels, m |
| 25 | 2,5 | 2.5 | 1,9 | 1,9 |
| 32 | 2,5 | 3,2 | 2,7 | 2,7 |
| 40 | 2,5 | 3,9 | 3,0 | 3,0 |
| 57 | 2,5 | 4,9 | 3,8 | 3,8 |
| 76 | 3,0 | 6,4 | 4,9 | 3,8 |
| 89 | 3,0 | 6,9 | 5,3 | 4,1 |
| 108 | 3,5 | 8,3 | 6,4 | 4,9 |
| 133 | 4,0 | 9,6 | 7,4 | 5,6 |
| 159 | 4,0 | 10,4 | 8,0 | 6,1 |
| 219 | 4,0 | 12,8 | 9,8 | 6,4 |
| 273 | 4,5 | 14,7 | 11,3 | 7,9 |
| 325 | 5,0 | 16,6 | 12,8 | 8,3 |
| 377 | 5,5 | 18,3 | 14,1 | 9,2 |
| 426 | 6,0 | 19,8 | 15,2 | 9,9 |
| 530 | 7,0 | 22,7 | 17,5 | 11,4 |
| 630 | 8,0 | 25,6 | 19,7 | 12,8 |
| 720 | 8,5 | 27,7 | 21,3 | 13,9 |
| 820 | 9,5 | 30,3 | 23,3 | 15,2 |
| 920 | 10,0 | 31,9 | 24,5 | 16,0 |
| 1020 | 11,0 | 33,6 | 25,8 | 16,8 |
The distances between the supports of steel pipelines with equal wall sizes are determined by the diameter. The characteristics of the soil during underground installation also influence. In addition, when installing thermal routes in accordance with SNiP, the distance is affected by temperature deformation. For heating mains, only movable supports are used in order to create an installation offset to compensate for thermal expansion.
Briefly about the main thing
Plastic or metal fasteners are used to attach pipes to the wall.
There are two installation methods: floating with space for thermal expansion of the channel and rigid fixation.
There are 6 main groups of fastenings: clips, clamps, staples, brackets, hooks and clamps.
Criteria for selecting fasteners: size, length and weight of the pipeline.
Install clamps at points of junctions, turns, fittings, and on long spans, taking into account the recommended distance.
Ratings 0
Pipe fasteners: options for fixing elements and their installation
Pipe fasteners are devices that allow you to fix a pipeline to a work surface (for example, a wall). Such devices are used when laying all communications without exception: water pipelines, heating pipelines, gas pipelines, sewer systems, etc. The choice of fastening elements depends on the type of pipeline structure and the features of the installation.
Fastenings are selected depending on the type of pipes, the type of pipeline and the load in it
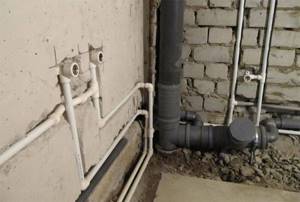
Features of laying a water pipe in the wall
Sometimes situations arise when water risers need to be embedded in the partition. For example, in order to make maximum use of the usable area of a small bathroom or for aesthetic reasons. Plastic gels are quite suitable for these purposes, due to their increased resistance to corrosion and chemicals. They are placed in a groove. In general, laying a pipe in a groove has its own characteristics:
- firstly, the polypropylene tube laid in the groove should have as few connections as possible in order to minimize the possibility of ruptures;
- secondly, a gap must be left between the water conduit and the groove. This is especially important when installing hot water supply, since thermal expansion must be taken into account;
- thirdly, the gap can be used for thermal insulation. Thermal insulation is made mainly from mineral wool or glass wool. The use of thermal insulation materials will help prevent the tube from fogging.
Relevant recommendations for laying plastic water pipes in the wall can be found on the Internet and in specialized literature.
Installation of heating risers
- 25 Jan/
- admin/
- popecham
When starting construction of a new house or apartment renovation, they always face heating problems. Apartments must have risers, since the houses are multi-story, and some apartments have more than one floor. In houses, risers are rarely found in the heating system. But first we should talk briefly about the types of heating. The principle of radiator heating is understood as a system that is used by almost all owners of apartments and houses. Radiator heating works like this: a radiator heats the air, which passes through the coolant according to the principle of circulation. The negative side of such heating is the occurrence of a draft and, as a result, unequal heating, that is, the air temperature below will be lower than above.
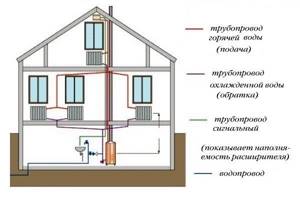
Diagram of a two-pipe heating system.
It has only seventy percent heating potential. Heating types are considered to be warm floors (a very convenient way to heat a room, but often suitable for small areas), as well as warm baseboards and warm walls (this heating system includes a radiator and heated floors). Between warm baseboards and warm walls, warm walls are often chosen. Air heating refers to the heating and circulation of air that passes through air ducts. This subtype of heating is recommended to be installed in large warehouses and shops. Infrared heating is also a type of heating. How does it work? Thermal energy moves, which appears from the sun's rays, but without the content of ultraviolet waves. The connected pipes are fifty percent of the work done. The next step will be the installation of heating risers, which is a very important step in heating work. There are different types of connection of heating risers. Each type has its own installation.
Pipe fastening technology - step-by-step instructions
Before installation work begins, the pipes are connected using butt welding, polyfusion welding or the electrofitting method. If you carefully familiarize yourself with the pipe laying technology, the process will not take you much time:
- The first step is to mark the path of the future pipeline along the perimeter. Please note that it should be installed with a slight slope - this way you will eliminate the possibility of water freezing in the pipeline even in an unheated room (for example, in a country house).
- Using a drill, you need to make holes for the dowel-nails.
- Pre-prepared fastening clips for polypropylene pipes are inserted into the holes.
- Insert the dowel into the hole using a hammer and screwdriver.
- The final stage of work is installing the pipes into clips.
Appearance of the finished fastener
Easy wall mounting
Today, the modern market can provide new technologies, one of which can be HDPE pipes. This product is used for pipelines such as sewerage, water supply, electrical or telecommunications networks.
To create sewer and water supply communications from HDPE pipes, special connecting devices, such as fittings and couplings, are used. The first option is used for water supply, the other for sewerage. But the products are attached using the same clamps.
Products made from low-pressure plastic currently occupy a leading position in the market. Their simple installation and a number of positive qualities allow you to install communications yourself.
You can tighten the fastening using a screwdriver
Advantages of HDPE material:
- Durable;
- Not afraid of corrosion;
- Reliable;
- Easy to cut;
- Good dielectric properties;
- Plastic;
- Able to soften at 80-degree temperature;
- Resistant to chemical environments.
Fasten these pipes yourself, using only clamps of the required diameter. To ensure that the pipeline is reliable and neat, it is necessary to install fasteners under each coupling.
When carrying out communication work in an apartment or private house, the first thing you need to do is choose the right mount for your pipeline. The future state of the entire communications system will depend on its reliability.
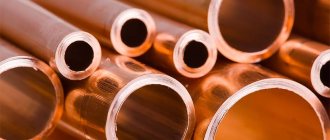
Copper heating pipes
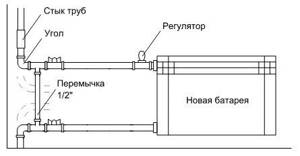
Heating battery installation diagram.
Very expensive blanks, but due to their good performance, they are an excellent option for water supply and heating systems, and bacteria do not grow in these pipes. It is not difficult to make bends, because these pipes are very flexible, but they are afraid of electrolysis; some encounter problems such as leaks. If your financial situation allows, installing copper pipes in heating systems will give you a chance to forget about the problems associated with pipes for many years. To install copper pipes, which have the advantage of heat transfer and anti-corrosion over all other types of pipes, no special skill or professional installation skills are required.
For installation you need:
- gas welding equipment (oxygen, propane);
- solders (with a silver content of seventy-two percent);
- hammer drill (for making holes in the wall);
- gloves (to avoid burn injuries);
- assorted wrenches (to take into account the diameter);
- couplings (must have different diameters).
Connecting copper risers also begins with drawing up a preliminary plan diagram of the future heating system. The riser is connected by cutting a tee into the hot water supply system. Using a hammer drill, holes are punched in the slabs between floors. The pipes are lowered into the punched holes, connecting them on each floor using couplings and gas welding. You should only use solders containing silver; you should not forget about this, since the presence of silver will perform the function of a high connection and will not allow pressure or corrosion to separate the welding seams in the future. The last stage will be the connection of the inter-riser heating pipes with the return system.
Fixation methods and advantages of fastenings
Fastening elements for polypropylene pipes of small diameter are made of the same material and have the appropriate physical characteristics. If it is necessary to fix a pipeline of a larger cross-section to the wall, metal products are used.
There are only two main types of fastenings - clamps and clips, which ensure reliable fixation of the structure if the installation rules are followed.
Installation using clips
Polypropylene clips are the best option for installing a heating or plumbing system from small diameter pipes. These fasteners are heat-resistant and durable, and the process of fixing the pipeline does not take much time.
The advantages of this type of fastening include:
- No need to purchase special tools. It is enough to have a hammer drill, a screwdriver or screwdriver, a hammer and measuring tools (level, tape measure).
- The strength of the system is guaranteed, without sagging pipe sections and leaks. However, this point is implemented only if the step sizes between the individual fasteners are observed.
- The finished structure looks aesthetically pleasing: after final assembly there is no need to hide it.
- It is possible to install parallel, adjacent pipes using a special double clip.
- The pipeline is not only quickly assembled, but also dismantled instantly. No tools are needed for this - just remove the pipe from the mount.
Note! To increase the reliability of fixation, you can use clips with special straps. They will provide additional strength to the entire structure.
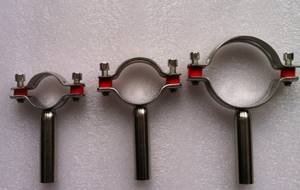
Mounting clamps
A clamp is a plastic or metal structure made of half rings with a screw tie, attached to the surface using dowels. This type of fastener is intended for large diameter pipes, as it can withstand significant weight. When installing a pipeline, there are two options for fixing it with clamps:
- Floating, when when the half rings are tightened, a small gap remains between them and the pipe. The loose fastening allows for movement, which is important for heating structures and hot water supply. Deformations occur when a material expands or contracts due to temperature changes. In this case, the diameter of the clamp is selected slightly larger than the external cross-section of the pipe.
- Rigid - carried out by tightening the half rings as tightly as possible when tightening the bolts. Such fastening is necessary to prevent mobility in the area of the pipeline sockets (fixation points are located below).
Note! For very large diameter pipes, it is necessary to use clamps made of metal. These structures must be equipped with rubber gaskets to prevent noise in the event of vibration.
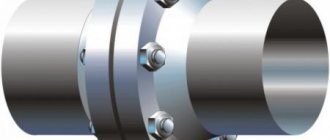
Installation equipment and tools used
To install the gas pipeline, craftsmen use special equipment:
- Long-fiber flax or FUM tape for making threaded connections.
- Lever wrenches with parallel jaws. They should be equipped with notches for better adhesion to the part.
- Apparatus for welding.
- Fittings are parts with fine threads for connecting several elements.
All tools and system elements must have a certificate from the factory that manufactures these parts. All certificates must comply with the requirements of Gosgortekhnadzor. If there are no certificates, then the use of such pipes is impossible.
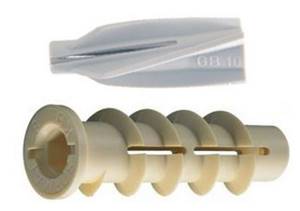
Installation instructions for the case
The process of installing the case is simple and takes little time. It is necessary to prepare in advance a tool for punching the wall and material for sealing the cavities between the sleeve and the wall.
Step-by-step instruction:
- Make a hole in the wall with a diameter exceeding the estimated diameter of the gas pipeline in a location determined by the project.
- Place the sleeve inside the hole and check if it is the right size.
- Fill the gap between the sleeve and the wall tightly with concrete mortar.
- Wait until the solution dries and check the stability of the installation.
The remaining work is usually carried out by gas service employees - they lay the gas pipeline and insulate it.
If the house is wooden, then a large hole in the beam can be made with a drill, drilling around the perimeter or using a large-diameter crown.
Preparation for installation
The primary task is to draw up an installation drawing of future highways. In fact, the pipeline plan must be carried out taking into account all connections, taps, technological cabinets, shut-off valves. Detailed planning helps to avoid redundant connections and waste of material, since it is determined in advance which parts and in what quantities are needed.
Walls for hidden installation of pipes will have to be grooved, that is, a channel will have to be cut in the concrete for laying a pipe line. It is advisable to pre-mark the working area in order to make an even and high-quality channel.
It is advisable to take into account that it is not recommended to groove walls in panel houses, since the thickness of the panels is usually small. The most suitable walls are made of thick brick or concrete. They can be tapped without fear.
Next, you need to mark the pipes and fittings to know the welding direction and installation order. If necessary, it is better to trim the products in advance.
To perform installation work, you need tools designed for polypropylene:
- cutting scissors;
- a shaver for removing reinforcement and a chamfer for leveling the cut surface;
- welding machine with temperatures up to 260 °C;
- wall chaser or grinder for cutting out a cavity in the wall;
- chisel and hammer or punch to remove material between the grooves.
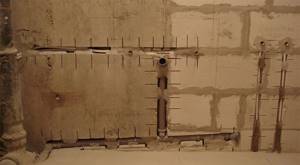
Installation
When the tools are ready, there is a detailed plan for installing pipe lines and markings, you can start working:
- Using a grinder or wall chaser, cut parallel to each other slots on the concrete surface of the wall; the distance between the slots should be slightly greater than the thickness of the polypropylene pipe in the thermal insulation. It is recommended to use a stone disc or a toothed disc coated with diamond.
- Use a hammer drill or chisel to remove concrete between the slots.
- To place technological cabinets, you will have to make a cavity in the wall and install a cabinet with slots for communications in it. This design will facilitate access to shut-off valves or sensors.
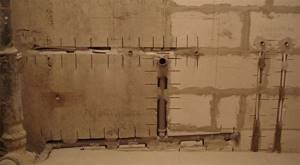
- The pipes are welded in advance, after which they are laid in the wall and fixed in the channel with clamps or supports. It is advisable to do most of the welding outside the channel because it is easier than welding in a confined space. Before sealing the grooves, it is recommended to check the system for leaks by running water into it. If no leaks are observed, then you can proceed to the final finishing.
- Before laying the pipes, it is advisable to wrap them in a layer of energyflex, or fill them with polyurethane foam after installation. This will provide space for the pipe to expand.
Of course, you can lay pipes on top of the walls, and make finishing on top of the main line, but then the free space in the room is reduced, and the cavity formed between the finishing and the wall will have to be filled with insulation. This approach is ineffective, since the finishing material must adhere tightly to the surface.
If you need to hide a ready-made pipeline structure, it is better not to make a blank monolithic wall, but to build a special plasterboard box to ensure free access to the pipes if necessary.
After a test check of the functionality of the pipeline, you can begin finishing the wall; it is better to use drywall for this.
Stainless steel pipes
Diagram of options for connecting heating devices to risers.
Of course, such pipes will last longer than all those described. To install this type of pipe, additional costs will be required due to the fact that the fitting is more expensive than the pipes themselves. This is the pattern. If you look at the heating characteristics, there is nothing bad. Stainless steel pipes are the best option for heating systems. Temperature, pressure, anti-corrosion and shockproof indicators are normal. But, as always, there are also bad indicators - a very high price, installation that requires good work skills, and the danger of fire when welding.
For installation you need:
- gas welding equipment (argon and carbon dioxide);
- hammer drill (for making holes in the wall);
- gloves (to avoid burn injuries) and mask;
- assorted wrenches (take into account the diameter);
- couplings of different diameters.
First, a preliminary plan diagram of the future heating system is drawn up. You will need consumables such as: pipes, radiators, couplings, shut-off valves. Installation begins by connecting the riser through a tee insertion into the hot water supply system. Using a hammer drill, holes are punched in the slabs between floors. The pipes are lowered into the punched holes, connecting them on each floor using couplings and argon-carbon dioxide welding. The last stage will be the connection of the inter-riser heating pipes with the return system.
Connecting heating system devices
The final installation of a water heating system involves connecting individual sections of pipelines and connecting radiating elements or radiators.
The traditional radiating element in water heating systems is the familiar cast iron battery (Fig. 5). In terms of a number of parameters (primarily price and practically unlimited service life), cast iron radiators have an advantage over any other. What do you need to know to properly connect a cast iron battery to a water heating system?
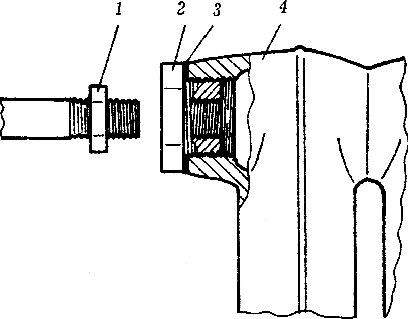
Fig.5. Connecting a cast iron battery:
1 - lock nut; 2 — connecting washer-sleeve (shown at the installation location); 3 - seal; 4 - battery case
In addition to reliable fastening, a cast iron radiator requires compliance with certain connection rules. First of all, you need to unscrew the plugs and hang the radiator itself in such a way that the external thread of the sleeve, “driven” from the long thread of the supply pipe, can be screwed as deeply as possible into the battery body. When installing, it is necessary to carefully insulate the threaded connections.
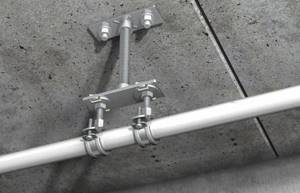
With top wiring, the inlet and outlet pipes are usually connected to one side of the battery. If the length of horizontal sections of pipelines is more than 150 mm, it is necessary to install a spacer stand between them (attached by welding) in order to protect the threaded connections from the effects of temperature deformations of the pipes.
Even painting a cast iron radiator has its own subtleties. So, if the battery has never been painted before, it is necessary to prime its surface with anti-corrosion primer and let it dry well.
The use of oil paints for painting batteries is not allowed - they quickly darken, and under the influence of high temperatures they actively release volatile substances into the air of the room. The best composition for painting cast iron batteries should be recognized as a special composition, the so-called rosin varnish (a mixture of 3 parts by weight of turpentine with 2 parts of rosin).
Preparatory work
Before starting the installation of internal gas pipelines, it is necessary to prepare the site. To do this, you will have to coordinate the work with the relevant organization. Coordination of gas pipeline installation is carried out in the following order:
- Write a statement to the company that monitors the gas industry.
- The specialist will make a verdict on the possibility of carrying out certain works.
- If the work is permitted, the specialist will draw up an estimate for its implementation.
Permits for gas pipeline installation are issued in accordance with SNiP 2.04.08–87 and “Safety Rules in the Gas Industry.” Preparation, coordination and drafting of the project make up a significant part of the costs.
Preparation for installation
The primary task is to draw up an installation drawing of future highways. In fact, the pipeline plan must be carried out taking into account all connections, taps, technological cabinets, shut-off valves. Detailed planning helps to avoid redundant connections and waste of material, since it is determined in advance which parts and in what quantities are needed.
Walls for hidden installation of pipes will have to be grooved, that is, a channel will have to be cut in the concrete for laying a pipe line. It is advisable to pre-mark the working area in order to make an even and high-quality channel.
It is advisable to take into account that it is not recommended to groove walls in panel houses, since the thickness of the panels is usually small. The most suitable walls are made of thick brick or concrete. They can be tapped without fear.

Next, you need to mark the pipes and fittings to know the welding direction and installation order. If necessary, it is better to trim the products in advance.
To perform installation work, you need tools designed for polypropylene:
- cutting scissors;
- a shaver for removing reinforcement and a chamfer for leveling the cut surface;
- welding machine with temperatures up to 260 °C;
- wall chaser or grinder for cutting out a cavity in the wall;
- chisel and hammer or punch to remove material between the grooves.
Installation
When the tools are ready, there is a detailed plan for installing pipe lines and markings, you can start working:
- Using a grinder or wall chaser, cut parallel to each other slots on the concrete surface of the wall; the distance between the slots should be slightly greater than the thickness of the polypropylene pipe in the thermal insulation. It is recommended to use a stone disc or a toothed disc coated with diamond.
- Use a hammer drill or chisel to remove concrete between the slots.
- To place technological cabinets, you will have to make a cavity in the wall and install a cabinet with slots for communications in it. This design will facilitate access to shut-off valves or sensors.
- The pipes are welded in advance, after which they are laid in the wall and fixed in the channel with clamps or supports. It is advisable to do most of the welding outside the channel because it is easier than welding in a confined space. Before sealing the grooves, it is recommended to check the system for leaks by running water into it. If no leaks are observed, then you can proceed to the final finishing.
- Before laying the pipes, it is advisable to wrap them in a layer of energyflex, or fill them with polyurethane foam after installation. This will provide space for the pipe to expand.
Of course, you can lay pipes on top of the walls, and make finishing on top of the main line, but then the free space in the room is reduced, and the cavity formed between the finishing and the wall will have to be filled with insulation. This approach is ineffective, since the finishing material must adhere tightly to the surface.
If you need to hide a ready-made pipeline structure, it is better not to make a blank monolithic wall, but to build a special plasterboard box to ensure free access to the pipes if necessary.
After a test check of the functionality of the pipeline, you can begin finishing the wall; it is better to use drywall for this.
Types of fasteners and their choice
Metal pipes are attached to the walls using the following types of fasteners:
- staples;
- brackets;
- clamps equipped with a rubber gasket (or without it).
Each of the elements is selected based on the outer diameter of the pipeline, the requirements for the aesthetics of the future pipeline, as well as the frequency of disassembling and reassembling the structure.
How to choose pipe fasteners
The simplest and most inexpensive solution is non-removable brackets for fastening steel pipes, put on at the time of their connection, and then fastened to the wall. Clamps with a rubber gasket will cost a little more, but they serve as a more universal solution, allowing you to easily disassemble a section of the pipeline in the future, for example for repairs, and then just as easily reassemble it. Brackets are used in rare cases when installing complex pipelines.
The clamp for a steel pipe should be selected based on its diameter
It is important not only to choose the right fastener itself, but also the element through which it will be rigidly connected to the wall, that is, a dowel or anchor. To do this, it is necessary to calculate the total mass of the pipeline and carrier, and then divide it by the number of attachment points. In this way, the mass per dowel (anchor) will be obtained, which will make it easier to choose its size and diameter when purchasing.
You should also take into account the load-bearing capacity of the material from which the walls are made. If it is concrete, then there will definitely be no problems with its strength. If the walls are made of aerated block, wood or other material, where the maximum tearing and shear force is relatively low, you will need to choose fasteners of a larger size and diameter, designed for implementation in this particular material.
In addition, it is recommended to slightly increase the number of attachment points for greater reliability.
When attaching pipes to a gas block, it is recommended to use dowels of a special shape and increased size