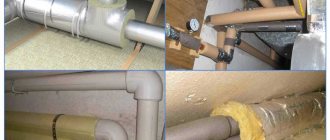
Options for closing heating pipes
You can use decorative pipe covers.
This will help reduce the cost of heating system equipment. Sometimes this is a fairly economical option. Functions of decorative overlays:
- Hiding batteries and pipes completely or partially;
- Protective function against hot radiators;
- Fitting the box into the design of the room;
- Simplifies maintenance as dust does not accumulate on the battery;
- Some pad options help distribute heat evenly.
But when choosing decoration, it is important to consider not only beauty, but also practicality. It is necessary that the material does not reduce heat transfer and does not emit toxic substances during heating. Plastic, for example, must withstand high temperatures for a long time
It is also important that the material does not change color or shape during use.
Plastic, for example, must withstand high temperatures for a long time
It is also important that the material does not change color or shape during use.
The decorative box must meet a number of parameters when used. The overlay should not take up much space; you should choose the most compact options. The fastening of the structure must be strong enough, but at the same time it is necessary to provide for the possibility of access to the batteries
It is also important that the box is not too heavy
Optimal heating scheme - types, wiring and installation
Modern experts have different attitudes towards existing heating schemes. where water is used as a coolant. Moreover, each master has his own preferences. But for a particular house you need to choose your own scheme that meets the customer’s requirements.
- it should be warm
- the system should not create problems during operation
- reduction in fuel costs and maintenance time
- the system must be autonomous
As a rule, this is enough for comfortable living in the house. But let's look at the process from the point of view of the laws of physics. In the boiler, the coolant heats up and rises, creating a slight pressure inside the heating system. The movement of hot water begins, which gradually bypasses the entire circuit and returns back to the boiler. This completes the cycle.
There is one very important nuance here - the easier the coolant moves, the more efficiently it passes through the circuit, which means the better it transfers heat to the radiators. Does the heating scheme affect the quality and efficiency of heat transfer? Of course it does. Let's look at a few options and determine what you need to pay attention to.
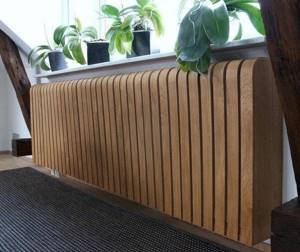
Wooden boxes for pipes
The natural material, which includes wood, fits perfectly into almost any interior and a box made from it will be an ideal frame for heating pipes. The only point that should be taken into account is that wood and products made from it are poor conductors of thermal energy.
For this reason, a decorative screen consisting of slats should not cover the top of the heating device if we are talking about a convection radiator, or the grilles of the structure should be spaced less frequently so that heat from traditional radiators is not retained.
It must be taken into account that over time, the wooden pipe box will dry out under the influence of high temperatures, change geometric dimensions, and the paint on them, especially from the inside, will begin to swell. To preserve the structure of a wooden structure, you need to maintain a distance to the radiators of at least 3-4 centimeters.
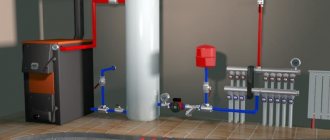
The main principle of heating operation
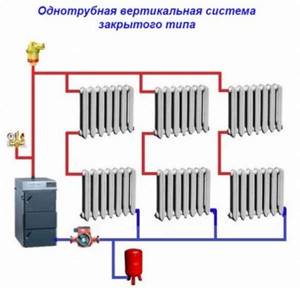
Any type of heating system is closed. In a simple version, any wiring diagram can be considered as a ring consisting of pipes. It circulates hot liquid from the heating boiler to the heating devices, remaining in them for some time. The coolant releases thermal energy during circulation and is again directed inside the boiler for heating. The cycle repeats periodically.
Any heating scheme includes:
- Heating boiler
- Connecting system pipes
- Radiators or similar heating devices
- Armature
- Expansion tank
- Circulation pump
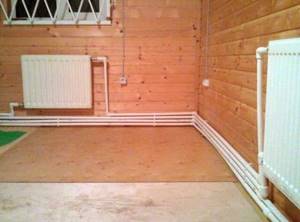
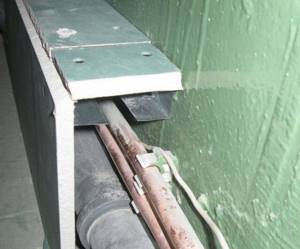
Hidden heating pipes
Pros and cons of hidden gasket
The undoubted advantage of this method is that there is no need to fear that when designing the room, the heating pipes will not fit harmoniously into the interior.
Disadvantages of hidden installation:
- Labor intensity.
- The presence of heat loss, since even with high-quality pipe insulation, part of the heat is spent on heating the structure, which simultaneously performs protective and decorative functions.
- Difficulty of maintenance associated with the need to dismantle protective and decorative structures to access emergency areas;
- High price due to the need for more material.
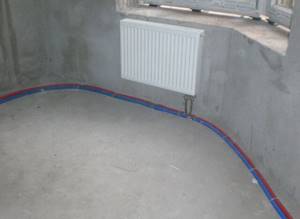
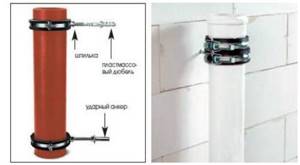
Hidden installation of heating pipes in the floor is carried out before pouring the screed
Hidden heating pipe technology
Installation of heating pipes is carried out after installing all radiators on the walls. During finishing work, the original packaging of radiators is not removed.
Stages of work production:
- Preparation, including choosing the type of heating. To install a forced circulation system, it is best to lay heating pipes under the floor or in a wall structure. With natural circulation, the discharge pipe is placed behind the suspended ceiling, and the riser drains and the lower pipeline are laid in the wall.
- Pipeline markings made on walls.
- Execution of grooves. First, using a grinder, its boundaries are set, then the groove itself is knocked out with a puncher.
Laying heating pipes in a groove
- Wiring laying. The heating pipes are secured in the groove using clips.
It must be remembered that the use of detachable connections, such as connections with detachable nuts, collet connections for metal-plastic pipes, is unacceptable for hidden wiring.
- Connecting the pipeline to heating devices.
- Crimping is carried out, in accordance with current standards, under pressure.
For hidden wiring, pipes must be filled only after a hydraulic test (pressure testing) of the heating system.
- Decorating or walling up. Before starting work, the pipes must be insulated. Decoration can be done in the following ways:
- Plastering - sealing the groove with a low-strength solution of sand and cement or gypsum-based plaster.
- Heating pipes in the wall can be decorated with plasterboard. Strips of drywall are glued using gypsum plaster. The subsequent putty completely masks the groove.
- Boxes made of plasterboard, which do not require damaging the walls. They are used quite often, since their use eliminates the need to destroy the finish when problems occur.
Decorating the heating pipeline with a box
The sealing of the pipeline should only be carried out when the entire heating system is under pressure, which emulates its “behavior”. Making the necessary adjustments allows us to achieve minimal impact of deformation forces on the decorative finish.
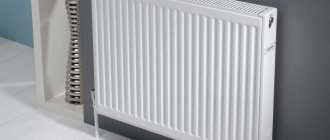
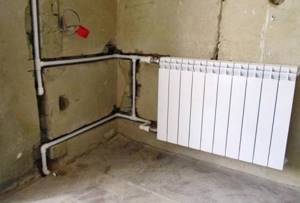
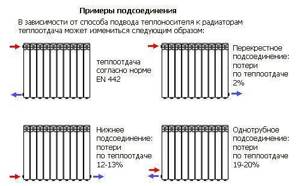
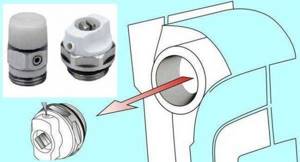
Types of radiator connections
The main methods of connecting heating system devices are several types:
- Lateral (standard) connection;
- Diagonal connection;
- Bottom (saddle) connection.
Side connection
Lateral radiator connection.
Connection from the end of the device - supply and return are located on one side of the radiator. This is the most common and effective connection method; it allows you to remove the maximum amount of heat and use the entire heat transfer of the radiator. As a rule, the supply is at the top and the return is at the bottom. When using a special headset, it is possible to connect from bottom to bottom, this allows you to hide the pipelines as much as possible, but reduces the heat transfer of the radiator by 20 - 30%.
Diagonal connection
Diagonal radiator connection.
Connection diagonally to the radiator - the supply is on one side of the device from the top, the return is on the other side from the bottom. This type of connection is used in cases where the length of a sectional radiator exceeds 12 sections, and a panel radiator is 1200 mm. When installing long radiators with side connections, there is uneven heating of the radiator surface in the part furthest from the pipelines. To ensure that the radiator heats up evenly, a diagonal connection is used.
Bottom connection
Bottom connection from the ends of the radiator
Connection from the bottom of the device - supply and return are located at the bottom of the radiator. This connection is used for the most hidden installation of pipelines. When installing a sectional heating device and connecting it using the bottom method, the supply pipe approaches on one side of the radiator, and the return pipe on the other side of the bottom pipe. However, the heat transfer efficiency of radiators with this scheme is reduced by 15-20%.
Bottom radiator connection.
In the case when the bottom connection is used for a steel panel radiator, then all the pipes on the radiator are located at the bottom end. The design of the radiator itself is made in such a way that the supply flows through the manifold first to the upper part, and then the return flow is collected in the lower radiator manifold, thereby not reducing the heat transfer of the radiator.
Bottom connection in a single-pipe heating circuit.
Infrared floor
This is the simplest and most affordable way to heat bathroom floors. The system consists of infrared film. This system is laid on a concrete screed and attached to it with glue. Ceramic tiles are immediately glued on top. In this case, it will not be the air that will heat up, but the coating, in this case ceramic tiles. The tile will be heated partly by electrical elements and partly by infrared radiation. The surface temperature will be about 26 degrees. When laying, the room itself heats up little. Only the floor remains warm. You can install a heated floor in your bathroom within one day. You don’t have to invite specialists, but after reading the instructions, spread the film with your own hands. If we compare energy consumption, the infrared system is more economical than the electric one. The savings occur due to the fact that there is no concrete screed above this system. These systems are also equipped with thermostats.
How to properly install heating in a private house
The independence of the private sector from central heating provides the opportunity to install the most comfortable home heating systems, selected according to the installation method and operational characteristics. However, often home owners want to save on work, wondering how to make heating themselves.
In this case, the scope for activity opens up much wider. In each room you can install the most suitable option, which will be both economical and have high efficiency.
- How does heating work?
- Standard heating kit
- Application of circulation
- Selection of boilers
- Pipeline equipment
- Heat accumulators
DIY materials
Resources for homemade protective installations for smoke ducts are selected depending on the characteristics of the planned work. Most often, galvanized steel sheets or corrugated stainless steel are used. If the process of arranging a gas duct indoors or on the attic floor is to be done, fire-resistant plasterboard is used. For brick chimneys, wooden protection is sometimes made in combination with basalt insulation and steel cladding. At the same time, do-it-yourself galvanized and corrugated chimney casing models are positioned as durable and effective options.
Necessary materials
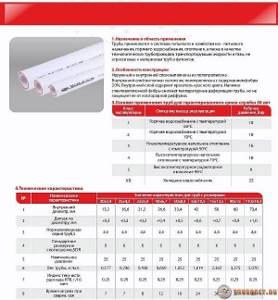
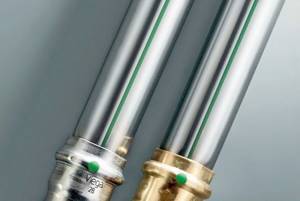
Choosing pipe material is a very important task.
If you do not approach it carefully enough, then in the future this will affect the performance of the pipeline. Most often, metals and polymers are used for their laying. Steel and cast iron perform well. High-quality copper also demonstrates high performance. This is what applies to metals. Among polymer materials, the choice is much wider: many types of polyethylene, polypropylene and so on. Pipes reinforced with fiberglass and aluminum are quite popular. All of the presented materials have certain features, thanks to which they have become popular. In the domestic market, steel pipes for pipeline installation are most in demand. This is due to the low cost of materials. But it has a number of disadvantages: such pipes are susceptible to corrosion, require painting, and installation is difficult.
As mentioned above, copper pipes are also used in pipelines. This material has a long service life, but is also expensive. Copper pipes are resistant to corrosion, overgrowing of the cross-section, and can withstand high and low temperatures, as well as temperature changes. Such a pipeline will last a very long time, but the costs for it will be corresponding.
Among polymer materials, polypropylene is most often chosen. Such pipes are relatively cheap, yet have high performance characteristics and are durable.
No. 1. What should heating pipes be like?
The purpose of heating pipes is clear even to a child. They must transport hot water from the boiler, whatever it is, to the radiators. This is a very important part of the heating system, on the quality of which not only our comfort, but also safety depends.
The following minimum set of requirements is put forward for heating pipes:
- strength and durability. Throughout their service life, the pipes must maintain their integrity. If minor damage occurs and oxygen penetrates through it, the pipes may begin to rust from the inside and become clogged. Large damage will lead to coolant leaks, and this, in most cases, is hot water. The consequences of all this can be catastrophic;
- low noise level during operation, because constantly listening to the sounds of bubbling water is a test for the nervous system;
- aesthetics. It is not always possible to hide pipes in the walls or disguise them, so they should not be frightening with their appearance, much less spoil the interior.
Glass fiber reinforced pipes in the heating system
Fiberglass heating pipes are among the most modern. Such heating options are lighter than metal counterparts, elastic, and excellently resistant to corrosion and chemicals.
A significant advantage in this case is the strength and environmental safety of the product.
The workpiece, reinforced with fiberglass, is a composite of three layers. The middle layer of fiberglass is welded with polypropylene particles from the middle and top layers.
The resulting high-strength structure is characterized by a very low thermal expansion coefficient.
Video
Fiberglass pipe. Be careful when purchasing.
Also, this material does not delaminate at all, which cannot be said about its aluminum-reinforced “brother.”
The workpiece, reinforced with fiberglass for heating, is highly elastic. This indicator provides the necessary flexibility, and this greatly simplifies the installation of the heating line.
The time spent on installing the system is also reduced, because fiberglass-reinforced types do not require preliminary cleaning of the aluminum layer.
Video
Select pipes for heating your home.
For home heating, fiberglass-reinforced piping is best suited. In addition to a large number of basic positive characteristics, these materials are characterized by improved elasticity and resistance to high temperatures.
They are characterized by minimal thermal conductivity, therefore, they are ideal for pipelines laid in an open way.
How does a radiant heating system differ from a tee system?
Panel radiant heating can operate with maximum efficiency and creates high living comfort. The radiant heating system allows you to connect devices in parallel to the distribution manifold. Two pipes are connected to a special radiator from the collector, the first is the supply, and the second is the return. A heat collector is a fairly large piece of equipment that owners prefer to place in a designated cabinet.
The well-known tee system uses small pipes, but such a connection will require many more fittings. With such a connection, installation becomes more complicated, the probability of breakdown increases several times, for example, from pressure drops and errors during assembly.
Tee heating system
If the wiring is manifold, then the pipe flow increases, all connections are accessible, and thanks to such wiring, repairs can be completed much faster.
A “beam” separate from the system can be easily turned off without turning off the rest of the rooms. Radiant heating can be based on either forced or natural circulation.
Perhaps one of the most important advantages of radiant heating is the ability to neatly hide all the pipes. If you do tee wiring, then it will be impossible to make a hidden gasket, and if you have to do repairs in the future, then you will have to break the floor and walls.
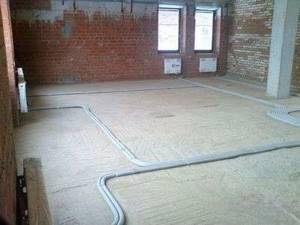
With radial distribution, heating pipes are hidden in the floor after installation
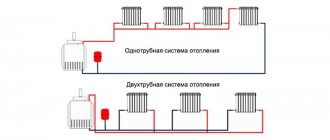
Pipe layout classification
To achieve maximum efficiency of the coolant in the radiator, you should carefully approach the installation. There are several types of heating system wiring, differing in design and number of pipes involved.
Classification of heating system wiring:
- plinth
- single-pipe;
- two-pipe;
- collector
There are also four options for mounting circuits:
- Hidden. In this case, the pipes are recessed into grooves in the wall or screed.
- Open. The pipes are placed outside, this option is less labor-intensive.
- Vertical.
- Horizontal.
Natural and forced flow of water in the pipeline is possible.
In general there are two types of system:
- Open. In this case, the expansion tank comes into contact with the environment. Because of this, you need to constantly monitor the water level in the middle.
- Closed. In this design, constant internal pressure is usually established. The expansion tank includes a rubber bulb with a metal casing. In this case, the liquid does not come into contact with the external environment.
Which decorative screen is better?
At the moment, decorative boxes for pipes of heating systems are made from the following materials:
- plastic;
- metal;
- MDF;
- wood.
Plastic is one of the worst materials for making boxes designed to hide hot pipes. The fact is that in order to reduce prices, manufacturers use inexpensive types of plastic for these products. Such material quickly warps from heating, loses its appearance, or even turns yellow and becomes brittle. Of all types of screens, a plastic pipe box is the cheapest, but it does not last long and is well suited as a temporary solution to the problem. The plastic box made to look like a plinth deserves attention, but this is a different price category.
Metal, on the contrary, is the best solution for decorative fencing of heating risers and mains. Products with frequent perforations or lattice designs are especially good. Metal is an excellent conductor of heat and will successfully transfer it into the room, and through the holes the casing will allow enough air inside for heating. So from the technical side, metal has no equal.
From the point of view of operation, steel products are also at their best. They are coated with a durable polyester powder coating that can withstand high temperatures and various mechanical stress. Again, metal boxes can always be repainted if necessary, so they will last a long time. Well, the last argument in favor of steel screens: they are easy to clean in any way, even wipe with a rag, or remove and wash in the bathroom under running water.
Gravity heating system, advantages and disadvantages
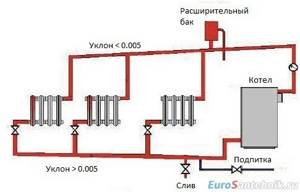
In this type of heating system for a private house, hot water, heated inside the boiler (usually solid fuel), moves upward, after which it ends up in the heating radiators. From them, heat goes into the room and is again sent to the return pipeline. From it it already goes into the heating boiler. The constant movement of heated water is ensured by the necessary inclination of the supply (direct) pipeline and return, as well as the use of pipes of different diameters. For the supply from the boiler, pipes of a smaller diameter are used, and for the return, the pipeline in which water is directed to the boiler, a larger one.
The gravity-flow wiring diagram for the water heating system of a private house has a specific device in the form of an open expansion tank connected to the outside space, mounted at the top of the pipeline. The tank is intended to take part of the water when it is heated, since this process is accompanied by an increase in the volume of coolant. An expansion tank filled with water creates the hydraulic pressure in the heating system necessary for fluid movement.
As water cools, its volume decreases. Some of the liquid from the open tank again enters the pipeline system. This ensures the necessary continuity of water flow circulation.
A gravity heating system has the following advantages:
- Uniform distribution of thermal energy
- Sustained action
- Autonomy from power grids
A gravity heating system also has disadvantages:
- Difficult installation. The slope angle of the pipelines must be observed
- Significant length of pipes
- The need to use pipes of different sizes
- Inertial system. It reduces the degree of control of the heating process
- The need to heat water to a relatively high temperature, which limits the use of polypropylene materials for pipes
- Significant volume of pipeline
- Inability to connect “warm floors”
How to decorate a heating pipe
Text of the apartment and cottage "How to decorate a heating pipe":
Before starting European-quality repairs, you should decide how the pipes and heating radiators will be closed. When closing heating pipes, make technological removable hatches in those places where the hot water supply control valves are located. Also, do not forget to leave wide enough openings at the radiators for the influx of cold air and the outflow of heated air. You can quite simply cover heating pipes with laminated chipboard.

You will need
- — wooden beam with a section of 30 by 30 mm;
- - jigsaw;
- - screwdriver and screws;
- — a hammer drill with a Pobedit drill bit with a diameter of 6 mm;
- - yardstick;
- — dowels “quick installation” 6×60;
- — laminated chipboard 16 mm thick;
- - drill;
- — wood drills with a diameter of 4 mm and 6 mm;
- — decorative plastic corners 25×25 mm;
- — copper nails 2×20 mm;
- - hammer.
Instructions
1 Measure the distance from the floor to the top edge of the heating radiator, as well as the distance from the outer edge of the heating radiator to the wall on the side of the heating pipes. Find out the maximum depth to which the radiator and heating pipes extend from the wall. Using this size, assemble a rectangular L-shaped frame from a wooden beam. The top and inner edges of the frame should not reach the plane of the window by 60 mm in the plane of the window sill and 16 mm in the plane of the side slope. Assemble the corners of the frame end-to-end, and if necessary, reinforce them with inserts from the same timber. Drill holes for all screws with a drill with a diameter of 4 mm.
2 In the beam from the wall side, drill holes with a drill with a diameter of 6 mm, retreating 50 mm from the edge of the frame. Drill holes in the middle of the frame at a distance of 400 mm from each other. Place the frame against the wall. Through the 6 mm holes in the frame, mark the location of the holes in the wall for the “quick installation” dowels. Set aside the frame. Using a hammer drill with a drill with a diameter of 6 mm, according to the markings on the wall, punch holes for dowels “quick installation.
3 Place the frame and secure it to the wall with “quick installation” dowels. Determine the location of the service hatches opposite the valves for regulating the hot water supply and air discharge. Assemble from timber and install frames under removable hatches in these places.
4 Set aside 50 mm in height from the top and bottom of the frame opposite the radiator and screw two horizontal beams in these places. These gaps will be used for the influx of cold air (from below) and the outflow of hot air (from above).
5 Use a jigsaw to cut the laminated chipboard into pieces of the required size. Screw the chipboard with screws at a distance of 10 mm from its edge. Nail decorative plastic corners onto the joining corners with copper nails. Use the same corners to trim the edges of the openings for service hatches.
6 Cut out chipboard for service hatches. Make the size of the chipboard smaller than the size of the technological hatches by 5 mm (measure the size from the installed decorative corners). Cover the resulting pieces with decorative plastic corners. Press them into place. If necessary, hang with decorative or hidden small loops.
Sent by: Vasilyeva Svetlana. 2017-09-15 19:49:53 Share
Features of installation of a one-pipe system
It’s not easy to do heating in a private house with your own hands; you need to strictly follow the technology for carrying out the work.
Necessary consumables and tools
To install a dead-end single-pipe circuit, you will need the following tools:
- adjustable wrenches;
- welding or soldering machine;
- hammer drill or electric drill;
- file.
You will also need the following consumables:
- radiators complete with fittings, plugs, taps and thermal valves, brackets;
- pipes, fastenings, bends, tees;
- three way valve.
In addition, materials will be required to insulate pipe connections.
Preparing the circuit
Even if the system is the simplest, a drawing is necessary. It indicates the exact dimensions of all parts of the structure, the distance between the radiators. Without a diagram it is difficult to calculate the amount of materials required.
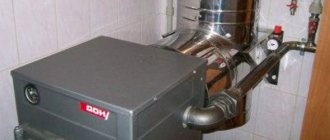
Boiler installation
This device must be installed by specialists. Solid fuel and electrical devices that do not have a warranty can be installed independently. The gas option is connected only by a specialized service. Devices can be wall-mounted or floor-mounted.
To install a gas boiler, a chimney (coxial or conventional) is required, and for other models - a straight one. If the power of the device does not exceed 60 kW, then it can be installed in the kitchen. More powerful models require a separate boiler room.
When installing, you must maintain the distance to the walls:
- The minimum distance in front of the boiler is 1 m;
- From the side or rear wall - 0.7 m;
- The device should be at least 0.7 m away from the nearest furniture.
As for the height of the return connection, when installing the device in a system with natural circulation, it should be connected below the level of the first floor batteries.
The boiler is connected with metal pipes.
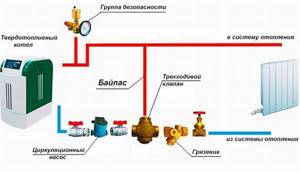
Filter installation
A mud filter and a strainer are devices that clean the liquid from debris. They are installed before introducing waste liquid into the heating device.
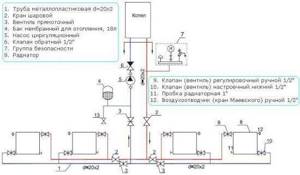
Installation of the security unit
Its location is on the supply pipeline, at the boiler outlet. The unit must not be installed further than 50 cm from the unit. No taps or tees should be installed between the unit and the heat generator.
Pump installation
The device is mounted on the central pipe closer to the boiler. Its piping contains a mechanical liquid purification filter and ball valves. The axis of the device must be in a horizontal plane.
Installation of expansion tank
The open version is installed under the ceiling of the second (first) floor or in the attic. The container is connected to the main pipe using a pipe whose diameter is 1.3-1.6 cm. The membrane tank is screwed to the main line with fittings. After installation, air is pumped into it. The pressure in the container should be 10-15% less than in the system. The device can be installed near the boiler.
Marking radiator installation locations
The batteries are installed in places where the greatest heat loss is observed. This includes window sill niches and external walls. The radiator is installed at a height of 20 cm from the floor. The distance to the window sill is 10-15 cm. In a residential building, it is not recommended to cover radiators with blank or half-open screens, as heat transfer worsens.
Methods for connecting radiators
When installing water heating (stove or boiler), the batteries are connected in the following ways:
- diagonal (the most effective option, since the radiators heat up as much as possible and evenly);
- lateral (more often used for overhead pipe routing);
- bottom (the most ineffective method, since the bottom side of the radiator warms up better than the top).
After fixing the batteries, you need to check the quality of the connections and, if necessary, seal them.
Starting the system
After completion of installation work, the heating system is pressure tested with water or compressed air. If leaks appear at the joints, the connecting elements need to be tightened and sealed. If low-quality fittings are present, they should be replaced. If there are no deficiencies, the system can be filled with coolant, a test run can be carried out, and the functionality of the structure can be adjusted.
Decorating methods for lovers of thoroughness
If the heating system is so boring that you want to completely hide it from view, then the following solutions will suit you. They are somewhat more complex than those given above, largely due to the fact that they are intended for a luxurious, expensive interior, for which homemade creativity is strictly contraindicated.
Stationary box with lattice lid
False decorative columns are made of polyurethane. Easy to install: fastened with liquid nails. Easily dismantled if necessary to inspect heating pipes. Organically fit into an elegant interior; a creative solution for decorating a riser.
Drywall is an interesting solution for those who are not looking for easy ways
This is because to get an effective result, it is important to have the skill to work with a serious electric tool (like a screwdriver)
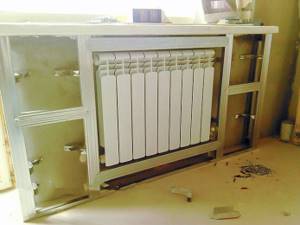
The basis of the box is a structure made of galvanized profiles
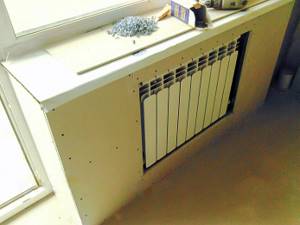
After facing with plasterboard, the structure is puttied and finished in any way
This is a capital structure that completely hides the heating system behind it. Boxes decorated with stone and lined with colored tiles look great.
Laying metal pipes
Well, for dessert I left a description of the process of laying metal pipes. What if someone decides to build a gravity-based single-pipe heating system in a small dacha outside the city. Or a solid fuel boiler will be used as a heat source.
I have already told you about the technology of welding metal pipes, so you can find this article and study everything in detail there. Here I will focus on describing the advantages of using metal pipes, otherwise some people treat them too dismissively.
So:
- Can be used to transport very hot coolant. The water temperature inside can reach 100 degrees Celsius. This is especially good if you plan to heat your dacha or house with a homemade boiler using wood or coal.
- Suitable for laying single-pipe heating systems with natural coolant flow. Again, for a small dacha this is an excellent option and the cost of materials and labor will be low.
- The main thing is that after laying metal pipes, paint them well and make sure that there is no air in the system, otherwise they will quickly become unusable due to corrosion.
Date: September 25, 2021
How to make registers from round pipes with your own hands
This option has become the most widespread of all the above-mentioned designs for several reasons: manufacturing does not require specific skills, round pipes are commercially available, and the design of the product is simple. Required materials and tools:
- round pipes of the required diameter (40–70 mm);
- pipes Ø 25 mm;
- end caps;
- drain valve;
- grinder, hacksaw;
- welding machine;
- measuring tool.
Standard four-chamber radiator
If you plan to manufacture an autonomous “samovar”, then you will additionally need to purchase a heating element and an expansion tank. The work flow diagram for manufacturing and connecting the device is as follows:
- Selecting a model suitable for a particular case: horizontal or vertical heating radiators.
- Determining dimensions, drawing up a diagram.
- Purchase of materials.
- Welding the product (or less commonly, assembly with a threaded connection).
- Checking for leaks.
- Connection to the heating circuit system.
Below are recommendations for making registers from round pipes yourself.
Any plumber or person who has the skill of assembling pipes or wiring according to a sample or diagram can install the product.
To manufacture registers, no drawings are required; a simple diagram or drawing is sufficient, giving an idea of what kind of design should be obtained at the output.
It is important not to give in to the temptation to “weld the pipe thicker.” The larger the diameter of the pipes, the larger the volume of water will have to be heated, and this is an additional load on the boiler plus an unjustified increase in the heating bill. The optimal nominal pipe diameter is Ø 32 mm
The optimal nominal pipe diameter is Ø 32 mm.
Heat transfer can be increased by increasing the distance between the pipes - add 5 cm to the pipe diameter.
The most reliable connection is welding. If a thread is used, then plumbing flax or UNITEC adhesive-sealant, which is specially designed for threaded connections in plumbing systems, is used as a gasket.
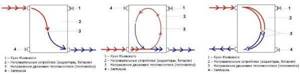
How does dual-circuit heating work?
The design of a two-pipe water heating system involves the supply and removal of coolant from each radiator through two separate lines. Simplified: the battery inlet is connected to the supply line, the outlet to the return line. Through the first pipeline, heated water from the boiler is distributed to all heating devices, the second pipe collects the cooled coolant and sends it back to the heat generator.
An example of the distribution and return of coolant from batteries along two lines
Features of double-circuit water distribution:
- if all elements of the system are calculated correctly, then each radiator receives coolant at the same temperature;
- a change in the flow of water through one battery due to adjustment has little effect on the operation of neighboring heating devices;
- the number of radiators on one branch can reach 40 pcs. provided that the pump capacity and the diameter of the supply pipes provide the calculated water flow.
The movement of water through pipes and batteries is ensured in two ways - natural (convection) and forced. There are also several options for supplying coolant, so we suggest considering each scheme separately.
Two-pipe classic closed-type wiring - connection to a floor-standing boiler
Multi-level floor
To zone the space, craftsmen install floors at different levels. They advise installing a podium to separate the kitchen and dining room. This option is considered one of the most practical because, among other things, the owners have additional free space where they can hide something.
It is convenient to use boxes or crates for this. Wicker baskets will look good. But such space can remain free.
However, such a design should not be made if there are small children in the family, since the podium can become an obstacle for him. In addition, various floor coverings can be used.

They will zone the space between the living room and the kitchen and protect the podium from damage. For example, tiles are laid in the kitchen area, and laminate flooring in the dining room. The main thing is to choose colors and textures and combine the finishes correctly.
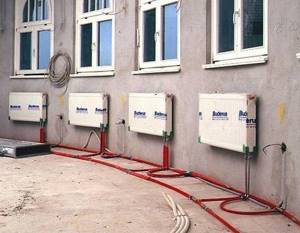
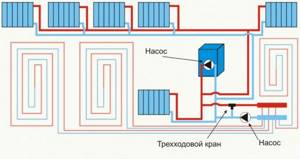
Collector system
I will dwell on this scheme in more detail, since, firstly, it is the most difficult to implement, and secondly, it was my neighbor who chose it.
The layout of heating pipes using a collector comb has increased reliability, scalability and allows you to flexibly regulate the microclimate in each room.
The collector circuit for laying heating pipes is, in fact, a type of two-pipe, but personally I highlight it separately. In this case, the pipes are connected not to a common main, but to combs that supply hot coolant and collect cooled water.
The scheme of work is as follows:
- liquid from the boiler flows into the supply distribution manifold;
- from there the water flows through the pipes to the heating radiators (each battery is connected to the comb by a separate pipe);
- After heat exchange in the radiators, the cooled coolant flows to the collecting manifold (return), after which it is sent to the boiler.
To ensure the operation of this complex system, additional equipment is required:
- sealed expansion tank;
- circulation pump (sometimes several).
This is what the pipe distribution unit for a manifold heating system looks like in a large country house.
Manifold combs are usually installed in the boiler room in a special distribution cabinet. On the contrary, I prefer to place the cabinet somehow so that there is approximately the same distance from it to the heating radiators (this way you can save pipes).
You can connect radiators in different ways, but I prefer the bottom connection. In this case, all pipes are embedded in the floor screed and do not disturb the harmony of the interior of the rooms.
Naturally, to bleed air here, you also need to use Mayevsky taps.
As I already said, one of the reasons for choosing a collector heating system was the possibility of installing heated floors. Everything is simple here. In addition, a pipe is connected to the collector, which does not lead to the pipe, but is walled up in the floor, heating it. To increase efficiency, I always install an additional circulation pump on this circuit so as not to load the main one.
This is how you can lay pipes by connecting heating radiators and installing heated floors.
If you also decide to take the plunge and lay pipes according to this scheme, I’ll tell you about the pros and cons of such a decision.
So, the advantages:
- Despite the apparent complexity, this pipe laying scheme does not require special skills or the involvement of specialists of the highest level. It is enough if you just know which end to grab the wrench from.
- This system has the highest efficiency, since the coolant delivers thermal energy to the heating radiators with virtually no unproductive losses.
- To design the system, you can use a not very powerful boiler (since the efficiency is high) and pipes of a smaller diameter. However, a lot of the latter is needed.
- The metal-plastic pipes leading from the collector to the batteries do not have joints, so you don’t have to worry about leaks if you wall them up in the floor.
- You don’t have to install radiators at all, limiting yourself to installing heated floors. I have come across similar solutions more than once and it looks very impressive and quite warm.
- The failure of any part of the collector heating system does not in any way affect its other parts. You can simply disconnect the damaged circuit and repair it.
Well, the most important thing, for me personally, is the ability to finely regulate the temperature in each room. For example, in the nursery you can set the temperature to 28 degrees Celsius so that the child does not get sick, and in your office to 20 so as not to fall asleep.

To lay pipes according to the collector circuit, a large amount of materials is required.
But there are also several disadvantages:
- Airing the heating system. Due to the intense operation of the pump, air bubbles often form in horizontally laid pipes, which accumulate in the upper part of the heating radiators. It’s easy to release them from there through Mayevsky’s tap.
- High cost of project implementation. Manifold combs, pumps, pipes, and so on cost a lot of money. But this, in my opinion, is exactly the case when every ruble spent is worth it.
- Inoperability without electrical energy that powers the circulation pumps. However, almost all modern boilers cannot operate without electricity, so this minus applies to all pipe laying schemes.
Fasteners and other materials
In addition to the pipes themselves, for installation you need to prepare in advance:
- Fastening materials:
- plastic fastening clips or clamps for polypropylene pipes of a given diameter;
- dowel-nails.
- Tools:
- hammer;
- drill;
- crosshead screwdriver;
- scissors or a knife for cutting pipes;
- roulette;
- level;
- marker.
Clips - their meaning and installation details
The clip is made from a special material - nylon. It has such useful properties as high heat resistance and resistance to mechanical stress.
Among the technical characteristics of the clip, you need to pay attention to the diameter; it must correspond to the size of the outer diameter of the polypropylene pipe. Installation of clips has its own rules, the implementation of which determines the service life of the finished communication system. Single clips and double clip
Single clips and double clip
The main issue that is important not to miss is the step size between the clips. If you install the clips too far apart, there is a risk of sagging at the support points. When installing a communication system with two parallel pipes, use a double clip
When installing a communication system with two parallel pipes, use a double clip.
Correct pitch between clips
In what cases are clamps used?
It is recommended to fasten polypropylene pipes to the wall using clamps in cases where it is necessary to install large-diameter pipes with a fairly heavy weight. The clamps are a design with a screw tie and a rubber internal gasket, which is necessary to compensate for vibration. Thanks to this, they reliably hold the pipe even when strong vibrations occur.
The clamps are equipped with a dowel and a pin. The mount can be made of metal or plastic. When laying polypropylene pipes, it is better to choose clamps from similar raw materials: this way you will ensure the same strength indicators for the entire structure. Installation of fastening material can be rigid or floating:
- Rigid fastening is made by tightening the clamp extremely tightly around the pipes. A rigid coupling is required in areas below the bell. Thanks to rigid fixation, the possibility of displacement of the communication system is eliminated.
- A floating mount indicates that there is a gap between the pipes and the clamp. The fastening is tightened in such a way as to allow free movement of the pipe. The mobility of the fasteners allows the pipes to expand during temperature changes.
How to attach the clamp
Features of single-pipe wiring
It is quite simple to install all the parts of the system inside the house. In this case, it starts from the water supply point and ends at the heating equipment. The diagonal connection is the most effective, so it is chosen more often. An expansion tank must be placed in the building.
There is a simpler option that is easy to implement yourself. In this case, it is necessary to install the door on the flight of stairs. This will isolate the floors from each other. This option is quite effective, although not very aesthetically pleasing.
Advice! Before wiring, you need to study the various diagrams. Then it will be much easier to decide on the choice of system.
Preparation for installation
The primary task is to draw up an installation drawing of future highways. In fact, the pipeline plan must be carried out taking into account all connections, taps, technological cabinets, shut-off valves. Detailed planning helps to avoid redundant connections and waste of material, since it is determined in advance which parts and in what quantities are needed.
Walls for hidden installation of pipes will have to be grooved, that is, a channel will have to be cut in the concrete for laying a pipe line. It is advisable to pre-mark the working area in order to make an even and high-quality channel.
It is advisable to take into account that it is not recommended to groove walls in panel houses, since the thickness of the panels is usually small. The most suitable walls are made of thick brick or concrete. They can be tapped without fear.
Next, you need to mark the pipes and fittings to know the welding direction and installation order. If necessary, it is better to trim the products in advance.
To perform installation work, you need tools designed for polypropylene:
- cutting scissors;
- a shaver for removing reinforcement and a chamfer for leveling the cut surface;
- welding machine with temperatures up to 260 °C;
- wall chaser or grinder for cutting out a cavity in the wall;
- chisel and hammer or punch to remove material between the grooves.
Installation
When the tools are ready, there is a detailed plan for installing pipe lines and markings, you can start working:
- Using a grinder or wall chaser, cut parallel to each other slots on the concrete surface of the wall; the distance between the slots should be slightly greater than the thickness of the polypropylene pipe in the thermal insulation. It is recommended to use a stone disc or a toothed disc coated with diamond.
- Use a hammer drill or chisel to remove concrete between the slots.
- To place technological cabinets, you will have to make a cavity in the wall and install a cabinet with slots for communications in it. This design will facilitate access to shut-off valves or sensors.
- The pipes are welded in advance, after which they are laid in the wall and fixed in the channel with clamps or supports. It is advisable to do most of the welding outside the channel because it is easier than welding in a confined space. Before sealing the grooves, it is recommended to check the system for leaks by running water into it. If no leaks are observed, then you can proceed to the final finishing.
- Before laying the pipes, it is advisable to wrap them in a layer of energyflex, or fill them with polyurethane foam after installation. This will provide space for the pipe to expand.
Of course, you can lay pipes on top of the walls, and make finishing on top of the main line, but then the free space in the room is reduced, and the cavity formed between the finishing and the wall will have to be filled with insulation. This approach is ineffective, since the finishing material must adhere tightly to the surface.
If you need to hide a ready-made pipeline structure, it is better not to make a blank monolithic wall, but to build a special plasterboard box to ensure free access to the pipes if necessary.
After a test check of the functionality of the pipeline, you can begin finishing the wall; it is better to use drywall for this.
Installation
Due to the fact that this material is very light and affordable, you can organize the heating of a private house, cottage or apartment using polypropylene pipes with your own hands. Before starting work, you need to make a project. It is necessary to indicate the dimensions and joint locations, connection features and installation method. With its help, it is easier to calculate the required materials. You can draw it yourself or by using a special program such as AutoCAD or SolitWorks.
Heating scheme made of polypropylene pipes
Pipe routing can be done according to two principles: with one pipe and with two. The first option is when only one pipe is used to supply water from the boiler and return it. The second is the classic way of organizing heating. Naturally, it is easier to connect the system with this pipe yourself, but in this case you will not be able to heat your home evenly.
Types of pipe connections
The design of the heating system when installing only plastic pipes or when connecting them with metal ones is practically no different. You just need to choose the right diameter when combining different materials. To do this, consult a specialist in the store.
Installation of polypropylene pipes into the heating system is carried out using a special welding machine for plastic, but in addition to it you will also need connecting fittings.
How to solder heating with polypropylene pipes:
Pipes need to be cut to the required size
It is very important that the joints are level and at right angles to the floor; Afterwards, you need to treat the sections with degreasing compounds and remove chips from their surface; Install the pipes into the centralizer. This is a special device that will help achieve maximum geometric accuracy of the connection.
Then put fittings on the joints; Welding is carried out only according to the instructions. Read the user manual for your inverter carefully. Afterwards, heat the device and solder. It is also possible to use electric welding couplings, in which case the installation is carried out directly in them.
The assortment of modern online and simple plumbing equipment stores allows you to choose everything for a heating system made of polypropylene pipes. In addition to fittings, special turn signals, American connections and other connections are often used. The technology for their installation is similar.
If it is necessary to connect polypropylene pipes to a metal heating system, then you need to use flanges; they have a different installation scheme. They have a thread on one side - for cutting into steel pipes, and on the second - a smooth valve for installation on plastic.
To make central heating from polypropylene pipes, you need to buy all the components, the price of which depends on the manufacturer and type of reinforcement; below is a small rating:
| Brand | Diameter | Price, rubles |
| Kalde | PN20 D20 Kalde | 65 |
| Valtec | VALTEC PPR PN 20 | 80 |
Naturally, the dimensions directly affect the cost of polypropylene heating pipes. For example, Kalde with a diameter of 75 mm costs about 800 rubles/meter. This equipment is sold in company stores.
Plasterboard boxes
The simplest option for hiding heating system pipes are structures assembled from plasterboard sheets. The demand for this building material is explained by its low cost and the ease of making boxes from it.
For this you will need:
- metal profile or wooden blocks;
- plasterboard - when you plan to decorate pipes in the bathroom, it is advisable to buy moisture-resistant material, and for all other rooms you can purchase a standard one (read: “How to make a box for pipes in the bathroom - step-by-step installation guide”);
- screws and dowels;
- putty;
- finishing materials;
- accessories for covering the junctions of the structure with the walls and floor - these are decorative items such as sockets, rings, plugs and overlays.
A plasterboard box for heating pipes is created in stages:
- First of all, design parameters are determined. In this case, it is necessary to ensure that the pipes do not come into contact with the frame elements.
- Based on the dimensions, profile strips or wooden blocks are cut.
- A starting profile is attached to the floor, on which the frame will then be assembled. To connect its elements, use self-tapping screws, screwing them in with a screwdriver.
- Fragments of the required size are cut from the plasterboard boards to finish the frame.
- The edges of the sections are processed with a drywall plane, applied to the constructed sheathing and secured with self-tapping screws.
- To protect the slabs from damage, overlays made of perforated metal are glued to their edges.
- The places where the self-tapping screws enter the material and the joints between the plates are treated with putty.
- The structure is primed and finishing is performed.
- At the final stage, a plinth is installed at the junction of the box with the walls and flooring.
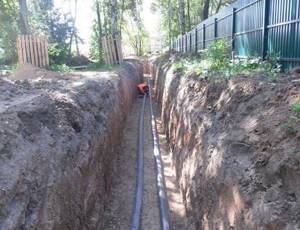
Pipe laying
After choosing the material, you need to prepare a trench, which can be dug either with a shovel or an excavator. It all depends on the level of freezing of the ground. According to the standard, pipes are required to be laid 0.5 meters below the soil freezing level. In the middle zone, the laying level is about 2 meters, and in the northern regions 3–3.5 meters. The numbers are imprecise and may vary depending on the area and groundwater levels.
When laying the sewer line, pipes with a diameter of 100 mm are used. The trench should be 0.7 m wide and 0.07 meters deep than the planned depth of laying the pipes themselves.
After the trench is dug, it is necessary to level the bottom and create the necessary slope. For every meter of pipeline, a slope of 1-2 cm is created. A sand or gravel layer 20 cm high is poured onto the bottom and thoroughly compacted. Next, the pipeline is installed.
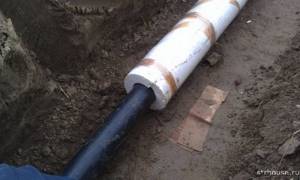
During installation, pipes are laid with a socket up the slope. When connecting the joints, the socket and the end of the other pipe are pre-treated to remove contamination and lubricated with an adhesive composition. The end of the pipe is inserted into the socket until it stops. The remaining elements are installed in the same way. For a quality connection, the length by which one pipe enters the other is measured. Next, you need to put a mark on the desired location. After installation is completed, the pipes can be insulated if necessary. As a rule, pipes are insulated in areas with high levels of soil freezing. For insulation, the material used is stenoflex or energyflex.
After laying the pipes, you need to make sure that the slope angle is maintained. You can also carry out a test run of water through the pipes, after which the pipes are covered with another 20 cm layer of gravel or sand, since in the event of a breakdown, it will be easier to get to the pipe. Next, everything is covered with soil that was formed after digging the trench. The trench is filled in layers of 10 cm, and each of them is compacted on the sides. To avoid damage to the structure, it is not recommended to compact the area above the pipe itself.
In order for the installation of the structure to proceed without any particular difficulties, the work must begin with the correct selection of material and study of the installation process. By following the simple advice in this article, the design will last for many years.
We analyze the types of boxes and decorative overlays
One of the most popular ways to hide heating pipes in a private home is the method of installing overhead ducts and decorative overlays. This method provides visual closure of pipelines without carrying out work associated with moving the pipes themselves. In addition, there is no need to violate the integrity of the walls; there are no channels drilled into them for laying the main line. This method is good because to implement it there is no need to coordinate work permits with service organizations. At the same time, the choice of one or another technology of work is dictated by the expediency and aesthetics of the finished composition.
In order to hide heating pipes using boxes or decorative overlays, in practice there are 5 main options:
- Perforated overhead boxes;
- Metal boxes and linings;
- Skirting box models;
- Plasterboard structures;
- Plastic tunnels and boxes.
Additional types of finishing can be used:
- Wooden structures;
- Cardboard overlays;
When choosing a method for hiding pipes in a private house, it is necessary to take into account the fact that in this case the old distribution of heating pipes remains unchanged and therefore it is necessary, before installing screens and ducts, to prepare the surfaces of the pipes, remove rust and paint the surface. The proposed technologies involve installing decorative panels that completely cover pipes tightly or installing the structure in such a way that there is access to shut-off valves through hatches and technological openings
The proposed technologies involve installing decorative panels that completely cover pipes tightly or installing the structure in such a way that there is access to shut-off valves through hatches and technological openings.
Plasterboard structures
The simplest and most technologically accessible method for hiding heating pipes is installing a plasterboard structure. This is by far the most versatile technology. Strips of drywall are attached to wooden slats or a metal profile of the cover pipe structure. These can be vertical, horizontal or complex shaped boxes; fortunately, drywall can allow you to perform literally all options. In addition, this is a universal material; after further processing, putty can be applied to it and in the future use almost all finishing materials - from vinyl wallpaper to ceramic tiles. Another advantage of drywall is the ability to install inspection hatches in the box, which is very convenient for hiding meters, taps, and other equipment.
Metal boxes and linings
Metal boxes and trims have so far found little use and are mainly used for decorating large public spaces. In a private house or apartment, it is more convenient to use panels and boxes made of perforated metal. Panels made of anodized aluminum, stainless steel or panels coated with powder paint are suitable for this purpose. The disadvantage of this type of finishing material is its high cost and the need to take into account decorative properties in the design.
Such a bright material as shiny stainless steel will greatly attract attention, so the interior with such an element must be decorated with special care
Plastic structures
Plastic has found application in several types of finishing materials that can help solve the problem of how to decorate a heating pipe. In this case, you can use plastic lining to build a box, ready-made plastic boxes for laying cable lines and communication lines, decorative plastic plinth structures.
For plastic lining, a base in the form of a frame is used in the same way as for drywall. Typically the frame is made of wooden slats. Metal structures are used for rooms with high humidity, for example, for bathrooms and toilets. The panels can be placed vertically or horizontally. In order for the panels to be attractively designed, you can choose lining not only with a print, but also with an unusual surface texture, for example, imitating the surface of wood or fabric.
Heating wiring methods
In the interior of a modern private house you can often see a fireplace or stove, but most often they are elements of the overall style of the room. In this case, a single-circuit or double-circuit boiler is responsible for the heat in the house. Moreover, the first option is used only for heating rooms, the second type of boiler serves in parallel to supply heat and heat water.
The installation of a heating system in a private house can be carried out using a single-pipe or two-pipe wiring diagram from a heating boiler. Before choosing one of the options, you should study in more detail the features and characteristics of each type, as well as identify their advantages and disadvantages.
Options for single-pipe heating schemes
Single-pipe heating systems are divided into:
- By type of coolant circulation - with natural and artificial circulation.
- Closed (sealed) and open.
- Vertical and horizontal.
- With top and bottom wiring.
Systems with natural and forced circulation
Previously, the plan for single-pipe heating systems for private houses had an expansion tank under the ceiling; hot water flowed into it from a stove or other heating unit, and then flowed by gravity through the pipes to the radiators. The system was quite simple and reliable and was successfully implemented by craftsmen when upgrading a stove heating system in small one-story houses with a piping length of within 30 m (and previously, most houses had an area of 50-70 m² and had a shape close to a square).
To heat water, pipes were installed in the furnace firebox, which served as heat exchangers between the coolant and the fire in the firebox. But progress does not stand still, and stoves have been replaced by coal, gas and wood boilers. Houses began to acquire heated kitchens, verandas, and bathrooms - the area began to increase, the systems became more complicated, and the scheme stopped working.
Progress does not stand still, and modern automatic boilers are all produced with built-in circulation pumps. For heating units that are difficult to automate (solid fuel boilers), the pump is installed separately. The main reason is severe overheating of the pump due to strong fuel combustion. A system with forced circulation allows you to implement the most complex heating schemes, including underfloor heating - with natural circulation, floor heating simply will not work.
Another reason for using forced circulation of the coolant is the increase in the area and number of floors of houses under construction (a two-story house or a house with an attic is cheaper than a one-story house of the same area).
Open and closed heating system
Previously common systems with natural circulation were most often open; the water level in the tank increased when overheated, and decreased when cooled. A pipe was installed in the tank to release excess pressure and steam into the atmosphere (or sewer) in case of overheating of the system.
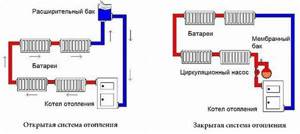
In fully automated modern boilers (gas, fuel oil, pellets) there is a small expansion tank that allows you to compensate for a slight increase in coolant pressure. But in principle, pressure depends on temperature, and in a working boiler, when the pressure rises, the boiler simply turns off and the pressure drops.
The situation is much worse in boilers burning coal, peat or wood - burning in them cannot be stopped quickly, and overheating of the water is possible. Therefore, when developing a project, the system necessarily includes a fairly large expansion tank, a valve for discharging steam into the sewer or into the atmosphere, and an automatic water make-up system. Even when installing modern solid fuel boilers, an open system is sometimes used.
Upper and lower wiring
Pipelines can be laid above or below the radiators. There is no fundamental difference, but in private houses they often use a scheme with lower wiring - it’s more beautiful. Overhead wiring is rarely used in office or industrial buildings - there is less chance of the pipes being touched by a load or feet.
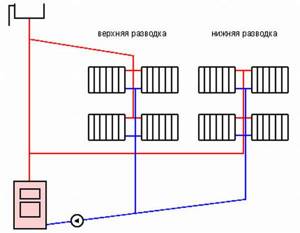
Vertical and horizontal
A vertical single-pipe multi-storey building heating system was previously often used in multi-storey buildings; water was supplied to the attic or to the top floor and descended through separate risers, passing successively through radiators. This system is called Leningradka or Leningradskaya.
Horizontal - when the pipe is laid horizontally, the heating devices are connected in series - used in one-story buildings.
The most effective single-pipe system scheme for houses with 2 rooms
In small houses, horizontal pipe routing is always used.
The most effective single-pipe system scheme for houses with 3+ rooms or an area of more than 60 m2
The choice of wiring diagram for a medium-sized private house comes down to horizontal for a one-story house and vertical single-pipe for two-story houses. The heating is distributed from the top of the second floor, lowered to the bottom and collected back to the boiler.
If the house is very large (more than 150 m²), it is worth ordering the project from a specialized organization - it is almost impossible to calculate all the parameters of the system yourself. In any case, you should choose a more progressive and economical scheme with forced circulation.
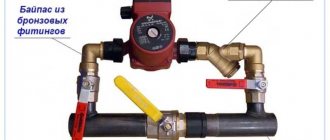
Selecting a security system
A pressure gauge, safety valve, and automatic air vent are installed in the supply after the solid fuel heating unit. The valve relieves excess pressure when the coolant overheats. A bypass and a three-way valve are installed in front of the pump - it does not let cold water into the boiler until the water in the boiler heats up to a certain temperature - this protects the firebox from condensation and damage to the boiler.
Which home heating system to choose
There are several types of heating systems. They differ in pipe layout, methods of connecting radiators and how the coolant moves through them. Competently choosing the most effective option is possible only if you have knowledge of heating engineering. It is necessary to make complex calculations and prepare a project. For a small cottage, a simple one-pipe scheme is quite suitable. In other cases, it is better to delegate the design to a professional. But the installation work can be done independently.
Serial connection of two heating radiators
sansvar wrote. What the customer bought, I delivered. the number of sections and location, the choice made in advance before my recommendations and advice. For example, I actually suggested that he put one instead of two, well, I don’t like the diagonal connection. It’s kind of ugly, there’s a lot of “extra” pipes
Yes, I realized this right away, I’ve seen loads of them like that, by the way, I know that there are weirdos, enough.
sansvar wrote. You can’t put the tap on bypass, I’m just not one of those people... if something is very critical in the customer’s desires, I refuse even for an additional payment
And it is right.
I'll bring up the topic. From the developer we have two steel panel radiators Maxterm type 22 (double-row, double-panel) with bottom connections (apartment wiring, Bir Pex). In appearance, they seem to have bypasses (they didn’t answer anything about this on the manufacturer’s website). No, I’m lying. Answered:
Please tell me, when the thermal valve is closed, the coolant bypasses the radiator (the coolant flow remains constant) or the thermal valve simply blocks the coolant flow. Thanks in advance for your answer. Yes. The thermostatic head regulates the flow through the radiator through the valve stem. Those. regulates the coolant flow through the radiator. And the constant flow through the system is maintained. Moreover, if all radiators operate to limit flow, then the system resistance increases. And in this case a bypass must be provided.
My task is to modernize the distribution of heating pipes in the apartment in order to ultimately get as few intersections and joints of pipes as possible. There is already one piece of advice to replace my Wishlist with a collector circuit. But I can’t understand why it is believed that water shunted through the bypass (after all, there are very strong suspicions of its presence) will poorly heat the second radiator?
Registration: 03/25/2011 Penza Messages: 7080
12/10/2013 at 16:18
Loki wrote. we have two steel panel radiators Maxterm type 22 (double-row, double-panel) with bottom connection
Loki wrote. have bypasses (nothing was answered about this on the manufacturer’s website)
Bypasses are used only in single-pipe heating systems. And they don't happen inside radiators. There are bottom connection fittings with built-in bypasses.
Draw a general diagram of the heating system in the apartment. Without it, it is unclear whether you have a one-pipe or two-pipe system. Also indicate the brand of radiator bottom connection fittings used.
Loki wrote. Will the second radiator heat up badly?
If the pressure difference on the supply and output lines (supply/return) is sufficient, then the radiators will heat normally, provided that the hydraulics of the entire residential heating system are calculated and rebalanced with adjustment. Because connecting an additional radiator will introduce an imbalance in the operation of the apartment’s heating system.
It is not possible to answer how critical the imbalance will be without carrying out hydraulic calculations.
Hydraulic calculation of heating systems. Heat calculation (calculation of insulation) of houses and apartments.
Sergants. poorly legible photo. But from what I was able to see, I conclude that the system is two-pipe.
It is better to install a floor (in-floor) convector of sufficient power under the window. Then there will be no need for additional radiators.
Sergants wrote. And is it possible to leave the fittings that are in place now?
It is strange that there is a regular ball valve on the return line, instead of a shut-off valve. Then the thermal valve under the blue cap should have presets. If so, then leave it and do not upset the design presets.
Hydraulic calculation of heating systems. Heat calculation (calculation of insulation) of houses and apartments.
What is needed for installation
Installation of heating radiators of any type requires devices and consumables. The set of necessary materials is almost the same, but for cast iron batteries, for example, the plugs are large, and they do not install a Mayevsky valve, but instead, somewhere at the highest point of the system, they install an automatic air vent. But the installation of aluminum and bimetallic heating radiators is absolutely the same.
Steel panel ones also have some differences, but only in terms of hanging - they come with brackets, and on the back panel there are special arms cast from metal, with which the heater clings to the hooks of the brackets.
These are the arms that hook the hooks
Mayevsky crane or automatic air vent
This is a small device for releasing air that may accumulate in the radiator. Placed on the free upper outlet (collector). It must be on every heating device when installing aluminum and bimetallic radiators. The size of this device is significantly smaller than the diameter of the manifold, so you will also need an adapter, but Mayevsky taps usually come complete with adapters, you just need to know the diameter of the manifold (connection dimensions).
Mayevsky crane and method of its installation
In addition to the Mayevsky crane, there are also automatic air vents. They can also be installed on radiators, but they are slightly larger in size and for some reason are only available in a brass or nickel-plated case. Not in white enamel. In general, the picture is unattractive and, although they deflate automatically, they are rarely installed.

This is what a compact automatic air vent looks like (there are more bulky models)
The side-connected radiator has four outputs. Two of them are occupied by the supply and return pipelines, on the third they install a Mayevsky valve. The fourth entrance is closed with a plug. It, like most modern batteries, is most often painted with white enamel and does not spoil the appearance at all.
Where to install the Mayevsky plug and tap for different connection methods
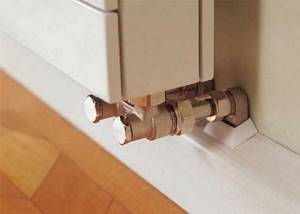
Shut-off valves
You will need two more ball valves or shut-off valves that can be adjusted. They are placed on each battery at the input and output. If these are ordinary ball valves, they are needed so that, if necessary, you can turn off the radiator and remove it (emergency repairs, replacement during the heating season). In this case, even if something happens to the radiator, you will cut it off, and the rest of the system will work. The advantage of this solution is the low price of ball valves, the disadvantage is the impossibility of adjusting heat transfer.
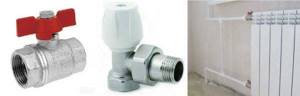
Radiator taps
Almost the same tasks, but with the ability to change the intensity of the coolant flow, are performed by shut-off control valves. They are more expensive, but they also allow you to adjust the heat transfer (make it less), and they look better externally; they are available in straight and angular versions, so the piping itself is more accurate.
If desired, you can install a thermostat on the coolant supply after the ball valve. This is a relatively small device that allows you to change the heat output of a heating device. If the radiator does not heat well, you cannot install them - it will be even worse, since they can only reduce the flow. There are different thermostats for batteries - automatic electronic ones, but more often they use the simplest one - mechanical.
Related materials and tools
You will also need hooks or brackets for hanging on walls. Their number depends on the size of the batteries:
- if there are no more than 8 sections or the length of the radiator is no more than 1.2 m, two mounting points on top and one on the bottom are sufficient;
- For every next 50 cm or 5-6 sections, add one fastener at the top and bottom.
You also need fum tape or linen winding and plumbing paste to seal the joints. You will also need a drill with drills, a level (preferably a level, but a regular bubble one will do), and a number of dowels. You will also need equipment for connecting pipes and fittings, but it depends on the type of pipes. That's all.
The influence of pipe type and size on system performance
Is the pipe diameter really that important? As practice shows, extremely! A number of factors that ensure high efficiency of the entire circuit depend on it:
- Throughput and heat transfer coefficient. Those. the total volume of coolant located in the main during a certain period of time and subject to heating.
- Coolant pressure in the circuit, temperature and speed of its movement.
- Hydraulic losses that occur at the junctions of pipes and elements of different sections. The more such transitions, the greater the losses.
- Noise level of the heating system.
There are several types of diameter:
- External. Takes into account the cross-section of the internal cavity and the thickness of the pipe walls. Used when designing a heating system.
- Interior. Reflects the cross-sectional value of the internal cavity of the pipe. Determines the throughput of the pipeline.
- Nominal (conditional). Represents the average value of internal diameters obtained as a result of calculations.
In order for the heating system to work fully, in addition to the pipe cross-section, a number of other factors should be taken into account:
- Properties of the coolant, which is water, antifreeze or steam.
- The material from which the pipes are made.
- The speed of the coolant.
- Type of heating system: one- or two-pipe.
- Type of circulation: natural or forced.
Serial connection of two heating radiators
sansvar wrote. What the customer bought, I delivered. the number of sections and location, the choice made in advance before my recommendations and advice. For example, I actually suggested that he put one instead of two, well, I don’t like the diagonal connection. It’s kind of ugly, there’s a lot of “extra” pipes
Yes, I realized this right away, I’ve seen loads of them like that, by the way, I know that there are weirdos, enough.
sansvar wrote. You can’t put the tap on bypass, I’m just not one of those people... if something is very critical in the customer’s desires, I refuse even for an additional payment
And it is right.
I'll bring up the topic. From the developer we have two steel panel radiators Maxterm type 22 (double-row, double-panel) with bottom connections (apartment wiring, Bir Pex). In appearance, they seem to have bypasses (they didn’t answer anything about this on the manufacturer’s website). No, I’m lying. Answered:
Please tell me, when the thermal valve is closed, the coolant bypasses the radiator (the coolant flow remains constant) or the thermal valve simply blocks the coolant flow. Thanks in advance for your answer. Yes. The thermostatic head regulates the flow through the radiator through the valve stem. Those. regulates the coolant flow through the radiator. And the constant flow through the system is maintained. Moreover, if all radiators operate to limit flow, then the system resistance increases. And in this case a bypass must be provided.
My task is to modernize the distribution of heating pipes in the apartment in order to ultimately get as few intersections and joints of pipes as possible. There is already one piece of advice to replace my Wishlist with a collector circuit. But I can’t understand why it is believed that water shunted through the bypass (after all, there are very strong suspicions of its presence) will poorly heat the second radiator?
Registration: 03/25/2011 Penza Messages: 7080
12/10/2013 at 16:18
Loki wrote. we have two steel panel radiators Maxterm type 22 (double-row, double-panel) with bottom connection
Loki wrote. have bypasses (nothing was answered about this on the manufacturer’s website)
Bypasses are used only in single-pipe heating systems. And they don't happen inside radiators. There are bottom connection fittings with built-in bypasses.
Draw a general diagram of the heating system in the apartment. Without it, it is unclear whether you have a one-pipe or two-pipe system. Also indicate the brand of radiator bottom connection fittings used.
Loki wrote. Will the second radiator heat up badly?
If the pressure difference on the supply and output lines (supply/return) is sufficient, then the radiators will heat normally, provided that the hydraulics of the entire residential heating system are calculated and rebalanced with adjustment. Because connecting an additional radiator will introduce an imbalance in the operation of the apartment’s heating system.
It is not possible to answer how critical the imbalance will be without carrying out hydraulic calculations.
Hydraulic calculation of heating systems. Heat calculation (calculation of insulation) of houses and apartments.
Sergants. poorly legible photo. But from what I was able to see, I conclude that the system is two-pipe.
It is better to install a floor (in-floor) convector of sufficient power under the window. Then there will be no need for additional radiators.
Sergants wrote. And is it possible to leave the fittings that are in place now?
It is strange that there is a regular ball valve on the return line, instead of a shut-off valve. Then the thermal valve under the blue cap should have presets. If so, then leave it and do not upset the design presets.
Hydraulic calculation of heating systems. Heat calculation (calculation of insulation) of houses and apartments.
The difference between one-pipe and two-pipe heating systems
The main structural difference between one- and two-pipe heating systems:
- With a single-pipe heating system, heating devices are connected to each other by one pipe, and the coolant is supplied to the radiators in series.
- With a two-pipe system - two pipes (supply and return) - the coolant is supplied to each radiator through the supply pipe, and is discharged back to the heating boiler through the return.