- 1 Device design
- 2 Repairing the heater
- 3 Tank repair
- 4 Conclusion on the topic
An oil radiator is a very reliable heating device. It works for years without creating unnecessary problems for its owner. But the time comes, and even he begins to fail. Some people simply get rid of it, some take it to the workshop, and some try to repair the oil heater with their own hands.
How difficult is this process? Let's figure it out together.
Device structure
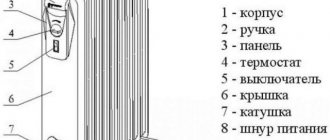
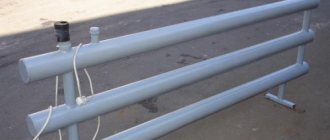
Oil radiator Watt WOH-80
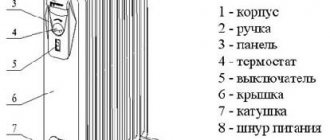
The components of an oil heater are:
Today, manufacturers use disposable wire-type fuses or reusable bimetallic fuses in the form of tablets. As for the control relays, in oil heaters they are similar to an electric kettle, and not to irons. In the design, the relay hangs in the air without contacting the device body.
The electrical circuit of an oil heater is almost the same as in irons, electric kettles and other heating devices. It is simple and yet reliable. Typically, all these heaters have two heating elements installed, and when both are turned on at once, electricity consumption increases greatly. But at the same time, the time to reach the operating temperature increases. If the temperature in the rooms is low, then even with two heating elements turned on, the device can operate without turning off.
The metal case, which covers the power and safety unit of the device, has ventilation slots at the top and bottom. If you close them, the device will not suffer from this, but it will work with difficulty. It will turn off faster, but turn on less quickly. Therefore, it is recommended not to hang things on the radiator to dry. If this happens, try not to close the ventilation gaps.
The most common breakdowns and how to fix them
Instantaneous water heaters are quite simple in design if they do not have additional electronic control units. If any malfunction occurs, you can simply seek help from the list in which they are all listed. The list of faults also includes methods for eliminating them.
Failure No. 1: burnt-out heating element
The most common breakdown in which a household appliance continues to function even when the warning light is on, since the electric current reaches the heating element, but does not pass through it.
Burnt water heater heating element
We repair the heating element in the following order:
1. Disconnect the water heater from the electrical network and drain the water from it.
2. Remove the heating element. To do this, you need to unscrew several bolts securing it to the body of the water heater.
3. Attach the working probes of the multimeter to the two main terminals of the heating element, having previously set the resistance measurement. The operating resistance of the heating element is 32-35 Ohms. If the multimeter shows one, this means that the heating element is damaged.
Installation of the element occurs in the reverse order. Also, do not forget about the rubber gasket under the heating element. If the gasket has become unusable, it should be replaced.
Failure No. 2: clogged household appliance
The consequence of a clogged water heater may be too low water pressure at the outlet. An incomprehensible noise is also heard, similar to the passage of large debris through the pipes of the system.
In case of such a breakdown, all working elements of the electrical circuit remain intact, so troubleshooting can take a lot of time. A clogged water heater does not require repair; it only needs to be thoroughly cleaned.
Water heater clogged
The procedure for cleaning an instantaneous water heater:
1. The device should be de-energized and all water drained from the system.
2. It is necessary to remove 2 wires from the heating element: phase and neutral. Then unplug the heating device and rinse it thoroughly in hot water. It is prohibited to use hard objects to remove scale and rust, as this can damage the body of the element.
3. Rinse the water intake and discharge pipes under low pressure. For the best effect, it is allowed to use household chemicals with a mild effect, without active elements.
4. Install the heating element in the reverse order. Turn on the device and check its functionality.
Failure No. 3: power switch does not work
Multi-stage power switches are installed mainly on the latest generation boiler models. This allows you to accurately regulate the water temperature and save on electricity. The consequence of a breakdown of the power regulator: the device does not respond in any way to the rotation of the operating mode switching handle. The outlet may contain slightly heated liquid, but the pressure remains normal.
Standard power switch
Most often, the power switch is a variable rheostat, which can be checked using a multimeter. It is necessary to connect probes to the terminals of the element and smoothly rotate the adjusting knob. If the resistance changes, then the rheostat is working; if not, then it should be replaced. When replacing, it is necessary to mark the wires and connect them to the corresponding switch terminals. It is better to buy an original switch rather than a cheaper analogue.
Failure No. 4: the external tank is broken
Over a long period of use, the water heater tank may become leaky. The integrity of the material is also affected by the quality of the heated liquid - very often, after several months of operation, scale forms on the surface of the heating element.
Damage to external tank
If the housing is broken, the liquid pressure at the outlet drops sharply, and the device body may be covered with liquid leaks. This malfunction is determined quickly through visual inspection.
Another reason for water leakage can be a worn-out rubber gasket under the heating element - the so-called flange. To replace the gasket, simply drain the water, disconnect the water heater from the mains and remove the heating element. Having taken out the old gasket, you need to put a new one in its place and reassemble the device in the reverse order.
We repair the heater
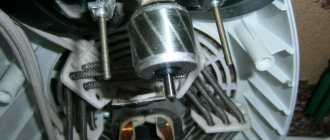
The appearance of the heater creates the feeling that it is a single whole, that is, the electrical unit and the body are connected using rolling. But this is only an appearance. Pay attention to the inscription “do not cover” - under it there are several screws with which the lid is held on the body. They need to be unscrewed, but the lid will not come off because there is a spring installed in its lower part that holds it. Simply remove it and remove the lid.
Now pay attention to the heating element. It is tightly and hermetically sealed. Manufacturers did this on purpose to prevent curious people from prying into it. These tubular heating elements last for decades, so there is no point in touching them. If one of them fails, then it is better to purchase a new oil heater. No one can repair such a breakdown with their own hands. To do this, you will have to replace the elements, but at home and even in some workshops it is impossible to roll the heating element back into the housing with 100% tightness. The result is constantly leaking oil, which can lead to big troubles.
But anyone can wipe the connection elements with alcohol. All of them are made in the form of terminals, so disconnecting, cleaning and connecting them back will not be a big problem. It is important here not to confuse anything when installing the wire to a specific terminal.
The same goes for replacing power supply and safety parts. It will be difficult to repair any of them with your own hands. And if you are not an expert in this matter, then you are unlikely to succeed. Therefore, there is only one way out - to replace the failed elements with new ones. They are all held on by screws or brackets, so removing them won't be too difficult. Again, we remind you that your main task is not to confuse the connection wires. After all, the electrical circuit of a radiator is the basis for its correct and efficient operation.
Fault 3
The electric radiator did not turn on after an emergency self-shutdown by the thermal limiter; its red button is raised unusually high. After pressing, it returns to the same position.
Cause
: The gear in the thermal limiter mechanism has become unsoldered or turned.
Remove the cover from the control unit and remove the panel.
On the reverse side of the plastic panel 1 (see figure) there is an emergency temperature limiter. It consists of a screw with a fixed contact 14 and a movable contact riveted to an elastic plate 12. In the normal state, this contact pair is closed. In the event of an emergency operation of the thermal limiter, the contacts are separated by a plastic plate 13 attached to a pull rod 5. At the opposite end of the rod there is a red button 3. Together with the rod, it is under the influence of a spring 4. In the operating position, the rod is held by a plate 6 with a groove riveted to the rod. The edge of the groove rests the plate on the gear 7, mounted on the rod 9 of the emergency temperature limiter sensor and soldered with low-melting solder to the bar 8. The bar itself is attached to the plastic panel 1 with two screws 10.
When the sensor rod is heated above 130°C, i.e. in an emergency, the low-melting solder melts and the rod 5 rises upward under the influence of the spring 4. In this case, the plastic plate 13 disconnects the contacts and the heater turns off.
If you find that gear 7 has become unsoldered or turned for other reasons, unscrew two screws 10, remove bar 8, sensor rod 9 and gear.
After sanding the end of the rod with fine-grit sandpaper, insert it into the hole in the strip. Now you need to put a gear on the rod and solder it to the bar with low-melting solder, for example, type PVSO-96. The melting point of the solder should be 120-135°C. Attach the assembly to the panel by screwing two screws into the holes in the plate. Place the thermal limiter in the working position by pressing the red button 3 and using a screwdriver or tweezers, ensure that the teeth of the wheel 7 fit into the groove of the elastic plate 6 and lock the rod.
Now remove the elastic plate 12 with the moving contact. After unscrewing screw 11, inspect the moving and fixed contacts 14. If you find burnt or corrosion, restore the serviceability of the contact pair, as you did when troubleshooting the malfunction caused by cause 4. A slight decrease in the thickness of the contacts can easily be compensated by carefully bending the elastic plate 12. If the total thickness of the contacts has decreased by more than 0.5 mm, you need to loosen the nut on the front side of the plastic panel and, by unscrewing screw 14 with a fixed contact, compensate for the decrease in the thickness of the contacts.
Then tighten the nut securely on the face of the panel. Make sure that the contacts are pressed tightly and that the contact pair is closed.
Having restored the serviceability of the emergency temperature limiter, try to establish the reason for its operation. Check and, if necessary, adjust the electric radiator thermostat, as you did when troubleshooting fault 2 caused by cause 1.
Assemble the control unit, check the operation of the oil cooler.
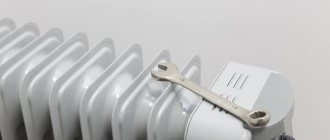
Tank repair
Oil heater Forte EW-RD
Although it is not recommended to repair the tank yourself, some DIYers still try to fix it. What do you need to know so that the result does not disappoint you?
Pay attention to its variety. The fact is that when repairing the body of an oil heater, some of the oil will spill out, and it will have to be replenished. However, you cannot mix mineral oil with synthetic oil. Its volume should be such that an air cushion remains inside the housing. It is necessary for the expansion of the oil.
Sometimes small holes in the housing are sealed with a threaded connection. The repair method is not very reliable, but it is acceptable as a temporary option. It is important to seal the joint well here. During the repeated cycle - heating and cooling - any sealant will begin to crack, so smudges cannot be avoided.
Repair of heating elements in a heater
As for replacing the heating element with your own hands, this heating element is selected based on power. And if you decide to change it yourself, you will have to work hard. Flaring it will not be so difficult, but doing the flaring again is a big problem. Some models of oil heaters are equipped with removable heating elements, which makes them easier to repair.
The oil heater is leaking, what should I do?
Household oil heaters for the home - selection, purchase, operation
Answer
Posts: 23 • Page 1 of 3 • 1 , ,
The oil heater is leaking, what should I do?
thoruk.tema » March 18, 2013, 03:46
pm The oil heater is leaking, what should I do?
It doesn’t leak much, just a little bit at a time, but I’m afraid that such a heater may explode, how can I avoid this, can I fix it myself? Is there any chance to repair it or is it better to buy a new one? thoruk.tema Posts: 5 Registered: Mar 18, 2013, 2:41 pm
Return to top
The oil heater is leaking, what should I do?
Bibikin Ivan » March 19, 2013, 12:22 pm
Don’t be afraid - it won’t explode! But if it leaks, you can’t use it any further! Oil is not water, it won’t cover the hole, so it’s definitely a repair only. Take it to the service center, if not it’s easier to buy a new one. You can try to fix it yourself, of course, but I’ve never encountered this myself, so I can’t help with advice this time.
We are moving to live on a desert island! With us?! — https://www.neobitaemyi.ru/
Bibikin Ivan
Messages: 1662 Registered: May 16, 2012, 14:10 From: Moscow
Return to top
The oil heater is leaking, what should I do?
Rikota » March 21, 2013, 08:43
If an oil leak occurs due to depressurization of the housing, then this device requires repair, and then, possibly, adding working fluid.
Such heating devices must be repaired only in specialized service centers. It is strictly not recommended to repair them yourself. Remember, the temperature of boiling oil is much higher than that of water. Rikota Posts: 994 Joined: Mar 11, 2013 12:41 pm
Return to top
The oil heater is leaking, what should I do?
Anatoly » April 09, 2013, 03:19
This is our important question of our time.
And it sounds like this: The heater is faulty. It's warm. Can I use it a little more??? And the user correctly intuitively senses trouble. What to do??? Definitely... don't use it!!! This is practically the opinion of all forum participants. I'm joining them. And I still advise you not to repair it. Buy another one. Repairing an apartment after a fire is not comparable to buying a new heater. Anatoly Messages: 1707 Registered: Apr 03, 2013, 01:23
Return to top
The oil heater is leaking, what should I do?
Rikota » April 09, 2013, 08:56
Anatoly wrote: This is our important question of our time. And it sounds like this: The heater is faulty. It's warm. Can I use it a little more???
Yeah, instead of the classic “To be or not to be?” in the twentieth century they came “Who is to blame?” and “What should I do?”, and now the questions have changed to “If you can’t, but really want to, then is it possible?”
Anatoly wrote: And I still advise you not to repair it. Buy another one. Repairing an apartment after a fire is not comparable to buying a new heater.
Well, why buy another one right away? You can contact the service department, maybe they can repair it for 100 rubles? And the heater will serve faithfully for another 5 years. By the way, did it start leaking after the warranty period expired? Rikota Posts: 994 Joined: Mar 11, 2013 12:41 pm
Return to top
The oil heater is leaking, what should I do?
Anatoly » April 12, 2013, 12:01 pm
Still, I recommend buying another one.
But this does not apply to replacing the plug, cord or anything else that you can reach with your hand. There are other types of simple breakdowns. But this is not a simple breakdown at all!!! A radiator leak is a serious matter. There is such a malfunction - eliminating the leak. It is almost impossible to eliminate it on your own. After all, it is necessary not only to know the location of the leak, but also to seal the radiator and fill it with the missing oil. Fixing a leak requires special equipment, so such repairs must be done at a service center. Yeah!!! Nice line!!! But in fact, these are empty words, since there is an opinion of professionals who repair oil radiators in specialized centers. I quote their summary verbatim: “Repair of oil-based radiators is allowed only when malfunctions arise related to the power supply, replacement of the power cord and socket plug.” Believe it or laugh, but this is the opinion of a pro. Anatoly Messages: 1707 Registered: Apr 03, 2013, 01:23
Return to top
The oil heater is leaking, what should I do?
Anatoly » Apr 12, 2013, 12:17 pm
“If you can’t, but you really want to, then is it possible?”
Unfortunately, this approach to our lives is fraught with sad consequences. If the use of the current radiator threatens the tragedy of one person or family and is generally unnoticeable for the entire country... Then we have a lot of trouble when it was “impossible, but I wanted to conduct experiments on a nuclear reactor to produce plutonium.” In the end, this is not an oil radiator for you - this is Chernobyl. Well, it was impossible to fly to Smolensk, but I really wanted to. Another tragedy. And this list goes on... Unfortunately, “If you can’t, but really want to, then is it possible?” - this is our problem. Anatoly Messages: 1707 Registered: Apr 03, 2013, 01:23
Return to top
The oil heater is leaking, what should I do?
Question » 12 Apr 2013, 15:19
Well, Chernobyl is not Chernobyl, and it would be better not to start repairing an oil radiator that is leaking.
This is a dangerous idea in terms of consequences. An oil heater is not that expensive to risk your health and property, because in the event of a fire the consequences will be dire. And if the repair is done improperly, then a fire is very likely! Question Messages: 29 Registered: Mar 25, 2013, 8:19 pm
Return to top
The oil heater is leaking, what should I do?
Anatoly » April 12, 2013, 6:55 pm
The question was written by: ... and it would be better not to start repairing an oil radiator that is leaking. This is a dangerous idea in terms of consequences. An oil heater is not that expensive to risk your health and property, because in the event of a fire the consequences will be dire. And if the repair is done improperly, then a fire is very likely!
And I mean the same thing... Don't play with fate. For example, a cheap oil radiator DE LONGHI GS 770715 is always on sale. Its power is adjustable 0.7, 0.8, 0.7 + 0.8 = 1.5 kW, there is a thermostat. It is designed for heating rooms with a volume of 45 cubic meters and costs only 1948 rubles 70 kopecks. And we all know where good intentions lead!!! I support common sense, it was not me who said that “... but it would be better not to start repairing an oil radiator that is leaking.” Anatoly Messages: 1707 Registered: Apr 03, 2013, 01:23
Return to top
The oil heater is leaking, what should I do?
Sergey N » April 17, 2013, 15:46
YES, it is better for an unprepared person not to do or engage in such complex engineering things. But, from my own experience, I can say that today there is almost no normal equipment on sale; you have to bring everything to fruition yourself. For example, take clothes. Lately, no matter what I buy, I have to change the parts. If you take a lamp, you have to make holes for ventilation of the lamp yourself, otherwise it will burn out within a month. In short, they do everything raw!
The most economical gas heaters + reviews - https://www.optcentre.ru/topic/3185-otzy ... #entry4007
Sergey N
Messages: 2684 Registered: March 11, 2012, 23:18 From: Kazan
Return to top
Answer
Posts: 23 • Page 1 of 3 • 1 , ,
Return to Oil heaters (radiators)
Who's at the conference now?
Registered Users: Bing [Bot]
Switch to mobile style
DIY oil heater repair
But even in this case, it is necessary to devote a lot of time and attention to the junction of the housing and the heating element. Any gaskets and sealants will not last long, and the likelihood that you will return to repair work again is very high.
To repair a tank hole, it is better to use electric welding. To do this you will need an inverter for thin sheets. Before starting welding work, it is necessary to remove rust from the edges of the crack or hole. Repairing the tank in this way is the best option and increases your chances of success.
Methods for repairing cast iron radiators
There are several methods that allow batteries to last not only until the end of the heating season, but also for a couple of years. These include:
- If there is a leak at the junction of sections, it can be quickly eliminated using a bandage and epoxy glue. The material is impregnated with glue and wound around the leak. After it sets, you can paint this place to match the battery, but the main thing to remember is that such an “operation” is considered temporary, and it is better to buy and install a new section after the cold weather ends.
- If a fistula or crack is detected, a clamp will be required. You can buy it at a building materials store, or you can make it yourself from rubber or tin.
- Cold welding for cast iron batteries is the best way to quickly eliminate a defect. This is a special sealant that looks like children's plasticine. It must be thoroughly kneaded and applied to the damaged area. The product sets quickly, is resistant to temperature changes and is quite suitable for quick and temporary repair of a cast iron battery.
Knowing how to weld a cast iron battery using a welding machine with an inverter circuit, you can save the device from leaks for quite a long time.
Heating water supply boiler room
Heating installation
LLC DESIGN PRESTIGE > https://resant.ru/
Telephone: 8(495)744-67-74
We provide installation services for heating and water supply systems for private country houses, dachas, and organizations. We supply equipment for work at discounts.
Heating of houses > https://stroitelstvo.domov.resant.ru/otoplenie-domov.html
Heating installation > https://stroitelstvo.domov.resant.ru
Our services:
Heating: > https://resant.ru/otoplenie-doma.html
Installation, design, service repair. Heating by type: autonomous, water, private, wood, individual, gas, natural.
Water supply: > https://resant.ru/vodosnabzhenie-doma.html
> Autonomous water supply < from a well and a borehole. Installation of a water supply system for both permanent and temporary residence and use of the house. We provide maintenance of water supply systems: pump replacement, replacement, repair of hydraulic accumulator, setting up automatic pump control.
Reasons for heater failure
An oil heater stops working for various reasons, but all damage can be electrical or mechanical.
In the first case, electrical equipment fails, this can be a heating element and elements of the control unit, including thermal fuses, a thermal relay and a switch. In rare cases, malfunction occurs due to faulty electrical wiring.
Mechanical damage involves deformation of the housing, including the formation of cavities through which oil leakage may occur. This problem is the result of metal corrosion.
It is very easy to determine such a malfunction; in this case, an oil stain forms under the heating device.