With the onset of cold weather, there is a need to heat the premises. It is not always possible to provide central or autonomous heating to premises such as a garage, barn, paddock, or greenhouse. The reasons may be different: lack of funds due to the high cost of connecting such systems or lack of technical capabilities.
If you make a gas heater with your own hands, it will effectively heat utility rooms. Now on the market you can choose and buy many different models of gas heaters at different prices and with different characteristics. However, the price includes a steep seller's markup.
We will tell you how to assemble an almost free homemade product from available materials. Here you will find a detailed description of homemade devices and instructions on how to make them. To help do-it-yourselfers, we offer assembly guides and valuable advice.
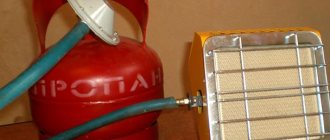
Gas heater for garage
If you want to choose a heater that uses cheap fuel, we recommend using gas. Such devices are also cheaper compared to infrared heaters, which will cost the buyer far from a small amount. For this reason, it is worth finding out better whether there is a gas connection near the garage. But taking into account the potential danger, it is first necessary to obtain the appropriate permits for connecting gas and installing heating equipment. After the necessary papers have been collected, you can contact specialists to properly supply gas to the garage box. Unfortunately, not every car enthusiast will be able to achieve the desired result, and not everyone has interchanges in a convenient location.
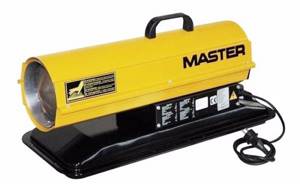
Prices for gas heaters for garages
As a solution to the problem of no permanent gas supply, you can use an alternative option in the form of a portable gas heater. To operate it, you will need liquefied gas, usually a propane-butane mixture is used for this.
Advantages of a gas heater for a garage
- Using gas equipment you can quickly heat a small room.
- The compact gas heater can be installed in any accessible point of the garage in compliance with safety standards.
- Gas-fired heating appliances are lightweight, can be easily moved and require little fuel.
- Gas heating can be obtained even when there is no electricity connected to the garage.
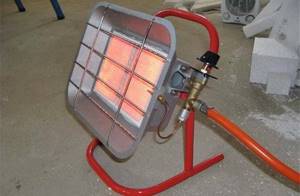
Types of gas heater designs
The most common type of gas heater is convector. Using a special air duct, air is supplied to the device from below, heated inside it and then released outside. The unit is covered with a protective casing, for which the maximum permissible heating does not exceed 60 degrees. This allows you not to worry about the possibility of getting burned.
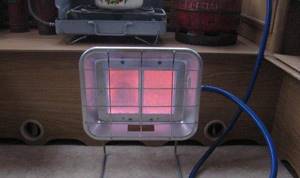
Another equally common, but more reliable and safe type of gas heater is ceramic. The design of the above heater, operating on gas fuel, assumes the presence of a closed combustion chamber. Together with combustion control sensors, it ensures proper safety. The system works as follows:
- If the flame begins to die out, this is detected by sensors.
- Having received a signal from the sensor, the system independently completely turns off the gas supply.
- The installation stops working.
As already mentioned, one of the advantages of a gas installation is its low cost.
Therefore, if you want to equip your garage with a good heater at a reasonable cost, you should pay attention to this heating option
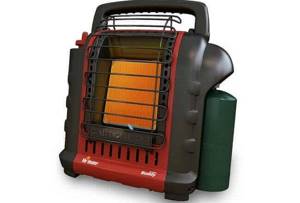
Portable propane fuel radiator Mr. Heater is capable of providing heat to a room of up to twenty square meters. One of the best models of its group.
Common types
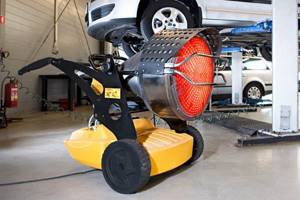
Forced air heating devices are widely used. Thermal energy in them is created due to the combustion of diesel fuel. This heat is used to heat the metal or ceramic element, and when the fan is turned on, warm air begins to circulate and warm up the room. They are best used in large rooms, without air flow and drafts. Such heaters are very effective and inexpensive.
Infrared diesel heaters. Infrared radiation is similar to solar radiation; it warms up objects and people first, and then the air. Infrared heaters using diesel fuel are also available.
An important advantage of this type of heating is the instant heating of objects located close to it. The devices are well suited for drafty rooms
Due to the fact that diesel fuel burns completely, such devices do not require smoke removal. They are often installed outdoors and in street cafes. The disadvantage of such heat sources is their inability to warm large rooms.
Diesel heating boilers operate on the same principle as turbocharged gas appliances. Their similarity is also in easy control using electronics in automatic mode.
Compact appliances – a kind of potbelly stove with a fan – are very popular on the market. They come in 2 types:
- with direct heating (without chimney);
- with indirect heating.
The operating principle of a potbelly stove with indirect heating is very simple. Liquid fuel enters the combustion chamber, where it is burned thanks to the air supplied by the fan. Passing the heat exchanger, warm air rushes into the room, heating it throughout the entire area. This heating device is very often used in garages. The design of heating devices allows you to: control the fuel consumed and regulate the temperature.
Homemade garage heater
The main condition for high-quality assembly of a heater with your own hands is to follow the sequence of work and safety measures. The most popular scheme is a flameless combustion heater, the operating principle of which is based on the fact that gasoline/alcohol vapors are oxidized with oxygen using a catalyst. Thanks to this operating principle, thermal energy is produced through a chemical reaction rather than as a result of fuel combustion. Therefore, the heater does not burn oxygen and maintains a healthy microclimate in the room. Work order:
- Select a fuel tank with a cap and a neck (you can use an old car fuel tank).
- Assemble the heating element. First you need to prepare a gasket of asbestos wool and impregnate it with a catalyst, then equip it with two iron mesh with a frame (heating element).
- Place the heating element into the burner. When installing, it is recommended to install a wire gasket between the installation location and the frame and wrap it with corded asbestos.
- Make a wick through which gasoline will be supplied to the burner using asbestos wool or cloth.
- Install the wick: place the lower part on the bottom of the tank, and place the upper part evenly under the mesh.
- Fill all free space in the tank with cotton wool.
- Equip a homemade heater with a metal lid. The lid must be placed on the burner and stop the operation of the device.
- Pour gasoline (100 ml) onto the grid of the heating element and set it on fire. When the fire goes out, vapors will begin to leak from the tank to the heated surface. The vapors will begin to oxidize, increasing the temperature in the room.
To make a heating element, it is recommended to use long-fiber asbestos: impregnate the material with a cobalt-chrome catalyst and leave for 1 hour. The catalyst can be made independently from manganese, cobalt, concentrated ammonia and ammonium dichromate. Cobalt chromate, which will settle on the asbestos during impregnation, must be dried at high temperature (+120°), then loosened and calcined for three hours at t° +400. After this, the mass must be placed evenly between the meshes. The main condition for operating such a heater is to protect the unit from water, oil or dirt.
Effective heating of a room can be achieved in another proven way - using a do-it-yourself electric garage heater. The heater can be assembled at almost no cost from old spare parts: a pump with pipes, an electric motor with a torque of 1,500 rpm, a radiator and a fan. Work order:
- Weld a frame from a metal corner.
- Attach the motor with starter, radiator and pump to the frame.
- Install 3 heating elements with a power of 1 kW or triple with a common shank in the lower tank. First you need to cut a hole in the radiator tank, solder the threaded ring to the edge, then install the heating element.
- Install the car's V-belt and adjust the tension by moving the pump towards the frame. Installing a car belt will ensure rotation of the electric motor to the pump.
- Additional equipment for the heater is to connect the electric motor through a sensor (DTKB or similar). The sensor will ensure that the desired temperature level is maintained in the room.
The peculiarity of the heater is that the heating element is placed in a liquid and when heated does not come into contact with air, therefore it does not burn out the air in the room. It is recommended to use car antifreeze or transformer oil in the heater. The advantage of a homemade device is that the car enthusiast will be able to regulate the temperature by changing the air flow that passes through the tank. To achieve the greatest efficiency of the heater, it is necessary to install an expansion tank and select the diameters of the pulleys so that the liquid is heated to 80°.
Heating with liquid fuel
Do-it-yourself budget heating of a garage can be done using liquid heating units, including homemade ones. In our reviews, we have already described exhaust furnaces that provide cheap, and in some cases, free heat. For example, if you are changing engine oil, then over the spring and summer you can collect several barrels of finished fuel. A properly assembled oil stove will generate a large amount of heat and will delight you with even combustion without soot and soot.
Pyrolysis-type furnaces consisting of several parts, as shown in the figure, give good results. A fire is lit in the oil container, as a result of which oil vapors and pyrolysis products begin to form. They are burned in a vertical pipe with holes, producing a large amount of heat. By regulating the access of oxygen, you can adjust the intensity of combustion.
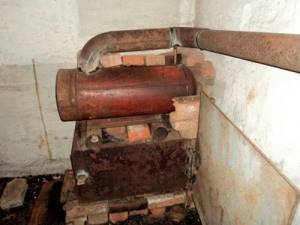
When using any stove, it is better to allocate a separate corner for it. You also need to think about a reliable foundation and lining the adjacent walls with non-combustible materials.
Using a stove with a plasma bowl to heat your garage, you can achieve maximum heat transfer and minimum fuel consumption. The oil here breaks down into its constituent parts in a hot bowl, after which it burns to form a bluish-white flame, similar to plasma. Of course, there is no trace of plasma here, since it is formed at much higher temperatures. These furnaces are characterized as the most productive.
Oil version
If you decide to make an oil heater strictly with your own hands, then be sure to arrange its reliable grounding. To fill it, use only high-quality transformer oil. The test version is only suitable for an empty concrete room.
To heat a large room, you need an apparatus with catalytic afterburning. It is very expensive.
Different craftsmen have their own way of answering this question. They created a do-it-yourself tent and camping heater with an afterburning function. True, this solution is not optimal for large rooms. But in hiking conditions it is optimal.
Variations of oil heating devices
Such an afterburner interacts with a camp stove. To create it, cans and car filters are used to make it easier to put in a tent. Then the operation of the device is based on gas fire.
A more advanced version of the afterburner has a mesh. This is a device made of steel. It has better efficiency and economy.
It is logical to combine these versions into one. It will work both from a burner and a candle.
Oil device diagram
If the device is rarely used, it can all be made from cans. You just need to put on a mesh cover.
Fiery
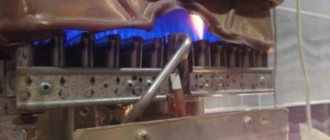
Powerful gas heaters for large rooms with catalytic afterburning are expensive, but record-breakingly economical and efficient. It is impossible to reproduce them under amateur conditions: you need a micro-perforated ceramic plate with platinum coating in the pores and a special burner made of parts made with precision precision. At retail, one or the other will cost more than a new heater with a warranty.

Gas mini camping heaters
Tourists, hunters and fishermen have long come up with low-power afterburner heaters in the form of an attachment to a camp stove. These are also produced on an industrial scale, pos. 1 in Fig. Their efficiency is not so great, but it’s enough to heat the tent until lights out in sleeping bags. The design of the afterburner is quite complex (item 2), which is why factory tent heaters are not cheap. Fans also make a lot of these, from cans or, for example. from automobile oil filters. In this case, the heater can operate both from a gas flame and from a candle, see video:
Video: Portable oil filter heaters
With the advent of heat-resistant and heat-resistant steels in widespread use, lovers of being outdoors are increasingly giving preference to gas camping heaters with afterburning on a grid, pos. 3 and 4 - they are more economical and heat better. And again, amateur creativity combined both options into a combined type mini-heater, pos. 5., capable of working from both a gas burner and a candle.

Drawing of a mini-heater made from scrap materials for a summer residence
A drawing of a homemade mini-heater with afterburning is shown in Fig. on right. If it is used occasionally or temporarily, it can be made entirely from tin cans. For an enlarged version for the garden, cans of tomato paste, etc. will be used. Replacing the perforated mesh cover significantly reduces warm-up time and fuel consumption. A larger and very durable version can be assembled from car wheels, see next. video clip. This is already considered a stove, because... You can cook on it.
Homemade heat gun
Another option for equipment that you can assemble yourself is an electric heater similar to a heat gun.
To make a home heat gun you will need:
- metal cylindrical container (bucket, cut cylinder),
- heating element - a spiral from an electric stove,
- metal grate,
- fan,
- conductive wires,
- switch.
The heat gun is assembled as follows:
- Using a grinder, the bottom part of the structure of the prepared cylindrical container is cut off. This results in a through workpiece.
- The grid is cut to the diameter of the container. The spiral is fixed on the grid so that the diameter of the installation is smaller than the diameter of the container.
- Horizontal rectangular holes are made on the sides of the container to insert a grid with a fixed spiral. Thus, the spiral is positioned 3 cm from the edge of the container.
- From the spiral, conductive wires are led out of the walls of the container through special insulators. A circuit breaker with additional insulation is fixed on the outside of the container wall.
- A fan is installed on the opposite side of the grille, which is securely fixed to the walls with self-tapping screws. The device is connected to the machine.
- Holes are made along the edges of the body for mounting supports secured with nuts. The finished structure should be as stable as possible.
- Test run of the finished heater. First, the fan turns on, then power is supplied to the coil.
Constructing a home electric heater with your own hands from improvised materials, the cost of which is low, is not particularly difficult, so even a novice master can cope with such a task.
The article will look at an example of how you can make the simplest heater using available materials. Of course, this is just a sample showing the principle of operation of the device, the process of its assembly, and so on. But based on the described scheme, you can assemble a more powerful option, with which you can heat a garage or house without any problems.
The device operates directly from a 220 Volt network, no power supplies are required.
Materials and tools for creating a heater: - two pieces of glass (you can cut out any necessary ones); - some aluminum foil; - an ordinary candle; - sealant, glue, etc.; - a cotton swab or any other similar item; - a piece of wire with a plug ( two wires); - it is advisable to have a multimeter; - a soldering iron.
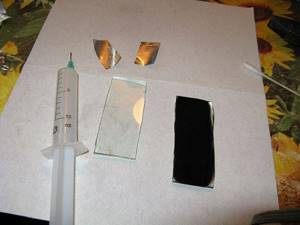
Heater manufacturing process:
Step one. We create an analogue of thermal film
First, the glass must be thoroughly washed and cleaned; there should be no traces of dirt or grease on it. Next, take an ordinary candle, light it, and use it to thoroughly smoke one half of the glass. In total, the author moved the glass back about 4 times so that it was well smoked. You also need to take at least three pauses before “smoking”. That is, smoke the glass the first time, then the second time and again the third time. The more smoked the glass is, the more the heater will heat up.
Step two
Assembling the structure Now you need to take a cotton swab and carefully collect excess pieces of soot on the glass. In total, you need to clean a distance of about 0.5 cm along the edge
Next, you need to take the foil and cut out two electrodes from it; their width should be the same as the width of the remaining soot on the glass.
Now you can assemble the device. Electrodes are placed on the soot, and glue is applied along the edges of the glass.
Now you need to carefully press the halves together and let the glue dry. That's all, the heater is ready
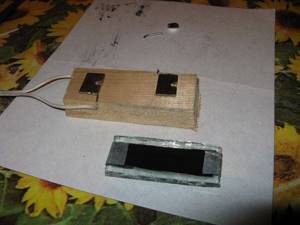
Step three. Heater tests
When the heater was turned on, it began to heat up very slowly, and at the 40th minute its temperature reached 37 C degrees. The temperature did not rise higher, apparently this is the turning point at which a balance was reached between heating and heat transfer. As a result, the device works normally and a larger sample can be collected. By the way, the pattern of soot can be varied; it does not necessarily have to be a stripe. Thus, you can make any picture that will warm you up just as well. In any case, this is just a sample and there are still many ways to improve the system.
Step-by-step assembly diagrams
Enough time is devoted to choosing an economical and effective option so that you don’t have to be disappointed later. Assembling an electric heater with your own hands is not so difficult that a novice master cannot handle it. The assembly principle of almost all designs is similar, therefore, having mastered the manufacture of one device, it is easy to switch to another.
Oil battery
Oil heaters are very popular. Their operating principle is very simple: the oil located inside the pipes is heated by a heating element inserted inside. This device is very easy to manufacture and has good efficiency and safety indicators.
Making your own oil heater is not difficult, you just need to follow the instructions
They do it like this:
- Take a heating element (power - 1 kW) and an electrical cord with a plug for the socket. Some craftsmen install a thermal relay for automatic control. It is also purchased in the store.
- The building is being prepared. An old water heating battery or car radiator will do for this. You can weld the body of the device from pipes yourself if you have welding skills.
- Two holes are made in the housing: at the bottom - for inserting the heating element, at the top - for filling oil and replacing it.
- Insert the heating element into the lower part of the housing and seal the mounting location well.
- Fill in oil at the rate of 85% of the internal volume of the housing.
- They connect control and automation devices and insulate electrical connections well.
DIY infrared heater;
Mini garage heater
Sometimes a very compact heater is required for certain purposes. In such situations, a mini fan heater made from an ordinary tin can can help out.
To make it, take the following steps:
- Prepare a large tin can of coffee or other products, a computer fan, a 12 W transformer, nichrome wire with a cross section of 1 mm, and a diode rectifier.
- A frame is cut out of PCB according to the diameter of the can and two small holes are made in it to tension the incandescent coil.
- Insert the ends of the nichrome spiral into the holes and solder them to the stripped electrical wiring. For variability of modes and reliability, several spirals are connected in parallel and a power regulator is installed.
- Assemble the electrical equipment of the heater. All connections are well soldered and insulated.
- Mount the fan inside the can with bolts and a bracket.
- The electrical wires are secured well so that they do not overheat and do not fall into the cavities of the fan when the heater is moved.
- To allow air access, about 30 holes are drilled in the bottom of the jar.
- For safety, a metal grill or cover with holes is put on the front.
- For stability, a special stand is made from thick wire.
- Plug in and check the device.
Infrared heating panel
Recently, infrared ceramic heaters have become increasingly popular. Making such a device with your own hands is much more difficult if you do not buy ready-made thermal panels, but it is quite possible.
You can make a similar modern infrared heater at home
To do this, do the following:
- Prepare materials: fine graphite powder, epoxy glue, 2 metal-plastic or ceramic plates of 1 m² each, 2 copper terminals, wooden blanks for the frame, electrical wires and a switch, maybe a power regulator for a more complex option.
- Draw a mirror arrangement of spirals on both plates on the inside. The distance from the edge is about 20 mm, between the turns and terminals - at least 10 mm.
- Graphite is mixed with epoxy resin 1 to 2.
- Place the slabs with the diagram on the table, smooth side down.
- Apply a thin layer of a mixture of graphite and glue according to the scheme.
- One of the sheets is placed on top of the second sheet, with the smooth side facing you. They press them tightly to each other.
- Insert the terminals at the pre-designated terminal locations.
- Let it dry.
- Connect the electrical wires and check operation.
- Make a wooden frame for stability.
- The device is equipped with a thermostat.
DIY homemade heater;
General recommendations for creating devices
In an effort to save on expenses, many owners, when choosing among heater options, are in no hurry to purchase ready-made factory models.
After all, if you have the desire and the appropriate skills, you can always construct a heating device on your own.
When choosing a DIY garage heater, many are guided by two parameters:
- The heating device should be easy to activate, quickly warming up the room.
- The device must have a simple design, devoid of complex parts and elements.
- Operation of the device must be carried out with minimal financial costs.
All these requirements are met by three options for the homemade heaters described below, which operate from different energy sources: gas, solid fuel and electricity.
The safety of the device is also important. Therefore, regardless of the heating method in the garage, it is necessary to equip a ventilation system
After all, a decrease in the amount of oxygen and the accumulation of combustion products poses a risk to human life.
Which heater is best for home
For your home, it is best to choose appliances that dry out the air the least. This problem has been known for a long time: old open-type electric convectors burn out oxygen. Gas appliances also reduce humidity to 0% and their installation requires a constant flow of fresh air into the house.
What to consider when choosing a heater
Therefore, it is better to use electric infrared heaters for a house, apartment, or residential outbuilding.

Electric infrared heater
Let's just list some of them:
- Infrared ceiling lamps are the most modern and economical heating method (1 panel per 8 m2, power consumption from 400 W/h).
- Oil radiators (expensive technology, but effective, the advantage is low cost).
- Electric convector. A modern convector does not dry the air. But only modern. It will quickly heat any room, has low energy consumption, but is expensive. To equip the whole house with these, you will have to spend a lot of money.
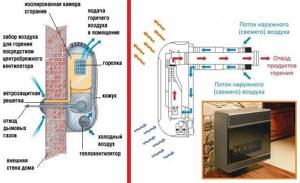
Gas heaters
Natural gas can become the basis for:
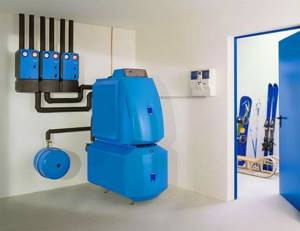
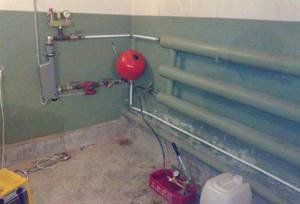
- a complete heating system with a gas boiler that heats water that circulates in the pipes;
- heating using a heat gun, in which gas burns in a special burner, and heat is distributed using a fan;
- using a catalytic or infrared gas heater, where the gas burns in a ceramic honeycomb and the heat is distributed throughout the room.
The first option requires a connection to the main gas pipeline, which is carried out by gas service employees only after signing a number of documents and paying the cost of the connection.
This option for using gas is the most difficult: it takes time to prepare documents, design and install a heating system, purchase and install a boiler. The costs will only pay off with constant heating of a large capital garage.
The second and third options are easier to use and do not require special permissions. To implement them, you can use liquefied gas from cylinders.
According to fire safety standards, the gas cylinder must be located in a closed metal box, away from the heating element.
Of course, when using this type of heating you will have to spend money on special equipment, but the small cost of fuel will pay off these costs over time. The main disadvantage of using a gas heat gun and gas burners is that combustion products remain in the room and it must be frequently ventilated.
Making a tabletop fan heater
This type of device is a heater and fan rolled into one. If desired, a homemade fan heater can be used as an improvised air conditioner.
This type of heater is convenient because it allows you to regulate the heating temperature and the rotation speed of the cooler.
Selection of required materials
To create a fan heater you will need the following materials:
- rheostat;
- switch;
- power connector;
- electrical wire;
- LED Strip Light;
- 12 Volt computer cooler;
- three-amp 12-volt power supply;
To fix the heating element, you will also need two ten-centimeter rods of copper wiring with a cross-section of 1.5 sq. mm.
The tools you need to prepare are:
- jigsaw;
- hammer drill or drill;
- soldering iron;
- hole saw;
- glue for woodworking;
- “moment” or superglue;
To clean wooden workpieces, removing burrs along the edges, you will also need fine-grained sandpaper.
Assembly of body parts
The future heater will have the shape of a cube. The body of the device is assembled from wooden boards 9 mm thick.
- two square blanks measuring 12*12 cm;
- 3 parts measuring 10.2*10.2 cm;
- two rectangular blanks 12*10.2 cm;
- four small rectangles measuring 1*1.5 cm.
To make the legs of the structure, 2 pieces, each 3 cm long, are sawn off from a wooden stick D12 mm.
To simplify your task, make paper patterns, the dimensions of which correspond to the dimensions of the blanks 12x12 cm. Marking the location of the holes is applied directly to the patterns. They are applied to each side and drilled through.
In a workpiece 10.2*10.2 cm, maintaining a distance of 2.5 cm from the edge, make a hole D7 mm. On the second similar workpiece, two similar holes are made, maintaining a distance of 2.5 cm between them. On the third workpiece, 10.2 * 10.2 cm, a through hole of D9 cm is made in the center.
In each of the four rectangular blanks measuring 1 * 1.5 mm, holes D5 mm are made.
On the long side of a rectangle measuring 12*10.2 cm, moving 1.2 cm from the edge, make two holes D12 mm, maintaining a distance of 7 cm between them.
A square blank with a 9 cm drilled hole is installed inside the body. After this, the last rectangular part is attached, closing the body of the structure. At the final stage, the legs are glued.
Installation of heating elements
A spring stretched between two copper rods will act as a heating element. To determine whether the spring is suitable, you need to connect it to a 12-volt power source and take measurements using a multimeter.
So, to create a warm flow, it is enough if the multimeter readings are 2.5 A. With such parameters, about 30 V of heat will be generated with a power supply of 12 W.
The selected spring is soldered to copper rods, the ends of which are fixed to blanks measuring 1x1.5 cm. The assembled structure is glued to the corners of the body. The bare “tails” of the electrical cable are soldered to the ends of the rods. After this, a bar equipped with holes is attached.
Having fixed the cooler inside the case, the same manipulations are performed with the rheostat, switch and power connector.
If all structural elements are connected correctly, then when the rheostat is turned on, a blue light will light up on the LED strip. When the switch is turned on, the LED strip will acquire a red tint, which will create a violet color against the background of the main blue. After this, the heater spring will begin to heat up.
The assembled structure from the outside can only be sanded and treated with wood wax, or varnished in 2-3 layers.
Thanks to its presentable appearance, such a heater can be safely used not only for heating a garage, but also when arranging living rooms.
Alternative options for economical garage heating are described in this article.
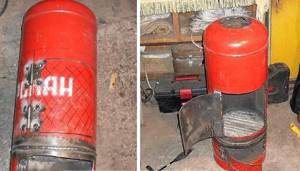
Potbelly stove from a used cylinder
Potbelly stoves, which were popular a hundred years ago, still hold their ground today, serving as the main source of heat in garages and utility rooms. And their main advantage is that they can work not only on wood, but also on anything that burns.
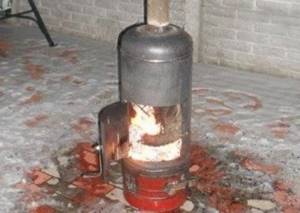
Potbelly stoves are made from gas cylinders containing propane until empty, with a volume of 40-50 liters, sections of steel pipes and thick-walled barrels with a small volume
The minimum thickness of the walls of such structures should be 2-3 mm, but still the optimal option is 5 cm, thanks to which it will be possible to use any type of fuel. If we compare horizontal and vertical models, the former win in terms of ease of loading logs.
Vertical design
The simplest option for making a potbelly stove involves using a gas cylinder: the body of the heating structure is already ready, all that remains is to equip the compartments for storing fuel and the ash pan. The height of the cylinder is about 850 mm, the diameter in circumference is 300 mm, and sufficient wall thickness allows the use of any type of fuel.
To build a vertically installed structure, the cylinder is divided into two parts unequal in volume:
- upper – occupies 2/3 of the structure and serves as a receiving chamber for laying firewood;
- the lower one - occupies 1/3 of the structure and serves to collect ash.
To make a potbelly stove, holes are cut in the wall of the cylinder to suit the size of each of the two sections for the arrangement of doors. The doors themselves can be constructed from a cut-out piece of a balloon wall or cut from sheet metal.
Grate bars are installed at the border between the upper and lower compartments. But since it is difficult to find a ready-made cast iron grate of a suitable size, thick rods are used to make it.
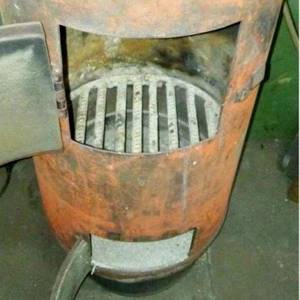
The basis for the manufacture of grates is steel reinforcement 12-16 mm thick, the cut rods of which are placed at a distance of 2 cm from each other
A hole for the chimney with a diameter of at least 150 mm is cut out in the upper part of the cylinder. This element can be welded from a piece of sheet metal. The main thing is that the diameter of the resulting pipe matches the size of the chimney in order to simplify the joining process.
The doors are equipped with locks and attached to the body by welding. If desired, the loops can be made from several links of a thick steel chain.
Since the potbelly stove is not initially a sealed heating structure, there is no need to use seals
To close the gap formed around the perimeter of the doors, it is better to weld a small side - a strip of metal 1.5-2 cm wide - on the outside along the perimeter of the workpieces. All that remains is to connect the finished structure to the chimney and carry out tests.
Model with horizontal body
When the housing is positioned horizontally, the ash collection compartment is welded to the bottom of the structure. The main compartment is designed for loading fuel and unloading burnt coals. It is equipped with a chimney pipe with a diameter of 10 cm.

It is possible to construct a compartment for collecting ash from a suitable size channel or weld it to specified dimensions from a piece of sheet steel
A hole is made in the side wall of the housing to install the combustion door. Its size should not exceed the diameter of the chimney pipe. The door itself is equipped with a latch and installed on hinges.
Holes are made in the wall of the housing, which will be directed downwards. They will perform the function of a grate.
To improve the heat transfer of a hot potbelly stove, the chimney can be made in the form of an elongated broken structure. The main thing when arranging such a chimney is to avoid horizontal sections. To improve room heating, some craftsmen build casings made of sheet metal around the cylinders.
But do not forget that a potbelly stove carries potential danger. Therefore, the room where it will be installed should be periodically ventilated.
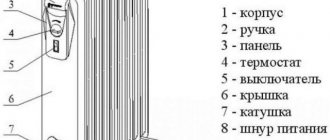
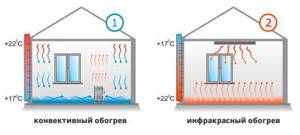
Convector – efficiency and quality
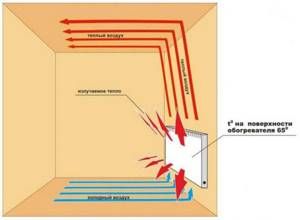
Fast and efficient garage heating with household convectors is the choice of most car owners. The convector has many more advantages than disadvantages:
- the colder the air entering the convector from below, the higher the heat output of the heater;
- it is possible to install both electric and gas convectors;
- the heater body does not heat up, the temperature does not exceed 65 degrees;
- full guarantee of fire safety;
- uniform heating of the entire garage;
- automation allows you to maintain the desired temperature and saves energy consumption;
- The heater is easy to install in any convenient place in the garage.
The only disadvantage of such a convector is that it will have to be cleaned often, since there is always a lot of dust in the garage.
Important. When installing a gas convector, it is imperative to equip the room with high-quality ventilation
Classification by heating element type:
- needle type heating element - cannot be used in rooms with high humidity, since the heating element is practically not protected from water, dust and dirt;
- tubular heating element is waterproof and has protection against overheating. A budget solution for a small garage, but it takes a long time to heat up;
- monolithic heating element type - there are no welds in the body of this heating element, so the heating element is reliably protected from water and shock. It quickly warms up the garage and can be set to automatically adjust the desired temperature.
How to roughly calculate energy costs when choosing a convector for a garage? For an insulated garage of 10 square meters you need a 1 kW convector, this is quite enough.
Options for thermostats in convectors:
- mechanical regulator - it is impossible to accurately set the temperature control; it is not recommended to choose such convectors for the garage;
- electronic regulator - has a timer and temperature sensor, economical and safe;
- programmable adjustment - from two to four temperature programs, it is possible to set individual parameters. The best choice, but the price is higher than the electronic regulator.
If you combine an IR heater above the hood and a programmable convector, then the garage will always have a comfortable temperature for both the owner and the car.
Basic requirements for a homemade heater
Any type of heating equipment for the home, regardless of design features and manufacturing complexity, must meet the basic requirements:
- Simplicity and accessibility in assembly.
- Safety and reliability in operation.
- Efficiency in energy consumption.
- High productivity and working power.
- Affordable cost of structural elements and materials.
- Ergonomics and ease of transportation.
- Durability and practicality.
Among the existing heaters, the most efficient and productive are: infrared, quartz and ceramic emitters, and electric convector.