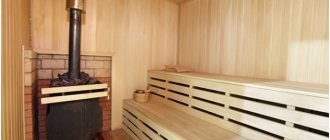
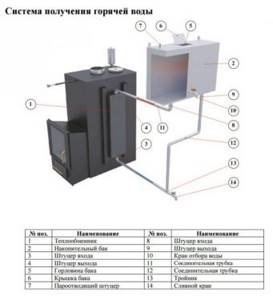
It is always a pleasure to visit a well-designed sauna, which contains a high-quality heater capable of producing light steam. The water supply and heating system also plays a big role for the steam room, so you should always take time to design the heat exchanger.
Warm water for the steam room can be heated in two ways: using an electric boiler or using a heat exchanger, which is located in the bathhouse and takes thermal energy from fuel combustion.
The first option of a heat exchanger for a sauna stove is not always rational to arrange, since it requires a large amount of electrical energy.

At the location of the warm water tank
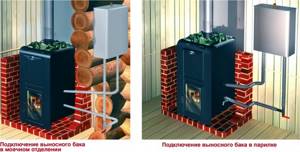
Depending on where the container with water is located, the following types of heaters are distinguished:
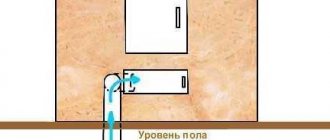
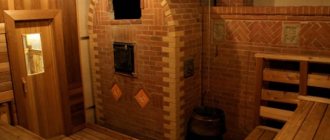
- The container directly in the steam room allows the water to heat up faster, since there is no or very short water supply. Heat loss is also reduced. The disadvantage is quite obvious: the usable area of the steam room is reduced.
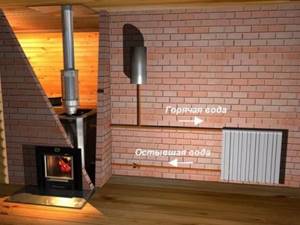
- The container is located in the adjacent room where the shower is equipped. This option is often recommended. It is more convenient to wash in a separate shower and there is more space in the steam room. But the length of the water pipeline is increasing.
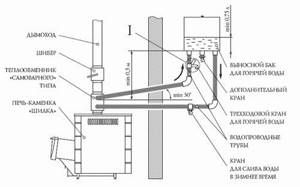
- The problem of low pressure can be solved by installing a coolant tank in the attic. This method is also not without its drawbacks. It is necessary to bring cold water upstairs, and the length of the hot water supply is longer. The container must be carefully insulated to minimize heat loss.
Tips for setting up the system
At their core, such designs are the progenitors of modern solid fuel boilers. But unlike them, heat transfer is carried out not only through piping and a radiator system, but also from the stove itself.
Plus, installing brick stoves with water heating yourself is much easier and cheaper than installing a solid fuel boiler.
A few words about the register
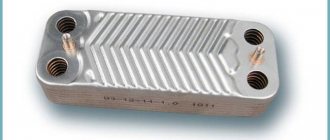
Without exaggeration, the metal register can be considered the heart of the entire heating system. This design is installed directly in the firebox itself and is responsible for the heating level of the coolant.
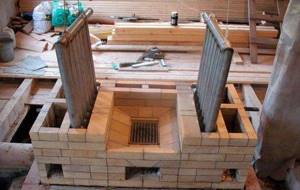
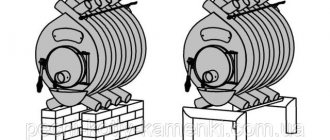
Lateral arrangement of registers.
The simplest and most affordable option is to install a rectangular metal tank directly into the firebox. Such a tank is made of heat-resistant steel, with a thickness of 3 mm or more, most often from stainless steel.
To heat a house of 200 m², a tank 750 mm long, 500 mm wide and 300 mm high is sufficient. The outlet is made from the top of the structure, the return line cuts into the bottom of the tank.
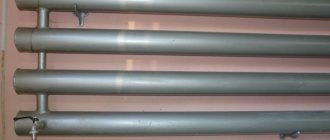
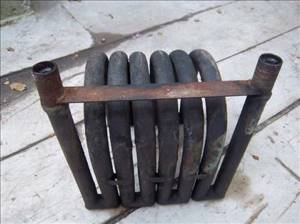
Registers welded from stainless steel pipes with a wall thickness of at least 3 mm are considered more functional. In this case, the heating area increases several times, hence the efficiency of the system is disproportionately higher.
Advice: it is not difficult to find cast iron registers on the market now; according to most experts, they are the best option. Firstly, cast iron is little susceptible to corrosion, practically does not burn out, and most importantly, this material is considered the best heat accumulator.
Stainless steel registers.
During installation, pay attention to the location of the register. The more contact with fire, the higher the productivity
But at the same time, regardless of the configuration of the tank, there must be a compensation gap of at least 5 mm between it and the walls of the furnace. Otherwise, during heating, the metal will begin to expand and the walls of the firebox will crack.
Diaphragm tank
Installing a register into the firebox is only part of the story; it is equally important to properly arrange the piping. Any heating system built on this principle must be equipped with an expansion or membrane tank
As a rule, it is installed on the return pipe, but this is not important; some craftsmen prefer to mount it at the highest point of the system.
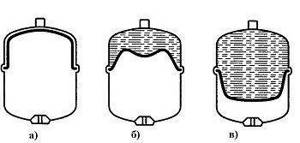
Operating principle of a membrane tank.
In a system with natural coolant circulation, its function is performed by an ordinary metal container. But now, in most cases, owners prefer to install circulation pumps. It is advisable to install a real membrane tank in such a system.
The device is a sealed metal container, in the upper part of which there is a valve. Air is forced through the valve, creating excess pressure in the system. As the temperature rises, the coolant expands proportionally, squeezing the excess into the membrane tank. During the cooling process, the air that presses on the membrane compensates for the pressure drop in the system.
Some aspects of laying a furnace
As mentioned earlier, you can build water-heated brick stoves with your own hands, but if you are not confident in your abilities, it is still better to invite a specialist.
Although in any case, there are general rules that it is not advisable to break.
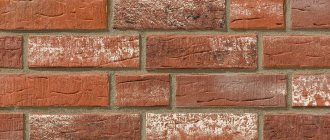
- All brick ovens are made of solid red brick. It is not advisable to use hollow brick even for cladding. The fact is that hollow blocks are a heat insulator, and in this case this can only do harm.
- If you plan to burn with wood, then the firebox can be made of ordinary baked brick. But if there is a possibility of using coke or high-grade coal, such as anthracite, then we would advise making the firebox from special fireclay bricks, which are used in the construction of blast furnaces.
- There is no need to save on wall thickness; in addition to the weight of the oven itself, the load from the registers will also be added here.
- And yet, any stone structure needs a reliable foundation; as for stoves, the foundation should be laid separately and in no case should it come into contact with the general foundation of the house, the minimum distance between them should be 50 - 100 mm.
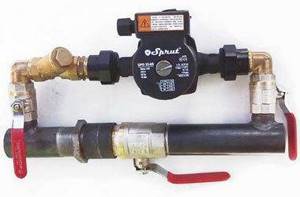
Circulation pump in the system.
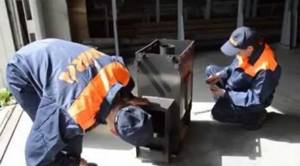
The video shows some of the intricacies of installing the system.
In this case, we were talking about heating a house. But it is worth noting that if a metal water container is inserted into the system in parallel, it will act as a passive boiler, as a result of which hot water will still appear in the house for domestic needs.
According to the location of the heat exchanger
Depending on the location of the heater itself, there are:
- The heater is part of the oven itself. Repairing such a heat exchanger is very difficult. You will have to dismantle part of the furnace. Keep in mind that scale will gradually reduce the efficiency to virtually zero (1 mm of scale reduces efficiency by 10%).
- The heat exchanger for the stove in the bathhouse is located next to the chimney. In this case, the coolant will heat up more slowly. But it won’t boil (the gases in the chimney won’t heat it up that much), and the problem with scale will disappear. Access to such a device is much easier.
Calculation of heat exchanger area
A stove for a bath with a heat exchanger for heating should produce 5 kW of heat with a standard area for an ordinary family. When independently calculating the dimensions of the system elements, we proceed from the fact that 1 m2 of heat exchanger area gives about 9 kW.
It is recommended to make dimensions with a large margin, since the efficiency of the system is affected by the location and shape of the boiler, and the quality of the fuel.
When designing a system for obtaining hot water (with a remote tank), it should be taken into account that the tank itself will additionally heat the room.
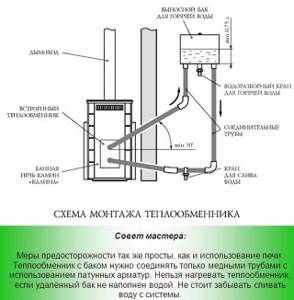
The connection diagram for the heat exchanger in the bath is simple for factory-made stoves in the corresponding models. However, for people with welding skills, it is quite possible to assemble the system on their own for a brick oven. For a system with natural circulation, you will need pipes, fittings, fittings (2 taps), and a water tank.
Metal sheets are needed if the water tank or heat exchanger is to be welded independently (in the shape of a cube or parallelepiped).
How to choose?
The choice of a particular heater depends on the initial conditions and the tasks assigned to it. It will heat the liquid inside the oven much faster, but it may boil. Scale forms, which quickly damages the device. Correct calculation of the required power avoids this problem.
Located near the stove chimney, the external heater takes up more space and heats the liquid much more slowly. But there is always access to it. In case of breakdown, it is easy to repair or replace. The coolant rarely boils, it simply does not reach such a high temperature, so scale does not form. The choice is up to the owner.
Expert opinion
Pavel Kruglov
Stove maker with 25 years of experience
You can purchase a factory model, which will cost from 10,000 rubles, depending on the power. The cost of a high-quality brick stove with a heat exchanger starts from 20,000 rubles, but practice shows that it will not be so effective.
There is nothing tricky about the design of the device; how justified such a purchase is is a big question. Everything can be installed by hand.
What it is
The device is used to heat water in the bath. Its operating principle is based on the physical properties of hot water, expanding and rising upward, while cold water remains below.
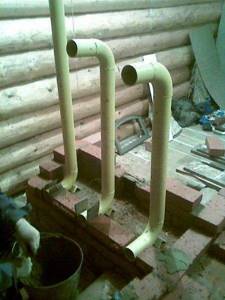
Typically the heat exchanger is small in size, so the liquid in it heats up quickly. Two pipes are connected to it - below and above. Thus, hot water through the upper pipe, replaced by cold water from below, rises into the tank, which can be located either in the steam room or in an adjacent room, usually in the sink. In this case, low-temperature water is constantly added to the heating device through the lower pipe without forced supply.
Options for heating water in a bath from a stove
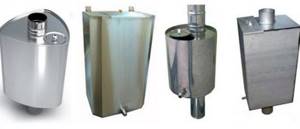
The following models are distinguished:
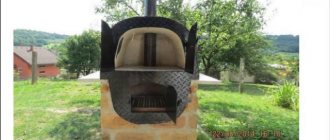
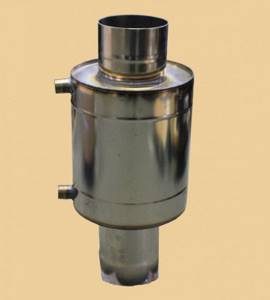
1. Samovar-type container - installed on the outlet pipe of the chimney. Heating occurs due to the heat of the flue gases escaping into the chimney. A tap for dispensing hot water is connected to the fitting at the bottom of the tank. If you don’t have a washing machine, then this option will be an excellent solution for heating
We recommend paying attention to the following operating conditions:
- the use of a samovar-type tank is allowed only with bathhouse stoves;
- It is prohibited to operate an empty tank while the stove is operating;
- If you want to get a “Finnish sauna”, this option for heating water will not suit you, since if the steam room is heated for a long time, the liquid will begin to boil, which is why heavy steam is formed.
2. A samovar-type heat exchanger (small in size with the ability to connect to a tank), which can be located anywhere. It is convenient because, if available, the tank can be placed in the washing room. One of the obvious advantages over other options is that it quickly heats the water.
3. Heat exchanger, which is installed on the starting chimney.
4. Starting chimney + tank-backpack - an option with being in a steam room and the absence of controlled convection to warm up the room. The container comes into contact with the wall of the chimney pipe, due to which the liquid is heated. Among the disadvantages, it can also be noted that this model does not have protection from hard infrared radiation, and in case of strong heating, the water begins to boil.
5. Convector chimney with a heater built into it.
Features: the register is located inside a pipe from which 2 identical ¾-inch fittings with internal thread come out. Using pipes, the device is connected to a tank hanging in a convenient place.
May be:
- Built into the oven - when scale appears, it loses efficiency.
- Located near the chimney (on it) - it provides heating to the required temperature more slowly, but nothing settles on its inner surface, it is easy to access, and its repair is not difficult.
The choice depends on the user: what to give preference to, performance or ease of maintenance, saving usable space or fuel.
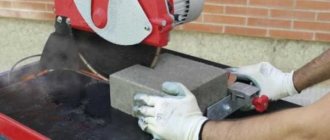
How to make a heat exchanger yourself?
It is not advisable to buy expensive stainless steel products for use in a bathhouse. You can easily make a heat exchanger for a sauna stove yourself. How to make a heat exchanger for a sauna stove with your own hands? Step-by-step instructions will be below.
Materials and tools
What materials are of primary importance for the heat exchanger of a sauna stove? Depends on how much water needs to be heated. Here is a sample list of what you will need:
- metal sheet, thickness 2-3 mm - S=2*(0.40*0.80+0.40*0.20)+0.80*0.20 = 2*(0.32+0.08) +0.16 = 0.96 m2
- tap Ø32 mm – 2 pcs.
- check valve Ø32 mm - 1 pc.
- fittings Ø32 mm—6 sets.
- pipes Ø32 mm - 6 pcs.
- valve Ø32 mm (for drainage) - 1 pc.
- metal pipe, corrugated Ø32 mm - 3 m.
- pipe Ø32 mm (cold water supply) - as needed.
- sealing cord for sealing connections - 1 pack.
- electrodes - 1 pack.
What tool is used? Here is the list:
- welding inverter;
- "Bulgarian"
- other tools.
Size calculation
The power of the heater must correspond to the power of the furnace itself. It is recommended to make a heat exchanger based on the following:
- The heat exchanger should not consume more than 10% of the power of the furnace itself. In this case, the power of the stove will be enough to heat the room. Fuel will be used as efficiently as possible. The heating time will not increase.
- The total length of the pipes should not exceed 3 meters. It is necessary to make the necessary slope, which is 2500 on the direct feed, and on the return one - more than 300 towards the stove. This way the coolant will be effectively supplied by gravity. Otherwise, you cannot do without a pump.
- There should be enough water. It should heat up for no more than two hours, but not boil. If you make the tank too small, the coolant will boil very quickly. If the boiler is located directly in the steam room, it will be very difficult to wash there. Heavy steam will fill the room and it will become impossible to breathe normally. If the volume of the metal tank is too large, the coolant may not heat up at all.
- Don't forget that when the stove burns out, the water should still remain hot for some time. Therefore, you need to provide the necessary power reserve.
Considering all of the above, let's try to choose the optimal metal heat exchanger. We assume that to warm up the air in the bathhouse you need 5 kW. Then the power of the metal heat exchanger will be 10 kW, and its area will be 1 m2. We will assign 3 kW to possible heat loss. Then installing 1 m2 of heat exchanger will give us 7 kW of energy. Water heating time is 2 hours. Then we determine the required heat exchanger area using the formula: S = 1/7*W, where
W = 0.00117*V*(tk-tн) /T= 0.00117*65*(70-10) /2= 2.3 kW, hence S = 1/7*W=1/7*2.3 = 0.33 m2, where S is the required heat exchanger area, m2;
- W is the required power of the heat exchanger, kW (it is important to determine it correctly);
- V is the volume of water that needs to be heated, we take 65 liters (enough for 4 people);
- tk – required water temperature, take 700C (optimal hot water temperature);
- tn – initial water temperature, take 100C. The required furnace power is 5+2.3 = 7 kW. 0.3 kW can be ignored, since 10% of the initial power of the furnace is an acceptable loss (0.3 kW < 0.5 kW).
Manufacturing instructions
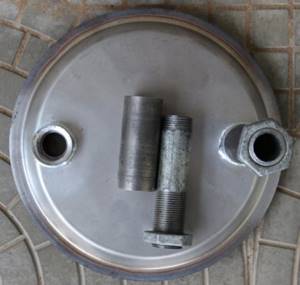
- Let's make 2 water tanks correctly: one is best made in the shape of a cylinder (for the heat exchanger), the second is rectangular (remote). We calculate the sizes individually; it is better to proceed from the calculation above and your own needs.
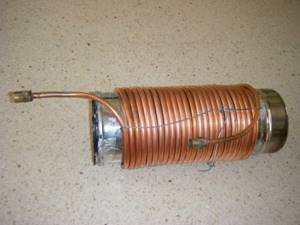
Design options - We make a coil and install it in the tank.
Coil design example 1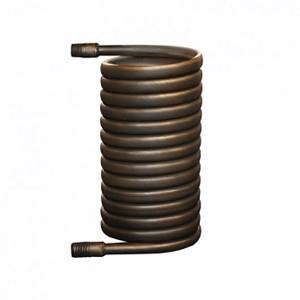
Example 2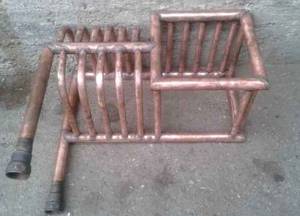
Example 3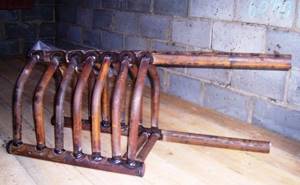
Example 4 - Fill with water and test for 6 hours. All seams must be sealed, there should be no stains or leaks. Keeping water in the tank at sub-zero temperatures is prohibited.
- We weld 2 pipes for forward and reverse (bottom) supply to organize circulation.
Difference by type
There are several types of heat exchangers for equipping sauna stoves. They are distributed:
- by design;
- by location.
Depending on the design features, there are:
- coil. which is a fairly simple option. Both ends of the heat exchanger are removed from the tank to take in cold water and release heated water;
- connection of two metal containers. cylinder and parallelepiped. When heated, water from such a heat exchanger flows through pipes to its destination.
The second version of the heater is considered the most common, because with its help not only the water becomes hot, but also all the rooms of the bathhouse are heated. This saves fuel and, accordingly, money.
The location also determines two types of heat exchangers:
- mounted that is, located on the chimney;
- built into the furnace design.
A wall-mounted device receives the necessary heat not from the stove itself, but from the chimney by heating the emitted gases. Due to the significant capacity of the box, the liquid quickly heats up in the tank and remains hot throughout the entire heating time of the bath. As a drawback, it is worth noting the massive appearance of the device. Sometimes, when installing a chimney, a heat exchanger of the so-called samovar type is first installed. and then the chimney pipe.
It is imperative to ensure that the heat exchanger is filled with water, since in a dry state it can overheat and lose its sealing properties.
When assembling a system for water circulation, you should stop using plastic pipes in the steam room. The high temperature of such a room affects the plastic, as a result of which this material begins to release substances that are harmful to human health.
The heat exchanger built into the furnace design has the form of a sealed flat tank with a capacity of up to 5 liters. Two pipes with threads cut at their ends are welded into this tank. They are connected to water pipes leading to a large volume remote tank (up to 100 l)
In the furnace, the heat exchanger has a place between the convector casing and the firebox. In this case, the device does not come into contact with fire at all.
It is necessary to fill the system with water just before starting to fire the stove, since a heated dry heat exchanger under the influence of cold water loses its tightness and simply begins to leak. In order to prevent the appearance of air pockets in the system, water must be pumped from below using a pump.
Heat exchangers for stoves of these types deserve great attention because of the opportunity to save on fuel, because for their normal functioning they require heat accumulated from the combustion of wood. Thus, a built-in type device is heated by thermal energy used to heat the steam room and stones
The heat exchanger is located on the chimney. It is powered by heat, which simply goes out into the pipe. Its efficiency and heating rate are much higher due to the larger capacity of the device. In this case, the tank into which hot water is drained can be removed a significant distance from the stove.
Installation and connection
How to mount the heat exchanger is shown in photo No. 1:
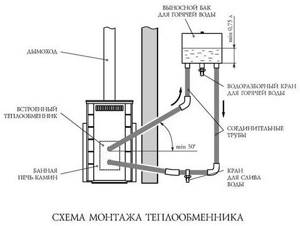
Photo No. 1 Connecting the heat exchanger
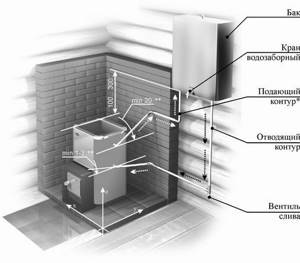
Photo No. 2 - required slopes and dimensions
Step-by-step instruction:
- Let's determine a suitable location for the remote container. It is hung on the wall, 100-300 mm above the heat exchanger.
- The tank should not be hung directly on the wall of the bathhouse. First, we attach the guides with dowels - 2-3 wooden dies. Then, already on them, we hang the tank. The gap between the wall and the container must be at least 20 mm.
- To strengthen the structure, use special brackets, securing them under the bottom of the container. When assembling the container, do not forget to provide holes through which it will be attached.
- We will need 4 pipes: one for direct supply, the second for reverse supply, the third for filling with cold water, the fourth for the consumer. Place a check valve on the third pipe, and connect the tap and shower to the fourth.
- Using fittings, connect the remaining 2 pipes (forward and return) to the heat exchanger using good copper or steel corrugated pipe. Don't forget to seal all connections.
- We install a valve on the return line to drain the liquid. It must be installed so that it is at the lowest point.
- We attach a low tank with a heat exchanger to the wall of the furnace. How to install a heat exchanger on a sauna stove is shown in photo No. 1, and the necessary slopes are also shown there (photo No. 2). It can be built-in. Work must be carried out in compliance with safety regulations.
- Using fittings, we connect the forward and return supply pipelines.
Pipeline installation
We have already mentioned that for pipelines it is better to use pipes with a diameter of 3/4″; this diameter is most often used in all heating systems and is suitable in all respects for a bathhouse heat exchanger.
Pipe diameter 3/4″
Pipes can be metal or plastic. You can also use flexible corrugated hoses, but you need to keep in mind that they have a significantly smaller nominal diameter, and this negatively affects the speed of water flow.
Let's give some tips on installing pipelines.
- Try to reduce the length of the pipelines as much as possible; do not make many turns or bends in the pipe. Your task is to create the most favorable conditions for water circulation.
- When using plastic pipes, do not allow them to overheat at the junction with the heat exchangers. The presence of water inside will prevent their complete breakthrough due to loss of strength caused by heating, but deformation is possible.
- Don't forget to place the drain valve in the lowest place. If the bathhouse is not used for a long time, then in winter you need to drain all the water from the system.
- When connecting pipelines, provide for the possibility of dismantling them to perform repair or routine maintenance work.
- Try to keep the length of horizontal sections of the pipeline to a minimum. Install all such sections at an angle of at least 10°. Such measures have a positive effect on the speed of water flow.
Conclusion
Installing a heat exchanger on a sauna stove does not require much work. To do this, just follow the instructions above. The main principle is compliance with slopes. Photo No. 1 shows one of the heat exchanger options for a bath and its installation. Otherwise, problems will arise with the pressure. When organizing water heating, you should adhere to the following rules:
- The length of the forward and return pipes should not exceed three meters.
- The remote tank is placed at such a height that the slopes are maintained. The excess must be at least 100 mm.
- Pipes for the heat exchanger of a sauna stove for heating water must be made of stainless steel or copper.
- The water in the system must not be allowed to freeze; it must be drained after each use of the steam room. A special valve is provided for this. It also serves as an emergency drain if an accident occurs.
- The power should be selected so that the device heats the required amount of water to +700C in 2 hours. The liquid in the system should not boil. Scale quickly damages the device.
- The diameter of the pipelines should not be less than 24 mm.
By following these simple rules, you will always have hot water and save money on installing an electric boiler.
Bath stove with water heat exchanger
You can heat boiling water for a steam room in a variety of ways. There are many schemes for extracting heat through the firebox wall, or you can use external water heating in a separate furnace.
In this situation, an additional heat exchanger for the furnace turns out to be the best option. Even the manufacturers of sauna stoves have realized that it is easier to install a small additional circuit in the firebox than to complicate and increase the dimensions of the stove structure of the body due to attached containers. Therefore, approximately 60% of sauna stoves are produced with a heat exchanger.

The popularity of the heat exchange method is explained by three factors:
- Compact design with heat exchanger;
- Efficient heat removal and fast heating of water;
- Safety of heat exchanger design.
The last factor is probably decisive. The previously popular huge hundred-liter tanks, installed on the side or back wall of the stove, filled with boiling water, have always been unsafe and often led to thermal injuries. In addition, in order to heat such a mass of water, it was necessary to regularly be distracted by mixing the water supply or to light the stove long before the steam room began to warm up.
The heat exchanger for a bathhouse has become so popular that they began to make it in a handicraft way, use heat exchangers from boiler room heating systems and specialized equipment, and even install sophisticated devices in cast iron and brick stoves.
The use of a heat exchanger for a sauna stove made it possible to significantly improve the sanitary conditions inside the steam room, and, importantly, almost unlimited heating of water makes it possible to equip a full-fledged washing compartment. Now it is possible to take a shower practically without regard to the supply of boiling water in the steam room.
Principle of operation
The operating diagram of the heat exchanger was as follows. A heat exchange circuit is installed inside the furnace, usually in the firebox or on the outlet pipe. Most often this is a copper or steel tube 6-7 m long or a stainless steel container. For compactness, the pipe can be made in the form of a coil, a set of registers or a flat spiral.
Water enters the pipe from an external tank, usually by gravity or under the slight pressure of a water tower. The flow rate is low, so the liquid has time to warm up to a relatively high temperature of 90°C.
Important! The temperature and heating intensity can be easily adjusted using a tap installed at the inlet or outlet of the oven. Therefore, the heat exchanger built into the sauna stove heats water equally effectively both in winter and in summer.
The flexibility and efficiency of the heat exchanger has led to the fact that a sauna stove with a built-in heat exchanger has become the main source of hot water for country or country holidays. Moreover, in winter, a stove with a heat exchanger can be used to heat the room.
It is clear that in this case the dimensions of the firebox and heat exchange circuit must be at least twice as large and made of heat-resistant materials. There are also restrictions on the fuel used. In this case we are talking about a heat exchanger for a wood stove. Even peat briquettes, not to mention coal fuel, are not used for the types of stoves under consideration.
Types of heat exchangers
The designs of heat exchangers are not limited to the traditional copper pipe coil. The total number of models of heat exchange units, according to the most conservative estimates, is at least one and a half dozen pieces.
The most popular and in demand types of furnace heat exchangers include the following designs:
- Tubular heat exchangers made of copper or steel pipe in the form of a ring or flat snake. Such systems have the highest water heating efficiency; they are easy to manufacture and install on a sauna stove. Disadvantages of the design include high sensitivity to overheating;
- Box heat exchangers are made of heat-resistant sheet steel in the form of a plate-shaped container or a rectangular tank. In general, it is simply a container made of heat-resistant material, with welded pipes for connecting, supplying and draining water;
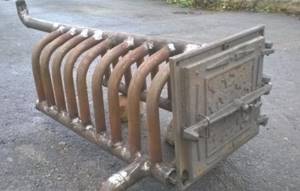
- Frame heat exchangers are a rather complex structure made of steel pipes welded in the form of a set of several registers. Structurally, this type simply copies the design of a locomotive boiler. Therefore, the design itself is very reliable and durable, capable of withstanding prolonged overheating and high steam pressure;
- Batch heat exchangers are manufactured for sauna stoves by specialized enterprises. They are not made using artisanal methods. They are highly efficient, but are prone to burning out the walls even with slight overheating.
If we compare the above designs, then all three models, with the exception of the package version, are sufficiently efficient to heat water in a running state. The heating rate for a conventional standard heat exchanger with a channel diameter of 10-20 mm is 10 ml/oC. At a water speed of 20-30 mm/s at the outlet of the furnace, the water has time to heat up to 70-80°C.
Advantages and disadvantages of designs
If you make a heat exchanger with your own hands, then the types and designs are of greatest interest. Most often, the flow part is made of a copper pipe with a diameter of 15-20 mm. The workpiece is wound onto a wooden block, and couplings or bends are pressed onto the ends, with the help of which the heat exchanger can be connected to the tank feeding the sauna stove.
It is more difficult with a plate or box heat exchanger. To make it yourself, you will need a semi-automatic carbon dioxide welding machine or argon welding. In terms of efficiency of heat extraction in a sauna stove, the heat exchanger plate is slightly inferior to the coil, but is cheaper.
Register heat exchangers are welded from pipes based on heat-resistant steel; in terms of efficiency, they are somewhat worse than plate heat exchangers, but they tolerate overheating well. Even if the water supply to the sauna stove stops, as a rule, this does not lead to damage to the heat exchange circuit. This type of heat exchanger can also be made of copper pipe; the efficiency of the device increases by one and a half to two times, but at the same time the resistance to overheating is significantly reduced.
Tips for choosing a stove
Recommendation number one: to heat the coolant in the water heating network, use a solid fuel boiler. If necessary, buy a long-burning model with a loading chamber volume of more than 100 liters. Modern TT boilers direct 75-80% of combustion energy to heat water and hardly raise the ambient temperature.
If, for various reasons, you want to install a stove with a heat exchanger, listen to the following tips:
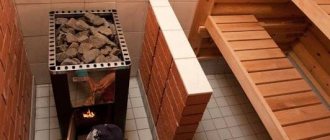
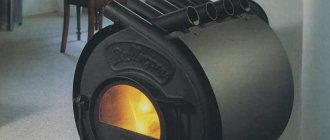
- A cast iron or steel potbelly stove is well suited for a small cottage with an area of 40-80 m². The heater is enough for convection heating of the central room; place radiators in adjacent rooms.
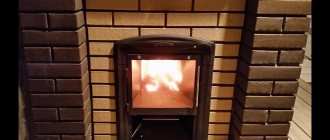
- A fireplace insert or iron stove, equipped with panoramic glass, will be a successful decoration in the living room. One condition: use the product as an additional heat source, and place the main load on a gas or wood heat generator. Then you will be able to maintain cleanliness and order around the potbelly stove.
- When building a house, definitely install a brick stove. This is the best option compared to iron heaters.
- Theoretically, the power of the fireplace insert is enough to heat an area of 100-120 m². Practice shows: without the help of a second heat generator, it will have to be loaded with firewood at intervals of 3-4 hours. Therefore, expect a smaller heating area.
How to select a design and calculate the heat exchanger area in a brick version of the furnace:
- If the register is located inside the firebox, 1 m² of its area can transfer up to 10 kW of heat to water. Example: you need to heat 80 square meters of space - you will need about 8 kW of energy and a heat exchange surface of 0.8 m².
- The coil in the chimney duct is not as effective. Expect a heat output of 400-500 W per 1 m² of register.
- For ease of cleaning, it is better to make the boiler flat - in the form of a tank with inlet pipes. Ribbed structures made from round pipelines are more difficult to clean. For installation inside the flue, weld the register from profile pipes.
- The heat exchanger material is low-carbon steel St10...St20 with a thickness of 4-5 mm. It is allowed to use heat-resistant and stainless steel 2-4 mm, but it must be cooked in an inert gas environment - argon.
- It is strictly not recommended to use ready-made cast iron batteries. Reasons: the metal cracks from temperature shock, and the seal between the sections will burn out over time and leak.
Home craftsmen are constantly putting forward various ideas for improving heaters. The option with steel flat batteries used as furnace water heaters is worthy of attention. Watch the video for an overview of the wizard: