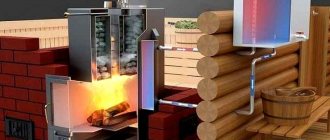
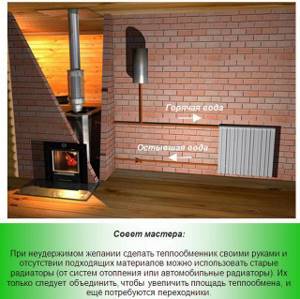
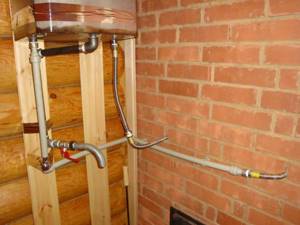
How and how to connect the external tank to the heat exchanger
Remember that the elements in contact with the stove become hot, their surface temperature exceeds 100 0C.
Therefore, the pipes must be made of stainless steel (cast iron will not work, as it is susceptible to corrosion). But ordinary pipes are allowed to be made of metal-plastic; they can even be replaced with flexible hoses. The main thing is that the diameter is 1 inch or 3/4, otherwise the circulation will be poor. Use tangit for seals, and paronite for fittings.
Feel free to replace factory elements with non-standard ones, but made of heat-resistant material. Don't forget about the drain valve - it is simply necessary to preserve the system for the cold season or to quickly remove stagnant liquid. Otherwise, during frosts, the remaining water will freeze and burst the pipes.
Features and functions of the heat exchanger
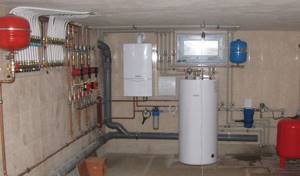
Before considering the main points of manufacturing and installation of a heat exchanger for hot water, it would be absolutely useful to find out what this unit is and what it is needed for.
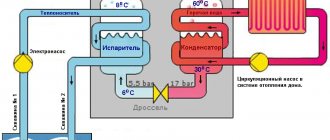
A heat exchanger is a technical device that connects two coolants: cold and hot. As a rule, it takes the form of a conventional pipe structure. Heat is continuously transferred between the carriers - from cold to hot, due to which the house is provided with hot water. Moreover, the heat exchanger does not have its own heat source - it uses energy coming from the heating system.
Thus, the main function of the unit is to heat cold water and produce hot water at the outlet. The effectiveness of this function depends on three factors:
- temperature difference between two coolants;
- dimensions of the heat exchanger and, consequently, the contact area of the media;
- the material from which the heat exchanger is made.
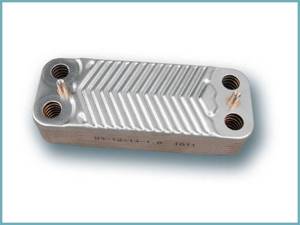
Plate heat exchanger
The last factor is important not only in terms of the efficiency of the unit, but also in the matter of its manufacture and installation. To make a heat exchanger, plastic, steel and cast iron can be used. The first material is not always effective due to its low thermal conductivity. As for the choice between steel and cast iron, you should compare the characteristics of the two materials to decide on the most suitable one.
Functions and types of heat exchanger
A heat exchanger for a private home heating system most often includes a device that has surface contact. In this case, there is a heat exchanger that is heated from the inside and through the surface. Most often it is metal, which heats the air around it.
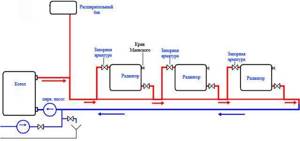
The principle of operation is most fully revealed in a heating system that has gas, solid fuel or electric boilers. Hot water is directed from the heating device throughout the heating system. It circulates through pipes and coolants that have a curved shape. This configuration retains water, warming it up properly. At the end of the journey, the cold water again flows to the boiler, where it begins to heat up again.
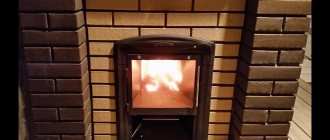
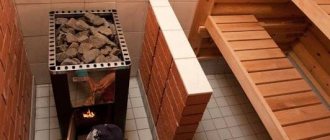
Another option could be a classic oven. It copes with its function quite effectively, but is intended only for small rooms. If there is a need to heat a cottage, then such a heat exchanger will not be enough. Such a device would be relevant in some small house or bathhouse. To turn the stove into a full-fledged heating boiler, it is necessary to provide it with a water heat exchanger. In this case, it becomes possible to heat even a 2-story cottage using a stone stove. As for the size of the heat exchangers, they depend on the size of the fuel chamber of the heating device.
It is best to choose a water heat exchanger for heating. This is due to the fact that water conducts heat much better than air. Its ability to increase room temperature is significantly higher than that of air heat exchangers.
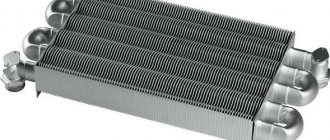
All heating systems that are manufactured in factories are equipped with heat exchangers. Their design is quite complicated; making them yourself is almost impossible. That is why you will have to resort to simpler options. The heat exchanger is made in the form of a coil and has many transverse plates inside, which increase the heated area. These are the structures that are used for heating a private home.
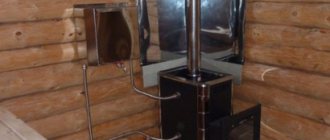
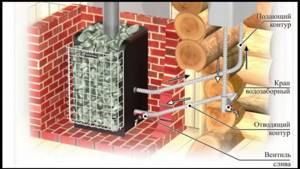
Open siphon type heat exchanger
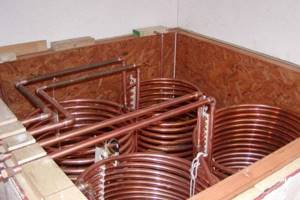
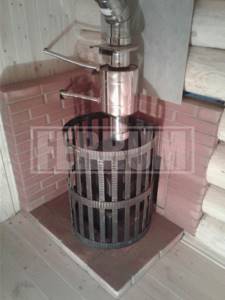
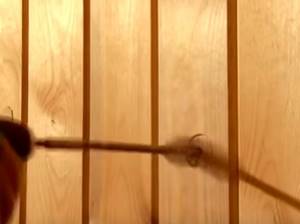
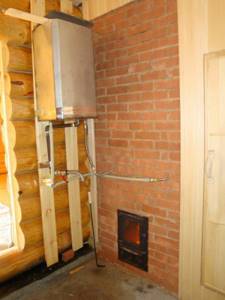
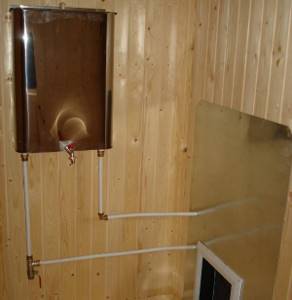
A very interesting and effective option is to heat water on a stove, but, unfortunately, not very common. An inclined pipe, sealed at the end, is welded into the furnace. Its second end - an open cut - is welded at the bottom of the water tank. When water is poured into the tank, some of it flows into a pipe located in the oven, where it is heated until it boils.
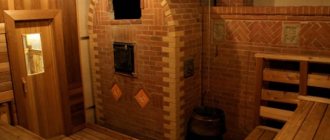
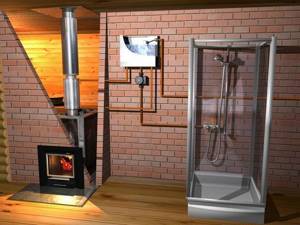
One of the practical implementations of such a heat exchanger is shown in the photo. The design has been slightly changed, but the principle remains the same.
In this option, the tank is located on a stand in the next room. A hole was made in the wall and in one side of the stove (the stove stands on its side). The length of the pipe is such that it almost reaches the opposite wall of the firebox. The pipe is sealed at the end, the hole in the furnace is slightly larger than the diameter of the pipe, and is not insulated or sealed.
The owner of such a siphon-type water heat exchanger has been using this unit for more than 6 years. He says that smoke does not enter the room. Sometimes, if you close the door to the steam room too quickly, a small portion of smoke may escape, but this happens very rarely and does not cause any trouble.
Second stage: connection to the heating water circuit
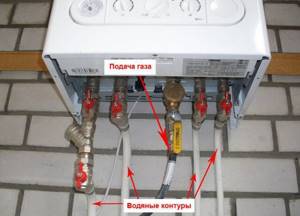
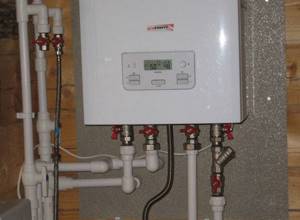
To find out how to connect a gas boiler to heating, you need to figure out where its pipes are located, from which there is an exit to the heating circuit. Almost all models are designed identically. At the bottom of the unit (usually in the center), there is a pipe for the gas pipeline, and to the right and left of it there are pipes for connecting to the water supply network. Closer to the end part there are outlets for connecting the water circuit: return and supply of coolant to the radiators.
Manufacturers of gas boilers warn about the danger of small debris getting into the system. This can happen when the water in the system is contaminated. If this is allowed, the gas unit may become operational. There is a simple solution: install a coarse filter on the return water pipe. It will significantly increase the “life” of the boiler and increase its productivity. When the coarse filter is already installed in front of the water meter, there is no need to place it in front of the gas boiler.
Therefore, before connecting a double-circuit gas boiler to heating, you need to purchase the necessary filters in advance.
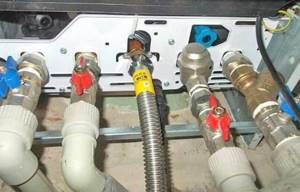
When installing the boiler, it is necessary to install shut-off valves. Plumbing fittings are installed on the water supply pipes to the system and on the return pipes. Without these devices, repair work will be very difficult. If shut-off valves are not provided, then when a malfunction in the system is eliminated, the air remaining in the pipes will block the circulation of the coolant. As a result, the radiators heat up poorly and fail. That is, saving on valves is not advisable.
Water jacket
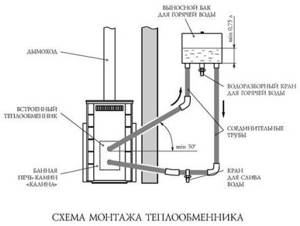
Another heat exchanger is simply implemented - a water jacket (water circuit) on the pipe. A larger diameter pipe with two pipes for water supply/discharge is welded onto the chimney section. The principle of operation is still the same: hot water rises up, colder water flows down from the remote tank.
This method is more attractive for several reasons:
- heating occurs due to heat that previously simply flew away;
- making such a heat exchanger with your own hands is not difficult, although there are factory-made options;
- can be installed on any metal chimney and for this you do not need to disassemble the stove and make holes in it;
- a heat exchanger on the pipe prevents the penetration of gases from the chimney into the room.
All these advantages make such a device quite attractive. But this solution also has disadvantages:
- complete sealing of seams is required;
- when adding cold water, condensation may form;
- You cannot pour water into a heated system - it may tear the walls of the chimney due to the temperature difference.
The water circuit for the stove is made in a similar way, but in this case, a container with water is built around the body. Almost always, such a heat exchanger is made for round stoves. Firstly, you can select a larger pipe and weld the bottom and top, which is unlikely to be possible with rectangular stoves, and secondly, water moves in a circle easily and the system is efficient, which is difficult to achieve with a square casing.
When installing a heat exchanger in a stove, you need to understand that it is primarily intended for heating a steam room, and heating water is a secondary function. It is impossible to control two processes at the same time; the steam room is a priority, so it costs nothing to boil the water in the tank or coil. This means that it is necessary to ensure good heat extraction or sufficient storage capacity. For the same reason, it is not recommended to use circulation pumps in such systems; the flow of the hot medium must be natural.
For installation of the system, you can use both metal and polymer pipes, excluding polyethylene. The diameters of pipelines for gravity networks should be taken at least as large as the dimensions of the heater nozzles, or better yet, one size larger. In this case, the distance from the tank to the furnace should not exceed 3 m.
The heat exchanger in the form of a tank located around the chimney is made of stainless steel or galvanized sheet. In this case, the design of the furnace should be taken into account. If it has a combustion mode for flue gases, and the smoke temperature at the furnace outlet does not exceed 200 degrees, you can use any material to make the heat exchanger.
In simple stoves without smoke circulation, the smoke temperature at the outlet can reach 500 degrees Celsius. In this case, it is necessary to use stainless steel, since the zinc coating releases harmful substances when heated strongly.
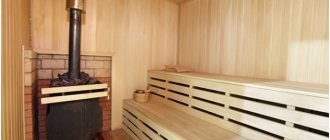
Most often, heat exchangers of this type are installed on a sauna stove and used as a water heater for domestic hot water. The tank is equipped with fittings in its upper and lower parts, and pipes leading into the system are connected to them. The hot water tank is installed in the shower or steam room. It is possible to use such a system for heating a utility room or garage.
Heat exchangers for industrial furnaces are sold complete with some modifications; when installing a new furnace, you can choose a suitable model with a ready-made water circuit. You can also make a heat exchanger for the chimney with your own hands. To make it you need the following materials:
- pieces of stainless steel pipe of different diameters with a wall thickness of 1.5-2 mm, sheet steel;
- 2 1-inch or ¾-inch fittings for connecting to the system;
- storage tank made of stainless steel or galvanized steel with a volume of 50 to 100 liters;
- copper or steel pipes or flexible connections for hot water supply;
- ball valve for draining coolant.
Manufacturing sequence for a sauna stove or potbelly stove:
- Work begins with preparing a drawing. The dimensions of the tank installed on the chimney depend on the diameter of the pipe and the type of stove. Furnaces of a simple design with a direct chimney are characterized by a high temperature of the flue gases at the outlet, so the dimensions of the heat exchanger can be quite large: up to 0.5 m in height.
- The diameter of the inner walls of the tank must ensure a tight fit of the heat exchanger on the smoke pipe. The diameter of the external walls of the tank can exceed the diameter of the internal ones by 1.5-2.5 times. These sizes will ensure quick heating and good coolant circulation. It is better to equip furnaces with low flue gas temperatures with a small tank to speed up its heating and avoid the formation of condensation and deterioration of draft.
- Using a welding inverter, the parts of the workpiece are connected, ensuring the tightness of the seams. Fittings for supplying and withdrawing water are welded into the lower and upper parts of the tank.
- The tank is installed tightly onto the smoke fitting of the furnace, coating the connecting seam with heat-resistant silicate sealant. An adapter from a non-insulated pipe to an insulated one is placed on top of the heat exchanger tank in the same way and the chimney is removed from the room through the ceiling or wall.
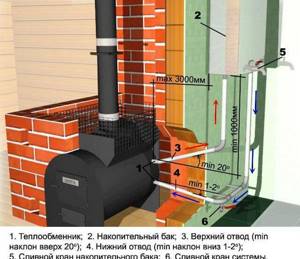
- Connect the heat exchanger to the system and storage tank. At the same time, the required degree of inclination is maintained: the cold water supply pipe connected to the lower fitting must have an angle of at least 1-2 degrees relative to the horizontal plane, the heated water supply pipe is connected to the upper fitting and, with a slope of at least 30 degrees, is led to the storage tank. The storage tank must be located above the heat exchanger level.
- A drain valve is installed at the lowest point of the system. In the bathhouse it can be combined with a tap for drawing warm water for the steam room.
- Before starting operation, the system must be filled with water, otherwise the metal will overheat and leak, which can lead to poor sealing of welds and leaks.
- The water supply to the storage tank can be done either manually or automatically using a float valve. When filling manually, it is recommended to place a transparent tube on its outer wall to monitor the water level in the tank, so as not to run the system dry.
A do-it-yourself water heater exchanger is shown in the video.
Stage four: connecting the unit to the gas pipeline
Connecting to a gas pipeline is an extremely important matter. The slightest mistake can be very costly. If installation work is not performed properly, serious emergency situations may arise that can lead to gas poisoning or explosion. There should be no small details when connecting the boiler to the gas pipeline.
The first step is to connect the pipe from the boiler to the gas pipe branch. There must be a shut-off valve on the gas pipe. A special filter for heating is also installed on it.
When connecting the gas pipeline to the boiler, you need to carefully ensure that all joints are airtight. Here, for sealing, you cannot use FUM tape or sealing thread, which do not provide high-quality insulation. The use of tow and paint is recommended.
Rubber hoses for connecting gas boilers to the gas pipeline are prohibited. Rubber may lose its performance properties (crack), this will inevitably lead to a dangerous gas leak. The hoses are attached to the unit nozzle using union nuts and paronite sealing gaskets. Seals are mandatory here, because they are the ones who will ensure sufficient sealing of the connection.
As for connecting the Baksi boiler to the heating system, you cannot do without the help of specialists. In this case, you can only complete the initial stages of its installation yourself. The boiler will work for a long time and efficiently when its connection is done professionally.
How to make heat exchangers with your own hands
A heat exchanger is a device designed to efficiently transfer heat from one coolant to another.
Such a process can be carried out several times in one system, because a heating radiator is a special case of a heat exchanger. and a gas or electric boiler.
The most common model of heat exchanger used in a heating system consists of 2 metal containers, which, like a nesting doll, are located one inside the other, and transfer heat through the metal wall.
The advantages of this mechanism are that, due to the hermetic design, mutual mixing of homogeneous media does not occur, and when using coolants with different physical properties, mixing does not occur.
Flaws
Despite many advantages, the installation of a heating element on a chimney pipe also has disadvantages. One of them, the most important, is a sharp decrease in the smoke temperature at the installation site of the heat exchanger. This can lead to deterioration of traction and the formation of condensation, increased soot deposition inside the pipe.
In addition, when connecting a heating system, for example, a garage, you need to calculate the volume of coolant to avoid boiling water and bursting pipes. Welds must be completely sealed.
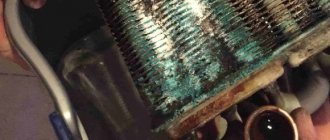
Any heat exchanger design significantly increases the efficiency of the furnace. For trouble-free operation of the system, it is necessary to carry out a visual inspection of all its elements at least twice a year, and, if necessary, timely repairs, descaling, replacement of gaskets and other necessary maintenance work. In this case, water heating and heating systems will operate flawlessly for a long time.
Heat exchanger what is it
A heat exchanger is a hollow container filled with water, built into the furnace structure. The heat exchanger is connected to a system of pipes and/or tanks through which water circulates, heated during the firing of the furnace.
Depending on the design, the movement of water through the system is carried out naturally or forced (using a pump). The principle of operation of the heat exchanger of a sauna stove is that heated water enters the heating radiators and shower tank, and cold water flows into the heat exchanger and is heated. The process occurs during the entire combustion time.
There are several designs of heat exchangers:
- Internal heat exchanger - a container with water for heating is placed in the furnace firebox. The design of the container can be any - in the form of a tank that forms one wall of the firebox or a coil of pipes surrounding the combustion chamber.
- External heat exchanger - the module is placed outside the stove; it usually surrounds the stove pipe, heating up from the temperature of the hot gases discharged through the pipe during the combustion of fuel in the stove.
The water circulating in the system can be used both for heating the room and for heating water for washing. Structurally, a stove for a bath with a heat exchanger for water is no different from a conventional stove with local water heating.
To install a system with two functions (room heating and hot water), you will have to provide a water tank and correctly calculate the length and diameter of the pipes for optimal operation of the system.
The highest efficiency is achieved by a system in which the following conditions are met:
- The length of pipes is no more than 3 m;
- The diameter of the pipes is more than 1 inch - with a small clearance, the liquid will not be able to circulate normally without the help of a pump;
- Open water heating system - air access is organized into the expansion tank.
This design will not require additional energy costs (including electrical energy for the pump) and will provide room heating and hot water.
Difference by type
The simplest designs of heat exchangers are coils with ends removed from the tank: one takes in liquid at room temperature, the other releases hot liquid.
More complex ones are a system consisting of two metal tanks with anti-corrosion properties - cylindrical and rectangular in shape with connecting pipes.
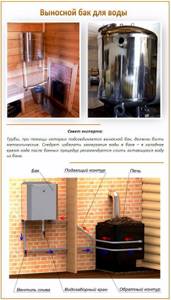
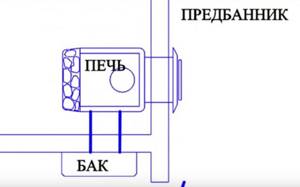
At the location of the water tank
There are two ways:
- This photo shows an option for installing a heat exchanger in a steam room and a tank in a wash room.
- The second option is to install a heat exchanger with a tank inside the steam room.
- high water heating speed;
- saving free space in the steam room;
- Wide range of options for installing the tank - in a steam room or in a shower room.
Advantages of installing a heat exchanger in a steam room
Securing the remote tank and installing the heat exchanger
Remote sauna tank
For a sauna stove, a tank with a volume of 80-120 liters is sufficient. This container must be hung on the wall of the bathhouse so that the level of the tank is higher than the stove.
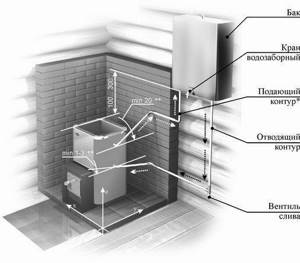
Scheme for connecting the tank and installing the furnace with heat exchanger
Connection diagram
Step 1. Choose a place to mount the tank. This can be either a steam room or a shower room behind an adjacent wall. We determine the mounting height using recommendations for the slope of inlet/outlet pipes.
Layout of the furnace and tank
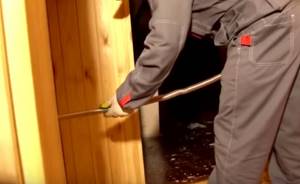
Step 2. Most experienced craftsmen do not recommend hanging the remote tank directly on the wooden wall of the bathhouse. Therefore, we measure the width of the tank, saw the rail into several sections of the appropriate size, and fasten the sections to the wall of the bathhouse with nails.
Step 3. The tank must have technological holes for attaching it to the wall. We secure the tank with self-tapping screws or dowels, checking horizontal and vertical. The structure can be further strengthened with brackets, fixing them under the bottom of the tank.
Brackets under the tank bottom
Step 4. The remote water tank has three or four pipes. Two of them are intended for connection to the heat exchanger, the third is for filling the tank with water (it may not be there), through the fourth hot water is supplied to consumers. A check valve is connected to the pipe through which the tank will be filled with water. If the system is open (water is added manually through an open tank lid), then a non-return safety valve is not needed.
A faucet with or without a shower hose is connected to the pipe from which heated water will flow.
Step 5. There are two pipes left, to which you should connect corrugated steel pipes or install a copper network. Connections are made using fittings. It is permissible to use metal-plastic pipes, connecting them with adapters to the pipes of the tank and heat exchanger. All threaded connections are sealed with thread sealant.

Flexible water supply
Prices for metal-plastic pipes
metal-plastic pipes
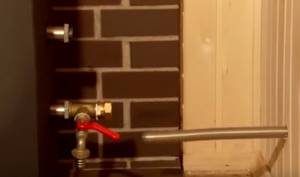
Step 6. A tap is connected to the pipeline that leads from the tank to the heat exchanger to drain water from the system. The operation of draining the liquid will need to be performed every time after completing bath procedures, otherwise during cold weather the water may freeze in the pipes.
Furnace heat exchanger installation diagram
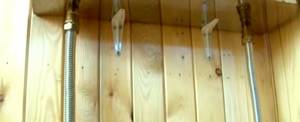
Step 7. A heat exchanger is hung on the wall of the furnace (or its fittings are brought out through the technological openings of the furnace, and the coil is located inside so that in the future there is no contact of the body metal with an open flame). The fasteners are tightened. Flexible corrugated hoses or pipes are supplied and connected to the heat exchanger with fittings. If necessary, holes are drilled in the wall with a diameter slightly larger than the diameter of the pipes.
Drilling holes
Pulling liners through holes in the wall
Connecting the line to the heat exchanger
Step 8. The system must be tested for leaks by supplying water under pressure.
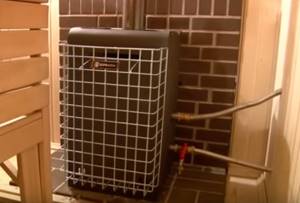
Sauna stove with heat exchanger connected
An example of connecting a remote tank to the heat exchanger of a sauna stove
An example of connecting a remote tank to the heat exchanger of a sauna stove
Step 9. If you have a metal stove, then you can put it into operation. The brick kiln will have to be completed, finishing, testing and other preparatory work must be done. However, metal stoves can also be lined with bricks (they are placed on edge) on two or three sides. Such a screen additionally accumulates heat, increasing the efficiency of the furnace.
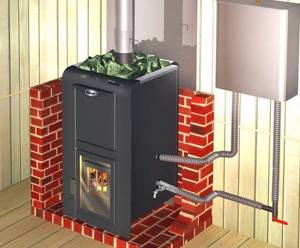
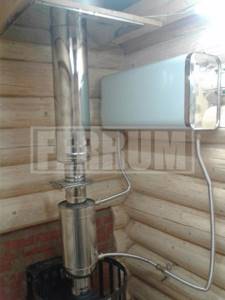
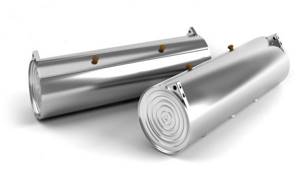
Heat exchanger for the Termofor sauna stove on the chimney
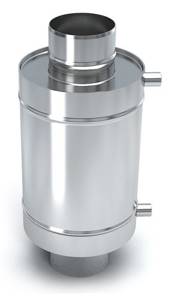
If you want to increase the efficiency of your sauna stove and use the heat of gases escaping into the chimney to heat water, a Kostakan “samovar” type heat exchanger is suitable for you. Named after a lake in Kamchatka, it has an increased volume and allows you to quickly heat water in large capacity tanks. The Kostakan heat exchanger is usually installed as the first element of the chimney in order to remove heat from the very first hot gases, as well as to maintain the height difference between the heat exchanger and the tank. The Kostakan heat exchanger is available in 4 modifications for different chimney diameters: Ø115 – 8l, Ø120 – 8l, Ø140 – 9l, Ø150 – 9l; The connecting thread for all is standard - G ¾.
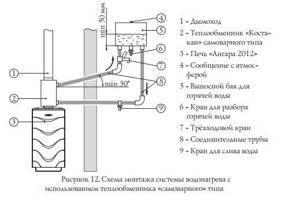
As you can see, the installation of a water heating system with a remote heat exchanger is identical to the installation of a water heating system using a sauna stove with a built-in heat exchanger.
For efficient operation of the water heating system, the height difference between the heat exchanger and the tank must be significant - at least 30 cm between the upper fitting of the heat exchanger and the bottom of the tank. It happens that it is not easy to comply with this requirement, since the ceilings in the baths are low, the heat exchanger is installed on the stove quite high, and most water tanks are vertical.
For such cases, the Termofor company produces a horizontally oriented external Zeppelin tank, with a shape and shine reminiscent of the German airships of rigid construction of the last century, after which it was named. It heats up better and is much more convenient to maintain. The large, long neck makes it easy to fill the tank with water, clean the tank and service the fittings.
Precautionary measures
Please note that any water heating system, like the sauna stove itself, is a fire hazard and requires a responsible approach during operation, therefore we strongly recommend that you carefully read the instructions for Termofor products and strictly follow all safety precautions!
Here are the basic requirements for the installation and operation of water heating systems in a bath using heat exchangers:
- Do not operate the oven with an empty heat exchanger and hot water tank or an unconnected water heating system.
- It is prohibited to pour water into an empty tank, heat exchanger or water heating system after lighting the stove - you must wait until the stove and tank have completely cooled down.
- Do not connect a heating system to the heat exchanger. For this purpose, the Termofor company produces tube heaters, which are identical in principle to a “samovar” type heat exchanger, only designed not for water, but for hot air.
- The bottom of the remote hot water tank must be at least 30 cm above the level of the upper fitting of the heat exchanger.
- When installing pipelines, the use of pipes with an operating operating temperature of less than +95 ° C is not allowed. It is recommended to install pipes for hot water at an upward angle of at least 30°, and for cold water – 1-2°. Sagging of pipes in horizontal sections is not allowed. Connecting pipes expand as the water temperature rises, so they cannot be fixed to the walls.
- The maximum length of the pipeline for hot water is 3 m.
- Threaded pipe connections must be sealed with plumbing sealant.
- Fill the water heating system only with clean water. It must meet quality requirements in terms of the content of salts, iron, lime, etc. It is prohibited for corrosive substances to enter the tank.
- It is necessary to ensure that the hot water tank is secured to the wall as securely as possible to avoid burns and injuries. The wall must be able to support the weight of a fully filled tank.
- Do not pour water into the tank right up to the lid, otherwise the water may splash out when boiling. When boiling, drain the hot water and add cold water.
- Do not operate the hot water tank under pressure other than atmospheric pressure. When operating a stove with a built-in heat exchanger, it is not allowed to exceed the operating pressure in the water heating system by more than 0.05 MPa (0.5 kgf/sq.cm). Pressure testing of the system with higher pressure should be carried out with the heat exchanger turned off.
- Do not use a heat exchanger or a faulty tank that has visible damage and/or leaks. Do not use the water heating system if the water circulation is not possible.
Cast iron heat exchanger
Advantages of heating units made of cast iron:
- High thermal conductivity - cast iron elements heat up quickly and effectively transfer heat from one medium to another.
- Slow cooling – cast iron heat exchangers take a long time to cool, which makes it possible to save on the operation of the heating system.
- Durability - cast iron is resistant to weak acids and scale formation, so it is less susceptible to corrosion than many other metals, which ensures a long service life of the heat exchanger.
- Possibility of increasing functionality - after installing the unit, new cast iron sections can be added to it, thereby increasing the power of the heating equipment.
Disadvantages of cast iron heat exchangers:
Bulky – cast iron units are distinguished by their impressive weight, which complicates their operation and maintenance. Moreover, the greater the mass of the heat exchanger, the higher its power.
- Fragility - despite their heavy weight, cast iron units are afraid of mechanical shocks: they quickly develop cracks, chips and other deformations.
- Low resistance to temperature changes - although cast iron can withstand the highest possible temperatures, sudden thermal changes can cause cracks to appear on the surface of the heat exchanger, which can lead to a significant decrease in its performance.
How to make a heat exchanger with your own hands
To make a device yourself, you need to decide on its type.
Below are instructions for heat exchangers in a hot water bath of two types: near the chimney, inside the stove.
Heat exchanger in a sauna stove near the outlet pipe
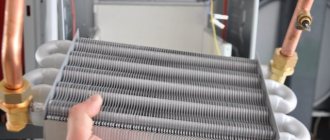
The easiest and most effective way is to use copper tubes. Here the diameter of the chimney is taken into account, relative to which it is necessary to take the length of the tubes (up to 2 meters) with a diameter of about 10 mm. The smaller size of the copper fixtures greatly increases the rate at which water boils in the tubes and fluid movement is limited. It is recommended to use 10 mm pipes.
Flared adapters are placed on both ends. Flaring is done with special devices. This procedure must be performed carefully. A level surface should be achieved to avoid leakage. Copper wire is “wrapped” around the chimney in the form of a spiral, the ends are connected to a tank of water. The structure is ready.
It is more difficult to equip a device made of two metal pipes. The first should have a slightly larger size than the chimney, the second should have a diameter 10 cm larger than the first, steel 1-3 mm thick.
A similar heat exchanger for a bathhouse with your own hands has the following algorithm:
- Two pieces, 30 centimeters long, are cut from different pipes. The ends are made smooth;
- two circles are cut out of a metal sheet, and holes are made with the diameter of the second pipe (smaller diameter);
- A piece is placed into the resulting holes and welded well. The weld should not have a lack of penetration;
- holes must be provided in the upper and lower parts for attaching the pipes. The entire structure must be sealed.
The device is ready, all that remains is to attach it to the chimney and make the piping. Aluminum foil should be used as thermal insulation.
Heat exchanger in the furnace
Such units are highly efficient, easy to manufacture and have a simple design. They can be arranged in the form of several tubes or made in the form of a stainless steel tank.
This type of heater begins to be mounted together with the walls of the sauna stove. Its dimensions are selected depending on the dimensions of the main heating equipment. The inlet pipe, designed to introduce cold water, is located at the bottom of the structure, and the outlet comes out from above. This solution allows for proper fluid circulation.
There are many types of internal heat exchangers, varying in size, configuration, material and location. The optimal solution is selected based on the characteristics of the bathhouse being installed and the equipment.
To create such a heater, you need to use only high-quality components, welds are made hermetically. At the slightest leak, you will need to dismantle the brickwork.
Installation and connection
Before connecting, the system must be checked with cold water. To do this, the system is filled with water and each section of the pipeline is inspected. Any hole will eventually turn into a serious leak, so it is better to eliminate all problems at the installation stage. If financial capabilities allow, it is advisable to install a circulation pump with simple automation to turn the circulation on and off.
As you can see, there is nothing complicated in creating a heat exchanger for a bathhouse with your own hands. The main thing is to choose the right heat exchanger for each specific case, based on the dimensions of the room and the financial budget of the construction site.
Stage one: boiler installation
Installing a gas appliance is usually not difficult. This is the simplest stage of installation of a heating system. Manufacturers have developed detailed installation instructions for each type of boiler.
It is easier to install a floor-standing one, despite the fact that it is heavier in weight and larger in size. For wall mounting you need special brackets. They come included with the device. The diagram for connecting a wall-mounted boiler to the heating system is indicated in the instructions for the device
The most important thing is to choose the right location for installing the boiler, while also considering how the pipes will be connected to the boiler.
When choosing the location of the unit, not only ease of maintenance is taken into account. It is necessary to comply with the standards and requirements that apply to gas appliances. Their implementation guarantees the efficiency and safety of using the heating unit.
Two basic rules to follow:
- The room where the boiler will be installed must be provided with a window or window that can be easily opened if necessary.
- No devices or objects should be placed near the gas unit.
The connection diagram for a floor-standing boiler requires careful preparation of the base. The wall-mounted boiler is placed at a height of 80 cm from the floor, no closer than half a meter from the walls. These are standard operating safety requirements.
To know how to properly connect a double-circuit boiler, you need to become familiar with the conditions required for the installation of a chimney and ventilation system.
Turbo boilers greatly simplify the task because they do not require the installation of bulky chimneys and exhaust systems. This type of boiler is becoming increasingly popular today. The peculiarity of turbo boilers is the device for the forced removal of exhaust gases and the simultaneous influx of street air, like a “pipe in a pipe”. This is the safest system, as it allows you to install gas units in almost any room.
There is another type: floor-mounted parapet boilers. These are chimneyless, energy-independent units. They are used where it is impossible to build a large chimney. Parapet boilers have a closed combustion chamber, it is completely isolated from the room. In such boilers, the coolant circulates by gravity, without an electric pump. This is their main difference from turbocharged boilers with a coaxial chimney.
How to make your own device
It’s easy to make a simple coil yourself from a copper tube. For a chimney with a diameter of 100 mm, a copper pipe with a diameter of ¼ inch and a length of 3-4 m is suitable. Threaded fittings should be soldered to the ends of the pipe. Then the tube is filled with fine sand, twisted and wrapped around the chimney.
It is advisable to leave a small distance between the turns - then the pipe from the chimney will be heated by both heat transfer and infrared radiation. It is convenient to do this work with an assistant. The sand is then washed out of the pipe with water under pressure. Connect the pipes leading to the radiators and expansion tank.
The Kuznetsov heat exchanger is made using welding. The simplest option is to make a housing from a gas cylinder or large diameter pipe.
For manufacturing you will need the following materials:
- Gas cylinder, large diameter pipe (300 mm) for the housing.
- Pipe with a diameter of 32 mm (it is better to take one piece with a larger diameter - up to 57 mm). The length of the blanks is 300-400 mm, the total quantity should be sufficient for cutting the blanks.
- Two small pipes of the same diameter as the chimney; It is advisable to use a chimney pipe - if the chimney is prefabricated, then on one side of the structure the pipe will have a socket, which is necessary for installing the heat exchanger.
- Two pieces of steel sheet, sufficient to cut out the end caps of the housing.
Air heat exchanger manufacturing technology:
- A large pipe or cylinder is cut to the required size.
- 9 blanks of the same length are cut from thin pipes.
- Circles are cut out for the plugs.
- 9 holes for small diameter pipes are cut in the circles; if one tube of larger diameter is taken, then a hole for it is cut in the center.
- Thin pipes are inserted into the holes of the plugs, attached by welding, and then welded.
Holes with a diameter equal to the diameter of the chimney are cut in the sides of the body.
A structure of thin tubes and plugs is inserted into the body and welded at the junction of the plugs and the body of a large pipe.
The pipes are inserted into the holes on the sides of the body and also boiled.
Alternative option:
What materials can be used
The ideal option is stainless steel (for example, food grade austenitic stainless steel 08Х18Н10 or AISI 304) or copper. Industrially produced products are sometimes made from titanium. But the price of these materials is quite high. But they are durable, do not rust, are reliable and durable. If you have a potbelly stove in the garage or a homemade heater from scrap materials in the bathhouse, it is quite possible to use ferrous metal (carbon steel).
You can use a high-quality corrugated stainless steel pipe. Galvanized corrugation is an undesirable and short-lived option. Aluminum pipes can also be used for the coil (just not for chimneys of solid fuel stoves).
Sometimes galvanized steel is used, but it should be borne in mind that during welding work the zinc layer evaporates, and all the advantages of galvanizing (corrosion resistance) come to naught. At temperatures above 400 °C, zinc begins to evaporate (zinc vapor is toxic), so you should not use galvanization for heat exchangers on the chimneys of solid fuel boilers.
Coil for furnaces
One of the easiest heat exchangers to manufacture is a coil. All you need is to find a pipe made of a sufficiently ductile metal. Copper or aluminum are most often used, as both metals are resistant to corrosion and bend easily. Then the pipe is bent, and in principle it can be any shape.
In order for the water to actively move by gravity (without a pump), the total length of the coil should not exceed 3 meters (this includes the connection to the remote tank). When creating your own heat exchanger, “try” it on the stove: it should not come into contact with an open flame, but should be heated by hot air. An external thread is cut at the ends, to which a remote tank is then connected through fittings.
The coil can be located not only inside the firebox, but also outside. It is hardly worth wrapping the stove, but a metal chimney will heat water quite effectively. After all, if the furnace does not have an afterburner, then the temperature at the furnace outlet can be up to 500 o C. For an example of such a heat exchanger on a pipe, see the photo.
In the simplest version, the heat exchanger can have the shape of a horseshoe. Then you can use stainless steel - this way you can bend it. For example, the video clearly shows a similar shape that was used in the Vitra sauna stove (for a video on how to move the heat exchanger in a Vitra stove from the left side panel to the right, look at the end of the article).
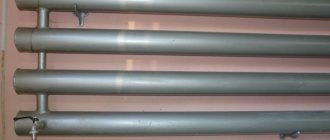
One type of coil is a register. This is, as a rule, a welded structure made of pipes, which is often somewhat reminiscent of heating ones. The register for a sauna stove is most often made of stainless steel, since only it can withstand harsh operating conditions for a long time. Welded structures are large in size and weight, and therefore they are more often installed in brick kilns. In an iron furnace it is not always possible to find a place to place a small heat exchanger tube, let alone a bulky welded structure. And when designing brick sauna stoves, you can allocate space for a register.
Some general tips
When using heat exchangers, some problems arise that can “spoil your mood.” What are these problems and how can they be solved?
Temperature of heating water in the tank
Temperature of heating water in the tank
You need to “catch” the moment when it will be acceptable, but such a “moment” is almost impossible to catch. The fact is that while taking a shower, the stove continues to burn, and accordingly, the water temperature constantly rises. What to do? Putting out the fire in the stove? This, of course, is not an option.
We suggest solving the problem using a mixer. If there is a water pipe in the bathhouse, great; it will help not only create a comfortable temperature, but also, using simple automation, make filling the water container automatic. It will be possible to wash without saving water, and the risk of it boiling in the heat exchanger will be somewhat reduced. If there is no water supply, we recommend installing an additional container for cold water next to the warm water tank. It must be connected to the shower through a mixer.
Connection diagram
Types of tanks
Water tanks of different configurations are installed. The method of heating water may also differ. When choosing a container, you should take into account all the nuances.
The purpose of the hot water tank in the bathhouse
Capacity
The volume of the installed tank depends on the number of people who can simultaneously be in the bathhouse and use hot water. On average, 10...20 liters of boiling water should be provided for each person (with a small reserve). Today, tanks with a volume of 50...100 liters are produced. As a rule, it is not advisable to install a tank with a capacity exceeding 100 liters.
The shape of the container can be any
Material
When choosing a container, you need to consider that it must be able to withstand high temperatures (up to 250 degrees) for a long time.
Metal tank for water in the bath
You should not try to save money and install tanks made of ferrous metals. This approach cannot be justified not from an aesthetic point of view, but mainly from practical reasons. Due to constant exposure to high temperatures, the metal will deform over time and traces of corrosion will appear on it. This significantly reduces the service life of the tanks and the quality of the water in them.
The most common tank option is stainless steel construction. The demand for such tanks is explained by their attractive appearance, durability, resistance to various types of external influences, high heating rate, ability to retain heat for a long time, relatively low weight, hygiene, high durability and ease of maintenance. The tank configuration may vary. But high-quality stainless steel costs a lot. And you need to take into account that today there are many counterfeit products on offer, which will soon rust.
Not so often, but there are tanks made of cast iron. They are not afraid of rust. However, it must be borne in mind that, despite the fact that the water in such structures will not cool quickly, it takes more time to heat it up. Due to the bulkiness of the tanks, you need to carefully consider their location. Today, not many companies produce cast iron tanks, and they are not very cheap.
Enameled containers can be used, but they are not the best option. Of course, such material does not corrode and is very hygienic.
But low resistance to mechanical damage over time will inevitably lead to the fact that the metal with a fairly thin coating will become chipped (as a result of not very careful handling) and these areas will rust. It will no longer be possible to fix the problem.
Location and design
Three methods are used to place the tank: traditional (directly near the firebox), on the chimney, and remotely. What is the difference?
Bath stove with tank
Tank built into the oven
The reservoir can be located on the side or above the firebox. The water in it heats up quite quickly (exposed to open fire). To drain it, a ball valve is installed. Of course, this design does not involve pipeline laying work, which saves labor and material resources. However, using such a container is not very convenient; usually a tank of not very large capacity is installed, and its installation takes up useful space in the steam room, which usually is not very much. The best solution in small-sized baths is the top location of the tank. Since the metal will be in direct contact with the fire, the thickness of the tank walls must be at least 8 mm.
Water tank next to metal firebox
Reservoir on a pipe
If the ceiling height allows, you can install the tank on the chimney. Water is heated by hot gases passing through it. To simplify the installation process, it is possible to purchase a container with built-in chimney elbows. This tank can be fixed without much effort. By laying a pipeline from the tank, you can carry water to any point in the bathhouse, for which a pipe is connected to the bottom of the tank, ensuring the flow of liquid, for example, into the shower. Filling a tank installed in this way is not very easy due to the high location of the filler hole. It is best to use a hose lowered into a container for these purposes.
Reservoir on a pipe
Remote design
Thanks to the installation of a heat exchanger on the heater (on the chimney or directly on the stove) and natural convection, it is possible to place the tank in the washing compartment.
Water tank over brick firebox
The heat exchanger can be integrated into the oven (removable or non-removable), but you can easily install it yourself. It is a coil or container with a volume of several liters with pipes to create a circuit.