Every bathhouse needs a stove to heat it. And the furnace requires a portal. This is a structure for placing cast iron, a kind of frame.
It must be made of durable and heat-resistant materials that can withstand the temperature of a hot oven for a long time.
Each person who starts building his own bathhouse decides for himself how to approach the arrangement of the frame. It can be made in the form of an ordinary wall, or you can approach its arrangement with a design concept.
Every bathhouse should have such a structure. We'll tell you how to make it yourself.
- Preparation of the solution
Why do you need a portal for a sauna stove?
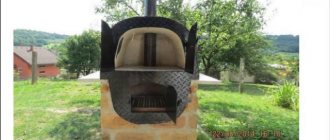
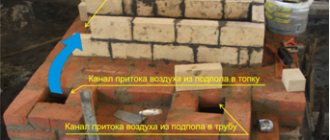
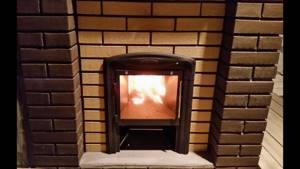
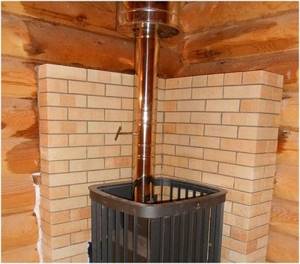
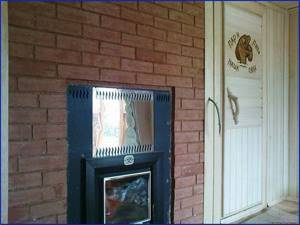
The U-shaped structure, which is commonly called a portal, serves to frame the furnace. Most often, a portal is made for a sauna stove with an external firebox; it is also designed to emphasize the advantages of the stove’s design.
The best solution would be to make a brick portal for a sauna stove with your own hands. Laying bricks will not take much time, and the quality of the finished product directly depends on your accuracy and knowledge of the intricacies of laying the material.
Recommendations for performing the work
- The creation of a furnace portal must be approached after careful preparation.
- Correct preliminary calculations will help achieve the desired result.
- In order not to complicate the work with alternating layouts, make a wall entirely of white brick, which is very easy to decorate using paint.
- If you do not have masonry skills, it is better to entrust the work to a professional.
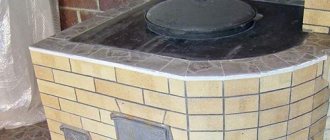
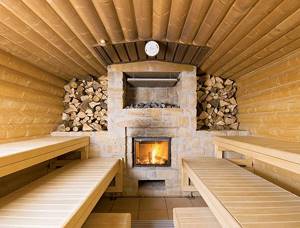
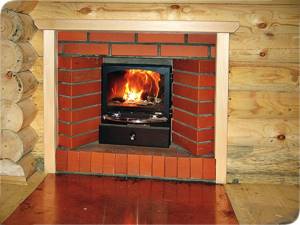
But despite the simplicity of this device, the brick portal is the main element of decoration in the bathhouse. Nothing will decorate it better than a self-made portal, a photo of which you will be proud to show to your friends and acquaintances.
Subscribe to our Social networks
Selection of materials and tools
Tools for creating a portal are selected individually for each material. These are ordinary carpentry tools for cutting and processing wood, stone and drywall: grinder, screwdriver, trowels, hammer and others.
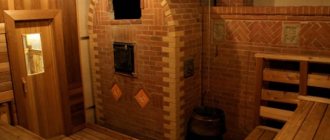
The most common is a brick portal for a sauna stove. It looks beautiful and discreet and always fits into the interior of the bathhouse. If you like classics or minimalism, this is a great option.
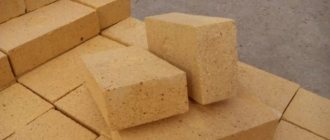
You can use red brick when building a portal for a sauna stove. It is more heat resistant than other types. It is also possible to use silicate and ceramic bricks.
Such an item also performs a protective function. After all, a heated metal stove can burn even from a distance. And if the space in the bathhouse is small, this becomes a threat to people. For personal safety, such a frame will be necessary.
General description of the design
You can purchase a sauna stove in a specialized store, or order production from an experienced craftsman, or you can build it yourself. In the latter case, you may encounter a lot of problems, but all of them can be solved. In addition, the process of making a stove is quite exciting, and also allows you to save on at least one of the design components - the portal. How to make a portal in a sauna for a stove? First, let's look at what this design is.
The portal is a kind of rim for a stove or fireplace, which has a recess. This is where the stove is installed.
Important! If you decide to make this decorative element with your own hands, we recommend using a hearth insert for it, since it does not have its own frame and you won’t have to think about how best to insert it.
In order to recreate this element, the first step is to calculate the heating ratio
device and portal.
The most optimal values, which are traditionally used quite often, are considered to be the height of the fireplace, which occupies approximately 75 percent of the portal you designed, and the width - 50 percent.
It is best to first buy a hearth insert, then adjust the frame to it.
This is much easier than trying to fit an unsuitable fireplace into an already erected frame.
The materials used can be chosen:
- Drywall;
- Natural wood;
- laminated chipboard;
- Wooden beam;
- Galvanized metallized profile;
- Laminated parquet board;
- MDF;
- Plywood.
In order to decide on the most optimal option, you should take into account the modification of the stove, as well as the skills of the person who will be involved in the construction of the portal for the stove to the bathhouse. Of course, a fireplace for an office and a sauna stove are significantly different. Therefore, in the second case, it is best to focus on non-combustible materials and refuse to use natural wood to decorate the stove. In our article you will learn how to finish a bathhouse near the stove and thereby protect the structure.
For electric stoves in the bathhouse, portals finished with:
- Stone;
- Self-adhesive film;
- Polyurethane stucco;
- Heat-resistant paint;
- Tapestry;
- Plaster stucco.
When in need of protection
The walls of a bathhouse do not always need additional protection by installing a screen for the stove or by lining it with fireproof materials.
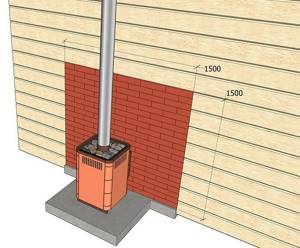
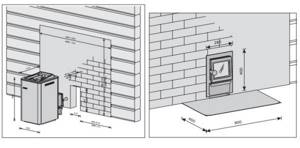
Information. There are standards according to which a certain distance must be maintained between the sauna stove and the wall. This is justified by the fact that this distance should be enough for the infrared rays to dissipate and not have such a strong effect on the bath walls, increasing the risk of fire.
The specific distance is regulated by fire safety standards and SNiP:
- The distance between the stove and the wall must be at least 13 centimeters if the adjacent wall is laid out in one brick, covered with lime-based plaster (layer - at least 25 millimeters) or asbestos, clay, brick cladding (layer - at least 40 millimeters);
- There must be at least 32 centimeters between the stove and the half-brick wall, which is covered with lime-gypsum (layer - at least 25 millimeters) or asbestos-vermiculite slabs (thickness - at least 40 millimeters);
- A minimum distance of 70 cm must be present between a metal stove with a refractory coating and a wall covered with a lime-gypsum mixture (layer - at least 25 millimeters);
- If the metal stove does not have a coating of refractory materials, the distance to the wall covered with lime-gypsum mortar must be at least one meter.
There are also similar rules for the ceiling surface, since the distance between it and the top of the stove must be maintained:
- At least 25 centimeters must be retreated from the ceiling protected by a metal sheet (which should be laid on asbestos cardboard or plaster) and a stove with a fire-resistant ceiling in three rows of bricks;
- A distance of 80 centimeters must be maintained if the stove has a thermally insulated ceiling on the surface and the ceiling is protected with fireproof materials;
- There should be a gap of 1 meter between the ceiling with missing protection and the stove, the ceiling of which consists of two rows of bricks;
- If the stove has no overlap at all, the distance should be at least 120 centimeters.
Attention! Of course, maintaining a meter distance is possible only in spacious baths, which is very rare. Usually compact buildings are erected, where every millimeter is worth its weight in gold.
That is why permissible distances are neglected, installing protective screens instead.
Calculation and dimensions
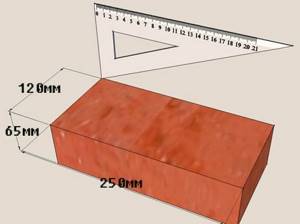
At the beginning of the work, you should correctly calculate the dimensions of the future frame, as well as calculate the required amount of brick for masonry. You should decide how far the brick sauna stove portal will be higher and wider than the stove.
Calculate the area of the masonry and add to it the reserve for the base (1-2 rows of bricks). The height of the portal may be greater than the width. But horizontal options are also common. Here you should rely on your taste and the size of the oven.
How to determine the amount of brick needed? To do this, you need to divide the area of the masonry by the area of the side of the brick and add about ten percent of the amount that came out. This is necessary in case the material is damaged during installation.
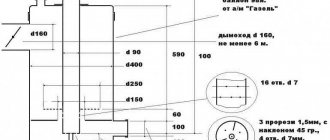
Approximate dimensions of the portal for a sauna stove:

Bathroom wall decoration for safety
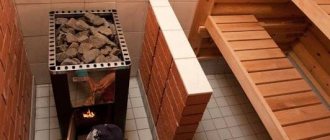
The firebox is fenced with natural stone from wooden products.
During combustion, the temperature of the stove surface reaches 400 degrees or more. For safe operation, all flammable elements are kept away. 20-25 cm is not enough. Wooden surfaces will catch fire when exposed to infrared radiation from a heated oven. This is relevant in a steam room, where temperatures above 100 degrees constantly dry out the wood.
The heat-insulating screen is made of brick or basalt cardboard coated with galvanization. In some cases, soap chloride becomes the insulating material. It conducts heat well, so the base for it is made of non-combustible materials.
Step-by-step instructions for laying bricks
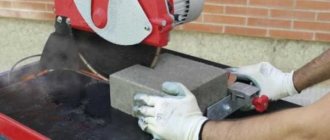
How to lay out a portal for a sauna stove? When all the calculations have already been made, you should prepare: brick, jointing, sand, mortar for masonry, trowel and grinder. You will also need a tape measure, buckets for mixing the solution, and a level to check the evenness of the surface.
Here are the instructions:
- Prepare the mortar for masonry. You can connect the rows with a solution of clay and sand (in a ratio of 2:1), water should be 1/4 of the amount of clay. 20 liters of mortar is enough for about 45-50 bricks (laying flat). The sand should be fine, so you will achieve uniformity of the finished mass. The clay should be of normal fat content.
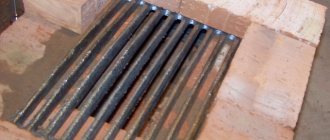
- Start laying the brick at the base. This must be done strictly with the help of a level, since errors at the initial stage will ruin the entire structure. And the work will have to be redone.
- Consideration should be given to the ligation of seams in subsequent rows.
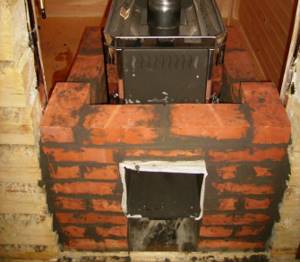
- To make the product more beautiful, you can use seam stitching when finished. This way your portal will have a beautiful and neat appearance.
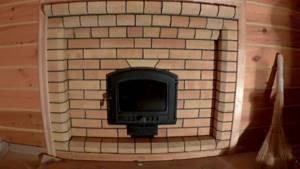
If all the calculations are made correctly and the work is done efficiently, then the result will be a beautiful decoration for your bathhouse - a brick portal for the stove.
More about firebox rules
It's no secret that the heart of the entire sauna room is the stove. That is why it needs very careful and reverent handling. The length of time that the stove will last depends on how to heat a bathhouse correctly with an iron or brick stove.
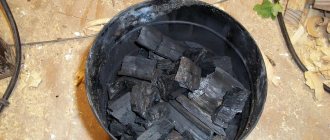
The first step is to ensure that you have high-quality firewood, which must be placed in the stove in such a way that the flame from it is even. In addition, hot coals should be formed during the combustion process.
Attention! It is important to remember that the firewood must be dry, since when using raw fuel, a smoky and carbon monoxide flame cannot be avoided, which will lead to smoke in the steam room.
All surfaces in the bath are heated evenly, while avoiding the appearance of unpleasant odors, only when the steam is dry and very hot. This can be achieved if the heated stones are crimson in color, and their volume in relation to the steam room in the heater should be 1:50.
Any experienced steamer has his own secrets about getting truly intense heat, but there is also a set of certain rules that must be followed by everyone without exception:
- You need to carefully splash water in small portions on the hot stones. Usually this is 50-100 ml, but during the vaping process the volume decreases. Under no circumstances should stones be allowed to flood;
- In order to cover a large area of stones during the pouring process, it is necessary to use a fan;
- To keep the steam as dry and hot as possible, water should be splashed between hot stones;
- If the moistened stones shine with bright crimson shades, then you are doing everything right;
- Evidence that the temperature in the bathhouse is decreasing will be the hissing of water when it hits hot stones.
You should also know and follow some recommendations on how to light a stove in a bathhouse:
- It is necessary to stack the firewood so that there are small gaps between them. This is done for better air circulation;
- There should be a gap of at least 2 centimeters between the topmost log and the surface of the stove;
- In order to save firewood, the pipe valve can be slightly closed;
- For greater heat transfer, you can open the oven door slightly;
- Keep an eye on the coals, as bluish-yellow flames emanating from them indicate carbon monoxide.
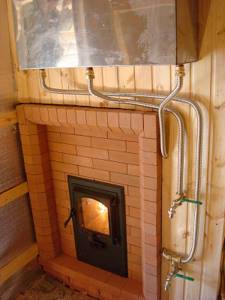
The second stage - type of stove
It is necessary to decide on the type and appearance of the sauna stove. Whether your design will have a water tank or not. What type of heating will the hot water have (with direct gas outlet through the firebox). What type of heater can be used (open heater or with exposed stones).
Having decided on the type and type of stove for the bath (in white), do not forget about the removal of gas from the stove. Fortunately there are not many options here. With a straight chimney or with a side chimney. It depends on your location of the structure and the possibility of venting your chimney. When building a new chimney, be sure to insulate the distance between the chimney and the roof with heat-resistant material to prevent the roof from catching fire.
Ceiling preparation and chimney installation
Many fires have started in the area of the ceiling where the chimney runs. There are many mistakes associated with arranging the passage of a chimney through ceilings. The cause of the fire may be:
- pipe overheating;
- cracks in the pipe through which sparks escape;
- errors in the distances between the pipe and the combustible ceiling.
Not the most competent way to pass the ceiling for a bathhouse
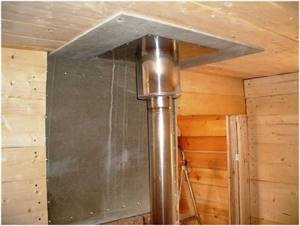
If you did not design the position of the stove in advance, there may be a beam above it. In this case, you will have to cut out part of the beam and fasten it with jumpers to adjacent beams. The empty space above the center of the pipe passage should be about 90 cm in diameter.
The ceiling slabs are cut out square to install a cutting box, which is a tin box closed at the bottom and top with stainless steel sheets in which a hole is made for the pipe (see photo above).
The chimney is mounted from the pipe coming out of the stove. If the monopipe is larger in diameter, you will have to put an adapter on the pipe. But in any case, the first pipe running through the steam room will be a monopipe
A gate is mounted on it, then it continues again, but before reaching the ceiling (this is important!), a “start” is put on it - an adapter from a mono to a sandwich pipe that will go through the ceilings. Pipe connections must not go into ceilings
It is worth noting here that sandwiches, of course, are the most common, but this is a dangerous type of chimney - so what if the gap between the two pipes is clogged with thermal insulation? This will in no way prevent the inner pipe from burning out if the owner is often in a hurry to heat the bathhouse. And the properties of the insulation, when condensation forms in it, will not be the same as stated - it will transmit heat perfectly, overheating the outer pipe.
An alternative to sandwich pipes is ceramic or brick-lined chimneys, but both are heavier and more expensive. Therefore, the majority prefers to risk the entire bathhouse.
OK. This means that through a hole in the stainless steel the sandwich pipe enters the cutting box.
There is still space around it that can be filled:
- expanded clay;
- mineral wool;
- sand.
Attention! The height of the box must be several centimeters greater than the thickness of the ceiling
The outside of the box can be wrapped with basalt cardboard so that it does not touch the wood.
Next, the pipe is brought out through the roof, through a hole of a larger diameter than the pipe. On the outside, the area nearby is coated with sealant, a master flush is put on top, secured to the roof with self-tapping screws at intervals of up to 5 cm, and the connection between the flush and the pipe is also sealed. All that remains is to install an umbrella or deflector.
master flush
Do not forget! It is necessary to constantly check the vertical position of the chimney with a plumb line, and also secure it for greater stability using a clamp with a bracket to the wall or other stable structural elements.
Installing a stove in a steam room
The installation of a wood-burning stove in a log bathhouse is regulated by building rules and fire safety standards. Thus, a stove in a wooden bath must be installed on a heat-resistant, non-flammable base. It can be made of heat-resistant brick, concrete, porcelain stoneware, ceramic tiles.
Brick ovens most often have this weight. The foundation for a brick stove is laid along with the main one at the initial stage of construction of the bathhouse. The depth of the foundation, in this case, is made the same as the depth of the general foundation of the house. But in terms of size, the stove foundation is made 15-20 cm larger than the heating structure with a screen.

The installation of a wood-burning stove in a log bathhouse is regulated by building rules and fire safety standards
So, installing a heating structure in a bathhouse has the following stages:
- Selection of heating design;
- Choosing a location for installation;
- Organization of the foundation (if necessary);
- Preparation of a heat-resistant base;
- Installing a stove or laying a brick structure (for this, a masonry diagram is prepared in advance and materials are purchased);
- Chimney installation;
- Installation of elements provided for by the design (damper, firebox doors, etc.).
Before putting into operation, the stove in the bathhouse is heated. At the same time, the oven may emit unpleasant odors. This is due to the burnout of industrial oils, the internal enamel of the metal structure, the combustion of dust, etc. Therefore, the first time the bathhouse is heated empty, with maximum ventilation.
Fire protection system in the partition
To achieve maximum heating efficiency in a bathhouse, it is advisable to place the stove in a partition. In this case, it will heat the partition, and not the outer wall or corner, which is much more rational and profitable, since firewood or gas will be well saved.
The partition in the bathhouse near the stove should be well protected. All the same methods are suitable for this as for the usual placement of the furnace. You can use all the techniques described above (brick, tile, metal) both for the outer wall and for the partition.
A brick partition in a bathhouse near the stove will be the most convenient option. It should be noted that brick partitions are often found in wooden bathhouses. Basically, they are made there for design reasons because of the beautiful facing bricks, but the option with a stove is much more functional.
The result is a highly efficient bathhouse for heating; the partition-stove in it is located in the center of the building and does not lose heat. In this case, the portal around the furnace is made lighter. For its construction, it is appropriate to use the same brick as for the rest of the partition. In this case, you will not need to purchase additional materials. If the design requires it, you can use any other option.
Finish options
Depending on the chosen style, when laying the portal of the furnace combustion channel, you can select the appropriate material.
The main requirement for finishing material is fire resistance. The main building materials for masonry include:
- brick
- stone
- tile
- tiles
Brick
Brick is one of the most used and inexpensive materials for lining furnace portals. It has high fire resistance and a number of advantages:
- it heats up quickly;
- heat is retained for a long time;
- moisture resistant;
- It is distinguished by its affordable cost and ease of working with this material;
- This is what is most often used by lovers of the classic style in decoration. A reliable decorative portal can be used to cover the entire area around the equipment.
- Combinations of brick colors will enhance the external style of the device. When grouting joints, use a mixture that is resistant to high temperature and moisture.