Why is this being done?
And really, for what? It seems that the metal stove, which is used in the vast majority of cases, looks more than reliable and absolutely does not need any improvement. Moreover, even a beginner can make such a stove with his own hands. However, this is a typical superficial opinion, which is completely devoid of any sober knowledge of the actual state of affairs. In fact, there are several reasons why an iron stove in a bathhouse is also finished with brick.
- when heated, iron can negatively affect human health through radiation;
- iron does not stay hot for long - and to maintain the desired temperature in the room you have to spend a lot of time and resources;
- There is always a risk of overheating and loss of oven performance, so the metal part of the oven needs insulation.
But if you use brick, you can get quite significant advantages:
- the steam becomes more humid and pleasant;
- heat spreads more evenly throughout the steam room;
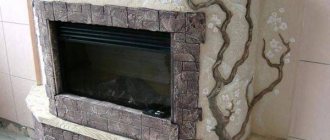
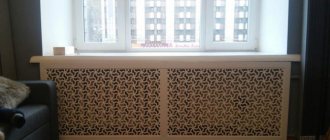
- the appearance of the stove becomes attractive, and with original finishing it is possible to achieve the fact that this element of the bathhouse will be a real design revelation.
What conclusion should be drawn from this? If you do not bring the stove back to normal in a timely manner, then instead of the expected pleasure from the steam room, you may end up with dry and indistinct steam, as well as a bad mood and disappointment. But with brick, heat is retained longer, and the use of a bathhouse broadly pushes the boundaries of comfort.
We line the metal stove with bricks in the bathhouse. 7 secrets of successful work
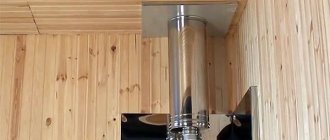
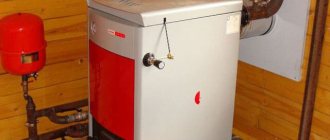
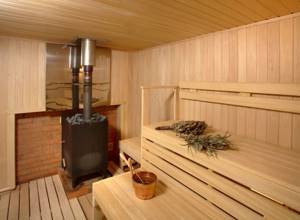
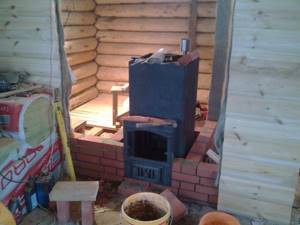
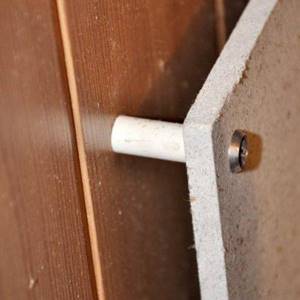
It is equipped with a self-cooling handle and heat-resistant glass, which allows you to observe the combustion process without opening the door. The latter can be re-hung after removal. The door has a corrosion-resistant stainless steel frame around the edges. On top of the firebox there is a heater, which creates an additional microclimate in the room; it is open and can be ventilated. In the center of the compartment there is a chimney pipe, around which there are stones.
The heater frame is made of stainless steel, which extends the service life of the unit. On the walls of the heater you can install additional elements such as a mesh or a hanging tank. Photo 1. To use a sauna stove safely, you must follow a number of rules:. Water is poured until the stove is lit. Filling the heat exchanger while the stove is open may damage it or the stove. An online magazine about barbecues, ovens, grills, barbecues and other garden and home cooking equipment.
Grills, ovens, barbecues.
Rate the article: 5 4 3 2 1. Average rating: 0 out of 5. Rated by: 0 readers. Share with your friends! This is just a dream!
Which brick to choose?
Most often, 2 types of bricks are used:
- red ceramic;
- fireclay.

On the one hand, fireclay is more attractive: solid heat resistance, strength and relatively longer heat retention allow us to hope for impeccable efficiency. However, it has one significant disadvantage - its cost. Whatever one may say, it is quite high. Therefore, most often the stove in the bathhouse is decorated with red ceramic brick. It does not retain heat as well as fireclay, but has similar characteristics in terms of fire resistance and density.
Features of the stove lining installed on a wooden floor
When the bathhouse has a concrete floor, there are no questions about the arrangement of the base of the stove and the cladding around it. But with wooden flooring, before you start laying around a metal stove, you should consider a lot of questions.
First of all, it is important to decide whether a foundation is needed. To do this, the weight of the brick structure is calculated and the endurance of the wooden floor is assessed. In some cases, it is enough to simply additionally strengthen the load-bearing logs. But the safest thing to do is to pour a foundation under the brickwork. It is up to the owner to decide what it will be: strip or pillar.
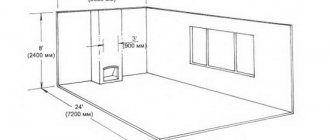
If the foundation was not laid during construction, then it will be necessary to dismantle a certain part of the floor and dig a pit, since the foundation for the furnace formwork must be located at the same depth as the base of the building itself. In size, it should be 15-25 cm wider than the furnace screen itself.

First of all, you should calculate whether the floor will support the weight of the foundation
The foundation of the stove should not be connected to the main one; if the firebox is located near a load-bearing wall, then a distance of at least 5 cm is provided between the two foundations. The gap formed between them should be filled with heat-insulating materials. The height of the stove foundation should be 10-15 cm below the floor level.
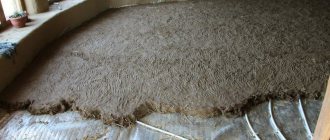
It should take about a month for the foundation to dry completely. And only after that work continues. Several layers of roofing felt or roofing felt are laid on top as a moisture-proof material. Then two rows of bricks are laid, each subsequent brick of the second row is laid offset relative to the previous one so that the seams overlap. Now the foundation for the furnace screen is ready.
Even if the floor and foundation joists seem strong and reliable, capable of supporting the weight of a brick screen, a number of preparatory work will be required. A base for installing the oven and screen is being organized. The base must be non-flammable and strong; the following materials can be used:
- A sheet of metal fixed over a thermal insulation layer;
- Two rows of brickwork that are laid on a wooden floor;
- Ceramic tiles resistant to high temperatures;
- Artificial or natural stone.
Guide to action
The process itself does not cause any particular difficulties and is quite feasible even for people who do not have construction skills. However, if you force it and disrupt the sequence of technological stages, you can get a result that is far from expected. Therefore, we offer you step-by-step instructions so that, in full accordance with its points, you can efficiently line an iron stove in any bathhouse with suitable bricks and be satisfied with the result.
Foundation design
Usually this stage is performed when the furnace itself is being built. However, if for some reason you lost sight of the need for its construction, then nothing bad will happen. True, for this you will first need to dismantle the stove.
- decide what size the base will have;
- build wooden formwork - for this it is best to use plywood boards;
- cover the boards with roofing felt - this will protect them from moisture and subsequent rotting;
- pour fine crushed stone and sand into the hole, and then fill it with cement mortar;
- It is best to cover the base with a reinforcing mesh and allow time to dry - usually no more than 3 weeks.
Construction of the foundation
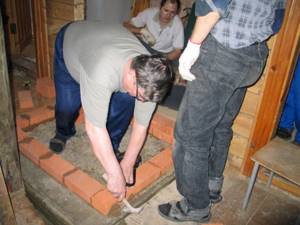
- lay out the base of bricks in one row;
- make sure that the masonry has no discrepancies in height;
- lay roofing felt for waterproofing and a sheet of iron - select a size so that it extends beyond the masonry by about 0.1 meters;
- Place the oven and wrap it with plastic wrap so as not to stain it with the adhesive solution afterwards.
Preparing the mortar for masonry
In order to prepare a truly successful solution, you should make sure that there are no lumps or foreign impurities in it. Ideally, you take equal parts clay and cement and add about a third of river sand.
- carefully stir the solution in the container and add water until an acceptable homogeneous mass is obtained;
- A construction mixer will help speed up the process;
- You can check the density by placing part of the mortar on the brick with a trowel - if it doesn’t drain, then you’re done!
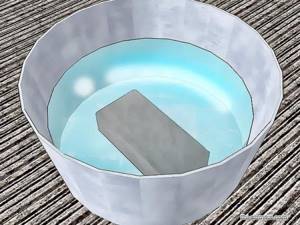
Preparing a brick
True, this is done quite simply: select the required amount and soak in water for about 12 hours. You may ask, why such a perversion? It’s simple: this way it will not absorb the solution during direct installation. If there is dirt and defects on the brick, it is better to get rid of them immediately: doing this later will be very problematic.
Types of masonry
There are two installation options, each of which has its own pros and cons:
- traditional block;
- lattice.
The second option looks much more impressive, but allows too much heat leakage. Simply put, it's not that effective. The first is classic, used everywhere and for good reason: such a heat shield has a minimum of holes that allow air to pass through, which means that such brickwork fulfills its purpose as efficiently as possible.
- you need to start laying from a corner and check the evenness of each row with a level;
- to maintain angles, use a plumb line;
- do not overdo it with the solution - always remove excess with a trowel, especially if it penetrates inside the heat shield;
- The rigidity of the structure is given by the reinforcing mesh; it is advisable to tie the second row with the third immediately after laying with wire;
- do not forget about the need for air circulation - for this you need to provide 2 gaps in the row, which are approximately equal to half of the brick used - but they need to be done only through the row;
- The last row can be laid out arbitrarily, designed in full accordance with your aesthetic preferences.
Also, for a better understanding of the situation, we recommend watching several videos on the topic:
A large collection of photos will also help you, revealing all the styling details. There is no point in explaining them - you will understand everything yourself.
How to line a sauna stove with bricks: step-by-step instructions
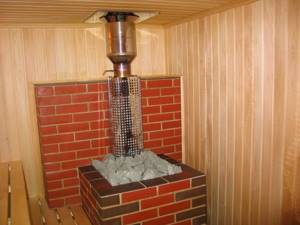
Fireclay brick, immerse in water for a moment. The task here is not to moisten, but to wash away dust from the surface. It must be laid quickly, since fireclay quickly absorbs the moisture of the solution. During work, a plumb line and a building level are used. If it is a round stove, then the ideology of ventilation ducts remains the same. Try to arrange them symmetrically, on three sides, conventionally, with two windows on top and bottom, as it would be approximately in a rectangular masonry.
Classic option: two windows in the second row from the top and the second row from the bottom. So, on each side. The lower holes will provide suction of cold air, and the upper ones will provide the release of heated air. In addition, circulation will have a beneficial effect on the metal of the furnace. The solution may take time to set, so it is better to wait a day. Finishing involves cleaning the brick from the mortar and giving it a uniform shade.
It is more convenient to remove excess solution using a drill with a brush attachment. The work is dusty, so use a respirator and goggles. After cleaning, stains of uneven color may remain on the bricks.
To even out the shade, use a solution of laundry soap and water and a hard, dense brush. The result is a beautiful shade without blemishes. Carry out the first fire after lining slowly, allowing the brick to gradually absorb the heat.
That's probably all. I think that you will feel the comfort of a lined stove right away. The heat will become more balanced, and the heat source will delight you with a pleasant view and pleasure from independent work. Subscribe to the blog for updates and stay up to date with all articles. Good luck and soft steam to your bathhouse! See you! We line the metal stove with bricks in the bathhouse. For those who do not understand, I will explain: The first disadvantage of an iron sauna stove is its low inertia. From this article you will learn: 1 A stove lined with bricks will create additional load on the floor and foundation 2 Surface marking 3 Mortar for masonry 4 Bricks for lining stoves 5 Lining the stove with bricks 6 Ventilation windows for convection of air leaving and entering the stove 7 Finishing.
Did you like the article? Share with your friends! You may also be interested in: How to make a chimney through a wall? All stove maker rules and fire safety standards.
Protective screens near (around) the stove
Protective screens are insulation panels that cover the side surfaces of the furnace and reduce the intensity of thermal radiation. Screens can be metal or brick. As a rule, they are used for metal furnaces.
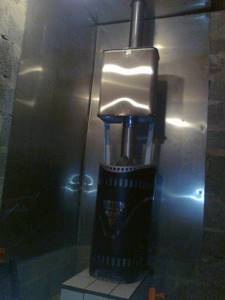
Method #1 - metal screens
The most common protective screens are factory-made steel or cast iron sheets. They are installed around the stove, at a distance of 1-5 cm from the walls of the firebox. Depending on the need to insulate one side or another of the furnace, you can purchase side or front (front) screens. Many metal furnaces are initially manufactured with protective screens in the form of a protective casing.
Protective screens make it possible to reduce the temperature of external metal surfaces to 80-100°C and, accordingly, reduce the fireproof distance to 50 cm. The total distance from the firebox to the wall (including a gap of 1-5 cm) will be 51-55 cm.
Installing protective screens is not difficult. Thanks to the presence of legs, metal panels are easily bolted to the floor.
Method #2 - brick screens
A brick screen can cover all the side surfaces of a metal furnace, representing its outer cladding. Then the stove will be in a casing made of brickwork. In another case, a brick screen is a wall separating the stove and the flammable surface.
To lay the protective screen, solid fireclay bricks are used. The binder is cement or clay mortar. It is recommended to use half a brick (thickness 120 mm). But, if there is a lack of material, it is possible to make a wall of a quarter of a brick (60 mm thick), although in this case the thermal insulation properties of the screen will be reduced by half.
Small openings (sometimes with fire doors) are left at the bottom of the shield for air convection between the brick wall and the stove.
The brick walls of the screen must end at least 20 cm above the top surface of the oven. Sometimes the masonry goes all the way to the ceiling.
The brick screen is not installed flush against the walls of the stove, the optimal distance is 5-15 cm. The acceptable distance from the brickwork to the flammable wall is 5-15 cm. Thus, the use of a brick screen allows you to reduce the distance from the stove to the wooden wall to 22-42 cm (stove - ventilation gap 5-15 cm - brick 12 cm - ventilation gap 5-15 cm - wall).
Covering bathhouse walls with non-combustible insulating materials
To prevent the walls from overheating, you can use materials with increased thermal insulation properties and inertness to high temperatures. Two types of materials are used:
- reflective;
- fireproof with lining.
The first type includes materials for wall cladding, consisting of thermal insulation with fire-resistant properties and a metal covering in the form of a sheet.
Insulating walls with reflective sheathing
A protective cake with reflective materials is done this way. First, the thermal insulation is attached using ceramic bushings directly to the wooden walls, then it is sewn up with a stainless steel sheet.
Advice! It is better not to use galvanized metal, since heating may release heavy metals harmful to the human body.
Stainless steel with a polished surface reflects the heat flow inside the steam room, reducing heat loss. In this case, reflected heat is more useful than direct heat. For thermal insulation use:
- basalt cardboard or cotton wool, the only material with increased hygroscopicity, non-flammable, environmentally friendly;
- asbestos cardboard, which reliably protects against flames and has a long service life;
- mineralite, an artificial material made specifically for these purposes.
Protective sheathing requires ventilation gaps of 2 cm from the wall to the insulation, 2 cm from the insulation to the steel sheet. If it is necessary to install the stove as close to the wall as possible, make a double skin of non-combustible insulation, use ceramic bushings to maintain gaps of 2-3 cm and sew them up with a steel sheet.
Insulation with cladding
Measures to protect walls with cladding are necessary in order to preserve the interior decoration of the room. They are more expensive, but no one has canceled the aesthetic advantages of the bathhouse. It is based on tile cladding, which is laid on fire-resistant cladding made of gypsum plasterboard, non-deformable gypsum-based cardboard with fiberglass, mineralite, non-flammable cement-fiber material, moisture-resistant and resistant to biochemical influences, LSU, fiberglass material bound with magnesium additives, resistant to high temperatures, high humidity. Heat-resistant glue is used for installation.

Advice! Use heat-resistant reinforced Terracotta glue, made from fireclay dust bound with kaolin additives, intended for tiling stoves, fireplaces, and all heated surfaces.
The recommended facing materials are quite varied, the best of them are:
- terracotta tiles, they are made from specially fired clay, which gives increased heat resistance and durability;
- clinker, denser clay tiles with a surface of various colors, similar to facing bricks;
- tiles, also made from clay, having an original embossed surface;
- porcelain stoneware made from a mixture of clays, kaolins, quartz sand, feldspars by high-temperature firing under a pressure of 400-500 kg/cm², with imitation of stone, wood, durable artificial material;
- soap chloride, a rock mineral consisting of talc, magnesite and chlorite, an environmentally friendly natural material that does not absorb moisture at all, has an attractive appearance, does not crumble, and is not afraid of high temperatures.
Advice! Use soap chloride to finish the steam room, this mineral has a healing effect on the human body, regulates blood pressure, stimulates cerebral circulation, expels viruses and microbes due to the release of vitamin D when heated.
All of the listed tiles are an element of protection that forms a cake, the basis of which is a fire-resistant material. Just like a screen, sheet material is installed on ceramic bushings with a gap of 2-3 cm from the wall. The minimum distance to the heat source from the tile should be 20cm.
Protection with cladding decorates the room, creates a positive mood, and helps to increase the efficiency of procedures. And most importantly, properly installed insulation prevents wooden walls from overheating and catching fire. Have a nice steam!
Required materials and tools
For work, prepare the following tools:
- bubble level 90 cm long;
- plumb line;
- steel square with sides 40x60 cm;
- mason's hammer and small trowel;
- pencil, tape measure and cord for marking;
- Master OK;
- container for mixing masonry mortar;
- a grinder with a circle for stone, it will be needed to adjust the brick to size.
What is needed to build a stove
To build the furnace, you should use ordinary refractory bricks made of red baked clay. According to the standard, their dimensions are 12.5 × 25 × 6.5 cm. However, various brick factories can produce batches of material that differ in dimensions. Based on this, before work you should carefully select the size of the bricks.
To construct a firebox, bricks made of fireclay clay, grade Sh-5, are required. They can be light yellow, pinkish or white. This material is fireproof and can withstand exposure to open flames.
Fireclay brick sizes may vary slightly. There's nothing wrong with that. Typically, the fuel chamber in a sauna stove is not connected to its body. Therefore, there is no need to adjust the brick rows to a single level.
It is not worth laying out the stove completely from fireclay material:
- firstly, it is expensive;
- secondly, fireclay bricks cool faster than their ceramic counterparts.
Furnace mortar
You should not completely build a stove using such a mixture. At a temperature range of +700-800º, such a solution is baked to a monolithic state. There will be no such temperatures in the external part of the structure. Therefore, the fireclay gradually cracks and falls out of the masonry.
For laying the stove body, a clay-sand mortar is used in a ratio of 1:5. The sand must be quartz - river or quarry. The quality of the first variety is slightly worse. The grains of river sand are round, so the solution made from it has worse properties.
Clay must be taken from a quarry, raised from a depth of at least two meters. How to check its quality:
- Soak some clay (300 g) in water for one day.
- Then make a ball out of it and let it dry.
- After a couple of days, throw the bun onto a hard surface. If the ball breaks up into large fragments, then the material is suitable for oven mortar.
Also prepare steel wire with a cross section of 3 mm. This will be used to secure the doors of the firebox and vent. For installation of casting you will need an asbestos cord. This heat insulator is used to wrap the edges of the grating, which are embedded in the masonry. Thanks to this, the brick does not crack due to high temperature.
Overlay methods
In essence, stone cladding is used to act as a heat shield for a furnace. Due to the fact that such a structure is not susceptible to the main thermal effects, it can be constructed in the form of:
- Continuous lining, which is characterized by rapid heat transfer, which causes a decrease in furnace performance. In this option, cladding is rarely performed, and most often to give the metal stove elements of a decorative nature. At the same time, the quality of heating is in the background.
- A heat shield that will look like a small stone fence. This option is quite comfortable for others and helps to increase heat transfer.
- Convector facings with vents. This structure is the most optimal for bathing needs and is suitable for any metal structure, regardless of the size of the steam room.