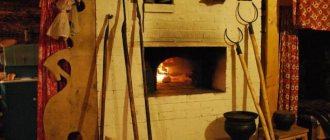
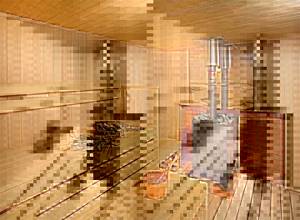
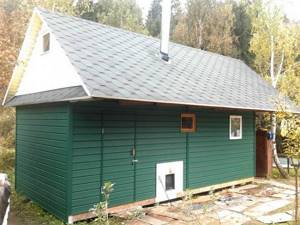
In the cold frosty winter, bath procedures are much more relevant than in the summer. This is a great opportunity not only to take a steam bath, but also to relax comfortably in a warm room. To heat a classic Russian bath, a wood-burning heater is chosen; for modern saunas, electric saunas are often used.
In any case, correct installation of the stove in compliance with fire safety standards is important. To do this, you need to select a location in advance, determine the type of furnace, what raw materials it will be heated with, and whether there will be a heat exchanger.
Users often search for:
- Stones for the sauna heater
- How to make shelves in a steam room correctly
Where is the best place to put a stove in a wooden house?
When choosing the optimal location, the operating principle of the stove, the possibility of further connection of the chimney and ease of maintenance during operation are taken into account.
Fire breaks must be calculated - the distance between heating surfaces and walls made of flammable materials. The installation location of the stove in a wooden house is determined as follows:
- Principle of operation:
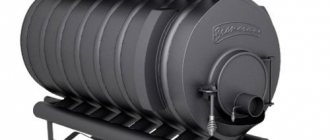
- Air-heating furnaces, operating like the Russian “Burzhuika” or the Canadian “Buleryan”, are installed in a place where convection currents move unhindered. If it is planned to heat adjacent rooms, the structure is built into the interior partition, or air ducts are connected.
- A stove with a built-in water heat exchanger is installed so that the circuit in the stove is the lowest point of the heating system. The location is not critical and is determined only by fire safety requirements.
- Connecting a chimney - installation of a heating stove and chimney in a wooden house are closely interconnected. The stove is located where it will be easier to connect the chimney in compliance with fire safety requirements.
- Ease of maintenance - to fire and clean the stove, you will need a sufficient distance towards the opening of the combustion chamber door. Furnace equipment with panoramic glass provides the opportunity to admire a live flame; this feature is also taken into account when choosing a location
- Fire breaks - from the heating surfaces of the stove body to the walls made of combustible materials, leave a distance of 110-125 cm. In the direction of the opening fire door, at least 125 cm.
Protective non-combustible wall coverings
If there is no need to carry out work to protect walls using screens, in this case, you will still need to reliably protect the surfaces from exposure to high temperatures.
You can use classic mineral wool or use mineralite slabs. We get a reduction in the distance from the wall to the stove in the house, without the risk of fire and deformation of building materials.
Minerite
Installation of reflective trim
This is one of the main methods of protecting surfaces from high temperatures. To do this, you can use a sheet of thin cold-rolled metal with its glossy surface or buy more expensive stainless steel sheets with a mirrored face. This heat-reflecting protection allows you to quickly heat the room without wasting firewood and reliably protects the walls and ceiling from deformation.
First, the sheathing strips are secured. The bars should be selected taking into account the thickness of the insulating material. A thermal insulation layer is embedded in the spaces between the sheathing parts. On top of it, sheets of reflective sheathing are attached to wood or metal screws (this depends on the material of the bars).
Using this method of protection, you can reduce the distance from the stove to the wall to 380 mm.
Protecting walls from the heat of the stove can be used as decorative decoration for premises.
Examples:
Photo 1
Photo 2
Installation of sheathing with cladding
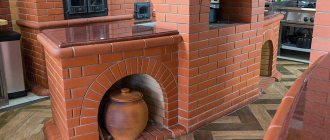
This method will require increased costs for the purchase of materials, but will also make your home cozy and beautiful. Porcelain stoneware or expensive tiles can be used as cladding, it all depends on the capabilities of the owner of the house.
Work on the protection and decorative finishing of walls is carried out in several stages, the result is a kind of cake:
a ventilation gap is made on top of the wall, 20-30 mm thick; then a layer of thermal insulation is laid and fire-resistant drywall is attached on top of it; a layer of decorative finishing is laid on fire-resistant glue or mastic using beacons to ensure an equal gap between the rows
It is important not to use large tiles. Such parts are more susceptible to deformation, unlike small tiles.
Using this method, you can reliably isolate the stove from the wall and make a gap of 150 mm between them.
Example
Shallow base
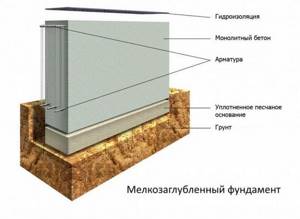
Here is the answer to the question of how to properly install a stove in a bathhouse with minimal time and money. Such a foundation is made relatively quickly and simply, however, it is only suitable when building on stable and water-free soil. The sequence of work on its arrangement is as follows:
- Mark the boundaries of the pit and dig it - up to 0.5 m deep.
- Tamp the bottom, leveling it with river sand (5 cm layer), moistening it with water and compacting it.
- Make a cushion of crushed stone (15-20 cm) and fill it with liquid cement.
- Wait until it dries, waterproof the base with roofing felt, install the formwork, strengthen the structure with 20-30 cm of concrete.
- After hardening, remove the unnecessary panels and level the foundation horizontally.
Protective screens near (around) the stove
Protective screens are insulation panels that cover the side surfaces of the furnace and reduce the intensity of thermal radiation. Screens can be metal or brick. As a rule, they are used for metal furnaces.
Method #1 - metal screens
The most common protective screens are factory-made steel or cast iron sheets. They are installed around the stove, at a distance of 1-5 cm from the walls of the firebox. Depending on the need to insulate one side or another of the furnace, you can purchase side or front (front) screens. Many metal furnaces are initially manufactured with protective screens in the form of a protective casing.
Protective screens make it possible to reduce the temperature of external metal surfaces to 80-100°C and, accordingly, reduce the fireproof distance to 50 cm. The total distance from the firebox to the wall (including a gap of 1-5 cm) will be 51-55 cm.
Installing protective screens is not difficult. Thanks to the presence of legs, metal panels are easily bolted to the floor.
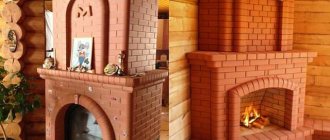
Method #2 - brick screens
A brick screen can cover all the side surfaces of a metal furnace, representing its outer cladding. Then the stove will be in a casing made of brickwork. In another case, a brick screen is a wall separating the stove and the flammable surface.
To lay the protective screen, solid fireclay bricks are used. The binder is cement or clay mortar. It is recommended to use half a brick (thickness 120 mm). But, if there is a lack of material, it is possible to make a wall of a quarter of a brick (60 mm thick), although in this case the thermal insulation properties of the screen will be reduced by half.
Small openings (sometimes with fire doors) are left at the bottom of the shield for air convection between the brick wall and the stove.
The brick walls of the screen must end at least 20 cm above the top surface of the oven. Sometimes the masonry goes all the way to the ceiling.
The brick screen is not installed flush against the walls of the stove, the optimal distance is 5-15 cm. The acceptable distance from the brickwork to the flammable wall is 5-15 cm. Thus, the use of a brick screen allows you to reduce the distance from the stove to the wooden wall to 22-42 cm (stove - ventilation gap 5-15 cm - brick 12 cm - ventilation gap 5-15 cm - wall).
Oven installation methods
In the classic version, it is customary to place the stove directly in the steam room. But it is also installed in a steam room with the firebox removed to the dressing room or rest room. In small bathhouses, it is permissible to place the firebox on the street side.
Let's look at each of the methods in more detail.
In the dressing room, rest room
Removing the combustion part to the dressing room is considered the safest and most convenient installation option.
This heating arrangement has several significant advantages:
- Oxygen in the steam room is not burned out by fire.
- More free space in the steam room.
- It’s easier to keep the room clean by cleaning the ash pan.
- They throw firewood in the dressing room. The firewood shed should also be located here.
- There is no need to separately heat the dressing room, provided that the stove has enough power.
Stoves with a protruding firebox and rectangular shape are suitable for this.
The installation of such a structure should be planned during the construction phase of the bathhouse, otherwise you will have to break part of the partition between the rooms.
To do this, a hole is left in the wall, which is then lined with fireproof materials. The stove must be installed so that access to the firebox is from the outside, that is, from the dressing room.
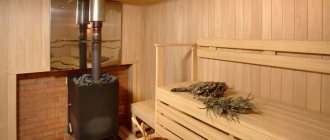
In the steam room
The most popular option in the classic Russian bath. The oven is located entirely in the steam room. Firewood is also loaded from here. Therefore, you need to immediately leave a little more space for firewood.
The advantage of a stove in a steam room is convenient draft adjustment by opening/closing the combustion door. A device with a door made of tempered glass, through which the fire will be visible, looks beautiful.
Disadvantages of this location:
- It is more difficult to keep clean near the stove.
- In a small steam room, oxygen will be quickly burned out by the flame.
The location of the stove must be planned in advance so that vacationers do not come into contact with the hot surface.
It is better to place the stove in the corner so that when pouring water on the stones, no one will get burned by the hot steam. It is imperative that the distance from the stove to the shelves complies with current fire safety standards and regulations.
It will be easier to install the stove if you follow the manufacturer's instructions. To protect the walls from fire, a fire-resistant apron should be installed.
For good air exchange in the room, you need to make a ventilation hole in the floor. It should not be higher - the heat will escape from the room.
With access to the street
This option is for a seasonal bathhouse in a country house, designed in the form of a barrel or a mini-house. Fuel loading and ash removal are done outside.
The disadvantage of this solution is the inconvenience of controlling the filling of the stove with wood, coal and maintaining the required temperature.
Installation of railings
In order to prevent possible contact between a person and a hot stove, railings can be installed along the perimeter of the fireproof foundation.
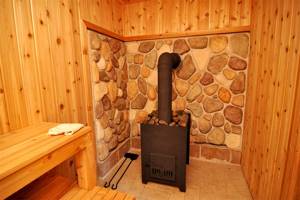
To reduce the level of harshness of radiation from metal, it is recommended to line the stove with natural stone or refractory brick.
In order for the air flow to pass freely to the firebox, openings must be left at the base of the masonry. The dimensions of these openings must be no less than the area in terms of the space around the firebox (it is better if the openings are twice as large as this area). The length of the firebox contour in plan is multiplied by three centimeters of the gap. The result is an area (in centimeters), no less than which the windows at the base of the masonry should be.
Articles about baths:
- back to the section “Building a house with your own hands”
- Bath brooms
- Bath and sauna in the house
- Ventilation holes in the bath
- Bath ventilation system
- Internal structure of the bath
- Interior decoration of the bath
- Construction of a chopped bathhouse
- Construction of bath walls
- Auxiliary materials for the construction of a bathhouse
- Choosing a place for a bath
- Choosing a stove for a bath
- We make furniture for a bath
- Reducing humidity on the walls of the bathhouse
- Which sauna should you choose?
- Choosing stones for a bath
- Installation of a sewerage system for a bathhouse
- Caulk of a wooden bath
- Operation of hatches and chimneys
- Materials for building a bathhouse
- Installation of a concrete floor in a bathhouse
- Installation of bath doors and windows
- Installation of a wooden floor in a bathhouse
- Bathroom ceiling installation
- Lighting in the bath
- Features of choosing tiles for a bath
- Finishing of sauna log houses
- Bath heating
- Cleaning the ash pan
- How to choose the right stove for a sauna
- How to take a steam bath correctly
- Heaters for solid fuels
- Steam room ceiling
- Rules for lighting the stove
- Types of sauna stoves
- Bathhouse repair
- Chimney pipe repair
- Repairing the crown of the chimney
- Bath walls
- Arrangement of the roof of the bathhouse
- Thermal insulation of the bath
- Bathhouse foundation
- Cleaning chimney bricks
- Choosing an electric heater for a sauna
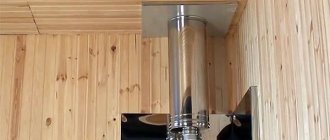
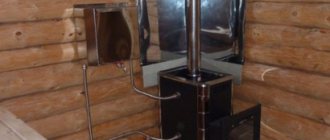
Chimney
It is important to know how to organize the exhaust gas outlet. Proceed as follows:
- Mark the location of the passageway on the ceiling.
- Saw the ceiling, treat it with fire-retardant impregnation, insert the groove (box with outlets) and secure it in the corners with self-tapping screws, lay 7.5 mm thick basalt insulation.
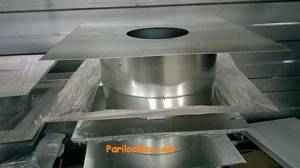
- A single-wall module, at least one meter deep, or a pipe heat exchanger is first installed on the sauna stove. Next, an adapter from a single-walled to a double-walled pipe, then the use of a sandwich structure is recommended.
- Connect the free end to the adapter, to which, on the other side, connect the first section of the chimney, followed by the second, and so on. Reinforce the joints with metal clamps.
- Protect the outlet pipe with a steel sheet (from the attic side), which is secured to the wooden ceiling using self-tapping screws.
- Cut a hole in the roof and bring out the pipe using a groove with an aluminum element.
- Make sure that the chimney rises 0.5-1.5 m above the roof level and install a cap.
If you purchased a ready-made unit, you must follow the instructions. On the website you can find high-quality factory-made polyurethane foam, presented in various configurations: “empty” or with additional insulation. In the first case, it is necessary to cover the base of the unit (stainless steel sheet) with basalt cardboard from the inside, and install the polyurethane foam itself in a box protected by mineralite sheets. We leave the distance between the pipe and the sheet empty. But the assembly itself must be covered with kaolin wool to a depth of 5-7 cm from the attic side; no more is needed to avoid overheating of the pipe.
Where to put the stove in the bathhouse?
The location of the stove depends on many factors, in particular, on its type, as well as on the location of the firebox (in the same or in an adjacent room). In addition, fire safety is important - there should be at least half a meter from all fuel.
So, those who decide to install a brick oven make a foundation for it, so the location is already determined at the sketch stage. But with a metal stove, sometimes people delay until the last minute, not knowing which model to buy. Therefore, it happens that already finished walls have to be cut and other unnecessary work done.
IMPORTANT! The location of the supply ventilation depends on the location of the stove, so it’s better to think in advance. In addition to ventilation, it is worth thinking about fire safety, especially in a bathhouse with flammable walls
Often, in order to provide it, part of the wall is made of brick. Which again speaks to the need for planning.
In addition to ventilation, it is worth thinking about fire safety, especially in a bathhouse with flammable walls. Often, in order to provide it, part of the wall is made of brick. Which again speaks to the need for planning.
The location of the stove in a bathhouse with a separate steam room
There can be two options:
- or the stove, together with the firebox, is located entirely in the steam room, which means it only heats it;
- or the firebox is moved to the adjacent room, which allows for partial heating of that room too.
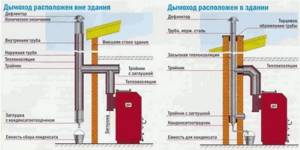
The location of the stove in a bathhouse with a separate steam room: option with a firebox from the rest room. Diagram from the article about the hood
In the first case, during the cold season you will have to think about how and with what to heat the neighboring rooms, in the second - the same problem remains only partially.
Stove in a bathhouse with washing and steam room
Here you can also find several solutions. The firebox can be taken not to the rest room or dressing room, but to the washing room. But this is problematic from the point of view of storing firewood. Therefore there are other options.
Stove in a bathhouse with washing and steam room
You don’t have to remove the stove at all, just install a water tank at the top, which will be connected through the wall to the “samovar” on the chimney pipe in the steam room. “Samovar” is a heat exchanger (!stoves with a heat exchanger are reviewed here), which can be found on sale; with its help, water for the washing room is heated, and from the tank there is heat sufficient to maintain a normal temperature of 30-32 degrees in the washing room.
In some cases, the problem is solved by additional heat sources - a warm floor or a second stove.
Is a foundation always needed for a furnace?
We already said above that no, it is not always needed. The need for it arises only when the weight of the sauna stove with everything associated (from the water tank to all the bricks that line the floor, stove and chimney) exceeds 700 kg. If the total weight is lower, you can simply lay the base with bricks instead of a foundation, put 12 mm asbestos on top, and on top of it - a steel sheet of any thickness (from 1 mm). The topic is discussed in detail here.
IMPORTANT! A separate foundation for a brick oven is made so that it has its own shrinkage, not related to the shrinkage of the house. Such a foundation is made thoroughly, deepened to the load-bearing layer
If the stove weighs more than 700 kg, but not much, then you can make a shallow foundation
Such a foundation is made thoroughly, deepened to the load-bearing layer. If the stove weighs more than 700 kg, but not by much, then you can make a shallow foundation.
Usually the foundation for the furnace is not brought up to the height of the subfloor, because then the bricks are laid and the height is compared. The area of the stove foundation should be 15-20 cm larger than the area of the stove base on each side.
The video below clearly demonstrates the process of pouring a foundation for a bathhouse yourself. The video is a little dark, but it gives you an idea of the process.
Installing a metal stove in a bathhouse: choosing a location
Where exactly in the steam room do you see the future stove (see here about choosing a stove for a steam room)? Will it be located in a corner or just against one of the walls? Where will the firebox go - into the steam room or into an adjacent room (dressing room, for example)? What will be the distance between the stove and the shelves, the opposite wall, and the adjacent wall? How far from the beam will the chimney be?
All these questions need to be answered. And since some of the answers are dictated by fire safety standards, we will turn to them.
First, let's figure out
the distance to the wall . If it is made of flammable material, then the optimal distance would be half a meter from the stove . But who has that much space in their steam room? The only way to reduce the gap between them is to either line the wall with non-combustible material, or replace a piece of wooden wall with a brick one .
The latter is most often done in cases where the firebox is located in an adjacent room. Considering that the combustion tunnel is usually between 20 and 30 cm, the stove cannot be much further from the wall. Combustion tunnels have different lengths. They go through the wall. Subtract the wall thickness. The remaining distance is the maximum how far the stove can stand from the wall. The half-meter rule also applies to the gaps between combustible walls and the side walls of the stove. With the same allowance for non-combustible cladding or brick cutting. Yes, this applies to all flammable items, including shelves.
Regarding the firebox: an external firebox is preferable for two reasons: more oxygen will remain in the steam room, and some of the heat will go to the dressing room.
But there is an important point: IMPORTANT! Wherever the firebox is located, there must be a free space in front of it of at least one and a half meters, and on the floor in front of it a firebox must be placed, protecting at least half a meter of the floor surface from accidental sparks and fallen coals.
Regarding the beams: the distance between them should initially not be too small. For example, it could be 90 cm . In this case, it is better to put the chimney in the middle, surrounding it with a cutting box.
Cutting boxes
Advice! Do not forget about the location of the beams when choosing a place for the stove so that you do not have to bend the chimney.
And regarding ventilation: the inlet must be brought out next to the ash pit so that oxygen-saturated street air enters the firebox. But ventilation is installed during construction and redoing it is very troublesome , so once again: think ahead. We advise you to research bath ventilation materials.
Separation of a section of ceramic coating along with the solution from the base
The most likely cause of such destruction is an incorrectly selected primer mixture or no priming at all before laying the tiles. A common mistake when preparing the base is priming with concentrated latex, which forms a thin rubbery film on the surface that prevents adhesion to cement-based tile adhesives.
The separation of the laid tiles along with the mortar from the base can be caused by deformation of the base
The preserved finish is inspected and tapped to identify voids that are fraught with additional destruction of the cladding. If the area of the collapsed finish and existing voids in total exceeds 20% of the total area of the base, then the wall or floor cladding will have to be re-done in full, taking into account the mistakes made, since after partial repairs the destruction of the old tiles will most likely continue.
Putting the stove into operation
During the first kindling, the stove is heated for 1.5 hours, then proceed to a full fire
The brickwork is dried at a temperature of +5 – +30°C. At this time, doors and valves are opened around the clock. The first kindling takes place without the use of flammable liquids and flammable materials. Use dry newspapers and small wood chips. After obtaining a stable fire, you can add logs in small portions.
The ashpit is kept open, the intensity of combustion is controlled by closing or opening the door. Check the draft and heating rate. The heating process lasts 1 - 1.5 hours, then you can proceed to normal heating of the stove.
Foundation for an iron furnace
Despite the fact that iron sauna stoves are usually light in weight, even for the lightest thin-walled model it is advisable to have a separate foundation. The thing is that even a slight misalignment, sometimes invisible to the eye, leads to accelerated wear. And only the presence of a solid foundation guarantees its absence, and therefore long-term operation of the stove.
Making a foundation for an iron stove is not difficult. Necessary:
- Dig a pit of a suitable size. The size of the foundation should be 10-15 cm larger than the dimensions of the stove (more is possible, less is not possible). If the metal furnace is built with a brick screen, then the indentation is calculated from the outer edge of the screen. The depth of the foundation and pit depends on the type of soil. On non-heaving soils, 50-60 cm is sufficient.
- Crushed stone is poured into the bottom and compacted thoroughly. The compacted size of this layer must be at least 30 cm.
- Compacted crushed stone is poured with liquid cement mortar. The approximate ratio of materials for its manufacture is as follows: take 4 parts of sand for one part of cement, the amount of water depends on the state of the solution - it should be of medium thickness.
- After the layer has dried (in a day or two), a waterproofing layer is laid. This can be roofing felt in two layers or one of the new bitumen waterproofing materials (roll or coating).
- The formwork is set according to the selected foundation dimensions.
- A layer of concrete is poured. For one part of cement you need to take 2.5 parts of sand, 4 parts of fine gravel or expanded clay (with expanded clay you will get a more thermally insulated base). First, cement and sand are mixed dry until an even color is obtained. Then gravel or expanded clay is poured in and everything is mixed again. When all parts are evenly distributed, dilute with water. Water usually goes a little less in volume than cement. We carefully level the laid out solution, checking its horizontalness using a building level.
- Instead of a concrete layer, you can use bricks. They are placed on a cement-sand mortar.
The formwork can be removed after three days, and the concrete gains its design strength in three to four weeks. For normal ripening, it must be regularly moistened with water: sprinkle generously 2-4 times a day, depending on the temperature. There should be no puddles, but the solution should get wet well. If it's too hot outside, cover the base with plastic wrap to prevent moisture from evaporating quickly.
There is a moisturizing option that does not require frequent spraying: cover it with burlap or some other fabric, add a good layer of sawdust, and wet it. This is enough for a day.
A concrete base is cheaper and stronger, but requires more physical effort, even if you have a concrete mixer. The disadvantages of concrete include the difficulty of dismantling it.
How to line the foundation for a metal stove
If the upper part of the base is cast from concrete, then outwardly it has an unattractive appearance. You can line the foundation with bricks from the outside, but this is only if conditions permit: the brick is still of decent size. For other cases, cladding with thick ceramic tiles (thick ones) is suitable. Porcelain tiles are likely to crack at high temperatures. Perhaps a natural finishing stone would be suitable.
The tiles are laid on a special heat-resistant glue (there are such). The grout is also selected accordingly - resistant to high temperatures. You can do without grouting: carefully open the seams with glue. If you do everything carefully, the appearance will be normal. The grout only looks good at first. Then, when ash and soot are added, you will be tortured to scrub it off.
Pouring a monolithic foundation
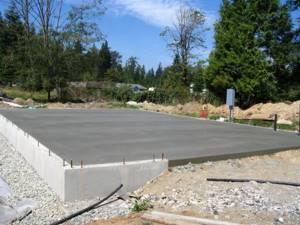
It is carried out according to the rules for installing a stove in a bathhouse, exactly according to the diagram it is necessary:
- To carry out the main excavation work - carefully dig a small vertical pit 1.5 m deep so that on all sides of the perimeter it is 10 centimeters wider than the future foundation. To speed up the process, it is possible and even recommended to use special equipment.
- Set up a sand-crushed stone cushion - fill the bottom with river sand, compact it, watering it with water. At the same time, mix the fine-grained material in a ratio of 1 to 1, then lay it in an even layer of 15-20 cm.
- Mix the “milk”, that is, not a thick cement mortar, then gradually pour it into the pit. Allow time to harden so that the crushed stone and gravel adhere firmly.
- Waterproof the initial layers of the base using roofing felt or liquid bitumen.
- Assemble the formwork - make panels from plywood (or boards, as an option), nailing them together or fastening them with screws, and then placing them in the pit. Align vertically (the height of the structures here should rise right up to the finished floor), check the diagonals, making sure that the finished sole will be in the shape of a rectangle (square).
- Reinforce - tie the frame (10 cm less than the perimeter and height of the formwork) with wire and place it inside.
- Pour - prepare a solution (in a ratio of 1 to 2.5 to 4 from sand, cement and crushed stone, respectively), mixing thoroughly, and tie it in layers with everything that was placed in the foundation pit earlier. Don’t forget to compact it with an in-depth vibrating device or a regular rod. Allow to dry for 3 weeks, then remove the formwork and fill the resulting voids with a mixture of sand and soil.
- Waterproof the finished concrete slab, first leveling it with grout (if necessary). To do this, lay the roofing material in two layers, fastening each with liquid bitumen mastic.
Installation features
When installing a chimney, there are several nuances that must be taken into account during the work:
- the first horizontal link should have a slight slope from the stove, which will protect the device from condensation;
- There are two ways to remove the smoke exhaust duct through the wall: raise part of the pipe to the ceiling and at this level bring it outside, or place the exit point of the duct to the street at the level of the stove inlet pipe. The second method is more preferable, which involves the use of a smaller number of shaped parts (only one rotary elbow);
- the entire chimney structure must be assembled from pipes identical in technical characteristics;
- in the area of passage through the wall, the pipe must be solid, without joints;
- the joints of sections and shaped elements should be coated with heat-resistant sealant before assembling the system, and after installation they should be additionally secured using special wide clamps;
- A protective umbrella must be installed on top of the pipe.
Basalt cardboard characteristics
The main difference of this material is its high thermal insulation and sound insulation. It is non-flammable, fire-resistant and fireproof. At the same time, basalt cardboard has extremely low hygroscopicity, in other words, it is not able to absorb moisture from the air. The temperature of use of this material is +500 degrees, while for a short period it can withstand up to +700 degrees. Another reason why cardboard should be used in a bathhouse is that it has excellent vapor permeability. It has increased resistance to microorganisms and rodents, does not crumble, does not rot, and is resistant to vibrations and thermal-oxidative aging. The approximate service life of this material is 50 years.
At the same time, basalt cardboard is very easy to cut; this can be done even with a simple knife. The sheets bend well and can take any shape, which allows for excellent thermal insulation of the bath room. Parts made of such material can be fixed using special glue
When cutting, it is necessary to take into account the shrinkage of the cardboard, which can occur from exposure to elevated temperatures. In case of high humidity, the sheet may bend, but after drying it will return to its previous shape. In total, it can withstand more than two thousand cooling and heating cycles
In total, it can withstand more than two thousand cooling and heating cycles.
Installation on a wooden floor
Options
There are three options for installing a heat-resistant base:
- a metal sheet;
- brick;
- natural or artificial stone;
- ceramic or porcelain tiles. The minimum size of protection should be 40 cm.
Preparing the walls
As already mentioned, it is easier to decorate the walls with refractories than to take away useful space from the steam room. The most economical, but not the best option is to nail a sheet of metal to the wall on bars.
In general, we have the following options:
- attach the refractory sheet to the wall;
- plaster it (it is better to make the layer more than 2.5 cm);
- make a brick casing for the stove;
- lay it out with bricks instead of a wooden wall.
If the stove is located close to the wall, then you will need a two-layer mineralite with an air gap of 3 cm between these layers of ceramic bushings. It looks something like this: wooden wall - first layer of mineralite - bushings - second layer of mineralite.
When space allows, you can get by with one layer, but grommets are also used to attach it to a wooden wall.
Heat-resistant tiles or mirror stainless steel are sometimes placed on top of the mineralite. The latter perfectly reflects heat, but heats up itself, so it can be attached to any refractory material - mineral wool, ceramic fiber, superisol, etc.
Those who brought the firebox into the dressing room either put up a brick wall, or then cut out part of the timber. A space is left in the brick with a reserve for the combustion tunnel, where a heat insulator, for example, mineral wool, is subsequently placed. It is also used at the junction of brick and wooden walls. If you don’t want to replace the entire wall, make a portal - at least a meter wide.
Ceiling preparation and chimney installation
Often the cause of a fire is the section of the ceiling where the chimney is located. There are many errors associated with the passage of a chimney through ceilings.
The specific cause of the fire may be:
- pipe overheating;
- cracks in the pipe allowing sparks to pass through;
- shortcomings in the distance to combustible objects.
If you haven't thought about the position of the stove in advance, there may be a beam above it. In this case, part of the beam is cut out and fastened with jumpers to adjacent beams. The empty space above the center of the pipe passage must be at least 90 cm in diameter.
The chimney is installed from the pipe that comes out of the stove. In the case of a larger diameter monopipe, an adapter is put on the pipe. The first pipe passing through the steam room will be a monopipe
A gate is installed on it, then it continues again, but not to the end (this is very important!) of the overlap, because there they put a “start” on it - an adapter for a sandwich pipe that will pass through the ceilings
Pipe connections should not be in overlap areas.
It is important to know here that although sandwiches are the most common, they are a dangerous type of chimney. An analogue of sandwich pipes is ceramic or brick chimneys, but both options are heavier and more expensive
The outer side of the box can be wrapped with basalt cardboard to prevent it from touching the wood. The pipe is then laid on the roof through a hole larger in diameter than the pipe itself. Next, it is sealed with sealant, a master flush is put on and secured to the roof with self-tapping screws at intervals of 5 cm. Finally, a deflector or umbrella is installed.
Preparing the oven
Before installing the chimney, the stove should already be located in its designated place. It is recommended to heat it outside first
It is extremely important to do this, because... the first fire is usually accompanied by burnout of industrial heat-resistant paint
The oven may smoke a little and smell. This is a normal state for her. At the same time, you will find out whether it has any manufacturing defects.
New stones should also be tried out in the fresh air, not inside, because they can also sting the throat and eyes.
Strictly follow the step-by-step instructions for installing a metal stove.
Preparing the oven
Before you work on the chimney, the stove should already be in its intended place. But first, it should be heated in the yard for the first time. is necessary to do this , because during the first fire the industrial heat-resistant paint usually sets and partially burns out. It “smoke” a little when fired and smells. This is normal, this is how it should be.
By the way, new stones in the yard - sometimes they give off a stench that stings the throat and eyes. It is better to experience this in the fresh air, and not in the steam room.
Assemble the stove according to the instructions, install it on a flat and solid base, place some piece of at least a ventilation pipe on the chimney pipe ( at least 2 meters long) and heat it thoroughly once. At the same time, find out if there are any design defects, if it smokes, in general, get to know each other.
On a note! Heat for the first time with normal wood, not garbage, and most importantly, wait for natural cooling after the wood has completely burned out. In this case, the paint polymerizes correctly.
Making and installing a chimney with your own hands
Before you remove the chimney through the wall with your own hands, you need to decide on its installation location and dimensions, and also develop a design diagram.
Options for correct placement of the chimney are presented in the following diagram:
Size calculation
The main parameter for choosing a chimney pipe is its internal cross-section. The internal diameter is calculated depending on the power of the heating device. Just keep in mind that the cross-sectional size should not be too large, otherwise heat will not be retained in the heater, and a pipe with an excessively small diameter will not create the required level of draft for smoke removal. And, of course, the diameter of any section of the structure should not be less than the outlet of the heating device pipe.
For stoves of low and medium power, the diameter and height of the chimney can be selected according to the table:
| Boiler power, kW | Diameter, cm | Height, m |
| 18 | 13 | 7 |
| 28 | 15 | 8 |
| 45 | 15 | 9 |
| 65 | 20 | 10 |
| 90 | 25 | 13 |
Selecting the location of the chimney outlet
The place for the chimney pipe outlet should be a blank side wall, where there are no attic windows, balconies or second floor windows.
Installing an iron stove: choosing a base
Nobody just puts a metal stove on the bath floor. And here's why: the thing is heavy, and therefore it would simply begin to sag on the floor over time . And it would do it unevenly. And when the stove is not level, it can crack . Therefore, either a brick foundation is made for it , or even a separate foundation with verified level horizontal lines to prevent destruction of the furnace.
To decide whether you need a lightweight or a full-fledged base, you must first calculate the mass of the stove with everything due to it. You will learn how to do this from our article - you don’t want to repeat yourself, but everything is described in detail there.
Bathhouse layout and stove installation features
Before you build a bathhouse, you need to think through in advance all the issues related to the future design. It is worth understanding that proper design makes it possible to create an extremely effective bathhouse that can satisfy all needs.
At the planning stage, it is worth paying special attention to the main functional elements of the bathhouse. In particular, we are talking about a sauna stove, which simultaneously creates heat, provides visitors to the sauna with steam, warms up the entire room and heats the water if a tank was connected to the stove.. Speaking about sauna stoves, one cannot fail to mention the correct choice of a good model
There are a lot of manufacturers involved in the manufacture of bath equipment, whose products can be both quite traditional and suitable for solving a variety of problems. Naturally, such devices differ greatly from each other, and the price range is also wide.
Speaking about sauna stoves, we cannot fail to mention the correct choice of a good model. There are a lot of manufacturers involved in the manufacture of bath equipment, whose products can be both quite traditional and suitable for solving a variety of problems. Naturally, such devices differ greatly from each other, and the price range is also wide.
Taking into account all of the above, we can come to the conclusion that a sauna stove needs to be selected individually, depending on operating conditions, the cost of the equipment and personal wishes. Before purchasing a stove, it would be useful to read several articles on how to choose a stove for a sauna.
In this sense, two main groups of requirements for the location of the sauna stove can be distinguished:
- Fire safety requirements;
- Requirements for placement depending on the characteristics of the entire building and the premises located in it.
Both categories of factors are quite important and require detailed consideration.
Fire safety rules
If you plan to use an iron stove in a steam room, for fire safety purposes you must strictly follow the installation rules
:
- The firebox doors should open towards the door, and the heater door, on the contrary, should open towards the corner of the room.
- The penetration through the ceiling must be a structure with a heat-insulating layer and a metal screen on the ceiling. Its format should be 1/3 larger than the projection of the stove body.
- If an electric furnace is selected, proper installation involves the installation of grounding, as well as coordination of the implemented project with the fire inspectorate.
- The bathhouse is equipped with fire extinguishing equipment. They must be at hand and in good condition.
- Regardless of which stove installation scheme is chosen, it is required to comply with standards regarding the distance from the stove to structures.
Lining the firebox with bricks in a bathhouse is good protection against fire
Distance from the stove to the walls of the bathhouse
It is important to know how to correctly install the stove in a bathhouse in relation to walls and other structures. Remember:
- there must be a gap of at least 0.5 m between the metal or brick lining of the stove and the wall (a similar distance is maintained with respect to any other flammable structures);
- walls and structures made of flammable materials located in the immediate vicinity of the stove must be covered with a screen made of fire-resistant materials.
Stove installation diagram - recommended distances
Installing the stove unit on a wooden floor
If the choice fell on a small metal stove (the weight together with stones, brick casing, fuel and water tank does not exceed 700 kg), it can be installed without constructing a foundation, directly on a wooden floor. Since it is recommended to select a stove unit at the bathhouse design stage, in the place where it will be installed, it is necessary to provide for laying the logs with a smaller pitch - this will increase the strength of the base.
Installing a metal stove in a bathhouse directly on the floor, according to SNiP, requires installing a screen that will protect the wood from ignition
. The weight of the screen is also taken into account when calculating the total load on the floors.
Metal stove on a wooden floor in a bathhouse
Screen arrangement:
A rectangle corresponding to the dimensions of the stove is drawn on the floor at the installation site. 50 cm is added to it on the side of the fire door, 10 cm on the other three sides. If the stove is mounted with the fire door outside the room, a place for the portal is marked on the wall with the expectation that 25–50 cm should be left around the stove body on each side sides around the perimeter. If necessary, part of the partition or wall is dismantled in accordance with the markings. A rectangle is cut out of a fireproof heat-resistant plate according to the size of the figure drawn on the floor (with added centimeters). The prepared element is attached to the floor using self-tapping screws. Fireclay or solid red bricks are soaked in water, after which a platform is mounted from them in one layer on top of the fixed slab
It is important to use a heat-resistant mortar for laying stoves and check the horizontal level of the site. Ceramic or porcelain tiles can be laid on top of the brick for an aesthetic appearance. The base in front of the fire door in the room is covered with a steel sheet, and if the firebox goes outside, the corresponding area is concreted. 24–48 hours after the foundation has been laid out, the stove can be installed.
Wall decoration near the stove
Baths are built from different materials, but most often wood is used to construct wall structures. The building can be frame or be a log house made of logs or timber.
The walls near the stove can be finished with tiles or natural stone
When arranging a screen on the walls, basalt cardboard or a heat-resistant plate, which is attached to self-tapping screws, is used as thermal insulation. The protective layer can be laid out from solid red or fireclay bricks (half-brick masonry). The use of ceramic or porcelain tiles is also practiced. The cladding will not only protect the walls from overheating, but will also add attractiveness to the interior of the steam room.
The simplest option for protecting a wall is to install a steel sheet with a thickness of at least 3 mm on top of the thermal insulator.
Basic options for installing a sauna stove
The most common:
- Placement of the entire structure in the steam room. The advantages include loading firewood directly from it. It is convenient to easily adjust the traction. But there are many disadvantages: oxygen is burned out relatively quickly in a small room, it is difficult to maintain the required humidity level, and when using it, dirt from the logs remains on the floor.
- Installing a stove in a bathhouse with an external firebox is the best option in terms of safety, cleanliness and space saving. True, its installation needs to be thought out in advance, because to bring out the fuel channel it is necessary to provide a technological hole, since if it is not made, you will have to break the wall.
- The fuel channel can even be placed outside. This option is the rarest, and is used in extreme cases, when the area of the steam room and dressing room is small, or coal, which is very dirty, is planned to be used as fuel. The main disadvantage of this design is the inconvenience of operation, especially in winter.
It is necessary to decide on the placement option at the stage of building the bathhouse. If you plan to move the furnace firebox to an adjacent room, then when constructing a dividing wall between the steam room and the dressing room, an opening is immediately installed in it. In the case of a completed reconstruction, it is quite acceptable to cut out the necessary window in the wall to remove the fire door.
Fire resistant structures
A special heat-resistant cladding is used as protection for the walls. To do this, the fire-resistant cladding is covered with heat-resistant tiles. Non-flammable glue is used for its installation. The following facing materials have good fire-resistant qualities:
- terracotta tiles;
- tiles;
- porcelain stoneware;
- soapstone and so on.
In addition, fire-resistant plasterboard, mineralite, glass-magnesium sheet and other fire-resistant boards for a bathhouse can be used as fire-resistant protection for walls. It must be taken into account that for each type it is necessary to provide ventilation in the form of a gap at the bottom. Practice shows that the use of cladding as heat-resistant protection for walls in a bathhouse has almost the same thermal characteristics as reflective cladding. The only drawback is the cost, which is several times higher than standard options.