Types and advantages of ovens for brick kilns
There are several options for such devices, depending on the design features. Classification of ovens:
- cast iron;
- steel;
- iron;
- shellless oven chamber.
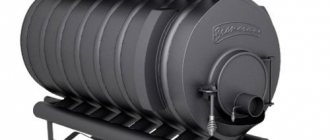
The oven can also have a closed/solid door or a glass door. The optimal and functional option is a cast iron oven. The main material is thick-walled cast iron, due to which a constant temperature is maintained inside the chamber and the air is slowly cooled.
Advantages of cast iron devices:
- Uniform heating.
- High thermal conductivity of the metal.
- Long cooling due to high heat capacity.
- Possibility of adjusting heating by damper
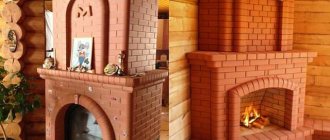
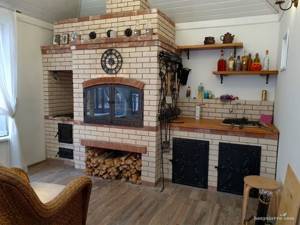
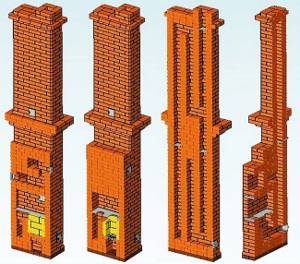
Project of a stove with a stove bench and stove
The design shown in the photo is an alternative to the bulky Russian stove, which requires more materials and skill for construction. Thermal power of the “Swedish” with a sunbed and a traditional stove is 3.5 kW, heated area is 40...45 m². The dimensions of the stove itself are 1245 x 765 mm, the stove bench is 1910 x 765 mm.
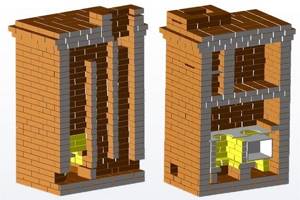
The bed is heated by gases passing through a horizontal channel in the lower zone of the stove
The heater has a summer operation mode - a straight channel is made to the left of the combustion chamber, closed for the winter with a valve. Combustion products penetrate inside the lounger through the lower horizontal channel, pass through a system of vertical flues, from there they return to the heating panel and fly out through the chimney pipe.
How many and what building materials will be needed for masonry:
- red solid brick (standard) – 870 pcs.;
- fireclay stone type ША-8 – 140 pcs.;
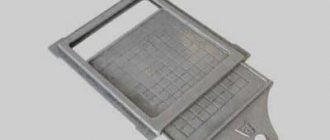
- grates measuring 415 x 240 mm;
- cast iron hob panel 65 x 31 cm;
- flap 13 x 25 cm – 2 pcs.;
- doors: loading 21 x 25 cm, ash 14 x 25 cm, inspection 7 x 13 mm (5 pcs.);
- corner No. 5 (50 x 50 x 5 mm) 1 m long;
- steel strip with a cross section of 50 x 5 mm - 7 m;
- metal plate 375 x 360 mm.
The vertical shaft to the right of the stove takes away part of the useful volume of the niche, but allows you to use the stove during the warm period.
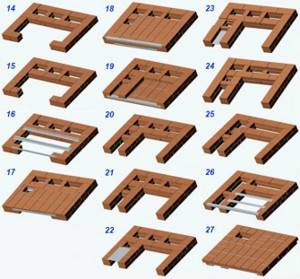
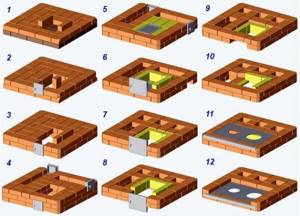
We build a Swedish bed in the usual manner - first the foundation, then waterproofing and laying with non-flammable insulation. Next we go in order:
- We lay the first and second tier solid, then fasten 5 doors - one blower, 4 inspection doors. On the third, we lay the walls of the ash pit and horizontal channel from refractory bricks.
- Rows 4, 5 – we continue to build the walls according to the drawings. On the 5th horizon we install a grate and cover the technological opening formed in the middle with steel strips - it will not be used in any way. Tier No. 6 forms the vertical channels of the stove bench, and the laying of the firebox continues.
- On the 7th horizon we install the combustion chamber loading door, lay out rows 8-10 according to the diagram - we build the walls of the firebox and the deck to the end. We cover the bed with the eleventh continuous tier, and after the twelfth we install the stove.
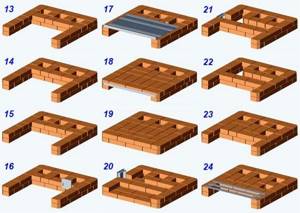
- Row No. 13 completes the construction of the bench and begins the construction of the side walls of the cooking niche. Tiers 14-18 are a continuation of the masonry; on the eighteenth we install a support corner on the front side and an exhaust door. A steel strip is laid next to the corner to better support the stove facade.
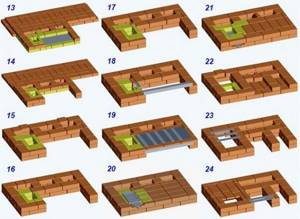
- Horizon No. 19 forms the ceiling of the niche - first we put bricks, then we cover it with sheet metal, and on top we place stiffeners made of 5 steel strips. In the twentieth row, we completely cover the niche, and cut the summer shutter into the channel. Tiers 21-23 are built according to the order.
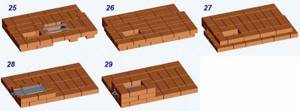
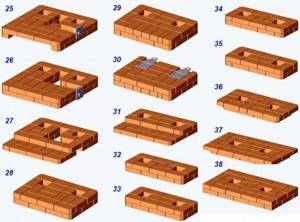
- On the 23rd row we place 3 stripes above the left vertical shaft, and with the 24th horizon we overlap it. Similarly, tiers No. 25, 26, 27 form the ceilings of the drying niche and stove.
- The last rows of the stove (28, 29) serve as the base for the pipe. After the 28th tier we install a smoke valve, then we begin construction of the pipe.
Since the text description of the masonry does not reflect the progress of the work in sufficient detail, we suggest watching the master’s step-by-step video instructions:
Installation features
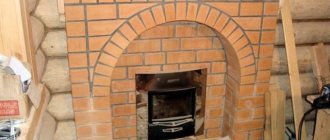
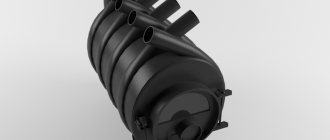
The cast iron oven is a large box with a door. It is immersed in a niche that is pre-made in the oven. After installing the cabinet in the opening, the space is filled with refractory bricks, and a heat insulator is placed in the gap area - asbestos cords or plates. The oven is lined with ceramic bricks, having previously placed it on edge. The upper part of the device is coated with clay, a layer of 5-6 cm .
The main feature is that there is no load on the furnace, so a supporting part of the structure is preliminarily provided. For this purpose, there is a brick “castle”, which completely eliminates the load on cast iron parts. Such a system is called vault access. If there is no brick “lock”, then a strong steel plate is installed in the upper part. A cast iron oven for a brick oven has the property of expanding during heating. Because of this, destruction of the brickwork is possible. That is why a small space is left between the side walls and the cabinet, into which a shock absorber - a heat-insulating material - is placed. It smooths out fluctuations in volume.
We lay out the classic “Swedish”
The dimensions of this stove are 102 x 88.5 cm in plan, height - 2.03 m, heating power - 3.2 kW. Accordingly, the heating area is up to 40 m² of a country house, insulated according to the climate in the area of residence.
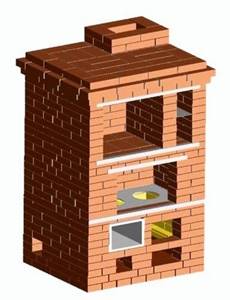
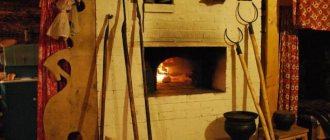
Oven heater can be used for baking and heating the kitchen
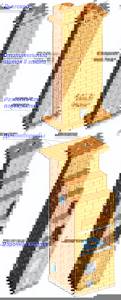
Comment. In the presented model there is no channel for the summer passage of gases, so it is more convenient to use the stove for cooking in winter. The heater device is shown in section in the picture below.
To fold a traditional “Swede” yourself, purchase the following materials:
- solid ceramic brick of standard sizes 250 x 120 x 65 mm – 553 pcs.;
- fireclay brick SHA-8, operating temperature – up to 1300 °C, size 230 x 114 x 65 mm – 33 pcs.;
- grate 30 x 20 cm;
- oven 45 x 25 x 29 cm;
- doors: firebox 21 x 25 cm, blower 14 x 25 cm, inspection 14 x 14 cm (3 pcs.);
- hob panel 2 burners made of cast iron 410 x 710 mm;
- valves: smoke 25 x 13 cm, exhaust 13 x 13 cm;
- equal-flange steel angle 45 x 45 mm total length 6.5 m;
- steel strip with a cross section of 50 x 5 mm and a length of 2 m;
- metal sheet 2 mm thick – 1 m².
Walls in contact with flames and hot gases are lined with fireproof materials.
According to fire safety requirements, a sheet of roofing steel 70 x 50 cm is laid on the floors on the side of the firebox. Building materials for the chimney and foundation are not included in the list.
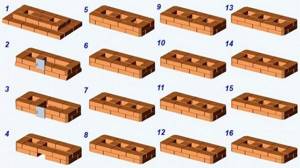
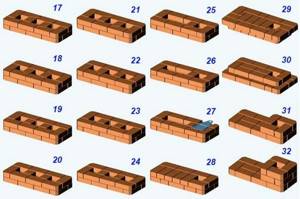
When the stove is ready, it is laid out according to the presented order:
- Rows 1, 2 are solid, on the third the outlines of the ash pan, the secondary chamber for the oven and the vertical shafts are laid out. We attach 3 cleaning doors and one ash door.
- The fourth tier is a continuation of the masonry according to the drawing, the fifth overlaps the installed doors. We begin to form the bottom of the firebox from fireclay bricks and install the grates, having previously made a depression in the stones with a grinder.

- Row 6 – lay out the walls of the combustion chamber, mount the oven and loading door. Between the firebox and the oven compartment we make a partition ¼ thick of fireclay stone. We build the 7th horizon according to the scheme, on the eighth we block the lower gas duct, the ninth tier covers the door of the main chamber.
- After the tenth row, a hob and a metal corner are installed on the front side. On the 11th, the walls of the niche begin to form; horizons 12–16 continue. Then we lay the support corners and the brick floor - row No. 17. On the left we leave an exhaust opening above a niche the size of half a brick.
- On the 18th tier we attach the second end corner and begin laying the walls of the drying chamber (rows 19-26). After the 22nd horizon, we cover the stove with a sheet of 34 x 19 cm, on the 26th row we place the next corners of the ceiling, and on top we place a metal plate measuring 905 x 800 mm.
- Tiers 27-29 are solid, leaving one chimney opening. Rows 30-31 - we form the beginning of a pipe with an internal channel 250 x 140 mm.
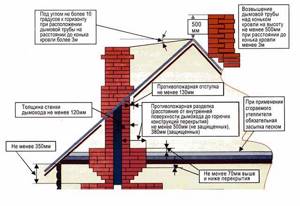
Further masonry is carried out using cement mortar, in compliance with fire safety rules. That is, in the wooden ceiling there is a stove groove with a thickness of one and a half bricks (38 cm), on the roof there is a setback of 130 mm, as is done in the diagram.
For the procedure for laying a Swedish classic stove, watch the video:
Note. Here and below, materials from the website “Heating Stoves and Fireplaces” by the Belarusian master Nikolai Zolotarev are used.
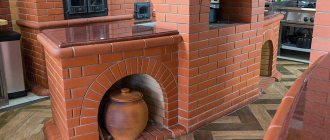
Rules for installing the oven in the oven
Installing an oven in a brick oven begins with counting the number of bricks, which depends on the size of the cabinet. A clay mortar, cast iron elements and a cabinet are required.
Installation steps:
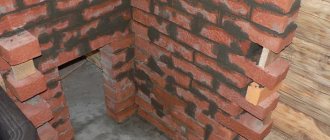
- The first row of bricks is laid without mortar.
- The second row is laid with the seam bandaged to form a monolithic structure. This will give the structure stability.
- From the next row, smoke begins to flow out of the stove. This is necessary to remove combustion products from the chamber.
- An air duct is provided to maintain the combustion process and a draft for the outflow of combustion products. The channel removes smoke from the bottom of the chamber to the chimney.
The next row is the furnace row, only from the 6th row the bricks are laid on the chamber. The calculation is made with a margin so that the distance from the walls of the structure to the brick is approximately 10 cm. This is necessary to create a gap, which is necessary due to the expansion of cast iron during the heating process. On the sixth row the oven is installed. It is installed directly on the clay solution.
Second row of furnace masonry
After the first row is ready, you can proceed to the second level. In addition to the horizontal, now you also need to monitor the verticality of the corners. To do this, you can use a level or plumb line. As in the first row, you need to first lay out the perimeter, and then start filling in the middle in the established order. After laying out the second row of bricks, drive nails into the seam between the second and first rows. You can choose the length of nails from 80 to 100 mm.
If you use a plumb line, lower it one by one to each corner of the second row. Mark the points from which the plumb line was lowered.
Drive nails of the same length into the marked points. Then tie the nylon cord to the nails and pull it tight. Use a plumb line to check that the cords are vertical. If you notice deviations from the level, then bend the top nails. This way you will have the perfect oven outline. All subsequent rows can be safely laid out, based on the verticality of the corners along the cords. This technique saves a lot of time because you no longer have to control the angles using plumb lines.
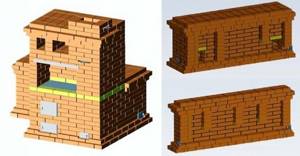
Stove for heating a two-story house
If the duct part of the “Swede” is increased in height, it is possible to organize heating of the rooms on the second floor, which is what is implemented in this project. The firebox with oven and stove remains unchanged. The dimensions of the stove near the base are 89 x 89 cm, the heating panel on the 2nd floor is 89 x 38 cm.
The total heat output of the furnace is approximately 4 kW. The distribution by floor looks like this: an area of up to 25 square meters is heated below, and 15 m² above. There is no summer mode, but there is the possibility of floor heating - valves block the channels of the lower or upper part.
Materials for construction:
- red clay brick (solid) – 950 pcs.;
- fireclay brick SHA-8 – 18 pcs.;
- grates 200 x 300 mm;
- 2-burner stove 71 x 41 cm;
- valve 130 x 130 mm – 3 pcs.;
- doors: firebox – 21 x 25 cm, others – 14 x 14 cm (7 pcs.);
- equal angle corner 40 x 5 mm – 2 m;
- strip 50 x 5 mm – 5 m;
- metal sheet 50 x 80 cm.
Considering the height and decent weight of the structure, it is recommended to pay special attention to the strength of the foundation and the alignment of each row during the masonry process, so that the result does not turn out to be the Leaning Tower of Pisa. Just follow construction technology and do your work responsibly.
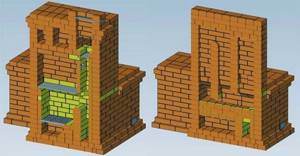
Two dampers installed in the lower section switch heating between floors or open all 3 channels for simultaneous heating.
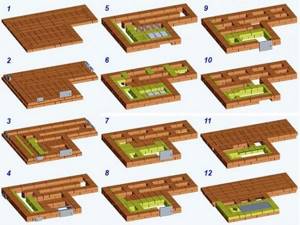
We begin the construction of the “Swedish” from the first floor, guided by the diagrams and cross-sectional drawings of the furnace:
- We lay out a solid zero tier, and on the first one we begin to build the ash compartment of the stove. On the second horizon we install the chamber door, we build the third according to the diagram, after the fourth we attach 2 inspection doors.
- Row No. 5 – we lay the bottom of the firebox with refractory material and install the grate bars. On the 6th tier we install the combustion door, form the walls of the wood chamber and smoke ducts. The seventh and eighth horizons are a continuation of the masonry according to the order, the ninth and tenth rows cover the loading opening. On the 10th row we make an opening connecting the firebox to the left channel.
- After the construction of the 11th tier, we install the slab and the front end corner. Horizons 12–17 form a niche for cooking. A ventilation door is installed on the 16th row, the seventeenth is covered with a metal plate and strips. Next we lay out two tiers of flooring - No. 18, 19.
- Horizon No. 20 begins to form a drying niche; a cleaning door is placed on the side. We make rows 21-24 according to the diagrams, then lay the strips of overlap of the upper chamber. We cover the dryer with tier No. 25, and attach the inspection door to the right.
- In rows 26-30 we continue laying and install 2 smoke dampers. The 27th horizon reduces the size of the stove, forming a ledge. The second “step” appears on the 31st tier, then we drive two smoke circuits without changes up to the 35th row inclusive. Horizons 36-38 expand the furnace again, and a fireproof cut is formed (passage through the ceiling of the 1st floor).
Comment. The height of the main section of the stove is 2.6 m. If the ceilings of the room are higher, add the required number of rows of bricks between tiers 32-35.
After laying the lower part of the two-story “Swede”, we proceed to the construction of the upper channel section:
- The first tier narrows the oven after cutting, on the second we fix the next inspection door.
- Then we continue to drive 3 channels in height according to the same type of schemes. Having reached the 27th horizon, we build in the main valve.
- Row No. 28 covers 2 vertical shafts, the remaining tiers 29-32 form the transition to the chimney.
The procedure for constructing the stove is demonstrated more clearly in the video: