Despite technological progress in the heating equipment industry, home furnaces continue to enjoy continued popularity. They allow you to heat houses in areas remote from civilization. Where electricity and gasification are not provided. The construction of any furnace begins with the construction of the foundation. We will talk about how to make a foundation for a stove correctly in this article.
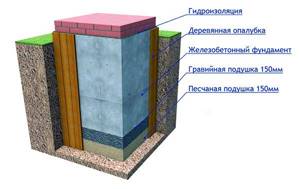
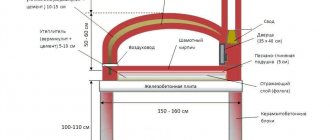
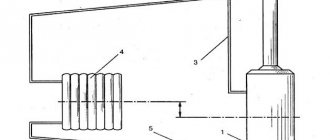
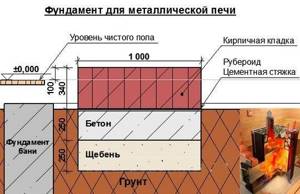
Sectional view of the foundation for the furnace
Making a stove, of course, requires a lot of labor, experience and knowledge of technology. When thinking about building a stove at your dacha and building a foundation, you can, of course, hire specialists. But in fact, arranging the foundation for a furnace can be easily done on your own.
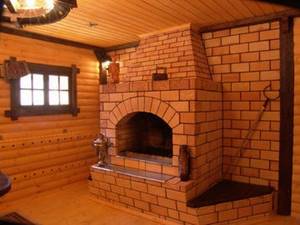
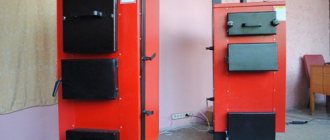
Home oven
This is not such a costly or complicated matter, but the pleasure from a self-built structure will more than pay for all the trouble.
Basic rules for laying a foundation
Whatever option you choose for the foundation for the stove, and whatever size you decide to implement, there are a number of basic rules that you should not ignore:
- The foundation for the stove must be made independent, in no way connected with the foundation of the entire house. Why? The fact is that during operation, the house may shrink slightly. When lowering, it should not pull the stove along with it, as this can lead to its deformation, deterioration of draft and disruption of technical properties.
The foundation for the furnace is separated from the general one
In some cases, it is possible to partially combine two bases by connecting them with one wall.
- If both foundations (for the house and for the stove) are located close to each other, you need to fill them with sand 50 mm thick.
- If the foundation for a common house is strip, then the base for the stove should in no case be in contact with this foundation.
- When choosing a place for a stove and, accordingly, a foundation, you should not only rely on wishes, but also on factors such as: the location of doors, windows and roof beams. The location of the chimney should be taken into account so that the pipe does not fall into the ceilings and beams during the construction of the stove.
- When calculating the size and depth of the foundation, be sure to take into account the weight of the floors and the weight of the stove along with the chimney.
The size of the foundation is influenced not only by the dimensions of the furnace, but also by the density of the soil on which it is built. The main load in the furnace is usually created by the chimney, so when designing the furnace, it is necessary to place it closer to the center of the base. This will help avoid asymmetrical loading and premature incorrect shrinkage of the oven.
Sometimes, when designing a very large and massive stove with a stone chimney, stove makers create a separate base for the chimney.
Also, the choice of foundation depends on the material of the furnace. For a metal structure and a stone one, it will be different in depth; the entire mass of a brick oven is at least 400-500 kg, while a metal oven weighs approximately 150 kg.
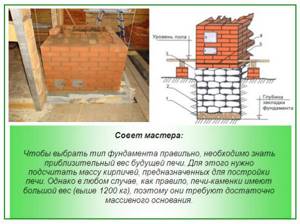
How to calculate the weight of a stone stove
In principle, for a small metal stove you don’t have to build a separate foundation, especially if it is being built in a house that stands on a tiled monolithic foundation.
Important! Before laying out the foundation for the furnace, it is necessary to determine the type of soil on the site.
The density of the soil and the degree of its freezing play an important role in determining the size of the foundation. The climate in Russia is accompanied by fairly harsh winters throughout almost its entire territory. Therefore, the foundation for the furnace must be laid to the entire depth of soil freezing.
The type of soil is also of great importance.
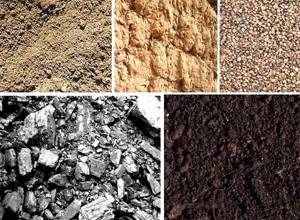
Types of soil
It comes in three types:
- clay;
- sandy loam;
- loam.
In places where a large number of rivers, reservoirs, and lakes predominate, sedimentary types of soil are usually found. Here, it is better to entrust the construction of the foundation for the stove and the house to professionals, so calculations of the water passage point must be carried out.
In Central Russia, the most common type of soil is loam, which is a mixture of sand and clay. It is clay that predominates in it, so this soil is less plastic.

Loam
Building a foundation on such soil is usually associated with hassle and additional problems, since when dry the loam is crumbly, when frost sets in it begins to “heave”, and when there is a large amount of sediment it becomes viscous.

Clay soil
Therefore, in this case, the depth of laying the foundation for the furnace must be made above the freezing point.
But in forested areas, on the contrary, it is necessary to lay the foundation for the stove below the freezing point of the soil and the foundation must be built on a sand cushion 60-90 cm thick.
One of the most reliable types of soil for building a foundation is gravelly and rocky, but, unfortunately, sometimes you have to build a house and stove on an unstable one. Proper construction of a reliable foundation will help offset this fact.
Advantages and disadvantages
Types of pile foundations are divided primarily according to the method of construction into driven, driven and screw. Each model of a structural element is characterized by its own characteristics.
The general advantages of all types of piles include the following:
- Applicability for all types of soils and reliefs of any complexity.
Where laying a strip or slab base would be ineffective or impractical, supports are used. Pile foundations can be built on unstable, waterlogged soils, areas at risk of landslides or flooding, wetlands, as well as on slopes and depressions. - Economic expediency. Laying single load-bearing elements connected into a single structure with strapping costs 30–40% less than constructing a slab or strip buried foundation.
- Possibility to select a power element for any conditions. The popularity of pile technology has led to an increase in offers from pile manufacturers. Today you can select supports with a load-bearing capacity from 0.8 to 15 tons or more, and composite elements are used for deep laying.
- Small amount of excavation work. If, in the case of a buried strip or slab base, it is necessary to dig a pit to the design depth, then to install cast-in-place piles it is enough to drill holes in the ground, and the driven and screw pillars are immersed in the soil by force.
Disadvantages of pile technology:
- Complexity of engineering calculations. Pile foundation technology can satisfy almost all hydrogeological and design conditions, but this will require a number of engineering calculations. Before designing, the designer needs to study the regulatory requirements for the construction of foundations in order to take into account possible nuances for each type of support.
- Labor intensity of work on arrangement of basements. It is possible to organize the construction of underground premises in the space between the power elements, but this will lead to a significant increase in the cost of the project, which will practically cover the benefits of using pile technology.
For a private home
Private residential buildings and cottages are relatively light in weight compared to high-rise buildings and industrial facilities. This feature allows you to abandon the laying of an expensive reinforced concrete strip or slab foundation in favor of factory-made or home-made piles.
Advantages of pile technology for private construction:
- the possibility of laying the foundation with your own hands (screw piles, cast-in-place piles);
- if necessary, methods are available to strengthen the foundation (when building extensions, increasing the number of storeys, replacing floors in a house, etc.);
- maintainability.
Why you should not build a private house on a pile foundation:
- significant heat loss due to the elevation of the house above ground level;
- labor-intensive procedure of engineering calculations;
- There is high seismic activity in the area.
Different types of piles
The choice of piles is based on the results of hydrogeological soil surveys, as well as engineering calculations for design loads. Comparative table of pros and cons for various types of power structures:
| Support type | Benefits of technology | Disadvantages of technology |
| Driven reinforced concrete |
|
|
| Driven steel |
| |
| Driven wooden |
|
|
| Bored |
|
|
| Screw metal |
|
|
| Screw reinforced concrete |
|
|
Types of foundation
There are three main types of foundation for a brick kiln:
- cement;
- rubble concrete;
- on stilts.
What is their main difference, and which foundation is better to choose for a furnace?
We will consider in detail several construction options, which will allow you to choose the best option for yourself.
Many are also interested in the question: how deep should one go when digging a foundation pit?
It all depends on the density of the soil and the weight of the heating structure, but you shouldn’t overdo it. The optimal option is a hole depth of 80-100 cm. Some craftsmen take the path of less resistance and remove only the plant layer of soil, build formwork 20 cm high and fill it with concrete mixture. But this is a bad option.
The foundation experiences pressure of several hundred kilograms, the load will especially increase in winter, when the soil freezes. Therefore, you should not be lazy and save money on arranging the foundation, on which the strength and reliability of the stove’s operation entirely depends.
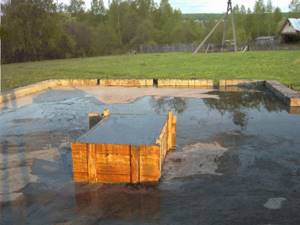
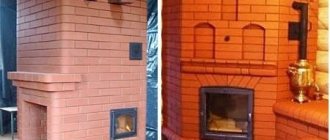
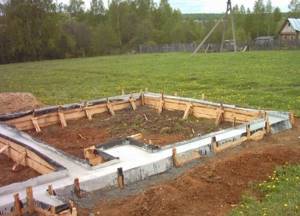
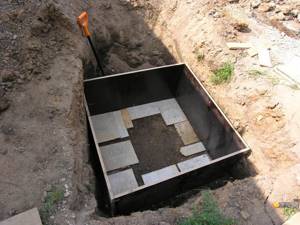
Ready foundation
Base for a metal stove
A metal heating structure also requires a separate base. The fact is that if the stove does not stand level, this can lead to its deformation and destruction.
The procedure for constructing a base for a stove weighing no more than 150 kg is as follows:
- The trench is marked and excavated. Its depth should be no more than 0.5 m.
- Crushed stone is laid and compacted. The final layer of the pillow must be at least 30 cm thick.
- The concrete mixture is poured. You will need to set aside a day to set it. This solution is made in the following proportions: 1 part cement, 4 parts sand and water.
- After the cement has set, roofing felt is installed. It will serve as a waterproofing layer.
- The remaining space is also filled with concrete, but made in different proportions. You will need to take 1 portion of cement, 4 portions of gravel and 3 portions of sand and water.
- The finishing layer is leveled using a building level.

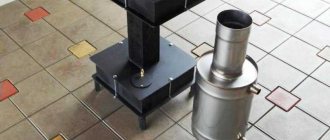
Metal furnace on a foundation Source sarinform.com
It will also take about 2-3 weeks for such a base to harden. It will need to be moistened periodically.
Tools and materials for building a foundation
The first thing you need to do before starting construction work is to stock up on the necessary set of tools.
The work will have to be carried out not only in excavation, but also in carpentry, so prepare the following tools:
- Bayonet shovel (needed for digging the main pit).
- Scoop shovel (convenient to prepare sand-cement mortar).
- Hammer.
- Hacksaw or saw.
- Sieve for sifting cement (mesh size 1*1 mm).
- Sieve for sifting sand (mesh size 2*2 mm).
- Bucket for water (for preparing cement-sand mortar).
- A metal trough in which we will prepare the solution.
- Building level.
- Tape measure and pencil.
- Stapler.
- Concrete mixer.
Materials you will need:
- Boards (for making formwork).
- Polyethylene (for waterproofing formwork).
- Sand.
- Cement.
- Gravel.
- Reinforcing mesh or bars.
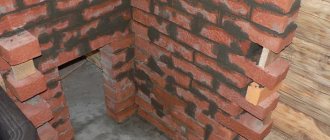
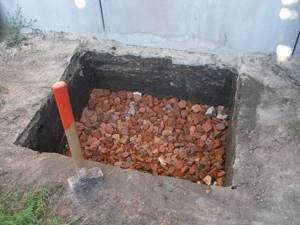
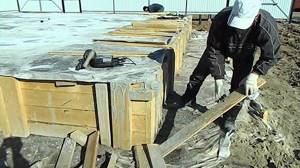
Arrangement of a rubble concrete base for the stove
Creating this type of base for a stove consists of the following steps:
- The trench is being marked. Just as in the case of a concrete foundation, the size of the pit should be 10 cm larger than the foundation itself so that the movement of the soil does not cause significant damage to the structure. A hole is dug out.
- At the bottom of the pit, a cushion is placed based on crushed stone with a thickness of 15 cm. The layer is carefully compacted.
- Then a layer of large stones is placed on the bottom, but they should not be more than 15 cm in diameter. Crushed stone is poured on top, which will fill the empty spaces between the stones.
- A cement-sand composition made in a ratio of 1 to 3 is poured. It is best to use cement grade 400 or higher.
- A day later, a new layer of stones is laid, and so on until the entire trench is filled. The layers of stones must settle, otherwise the service life of the rubble base will be significantly reduced.
- When the hole is filled, the evenness of the surface is measured using a building level. If irregularities are noticed, they are eliminated using a cement-sand composition.
- The smooth base is covered with film and left until completely dry. This takes at least 2 weeks. The solution must be constantly moistened and protected from exposure to the sun.
- After drying, the formwork is dismantled and waterproofing is carried out. You can use molten tar for this. The empty spaces between the base and the soil are filled with coarse sand and crushed stone.
Rubble concrete foundation for the furnace Source stroimdom.com.ua
Making a foundation for a metal stove with your own hands

Metal oven
If the stove is installed in an already finished house, where this device was not previously intended and wooden floors are already laid, then the construction of the foundation will have to begin with partial dismantling of the floor covering.
Foundation for a metal stove
- We mark the floor with a construction marker, depending on the size of the stove. The base should exceed the stove by 7-10 cm on each side.
- Using a grinder, we cut a rectangle into the floor.
- We dig a hole with a bayonet shovel 50 cm deep.
- Pour gravel and sand into the bottom of the hole, compact it tightly and pour in a little water.
- We create formwork from boards or sheets of plywood and lay 1 layer of roofing felt around the perimeter.
Formwork
- Fill the pit with a solution of sand and crushed stone (for 4 portions of sand, take 1 portion of crushed stone). We do not reach the floor level by 10 cm.
- We level the mortar with a shovel and check the horizontal position with a building level.
- Technological break 2 weeks until complete hardening.
- We lay 2 layers of brickwork on top of the cement mortar, reaching the level of the finished floor.
As you can see, this is a simpler way to build a foundation, which does not require such careful preparation and laying of reinforcing mesh. The low weight of the metal structure of 150-170 kg does not require such a powerful foundation.
To avoid critical mistakes when building a foundation for a furnace, we recommend watching this video.
Video: Foundation for a stove, basic rules
Installation of a pile foundation with a slab
One of the types of foundation for a furnace is a pile structure, which is characterized by good reliability and ease of installation.
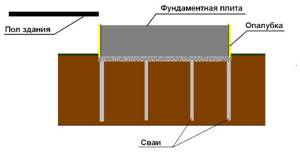
Foundation on stilts
- We make markings on the ground according to the dimensions of the future oven and measure 10 cm in each direction - this will be the size of the foundation.
- We remove 20 cm of the plant layer of soil using a bayonet shovel.
- We put pegs and pull the rope.
- In each part of the peg we drill holes with a diameter of 20 cm to a depth of 50 cm.
- We make formwork from wooden boards, fastening them together with nails, and set them according to the size of these holes. The formwork is a wooden box without a bottom.
- We make waterproofing using polyethylene, which we staple along the perimeter to the walls of the formwork.
- Pour sand onto the bottom, compact it well and fill it with gravel to a depth of 15 cm. Fill with water.
- We knit the reinforcing bars using 0.8 mm wire and twist them well.
We install a reinforced frame.
- We roll up thick sleeves of roofing felt and insert such piles into the pits. Asbestos pipes can be used as piles.
- We fill the finished piles and inserted into the hole with concrete mixture.
- We take a technological break for 2 weeks.
- Now you can fill the entire foundation with concrete mixture.
- Cover with polyethylene and let the foundation harden for at least 2-3 weeks.
Option for creating a rubble concrete foundation for a furnace
- The first steps are carried out similarly to the previous method: a foundation pit is dug, formwork is installed and waterproofed with polyethylene (or roofing felt).
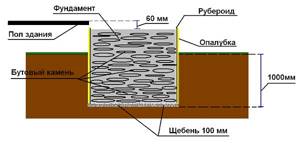
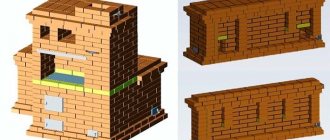
Rubble concrete foundation diagram
- Next, you need to compact the bottom of the hole well and fill the bottom with a layer of rubble (the diameter of large stones should exceed 16 cm).
- Pour a 10 cm layer of medium-fraction crushed stone and level it.
- Pour in the cement mortar for 10-15 minutes and take a technological break for several days until the mixture hardens well.
Example of a rubble concrete foundation - We repeat the layer of crushed stone of the middle fraction, and then pour the solution again, filling it almost to the end, not reaching 8 cm to the level of the finished floor.
- We level the solution and check the evenness of the coating with a building level. We take a technological break for several days. Cover the foundation with a layer of polyethylene.
- Thus, we get a reliable foundation consisting of four layers.
- Remove the top part of the formwork using a hammer.
Removing formwork
- We bring the foundation to the level of the finished floor using two rows of red baked bricks.
- Depending on what kind of brick you took, immediately calculate its height and do not pour the concrete mixture to exactly 2 brick heights. The top row of bricks must completely coincide with the level of the finished floor.
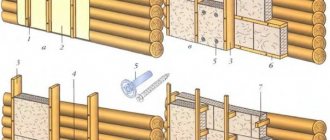
Installation of formwork: construction and nuances
Work begins only after everything necessary has been delivered to the site. The foundation is built in such a way that it has a connection with the main base of the structure.
The most common options are when one of the parties unites with him. To begin with, it is worth making the markings.
Installation diagram of a columnar foundation for an iron stove.
- To carry it out correctly, you will need to remove all unnecessary things from the site. Next, using various measuring instruments, the contours of the future furnace are outlined. Then, according to the markings, a trench of the required depth is dug. All soil must be thrown into the middle of the building.
- A sand cushion is poured onto the bottom of the trench. Its thickness is approximately 12-15 centimeters.
- Next, the pillow must be moistened with water and compacted tightly. Formwork is installed along the outer and inner contours. Its top edge should be at the same level as the ground. Formwork panels are made from unedged boards. The boards are connected using nails and slats.
- It is necessary to lay waterproofing and thermal insulation on the pillow. Next comes the installation of fittings. It consists of steel rods, which are laid in a trench, two pieces each.
- You can connect the reinforcement to each other using welding, but a more effective method is to knit the rods with a special wire. To do this, you can purchase a hook at a specialized store, created specifically for such purposes.
Now you can begin the final stage of work, namely pouring the foundation.
What are the features of installing a stove in an already built house and when does it need a separate foundation?
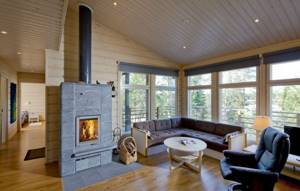
A country house without a stove or fireplace is like an orphan, deprived of comfort and warmth. Fire has an amazing attractive power, and the hearth certainly becomes a semantic center around which the entire space is organized. But it also happens that a stove or fireplace has to be built into an already finished building. What difficulties may arise in this regard?
Tips for stove makers
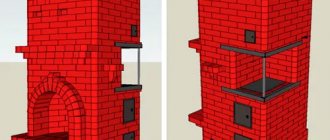
- Consider the total weight of the brick stove when choosing the type and material. So, if the total mass of the structure is less than 750 kg and it will be erected on the ground floor, a simple reinforced concrete base is sufficient. If the weight exceeds the specified figure, you should think about building a separate foundation.
- An ideal and very reliable solution for light-weight brick kilns is a columnar base. Pillars dug to a sufficiently great depth work like piles. And the role of support is performed by a reinforced concrete slab placed on the ground.
- You should not connect the base of the stove and the house or bathhouse, since the foundation must accept the load coming exclusively from the stove. The gap between these two bases is about 5 cm and is filled with two layers of sand or laid with waterproofing.