Why make a foundation for a stove in a wooden house
The foundation is needed mainly for brick kilns.
Metal ones are not so heavy and in most cases are installed without a base. But in wooden houses there is an increased risk of fire, and when planning to build a stove, they decide in advance what kind of foundation it will have.
The need for a foundation is due to two factors:
- Heavy weight of the structure and the possibility of its subsidence and deformation;
- The requirement to protect materials from moisture and contact with an aggressive external environment.
The base of the heating and cooking structure can be built at the stage of building a house and in a finished, operational building.
The first option is more successful: it allows you to avoid work on dismantling the floor and excavating soil from the basement.
Which heating method should I choose?
Heating a basement or cellar is a rather complicated issue. Here it is necessary to approach the issue of choosing the type of heating of the room as responsibly as possible, based on the wishes and requirements of the owner. For example, if you need to heat the basement in a seasonal home (that is, during the cold spring and autumn months), then installing a simple heater will be enough.
On the other hand, if you plan to turn the basement of a country house into a full-fledged living space, then it is necessary to arrange more efficient heating. The best option in this case seems to be installing a furnace or boiler. It is worth noting that for the installation of a gas boiler it is necessary to allocate a separate room, and its operation must be coordinated with the relevant services.
Choosing a location
The stove is a fire-hazardous structure, so when choosing a location, follow the following rules.
If the house is installed on a slab foundation, choose any convenient location.
It is advisable to build the stove into the internal walls of the building so that the firebox faces the exit to the street.
In the building being used, a location is chosen so that it is not necessary to displace and dismantle logs and rafters.
The rules for placing heating structures are regulated by clause 5 of SP 7.13130.
The foundations of the building and the stove are not connected to each other. A gap of at least 5 cm wide is required between them. The distance is determined by possible soil movements. This requirement does not apply to concrete foundations.
The gap is filled with fire-resistant materials: sand, slag, expanded clay.
The upper plane of the stove base must be at least 15 cm higher than the lower plane of the subfloor.
The location and type of foundation depends on the type and bearing capacity of the soil. Provide free passage to the chimney. It is built between the rafters.
Types of foundations
When building houses, it is most correct to build a foundation built into one of the walls of the building. The task is performed in several ways.
If the house is installed on a strip foundation, a widening is made at the location of the heating structure. It is a concrete slab of the same thickness as the tape. Both bases must be connected to each other by reinforcement bars. If the masonry will be carried out in a building that is already in use, use the most convenient of the methods below.
The formwork is mounted along the tape and two slabs are poured, the upper plane of which is 10 cm higher than the tape. Provide a 5 cm widening around the perimeter (cut). This minimizes subsidence into the ground. A slab is laid on top of the supports, on which the stove is installed.
When it is not possible to raise the furnace foundation above the belt level, MZL restoration technology is used.
In the selected location, holes with a depth of 10-12 cm are drilled on both sides of the tape. The slabs are poured, tying them into the holes of the reinforcement with the tape. In this case, both bases will be the same height.
If the foundation of the house is columnar, the base is erected in the form of a slab. The task is performed in a building under construction and in operation.
Based on the type of materials used, the following bases are distinguished:
Main types of heating systems
We can immediately distinguish two main types of heating:
- Water heating of a private house, which involves installing radiators and a boiler (gas or electric).
- Stove heating, the organization of which requires the presence of a “potbelly stove” or stove.
Water heating operates on the basis of a boiler (it can be electric or gas). One of the main advantages of such a heating system is the constant availability of warm water.
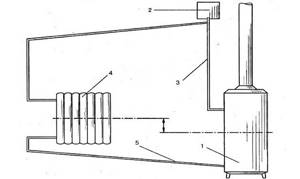
Simple water heating system: 1- boiler; 2 - expansion tank; 3 - supply pipe; 4 - radiator; 5 - return pipe.
When installing stove heating, the installation of a “potbelly stove” or stove is required. This type of heating is more economical both during installation and during further use, which is its main advantage. In addition, in this case there is no need to look for a place to install a bulky boiler. The stove will produce enough heat to heat a small basement of a private house.
But for the system to operate effectively, it is necessary to provide a chimney. Here you need to approach the issue responsibly and accurately calculate the parameters of the pipes to organize sufficient traction.
What materials will you need?
In order to construct a stone foundation you will need:
- Boards and timber for formwork;
- Rubble stone;
- Cement grade not lower than M400;
- Sand;
- Ruberoid;
- Gravel or crushed stone of medium fraction.
A reinforced concrete foundation is erected using:
You will also need formwork lumber. It is not needed for brick foundations. In this case, you need to choose the right brick. Buy red, durable, without chips or cracks. Such foundations are made for structures of light weight (up to 250 kg).
Construction process
Construction of the foundation at the same time as the construction of the foundation of the house will not cause any difficulties for anyone. It is most difficult to install a stove in a finished building. In order to perform the task correctly, follow the instructions provided.
Determine the location and dimensions of the furnace.
Based on the received data, markings are performed. It must exceed the dimensions of the oven on each side. If the soil is dominated by sand - by 5 cm, heaving soil - by 10 cm.
Start excavating soil in accordance with the markings. Form a square or rectangular pit with a flat bottom and walls. The optimal depth is 0.5-0.8 m. Harsh climatic conditions in the construction region require insulation of the foundation; the depth of the pit is increased by the thickness of the insulation. Most often this is polystyrene foam 5 or 10 cm thick.
The high level of groundwater at the construction site requires a drainage and shock-absorbing layer of crushed stone 30-40 cm thick. The stones must be compacted layer by layer, every 10-15 cm. In other cases, 20 cm of crushed stone is sufficient.
Roofing felt sheets are laid on the stones with an overlap of 10-15 cm.
Formwork is installed inside the pit.
Two meshes with a 15x15 cm mesh are connected from reinforcement bars and connected with stronger vertical pins.
Install the reinforcing mesh into the formwork.
They begin pouring concrete, which is done in layers. Each layer is compacted.
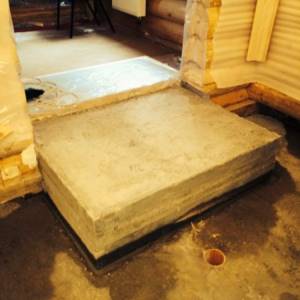
The top of the furnace foundation is leveled with a rule or a flat board.
Construction of a cellar in an already finished house
Having a heated floor in a living space will be an excellent solution for creating a comfortable environment.
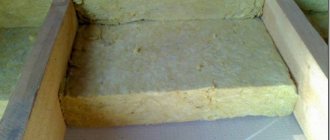
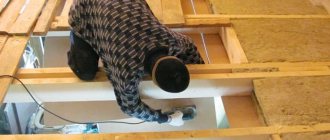
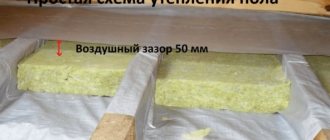
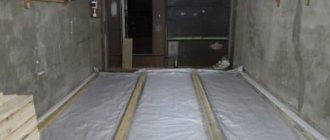
Often, heated floors are installed even when the house has stove heating, since cold air masses that arise during ventilation of the room pass through the floor. It must be taken into account that when installing a heated floor in the basement of a private house, special attention must be paid to thermal insulation and waterproofing of the foundation base. It is recommended to use a combined solution – mineral wool and expanded polystyrene – as insulation. Installation of an additional waterproofing layer is necessary if the area has a high groundwater level or there is a possibility of seasonal flooding of the basement.
Installation options for heated floors. Click to enlarge.
Freestanding cellars have many problems that can be avoided by building a cellar in your home. For example, the ceiling of an outdoor storage facility must be carefully and correctly insulated, putting a lot of effort and spending serious money. There are many solutions for insulating the ceiling of a cellar, but none of them will guarantee a stable temperature in the storage room throughout the year.
The task of insulating floors will become much easier if you decide to build a cellar under a residential building. Building a cellar in a private house with your own hands is an excellent option, and very affordable in all respects. It is quite possible to dig a pit in the basement of a house, and to arrange a cellar too. So who is forcing you to make a cellar on the street?
In our country, suburban housing has private plots. which are usually used for gardens and vegetable gardens. A spacious and dry cellar in the house is necessary to preserve the harvest. An office space for this purpose can be arranged in the basement under a residential building. garage or shed. It is also possible to build a separate structure. The final decision on the location of the cellar should be made based on the results of a study of the house and land.
At the stage of laying the foundation, it is necessary to mark the pit and dig it. Excavation work is carried out in compliance with rules and safety measures. The total depth of the pit should be about 2.7-3 m, and the diameter should be at least 2.5 m. The round shape for a buried structure is optimal and ensures its maximum strength. On the other hand, rounding a wall requires quite high qualifications from the mason.
Another option is the construction of monolithic walls made of concrete reinforced with steel or composite rods. This technology can ensure maximum resistance of underground structures to external mechanical loads. To make a cellar in a house correctly, you should evaluate your financial capabilities and practical skills in performing construction operations.
The choice of a specific technology for the construction of an underground structure will allow an assessment of the required amount of building materials. To build load-bearing walls we need red brick. The amount of material is calculated based on the minimum thickness of the wall, as they say among professional masons - one and a half bricks. When choosing a brick, special attention should be paid to its quality.
In this video you can see how to build cellar walls with your own hands from bricks
For underground structures, the use of bricks of heterogeneous composition, having deep cracks or inclusions is unacceptable. Construction material must be stored in proper conditions. Prolonged exposure of bricks to high humidity conditions can lead to a deterioration in its qualities and properties. When purchasing materials, you should ask the seller for certificates of conformity.
The walls of an underground storage facility must be built on a reliable foundation. Typically, the role of the base is performed by a reinforced reinforced concrete belt at the bottom of the structure. It is quite possible to build a cellar in a house with your own hands, especially if you strictly follow the construction technology.
Buried structures require high-quality protection from moisture penetration through building structures. The most likely ways for water to enter a cellar or basement are:
- the presence of through gaps;
- violations of technology during bricklaying;
- penetration of moisture through capillaries in an array of building materials;
- the formation of condensation on walls or other surfaces due to temperature changes or insufficient air exchange.
Typically, waterproofing of walls, floors and ceilings is done using roofing felt. It is recommended to lay this roll material in two layers. The overlap of the sheets should be at least 10-12 cm, and each subsequent row should be laid perpendicular to the previous one. Under the waterproofing it is necessary to pour a gravel-sand cushion with a thickness of at least 100-150 mm.
Scheme of the cellar waterproofing device
It is possible to correctly build a cellar under a house with high-quality waterproofing of the walls during the process of laying the foundation.
In this case, the work will not be interfered with by other structures and elements of the building. During the construction of walls, bitumen mastic is applied to their outer surface, onto which, in turn, roofing material is glued. When performing this operation, the sheets are arranged vertically with an overlap of 8-10 cm.
The floors in the cellar are poured with mandatory reinforcement with a two-layer steel coarse mesh. The screed is filled with a cement-sand mixture with the addition of a fine fraction of crushed stone as a filler. The mixture is prepared on site by hand or using a concrete mixer. It is possible to order concrete from a specialized enterprise with delivery to the work site by vehicle with the appropriate equipment.
Scheme of correct filling of the floor in the cellar
As soon as the load-bearing structures of the walls and floor are ready, you can begin to build the ceiling above the cellar. Taking into account the fact that the structure is of a recessed type, the best material for the floor would be a reinforced concrete slab. The calculation of the required number is carried out taking into account the length and width of the structure. When laying floor slabs, heavy construction equipment is used - a crane on a vehicle chassis.
Cellar floor plan
Another method allows you to do without lifting mechanisms. Building a cellar in a house using this technology involves casting a floor slab directly on site. Wooden formwork for these purposes is made from boards with a thickness of at least 40-50 mm. It is strengthened by horizontal beams and vertical posts that rest on the floor.
A visit to the cellar located under the house can be organized in two ways: through a hatch in the ceiling of the cellar or along a normal staircase. Calculation of a straight flight with a step length of 20 cm and a height of 250-300 mm shows that its horizontal length with a slope of 45 ° will be equal to the height. A doorway is installed in one of the walls, in front of which a rectangular platform is arranged.
Simple wooden staircase
A flight of stairs is installed along the outer surface of this wall, resting on one side on it, and on the other on an additional partition. The steps of the stairs can be cast from concrete and reinforced with a mesh of rolled steel or made from a metal profile. The use of wood is undesirable due to the high probability of damage by fungi or other pests.
Drawing of a complex concrete staircase leading to the cellar
A doorway with a door leaf that opens outward due to the relatively small size of the cellar is installed in the wall opening. Doors must have seals to prevent heat loss and temperature fluctuations. The process of making a staircase and installing it is quite complex.
To organize high-quality air exchange, it is necessary to install two vertical pipes. One of them serves as an exhaust hood, and the other is necessary for the flow of fresh air. Air is taken from under the ceiling and supplied closer to the floor. In order to create maximum draft, the duct should be installed above the roof ridge. Natural ventilation of the cellar is made with minimal cost and investment.
The air ducts in the upper part are covered with metal mushrooms to prevent the ingress of precipitation. As air ducts, you can use steel or asbestos-cement pipes with an internal diameter of over 150 mm. The deflectors are made of galvanized steel sheet, 0.55 mm thick, and are fixed to the end of the pipe using a clamp and support posts.
We invite you to read: Expanded clay blocks for foundations - can they be used?
The inside of the cellar must be plastered and treated with a special antibacterial primer. Instead, ordinary slaked lime can be used, which provides the necessary protection against the formation of colonies of pathogenic fungi on the walls. Experts do not recommend covering basement walls with clapboard or wood-based composite materials. In the gap between the wall and the facing panels, air stagnates with the formation of condensation.
The arrangement of the cellar consists of installing shelves for glass jars of different capacities. It is advisable to make shelves from metal. Wood with insufficient ventilation can be affected by colonies of pathogenic microorganisms. To store vegetables: potatoes, carrots and cabbage, wooden boxes are installed on supports for free passage of air.
The main task of an in-ground storage facility is to save crops from a personal plot. In the office space it is necessary to create a certain temperature and humidity regime. In cellars, balance is maintained due to the heat of the earth, which is, in fact, a huge heat accumulator. The energy accumulated during the warm period of time is sufficient to smooth out temperature fluctuations throughout the winter.
It is possible to install a reliable underground floor in your home on your own, without the involvement of specialists. The best option is to build a house with a cellar. The entrance to the storage facility can be organized both from the premises and from the outside. In this case, it is necessary to install double insulated doors with seals that prevent cold air from entering the room.
Pile option
Sometimes it is easier to install a concrete slab on piles than to pour it in the ground. Both options are comparable in terms of labor intensity. But in the first case, the foundation will be more expensive, since materials for constructing supports will be required. These can be concrete or brick pillars, screw piles.
The supports are also poured independently, using large-diameter metal pipes as formwork. The base of the pillars is installed at a depth below the freezing point of the soil by 20-30 cm.
Watch additional video:
The upper ends of the piles should be located in the same horizontal plane. At the final stage of work, a slab of such thickness is installed on the supports so that it can support the expected weight of the furnace. Following all the above rules will help create a solid foundation.
You can’t go anywhere without a foundation: we’re building a foundation for a stove
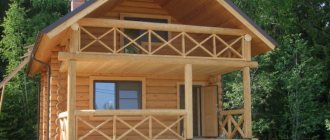
A mandatory attribute of a real wooden house since the times of ancient Rus', a sign of comfort and coziness is the Russian stove. The heroine of fairy tales is still popular today. But the real world is not so simple and magic will not save you from the hard work of installing a stove in your house. And we will not start with the head, but will take care of strong legs so as not to lose this very head. The foundation for the furnace is perhaps the most important part of the construction work. It depends on this whether the stove will serve us faithfully and whether it will not abandon us in the fight against time and nature. Let's move from legends to action.
Chapter one - arming yourself with knowledge
Before doing any work on installing any foundation for buildings, it is necessary to invite a professional geologist to study the soil. Based on geological research, experts must give an accurate picture of the underground component of your future home, and it is advisable to take care of this even before laying the foundation of the house itself, and not just the furnace. Geologists will draw up a description that necessarily includes the following points:
- Soil freezing level
- Groundwater leakage
- Type of working soil (required in layers)
- Seasonal deformations
Chapter two - choosing the type of foundation for the stove
From whatever materials a Russian stove and its foundation are now built. And this part of everyday life itself is located not only in the house, they are also installed in the bathhouse. A Russian stove in a Russian bathhouse is beauty, and that’s all. The most common types of foundation:
- Slab (monolith)
- Pile
- Screw
- Tape
- Under the stone oven
- Foundation for an iron stove
installing a base for a stove in a wooden house The last type is interesting because, in general, it doesn’t exist. The structure of an iron stove is such that in order to provide a good foundation for an iron stove, you just need to make strong floors.
Please note
The listed categories of fireplaces have their own design features that should be taken into account when choosing them. First, it is important to decide for what personal purposes you need a fireplace: for additional heating of the room and creating a cozy relaxation area, or as a decorative element, to create an original interior design of the room.
- Basement fireplaces should help remove smoke. Therefore, we need to pay special attention to this. There should also be high-quality ventilation of the room. This applies to operating units. If you are using a decorative or bio option. Then there will be no such need.
- A fireplace, like any other device with an open fire (and not only open fire), is potentially dangerous. It can be harmful to human health if technical inspection, cleaning and constant care and control of the combustion process are not carried out. This is especially important for the basement.
- If this is ignored, then it is better not to install a fireplace, but to watch it work with friends or neighbors. Believe me, the fireplace is not lit very often anymore, except on weekends. Therefore, it is worth thinking about whether all this is worth the additional cost of money and time.
Before making a final decision, you need to collect information about the required model. Look at the photos and videos. After all, the basement is not always properly ventilated, and special attention must be paid to this.
How to make a foundation for a stove - all options
In the distant past, in the Russian hut, no one specially built a foundation for the stove; the stove was simply placed on the floor, and in order for it to withstand the load, they simply reinforced the floor beams or laid additional ones.
Nowadays, it is simply not correct to ask the question of whether a foundation for a stove is needed at all, because a high-quality foundation is not only stability, but also protects the stove from destruction, cracks, and, of course, fires. Each foundation for a specific furnace has its own specific requirements and criteria; let’s consider them in more detail.
Types of bases
When talking about what kind of foundation is needed for a furnace, three main options are considered:
- rubble concrete;
- solid poured concrete;
- support-pile foundation.
The classic foundation for a furnace is built from cement-based rubble or concrete. The base itself should be 50-100mm larger than the area of the oven itself around the entire perimeter. The height of the foundation should be the same as the foundation of the bathhouse or wooden house itself.
Roofing felt or 2 layers of roofing felt for waterproofing are laid on the finished base, bricks are laid on the insulation and outlets are prepared from metal corners, from which fireproof cuts are made.
Nuances of construction
The first nuance is that the foundation for the furnace is not connected to the main foundation of the building. In addition, if they are located close enough, then a sand cushion about half a meter wide must be laid between them.
The second nuance: under no circumstances should you add concrete to the old foundation, since further installation of the entire furnace structure will cause shrinkage, cracks and many other problems will arise.
What depth should it be?
The most classic foundation for a furnace is built with a solid slab. The depth of the base depends on the following factors:
- ground water level;
- soil type;
- depth of soil freezing.
To avoid surprises in the future, before starting construction of the foundation, it is worth conducting a geological exploration of the entire site; its cost fluctuates around $50. Thus, you will be able to obtain accurate data on the groundwater level, soil type, and soil freezing depth. This data will help determine exactly what foundation depth should be selected.
Example of depth calculation:
- sandy and dry soils – 80 cm;
- heaving - below the freezing zone, at least 1 meter;
- The weight of a brick kiln is calculated using the formula: 1350xV=P, V is the volume of the masonry.
Other types available for the basement
Correct installation of a fireplace in the basement is the key to its high-quality operation and safety. You can choose other fireplace systems for the basement. They are less labor-intensive to install, and the installation price is much cheaper. Moreover, everything can be done with your own hands.
Gas fireplaces
Such fireplaces use both natural gas and cylinders to operate. Gas fireplaces use the principle of the presence of live fire, but they are cheaper and easier to install. In addition, unlike wood-burning ones, they give off more heat to the surrounding space.
Gas fireplace for basement
Attention: Gas fireplaces are equipped with automatic controls that can maintain the required fire intensity in automatic mode, which simplifies its operation. When using this type of fireplace, there is no need to organize a place to store fuel, since they are installed in apartments that have a centralized gas supply.
The design of such a fireplace does not require the installation of a chimney with good draft: it is enough to put a pipe outside to remove combustion products.
If you decide to install this type of fireplace, you should pay attention to the following:
- Such fireplaces are prohibited from being installed without permission from the relevant organization, which means that installing a gas fireplace will require technical documentation.
- Installation and commissioning are carried out by specialists with appropriate qualifications.
- Collecting and approving documentation, as well as its installation, will take a lot of time and lead to large material costs.
Like all types of fireplaces, a gas fireplace requires stable care and technical control:
- The presence of a gas fireplace in an apartment poses a threat to the lives of residents due to the fact that gas is an explosive material.
- The low efficiency of such a fireplace allows up to 50% of the energy to be wasted.
Attention: if the fireplace runs on a cylinder, then this design is not safe. You must always be indoors while the system is operating.
Electric fireplace
Fireplace insert with air supply from the basement using electricity
An electric fireplace uses electrical energy to operate. And it is one of the safest types of fireplaces. The simplicity of the design allows you to install it in any apartment without any problems.
At the same time, you do not need to think about the chimney, and their operation plausibly resembles the operation of a conventional fireplace. They do not require special care, and they can be installed in the basement of the room.
Moreover, electric fireplaces have a number of advantages over fireplaces running on gas or wood:
- If we compare the costs, then the electric fireplace benefits significantly, which makes it possible for different segments of the population to install it.
- Its installation does not require additional costs.
- When the fireplace is operating, a realistic effect of live fire is created.
- They have several operating modes: heated or unheated with the ability to adjust the degree of heating.
- It does not require special care.
- More modern designs have remote control, which allows you to adjust the intensity of the “burning hearth”.
The design features of electric fireplaces allow them to be installed in various institutions: apartments, offices, cafes, hotels, restaurants, holiday homes, etc. Unlike wood and gas fireplaces, electric fireplaces do not burn oxygen and do not require powerful forced ventilation, which significantly affects the well-being of others. When choosing the type of fireplace, you should definitely pay attention to this feature.
Biofireplace
This type of fireplace appeared quite recently and is one of the modern inventions. Despite the fact that the biofireplace uses the principle of open fire, it does not require exhaust devices or a chimney. At the same time, the fire burns without leaving behind any traces of combustion: ash, soot or smoke.
If you want to install it, you should rely on the following:
- Due to the design features, you can install it in any place you like in your apartment.
- The biofireplace is equipped with special energy units that can effectively heat the room.
- Biofuel of plant origin is used as an energy source, releasing water vapor and carbon dioxide during combustion. Its quantity is so small that the operation of a bio-fireplace can be compared to the burning of several candles.
- The fireplace can be decorated in any style and fit harmoniously into any interior.
- Open fire research requires supervision of its operation. And it’s not surprising, because fire is fire, despite its origin.
Attention: This device is intended for heating a room, but the door to the combustion chamber is made of heat-resistant glass, which creates the effect of an open fire.
Such a fireplace stove is an effective and at the same time absolutely safe design that does not require special fire safety measures. Such fireplace stoves can be designed for any energy source: wood, gas, solid fuel.
Such designs have the following main characteristics:
- The efficiency of such devices is more than 50%, which is quite acceptable.
- The design of the fireplace stove includes a special auxiliary air heating system, which increases its heat-generating characteristics.
- It does not require a massive foundation.
- It is possible to maintain optimal combustion intensity.
- The use of coal is not permitted.
Concrete foundation
To build it we need:
- cement, if the soil is saturated with sulfates and the groundwater is high enough, use sulfate-resistant cement under the brand name SSPC;
- the sand you need is coarse-grained, without inclusions, the best option is mountain sand, but river and sea sand are also suitable;
- formwork;
- crushed stone;
- rolled waterproofing material, for example roofing felt;
- trough for mixing the solution;
- bayonet and shovel;
- level;
- hammer and nails;
- construction stapler.
To build a high-quality foundation for a stove that will serve for many years, you must strictly follow all instructions. Let's look at each stage in detail.
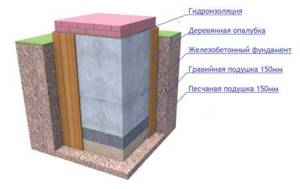
Pit
We have already written above about the depth of the foundation for the furnace. The pit should be deeper than the soil freezing level, 100 mm wider than the foundation itself - this is done in order to eliminate the influence of ground movement.
Dry sandy soils - take a depth of about 80 cm, heaving soils - at least a meter.
Pillow
Place a 15 cm layer of sand at the very bottom and fill it with water. After the water has gone, add more sand to the original level and pour water again. After this, crushed stone and broken brick are laid, the thickness of this layer should be about 20 cm. The layer is compacted, more sand is poured in, and water is poured. We repeat this until the sand stops settling.
Formwork and reinforcement
We lay formwork around the perimeter of the pit, making supports every 50 cm. There must be at least 10 cm of empty space between the formwork and the ground. If your soil is very dense and does not crumble, then you can do without formwork.
Reinforcing mesh is ordinary; ready-made options can be found on sale.
Pouring concrete
The mixture for pouring the foundation for the furnace is made according to the following recipe:
- 1 part cement;
- 3 parts sand;
- 5 parts crushed stone;
- water.
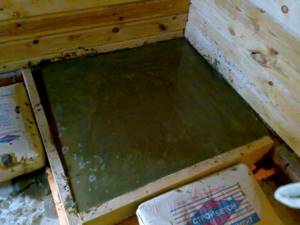
Everything is mixed, the solution is poured into the formwork. The formwork must first be moistened so that the tree does not absorb water from the concrete mixture. The pouring is done in layers of 20 cm, each layer must be beaten to remove air from the mixture. In this way they reach the highest point. The top of the foundation is leveled and covered with roofing felt or tarpaulin.
An important point: during the drying period (about 3 weeks), the foundation must be constantly watered and preferably protected from the sun.
After removing the formwork, the voids between the ground and the foundation are filled with fine gravel and coarse sand.
Rubble concrete base
The first step is to mark the pit, as well as the concrete foundation for the furnace; a rubble foundation requires a pit size of 10-15 cm larger in order to avoid soil heaving. A 15 cm layer of crushed stone is poured onto the bottom and the layer is compacted.
The formwork is installed in the same way as in the example with a concrete base.
Next, a layer of large stones is placed on the bottom, but not more than 15 cm in diameter. Crushed stone is poured on top to fill the voids between the stones. A cement-sand mortar prepared in a ratio of 1 to 3 is laid on top. Cement of at least grade 400 is used.
Each new layer of stones is laid only after 24 hours. If you do not allow the layers to settle, then in the future this will significantly reduce the service life of the rubble foundation. In general, pouring is completed when about 7 cm remains to the floor level. After this, a building level is taken and the evenness of the surface is checked. If there are deviations, they are removed using a cement-sand mixture.
The leveled foundation is covered with polyethylene and left for a couple of weeks to dry completely. In this case, the solution must be watered daily and try to protect it from the sun. After a couple of weeks, the formwork is removed and waterproofing is carried out. As an option, molten tar is applied to the foundation. All voids between the furnace foundation and the ground are filled with coarse sand and fine crushed stone.
As you can see, a rubble foundation for a furnace is built in almost the same way as a regular concrete one.
Technology and nuances of building a bathhouse in the basement
As practice shows, to build a bathhouse in the basement with your own hands, you can choose two options for implementing the project, the first is the purchase and assembly of a finished bathhouse from a set of prefabricated parts and elements. The second way is independent construction with your own hands according to your own design.
The first is preferable, since everything is purchased in a kit, which, like a children's construction set, contains everything from instructions to the last nail. The second one is more interesting, because everything is thought out and implemented independently, from the design to taking into account the specific placement of door handles and switches.
However, despite the differences between both methods of building a bathhouse with your own hands, both methods involve several stages of work:
- Project development;
- Selection of materials and tools;
- Installation of heat and waterproofing;
- Installation of ventilation system;
- Laying electrical wiring;
- Furnace installation;
- Decorative cladding of premises.
Technical details
A bathhouse in the basement of a private house is designed taking into account the safety requirements of the entire building. This means that during construction, not only the dimensions of the premises of the bathhouse itself are taken into account, but also the structural features of the entire building. It is preferable for the construction of a building with concrete floors, with a basement height of 2.15-2.45 m. If the basement is located under a wooden interfloor ceiling, then a headroom of 05.-0.7 meters is required for hydro and thermal insulation.
Before making a bathhouse in the basement of a private house, it is worth determining its capabilities - for a family of 3-4 people you need a room of 14-18 square meters. For 5-7 people, the size of the room increases to 25 meters. If you plan to install a font or pool with an area of 2.5-3 meters, then the size of the basement should be no less than 30 square meters.
The ceiling height for the steam room is selected in the range of 1.90-2.10 meters. You should not take a greater height, since the steam room will not heat up effectively. A lower height should not be chosen for fire safety reasons - even with an electronic stove controller, the casing of the steam room will be exposed to high temperatures, and this can lead to a fire.
For a shower stall, 2-2.5 square meters are provided. Its placement is done in such a way that splashes of water do not fall on the doors of the steam room (especially if the doors are made of glass.) Such location conditions are also provided for a font or swimming pool; the minimum distance from the pool to the door of the steam sauna is 2.5 meters.
The location of the electric furnace and the control panel must ensure the safety of electrical equipment, first of all, this concerns the ingress of water, steam and water condensate onto the wire cores and the placement of protective grounding. For a wood-burning stove, if it is located in a basement, supply and exhaust forced ventilation equipment is required. In addition, the chimney must be led out to the height of the roof ridge board. This means that if the chimney is located internally, it must pass through the interfloor ceilings and roof; if it is located externally, the chimney must be insulated to its full height.
Hot water is provided from an electric boiler, but lighting in the steam room and other rooms is recommended to be done with a voltage of 12 or 24 volts, this will provide additional safety.
When designing drainage, it is necessary to ensure that water drains not only from the shower stall, but also from the floor of all rooms. To do this, a calculation is made of the slope of the floor in the premises and the depth of sewer pipes by at least 0.4 meters. And one more nuance: when designing, it is worth considering the issue of building a toilet; it will take up little space, but in this case comfort will be ensured. In an isolated toilet room you can place a boiler and a pumping station; this arrangement will reduce noise in the room.
Materials
The procurement of materials for construction must take into account the actual dimensions of the premises, their height, area, and distances for installing electrical appliances.
When considering the possibility of purchasing different materials, it is better to give preference to high-quality, branded materials, the manufacturer of which guarantees compliance with GOST. The list of materials for the construction of walls and partitions should include:
- Brick or ceramic blocks for the walls of the steam room;
- Aerated concrete blocks for the walls of the shower, toilet and rest room;
- Cement, cement mixture for wall masonry;
- Basalt mats with aluminum foil for thermal insulation;
- Ceramic and tiles.

When building a bathhouse in the basement, you will need basalt mats.
For the construction of the floor, foundations for the walls and the stove, you need to provide:
- Expanded clay;
- Crushed stone of medium fraction 15-25 mm;
- River sand;
- Metal fittings with a diameter of 8-10 mm;
- Welded reinforcing mesh made of steel wire 2-3 mm;
- Sewer pipes with a diameter of 100 mm, pipes, tees, drains for installation;
- Ceramic tiles with anti-slip texture for flooring;
- Adhesive mixture for laying tiles;
For the steam room you need to purchase:
- Electric stove-heater;
- Stone for laying in the oven;
- Electrical cable;
- Door, preferably made of tempered glass;
- Basalt insulation;
- Fastening elements;
- Linden boards for shelves;
- Wooden blocks for fastening the sheathing;
- Linden lining for wall cladding;
- Sealed lamps;
- Exhaust fan and valve for steam room ventilation;
Hydro and thermal insulation
When considering different options for waterproofing a basement, two points must be taken into account - first, the waterproofing must reliably protect the structure of the house from moisture penetration from the steam room and shower. The second point is the protection of the bath itself from excess moisture. In the first case, the basement must be thoroughly examined and areas where the foundation waterproofing has holes are identified. These are most often the corners of walls, where there is no good blind area of the building outside, places where moisture from the roof seeps under the foundation and blind area. It’s quite easy to correct the situation with your own hands; you need to make a blind area and restore the external waterproofing of the foundation by treating the foundation blocks or monolithic grillage with bitumen mastic.
It is enough to treat the internal surfaces with a water repellent and a deep penetration primer. When building steam room walls, a gap of 10-15 cm should be provided between the outer wall and the insulation. This volume of air will not only ensure heat preservation in the steam room, but will also protect the walls and ceilings from excess moisture.
Quite often, groundwater comes very close to the surface. In this case, a private house, and especially the basement, may be flooded. To prevent this from happening, it is recommended to provide the entire basement area with a solid layer of waterproofing. To do this, first a clay solution is poured over the entire area, and on top, after it dries, a solid piece of high-density polyethylene film is laid. And only after this is filled with expanded clay and a layer of concrete screed is laid.
Attention! It is also necessary to install waterproofing on the floor slabs, as well as on the walls, this will prevent steam from penetrating into the upper floors.
Ventilation and sewerage
A bathhouse in the basement should be equipped with ventilation, both natural and forced. Natural ventilation will ensure that the required level of humidity is maintained in all rooms when there is no need to use the steam room. Forced, will quickly ensure the removal of moist hot air outside the house, thus normalizing the temperature and humidity after the bath procedure.
The sauna can be included in the general ventilation system of the house; if the ventilation duct goes to the roof, then natural circulation will ensure air removal with maximum efficiency.
A bathhouse in the basement can be included in the general ventilation system of the house
Sewerage can be included in the general sewerage system of the house, but this is provided that the pipes are below the floor level of the bathhouse. If the house has a sewer system that does not have the ability to receive wastewater from the basement, then a separate system is designed to drain the wastewater into a separate septic tank. As an option, you can use vacuum drainage systems or equip a septic tank with a fecal pump, which will turn on when the septic tank is full and discharge the wastewater into the general sewerage system.
Wiring
A basement, and especially one in which a bathhouse is located, must have reliable electrical wiring equipped with security systems. For a heater stove, usually connected from a three-phase network, there must be circuit breakers for each phase. Special lamps are used for lighting, and the voltage must be safe for humans - 12, 24 or maximum 36 volts.
Wires must be selected in double insulation, and the insulation must be marked “NG”, that is, not support combustion. The wires must be copper, with a cross-section of 1.5 mm for lighting, and 2-2.5 mm for power sockets. It is recommended to select a cable for a heater stove with a core cross-section of at least 6 mm2.
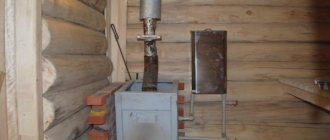
Installation of a sauna stove
The choice of a stove for a steam room largely depends on the preferences of the owner of the house. For lovers of natural heat, this choice will be in favor of a wood-burning stove, but those who value hand comfort and time will give preference to the electric option.
A wood-burning stove gives you the opportunity to enjoy a live fire, hear the crackling of logs, and receive additional pleasure from the light of the flame. On the other hand, it requires kindling, constant monitoring of the combustion of wood, and after use it will be necessary to remove the ash, otherwise the unpleasant smell will remain for a long time.
An electric stove makes it possible to obtain the required temperature; unlike a wood stove, it does not require the construction of a chimney and cleaning of the ash pit. In addition, it can be simply programmed and by the desired time the temperature in the steam room will reach the required parameter.
For a wood-burning stove it is necessary to provide a foundation at the design stage, but for an electric stove it is enough to simply determine the location and remove the power cable.
Regardless of the type of stove, the walls near it are sheathed with non-combustible materials or decorated with stone or brickwork. Above the stones, a sheet metal insert is also made to prevent the wooden elements from catching fire. For a wood-burning stove, the firebox is brought into the adjacent room, this allows for greater comfort and convenience in the steam room.
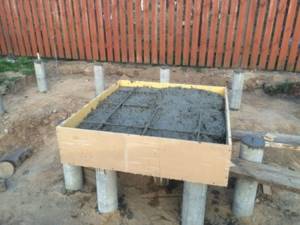
Pile foundation for the furnace
This is one of the modern and effective ways to build foundations. This option is perfect for both a bathhouse and a wooden house.
The essence of the method is that a reinforced concrete slab 15-20 cm thick is installed on piles or columnar supports - this depends on the depth of soil freezing.
Installation of such a foundation is extremely simple:
Holes with a diameter of about 20 cm are drilled in the ground to the required depth. Crushed stone with a layer thickness of 10-15 cm is poured onto the bottom. The layer is well compacted. Next, tubes made of roofing felt are inserted into the pits; they serve as formwork. Concrete mixture is poured into them. All this is left to dry for a period of 14 days.
Once the pillars have fully gained strength, a reinforced concrete slab is installed. Waterproofing is carried out along the upper edge using roofing material. The surface is lubricated with hot bitumen or cold mastic, and roofing material heated by a burner is laid on top.
Forced ventilation
This system is most often used for large basements. The purchase and installation of forced ventilation requires quite significant costs, for this reason not everyone can afford such a luxury. The advantage of this method is that it makes it possible to bring the microclimate of the cellar as close as possible to natural conditions. The basic principle of its operation is to forcefully create a flow of fresh air using special fans.
Tags: oven, basement, private
« Previous entry
Foundation for a metal stove
A metal stove, even if it is made of light, thin steel, also requires a separate pedestal. This is due to the fact that if the stove does not stand level, this can lead to many problems.
Algorithm for building a foundation for a metal furnace weighing no more than 150 kg.
- Stage 1. Mark and dig a pit no more than half a meter deep.
- Stage 2. Lay a layer of crushed stone and compact it. The final layer should be at least 30 cm thick.
- Stage 3. The concrete solution is poured and left for a day to set. The solution is made in the following proportion: 1 tsp. Cement, 4 hours. Sand, water until the mixture looks like rich sour cream. At this stage we laid the base of the foundation.
- Stage 4. When the layer is taken, it is necessary to lay roofing material on it for waterproofing.
- Stage 5. The entire remaining part is poured with concrete, but according to a different recipe: 1 hour. Cement, 4 hours. Gravel, 3h. Sand and water.
- Stage 6. The upper final layer is leveled. It should be perfectly smooth.
The foundation hardens within a few weeks. Don't forget to constantly moisturize it.
In the article we looked at what types of foundations for stoves there are, how to make such a foundation, and at what depth to lay it.
We hope our tips will help you in building your stove in a bathhouse or wooden house.
Features of the device and advantages of a bathhouse in the basement
So, before you start drawing a diagram for installing equipment, you should carefully understand the features of the device and the advantages of installing a bathhouse in the basement of a private house. In a traditional layout, a Russian bathhouse is a complex consisting of three main rooms:
- Steam room;
- Washing;
- Dressing rooms and waiting rooms.
The first room is the steam room, the most important complex room; it must maintain a high temperature, have excellent ventilation and thermal insulation.
In the washing room, a small family bathhouse, there is a shower and, if possible, a font or a small pool for cold water. Although, many avid sauna fans prefer a bucket-waterfall with ice water rather than a container with relatively cold water.
The dressing room is used both as a dressing room and as a rest room; there should be enough space for both a table for a feast and a bench for rest.
Until recently, a bathhouse in the basement of a private house was a curiosity. First of all, this is due to the fact that in private houses it is not customary to have a basement with an area equal to the area of the first floor. The second point is that the basement floor usually houses a cellar or a garage - a workshop, that is, there is simply not enough space for three full-fledged rooms. And of course, one should not discount such an argument as safety; many believe that a bathhouse made in the basement of a private house will be a source of dampness in the house, which will invariably lead to the formation of fungus and mold.
On the other hand, placing a bathhouse in the basement of a house will require much less money than building a separate house. Be that as it may, the basement already has a ceiling, walls and floor. Electricity, as in the house itself, functions properly, there is running water, and the sewage system runs through the basement, so all conditions are created for a small bathhouse. Well, as for the size, for a family of 3-4 people the space and a small basement are enough to accommodate a steam room, a shower cabin and a massage table.
What does a bathhouse look like in the basement?
An additional argument in favor of the project is usually the fact that the maintenance of such a home sauna is cheaper than a separate building. Even in the most severe frosts, the basement is cooled differently than a log house or brickwork. After all, there is a living space above the ceiling, and the fact that the basement, buried at least 2-2.5 meters into the ground, allows you to ensure a comfortable temperature in the intervals between bath days, and this already saves up to 30% on the maintenance of the bathhouse.
In addition, in modern projects, the entrance to the basement is located inside the house, and not outside, so that immediately after visiting the steam room you can go up to the living room and continue a pleasant evening in front of the fireplace.
Basic rules for laying a foundation
Regardless of the chosen type of foundation, when constructing it you must adhere to several basic rules:
- It must be completely independent. Due to the possible subsidence of the house, the stove should not change location, as this can lead to various complications.
- If the base of the house and the heating element are located nearby, it is necessary to fill up to 5 cm of sand between them.
- The base of the furnace should not be in contact with the strip foundation.
- When choosing a location, you need to focus on the location of doorways, roof beams, etc.
- When making calculations, it is necessary to take into account the mass of the finished structure in order to calculate its shrinkage.
The dimensions of the base are influenced by the type and density of the soil. The chimney has the greatest mass, so it is advisable to place it closer to the center to avoid off-center shrinkage. It is important to consider the weight and material of the structure. For brick stoves with heavy chimneys, you can build a separate base for the pipe.
Types of foundation
The main types of foundation include:
- Cement.
- Rubble concrete.
- On metal supports.
Cement foundation diagram
Rubble concrete foundation
The choice depends on the density of the soil and the mass of the structure. The optimal pouring depth is up to 100cm. The foundation is subject to high loads, especially when the soil freezes. Therefore, it is required to do it efficiently.
Tools and materials
To build a stove you need to prepare a set of tools:
- Bayonet shovel.
- Shovel
- Hammer.
- Saw.
- Set of sieves for cement and sand.
- Container for water and cement mortar.
- Construction or laser level.
- Office for measuring and making notes.
- Stapler.
- Concrete mixing machine.
- Set of boards for formwork.
- Polyethylene for vapor barrier.
- Sand.
- Cement.
- Gravel.
- Net or rod.
What depth should it be
The classic type of foundation is a solid cement slab. The depth of the pit depends on several factors:
- Groundwater level.
- Soil type.
- Freezing level.
Before starting work, it is advisable to conduct a geological examination of the area. Its cost may vary depending on the area. This will allow you to obtain all the necessary data for future laying the foundation. Based on the data obtained, you need to select the depth level. Example:
- For sandstones, the depth must be at least 80 centimeters.
- For heaving ones, below the soil freezing level - more than 100 cm.
Boiler room in the basement of a private house requirements
Main menu » Articles » How to make a boiler room in the basement
How to make a boiler room in the basement
The basement floor in an individual residential building is a functionally very convenient and useful part of the building, where you can place various utility, auxiliary and technical rooms, including the boiler room, if, of course, the necessary standards and rules for the arrangement of this technical room are met.
When using natural gas, in a boiler room located in the basement of a single-apartment residential building, you can have up to four heating or water heating gas boilers.
It should be noted here that the boiler room of a country residential building can be of several types, depending on the energy carrier used:
- gas (natural or liquefied gas);
- liquid fuel (diesel fuel, waste oil, fuel oil);
- solid fuels (coal, firewood, peat, coke);
- combined (both gas and liquid fuels);
- electric (powered by electricity).
It should be noted that the contractor must have all permits to carry out design and installation work on the construction of the boiler room. Usually, together with the contractor, a “technical specification” is drawn up, which reflects all the customer’s wishes for the installation of a boiler room.
Based on the technical specifications, specialists can offer engineering solutions for the construction of a boiler house, draw up a feasibility study, develop a project and calculate the load on heating, hot water supply, etc.
Boiler house design
When designing and installing heating equipment, it is necessary to strictly follow the requirements of building codes and regulations for the boiler room.
In general, the design of boiler houses is divided into stages:
- receiving technical specifications;
- calculation and selection of main equipment;
- execution of working drawings of the boiler room;
- execution of an explanatory note;
- approval and delivery of the project.
When choosing the type of boiler house, the determining factor is the type of energy carrier that will be used in the designed boiler house. The most appropriate is gas - it is relatively cheap, it does not need to be constantly transported to the place of consumption, its combustion products are the most environmentally friendly.
If you are considering a house for occasional visits, then you can use solid fuel and heat the boiler only during visits. In this case, it is necessary to provide for the possibility of draining water from the water supply and sewerage systems.
A correctly and pre-selected heating method will ensure the most optimal operation of a residential building from an economic point of view.
The choice of boiler mainly depends on the availability of utility networks near the building site, the characteristics of the site and the house, as well as financial capabilities.
Boilers can be placed in a separate room on any floor, including the ground floor or basement, with a total power for heating and hot water supply systems from 30 kW to 200 kW inclusive (when placed on the first or basement floor - even up to 500 kW inclusive) .
Boiler room requirements
The volume of the boiler room is regulated by the following standards:
Depending on the location of gas heating installations, the above figures may be more specific.
The clear distance from protruding parts of gas equipment along the front and in passage areas must be at least 1 m. Doors in the boiler room must be at least 80 cm clear in width.
The rooms where boilers are installed must have a ventilation duct. For air flow, it is necessary to provide a grille or a gap between the door and the floor (or a grille installed in the outer wall of the room) at the bottom of the door or wall opening into the adjacent room. The area of the inlet opening for the boiler room located in the basement must be at least 0.025 sq m (if the total power of the installed heating gas boilers is 30 - 200 kW).
Combustion products are removed from heating devices through a chimney.
The height of the boiler room located in the basement must be at least 2.5 m.
The room must be separated from adjacent rooms by enclosing walls with a fire resistance limit of 0.75 hours, and the limit of fire spread through structures is zero. The walls can be made of brick, cinder block, concrete. Natural lighting in the boiler room is provided by the installation of windows - at the rate of 0.03 sq m of window light surface per 1 cubic meter of room. In this room, ventilation should be provided based on the calculation - an exhaust in the volume of 3 times the air exchange of the room per hour, an influx in the exhaust volume plus the amount of air for gas combustion.
When installing boilers with a power of up to 30 kW, the height of the boiler room located in the basement can be 2.2 m; and when installing boilers with a power of up to 500 kW, the volume of the room should not be 15.0 cubic m plus 0.2 cubic m per 1 kW of power of the heating unit. The boiler room in the basement, equipped with a boiler up to 500 kW, must have direct access to the outside (and all doors must open outward). It is allowed to provide a second exit to the utility room; the door must be fireproof type 3.
The walls and interfloor ceilings separating the boiler room from other rooms on the ground floor must be vapor-gas-tight.
It is absolutely not allowed to place gas appliances in the basement of a house when using liquefied gas, as well as liquid fuel with a vapor flash point below 45 degrees C.
The above requirements for the boiler room for gas boilers also apply to the furnace room for boilers operating on solid and liquid fuels. However, there are a number of features that must be taken into account when designing and building such boiler houses, namely:
- the area of the boiler room in the basement, where boilers operating on solid and liquid fuels will be installed, must be at least 7.0 sq m;
- the room must have a window or hole for the influx of outside air measuring about 8 sq. cm per 1 kW of the rated power of the boiler; there should be an entrance to the ventilation duct under the ceiling of the boiler room, and an inlet to the chimney in the wall;
- below the inlet, 25 - 30 cm, a hole is made for inspection and cleaning of the chimney;
- the cross-sectional area of the chimney should not be less than the outlet cross-sectional area of the boiler chimney, the chimney pipe should have the same cross-section along its entire length, and there should be as few elbows and bends as possible in the path of the flue gases - it is best in this case to use round pipes, since the gases come out smoothly and without turbulence;
- the chimney must be gas-tight so that smoke does not penetrate into the premises; it is better to plaster it from the inside, or lay an asbestos-cement pipe of the required diameter inside the chimney (the greater the power of the boiler, the larger the diameter of the pipe);
- there must be enough space for the boiler to ensure fresh air and normal maintenance;
- the base of the floor under the boiler must be made of non-combustible material;
- cold water must be supplied to the room to provide a heating system and hot water preparation, as well as a sewer pipe to remove emergency discharges from the boiler and boiler;
- when installing a coal-fired boiler room, the electrical wiring must be hidden (preferably in steel pipes); lighting fixtures, switches, sockets must be hermetically sealed and must be powered from a low-voltage network - up to 42 V: this is due to the explosiveness of coal dust in the boiler room at a certain concentration.
The upper cut of the chimney must be no lower than the ridge of the roof to ensure complete removal of fuel combustion products and prevent air leakage through it.
News, promotions
- home
- News, promotions
- Boiler room in the basement of a private house: requirements, standards, features.
Boiler room in the basement of a private house: requirements, standards, features.
Installing a gas boiler in the basement is an obvious solution, since such equipment cannot be located in residential premises, and building a separate structure is too expensive.
We will talk about what requirements for a boiler room in the basement of a private house are put forward by state standards and building codes, and also answer frequently asked questions.
Installation of a boiler room in the basement
The question is often asked: “Is it possible to install a gas boiler in the basement?” The answer is clear and categorical: you can. The exception is systems whose gas supply is made from liquefied petroleum gas (LPG) extracted from oil.
The history of this issue stretches back to the times when the location of boiler rooms in basements and ground floors was actually prohibited due to the widespread use of LPG.
However, with the transition to natural gas and boilers with a closed firebox, this ban was lifted, and now in basements and basements, as well as in the attics and roofs of single-family houses, up to four heating or water heating gas boilers with a total capacity of up to 200 kW can be located.
In general, taking into account the specifics of the Russian bureaucratic apparatus, it is better to draw up a project for the future boiler house and approve it in all instances in advance. This is preferable for the following reasons: if you come to the fire inspectorate or other supervisory authority for permission to an already built and equipped boiler room, they can blackmail you with the fact that it will have to be remodeled or completely closed.
This will allow you to demand truly exorbitant bribes, because it will be easier to give even a decent amount than to rebuild the boiler room or build it again. On the other hand, if you bring a project for a future building, then there will be nothing to blackmail you with; the official can only make reasoned corrections and comments, after taking into account which he will have no choice but to approve your project.
In order to place a boiler room in a particular room, it must be brought into compliance with certain requirements.
Regardless of where exactly the room is located, it must meet the following parameters:
- The distance from the floor to the ceiling of the basement (room height) must be at least 2 meters, the optimal height is from 2.5 meters;
- The room must be separate; placing equipment in rooms adjacent or combined with living rooms is strictly prohibited;
- The area of the boiler room is taken at the rate of 4 square meters per boiler, and the minimum distance from the front of the equipment to the opposite wall should not be less than one meter;
- The equipment must be provided with free access from all sides for normal and convenient maintenance and repair of all parts of the system;
- The boiler room should have windows facing the street, the area of which is taken at the rate of 0.03 square meters. meter per cubic meter of room volume, but not less than 0.25 sq. meters;
- The width of the doorway should not be less than 80 cm;
- The floor must be level and durable, made of non-combustible materials. It is best to make a cement-sand screed, which can then be covered with tiles or other waterproof and fireproof material;
- Wall and ceiling structures should be made of non-combustible materials, finishing - plaster or tiles. Near the firebox, wall coverings that can catch fire or deteriorate under the influence of high temperatures should be covered with special shields made of non-combustible materials with a heat-insulating lining;
- The entrance door must have a basement ventilation hole at the bottom or a gap between the door leaf and the floor of at least 0.02 square meters. meters;
- The room must have supply and exhaust ventilation;
- It is better to limit access to the boiler room to the circle of persons who are directly involved in the maintenance or repair of equipment. Children and unauthorized persons are not permitted to enter the boiler room.
If we talk about the volume of the furnace room, then it matters only for boilers with an open firebox. For units with a closed, sealed firebox, the volume of the room is not standardized. By the way, most modern boilers have closed fireboxes, but if your device is equipped with an open system, then the table will help you:
We begin to pour the foundation for the stove with our own hands
After completing work on the plan and preparing materials, you can proceed to construction:
- Marking, digging a pit.
- Installation and strengthening of wooden formwork.
- Preparing cement, pouring the base.
It is required to consider all possible steps in more detail.
Marking for the foundation and pit
Instructions for making the base of a Russian stove:
- After determining the location of the future heating element, you need to correctly calculate its dimensions, taking into account the power. This depends on the total area of the room and the number of cold bridges.
- It is necessary to draw the size of the oven with chalk on the ground. It is required that the base be 200mm larger than the outline of the structure. Apply markings, then place wooden stakes around the perimeter of the pit.
- Using a bayonet shovel, dig a pit to a depth equal to the calculations obtained from the previous paragraph.
- At the bottom of the resulting pit you need to lay a pillow up to 15 centimeters thick. Then, compact it with a shovel and add a layer of gravel. Fill with water and compact tightly.
Installation of formwork and strengthening
After completing the previous step, you need to start installing the frame to generally strengthen the structure. Any durable wood can be used.
Wooden formwork is a box whose corners are secured with metal fasteners. All boards are connected with nails or screws. It is required to adjust it to the dimensions of the pit.
- The formwork is carefully lowered to the bottom of the pit and secured.
- You need to protect it from moisture. For this, polyethylene film is used, which is cut to size and laid out from the inside. Then, it is fastened with a construction stapler.
- Strengthening the base is carried out to increase rigidity. For this, metal rods up to 12 millimeters thick are used, which must be welded in the form of a frame or stiffeners.
- Docking with the main part of the foundation. This is done through brickwork.
Concrete preparation
To prepare the solution, you need to combine 4 parts of sand, 1 part of cement, 3 parts of medium-sized crushed stone. Mix thoroughly, mix with water, mix it with a concrete mixer. The resulting mixture should look like thick sour cream. If you add too much liquid, the strength of the concrete will decrease. Therefore, it is advisable to add liquid gradually.
It is necessary to fill the pit with the prepared solution to the floor level minus 8 centimeters. It is advisable to carry out all work at once. Laying the mortar in layers will lead to a significant reduction in the rigidity of the finished structure.
After the final filling of the pit, you need to check the evenness of the coating with a construction or laser level. Once the solution dries, it is difficult to correct imperfections in the base.
How to make a stove in the basement of a house?
Among the variety of kitchen equipment and heating devices, many owners prefer to bake in the basement of the house. Even with a heating system at home, an additional stove will be an advantage.
For example, this will save some of the money on payments during cold weather in the spring and autumn, when full-fledged heating is already or is not yet working, and the room becomes cool and damp.
By heating the stove once a day or twice a week, you can maintain optimal temperature and humidity conditions.
It is not very difficult for a beginner to build a stove with your own hands, building it into the basement of a house, if you do not choose complex configurations for its arrangement. When choosing a model, not only its shape is important, but also its functionality - heat transfer.
It depends on the area for which the stove heating is designed. Among the many models, choose those that are easier to fold, and you can make adjustments, knowing the nuances and features of the work.
These stoves are built into the wall, turning the stove and combustion part towards the kitchen, and the back towards the living quarters. Thus, the stove also works as a partition between rooms, providing warm air in the bedroom or living room.
Heating stove
The stove is intended only for heating, and is usually made of a small size. Its installation is done to maintain temperature and humidity in the house in spring and early autumn.
An excellent option for a summer house when you have something to cook food on separately. If the electricity in your dacha area is often turned off, you should choose a model with a hob.
Cooking option
The hob can serve not only for cooking, but also for heating a small area. The best option for country houses or small buildings where people permanently live. With such a stove and a supply of firewood, you don’t have to worry about dampness and cold; the house will be warm and dry even if there is no electricity or gas.
Each of the considered stove options can be massive or compact, it all depends on the area of the house and the space for arrangement.
Other types of foundation and their features
In addition to the traditional concrete base, it is possible to use three more types:
- Made from rubble stone.
- Slab foundation.
- Reinforced concrete base.
Final pouring of concrete
Rubble stone foundation
The design, made according to a similar scheme, almost does not shrink. The main element is rubble concrete, or rubble stone. Installing stone is easier than installing a reinforced concrete frame.
Manufacturing process
It is necessary to purchase a reinforced concrete slab, 5-10 cm wide, which is placed on the bottom of the pit and serves as a cushion. You can make it yourself or buy it ready-made. The rubble concrete is placed in compliance with the dressing rules. The finished masonry must be covered with two layers of roofing material using hot bitumen.
The final stage of forming a frame made of rubble concrete is brickwork.
Slab foundation
This basis is somewhat simpler. During operation, it is subjected to less stress due to the mass of the heating element. Therefore, during installation, fewer resources are involved, and the depth of the pit is lower.
Slab foundation