Increasing the thermal insulation of a private home is not only additional budget savings when paying for energy, but also additional comfort in the summer heat and winter cold. At the same time, without unnecessary effort and wasted time.
Depending on the building materials used to build a house, heat losses from the roof can reach up to 20% of the total.
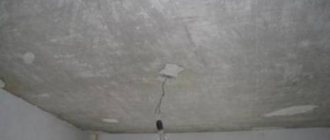
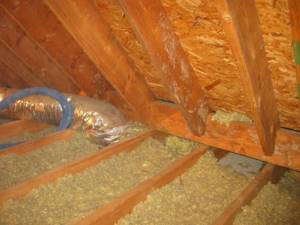
If the project does not provide for heating the attic space, then the heat transfer in the room is reduced directly by insulating the ceiling .
Advantages and disadvantages of the material
Sawdust has successfully passed the test of time and still remains one of the most practical materials for insulation.
Main advantages:
- availability;
- versatility;
- environmental friendliness;
- ease of installation;
- long service life.
The disadvantages of insulating the ceiling with sawdust are that the material quickly absorbs moisture and is considered a fire hazard. Therefore, you should take care of high-quality waterproofing and use only materials treated with antiprenes. The technology of application differs according to the type of placement of the material: from inside the room or outside. But before you start work, you should choose the right sawdust.
Advantages of making thermal insulation from sawdust
The shavings generated during the woodworking process are often used to insulate floors, walls, roofs and ceilings of commercial and residential buildings. Sawdust has low thermal conductivity and is inexpensive.
However, only specially treated sawdust is suitable for insulation. They are often mixed with cement, gypsum or lime, and treated with boric acid or copper sulfate. Untreated material is spoiled by rodents and quickly ignites.
Advantages of sawdust thermal insulation:
- The main advantages are low cost and high reliability.
- This natural and harmless material does not emit toxic compounds.
- The thermal insulation characteristics of wood chips are no lower than those of modern insulation materials.
- The material has stood the test of time and has previously been used everywhere.
- Simple installation that you can do yourself.
- Impressive service life.
- Light weight material. Thanks to this, the ceiling structure does not become heavier.
- Reducing space heating costs and saving natural resources.
- Sawdust has good soundproofing characteristics.
If we compare the cost of purchasing sawdust and laying it with installing other thermal insulation materials, the savings are significant.
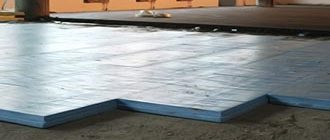
For comparison, below are the prices for the purchase and installation of modern heat insulators:
- polystyrene foam – purchase 1.6$/m², installation price per square meter starts from 1.2$;
- glass wool - 2.5 and 1.6 $/m², respectively;
- polyurethane foam – 5.8 and 5 $/m²;
- mineral wool – 3.2 and 2 $/m²
- sawdust - can be taken for free, installation price is less than a dollar per square.
Disadvantages of ceiling insulation with sawdust:
- the material is not resistant to high humidity conditions;
- installation is quite labor-intensive;
- sawdust in its pure form quickly ignites and is susceptible to damage by insects and rodents.
Important! Not all types of sawdust are suitable for use as thermal insulation.
Rules for choosing insulation
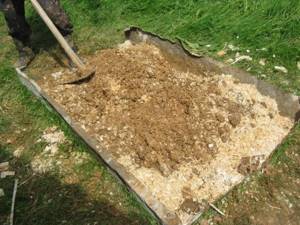
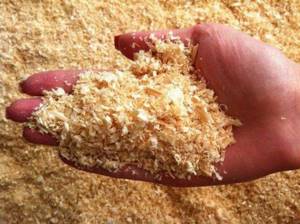
The first thing you need to pay attention to is the size of the elements. Sawdust of the medium fraction is best suited: large ones show low efficiency, while small ones are more difficult to work with. You need to choose woodworking material - such material is already well dried and will not rot or deteriorate. If necessary, the insulation can be dried in the open air at positive temperatures.
The type of wood is taken into account - coniferous species are characterized by greater resin content, therefore they are considered the most suitable material for insulating residential premises. However, in a bathhouse, resin will cause inconvenience; here preference should be given to deciduous wood.
Important! Before insulating the ceiling of a private house with sawdust, the material must sit for 9-12 months. This is necessary to reduce the level of sugar, which causes fermentation and rotting of fractions.
If there is debris in the mass of raw materials, it should be selected, the sawdust sifted and further dried.
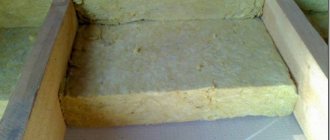
Standard sawdust insulation scheme
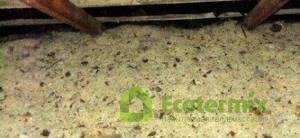
From the point of view of heating engineering, it is considered more competent to insulate the ceiling by simply filling it with clean calibrated shavings or sawdust. Sawdust, cleared of impurities, bark scraps and debris, is mixed with 7-10% dry lime and sent to the ceiling.
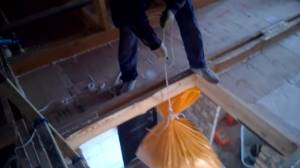
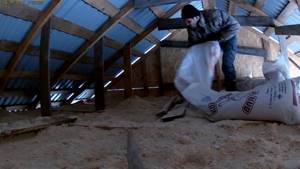
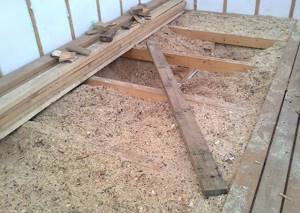
The biggest difficulty is how to quickly and without extra costs lift 20-25 cubes of light but loose shavings onto the floor. Usually an electric winch or lift is used for these purposes.
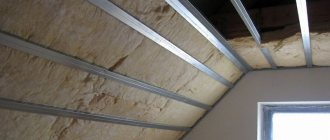
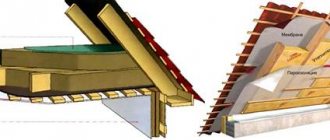
First, a vapor barrier is laid on the rough ceiling, taped at the joints, and the edges of the canvas are sewn to the floor beams. The mixture is laid out on a sheet and leveled using an improvised rule.
After some time, the layer of sawdust will shrink; it will need to be sprinkled to the level of the upper edge of the beams, after which the insulation is covered with plastic film and hammered with plywood, OSB or floorboard.
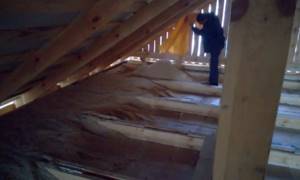
The result was an improvised “pillow” sealed in plastic film. Ceiling insulation made from sawdust does not absorb moisture and is not deformed. There are no conditions for inflammation or infection by pathogenic microflora. The only condition is that you will need to make a ventilation gap between the bottom layer of the vapor barrier film and the ceiling lining. Otherwise, condensation accumulating on the film will destroy the sheathing.
Ceiling preparation
Before starting work, the surface must first be prepared:
How to properly and how to insulate a ceiling in a wooden house with a cold roof
- Hem the plane with a board 2.5-3 cm thick, the width depends on the pitch of the beams. The boards selected are tongue and groove, planed, and dry.
- The plank flooring is laid on top of the laid vapor barrier layer, in a continuous order. Fix with nails 100 mm long, screws with a stem length of 50-60 mm. Two hardware is enough for each fastening point.
On a note! Drive nails into boards at an angle so that the direction of adjacent nails does not coincide - this will strengthen the fastening.
Impregnate all wooden elements with antiseptic and fire retardants, and it is best to do this before starting work. If the hemming boards are not sufficiently dried, dry them, then process them and dry them again.
Special option for ceiling insulation using sawdust
Not everyone knows the intricacies of insulating the ceiling plane in houses built of wood. In general, the insulation method is similar to that described above, but has a number of important nuances:
- All structures consisting of wooden elements must be treated with a special water-based antiseptic before the insulation process. In addition, a fire protection solution is applied. Large cracks can be removed by blowing in foam.
- Special geotextiles are laid on the base of the ceiling.
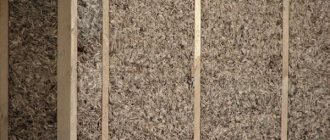
- First, coarse shavings are introduced into the space between the floor beams, and on top of it - a layer of sawdust of the smallest size.
- A final layer of impermeable fabric (agrotextile) is placed on top. Then the thermal insulation is covered with boards or a selected material in sheets (OSB, plywood, etc.).

With this installation method, the use of films and membranes for vapor barrier is not required. The steam escaping from the living space of the rooms easily penetrates the thickness of the loose insulation. After which it is also easily removed into the external environment using air ventilation. In a house built of wood, there is no problem of condensation or an abundance of water vapor. Adding lime in this case does not make any sense. Under the influence of carbon dioxide brought by water vapor, this substance will become ordinary chalk in just a few months. To protect the insulation from pests, it is better to use ash or fine slag.
Sealing cracks and laying out insulation
The cracks and seams are foamed with mounting foam or adhesive sealant. The work requires care so that there is not the slightest hole through which moisture can enter the insulation.
Sawdust can be laid out either in its natural form or after mixing with additional components. Lime, clay, and cement are used as fillers. The owner decides what sawdust should be mixed with to insulate the ceiling; the strength of the floors and load-bearing structures is taken into account.
Insulation with sawdust without additives
The technology is simple and efficient. Stages of work on how to insulate a ceiling in a wooden house with sawdust:
- from the attic side, pour a layer of material 150-200 mm thick;
- level the insulation, but do not compact it;
- Place a layer of cooled ash from the oven on top, which can be replaced with a vapor-permeable membrane;
- cover the floor with an unedged board, laying out the elements with a small gap for ventilation.
On a note! The insulation layer should not be higher than the thickness of the beams. If necessary, beams are extended with bars.
Insulation with sawdust with lime, cement
First you need to prepare a mixture that requires: 10 parts of sawdust, 5-10 parts of water, 1 part each of quicklime and cement. You can add copper sulfate, which will act as an antiseptic.
How to insulate a ceiling in a private house with sawdust, lime and cement:
- Mix lime and cement in a container. Separately, load all the sawdust into a concrete mixer or large barrel.
- Pour the cement-lime mixture into the wood waste and mix thoroughly. If a concrete mixer is used, mixing will be better. You can use a drill with an attachment.
- Add a solution of copper sulfate to the dry mixture. Prepare this way: for 10 liters of water, take 3 tbsp. l. powder. Pour into sawdust and stir.
- Add water portionwise, constantly stirring the entire mixture. The end result should be a mixture of medium consistency: a lump clenched in a fist does not crumble when you unclench your palm and water does not drain from it.
On a note! Copper sulfate is considered harmful to health, therefore, when insulating a bathhouse or premises with high traffic, it is better to replace the powder with borax (dilute in the same proportions).
Insulation with sawdust with clay, lime
For work you will need: 10 parts of wood products, 7-14 parts of water, 5 parts of clay, 1 part of quicklime.
Stages of preparing the solution:
Insulation of a wooden ceiling with clay and reeds
- first pour all the clay with 2 parts of water, wait until it gets wet and stir until the consistency of thick sour cream without lumps;
- mix half the sawdust and lime, pour portions into wet clay and stir;
- While mixing, add sawdust in portions, achieving the desired consistency.
To check the quality of the mixture, use a stick: put it in the solution - it doesn’t fall, the insulation is ready. If the composition turns out to be too liquid, you need to let the mixture stand for at least a day - the excess water will evaporate.
On a note! Instead of clay, gypsum is sometimes added in the same proportions. But such a mixture has a short shelf life, and the composition will have to be prepared in small portions.
Laying sawdust thermal insulation
The technology is not complicated. Lay a vapor barrier membrane on the surface of the attic floor, then lay a layer of insulation. Layout in portions with layer compaction. When choosing which layer of sawdust is needed to insulate the ceiling, you should focus on the thickness of the beams.
A thin layer of ash is poured onto the heat insulator, which will prevent the formation of fungus. Now you need to leave the mixture until completely dry. After 20-30 days, a vapor barrier membrane is laid over the insulation; it is secured to the floor beams using stapler staples. Instead of a membrane, a thick polyethylene film, which can be folded in two layers, is suitable. The laying is overlapped, the seams and joints are reinforced with tape.
Thermal insulation of a bath ceiling with sawdust
When installing a bath ceiling, the ceiling from below is hemmed with boards. Where the chimney pipe is laid, the boards are insulated with a piece of stainless steel and basalt wool.
The sequence of installation of thermal insulation of the floor is as follows:
- Lay a layer of vapor barrier with overlapping strips and gluing the joints. Place the material on the walls to a height of 100-150 mm.
- Lay out the sawdust mixture in layers, level it and compact it. For summer baths, the optimal insulation thickness is 50 mm, and for buildings used all year round - at least 150 mm.
- Let the insulation dry. Seal any cracks that appear. To reduce the likelihood of cracks forming, add salt to the prepared solution at the rate that 10 liters of water will require 75-90 grams.
- The mixture will dry within a month. After this, cover the surface with a layer of lime and lay a vapor barrier.
- Complete the rough plank flooring.
To protect a wooden building from fire, hide all wires in corrugated hoses and cover the ends with fire-resistant material. The described recipes for mixtures for thermal insulation of ceilings are suitable for insulating the walls of residential and commercial buildings.
Insulating the floor with sawdust in a wooden house: pros and cons, how to implement it
In those days, when technology had not yet reached the production of mineral wool or polystyrene foam as a thermal insulation material, people insulated their houses with ordinary sawdust. This natural material is found in abundance at any sawmill or in the construction of a house, especially a wooden one.
Sawdust was used to insulate floors, floors, walls and ceilings. And, despite the abundance of modern building materials, wood shavings are still used quite successfully.
Content:
Methods of using sawdust
There are 4 methods for insulating with sawdust:
- backfill;
- fill;
- plastering;
- use of slabs.
To backfill, wood sawing waste is mixed with lime, which prevents the appearance of rot or mold even with increased humidity and protects the insulation from rodents and various beetles.
After backfilling, the insulation must be compacted, adding new sawdust, until a layer of the same density is obtained over the entire height.
After 2–3 years, and sometimes earlier, you have to add additional sawdust, because the lower rows are caked and compacted .
To fill, wood sawing waste is mixed with various binders in different proportions.
Then the finished composition is poured into voids or cavities prepared for it , where it turns into a fairly strong and hard material with low thermal conductivity.
By changing the amount of sawdust and binder, the thermal conductivity and strength of the insulating material are regulated.
For plastering, the same compositions are used as for pouring, only more suitable proportions are selected . In addition, before plastering, the walls are lined with chain-link mesh or its plastic equivalent, this improves the adhesion of the insulating layer to the wall.
Insulating boards are made from the same compounds that are used for pouring and plastering, only by selecting the most suitable binder.
After manufacturing, the slabs are stacked in a dry, ventilated area, then secured to the walls or ceiling using the same mortar and anchor nails or bolts.
In addition, they can be laid in floor cavities formed by floor joists and the lining or ceiling of the lower floor.
The following are used as binders:
- cement;
- gypsum;
- clay;
- PVA.
Read more about these insulation methods, as well as about choosing the optimal binder and the correct proportions here.
What points to consider before work
It is best to choose small sawdust that remains after sawing the wood, but it is more difficult to work with them because they are less likely to fly apart during work. Large chips have lower thermal insulation.
Leftover carpentry works well.
It is this material that will not need to be dried again and again, because the carpenter uses dried wood.
If you want to insulate your house, it is better to choose pine sawdust, because the resin they contain is not liked by rodents.
Please note that sawdust requires special preparation. The material must be treated with an antiseptic, dried well and mixed with fluff lime so that the insulation is protected from pests. Lime should be at least 10% of the total amount of harvested material.
Ceiling insulation options
When insulating the ceiling with sawdust, you should be careful not to miss the cracks that are always present on the surfaces. To eliminate them, polyurethane foam is used.
There are several options for arranging thermal insulation of the ceiling using sawdust, both using pure wood raw materials and by adding additional additives to it, such as clay, lime, etc.
The most popular methods are:
- use of sawdust in its pure form;
- the use of additives - cement and lime;
- the use of additional components - clay and lime.
Brief description of insulation technology
From the attic side, regular sawdust is poured onto the floor in a thick layer.
Before considering the advantages and disadvantages of this option, we will briefly describe how exactly the sawdust insulation process is carried out.
Everything is extremely simple: from the attic side, ordinary sawdust is poured onto the floor in a thick layer. To avoid moisture getting on them (which will very quickly render the insulating layer unusable), a vapor barrier layer is laid underneath them, and a waterproofing layer on top.
With high-quality sealing and the use of a thick layer of insulation, such structures provide good heat retention performance. However, even with ideal performance of the work, sawdust insulation is an order of magnitude inferior in efficiency to modern materials that have recently appeared on the construction market (for example, polyurethane foam).
Features of sawdust and shavings
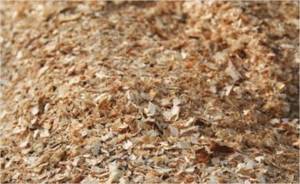
Processing and processing of boards or logs produces small particles as waste. Experts distinguish two main types of wood processing waste, distinguished by production method and size:
- sawdust - obtained as a result of sawing wood, in appearance they resemble dust, that is, they are quite small particles up to 1 cm long;
- shavings - obtained in the case of drilling or planing wood, the length of the particles is 3-5 cm.
No matter what type of wood particles you use, each variety has identical benefits. In particular, 3 main positive qualities can be identified.
- Environmentally friendly. Since sawdust is a natural material and is mainly made from coniferous wood, it does not emit harmful substances into the atmosphere even when heated. In addition, the product, when properly processed, is not subject to rotting and decomposition.
- High thermal insulation rate. You can compare this insulation with such a popular material as mineral wool, that is, when installed correctly, they cope with the task assigned to them no worse than factory thermal insulation.
- Affordability. Sometimes sawdust can be easily obtained for free; just go to the nearest sawmill, where the waste is stored in large piles and is often not in demand. Of course, the full cost of such insulation should include the costs of delivery and various impregnations that are necessary to protect the sawdust.
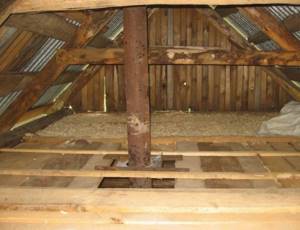
It can also be noted that the sawdust layer used to insulate the ceiling does not exert significant pressure on the structure of the building, that is, the specific gravity of the substance is minimal. Of course, with the addition of additional components, such as cement or lime, the mass becomes heavier, but not significantly. Before moving on to the issues of insulating the ceiling using carpentry waste, you should also learn how to properly prepare sawdust for work.
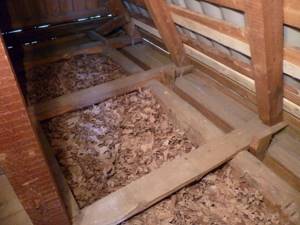
Arrangement of sawdust on the attic floor
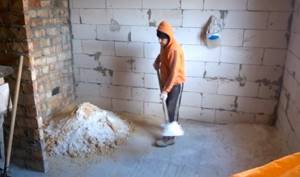
The vapor barrier membrane is spread over the entire surface of the ceiling. If you decide to use polyethylene film, you should take into account its susceptibility to mechanical damage and poor resistance to low temperatures - ensure a loose fit, without interference. The vapor barrier should cover not only the space between the beams, but also the beams themselves (describe the surface). It is advisable to seal all joints with tape or lay them with a significant overlap. And sawdust is already placed on the vapor barrier - over the entire surface of the ceiling, filling the space between the beams in an even layer. It is only necessary to ensure that the chimney is thoroughly insulated with fire-resistant material from organic insulation.
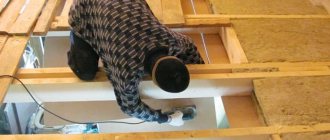
Scattering sawdust over the ceiling
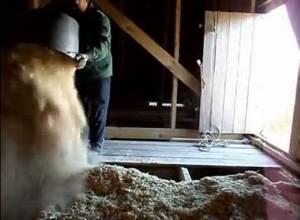
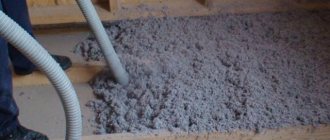
Filling the attic with sawdust in an even layer, of course, will not work. It is necessary to further level them. It is very convenient to do this by making a kind of shovel - just screw a piece of board to the handle and the convenient tool is ready. And then evenly distribute each batch, raised and poured onto the floor, according to the level of the laid beams. Wood dust, rising during work with sawdust, can become clogged in the respiratory tract and cause irritation of mucous membranes and skin. Do not neglect the elements of personal protection. A simple respirator, gloves, safety glasses. Clothes should be tightly buttoned and tucked in.