Life in a private house can be called comfortable only under one condition: if all the engineering systems in the building always work flawlessly. There are no unimportant communications; each of them performs its own function. But there are those that are completely difficult to do without. These include sewerage and systems through which water circulates. Since more often land owners have to build autonomous water supply and heating systems, for maximum convenience they use a “duet” - a pump and a hydraulic tank. Unfortunately, everything that can break, according to Murphy's Law, does so. Therefore, owners need to find out in advance about possible malfunctions of the hydraulic accumulator. Having the necessary information, they will be able to fix many problems on their own.
Hydraulic accumulator: operation and reasons for its failure
One of the most important “team players” is the hydraulic accumulator, which allows you to create and store a supply of water, protect the system and equipment from force majeure situations. This device is called differently, sometimes not quite correctly: expansion or storage tank, hydraulic tank, expansion tank, membrane tank, or simply - HA. This is a closed container that has a hydraulic chamber that changes its volume. In order to imagine how a hydraulic accumulator works, it is necessary to consider its design.
Membrane tank design
Any hydraulic tank has a certain number of elements. It includes:
- housing made of stainless steel;
- membrane (pear), which is made from special, elastic and durable rubber (EPDM, BUTYL);
- air supply nipple;
- a flange equipped with a valve, it is intended for pumping water;
- special instruments - pressure gauge, pressure switch;
- platform (supports).
- stabilize blood pressure;
- quickly equalize water pressure during intensive use;
- prevent the occurrence of water hammer, which is extremely dangerous for the system;
- guarantee the supply of water when the pump fails due to power outages, but in this case the hydraulic tank must have a large volume;
- significantly extend the life of the main element of the pumping station, since rare periods of operation of the hydraulic machine eliminate rapid wear of the equipment.
- unjustified activation of the pump at each water intake;
- uneven flow of liquid from the tap - in jerks, in small portions;
- a pressure gauge showing that the change in pressure occurs abruptly: in this case, the arrow of the device first rises sharply, then drops to zero.
As you can see, the device is quite simple, but continuous, intense work can “ruin” even the most reliable structures. Modern high-quality models of storage tanks have a long service life, work for a long time, and without “whims”. However, you need to know about possible malfunctions of the hydraulic accumulator, since some breakdowns cannot be ruled out.
Vessel tasks and their implementation
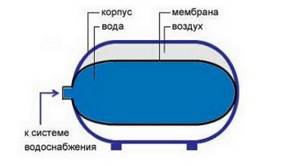
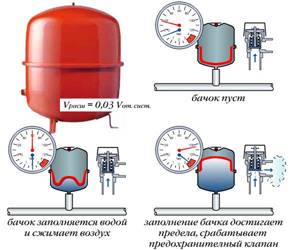
The storage tank consists of two chambers: one contains air, the other contains water. The last compartment deserves special attention. This is a rubber bag, or membrane. The principle of operation of the storage facility is based on compressing liquid with compressed air. When water is consumed in the system, the pressure drops.
The hydraulic tank immediately reacts to changes that have occurred: it quickly restores parameters by supplying a new portion of liquid, but without the slightest involvement of the pump. Naturally, the rare activation of this main device of the pumping station guarantees its longer operation.
Using a relay for the hydraulic tank, two important parameters of water pressure are set: its upper and lower limits. When the value becomes minimal, the pump “helps” the accumulator: it turns on and works until the pressure again reaches the maximum (preset) level.
The membrane tank eliminates the most common problems that arise during the operation of autonomous water supply, heating systems or economical solar systems. Water accumulators help:
The peculiarity of a membrane tank is that the efficiency of this vessel device is not determined. The device either works or it doesn't.
Symptoms of a faulty accumulator
The membrane tank is a relatively simple design. Therefore, possible malfunctions of the accumulator can often be detected visually.
One of the signs of its “inaction” is the frequent operation of the safety valve. When the pressure in the system rises to the limit, it releases water, protecting appliances and pipes. Other symptoms of malfunction:
If these signs are detected, you can be almost sure that the accumulator is either not working correctly or is faulty. Finding the source of the problem and eliminating it is the next operation that the owners of the hydraulic tank and pump (pumping station) will have to do.
You cannot delay repairing a faulty hydraulic tank. Ignoring the incorrect operation of storage equipment will lead to the fact that the problem will soon affect not only the tank, but also other elements of the water supply or heating system. This scenario is unlikely to inspire anyone, since in this case the costs of correction will significantly increase.
Design differences
First of all, you need to understand that a hydraulic accumulator and an expansion tank, despite the assurances of some unscrupulous managers, are not the same thing. Their design differences are determined by the specific application. Installing an expansion tank as a hydraulic accumulator is fraught with unpleasant consequences.
The bottom line is that in the expansion tank for the heating system, the membrane divides the internal volume in half. Initially, air pumped into the lower half creates enough pressure for the membrane to be completely pressed against the inner surface. As the temperature of the coolant rises, its volume increases, the pressure increases and water begins to flow into the upper half, squeezing the membrane. Accordingly, the air in the lower half is compressed. The hydraulic accumulator is distinguished by the fact that it contains a balloon membrane, entering which water does not come into contact with the internal walls.
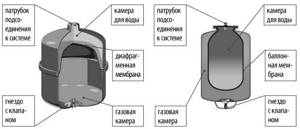
Closed expansion tanks: with diaphragm membrane, with balloon membrane
When considering the differences between an expansion tank and a hydraulic accumulator, it is necessary to understand that they operate under different conditions. The change in the volume of liquid in the heating system is insignificant; moreover, it happens slowly, without sudden jerks. However, temperatures can reach 90 °C. Therefore, the first requirement for such a membrane is resistance to prolonged exposure to high temperatures.
For a balloon membrane in a cold water accumulator, resistance to high temperatures is not so important, but the ability to operate in frequent expansion/compression mode is key
Unfortunately, there is no universal material that is equally resistant to high temperatures and regular stretching. The membranes in modern expansion tanks are made of the following materials:
— NATURAL — can be used at operating temperatures from -10 to 50 °C. Extremely elastic material, but partial diffusion may occur with use. Natural rubber can be used for both drinking and industrial water;—BUTYL—can be used at temperatures from -10 to 100 °C. More stable in terms of diffusion, but not as elastic as NATURAL. Synthetic butyl rubber can be used as a hydraulic accumulator membrane; - EPDM - operates at temperatures from -10 to 100 °C. More permeable to water than BUTYL. Synthetic ethylene/propylene rubber is installed in tanks for drinking or process water;— SBR – operation at temperatures from -10 to 100 °C is permissible. Less elastic. Used exclusively in expansion tanks of the heating system, not elastic enough for installation in hydraulic accumulators; - NITRIL - works at temperatures from -10 to 100 ° C. Resistant to active media.
The scope of application of compensation tanks is not limited to heating systems and water supply; they are successfully used for storing fire extinguishing liquid in automatic fire extinguishing systems, as well as as part of a powder fire extinguishing module.

Regardless of the type, the hydraulic accumulator and expansion tank are an integral part of any life support system and provide a high level of comfort and safety of living.
Selecting a hydraulic accumulator, expansion tank. Service. Exploitation. Repair. (10+)
Hydraulic accumulator, expansion tank. Features of choice
The hydraulic accumulator and expansion tank are designed for slightly different purposes, but are designed almost identically, so I combined them in one article. The hydraulic accumulator is designed to accumulate water in an autonomous water supply system, protect the system from excess pressure, and prevent frequent activation of the pump. The expansion tank is installed in the heating system. It protects it from excess pressure, which can occur when water (or other coolant) expands due to increased temperature. The key difference between a hydraulic accumulator and an expansion tank is that the expansion tank must operate at a sufficient temperature; such requirements are not imposed on a cold water accumulator. But for most hydraulic accumulators there are high requirements for the quality of the membrane material, since they are used to supply water that can be used for food. For an expansion tank, such requirements are less critical.
How can you be sure that the hydraulic tank is to blame?
The simplicity of the design gives us the right to hope for long and trouble-free operation of this container. This is absolutely correct, because there are not many problems that arise in the operation of the device. Therefore, first we need to consider the options when other equipment, the work of which is directly related to the water “collector,” may be acting up.
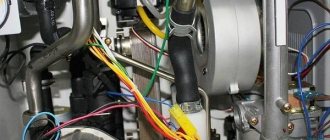
The hydraulic accumulator is not always the culprit of low water pressure or unsatisfactory operation of the system. Often the problem lies in an incorrectly selected or malfunctioning pump. In the first case, the power of the device is simply not enough; in the second, some kind of malfunction prevents the pump from working. Repairing a pump with your own hands is a risky operation, especially for those for whom such work is “terra incognita”. Therefore, it is better for them to turn to specialists.
A fairly common occurrence is frequent switching on or constant (almost continuous) operation of the pump. If your equipment is behaving strangely, you should first make sure that it is (or is not) its fault. The procedure is as follows:
- Checking the outlet pressure. The norm is considered to be 0.15-0.2 MPa (1.5-2 atm.) If the value is different, then the provocateur of the problem has been detected.
- Checking the source. If the pressure is okay, then the next possible culprit is a well or borehole. In this case, the pump is tested as follows: it is lowered into a container with liquid - into a barrel, a large canister, etc. When the pressure is normal, the problem is “source - source” of water.
- Adjusting the pressure switch. This is another possible way. The relay cover is removed, then the springs are compressed or weakened using the adjusting screw: the smaller of them is responsible for the lower pressure limit. The larger and thicker part goes behind the top one. After adjustment, the pump must stop working.
- The last step is to inspect the water supply, because another possible reason for the pump to run continuously is a leak in the system. To confirm or refute the guess, the valve is closed after the hydraulic tank insertion point. If the fault lies with the leak, then after some time the pump should stop.
When the pump continues to operate almost continuously when the water supply is shut off, as if nothing had happened, an accurate diagnosis can be made. The owners encountered a defect in a pressure vessel.
Design and purpose of devices
Expansion tank
- The main purpose of the tank is to compensate for the expansion of the coolant. When heated, water increases in volume, and quite strongly (+0.3% for every 10 degrees Celsius). In this case, the liquid practically does not compress, so the heated coolant will exert significant pressure on the walls of the pipes, joints and shut-off valves.
- To compensate for this pressure, as well as to minimize the consequences of water hammer, an additional reservoir is built into the system - an expansion tank. The first tanks were of a leaky design, but today pneumatic-hydraulic models are almost universally used.
- Inside such a tank there is a membrane made of elastic material. Since the membrane is in contact with a heated coolant, it is made from polymers that are resistant to high temperatures - EPDM, SBR, butyl rubber and nitrile rubber.
- The membrane divides the tank into two cavities - the working cavity (the coolant enters it) and the air cavity. As the pressure in the system increases, the air chamber decreases in volume (due to air compression), and this compensates for the load on the pipes and shut-off valves. Approximately the same thing happens with water hammer - but here the process occurs at a faster speed.
- As the temperature of the coolant decreases, the volume of water decreases, and the air, exerting pressure on the membrane, displaces an additional volume of hot water into the pipes of the heating system.
Hydraulic accumulator
The hydraulic accumulator, at first glance, is practically no different in design from the expansion tank:
- The base is the same container made of corrosion-resistant steel, only painted blue.
- There is also a membrane inside the container - although it is slightly different in shape from the membrane of the expansion tank.
- The internal volume is also divided into two chambers, only in hydraulic accumulators the water chamber is located inside the membrane, i.e. Contact of the liquid with the metal walls of the tank is completely eliminated.
And the design functions on a similar principle, although it is used for a different purpose:
- When the pump is turned on or water is supplied through a centralized water supply, the chamber is filled with liquid under a certain pressure.
- If the pressure drops for some reason, the air chamber increases in volume and water from the working chamber enters the system. Thanks to this, the pressure in the pipes is stabilized, and the equipment (washing machines, dishwashers, etc.) works without failures.
- The second aspect of the operation of the hydraulic accumulator is protecting the pump from frequent starts. While it is possible to compensate for the withdrawal of water from the system due to the reserve in the tank, the pressure switch will not operate and the pump will not start pumping water. Thus, the equipment will turn on less often, which means it will work longer.
- A large hydraulic accumulator (50, 100 or more liters) is also a water supply. Yes, you won’t last long on such a supply, but if you use it sparingly, you can easily survive a water supply accident or a power outage that will make the pump impossible to operate.
- In addition, the hydraulic accumulator, like the expansion tank, compensates for water hammer.
Possible malfunctions of the hydraulic accumulator
Some problems can be fixed relatively easily on your own; to fix other problems, you need to hire specialists. Everything depends only on the scale of the “emergency situation” that has arisen.
The culprits of the drop in water pressure
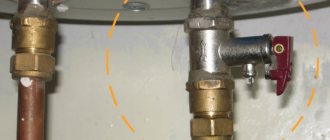
This is the first common problem, and there are three sources that cause a constant drop in pressure. This is a nipple that has suddenly failed, a flange that is not working correctly, or insufficient (missing) air pressure in the storage tank.
In the first case, the failed nipple is replaced, in the second, the pressure is raised to the required level. If liquid flows from under the flange, then first you can try to tighten the fasteners and make a rubber gasket. However, in order to avoid troubles in the future, the best solution would be to purchase and install a new element.

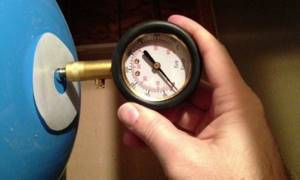
You can use your car's pressure gauge to check the pressure inside the hydraulic tank. The norm is considered to be 1.5-2 atmospheres, but the exact data - operating and maximum pressure - are indicated in the documentation of the device, or on a sticker on the case. Example - 1.5 and 10 atmospheres, respectively.
If the required pressure is not available, then it is pumped up with a car pump, and after 5-10 minutes the parameters are checked. After this procedure, the pressure is maintained. When this does not happen, the source of the problem is sought further. It may be due to a leak in the metal case or rubber bulb.
Air leakage through the housing
To make sure that suspicions are not at all groundless, use the same means as for checking the tightness of gas pipeline connections. This is a soap solution. You can mix a small amount of dishwashing detergent or shampoo into the water. The finished “preparation” is a liquid for blowing soap bubbles.
After making the solution, a car compressor is connected to the nipple. Then the body of the storage tank is sequentially lubricated with the solution, immediately carefully examining each area for the presence of bubbles. If we talk about the prevalence of this phenomenon, then it is rare: it is difficult to “pierce” thick steel without a tool. There is an exception: this is the “subversion” of a leaking rubber bag.
Much more often the membrane or other weak link is damaged. As a rule, such unpleasant defects are found on flanges made of galvanized but too thin metal. Therefore, it is better to immediately look for tanks in which this part is made of thick galvanized or stainless steel.
The appearance of a “hole” in a metal case is a rare “luck”. In this case, the most reasonable advice is to buy a new battery. Good reasons for such a step are a potential manufacturing defect in the metal or the inability to reliably seal the hole. If for now a “hole” has appeared in one place, then no one can guarantee the safety of other parts of the hull. Therefore, the container becomes a big “surprise” that can begin to “spread” at any moment.
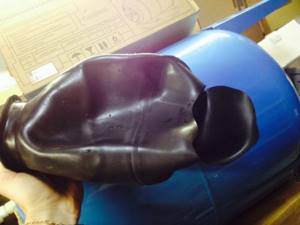
A pear in a damaged GA also automatically comes under suspicion. Wooden choppers, cold welding and epoxy glue sold in syringes are recommended as temporary “rescuers”. They say that traditional welding is not an option, even with the bulb removed before surgery. If the equipment is still under warranty, then the “break” has a direct route to the service center.
Membrane problems
If we consider all possible malfunctions of the hydraulic accumulator, then membrane failure is the most common emergency, since this element can be considered the weakest link in the structure.
Symptoms
Damage can be suspected based on several signs. Among the consequences of the appearance of a “laceration”:
The diagnosis is not difficult to make. A leak through the bulb is quite easy to detect.
Examination

To confirm your suspicions, you don’t even have to disassemble the unit’s body.
- First, the relay is dealt with: it is adjusted to start the pump under conditions of minimum pressure. In this case, water will flow continuously into the accumulator.
- Forced start of the equipment is the second possible option; it will no longer require preliminary manipulations with disassembling the device.
- After 10-30 minutes of continuous operation, unscrew the nipple. If water is found there, then the pear is damaged and the seal is broken.
The method of “fixing the problem” is simple: replacing the “on strike” membrane with a new bag.
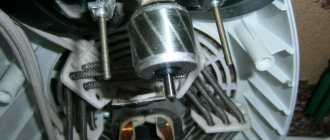
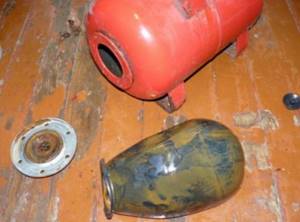
Replacing the pear
To place a new bag in the case, you first need to find it. However, the search is simplified: these elements are consumables, so one product may well fit tank models from different manufacturers. The main thing for GA owners is to choose:
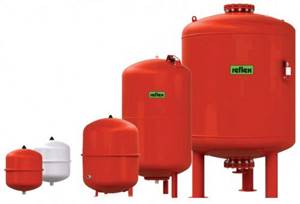
Bags designed for hot water accumulators and hot water supply (red or white tanks) can withstand higher temperatures, but their price is higher. If the equipment is purchased for cold water supply (blue vessels), then it is not advisable to overpay for rubber bands.
In this case, before the operation, the hydraulic tank is disconnected from the system, then all the water is drained from it. During this stage, you can once again verify that the rubber has been broken: if air comes from the drain valve, then the source of the malfunction has been identified.

The replacement is simple:
- The hydraulic accumulator is disconnected from the system by unscrewing the flange (coupling). Then release the pressure by turning out the nipple.
- Unscrew the nuts securing the flange and neck of the bag. Then the damaged membrane is removed.
- The surfaces of the flange and the ebb moldings are degreased, and the contact points are additionally coated with sealant.
- Reassemble the battery, reconnect it to the pipeline, then pump in air.
The last stage is setting the optimal pressure values: usually 1.5 atmospheres to turn on, 2-3 to stop the pump. After this, the system is thoroughly washed, draining the water for at least an hour.

During this operation, it is recommended to check the inner surface of the housing. If contaminants or areas with corrosion are detected, they are cleaned, washed with water and dried, then treated with protective agents. If the purchased membrane is not an oil-resistant product, then compositions containing such components cannot be used for anti-corrosion protection.
Connecting the accumulator to the system
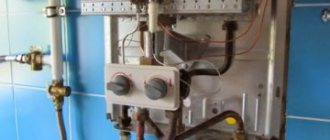
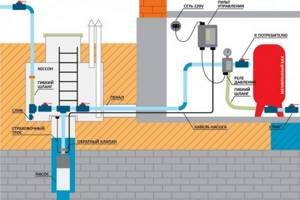
Typically, the water supply system of a private home consists of:
- pump;
- hydraulic accumulator;
- pressure switch;
- check valve.
This scheme may also include a pressure gauge for operational pressure control, but this device is not necessary. It can be connected periodically to carry out test measurements.
With or without five-pin fitting
If the pump is of a surface type, the hydraulic accumulator is usually placed next to it. In this case, the check valve is installed on the suction pipeline, and all other devices are installed in one bundle. They are usually connected using a five-pin fitting.
It has terminals with different diameters, just for the devices used for tying the hydraulic accumulator. That’s why the system is most often assembled on its basis. But this element is not at all necessary and everything can be connected using ordinary fittings and pieces of pipe, but this is a more labor-intensive task, and there will be more connections.
With one inch outlet, the fitting is screwed onto the tank - the pipe is located at the bottom. A pressure switch and pressure gauge are connected to the 1/4 inch outlets. The remaining free inch terminals are connected to the pipe from the pump and wiring to consumers. That's all for connecting the gyroaccumulator to the pump. If you are assembling a water supply circuit with a surface pump, you can use a flexible hose in a metal winding (with inch fittings) - it is easier to work with.
As usual, there are several options, the choice is yours.
The hydraulic accumulator is connected to the submersible pump in the same way. The whole difference is where the pump is installed and where the power is supplied, but this has nothing to do with the installation of the accumulator. It is placed in the place where the pipes from the pump enter. Connection is one to one (see diagram).
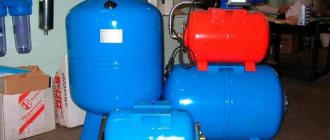
How to install two hydraulic tanks on one pump
When operating the system, sometimes owners come to the conclusion that the available volume of the accumulator is not enough for them. In this case, you can install a second (third, fourth, etc.) hydraulic tank of any volume in parallel.
There is no need to reconfigure the system; the relay will monitor the pressure in the tank on which it is installed, and the viability of such a system is much higher. After all, if the first accumulator is damaged, the second one will work. There is another positive point - two tanks of 50 liters each cost less than one of 100. The point is that the technology for producing large-sized containers is more complex. So it is also more economical.
How to connect a second accumulator to the system? Screw a tee onto the input of the first one, connect the input from the pump (five-pin fitting) to one free output, and connect the second container to the remaining free one. All. You can test the circuit.
Hydraulic accumulator and preventive measures
It is necessary to find out possible malfunctions of the hydraulic accumulator in advance, since in this case you can relatively quickly find the source of the problem, and then replace or repair the element.
However, it is better to devote time to regular maintenance of the device, which works daily and tirelessly. A visual inspection, during which you can easily find leaks and detect “extra” pressure, is recommended to be done monthly or once every 2 months. It is recommended to inspect the storage tank once every six months, at least.
It consists of checking the tank for damage and determining the degree of wear of all its elements. Constantly monitoring the pressure level inside the accumulator is a measure that will help detect problems at an early stage. In this case, a serious malfunction will be easier to prevent, and simple repairs will not require large expenses.
“Elderly” models that have worked for their owners for at least 3 years require comprehensive preventive measures. Such devices are disconnected from the system, and the membrane is replaced even if it is “seemingly intact.” If the owners are not satisfied with the condition of other parts, they are advised to replace the flange and nipple at the same time. Manufacturers strongly recommend purchasing only “original” products. This is especially true for pears.
Fortunately, this equipment is quite simple, so possible malfunctions of the hydraulic accumulator can be counted on one hand, and in most cases it is not difficult for the owners to fix them. In order to encounter troubles as little as possible, it is better to handle the container carefully and maintain it regularly. With such a caring attitude, the chance of trouble-free operation of the membrane tank increases significantly.
Prices for water batteries can be found here:
You can learn how to get rid of one of the common problems of GA from the following video:
Was this article helpful? We want to improve. Thanks for your opinion!
Expansion tank
Heating water is designed to transfer heat from the boiler to the radiators. It is known that when heated by 10 °C, the volume of water increases by approximately 0.3%, from which it follows that heating to the required 70 °C will increase the volume by approximately 3% from the original. It is known from a school physics course that liquids are practically incompressible, therefore even such a seemingly insignificant increase in volume can lead to rupture of the pipeline or leaks at the joints. In order to prevent this, an expansion tank is installed in the heating system.
Initially, such containers were open, which led to certain problems:
— the liquid in them constantly evaporates, you have to monitor the water level and replenish it regularly;— an open expansion tank must be installed in the upper part of the system and insulated to prevent freezing of the coolant and, as a consequence, an increase in the cost of the structure;— constant access of oxygen promotes corrosion;— Pressure regulation with an open circuit is difficult.
Modern materials and, in particular, durable and elastic membrane material, make it possible to set up a closed system, without access of oxygen to the coolant. This also allows for a constant water level and the ability to adjust the pressure. Another advantage of a closed container is that it is easy to install and maintain. It can be installed at any point in the heating system and, if necessary, easily dismantled and connected elsewhere.
If you liked the article, please share it
Previously on the topic:
Share
Maintenance Rules
Like all plumbing fixtures, the hydraulic accumulator has a certain service life. To increase it, it is necessary to carry out periodic maintenance. If the pumping unit turns on and off more frequently, this indicates that the pressure inside the tank has decreased - an air leak has occurred.
How to adjust air pressure
You can deal with the reason for the frequent activation of the accumulator with your own hands. To do this, you need a pressure gauge, which measures the pressure in car wheels. Sequence of operations:
- the pump is disconnected from the power supply network;
- any tap or mixer in the water supply network opens to relieve water pressure;
- remove the protective nipple cover, which is located on the opposite side of the inlet pipe;
- a pressure gauge is connected to the nipple;
- The air pressure reading is taken; it must correspond to the parameter specified in the product passport or on the metal plate located on the accumulator body.
If the pressure is much lower than the rated pressure or there is no pressure at all, air is pumped into the tank using a conventional car pump or compressor.
Before downloading, you must open one of the consumers. The one closest to the hydraulic accumulator is better. It is impossible to pump air into a tank that is almost completely filled with a bulb filled with water.
It is very important to adjust the air pressure correctly. If this parameter is higher than the passport value, a situation may arise when the air compresses the membrane to the maximum, causing it to shrink. It will be impossible to pump water into it. Therefore, after pumping, you need to check the pressure with a pressure gauge. If the indicator is higher than required, it is necessary to bleed the air.
In factory conditions, the hydraulic accumulator is usually filled with nitrogen. This does not mean that gas cannot be replaced with air. You just need to release it first.
The hydraulic accumulator must be checked for functionality once every six months. If the pressure in it drops, then there is a problem in the joint between the body and the nipple. Solving this problem is also easy. It is necessary to tighten the nipple or bolts on the flange. Leak testing is usually done using a soap solution.
Hydraulic accumulator service life
There are recommendations from manufacturers that must be used during the operation of hydraulic accumulators. If you strictly adhere to them, you can almost double the service life of the device.
- Once a month, check for compliance with the set value for turning on and off the pumping unit.
- Once every six months, inspect the hydraulic accumulator for external condition: the presence or absence of dents, corrosion, leaks, etc.
- Check the air pressure with a pressure gauge once every six months.
- If the country house will not be used in cold weather, care must be taken to drain the water from the accumulator for the winter.
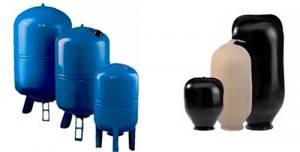
The hydraulic tank is available on the market in two versions: horizontal and vertical. Regardless of this, the maintenance is the same.
Stages of installing a new part
Replacement membrane for hydraulic accumulator
The problem of replacing a hydraulic accumulator membrane arises quite often. It’s good that this process is extremely simple; you can do it yourself, without the involvement of professionals. And the price of components is relatively low - from 200 rubles, depending on the volume.
You must first check the compliance of the new membrane with the volume and other parameters of the battery. If all indicators match, you need to disassemble the drive. Before replacing a worn-out bulb in a hydraulic accumulator, you need to relieve the pressure in it by shutting off the flow of water and draining the remainder, then disconnect it from the power supply.
To change the aperture, you need to proceed as follows:
- Loosen the flange mounting bolts and remove them.
- Remove the damaged part through the special hole at the bottom of the tank.
- Inspect the diaphragm and assess the extent of the damage - maybe it can be repaired.
- Clean the hydraulic tank itself from corrosion and plaque, and the flange from possible burrs.
- Take the holder and insert it into the hole that is on top of the diaphragm.
- Place the membrane in the hydraulic tank, and after screwing the bolt into the holder, insert it into the opening located in the bottom of the housing.
- Straighten the neck and tighten the flange, tightening the bolts from opposite sides.
After assembling the device in reverse order, pump air into the hydraulic tank. This will allow the device to function normally. Injection is carried out using a conventional pumping device through a spool located at the bottom of the body part.
Then there is a connection to the water supply and electrical networks and the operation of the equipment is checked. The water must be connected gradually so as not to provoke a rupture of the new diaphragm.
To ensure that problems with the membrane part arise as rarely as possible, you need to ensure comfortable operating conditions for the device. In particular, ensure that there are no pressure drops or temperature surges in the hydraulic tank, and regularly carry out preventive inspections. If the device is not in use, it should be stored in a dry place, away from heating devices, so that the diaphragm rubber does not dry out or crack.
How does membrane wear manifest?
If water flows from the tap unevenly: the stream becomes thinner, then thicker, splashes are observed, and the pressure sensor needle abruptly drops to zero, there is a malfunction of the rubber cylinder. You should check your guess by pressing the valve spool and completely bleeding air from the system. If at the end of the procedure water appears from the nipple, the membrane has ruptured.
If water does not flow from the spool, the bulb is working properly, and you should look for another reason for the malfunction of the hydraulic accumulator. If the pressure in the system has dropped, there is a possibility that a crack has appeared in the metal casing. If the damage is minor, you can repair the crack with cold welding.