Types of Termex water heaters
It is much easier to determine a malfunction if you know the structure of the water heater. There are three types of devices from Termex.
Storage boilers
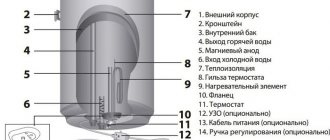
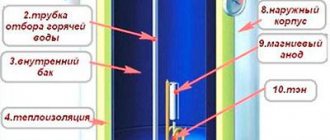
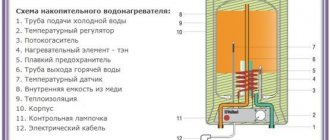
The design of Termex water heaters for 80 and 100 liters has a distinctive feature: the presence of two tanks at once. The first is covered with glass porcelain, which is necessary to protect the metal from the effects of the liquid with which it will constantly be in contact. An external tank is necessary to prevent heat loss. Polyurethane foam is poured between the layers, which reduces the rate of temperature decrease in the tank.
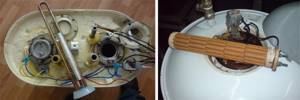
At the bottom of the water heater there are tubes that supply and discharge water. There is also a control panel and other electrical components, including a heating element, which looks like a metal tube twisted into a spiral.
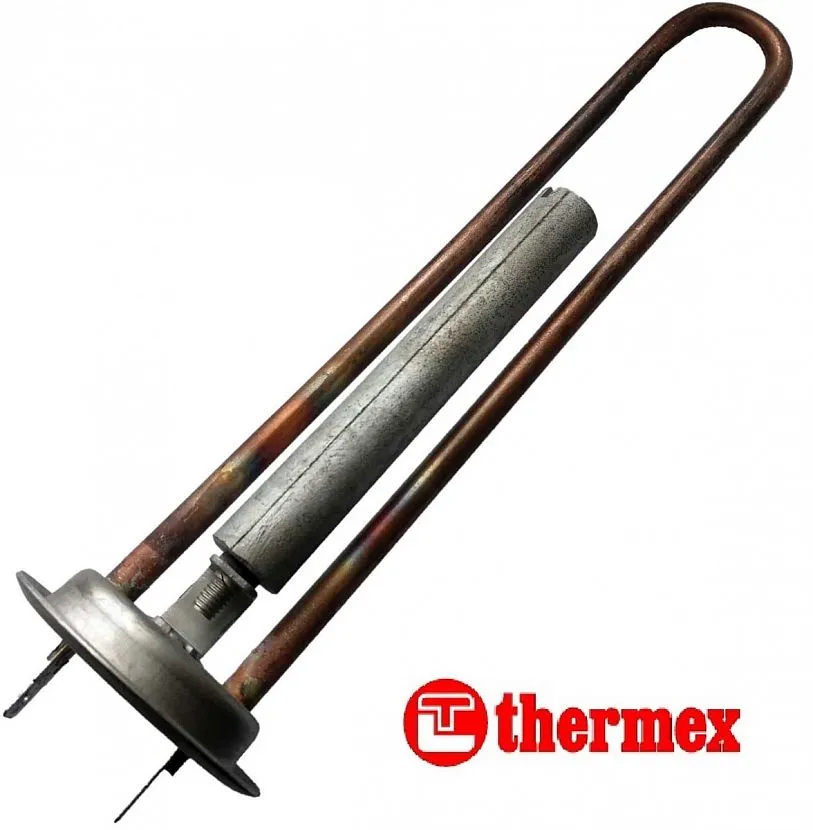
Branded heating element of the Termex water heater Source www.spares-bt.com.ua
The weakest point of any water heater is corrosion, which inevitably appears in the internal tank. To prevent its occurrence for as long as possible, use a magnesium electrode installed inside the water heater.
Flow type heaters
Unlike storage boilers, instantaneous boilers have smaller dimensions and volume. The Thermex water heater includes several heating elements for heating water. They are usually equipped with two or three elements.
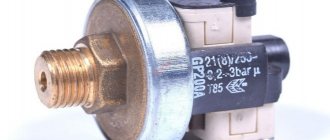
To increase service life, heating elements are made of ceramic-based materials, which are placed in a copper cylinder. The device is also equipped with a power regulator, which makes it possible to monitor the water temperature. The system monitors parameters using appropriate sensors. If, for example, the pressure exceeds a certain value, the water supply will be interrupted, and the temperature sensor will allow the heating element to be turned off when the water heats up to a certain value.
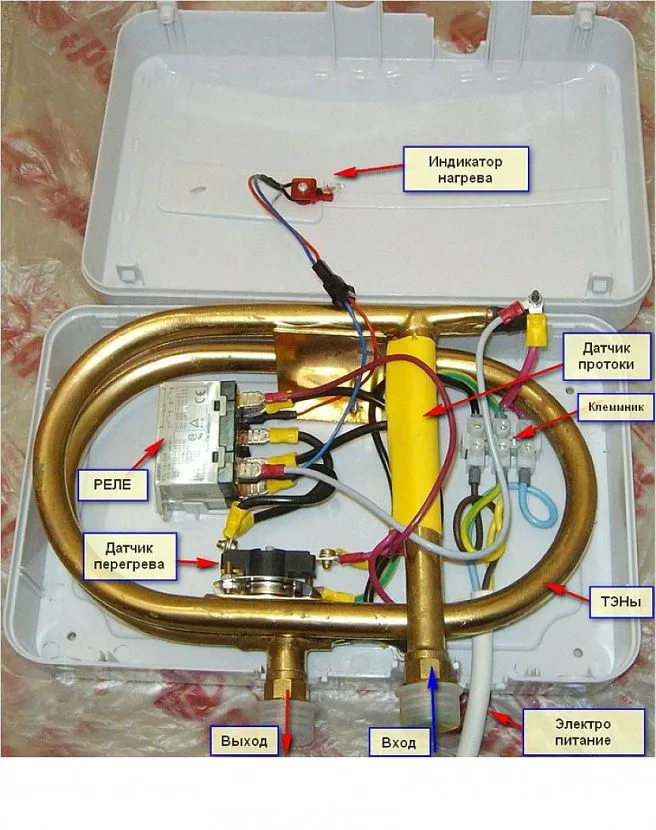
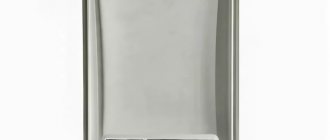
Design of a flow-type water heater Source vannayasvoimirukami.ru
Combined
Devices of this type combine large and medium volume tanks, which are used for storage and flow devices, respectively. Thanks to this, combined water heaters can be used in both modes.
Thanks to this design of the Thermex water heater for 50 liters or more, the system has the following advantages:
- Compactness.
- Possibility of working in both modes.
- Advanced corrosion protection.
- Economical.
On average, the power of Termex devices is about 2.5 kW. This indicator allows you to obtain water at the required temperature, while spending a small amount of electricity.
See also: Catalog of companies that specialize in work with electrical equipment and engineering systems
First start-up and checking the correct operation of the boiler
After connecting the unit, you need to prepare it for connection and check its functionality. Algorithm of actions:
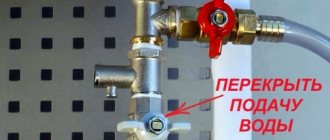
- Shutting off the supply of hot water from the common riser. This is done so that the broiler does not heat the central water supply of the house.
- Filling the tank. First, water is poured into the boiler, then the mixer and outlet for hot liquid are opened, then the inlet for cold liquid is opened. These manipulations are necessary to release air from the tank.
- Opening the supply valves located on the boiler inlet.
- Opening the hot water tap. After a while, when a stable and even stream comes out of it, it is closed.
- Connecting the water heater to the electrical network.
From connection to the first start of the unit, you must wait 1-2 hours.
With mechanical control
The first start-up of a mechanically controlled boiler is carried out according to the standard scheme. Step-by-step instruction:
- Indicate the power using the buttons on the control panel. There are 2 modes in total: 1.3 kW and 2 kW. The selected value is displayed on the indicator lamps: if 1 of them is on, Single power is selected, when 2 - Double power.
- Adjust temperature. This is done using the regulator knob. When turned clockwise, the value increases, and when turned counterclockwise, it decreases. The step is 1°C.
- Measure the temperature of the water in the mixer using a thermometer. Turn on the boiler, wait about 30 minutes and take another measurement to make sure that heating has started.
You can turn off a mechanically controlled device by turning the temperature regulator all the way.
On touch screen
The first start of a unit with a touch control panel is easier. Step-by-step instruction:
- Exit the DEMO mode in which the device is initially located. To do this, you need to simultaneously hold the upper and lower brackets for 5 minutes.
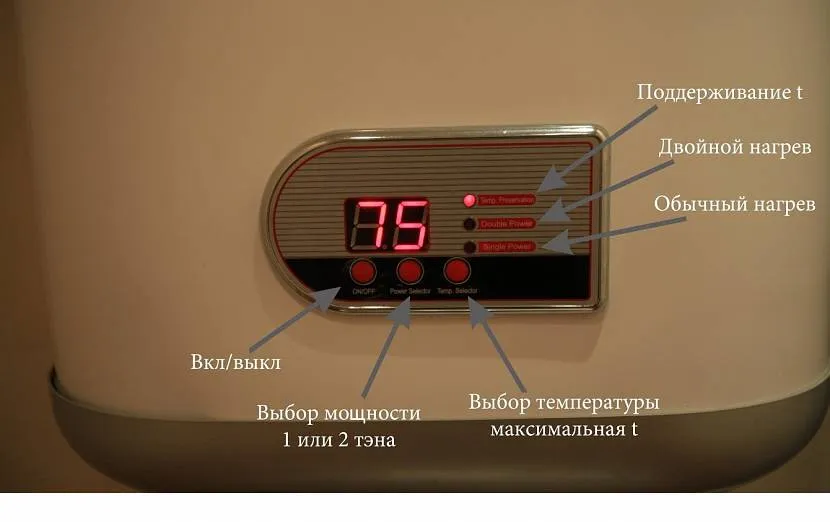
- Select power. This is done using the upper and lower selection keys. The display will show the selected indicator: Single power (1.3 kW) or Double power (2 kW).
- Set the temperature. Switching to the selection mode is carried out by 2 clicks of the upper bracket. The value is displayed on the screen.
- Set a timer. This is done by clicking the left selection bracket.
- Turn on the unit using the round key in the center of the screen. Note the water temperature (it is displayed on the panel) and recheck it after 20-30 minutes to make sure it is rising.
You can stop the operation of the device by pressing the key in the center of the display again. A boiler with a diagnostic system will switch itself off if operating conditions are violated and display an error message on the touch screen.
Basic faults
There are several reasons why a Thermex water heater does not work. The most probable ones are calculated thanks to the following nuances of the “behavior” of the device:
Doesn't work at all
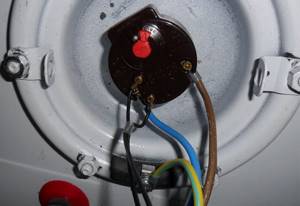
If the Thermex water heater does not turn on, then the reason may lie not only in the device itself. It also happens that the socket fails and electricity simply does not reach the water heater.
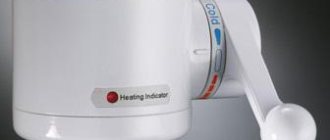
There are few buttons on modern water heaters, but if the device does not turn on, it is immediately noticeable Source userapi.com
To check the socket for serviceability, you will need a multimeter or an indicator screwdriver.
Checking the socket is carried out in several stages:
- Turn on the multimeter.
- Insert the probes into the holes.
- To set up a contact.
Now the device will be able to show the voltage. If it is approximately 220 V, then the outlet is working correctly. For voltage values below 200 V, it will be necessary to carry out repair work to eliminate the deficiency.
If an indicator screwdriver is used for checking, then it must be inserted first into one and then into the other hole of the socket. When one of the contacts occurs, the diode in it should light up. True, the disadvantage of a screwdriver is that if the neutral wire is faulty, it will not be possible to detect it.
If the socket is working properly, but the water heater does not turn on, then you need to proceed to testing the power supply wire of the device itself. To do this, you need to ring the device using a multimeter. Place one probe on one side of the plug, and the other probe on the boiler terminal box. If the device is silent, you will need to replace one or both wires. If there are no faults, the multimeter will beep.
Finding the cause of the breakdown
Before you begin repairs, you need to find out what is causing the problem.
This can be understood in advance without disassembling the device itself.
The main malfunctions of electric water heaters are:
- the device does not turn on;
- short circuit protection (RCD) is triggered;
- the water heater does not heat water or does not comply with heating standards;
- boiler leaked.
If a leak appears, you need to find out where the leak is. If it is the heating element gasket that has leaked, then such a defect can be easily eliminated. You just need to replace it with a new one, especially since they cost pennies.
You can find out how to make the right choice of water heater and not make a mistake here: https://teplo.guru/vodonagrevateli/ariston-termeks-elektrolyuks.html
You can first understand that it is the heating element that has failed by the following indirect signs:
- automatic protection is triggered;
- knocks out the machine on the meter;
- the water does not heat up, or the device does not heat well;
- the hissing of the water heater and the release of water with a cloudy consistency and an unpleasant odor.
With such symptoms, the heating element is most likely to fail. This can also be determined by the appearance of the heating element itself - the shell is damaged.
Sometimes heating elements burn out without visible damage to the shell, then this can be determined using a tester.
If the ohmmeter shows infinity at the terminals, then the nichrome spiral is broken.
If it is zero, then there is a short circuit somewhere. In any case, such an element needs replacement.
In some cases, the heating element fails for the following reasons:
- The heating element has served its term;
- the unit was turned on without water;
- the water heater was turned off for a long time, but the water was not drained;
- sudden changes in voltage in the network.
In any case, the heating element needs to be changed. Of course, the easiest way is to use the services of a specialist, but it is quite possible to change the heating element yourself. It is necessary to warn that repairs must be done in a certain sequence to avoid confusion. This is an important key to successful repairs.
Video description
To understand whether it is worth trying to change the heating element yourself, watch this video, in which the video clearly shows the complete procedure for replacing the heating element in a household water heater:
To replace the heating element you will need:
- Disconnect the device from the network.
- Drain all water from the tank. To do this, you need to put on a rubber tube instead of a drain tap, through which the water will drain.
- Remove the plastic casing. The screws that need to be removed are hidden behind stickers.
- Remove the voltage terminals from the heating element. The method of attaching them will depend on the type and model of the heater.
- Detach the heating element from the housing. This will also require unscrewing the bolts.
- Install a new heating element.
Most often, new heating elements are fine. But to be completely sure, you can check the part for serviceability using a multimeter operating in resistance testing mode. The correct value on operating devices is 0. If the multimeter shows a resistance of 1, then there is a break in the element tube.
Much less often, the cause of such a problem is the control unit. It may start to malfunction, so the only way to fix the situation is to replace the entire panel.
Slow water heating
There can be three reasons for such a malfunction of a 50-liter Thermex water heater.
- The thermostat has stopped working correctly, which is why it turns off the heating element until the required temperature is reached.
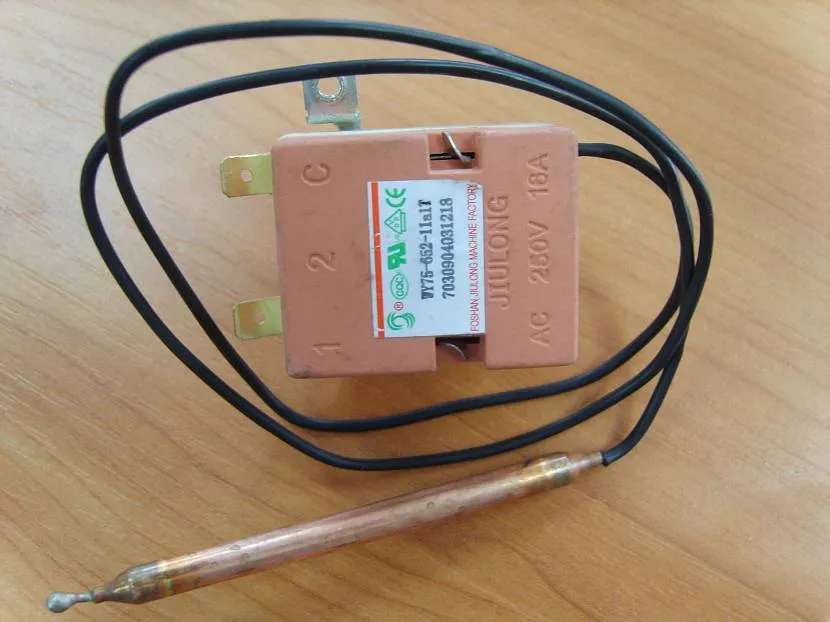
Appearance of the thermostat to be replaced Source insales.ru
How to repair Thermex yourself
Let's look at how to deal with problems on your own.
Replacing the heating element
If the body is vertical, then the heating element is located at the bottom and you don’t have to think about how to remove the cover. If there is a malfunction, the machine on the dashboard can knock out, and the body can give an electric shock. If you notice heating for too long, the element is overgrown with scale - as a result, heat transfer decreases.
If scale formation is severe, the heating element may not come out of the socket. Then carefully clean it with a thin screwdriver.
Before changing the heating element, select a replacement in accordance with the model serial number. If your appliance has two heaters, try to distribute the work evenly so that the appliance lasts longer.
Eliminating noise during operation
Magnesium and calcium salts create deposits not only on parts, but also settle at the bottom of the tank. Therefore, when switched on, noise may be heard and the circuit breaker may trip. To avoid serious problems, you need to clean the Thermex boiler at least once a year.
Due to impurities in the water and scale, the water from the boiler could become cloudy and acquire an unpleasant odor.
Rinse the inner walls with warm water, wipe and connect the equipment.
The boiler turns off quickly or does not work at all
The main reason is the tripping of the RCD. This is possible due to a short circuit or current leakage to the housing. Besides:
Repairing housing leaks
If the housing is leaking, immediate action must be taken. Causes:
To determine the location of the leak, unplug the device and use a flashlight. Carefully inspect the body. If a leak is found in the pipe connections, drain the water and reconnect the elements.
The gasket may leak. First tighten the boiler cover screws. If this does not help, install a new gasket.
Is there a leak where the heater is attached to the body?
It is necessary to completely replace it and the flange that holds the heating element. In case of depressurization of the tank itself, only a complete replacement will help, or better yet, buying new equipment.
Noticed problems at work? Take note of our publication and examine the device. If you doubt your skills, it is better to contact a specialist for repairs.
Video description
This video demonstrates what happens during unsuccessful repair attempts when the cause of the leak is not the flange, but the housing itself
Most often, such a breakdown occurs due to the following reasons:
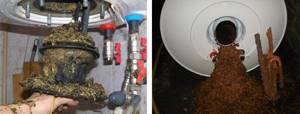
- Rotten tank . This is an advanced case of corrosion that could eat through the metal. Therefore, it is necessary to periodically check the tank for the presence of red spots. They can only occur if the magnesium electrode is faulty.
- Manufacturing defects . Typically, in this case, a leak occurs immediately after installing the device.
- The body began to deform . This occurs due to exposure to too high temperatures. It must be taken into account that the heating element can heat water to this level only if the thermostat has stopped working correctly.
- The sealing rubber began to crack and lose its elastic properties, which is why water began to leak through the flange.
A rotten tank just needs to be replaced. Such breakdowns cannot be repaired, since the inner layer of glass ceramics is also damaged - after all, this is the only way water can come into direct contact with the metal. The need to purchase a new tank may also arise if the housing is damaged.
Preliminary preparation
Preparations before repair are as follows:
- Disconnecting the water heater from the network. Unplug the plug from the socket.
- Close the check valve and water supply valves.
- The cold water hose is disconnected and the liquid is drained. There will be a small amount of it, only residues in the system.
- The hot water hose is disconnected and the water in the tank is drained. If there is no separate pipe for draining water, a check valve is used as one, although in this case the water takes quite a long time to drain.
- It is necessary to completely drain the water, after which the water heater is removed. It is best to do this together, because the weight of the water heater is quite large without water.
You may be interested in an article about Termex storage water heaters.
Read the article on how to properly replace the heating element in a Thermex water heater here.
Video description
This short video clearly and concisely explains in a few minutes what can be done with a rotten tank so that the device will work for some time:
The simplest situation is with a factory defect. Since the problem appears at the beginning of the device’s operation, all you need to do is contact the store where you purchased the water heater so that they can replace it with a new one under a valid warranty.
The only case when a leak can be eliminated without calling specialists is damage or incorrect installation of the seals. To replace them, you need to remove the flange, and with it the rubber itself will fall out. For additional protection against moisture, sealant can be applied on all sides.
Instructions for installing and connecting the device
The installation and connection of the water heater must be carried out only by a qualified specialist, otherwise it may malfunction and cause physical and property damage to health.
Placement and installation of the water heater
It is important that the location of the water heater is close to the place where hot water is used, this will help reduce heat loss when passing through the pipes.
The water heater is attached to a special housing bracket using pre-hammered anchors.
In the room where it is planned to install a Termex water heating device, there must be waterproofing of the floor and an outlet to the sewer. It is not allowed to place electrical appliances and objects that are “afraid of water” under the operating device. If such conditions cannot be met, it is necessary to at least install a special protective pan with access to the sewer. Termex kits with tank capacities of 15, 30, 50 and 80 liters do not have a protective tray.
Electrical connection
Before connecting the water heater to the electrical network, it must be completely filled with water.
The device comes with a standard cord and plug for connecting to the mains. The outlet must be modern (with a grounding terminal) and located in an area protected from humidity. In this case, you need to take into account the maximum permissible power for the socket and cord, which must be more than two thousand watts, otherwise the wire or socket may overheat and a fire hazard may arise.