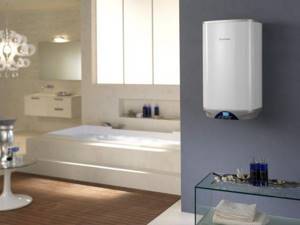
The presence of an autonomous water heating system ensures not only comfortable living, but also independence from the whims of public utilities.
The performance of such systems, their efficiency and safety depend on the technical characteristics of the Ariston boiler, the connection diagram and the quality of installation. The key to long and trouble-free service is compliance with all operating rules and timely maintenance. Ignoring the requirements prescribed by the manufacturer can lead to premature failure of both individual parts of the boiler and the entire product as a whole. In addition, the possibility of electric shock increases many times over.
The operating instructions contain all the necessary information regarding installation, connection, conditions of use and frequency of maintenance of the Ariston storage water heater. In addition, the document includes a list of the most common problems and methods for eliminating them yourself; however, to effectively solve problems that arise, you will need knowledge of the design and basic principles of operation of the product.
How to connect an Ariston water heater
Connecting an Ariston boiler is not a very complicated operation, the success of which depends on following the installation diagrams from the manufacturer.
Let's look at the diagrams recommended by Ariston for connecting boilers of this brand to the electrical network, water supply and hot water supply system.
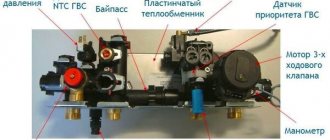
Water heater Ariston VELIS PLUS INOX
Where to begin?
Of course, from mounting the boiler on a supporting surface and arranging a drain from the cold branch of the home water supply.
The last operation - arrangement of the outlet - is carried out as follows:
- A separate branch of cold water supply is routed from the collector to the intended location of the boiler using ½-inch fittings.
- If the system does not have a collector, then you need to divide the section of the water supply system closest to the boiler by installing a standard tee at the cut site.
- The installation pattern of the tee depends on the structural material of the pipes. That is, plastic tees are fixed using a pipe soldering iron, metal fittings are attached to the thread, pressing the joint with a lock nut, fittings for metal-plastic pipes are mounted on collet clamps.
- A ball valve is installed at the free end of the tee or a specially equipped branch of the water supply system, shutting off the cold water supply.
Installing the boiler on a supporting surface is even easier:
- A counter plate is applied to the wall - a part from a standard set for mounting a boiler - it is aligned with the hydraulic level and the dowel placement points are marked.
- At the marked points, drill holes with a diameter of 16 millimeters and a depth of 80 mm using a drill or hammer drill. Then polymer inserts are driven into the holes.
- The counter plate is attached to the wall by driving the dowels from the kit into the inserts or screwing in self-tapping screws.
- The tank is hung on a bar using mounting brackets welded onto the boiler body.
To install the boiler, at least two counters are used, placed at a distance of 27-43 centimeters from each other.
How to connect an Ariston water heater to the electrical network
The next step is connecting to the power grid. Moreover, you will have to allocate a separate line for the boiler by installing a standard RCD included in the delivery set in the central distribution board.

Electrical diagram for connecting the boiler
The connection process itself is as follows:
- An RCD is installed in the shield, connecting its input to the output of the central automatic fuse.
- From the output of the RCD to the point where the boiler is placed, a three-core 2.5x3 cable is pulled, hiding the line in a groove or an external box.
- A 16 Ampere fuse is installed near the boiler, packaging this “switch” in a miniature cabinet with a removable front panel.
- The wire from the RCD is pulled to the input of the 16-amp fuse.
- The bottom cover of the boiler is removed and a three-core wire of the same cross-section - 2.5 mm - is connected to the contacts of the heating element.
- The wire from the boiler is connected to the fuse output.
The grounding line - a two-color core in the wire - is connected to the corresponding connector of the central panel. The phase line - a brown or red wire - is pulled from the phase of the central panel to the corresponding connector in the boiler. The “zero” line - the blue wire - is pulled from the zero bus in the panel to the desired connector in the boiler.
Connection via socket and plug is possible, but not recommended. In addition, a waterproof socket and plug are more expensive than a 16-amp machine, and their contact point is constantly heated.
Connection diagram of the Ariston boiler to the water supply
The next step is connecting the boiler to the water supply. Before doing this, you must disconnect the power supply line.
Connection diagram of the Ariston boiler to the water supply
After this you will have to do the following:
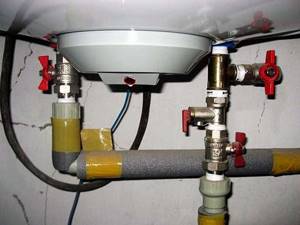
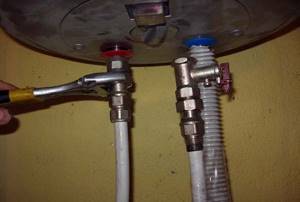
- Extend a vertical pipe with a diameter of at least ½ inch from the water supply shut-off assembly - the ball valve on the tee or elbow under the boiler - to the inlet of the water heater.
- Screw the American connector onto the “cold” fitting, the right one on the side of the front panel.
- Screw the drain valve onto the drain.
- Screw a one-way safety valve onto this fitting, reducing the inlet pressure to 6-7 atmospheres.
- Attach a filter to the lower end of the valve to reduce the water hardness level.
- Attach a vertical pipe from the valve on the water supply to the filter outlet.
- Install a check valve into the pipe to prevent hot water from draining into the cold water supply.
- Place a hose on the free end of the valve, leading it to the sink or sewer.
The boiler manufacturer recommends using polymer tape as a sealant. In this case, all joints between fittings and pipeline fittings must be collapsible (threaded).
In case of emergency, you can do without a drain tap and a hardness filter. However, these elements will facilitate the operation of the boiler. The faucet makes it easy to drain water from the tank. The filter increases the frequency of cleaning the boiler from scale.
How to connect a boiler to a hot water supply circuit
The final stage of the boiler connection process - installation of an outlet to the DHW circuit - is carried out according to the following plan:
Connection diagram of the boiler to the hot water supply circuit
- First, an American connector is screwed onto the “hot” - left side of the front panel - fitting.
- Next, a drain valve is screwed onto the drain.
- A DHW system collector is placed under the tap, the number of outlets of which must match the number of hot water taps in the house (plus a shower and/or bath).
- A vertical section of pipe of the required length is pulled from the tap to the collector.
Further wiring - from the collector to the point of consumption - is carried out as needed, installing a ball valve on each outlet.
Of course, you can do without a collector, but in this case you will not be able to take a shower with the hot water tap in the kitchen slightly open.
Checking for correct operation
It’s great if the water heater is connected to a separate machine. If problems arise in its operation, this will not affect the power supply to other appliances in the house.
If after starting the heater the circuit breaker is knocked out, you can turn it on again. If the situation repeats itself, then there is a serious problem. The unit must be de-energized and a technician must be called.
Here are a few more details that need to be checked after putting the boiler into operation:
- Inspect the hot water pipe to see if there is a leak. The fact is that a water heater can create more pressure than in risers. And if the gaskets are already worn out somewhere, but withstood the load from the central water supply, now they can give up.
- Make sure that the light indicating the supply of voltage to the heating element comes on.
- Take readings of how many degrees the meter shows at the very beginning of operation of the device, and then look at the temperature again after 20 minutes. If the data has increased, the heating element has successfully survived the rest period and is heating properly.
Due to their compact size and ease of use, instantaneous water heaters are in great demand. But you need to correctly assess your capabilities before deciding to install such a device yourself, because this process requires compliance with a number of rules. How to connect an instantaneous water heater: installation tips. read carefully.
You may be interested in the following information: how to drain water from a water heater and when it is necessary, read here.
Read about connecting the water heater to the water supply and to the electrical network here: https://microklimat.pro/otopitelnoe-oborudovanie/vodonagrevateli/ustanovka-svoimi-rukami.html. And also everything about choosing a place for the boiler.
How to properly install and connect an Ariston water heater for 15, 30 and 50 liters
2017-01-25 Evgeniy Fomenko
Let's look at the three main stages of how to properly connect an Ariston water heater with your own hands. The first step is choosing a location and installation. Usually the boiler is placed in the bathroom or in the toilet above the toilet.
It should be taken into account that a device of 50 liters or more occupies a large volume of space. The closer the device is located to the watershed points, the less heat loss will be.
Installation
The easiest way to install a floor model. To do this, you just need to choose a suitable place in the room. If the floor is uneven, you must first make a level screed or lay tiles.
Installation of wall models occurs in several stages:
- We mark places for fasteners. To do this, measure the distance between the holes for the hooks at the back of the water heater. We make marks on the wall with a marker, additionally using a level to ensure that the body hangs level.
- Holes for fastenings are drilled using a hammer drill. These can be either anchors or dowels with hooks. Depending on the weight of the device, the diameter of the fasteners is selected. For small boilers of 15 liters, 10 mm anchors are suitable, for devices of 30 liters - 12 mm.

- Anchors are hammered in or dowels are inserted and hooks are screwed in. The case is hung on the wall.
How to turn on the water heater
In summer, in most apartments with centralized water supply, hot water is turned off. During this period, utility services carry out repair and maintenance work. As an alternative, the vast majority of people choose to buy tankless or storage water heaters, depending on their needs and budget.

It’s not enough to just buy a device; you need to figure out how to turn on the water heater. Although the process is quite simple, some still have doubts.
The range of equipment includes storage and instantaneous water heaters, and connecting each of them requires a certain sequence of actions, most of them approximately the same.
Water supply
Next comes the connection to the water supply. A diagram is thought out, first drawn on a sheet of paper, and then transferred to the walls with real dimensions. Holes are drilled along the lines where the pipes will pass and clips are installed.
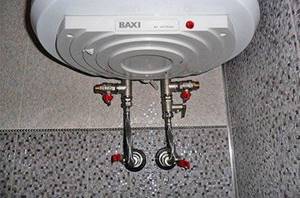
We close the valve at the water inlet and install a tee on the branch closest to the boiler. A pipe runs from it to the water heater. A valve is installed on it to make it convenient to repair the device, a strainer and a check valve.
We lead a flexible hose to the boiler and connect it to the pipe. Typically the input is indicated in blue. We draw a branch to the watershed point in the same way. It is not recommended to connect without flexible hoses. On the one hand, it looks better and more reliable, but if there are sudden changes in pressure, the tank takes the brunt.

The inlet to the boiler is marked in blue
After connecting all components, the valves are opened and all connections are checked for leaks. If they are detected, reconnections are made or more tow is added to the threads.
Inclusion
If you turn on the boiler for the first time, you should do the following:
- We inspect the inlet pipes to the water heater and find a check valve. If the normal pressure is exceeded, water will flow out of it. Therefore, you should either place a small container under it, or connect and drain the tube into the sewer.
- We fill the tank. Open the valves at the water inlet and outlet of the device. To do this, turn the tap handle 90 degrees counterclockwise. Open the hot water tap. We wait until the container is filled. If water starts flowing, this means that the Ariston boiler is full.
It is advisable to visually inspect the pipes for leaks. If water is dripping somewhere, you need to turn off the water and call specialists to fix the problem.
- We turn on the device to the network. To do this, we either insert the plug into the socket, or turn on the machine to which the electrical cable is connected. The machine may be located near the installation site or in the distribution panel.
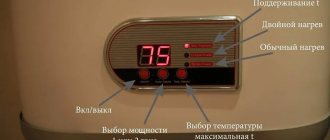
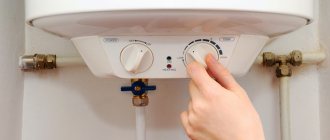
- Set the desired water temperature. It is recommended to set the level to 60-65 degrees. At higher temperatures, scale actively accumulates, and at lower temperatures, harmful bacteria can begin to multiply.
The temperature can be set with a mechanical knob, as in the Ariston SG 30 OR model, or by buttons on the control panel, as in the Ariston VELIS EVO PW model.
After this, all you have to do is wait until the liquid warms up and start using hot water. For convenience, you can mix cold water from the tap with warm water from the boiler to achieve the desired temperature.
Electrical connection
The scheme is also thought out in detail here. To connect less powerful models, you can use moisture-resistant sockets; powerful devices are connected with a separate cable, which is output to the machine.
It is important to use three-core copper wires with a cross-section of at least 2.5 mm. Additionally, for safety reasons, an RCD is installed on the cable to protect users from breakdowns. Remove the protective plastic cover from the bottom of the water heater and connect the wire in accordance with the markings on the device.
Next, the cable is led out in plastic boxes to the electrical panel and placed on the machine with the corresponding current rating. At the very end, the functionality of the connected Ariston boiler is checked. The taps open and the electricity turns on.
We invite you to watch a video about installing a water heater:
Ariston water heaters: diagram and principle of operation, popular models and connection diagram

Ariston water heaters are popular in the world market. This is due to the high quality of the products and long service life, if the technical requirements are met both during the installation of the equipment and during its operation.
Popular models of Ariston water heaters.
Models and displacement
Due to the popularity of the product, the manufacturer produces a large number of models with different characteristics. Models with electric heating elements differ in volume and the presence of a storage tank, power, and water temperature limit. The higher the power of the heating element, the higher the maximum heating temperature.
There are also differences in dimensions, weight and installation methods (vertical, horizontal).
The list below shows the most popular Ariston brand water heater models on the market and its brief characteristics:
- ABS VLS (VELIS) EVO PW 50 – electric storage water heater. Volume - 50 l, equipped with a fast heating function, an electronic thermometer for monitoring the water temperature, and a safety device to prevent it from being turned on if the storage tank is empty.
- NTS 80V 1.5K SU 3700366 – electric storage water heater. Volume - 80 l. Equipped with an external temperature regulator in the form of a round scale.
- ABS VLS EVO INOX PW 80 D - electric storage water heater. Volume - 80 l. The tank consists of 2 40-liter compartments. Has the ability to accelerate heating, there are 2 heating elements.
- ABS PRO R 100 V - electric storage water heater. Volume - 100 l. The model is equipped with overheating protection (ABS safety system). Energy savings are ensured by polyurethane foam thermal insulation. Vertical installation is provided.
- ABS ANDRIS LUX 30 - electric storage water heater. Volume - 30 l. The model has a bottom connection for water pipes. The tank is made of steel, the internal coating is Ag+.
There are also small models with 15 and 10 liter tanks. All mentioned products in Tyumen can be purchased in the online store of the KVANTA+ company.
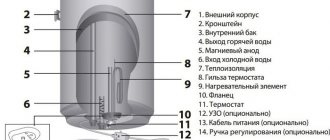
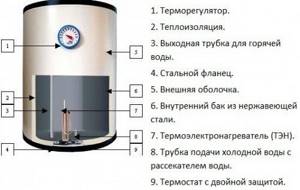
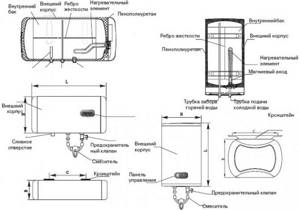
Typical boiler diagram Ariston 50
Ariston electric storage water heater consists of:
- outer body;
- bracket;
- internal tank;
- hot water outlet;
- magnesium anode;
- cold water inlet;
- heat insulator;
- thermostat sleeves;
- heating element (heater);
- flange;
- thermostat;
- power cable;
- regulator knobs.
Electric water heater Ariston: technical characteristics of boilers for 50, 80 and 100 liters
Ariston produces more than seventy models of storage water heaters with a capacity of 10-200 liters. Electric storage water heaters are available in several models, among which the 50, 80 and 100 liter series are especially popular.
| Model | Volume (liters) | Heating time up to 45oC (min) | IPX protection class | Dimensions (mm) |
| ABS VELIS INOX QH D | 50 | 29 | 4 – 20 | 800 x 405 |
| 80 | 43 | 4 – 26 | 1090 x 695 | |
| 100 | 53 | 4 – 30 | 1275 x 880 | |
| ABS VEL | 50 | 46 | 4 – 20 | 800 x 405 |
| 80 | 110 | 4 – 26 | 1090 x 695 | |
| 100 | 131 | 4 – 30 | 1275 x 880 | |
| ABS PRO ECO INOX POWER SLIM | 50 | 106 | 3 – 15 | 837 x 145 |
| 80 | 145 | 3 – 20 | 1178 x 145 | |
| ABS PRO ECO INOX POWER | 50 | 106 | 3 – 18 | 553 x 163 |
| 80 | 145 | 3 – 19 | 758 x 163 | |
| 100 | 212 | 3 – 22 | 913 x 166 | |
| ABS PRO R INOX | 50 | 156 | 3 – 13 | 553 x 163 |
| 80 | 306 | 3 – 19 | 758 x 163 | |
| 100 | 352 | 3 – 22 | 913 x 166 | |
| ABS BLU ECO POWER SLIM | 50 | 106 | 3 – 19 | 837 x 145 |
| 80 | 145 | 3 – 25 | 1178 x 145 |
Ariston “Velis” has proven itself very well - water heaters with remote control and double power, with a flat shape and interchangeable color displays.
How to connect an Ariston water heater
To connect the Ariston boiler correctly, you must follow the manufacturer's instructions.
First, the water heater is mounted on a wall or supporting surface and the outlet (cold water) is provided from the water pipe. It is most beneficial to install the device as close as possible to the source of water supply - this allows you to minimize heat loss.
If there is a collector in the system, a separate cold water supply pipe is transferred to the installation site of the water heater. If there is no collector, the nearest section of the water pipe is cut, and a standard tee is installed at the cut site.
The method of installing the tee depends on the material from which the pipes are made. Plastic fasteners are fastened using a special soldering iron, and metal ones are fastened with threads.
A ball valve is installed in a separate section of the water supply system, designed to shut off the cold water supply.
Wiring diagram for an Ariston electric storage water heater.
To connect the water heater to the water supply:
- Pay attention to the hot and cold water pipes - it is important not to confuse them. A check valve is installed on the cold side; it can be included in the standard kit. Hot water is connected using a pipe. First, a cold water pipe is installed, then a hot one.
- A special tape is wound onto the threads as a sealant and sealant; this is recommended by the manufacturer.
- A tee is installed on the cold water pipe, at the bottom of which there is a relief valve. A tap is attached to the side to completely drain the water from the tank in case of an emergency, possibly due to abnormal pressure or heating. A shut-off valve and adapter are installed at a short distance under the tee. The next step is connecting to the water supply.
- Connection to hot water is also made by installing a shut-off valve.
- When connecting different metals, adapters should be used.
Connection to the electrical network is carried out as follows:
- A separate circuit breaker (RCD) is installed in the distribution panel; it is connected to the central automatic fuse. A three-core cable is pulled from a separate RCD to the boiler, which is placed in an external cable channel (or a special groove is punched into the wall).
- It is recommended to install a 16 A fuse as a switch, since the socket and plug are subject to heat and moisture. In addition, the cost of waterproof electrical equipment is higher than the cost of a machine. The “switch” is closed in a compact cabinet with a removable panel.
- A separate RCD and the “switch” are connected by wire.
- A three-wire wire is connected to the heating element; for this, the bottom panel is removed from the water heater.
- Then the output of the machine is connected to the boiler.
- At the next stage, the ground, phase and zero lines are wired to the corresponding connectors.
Diagram for connecting an Ariston water heater to the electrical network.
Before turning on the device, you must make sure that there are no leaks and that the flange is in the correct position (strictly in the middle). Then fill the tank with cold water and open the hot water tap to release the air. After bleeding the air, the valve is closed and a test operation is performed.
More detailed advice and instructions for operation and installation can be obtained from the KVANTA+ company in Tyumen.
Under what conditions should the device not be installed?
Electrical appliances, in particular an electric water heater, must be installed in conditions that correspond to those specified in the instruction manual.
The following are stated in the instructions for Ariston boilers as unacceptable factors for installation:
- frost - this is associated with the risk of freezing water in the tank and pipes;
- sunlight - do not expose the electric heater to direct sunlight;
- power outages - the voltage in the network to which the device is connected must be stable;
- vapors, dust or gas - the water heater must not be installed in a room with a high concentration of dust and toxic or acidic gases/vapors in the air;
- dampness - it is not recommended to install the device in conditions of constant dampness and in long-term unventilated rooms (this item depends on the degree of moisture resistance of the selected water heater model).
Water heater “Ariston”
It is very important to prepare in advance all the tools and consumables for the work. Before starting installation, make sure you have the following tools:

Tools for installing a storage water heater.
- roulette;
- hammer drill with drill;
- adjustable wrench;
- spanners;
- wire cutters;
- pliers;
- two types of screwdrivers.
Consumables:
- Unipack type paste or FUM tape;
- tow;
- 3 shut-off valves;
- 3 tees;
- 2 connecting flexible hoses (if not included);
- metal-plastic pipe of the required length.
- if it is necessary to replace the wiring - a three-wire wire, a socket or a circuit breaker.
To install a storage electric heater, you will need a 32-40 A circuit breaker and a PVS 3X6 -3X8 cable.
Ariston water heater repair
Ariston water heaters are reliable household appliances, but they are also susceptible to some malfunctions. The most common are the appearance of scale on the heating element, failures in the electronic control unit and low pressure when supplying water to the tank.
For repairs, it is preferable to use the services of professionals. Guidance and advice on these issues can be obtained from KVANTA+.
How to identify a malfunction
To carry out repair work, the user must notice a malfunction in the operation of the water heater in time. Ariston boilers are often equipped with an electronic display on which messages appear in the event of equipment failures.
Direct signs of a malfunction may be:
- the machine is triggered when the boiler is turned on - this indicates a malfunction of the heating element;
- heating water above the maximum permissible temperature - this indicates a failure of the thermostat;
- heating of water below the required values - this may indicate contamination of the heating element, the appearance of scale;
- drips in the lower part of the tank and on its walls;
- breakdown of the information display, which most often does not cause significant disruptions in the overall functionality of the device, but can reduce comfort during its use.
An indirect sign can be considered extraneous noise during operation of the electric heater.
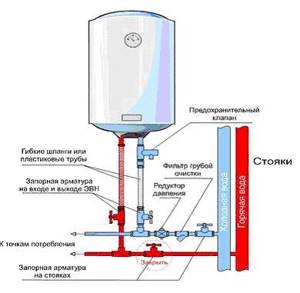
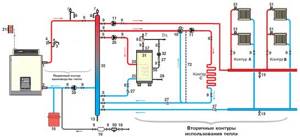
Ariston water heater and boiler connection diagram
Comfort in the house is ensured by several components: beautiful design, high-quality furniture, heat from the boiler room, a well-designed ventilation system, and a supply of cold and hot water. The absence of any of these factors leads to discomfort. The lack of centralized hot water supply is compensated by installing a boiler or water heater.
Ariston boiler diagram.
Among the huge number of this type of devices, Ariston water heating devices have proven themselves to work well. They are produced in different designs and modifications, differing in the principle of water heating and power.
The procedure for turning on a storage water heater in an apartment
When hot water is turned off, it becomes necessary to find an alternative, and here modern technology comes to the rescue. In order not to be left without the benefits of civilization to which we are accustomed, we will have to buy and install a storage water heater.
Quite often I have to turn it on in the summer, but not because it is some kind of complicated procedure, but because it doesn’t have to be done often, and therefore people forget the sequence of actions, and therefore I decided to write an article on this topic .
Turning on the storage boiler does not require any professional knowledge, but a certain sequence must be followed, since the structure of these devices, regardless of the model (Ariston, combustion, Termex, Electrolux), is the same for all, the order of activation is the same for all .
I’ll make a reservation right away, I’m telling you how to turn on a water heater with the correct standard connection diagram.
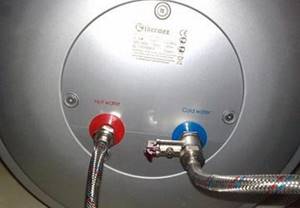
How to determine where the cold water inlet and hot water outlet are:
According to the standard, if you look at the boiler, the cold water inlet is on the right and the hot water outlet is on the left, and also the cold is marked in blue and the hot in red.
- First, turn off the hot water supply tap to the apartment, even if there is a check valve, since they tend to break, then open the same water on the mixer. It must be opened in order to bleed air if the water heater is empty.
- Open the hot tap of the boiler outlet.
- Open the cold supply tap to the device and wait for the air to escape from the mixer you opened and liquid to flow.
- When the water has flowed, close and plug in the boiler, and after a couple of hours you can use it.
That's the whole process, for greater clarity, watch this video, and I think you won't have any problems. You can turn off the device in the reverse order, but whether you need to drain the water from it is up to you.
Good luck to you!!!
The difference between a boiler and a water heater
Water heater safety group.
The operating principle of both devices is almost the same. And often a boiler is called a water heater, and a storage water heater is called a boiler.
There are differences between the devices:
- in design: the storage water heater has only an electric heating element inside the body, and inside the boiler there is a heat exchanger for supplying coolant from the boiler;
- in the heat source: in a water heater, the water is heated by a heating element; in a boiler, the heat source is natural or liquefied gas, electricity, various types of solid fuel, diesel fuel;
- by power: boilers are used to heat large volumes of water in houses with large water intake; water heaters heat a maximum of 120 liters and are intended for installation in apartments.
Main technical characteristics
Choosing a boiler based on power based on the number of users.
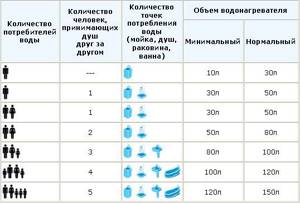
The water heating time is determined by the power of the device and its volume. These are the main technical characteristics of the boiler. The volume should be selected based on the intended use:
- washing hands and dishes – 10-30 liters per person;
- taking a shower – 30-50 liters for 1-2 people;
- taking showers one after another – 50-80 liters for 2 people;
- 3 people (shower) – 80-100 l;
- 4 people (any water procedures) – 100-120 l.
If the volume is large and the power of the heating element is low, the water will heat up for a very long time. A 1.2 kW heating element installed in a 15 liter tank will heat water to 60°C in 45 minutes. Heating to the same temperature, but 100 liters, when installing a 1.5 kW heating element, will already take 3 hours 50 minutes.
Optimal ratio of heating element power and tank volume:
- 1.2 kW – up to 50 l;
- 1.5 kW – up to 80 l;
- 2.0 kW – up to 100 l;
- 2.5 kW – up to 120 l.
In some models, more than one heating element is installed. With the help of additional heating elements, the fast heating function is realized. When the function is disabled, only one element works. This allows you to save money if there is no need to quickly heat water.
How are Ariston water heaters classified?
Table for selecting water heater volume.
Each individual residential building or apartment has different conditions and needs for the amount of hot water. This significantly influences the choice of device for heating water.
produces several types of water heaters:
- flow and storage devices powered by electricity;
- instantaneous water heaters (columns) running on gas.
A flow-through electric water heating device has the best characteristics, constantly providing consumers with hot water. An obstacle to installing it in an apartment or private cottage is its considerable overall dimensions. These devices are easy to use and highly reliable.
The Ariston storage water heater runs on electricity. The models are easy to install and maintain.
The operating principle of Ariston instantaneous gas water heaters does not differ from the operating principle of a gas water heater. For safe operation of this type of device, it is necessary to equip a reinforced ventilation system and chimney. Ariston flow gas boilers equipped with a modulation burner are popular.
How to choose the volume of a water heater
The capacity of the boiler is one of the main criteria that must be taken into account when purchasing. Customer reviews and statistical analysis made it possible to determine the required amount of hot water depending on the number of consumers.
For one person, a 30 liter Ariston heater is enough. If two people live in one apartment at the same time, a 50-liter Ariston will fully meet the need for hot water. A family of three or four people will need an 80-liter Ariston. If we are talking about providing a private cottage or a small restaurant, the best option would be “Ariston” with a capacity of 100 liters or more.
Storage heater - operating principle
Any model of Ariston storage heater is equipped with instructions for operating the device.
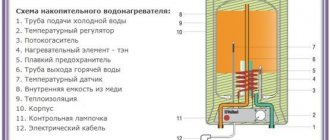
Scheme of a storage water heater.
The instructions contain a description of the device, its configuration and a detailed description of its operation, a diagram for connecting the device to the water supply and the electrical diagram of the device, rules for the safe operation of an Ariston water heater or boiler.
Apparatuses used to heat water consist of such parts.
The main elements of the Ariston water heater:
- A metal or plastic body, coated with white enamel, in which an internal tank made of metal is mounted. It is covered with a layer of porcelain glass or enamel, or the tank is made of stainless steel.
- The water heater has an insulating layer to retain heat and avoid a rapid drop in the temperature of the heated water. It is located between the surface of the body and the internal tank.
- There are two pipes in the tank: hot water is taken out through one, cold water is supplied through the second, since hot water is always at the top of the tank, the tube for its intake is longer than for supplying cold water.
- An anode is located inside the tank to protect the heating element from scale. Heating is performed by an element that includes a heating element and a thermostat.
- The thermostat is designed to disconnect the water heater from the electric current when heating the water to a set temperature. A heating temperature regulator is installed externally on the housing; it can be mechanical or electronic. A protective decorative cover is installed at the bottom.
- The device operates on the following principle: water from the water supply is supplied under pressure inside and falls to the bottom of the tank, where it is heated using a heating element. Heated water rises and mixes with cold water as it moves. When the set heating temperature is reached, the thermostat turns off the heating element. When the water temperature drops below the set temperature, the thermostat is activated and the heating element is automatically turned on.
- An indicator is displayed on the protective cover of the case, allowing you to monitor the operation of the device. When the indicator light is on, it indicates that the water is heating up.
- A check valve is installed on the water supply pipe near the entrance to the tank; it prevents water from flowing back.
Ariston boiler: design and principle of operation
The manufacturer uses proprietary protection against corrosive changes. Absolutely all budget models are equipped with a mechanical regulator, and every expensive water heater is equipped with a digital control unit. There is an internal temperature controller inside the water heater, which allows you to optimize heating. The design and principle of operation of such equipment are as follows:
- an internal tank or boiler designed to receive cold water and framed by an outer casing.
- built-in heating element designed to heat incoming water;
- a thermal insulation layer located between the body of the water heater and the boiler, which performs the function of a kind of thermos and allows the temperature of the heated water to be maintained for a long time;
- a shortened pipe equipped with a water supply divider;
- outlet pipe;
- built-in magnesium anode, which prevents heavy sedimentation in the form of mineral salts on the walls of the inner surface of the tank.
- a thermostat designed to automatically interrupt the power circuit after heating the liquid to the specified temperature.
The operation of water heating equipment is monitored using a voltage indicator, and using the built-in thermometer you can monitor changes in temperature indicators.
How to connect an Ariston water heater?
Water heater connection diagram.
Water heater connection diagram:
The water heater is connected to the water supply pipe through the lower pipe, and a hose is connected to the outlet pipe to drain water. Safety valves are installed at the inlet and outlet; they are open if the water heater is turned on and closed if the device is turned off.
After connecting to the water supply, the tank of the device is filled with cold water. The cold water supply tap must always be open. The tap on the hot water outlet pipe opens, when water flows through it, it is closed.
Electrical diagram for connecting the boiler
Connecting power to the water heating apparatus begins with isolating a cable that is routed from the switchboard to the installation site of the boiler. The cable must be three-core copper with a cross-section of at least 2.5 mm. The distribution board must be equipped with an RCD device to protect people from electric shock in case of leakage onto the device body.
The water heater is connected to electric current through a moisture-resistant three-pole socket, since it must be grounded. This type of connection is only suitable for low-power devices. You can connect the water heater to the electrical network yourself, but it is better to entrust this to specialists.
For high-power devices, a special distribution board is allocated; the cable is connected to the boiler without an outlet. The distribution board is installed in rooms with low humidity. The device is turned on and off by an automatic switch. The current strength for which the machine is designed is 16 A.
What are the consequences of excess moisture in the soil?
You can see the results of this phenomenon yourself - trees and shrubs die. Why is this happening?
- the oxygen content in the soil decreases and the carbon dioxide content increases, which leads to disruption of air exchange processes, water regime and nutritional regime in the soil;
- oxygen starvation of the root-forming layer occurs, which leads to the death of plant roots;
- the supply of macro and microelements by plants (nitrogen, phosphorus, potassium, etc.) is disrupted, because excess water washes out mobile forms of elements from the soil, and they become unavailable for absorption;
- intensive breakdown of proteins occurs and, accordingly, the processes of decay are activated.
Plants can tell you at what level groundwater lies
Take a close look at the flora of your area. The species inhabiting it will tell you at what depth the groundwater layers are located:
- perched water - it is best to dig a reservoir in this place;
- at a depth of up to 0.5 m - marigolds, horsetails, varieties of sedges grow - bladderwrack, holly, foxtail, Langsdorff's reed;
- at a depth of 0.5 m to 1 m - meadowsweet, canary grass, ;
- from 1 m to 1.5 m – favorable conditions for meadow fescue, bluegrass, mouse peas, rank;
- from 1.5 m - wheatgrass, clover, wormwood, plantain.
What is important to know when planning site drainage
Each group of plants has its own moisture needs:
- with a groundwater depth of 0.5 to 1 m, vegetables and annual flowers can grow in high beds;
- depth of water layer up to 1.5 m is well tolerated by vegetables, grains, annuals and perennials (flowers), ornamental and fruit shrubs, trees on a dwarf rootstock;
- if the groundwater is more than 2 m deep, fruit trees can be grown;
- The optimal depth of groundwater for agriculture is from 3.5 m.
Is site drainage necessary?
Record your observations for at least some time. You yourself can understand how much drainage is needed.
Maybe it makes sense to simply redirect melt and sediment water along the bypass channel, rather than allowing it to flow through your site?
Perhaps it is necessary to design and equip a storm drain and improve the composition of the soil and this will be enough?
Or is it worth making a drainage system only for fruit and ornamental trees?
A specialist will give you the exact answer, and we strongly recommend calling him. But after reading this article, you will gain some awareness on this issue.
Upon completion of the technological and production tasks associated with the arrangement of a sewer system in an apartment building, industrial building, as well as in a private household, it is necessary to test the involved system using the forced flow method. This task is used to identify possible defects or improper installation of the entire involved sewerage part, and the test report for internal sewerage and drainage systems will be material evidence of the work on acceptance of the facility.
A visual inspection should be accompanied by inclusion in the test report of internal sewerage and drainage systems according to SNIP, which is currently represented by the current regulations of the “D” series appendix, which corresponds to SP 73.13330.2012 “Internal sanitary systems of a building”, recently a new one has been applied updated working edition according to SNiP 3.05.01-85.
How to connect the boiler correctly
How to connect a boiler to your water supply system and start using it for your needs? This question has probably been asked by everyone who has ever encountered problems with a stationary hot water supply.
Unfortunately, the reality in our area is that residents of not every house have the opportunity to use all the benefits of civilization, including hot water directly from the water supply system. Very often, water heating for water procedures must be organized independently, by installing water heaters or boilers.
How to turn on the boiler and how to turn it off
Unlike “their” houses, where a boiler is needed all year round, in city apartments it is used seasonally or during periods of unexpected hot water outages.
Just because the procedure does not have to be repeated often, many people forget each time how to turn on the boiler when it is already installed, and then turn it off.
A short guide will help you remember the simple steps you need to follow.