Why hide pipes?
No matter how beautiful and aesthetically designed the interior of a private house is, openly laid heating communications can ruin the entire design.
Moreover, when the pipelines are located along the entire perimeter of the room or intersect with each other in many places. Well, if you take a number of measures in a timely manner to disguise the parts of the heating system, then the problem can be successfully avoided.
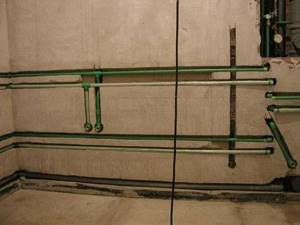
External gasket
It is considered the easiest way to install the necessary pipes. On the other hand, pipeline systems remain visible, which is not always appropriate from the point of view of the attractiveness of the building. Among the advantages of the described method, it makes sense to highlight the following:
- Simplicity. Heating installation is carried out quite quickly and does not require various preparatory measures.
- Availability. If necessary, the pipelines can be repaired without any problems since they are easy to access.
- No heat loss. Since the surface of the pipes does not come into contact with the wall structures or floor, the heat does not disappear anywhere, but is distributed throughout certain rooms.
- Economical. To lay pipes along the external areas of various building elements, small amounts of different materials are required. No adapters, no insulation products, or putty are needed.
Methods for masking pipes
In order to hide the heating system pipelines in a private home from view, you can use one of the following methods:
- wall up straight parts of pipes into the wall;
- decorate using special overlays and improvised means;
- install pipelines in the space between the ceiling and the suspended ceiling;
- hide pipes laid openly behind a decorative screen;
- disguise the pipes with plasterboard construction or a false wall;
- install heating system wiring in the floors;
- install a hinged perforated screen;
- hide pipelines using a raised floor.
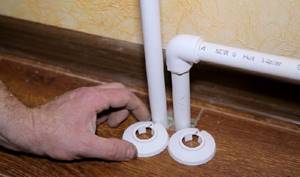
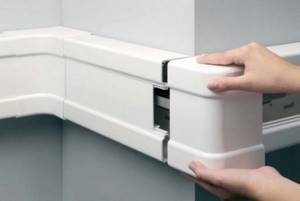
Decorative overlays
The junction of a pipe or plasterboard (plastic) box with the floor and ceiling is the most vulnerable: it is impossible to cut the edge so smoothly or lay down the floor covering.
When laying laminate flooring, it is even recommended to leave cutouts around the heating risers to avoid deformation of the flooring material itself when heated.
Therefore, decorative overlays are used to hide this unsightly place.
Advantages of use
Firstly, the overlays not only mask the joints, but also additionally decorate the room. Secondly, the practical benefits of the pads are obvious: during general cleaning or cosmetic repairs, they can be easily removed and then returned to their place.
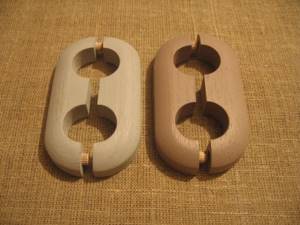
Material of manufacture
As for the material, it is recommended to opt for wood. The service life of a wooden part is 10 years, in contrast to its counterpart made of MDF (medium density fiberboard) - it will last only 5 years.
The holes in the cover must exactly match the diameter of the pipe or the shape of the box, otherwise the whole point of this decoration will be lost. You can also consider plastic overlays.
Recommendations for decor installation
As a rule, these decorative trims consist of two parts, which are separated and, after installation around the heating element, snapped back together. After the decorative parts are installed, they are glued to the floor or ceiling.
Installation of this system is very simple and takes less than a minute. This decor can then be easily removed.
Which way is better
The choice of method is determined by the material of the heating system pipes. If it is a copper alloy, stainless steel, i.e. durable materials that serve regularly throughout the entire life of the building, they can be walled into the wall under a layer of plaster. Products made of metal-plastic, and especially polypropylene, should be hidden under removable panels, since the former have limitations on service life, and the latter have a significant coefficient of thermal expansion, as a result of which polymer pipes under the influence of a heated coolant noticeably lengthen due to thermal expansion .
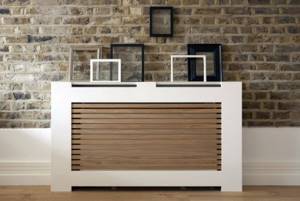
A good option for masking pipes made of any materials is to install screens. They are simply irreplaceable in rooms where metal risers extend a long distance from the plane of the walls. The advantage of this method of decorating heating pipes will also be a wide color palette and a variety of screen shapes, from which you can choose a copy that is in harmony with the style of any interior. It is easy to install and does not interfere with heat transfer, which is very important both for private houses and apartments with centralized heating.
Which pipe elements should not be masked?
This paragraph concerns the camouflage option, in which the pipes are laid in a groove in the wall and tightly walled up in it under a layer of a special solution, and then under facing materials. In this case, you need to be extremely careful. After all, if any damage occurs, in order to eliminate it, you will need to irreversibly damage the walls. It is not recommended to immediately hide the newly completed installation under cement mortar. Yes, plastic, steel or copper pipes have a very long service life, but if the soldering is done poorly, you may not see it right away. Sometimes a seam may be too thin in one place and leak, and this is not visible immediately, but only the next day. Therefore, give the pipes and their joints the opportunity to experience water pressure and stand free for a couple of days. And only after you are convinced of their tightness, you can seal the grooves.
So, you can sew into the walls:
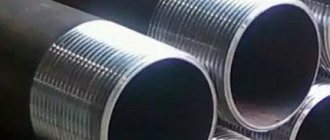
- Welded steel or copper pipes without threaded connections;
- Brazed plastic pipes without threaded connections.
It is not recommended to mask the following elements without quick access:
- Metal connection fittings having an L-, T- or X-shape. These areas have an increased risk of leakage.
- Connections made using threaded elements;
- Installation locations for meters or filters.
Do the work yourself or call a professional?
To install a heating system with hidden pipes, it is better to invite a specialist. Typically, this method of camouflage is used at the construction stage of a building or during its major renovation, when old pipes are replaced with new products. Assembling the system requires a competent approach to ensure further reliable operation of the entire heating system.
Any violation of the slope or the rules for joining pipes will lead to a lack of normal coolant circulation or leaks at the junctions of the elements.
You can cover the pipes with a box, a screen, or decorate them yourself. The maximum you risk in this case is that the design will not look beautiful enough. You will not cause much harm to the home heating system itself.
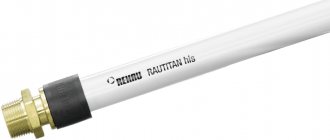
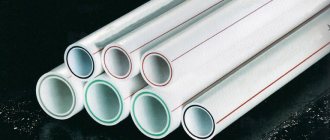
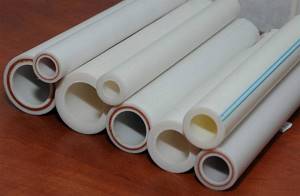
Characteristics of polypropylene pipe products
Today, such pipes are used, among other things, for laying household pipelines. In addition to completely plastic products, pipe products reinforced with fiberglass or aluminum are popular. It is more durable and less sensitive to temperature changes.
Unreinforced pipes are used exclusively for systems through which cold water moves. To lay a plastic water supply or heating structure, products with a diameter of 20 to 110 millimeters are used. Products with non-standard cross-sectional dimensions are produced exclusively on special orders.
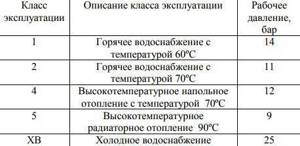
The main characteristic of polypropylene pipes is the wall thickness. Often a table is attached to the products, which reflects the requirements for materials for heating and water supply systems with different ambient temperatures and different loads.
Requirements for materials for sealing pipes
The materials used for sealing heating system pipelines must have the following properties:
- high thermal conductivity;
- resistance to chemical, biological and mechanical influences;
- fire resistance;
- safety for people and the environment;
- melting point higher than the temperature of the coolant;
- durability;
- ease of installation;
- reasonable price.
The use of synthetic elements with low heat resistance to decorate heating pipes can lead to the release of toxic substances into the room when heated.
Features of polypropylene pipes
To install the pipeline, high-quality and reliable material is required. This could be, for example, stainless or galvanized steel. Over time, polypropylene replaced these types from the construction industry. The main reason was the combination of useful properties at a reasonable price.
Polypropylene is suitable for hot and cold water supply and heating. The material is durable and does not require maintenance, so you can safely wall up water pipes into the wall.
The main thing is that their use does not exceed the temperature limit of 95 ° C, when the material loses its resistance to pressure and deforms. In residential water pipes and heating systems, such pipelines operate at lower operating temperatures, so no problems should arise.
The disadvantage of the material is thermal expansion, which can directly affect the integrity of the wall into which the pipes are walled. The expansion coefficient of polypropylene is quite high. The linear increase can be up to 10 mm per meter of pipe at a temperature of 70 °C; accordingly, the diameter of the pipe also increases slightly.
The higher the temperature, the more the expansion coefficient of the pipe increases. Therefore, the laying of heating networks, their correct installation, and the selection of types of pipes that suit the conditions deserve special attention.
Do-it-yourself masking of heating pipes
Protective boxes have become the most popular for masking heating pipes in private homes. You can build them yourself or buy them at a specialized store.
Required tools and materials
To make a box with your own hands, you can use:
- drywall;
- wood;
- plastic panels;
- MDF, laminated chipboard;
- PVC products.
To assemble the frame and fasten the sheathing material you will need:
- rack profile measuring 27×60 mm;
- guides - 26x27 mm;
- corner metal profile;
- screws and dowels.
The tool kit should consist of:
- measuring instruments: tape measure, square, marker;
- electric drill;
- screwdriver;
- cutter;
- metal scissors and a sharp knife.
Work progress
The box manufacturing process can be divided into several stages:
- Carrying out markings around the elements of the heating system on the surface of the walls, floor and ceiling relative to their location. You also need to take into account that the walls of the structure should not be close to the pipes, but at a distance of no closer than 30 mm.
- Construction of a frame from wooden slats or metal profiles. Initially, guides are attached to the ceiling and floor, then a rack profile is attached to the wall. Self-tapping screws or dowels are used as fastening elements.
- Laying a damper tape in places where the frame is adjacent to the pipeline, absorbing the thermal expansion of the metal;
- Covering the frame with one selected type of panels. If drywall is used, then when fixing it to the frame, the fastener heads are buried into the material no deeper than 1 mm.
- Seal the fastening points and seams with putty.
- Strengthening external and internal corners with a metal corner.
- Making several holes in the top panel of the structure through which warm air will enter the room;
- Putty and primer the surface of the finished box.
- Finishing of the structure; painting, tiling, decoupage, wallpapering, applying patterns, etc.
Using the same technology, a false wall is installed, making the heating system communications completely invisible. However, this design has a significant disadvantage - it takes up a lot of usable space, which is especially noticeable in small apartments.
How to decorate pipes?
If you don’t want to bother with complex construction procedures, then don’t hide the pipes, but decorate them. But you still have to tinker a little: before covering, the pipe is washed and insulated with plastic film.
Pipe decor options
Painting
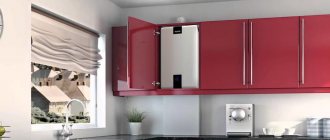
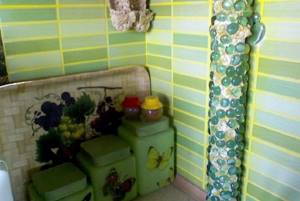
It is enough to paint the pipe to match the walls, and it will become less noticeable. Apply a pattern or ornament that is repeatedly repeated in the interior (on tiles, textiles) to the pipe. This will make her friends with the space. If you are ready for bold experiments, make the pipe a bright interior detail by painting it in rich contrasting shades.
Pink pipe in the kitchen
Important: before applying paint, you must exclude the presence of condensation on the pipe and cover the surfaces adjacent to it with a protective film.
To ensure that the paint adheres well and the metal is protected from corrosion, before painting, do not forget to clean the surface of the pipe from dust, sand it a little and coat it with a primer. For pipes through which hot water passes, choose special heat-resistant paints (alkyd enamels) that do not change their color when exposed to heat. Plastic pipes are the most vulnerable to chemicals. Compositions without acetone (acrylic, water-soluble, pentaphthalic based on white spirit) are suitable for them.
Advice: to get the hang of it, paint cold pipes first, since paint dries quickly on hot pipes, and poor-quality application will be immediately noticeable.
Bright trumpet
With the participation of polyurethane tubes and stucco decor, vertical pipes can be designed in the form of columns. They will fit perfectly into the classic style of the interior. And fans of eco style can paint the pipes to match the tree trunk and entwine it with artificial vines or leaves.
Imitation of railing
A horizontal section of a gas pipe in the kitchen, running along the apron, can make a good “false rail.” Only lightweight items can be hung on it. Install the real railing parallel to the pipe, but slightly lower. The main secret: the diameters and shades of the pipe and railing should match as much as possible. This life hack is perfect for modern interior styles.
Railing and pipe
Decorative overlays
These include sockets, pipe rings and plugs. They serve to cover sloppy protrusions where pipes enter the ceiling, wall and floor. Such a small decorative touch makes the design more aesthetically pleasing and complete. The main thing is to choose the appropriate texture, diameter, section shape and color of the lining.
Pipe covers
Rope trim
How to beat pipes in eco-style? Wrap them with hemp rope or jute rope. This is a great idea for decorating interiors with marine and eco themes, especially in children's rooms. Another plus is that the rope around the pipe can become a convenient scratching post for cats.
Pipe wrapped with rope
Pipe-claw
Shelf part
If special boxes and false walls take up a lot of space, try installing a practical shelf or rack on top of or around the pipe. The final touch is to paint the pipe and shelf in the same color for better camouflage.
Pipe under the shelf
Hanging shelves without screws and drills are easy to install using a horizontal heating pipe. Wrap it with a rope and hang small planks from it using hemp ropes. You can store any small items and lightweight trinkets on them.
Hanging shelves
Decoupage
This is a well-known decorating technique characteristic of shabby chic, rustic, Provence and country styles. With its help, you can effectively decorate the pipe, turning it into a charming decorative element.
Decoupage batteries
Knitting
Handicraft lovers will certainly be interested in the idea of knitted covers for pipes. The process of creating them is not fast, but as a result you can get an absolutely unique decor. Children will definitely appreciate colorful products in the shape of funny animals.
Knitted covers for pipes
Expert advice
To give the interior of your home a more aesthetically pleasing appearance without reducing the efficiency of your heating system, take advantage of useful advice from experts.
How to hide heating pipes in the floor or wall?
- The size of the groove for heating pipelines in the floor or wall should be calculated taking into account not only the diameter of the pipes themselves, but also increase by the thickness of the thermal insulation layer and the material for sealing the recesses;
- the pipes will be held in the walls if dowels with brackets are secured in the grooves;
- for metal-plastic pipelines, when embedding them into the floor or walls, it is necessary to use a protective casing that will protect them from heat loss;
- Removable fittings must be freely accessible, so they cannot be walled into the wall.
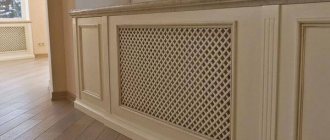
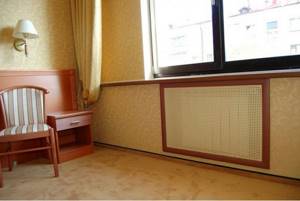
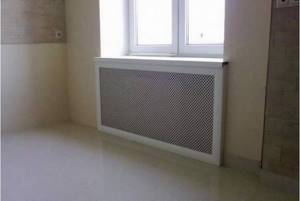
How to cover heating radiators with decorative screens?
There is no need to attach hanging decorative screens. They simply fit onto the battery. For radiators located in a niche under the window sill, you can take a flat screen and secure it using brackets or a chain, making it folding.
Is it possible to cover heating pipes with plasterboard?
Yes, you can. This is the easiest way to disguise elements of heating systems. The material is suitable for making boxes of any shape, as it bends and cuts easily. The advantages of using plasterboard to hide heating communications include the fact that it lends itself to any type of finishing.
How to hide pipes in ceiling structures?
It is prohibited to scrape floor slabs, so pipelines in ceiling structures can only be hidden behind removable structures: a multi-level stretch ceiling, a frame box made of plasterboard, plastic, plywood, cornices, or beautifully decorated using twine, ropes, bamboo, etc.
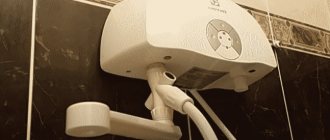
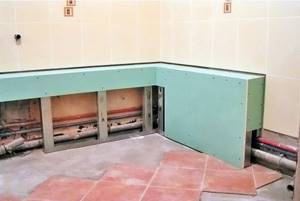
How to hide heating pipes in the bathroom?
To hide heating pipes in the bathroom and kitchen, you can use moisture-resistant plasterboard, screens made of plastic, wood, polycarbonate, disguise them with various cabinets, or decorate them using scrap materials. Examples of decoration can be seen in the video:
Types of pipes in the house
Before upgrading pipes, check their type and operating features. Failure to comply with the rules for using them is fraught with unpleasant and dangerous consequences. Pipes running inside the apartment are usually divided:
| By purpose | water, gas, sewer, ventilation, heating pipes |
| By room type | in living quarters, in the kitchen, in the bathroom, toilet, corridor |
| By type of material | polymer, steel, metal-plastic, non-ferrous metals |
| By location | on the ceiling, along the wall, along the floor. |
| Towards | vertical, horizontal, diagonal |
| By size | long and short |
| By section | round, profile (rectangular) |
Pipes as part of the decor
A number of pipes are hidden not only for aesthetic reasons, but also for their safety. For example, plastic pipes are vulnerable to mechanical damage, and steel pipes are vulnerable to corrosion. But you shouldn’t hide them “for good” (concreting them, walling them up). You may need access to them at any time to prevent or eliminate malfunctions.
Important: do not allow excessive pressure or tightening of pipes from the outside - especially in the area of connecting seams.
Pipes in the bathroom
Each type of pipe has its own service life and nuances of use. But there are several general rules for all types of communication pipes. They are unacceptable:
- cover with a permanent box or panels that are difficult to dismantle,
- cut and move by yourself,
- leave without ventilation.
The gas pipe requires especially careful handling. Combustible and explosive materials should not be placed near it. It must not be hermetically sealed and the hoses leading to the stove must not be deformed.
Tip: It’s safest to hide the gas pipe behind a removable ventilated box or false wall made of moisture-resistant plasterboard.
Floral decor for pipes
Common mistakes
Among a number of mistakes that novice masters often make are:
- the absence of special doors in the box or false wall in the places where detachable fittings and shut-off valves are installed, allowing quick access to them in the event of an accident;
- lack of thermal insulation when pipe wiring is hidden in the walls or floor;
- move heating pipes in apartments without agreement with the relevant organizations;
- installation of blind frame boxes without ventilation holes or grilles necessary to ensure natural air circulation.
Hide behind a false wall
Any decoration of heating pipes should not impede access to areas of possible accidents. Therefore, it is worth giving preference to those designs that meet these requirements. One of them is a false wall, erected using metal profiles. You can then cover them with anything: plasterboard, plastic, plywood. The main thing is to leave access in the form of opening hatches to the places where pipes connect with the heating device, to the locations of couplings and tees. Before assembling the box, it is important to inspect the pipeline and perform the following steps.
To disguise risers, it is better to build a false wall
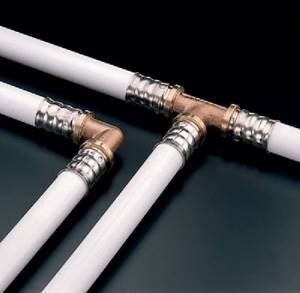
- If the heating risers are assembled using metal-plastic pipes connected by dismountable fittings, the latter should be removed and replaced with press fittings.
- If the wiring is old, you will have to completely change it.
- It is advisable to first cover pipes made of copper or steel with any plastic heat insulator.
After covering, the frame will completely cover all technical components
Note! Experts, when talking about how to decorate a heating pipe in a room, do not recommend using the box where polypropylene pipes are used for laying utilities. When heated, they expand; the high temperature of the coolant makes them plastic. In such a situation, before choosing pipe decor, it is necessary to make a preliminary calculation of the thermal expansion of the pipeline. Only an experienced engineer can do this.
The box is closed with plasterboard
The finished false wall can then be decorated with anything: you can paste wallpaper on it or lay ceramic tiles. It is important to remember that its construction will take away useful space from the room. For small rooms, this decor of heating pipes is not suitable. Here you can use another method.
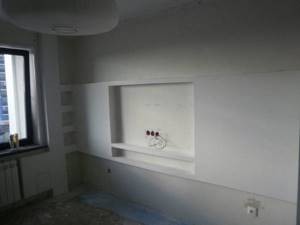
The box can become part of the overall decor of the apartment
This might be interesting! In the article at the following link, read about the design of a small kitchen with a gas heater.
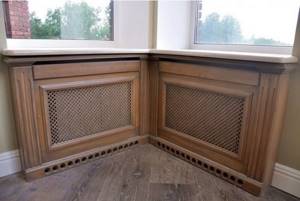
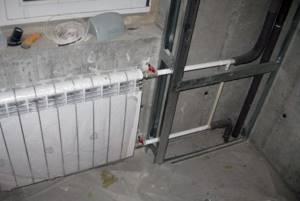
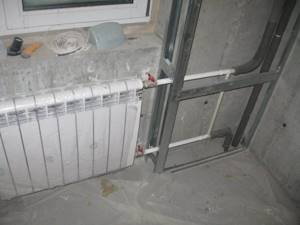
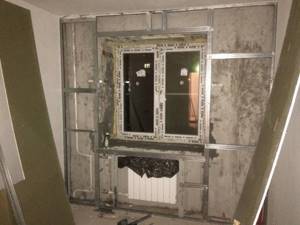
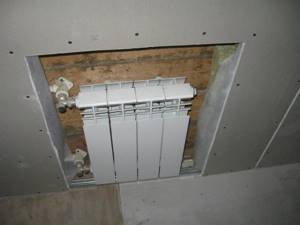
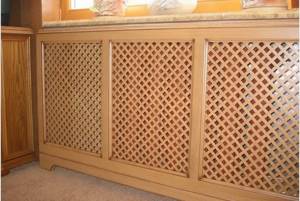
Work examples
For options for masking elements of the heating system of a private home, see the photo:
Factory-produced wooden box:
Horizontal plasterboard construction:
Masking the battery using an aluminum screen:
Finished plastic box:
Example of decor for a riser:
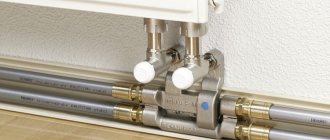
Installation of plastic water supply
To install the system from scratch, in addition to the pipes themselves, you will need:
- fitting;
- plugs;
- tees or crosses if branching is planned;
- clips for fixation.
Scissors for cutting, a shaver for stripping edges and a welding machine are required.
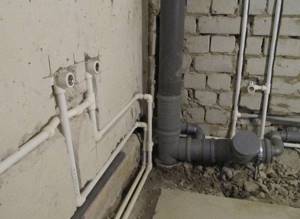
If the question of how to properly wall polypropylene pipes into a wall arises after the entire system has been assembled, the list is reduced to thermal insulation materials, fastening brackets and means for constructing false walls.
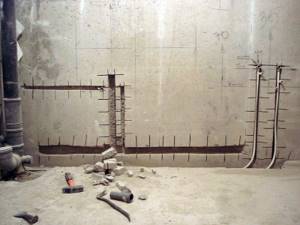
Grooves for plastic water pipes in the wall
Requirements for laying plastic water pipes
Fittings, tees and connecting elements are selected in accordance with the diameter of the pipes used. Most often, like the main elbow, they are made of polypropylene. However, they are used only for branching, fastening measuring instruments and redirecting flow: filling fittings and collapsible units with material is prohibited. In the thickness of the wall there can only be a soldered, permanent connection, made with special welding equipment and tested for the tightness of this welding.
In any case, a shock-absorbing “cushion” must be created around the thickly laid wall, allowing the pipe to “walk.”
Technique for masking a polypropylene pipe in a wall
- Marking the direction of the pipeline taking into account the placement of functional exits.
- Calculation of possible deformation coefficient. For a significant length of the system, a formula is used that provides for lengthening the pipe by 1 cm for every meter. The calculation was made for a liquid with a temperature of 70 degrees Celsius. The technique of creating a compensation unit, that is, laying out a small area in the letter P, will correct significant elongation and serve as accident prevention.
- Installation of the pipeline in compliance with all requirements. It is necessary to select polypropylene pipes whose wall thickness corresponds to the planned operating conditions.
- To compensate for casting expansion when laying plastic pipes in the walls of toilets and bathrooms, you can use a corrugated pipe. When laying a channel from a U-profile, it is recommended to additionally place a heat insulator; the same principle applies when laying it in a pre-prepared groove. Energyflex, foamed polyethylene or polyurethane foam can act as a heat insulator and at the same time a material for shock absorption.
- Fixation is based on clamps and supports.
- Is it possible to hide polypropylene pipes in the wall completely? When finishing finishing, a test “idle start” should show it.
- The easiest way to restore a wall is to attach a plasterboard partition.
- After completion of the work, it is advisable to save the pipeline laying diagram, since accidents of such systems often occur due to the fault of craftsmen trying to fix, for example, a mirror in this area and punching a plastic pipe with their own hands.
When wondering whether it is possible to embed polypropylene pipes into the wall, if the structure is ready, craftsmen advise not to take risks and instead of a blank monolithic wall, organize a small “cabinet” with access to the pipe. Firstly, this design is guaranteed not to be destroyed by vibrations of the plastic. Secondly, in the event of an accident there will be access to the pipes. The free space in the cabinet can be used to store household items.
Rules for installing hidden electrical wiring
There are also a few more rules that should be followed:
- It is forbidden to make grooves along an oblique line.
- The depth of the grooves must correspond to the diameter of the pipes, taking into account their minimum coverage of 4 mm after laying.
- It is forbidden to make grooves on the same axis (on different sides of the wall).
As we have already said, always perform hidden electrical wiring in insulating pipes. Take the choice of pipes quite seriously. The table for selecting pipe types will help you with this.
Hidden wiring
Hidden electrical wiring is much more difficult to install, but the result obtained is, from an aesthetic point of view, the best. Here, the difficulty of installation is that we have to lay insulated wires or cables in pipes recessed into the walls.
Hidden wiring can be installed before, during or after construction work (the so-called tie-in).
But as elsewhere, there is one nuance here - installing hidden wiring in the floor after construction work is prohibited. That is, it is not allowed to make excavations in an existing floor in order to lay pipes there. Electrical wiring in the floor is only possible before or during construction work. This is due to the fact that when gating an existing floor and removing material from the groove, the concrete screed is weakened (in this case). And in the future, the floor will begin to crack in this place.
Before construction work, try to pay great attention to the pipes that will be installed in a hidden way. They must not be damaged or have any deviations from the norm. When cutting into walls, the grooves must be of sufficient size so that all the recesses you have made can be secured there and completely covered with plaster. Pipes buried in concrete should have absolutely no auxiliary fittings (branches, connections). All connections of hidden electrical wiring should be made in junction boxes. To ensure that the entire process of installing hidden electrical wiring goes smoothly and without any complications or surprises, we have published a table of rules for installing hidden wiring.
What do you need to do before starting work?
You need to start decorating the heating risers in your apartment only after preliminary preparation has been completed. If the communications in your apartment are old, then before installation they must be replaced with new ones. Sheathing involves an insulation device. It is necessary to put a layer of polyethylene on the pipe or a special sleeve instead. Regardless of the chosen decoration method, the pipeline must be washed before decoration. If you decide to paint heating pipes, then serious preparation will be required.
- It is necessary to remove traces of previous finishing from the surface of the pipe.
- The surface must be cleaned with a wire brush.
- It is also necessary to perform priming.
By deciding to decorate the pipes in your home in an original way and using your imagination, you can get an original interior element and achieve an incredible effect in the room.
Installation of electrical wiring behind wall panels
When renovating premises, thermal insulation panels are increasingly being used. Here it is best to distribute some of the electrical wiring in advance. The final result is exactly the same as with hidden electrical wiring in the walls, but without its inconvenience. But like everywhere else, there are rules here:
- The pipes used must be made of non-combustible material.
- For electrical installation devices, special mounting boxes are used.
Also, wall panels can be installed and fastened to a metal profile. There are already ready-made holes here, and they can be used to pull the wire. As with everything, use corrugation. If the wire is pulled without corrugation, there is a possibility that the insulation will be damaged. Do not lay wires across the wall. Rules for laying electrical wiring behind wall panels
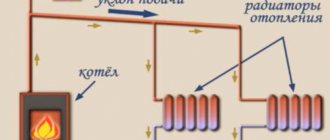
Heating pipeline laying technology
Many people think that laying heating pipelines comes down to just quick installation of pipes. In fact, behind such seemingly simple work there is a whole complex of activities hidden. It is based on a lot of preliminary calculations and drawing up a project, which must be approved by the relevant government agencies.
It is difficult to imagine a living space without heating communications that allow you to maintain a comfortable air temperature. At the same time, the appearance of these elements can hardly be called aesthetic; they are often discordant with the sophisticated interior, breaking out of the general style.
Pipelines for heating systems are laid openly, with the exception of pipelines for water heating systems with heating elements and risers built into the building structures. Hidden installation of pipelines may be used if technological, hygienic, structural or architectural requirements are justified. When laying pipelines hidden, hatches should be provided at the locations of prefabricated connections and fittings. Main pipelines of water, steam and condensate are laid with a slope of at least 0, and steam pipelines - against the movement of steam with a slope of at least 0,
Fasteners and other materials
In addition to the pipes themselves, for installation you need to prepare in advance:
- Fastening materials:
- plastic fastening clips or clamps for polypropylene pipes of a given diameter;
- dowel-nails.
- Tools:
- hammer;
- drill;
- crosshead screwdriver;
- scissors or a knife for cutting pipes;
- roulette;
- level;
- marker.
Clips - their meaning and installation details
The clip is made from a special material - nylon. It has such useful properties as high heat resistance and resistance to mechanical stress.
Among the technical characteristics of the clip, you need to pay attention to the diameter; it must correspond to the size of the outer diameter of the polypropylene pipe. Installation of clips has its own rules, the implementation of which determines the service life of the finished communication system
Single clips and double clip
The main issue that is important not to miss is the step size between the clips. If you install the clips too far apart, there is a risk of sagging in the support areas
When installing a communication system with two parallel pipes, use a double clip.
Correct pitch between clips
In what cases are clamps used?
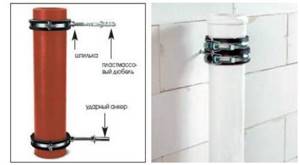
It is recommended to fasten polypropylene pipes to the wall using clamps in cases where it is necessary to install large-diameter pipes with a fairly heavy weight. The clamps are a design with a screw tie and a rubber internal gasket, which is necessary to compensate for vibration. Thanks to this, they reliably hold the pipe even when strong vibrations occur.
The clamps are equipped with a dowel and a pin. The mount can be made of metal or plastic. When laying polypropylene pipes, it is better to choose clamps from similar raw materials: this way you will ensure the same strength indicators for the entire structure. Installation of fastening material can be rigid or floating:
- Rigid fastening is made by tightening the clamp extremely tightly around the pipes. A rigid coupling is required in areas below the bell. Thanks to rigid fixation, the possibility of displacement of the communication system is eliminated.
- A floating mount indicates that there is a gap between the pipes and the clamp. The fastening is tightened in such a way as to allow free movement of the pipe. The mobility of the fasteners allows the pipes to expand during temperature changes.
How to attach the clamp
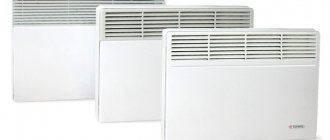
Examples in the interior
Decorating or hiding radiators in a room beautifully so that they are not a “fly in the ointment” and do not spoil the entire appearance of the room is not such a difficult task. Modern materials make it possible to solve this issue at minimal cost.
Vertical, horizontal, sectional, copper, cast iron - the modern market offers a wide variety of radiators for every taste.
A battery with a bright, cheerful color, for example, yellow, will look good in a children's room - it has a positive effect on the nervous system and emotional state of a person.
New models, unusual for the eyes - vertical radiators. They are located vertically on the wall and can occupy the entire height from floor to ceiling. This element looks quite stylish and does an excellent job of maintaining a comfortable temperature in the room.
In the bathroom you can place a wide radiator of small height (resembling a bench). It will be able to perform not only its direct task, but will also serve as a clothes dryer or towel dryer. By the way, the dryer can be connected to a battery - you get an interesting combination, again performing several functions. Efficient use of space and objects never hurts.
An interesting finish - with the help of chrome - brings to the interior some note of freedom, emancipation, inherent in bikers. These are the ones that come to mind when looking at these sparkling structures.
Designer radiators will also decorate any interior. Unusual designs, shapes, when looking at which you don’t immediately understand that this is an element of the heating system, they become a bright accent, like a picture on the wall. Such batteries should not be hidden; on the contrary, they are put on public display, emphasized with a contrasting background, placed in the center of the wall without any addition, so that nothing distracts attention from the unusual object.
Copper radiators - both vertical and horizontal - can also serve as an effective room decor.
Their design is not complicated, but they have such advantages as:
- High heat dissipation.
- Attractive color.
- Ease.
Pleasant to the eye, the discreet color of copper will be a worthy addition to any interior style.
Laconic black elements of the heating system will look good against the background of brickwork - white or gray. They can also be vertical or horizontal; in any case, they will be an attractive, effective, but at the same time, discreet element of decor.
In modern interiors, you can often find heating radiators displayed on display as an independent decorative element rather than hidden in boxes or covered with screens. Even cast iron batteries, which evoke memories of the Soviet Union for many, are now distinguished by an interesting design, unusual color schemes and high decorativeness.
The radiators left open cope better with the task of heating the room; nothing interferes with either air circulation or the emission of infrared rays. This means that the temperature in the room remains comfortable, objects and air are heated evenly, the heat does not remain inside the box or niche, but is distributed throughout the room. And this is the main function of the heating system
To learn how to hide a heating radiator, see the following video.
Procedure for laying pipes
First of all, it is necessary to develop a laying diagram indicating the exact location of the pipes. This requirement must be met so that during further work, hidden communications are not damaged.
USEFUL INFORMATION: Magnetic filter for water softening: a device for purifying water from scale
The installation of heating elements is carried out sequentially.
- In walls made of traditional materials, grooves are punched with a size that takes into account the diameter of the pipes, the thickness of the thermal insulation and plaster. The channel is made only vertically, so as not to weaken the supporting structures. Floor slabs cannot be tapped. First, pipes are laid on them, and then they are filled with concrete screed. If it was made earlier, it can be grooved, since the layer is not load-bearing. Under a wooden floor, heating pipes can be laid over the ceiling along the board, which can be removed if necessary.
- The pipes are secured to the wall or floor channel using clamps and dowels.
- The grooves are closed with cement mortar only after testing the system under excessive pressure and temperature for several days.
- Afterwards, the wall should be puttied for finishing so that it becomes smooth and uniform.